Configurações do questionário
From LimeSurvey Manual
Introdução
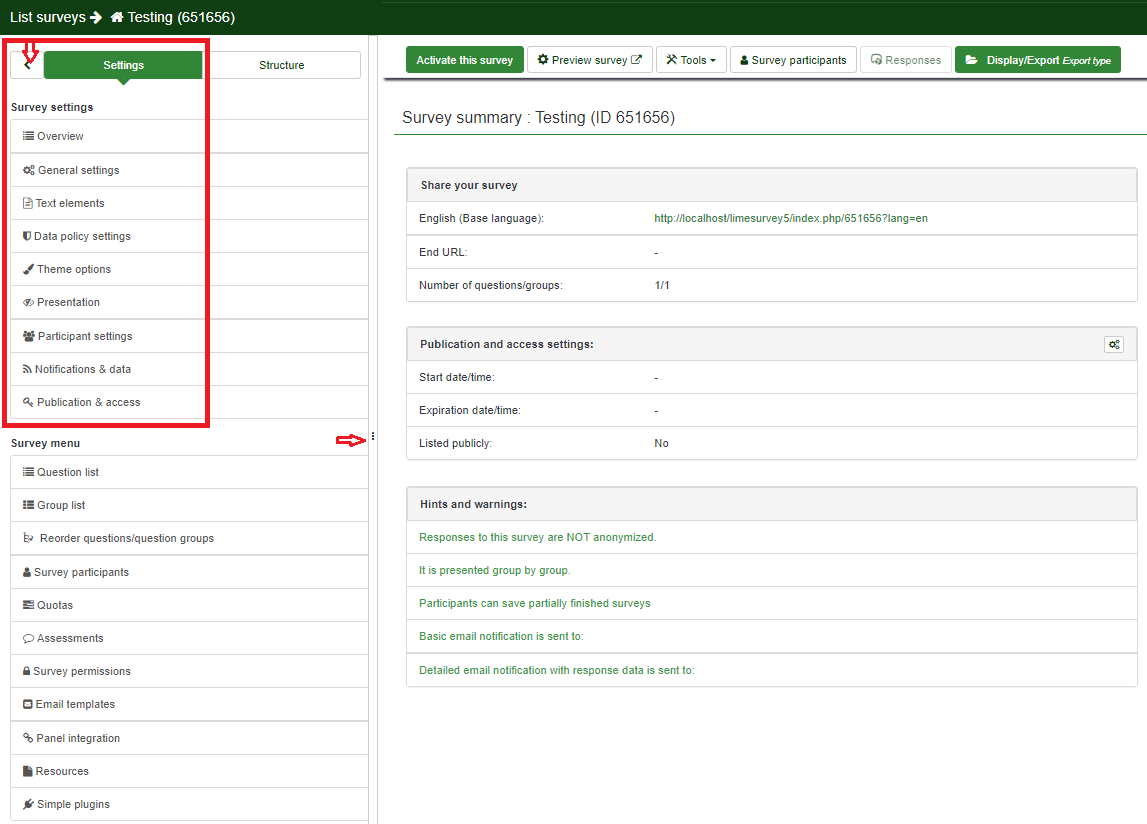
O menu de configurações do questionário permite que os usuários editem diferentes configurações relacionadas ao questionário. As seguintes configurações do questionário estão disponíveis por padrão:

- Survey settings/pt-br#Visão geralVisão geral
- Configurações gerais
- Elementos de texto
- Configurações de política de dados
- Opções de temas
- Apresentação
- Configurações de participantes
- Notificações & dados/Notifications & data
- Survey settings/pt-br#Publicação & Acesso
Na captura de tela acima, dois botões são enfatizados. Eles podem ser usados pelos usuários para reorganizar as dimensões do menu de configurações do questionário. Se você deseja reorganizar o menu principal de configurações do questionário, arraste o lado direito do menu para a esquerda ou para a direita, clicando no botão três pontos. Se você clicar na seta para a esquerda, o menu se recolhe, ficando minimizado até o momento em que apenas um menu lateral com ícones é deixado. Para voltar à visualização padrão do menu de configurações do questionário, clique no botão seta direita, localizado acima do menu de configurações. Passe o mouse sobre cada opção para ver o que cada ícone faz.
Overview
The overview page offers a general perspective on your survey. It is divided in two parts:
- Overview toolbar: The functions from the toolbar allow you to start/stop the survey, check its logic, save & export it, add survey participants, and manually introduce survey participants' data (in the case in which you conduct an offline survey);
- Survey summary: It comes with a short set of information about your survey.
For a complete description, check the Overview panel wiki page.
General settings
The general settings of a survey allows the user to edit basic information about the survey such as the survey owner, administrator's email, and the template employed in his survey.
For further details, please continue reading the following wiki page.
Text elements
From the Survey text elements panel, you can edit the title of the survey and its description, welcome and end messages, end URL of your survey, and the format of the decimal mark and date.
For more details, access the Survey text elements section.
Data policy settings
The set of options displayed under this option are related to the security text/policy settings about which your respondents have to be aware of before continuing filling in the survey.
For more details, access our wiki section on data policy settings.
Theme options
This panel is for those users that would like to enhance their templates by using the inheritance function and the bootswatch themes.
For more details, access our wiki section on theme options.
Presentation
You can edit in this panel presentation- and navigation-related settings of your survey. These changes impact how the respondent sees your survey. You can choose to show the number of the questions at the beginning of the survey, a progress bar or the current statistics of the survey once it is completed, and so on.
For a complete description, access the following link.
Participant settings
You can edit from this menu different survey participants table settings. For example, you can choose to anonymize all the responses you get from a survey or allow public survey registration.
For a complete description of the options, access our wiki section on survey participants handling.
Notifications & data
If you would like to save response-related details into the responses tables, access this panel. You can save the referrer URL, IP address, timings, etc. that can help you produce more in-depth analyses. Moreover, LimeSurvey allows you to use the tracking ID from Google Analytics.
For more explanations, read about notifications and data management settings.
Publication & access
This setting allows the survey administrator to choose the way in which the survey can be accessed by the survey participants (e.g., CAPTCHA codes can be used to increase the security of your survey). Moreover, you can also set up from here a start/expiry date/time.
For more details on each option, read from our manual about Publication & access.