Surveys - introduction/ja: Difference between revisions
From LimeSurvey Manual
Bravehorse (talk | contribs) (Created page with "*'''参加者による保存と再開:''' この設定により、参加者が回答を保存し、あとから再開できるようになります。オープンアンケー...") |
Bravehorse (talk | contribs) (Created page with "*'''管理者通知メール(簡易)の宛先'''と'''管理者通知メール(詳細:結果つき)の宛先''': この設定では、アンケートが送信され...") |
||
| Line 196: | Line 196: | ||
*'''参加者による保存と再開:''' この設定により、参加者が回答を保存し、あとから再開できるようになります。オープンアンケートや匿名アンケートで有効に機能します。アンケートで[[Survey participants/ja|トークン]]を使用し、[[Participant settings/ja|匿名]]とする場合、[[Participant settings/ja|参加者設定]]パネルから'''トークンベースの回答保持'''を有効にしたほうがよいでしょう。 | *'''参加者による保存と再開:''' この設定により、参加者が回答を保存し、あとから再開できるようになります。オープンアンケートや匿名アンケートで有効に機能します。アンケートで[[Survey participants/ja|トークン]]を使用し、[[Participant settings/ja|匿名]]とする場合、[[Participant settings/ja|参加者設定]]パネルから'''トークンベースの回答保持'''を有効にしたほうがよいでしょう。 | ||
*''' | *'''管理者通知メール(簡易)の宛先'''と'''管理者通知メール(詳細:結果つき)の宛先''': この設定では、アンケートが送信されたときに通知もしくはアンケート回答を指定のメールアドレスに送信します。[[Survey settings/ja#Email templates|メールテンプレートメニュー]]からメールのテンプレートを編集できます。セミコロン(;)で区切ることにより複数の受信者を設定できます(例えば、"yourname@test.com; myname@test.com;hisname@test.com"、あるいはプレースホルダーを使用して"yourname@test.com;{INSERTANS:82733X12X73};{TOKEN:EMAIL}") | ||
{{Box|To send an email to the survey administrator, '''you must use {ADMINEMAIL}'''. | {{Box|To send an email to the survey administrator, '''you must use {ADMINEMAIL}'''. | ||
Revision as of 08:47, 25 May 2018
全般
アンケートには、言語、質問グループ、質問、質問の属性、回答、サブ質問、既定の回答、評価、クォータ、クォータメンバー、クォータ言語設定など、相互に接続されたデータベースがあります。アンケート管理を容易にするため、アンケートグループ機能 (New in 3.0 )が最近追加されました 。
アンケート
新規アンケート作成ページには2つの方法でたどりつくことができます。
1. LimeSurveyホームページのメインツールバーにあるアンケートボタンのそばにある矢印をクリックします。ドロップダウンリストから新規アンケート作成を選択します。
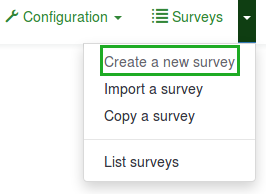
2. LimeSurveyホームページのメインツールバーにあるアンケートボタンを押します。

アンケートリストが表示されます。新しいアンケートを作成するには、ウィンドウの左上、アンケートリストの上にある新規アンケート作成ボタンを押します。

新しいアンケートを作成する
新規アンケート作成をクリックすると以下のページが読み込まれます。
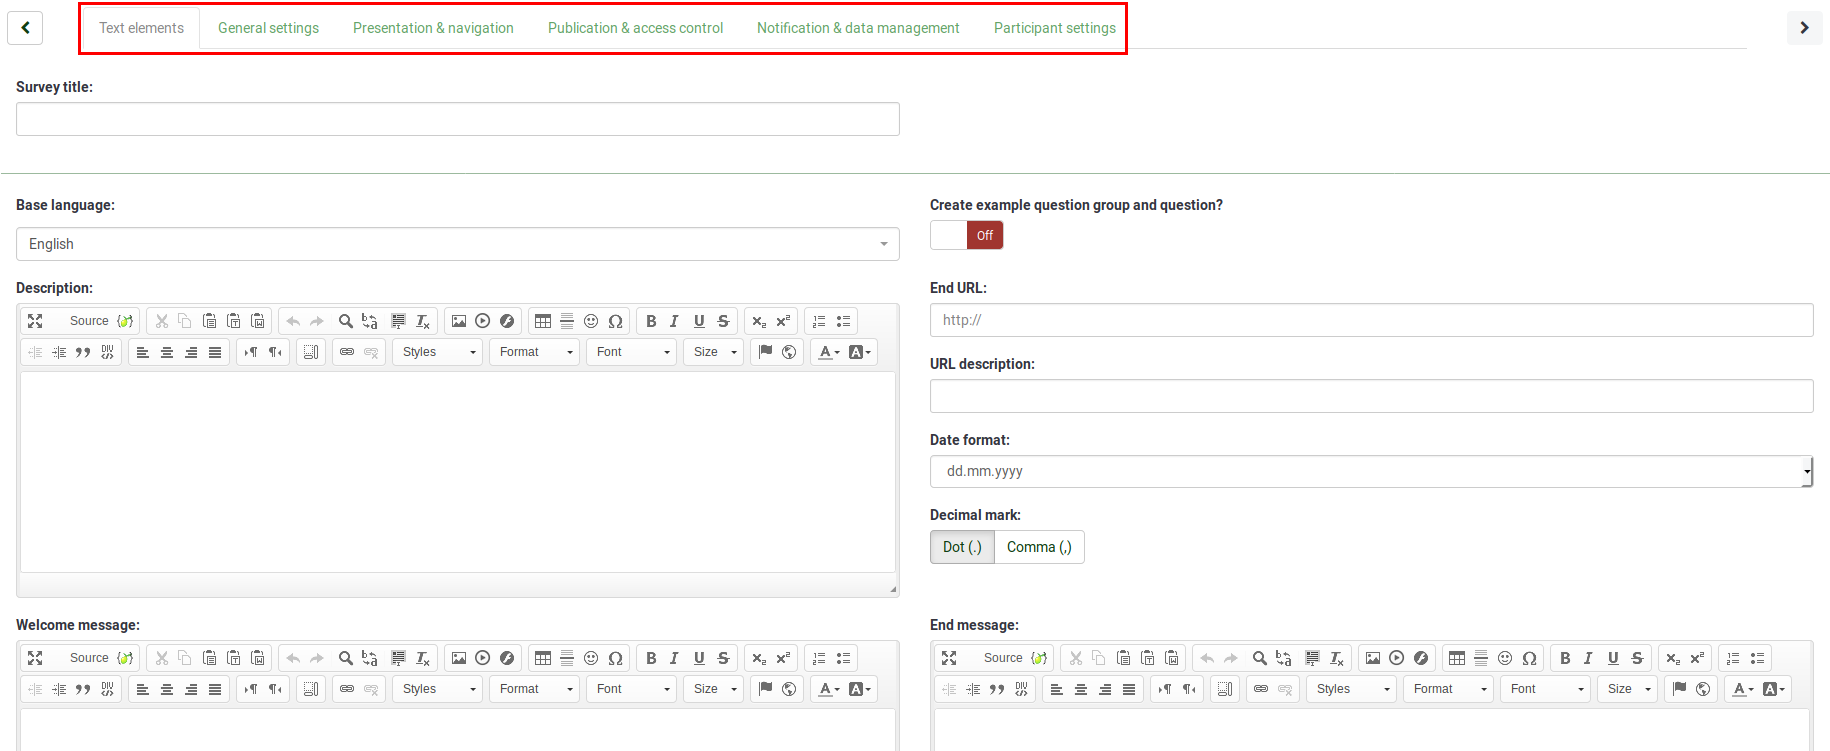
アンケートを最適化するため、新規アンケート作成ツールバーのそれぞれのタブにある設定項目をチェックしてください。
テキスト要素
このタブには以下の設定があります。
- アンケートタイトル: アンケートのタイトルはこの欄で変更できます。
- 質問グループと質問の例を作成しますか?: (New in 3.0 ) オンにすると、アンケートを作成するときに、質問と質問グループがデフォルトで追加されます。
- 基本言語: アンケートのメインとなる言語のことです。アンケートに他の言語を追加する場合は、まずアンケートを作成してから、新たに作成したアンケートの全般設定にアクセスし、追加言語を追加します。
- 説明: アンケートの説明を記入します。全体設定で設定すれば、説明欄をカスタマイズできるHTML editorが使えます。
- 終了URL: ユーザーがアンケートに記入し終わったら、他のページに誘導することができます。URLを記入し、プレゼンテーションとナビゲーションタブにある自動読込URL設定を有効にします。
- URLの説明: ユーザーがアンケートと関係のないウェブページに誘導される場合、短いURLの説明を追加することができます。これにより、アンケート管理者は、それぞれのURLの使用状況に応じてノートを追加することができます。
- 日付フォーマット: この設定は、アンケート参加者の回答とともにタイムスタンプを記録するときに重要です。クリックすると、ドロップダウンリストにたくさんの日付フォーマットが表示されます。アンケート回答者に適したものを選択してください。世界中で様々な日付フォーマットが利用されていることを忘れないでください。例えば、アンケートがイギリス市場(dd-mm-yy)ではなくアメリカ市場(mm-dd-yyyy)に焦点を当てている場合は異なる日付フォーマットを使うことを推奨します。
- 小数点: 点(.)とカンマ(,)の2種類から選びます。調査を実施する場所(例えば、アメリカやドイツ)に適したものを選んでください。
- ようこそメッセージ: アンケート参加者がアンケートリンクにアクセスしたときに表示されるメッセージを記入してください。
- 終了メッセージ: アンケート参加者がアンケートを終了したときに表示されるメッセージを入力してください。終了URL欄が自動読み込みとなっている場合、終了メッセージは表示されません。
全体設定
このタブには以下の設定があります。
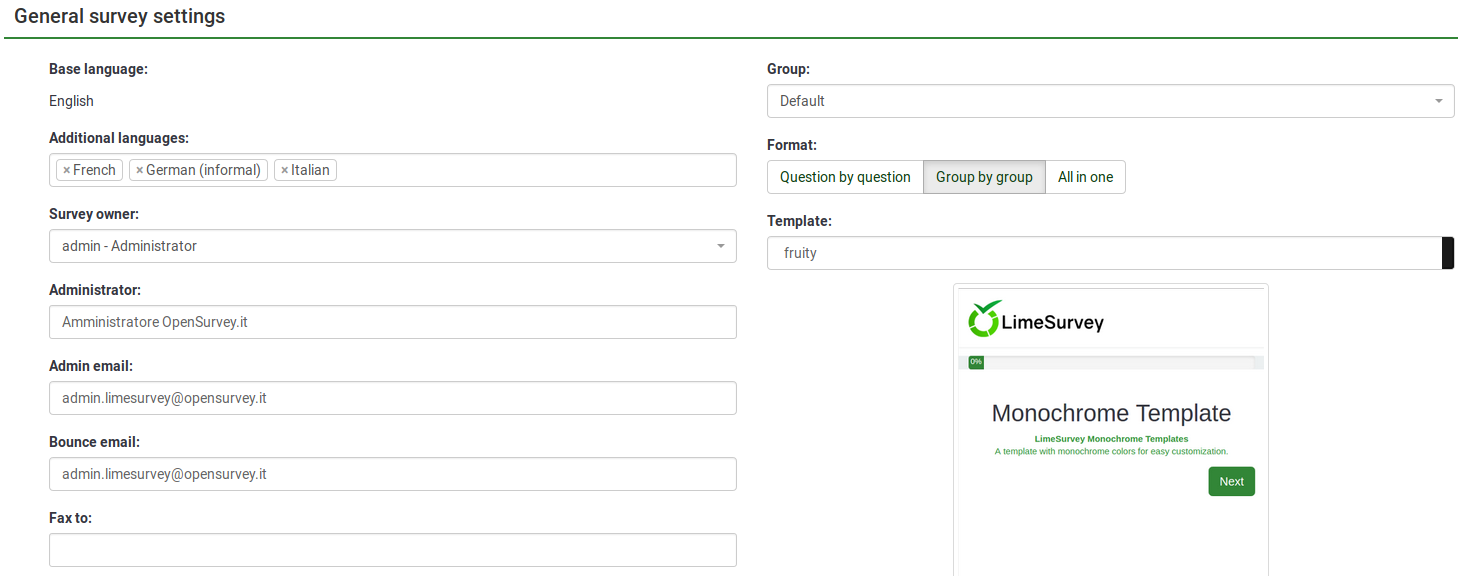
- 基本言語: アンケートのメインとなる言語のことです。基本言語は既定のサイト言語に対応しています。後者は最高権限管理者がLimeSurveyのグローバル設定で変更することができます。
- 追加言語: より多くの言語をアンケートに追加することができます。このオプションは多言語アンケートを作成するときに使用します。例えば、英語、ドイツ語、ルーマニア語をアンケートに使いたい場合、(英語が既定・基本の言語の場合)ルーマニア語とドイツ語を追加言語として追加します。利用できる言語は、LimeSurveyの管理者がLimeSurveyグローバル設定から利用可能な言語の数を制限することによって少なくなります。
- アンケートオーナー: アンケートオーナーの実名を入力します。
- 管理者: 管理者の名前。
- 管理者メールアドレス: アンケート管理者のメールアドレスを入力します。
- バウンスメール: 送信エラー通知メール(バウンスメール)を受け取るメールアドレスです。
- Fax番号: "印刷アンケート"に記載するファックス番号です(オンラインアンケートを実施できない人にハードコピーを送るときなどに使います)。
- グループ (New in 3.0 ): 新たなアンケートが作成されたときに組み入れるアンケートグループを選択します。
- フォーマット: アンケート参加者に質問を提示する方法を選択します。3つのオプションが利用できます。
- 質問ごと : 質問が一つずつ表示されます(1ページごとに1問)。このオプションを選択すると、アンケート実施時に"ようこそ"ページと"終了"ページが独立したページとして表示されます。
- グループごと : アンケートの各ページで一つの質問グループを表示します。"質問ごと"のアンケートと同様、アンケート実施時に"ようこそ"ページと"終了"ページが独立したページとして表示されます。
- 一括 : 選択すると、すべてのページが一つのページに表示されます。独立した"ようこそ"ページと"終了"ページは存在せず、質問と同じページに表示されます。
- テンプレート: 既定のテンプレートはシンプルですが機能的です。独自のテンプレートの作成について、詳細はこちらを参照してください。
プレゼンテーションとナビゲーション
このタブには以下の設定があります。
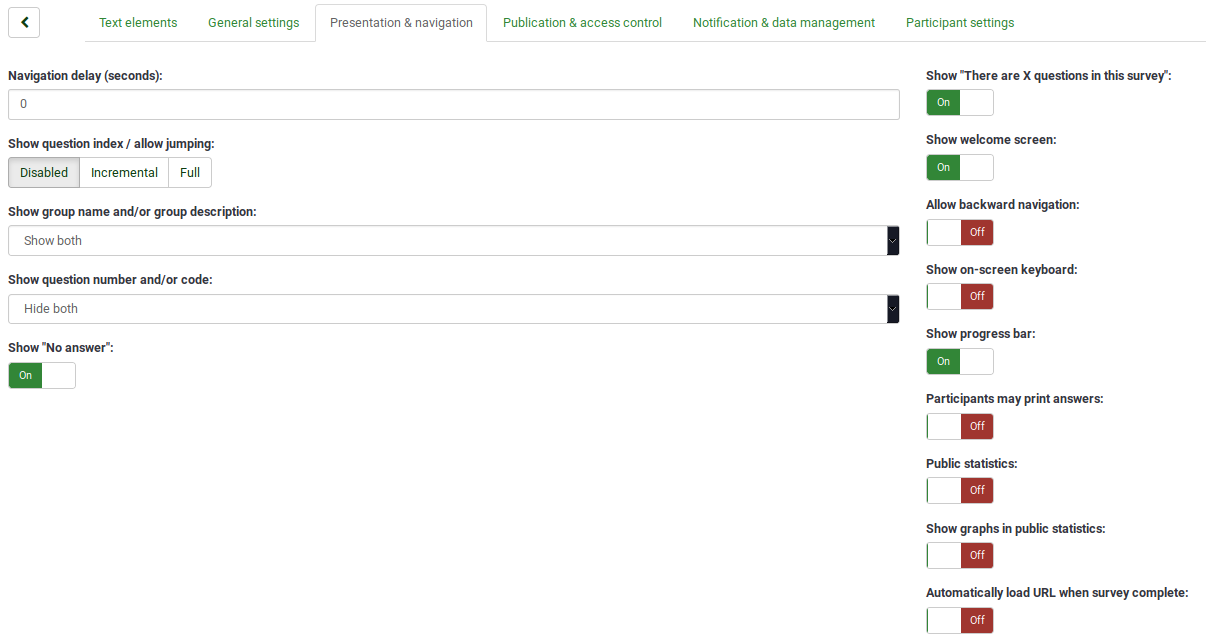
- ナビゲーションが現れるまでの時間(秒): 「前へ」「次へ」「送信する」ボタンが使えるようになるまでの秒数を指定します。設定しない場合、既定値は"0"(秒)となります。
- オンにすると、質問インデックス表示/ジャンプを許可: 質問インデックスが表示され、利用者は質問間を移動することができます。以下の選択が可能です。
- 無効 : 選択すると、アンケートにインデックスが表示されません。
- 進んだ分まで表示 : 選択すると、アンケートページのインデックスメニューに質問グループが進んだ分まで表示されます。到達済みのグループにだけ"ジャンプ"できます。
- フル : インデックスメニューから質問グループ間をジャンプできます。
- ポリシーの通知を表示: 設定すると、ポリシーの通知(個人情報の保護についてなど)がようこそページに表示されます。以下のオプションが利用できます。
- 表示しない : 選択すると、ポリシーの通知は表示されません。
- テキストとして表示 : 選択すると、ようこそメッセージの後にデータセキュリティ/ポリシーのテキスト全体が表示されます。テキストの下にチェックボックスが表示されます。
- モーダルに表示 : 選択すると、チェックボックステキストだけ表示されます。ポリシー/データセキュリティの全文にアクセスするには、アンケート参加者がチェックボックステキストの下にあるポリシーを表示ボタンをクリックする必要があります。
- 「このアンケートはX問あります」を表示: アンケートに質問が全部で何問あるかを表示します。
- グループ名とグループ説明のどちらかまたは両方を表示: 質問グループの名前やグループ説明を表示するかどうかを設定します。
- 質問番号かコードもしくは両方を表示: 質問番号や質問コードを表示するかどうかを設定します。質問番号はアンケートを始めるときに表示され、質問コードは各質問文の横に表示されます。
- 「回答なし」を表示: ラジオボタンや選択するタイプの質問(リストや配列など)で、「回答なし」を表示と設定され、さらに必須でないと設定されている場合、それぞれの質問/サブ質問に「回答なし」という項目が追加で表示されます。これにより、アンケート回答者は、質問/サブ質問に回答するかしないかを選ぶことができます。次の2つのオプションが利用できます。
- オン : 選択すると、必須でない質問では、回答者は「回答なし」を選択できます。
- オフ : 選択すると、必須でない質問では「回答なし」が表示されません。
- ようこそ画面を表示: オフにすると、アンケート開始時にようこそメッセージが表示されません。
- バックワードナビゲーションを許可: オンにすると、回答者が前のページに戻り、回答を変更できるようになります。
- スクリーンキーボードを表示: オンにすると、情報入力が必要な質問に回答するときにスクリーンキーボードが表示されます。
- 進捗バー表示: アンケート参加者に進捗バーを表示し、アンケートがどこまで進み、あとどれだけ残っているかがわかるようになります。
- 参加者による回答印刷: オンにすると、アンケート参加者がアンケート終了時に回答内容を印刷できるようになります。
- 統計公開: オンにすると、アンケート終了時に統計へのリンクが表示されます。
- 公開統計でグラフを表示: オンにすると、アンケート終了時の統計にグラフも表示されます。グラフを表示するには、"統計公開オプション"をオンにする必要があります。
- アンケート完了時自動読込URL: オンにすると、アンケート終了時に指定したURLにリダイレクトされます。
公開とアクセス制御
このタブでは以下の設定を行います。
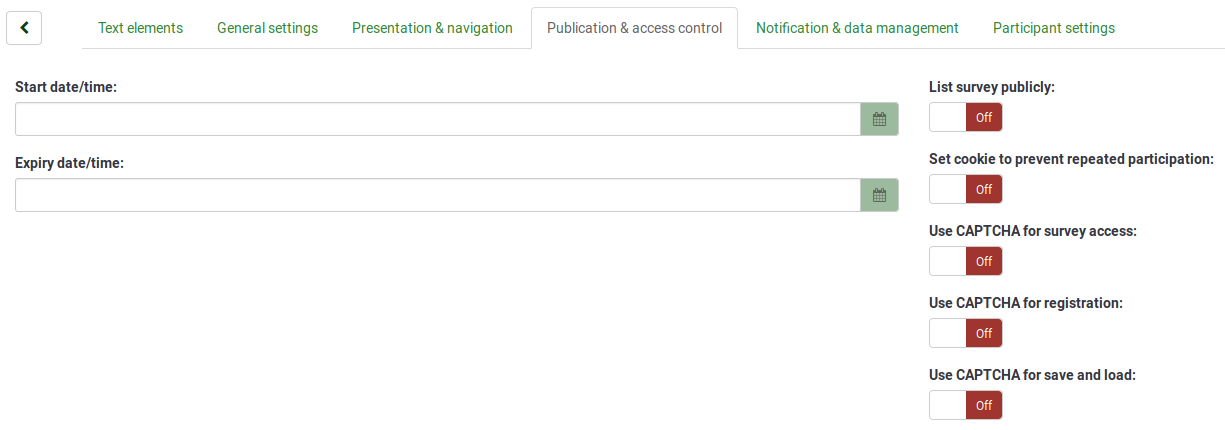
- 開始日時: アンケートを開始する日時を設定します。
- 有効期限日時: 特定の日にアンケートの期限を設定したい場合に使用します。アンケートに参加できる最後の日になります。(例: 12月31日にセットすると、1月1日にはアンケートに回答することができません)設定しない場合は入力欄の日付を消去します。
- 公開アンケート一覧に表示: 既定値は"いいえ"です。"はい"に設定すると、アンケートは"利用可能なアンケート"ページにリストされ、すべてのLimeSurveyユーザーが見ることができます。
- 繰り返し参加しないようにCookieを設定: オンにすると、アンケート参加者が2回目のアンケートを実施できなくなります。
- アンケートアクセスにCAPTCHAを使用する: アンケートにアクセスするため、アンケート参加者にCAPTCHAコードを入力させます。
- アンケート登録にCAPTCHAを使用する: アンケートに登録するため、アンケート参加者にCAPTCHAコードを入力させます。
- 保存と読込にCAPTCHAを使用する: 途中まで回答したアンケートを再び読み込む際、アンケート参加者にCAPTCHAコードを入力させたいときに使用します。
通知とデータ管理
下記のオプションが使用できます。
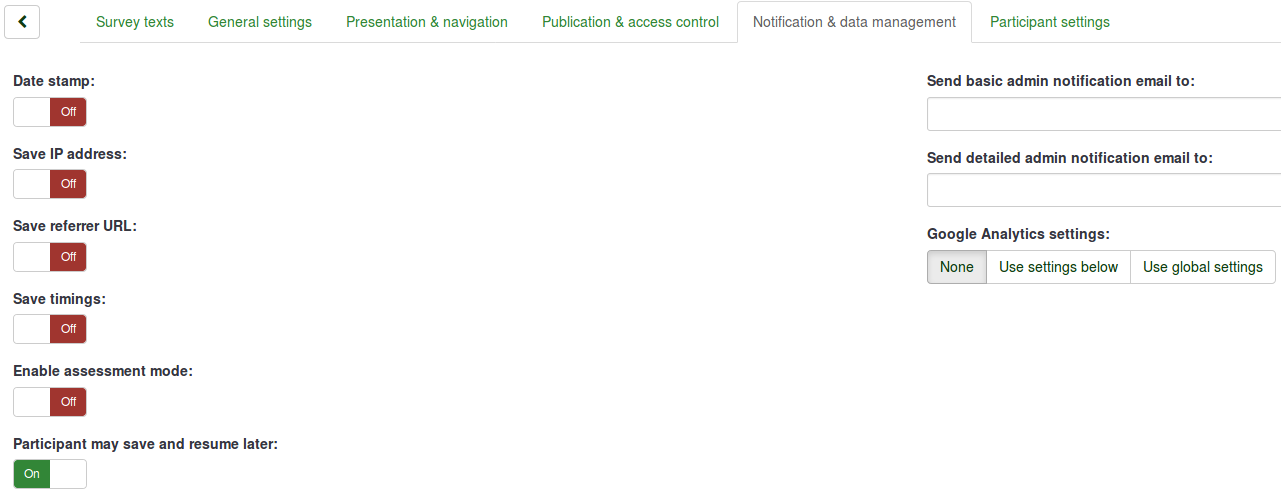
- 日付: 回答が送信された時刻を記録する場合にオンにします。
- IPアドレス保存: 「はい」にすると、回答とともにアンケート回答者のIPアドレスが保存されます。
- リファラーURL保存: 「はい」にすると、回答とともにリファラーURLが保存されます。
- 回答タイミング保存: オンにすると、アンケート参加者ごとがアンケートの各ページに滞在した時間を記録します。
- 評価モード有効: この設定で評価を有効/無効にできます。
- 参加者による保存と再開: この設定により、参加者が回答を保存し、あとから再開できるようになります。オープンアンケートや匿名アンケートで有効に機能します。アンケートでトークンを使用し、匿名とする場合、参加者設定パネルからトークンベースの回答保持を有効にしたほうがよいでしょう。
- 管理者通知メール(簡易)の宛先と管理者通知メール(詳細:結果つき)の宛先: この設定では、アンケートが送信されたときに通知もしくはアンケート回答を指定のメールアドレスに送信します。メールテンプレートメニューからメールのテンプレートを編集できます。セミコロン(;)で区切ることにより複数の受信者を設定できます(例えば、"yourname@test.com; myname@test.com;hisname@test.com"、あるいはプレースホルダーを使用して"yourname@test.com;{INSERTANS:82733X12X73};{TOKEN:EMAIL}")
There are different ways for entering an address:
- Enter a specific email address (ie: yourname@test.com);
- Enter a SGQA code and the response will be sent to an email address entered as an answer to that particular question (use the format {INSERTANS:9999X88X12} in the same way you would reuse information from previous answers);
- Enter a Token code (only possible if your survey is not anonymous) and the response will be sent to an email address retrieved from a token field (use the format {TOKEN:EMAIL} or {TOKEN:ATTRIBUTE_1} in the same way you would re-use Information from the Survey participants table).
- Google Analytics settings: If you would like to get further details about the survey web traffic, use Google Analytics. Three options are available:
- None : Google Analytics will not be used;
- Use settings below : If chosen, the survey owner can type in his or her Google Analytics Tracking ID to be stored only with the respective survey. You also have the possibility to choose one of the three Google Analytics styles:
- Do not use Google Analytics - so {GOOGLE_ANALYTICS_JAVASCRIPT} is an empty string;
- Default Google Analytics - {GOOGLE_ANALYTICS_JAVASCRIPT} uses the standard Google Analytics code, inserting the proper Google Analytics Key;
- SurveyName-[SID]/GroupName - {GOOGLE_ANALYTICS_JAVASCRIPT} contains customized Google Analytics code to log the URL as {SURVEYNAME}-[{SID}]/{GROUPNAME}. This can be helpful if you want to analyze navigation paths through your survey, time spent per page, and drop-off rates per page.
- Use global settings : If picked up, the survey will use the same Google Analytics Tracking ID as the one saved in the global settings and then you choose the desired Google Analytics style.
Participant settings
The following options are available:
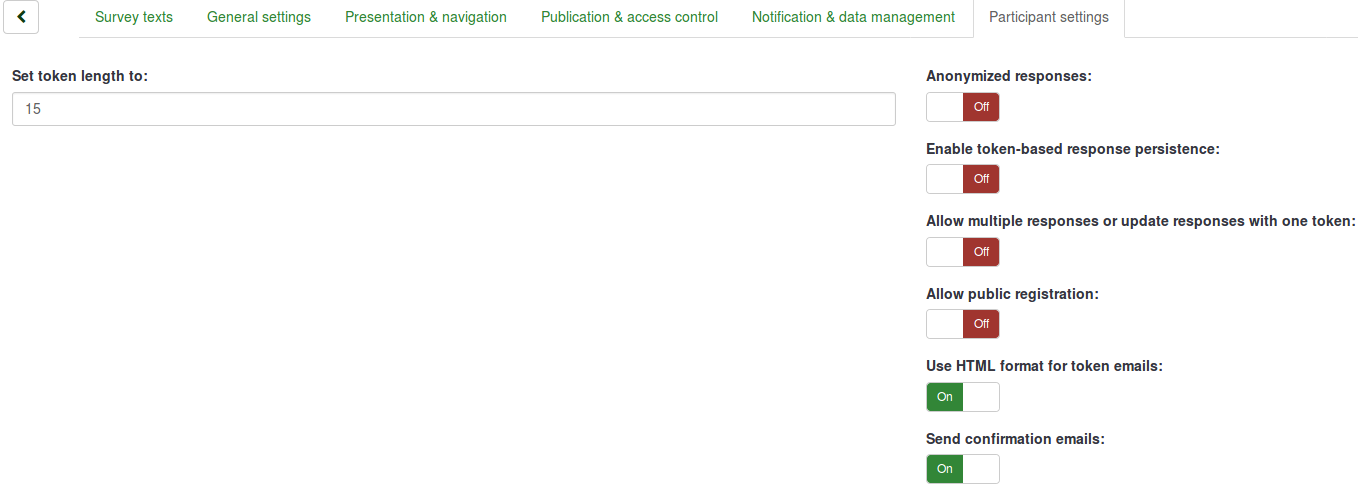
- Set token length to: Usually, the default value of 15 (max. supported value: 35) digits does not need to be changed. However, if you wish to change this setting, please enter a number (X) which is greater than 5. If the number entered is smaller than 5, it will be converted to the default value of 15. When generating tokens, all tokens will use a length of X digits;
- Anonymized responses: It allows you to determine whether responses to your survey are matched up with information from the Survey participants table (utilized in the respective survey) or are kept "anonymous". The default is "No". If you choose "Yes", then your survey is set to anonymize responses - there will be no way to connect answers and participants. Even the survey administrator will not be able to link response data and participant/token data. However, you will always be able to specifically view each response entered by your participants in the survey. Thus individual and anonymous analyses can still be done;
- Enable token-based response persistence: If your survey uses tokens and your responses are not anonymized, you may want to enable this feature. If you turn this on, your participants will be able to leave the survey and resume later at any time without using the Resume later function - for example, when they get distracted or their browser crashes. Upon clicking the invitation link again, they will find their survey answers still in place when they return to the survey and will even find themselves on the same page where they were before leaving;
- Allow multiple responses or update responses with one token: If this option is activated, participants will be able to return to their survey by clicking the invitation link, even if they have already submitted the survey. If the survey is anonymous or "Enable token-based response persistence" is set to "No", this will add a new response. If the survey is not anonymous and "Enable token-based response persistence" is enabled, the user will update the existing responses;
- Allow public registration: If you use tokens to control access to your survey, the only people who can use the survey are those who have an entry and a unique token code allocated in the Survey participants table. If you would like to use tokens, but also allow public registration, set this to "Yes". The "Yes" setting will allow visitors to register his or her name and email address. The script will create a new entry in your Survey participants table for this person, then send them an invitation email. The script will ensure that only one person per email address can complete your survey;
- Use HTML format for token emails: When enabled, all emails sent by the token management interface (invite, reminder, confirmation) will be formatted as HTML. You'll then be able to use rich formatting for these emails. The default value is "Yes";
- Send confirmation emails: If enabled, the participant will receive a confirmation email that the survey was submitted.
Import a survey
If you wish to import a survey, you can do that from the "Create, import, or copy survey" screen. To get there, click the Create, import, or copy a survey button and then on the Import tab. Next, click on browse to choose the file you wish to import, and then on the Import survey button.

The import process reads the following formats:
- .LSS files (XML-format created by LimeSurvey 1.90 or later);
- .LSA files (Survey archive which may include also token, responses and timings - available since LimeSurvey 2.0);
- .TXT files (Text-format created by Excel - available since LimeSurvey 2.0);
- .CSV files (Created by early LimeSurvey versions from 1.50 to 1.90).
The import function "intelligently" re-numbers the survey, groups, questions, answers, and condition IDs so that they all match each other. No existing survey is going to be overwritten during the import process.
By default, the resource links and expression fields are also imported. Basically, the more advanced type of questions are going to be also imported along questions that include complex branching, assessments, validation, and tailoring.
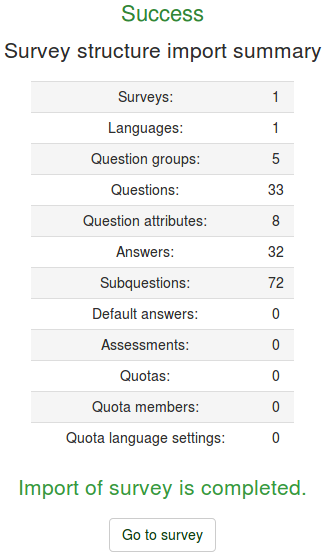
Once the import process is completed, a survey structure import summary will be displayed, showing whether it was successful or not:
Copy a survey
The last tab contains the copy survey functionality and its options:
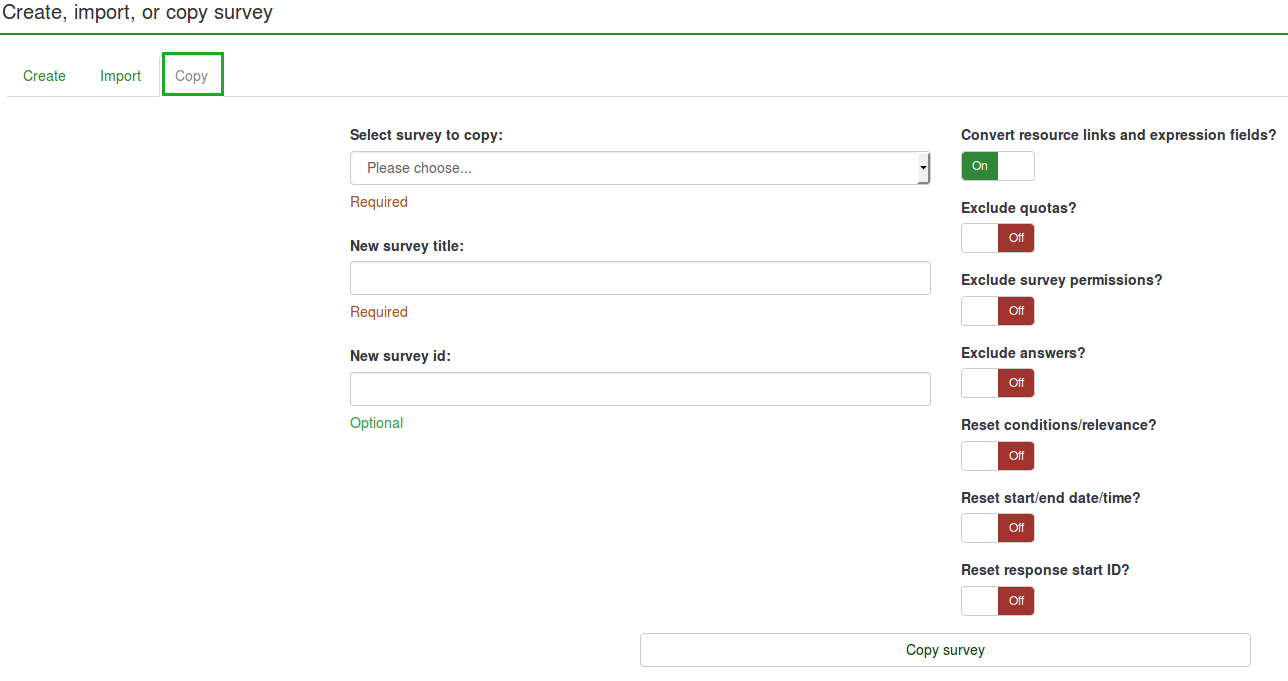
- Select survey to copy: Select from the drop-down list the survey you want to copy;
- New survey title: Type in the title you wish the copied survey to have;
- New survey id: You can complete it or let the field empty as it gets automatically assigned a survey id during the process;
- Convert resource links and expression fields: If you disable it, the more advanced question types that use the expression manager will not be copied;
- Exclude quotas: The quotas are going to be excluded if this option is disabled;
- Exclude survey permissions: If enabled, no survey permissions will be copied into the new survey.
- Exclude answers: Exclude the already-stored answers;
- Reset conditions/relevance: Reset the conditions set in the original survey;
- Reset start/end date/time?: Reset the set start/end date/time;
- Reset response start ID?: Each response has a corresponding ID. If enabled, the ID of the responses will be reset. However, bear in mind that it is better not to have an id with two matching responses because it might influence the output of your survey.
Once you are done with the options, click on the Copy survey button located on the bottom of the page. A survey copy summary will be displayed:
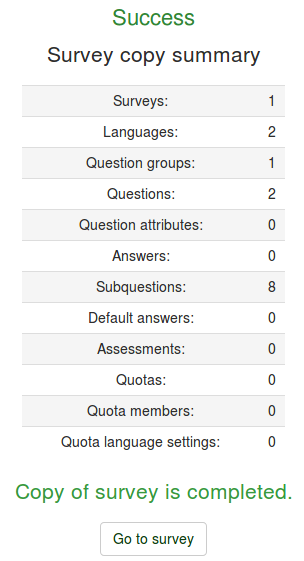
To access the copied survey, click Go to survey to be redirected to the settings of the newly added survey.
List surveys
To get an overview of all your surveys, click on the Surveys button located on the toolbar of LimeSurvey home page:

- Survey ID: When created, the survey receives a unique id that is used to make the connection between different LimeSurvey tables;
- Status: It can be:
- Title: The title of the survey;
- Group: The survey group to which the survey belongs to;
- Created: The date when the survey was created;
- Owner: The name of the user that owns the survey;
- Anonymized responses: It shows whether the responses are anonymized when stored into the database or not;
- Partial: The number of surveys that were partially completed;
- Full: The number of surveys that were fully completed by the survey participants;
- Total: The number of partially and fully completed surveys;
- Closed group: It can be either "Yes" (if a Survey participants table is used) or "No";
- Actions: The last column presents the actions that are available for each survey:

If you want to look for a specific survey, use the search bar and filter the results via the survey status field ("active", "active and running inactive", "inactive", "active but expired", and "active but not yet started").
Delete a survey
In order to delete a survey, you have to first access the survey list page. Then, select the survey(s) you wish to delete and click on the Selected survey(s)... button located on the bottom-left side of the page:
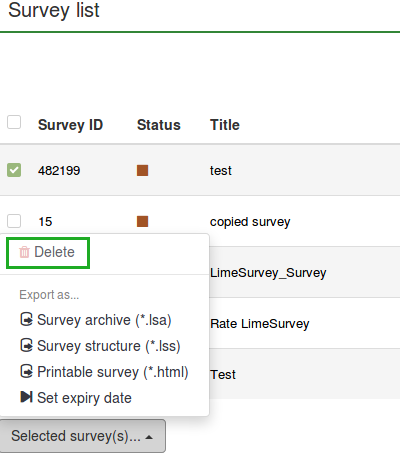
When you click Delete, a confirmation window will pop up in order to confirm your action.
Export a survey
If you want to export a survey, you have to access the survey list table and select the survey(s) you wish to export:
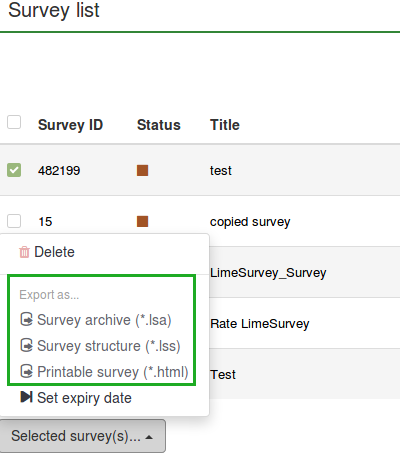
The following options are available:
- Survey archive (*.lsa);
- Survey structure (*.lss);
- Printable survey (*.html): if you would like to export the survey in a printable format in order to be filled out "offline".
For more details, check our wiki section on how to export a survey structure.
Survey groups
In order to access the survey group functionalities, click on the Surveys button located on the main toolbar of the LimeSurvey home page. Then, access Survey groups:

A survey groups list will be displayed.
On this page you can:
- Create a survey group - located above the survey groups table;
- Edit a survey group - located on the last column (the green pencil icon);
- Delete a survey group - located on the last column (the red trash icon).
Create a survey group
To add a new survey group, click on the Create a new survey group button located above the survey groups list. The following columns have to be filled in:
- Name: Type in the name of the survey group;
- Title: Type in the title of the survey group;
- Description: Type in a short description of the survey group;
- Order: Helps you organize the order of the survey groups within a parent group;
- Parent: Choose the survey group that will be the parent survey group. The parent group option is used to ease the edit of template-related options of a high number of survey groups via a few clicks.
Edit survey group
The following options of a survey group can be edited:
- Surveys in this group;
- Settings for this survey group;
- Template options for this survey group (New in 3.0 ).
Surveys in this group
If you click on the first tab, all the surveys from the respective group will be displayed.

This works as a filtering function, filtering out all the surveys not listed in the chosen survey group. You can now select the desired survey and start editing it. To see which survey-editing functionalities are available, check the list surveys section.
Settings for this survey group
The following fields can be edited from the Settings for this Surveygroup tab:
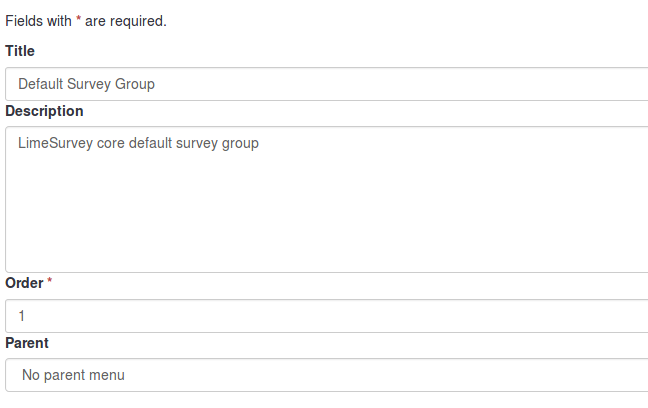
- Title: Type in the title of the survey group;
- Description: Type in a short description of the survey group;
- Order: Helps you organize the order of the survey groups within a parent group;
- Parent: Choose the survey group that will be the parent survey group. The parent group option is used to ease the edit of template-related options to a higher number of survey groups via a few clicks.
Template options for this survey group
The template options functionalities are present in LimeSurvey 3.0+. It offers a set of various options that allows you to quickly and easily change the templates-related settings of the surveys that belong to the same survey group:
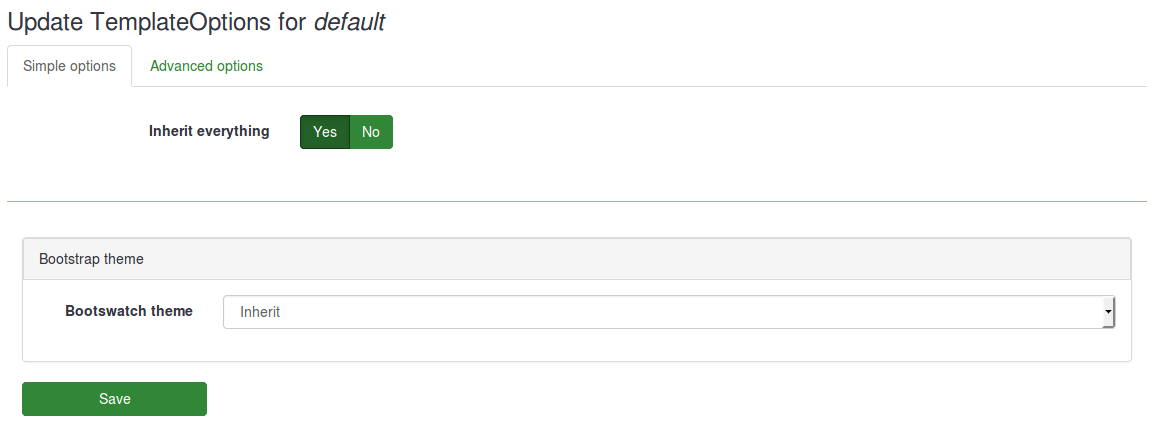
The Inherit everything functionality lets you decide whether you want the survey group to inherit everything or not from the parent survey group theme.
If you do not want this to happen, select "No". The following options will show up which will allow you to choose what should be inherited from the parent survey group theme:
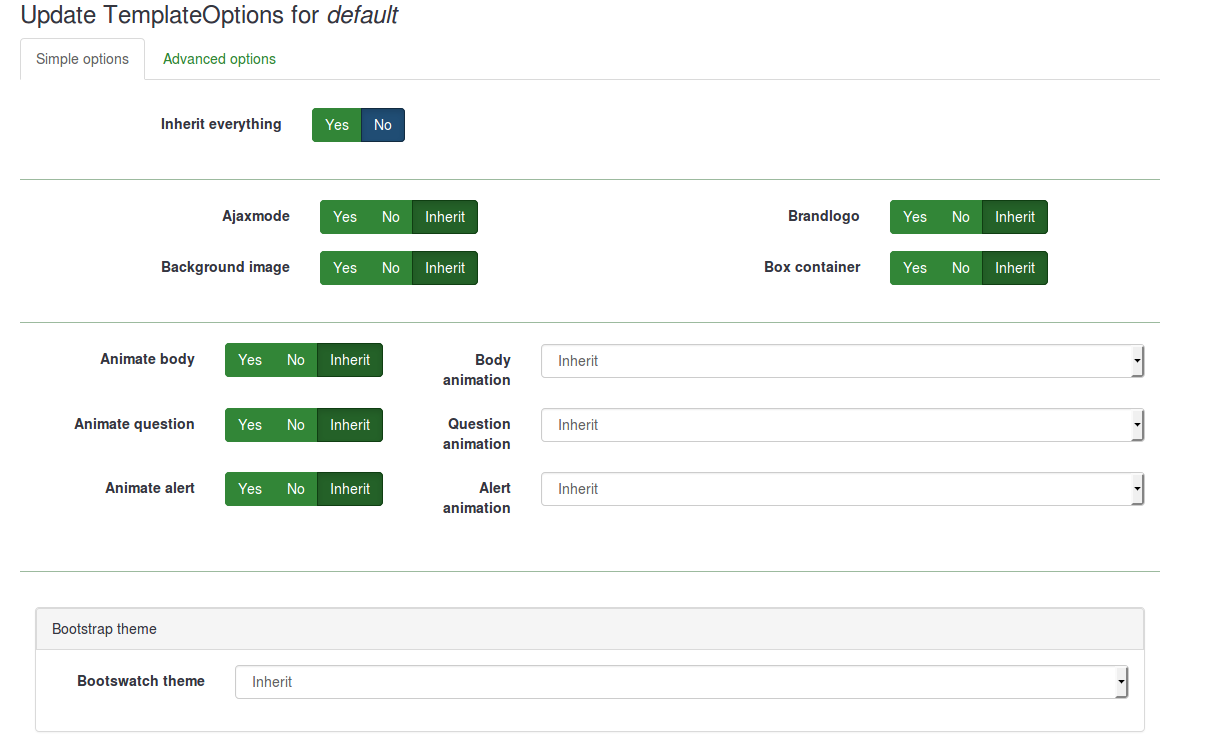
Below, you will see that you can choose a bootswatch theme for your survey group. Bootswatch themes can be used to quickly edit your templates. Basically, bootswatch is a collection of themed swatches which can be freely downloaded and dropped into your Bootstrap site. Some of these themes are already included into your LimeSurvey installation and they can be selected from the Bootswatch theme drop-down list.
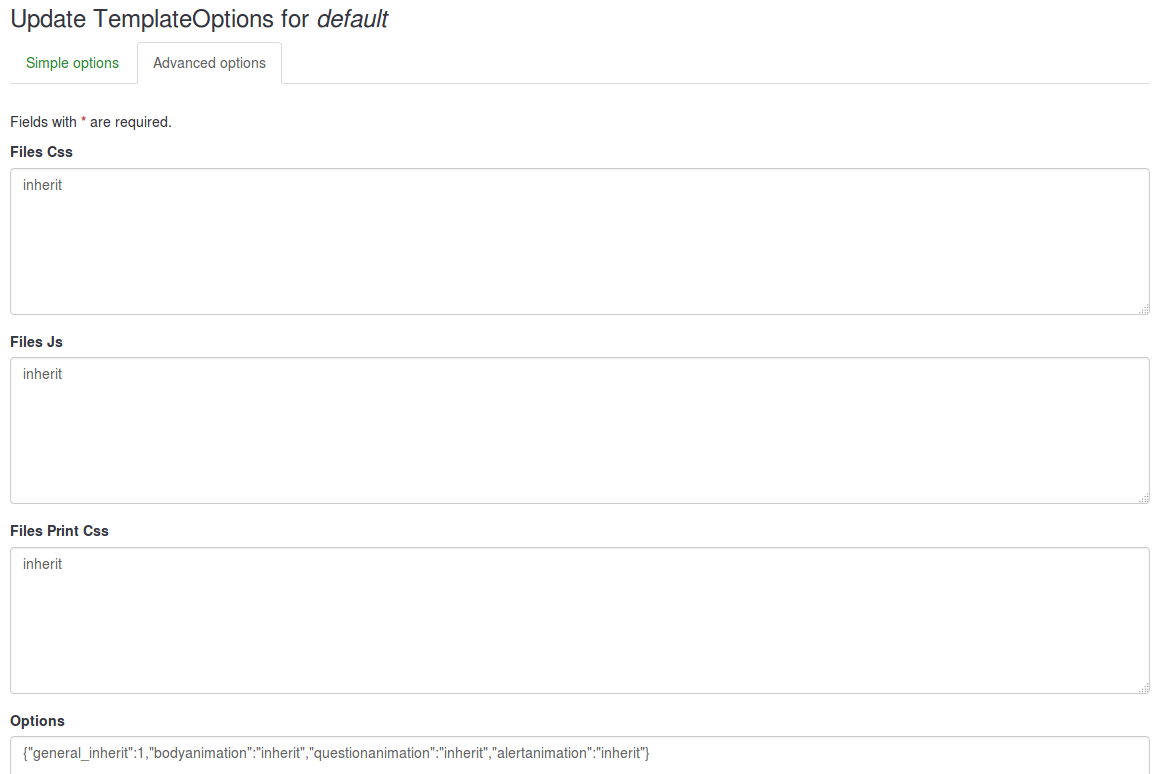
If you want to tweak more a survey group template options, click on the advanced option tab (recommended for advanced users):
Delete a survey group
To delete a survey group, select the survey group you wish to remove and click on the red trash button located in the last column. Then, confirm the deletion.