Surveys - introduction/nl: Difference between revisions
From LimeSurvey Manual
(Created page with "*'''Timing-instellingen opslaan:''' Moet de door de deelnemer gebruikte tijd per pagina van de enquête worden opgeslagen?") |
(Created page with "*'''Beoordelingsmode aanzetten:''' Je kunt hiermee het beoordelen van de enquête aan- en uitzetten.") |
||
| Line 180: | Line 180: | ||
*'''Timing-instellingen opslaan:''' Moet de door de deelnemer gebruikte tijd per pagina van de enquête worden opgeslagen? | *'''Timing-instellingen opslaan:''' Moet de door de deelnemer gebruikte tijd per pagina van de enquête worden opgeslagen? | ||
*''' | *'''Beoordelingsmode aanzetten:''' Je kunt hiermee het beoordelen van de enquête aan- en uitzetten. | ||
*'''Participant may save and resume later:''' This setting allows a participant to save his responses and resume to answer the survey questions at a later time. Please note that this makes most sense with open surveys or surveys with anonymized answer. If you are using [[Survey participants|tokens]] and the survey [[Participant tokens|is not anonymous]], in most cases it is better to activate '''token-based response persistence''' from the [[Participant tokens]] panel. | *'''Participant may save and resume later:''' This setting allows a participant to save his responses and resume to answer the survey questions at a later time. Please note that this makes most sense with open surveys or surveys with anonymized answer. If you are using [[Survey participants|tokens]] and the survey [[Participant tokens|is not anonymous]], in most cases it is better to activate '''token-based response persistence''' from the [[Participant tokens]] panel. | ||
Revision as of 16:41, 22 February 2018
Algemeen
In een enquête worden meerdere database-tabellen gebruikt. In versie 3.0 is de functionaliteit van de groepen toegevoegd.
Enquêtes
Je kunt op twee manieren naar de pagina om een enquête aan te maken:
1. Klik op het pijltje naast de knop Enquêtes in de taakbalk op je beginpagina. Kies in de dropdownlijst voor Een enquête aanmaken:
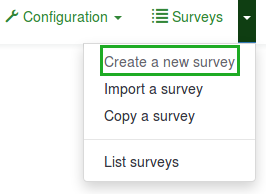
2. Klik op de knop Enquêtes op de taakbalk van je beginpagina:

De lijst met enquêtes wordt getoond. Klik op de knop Een enquête aanmaken linksboven de lijst.

Enquête aanmaken
Na het klikken op Een enquête aanmaken wordt de volgende pagina getoond:
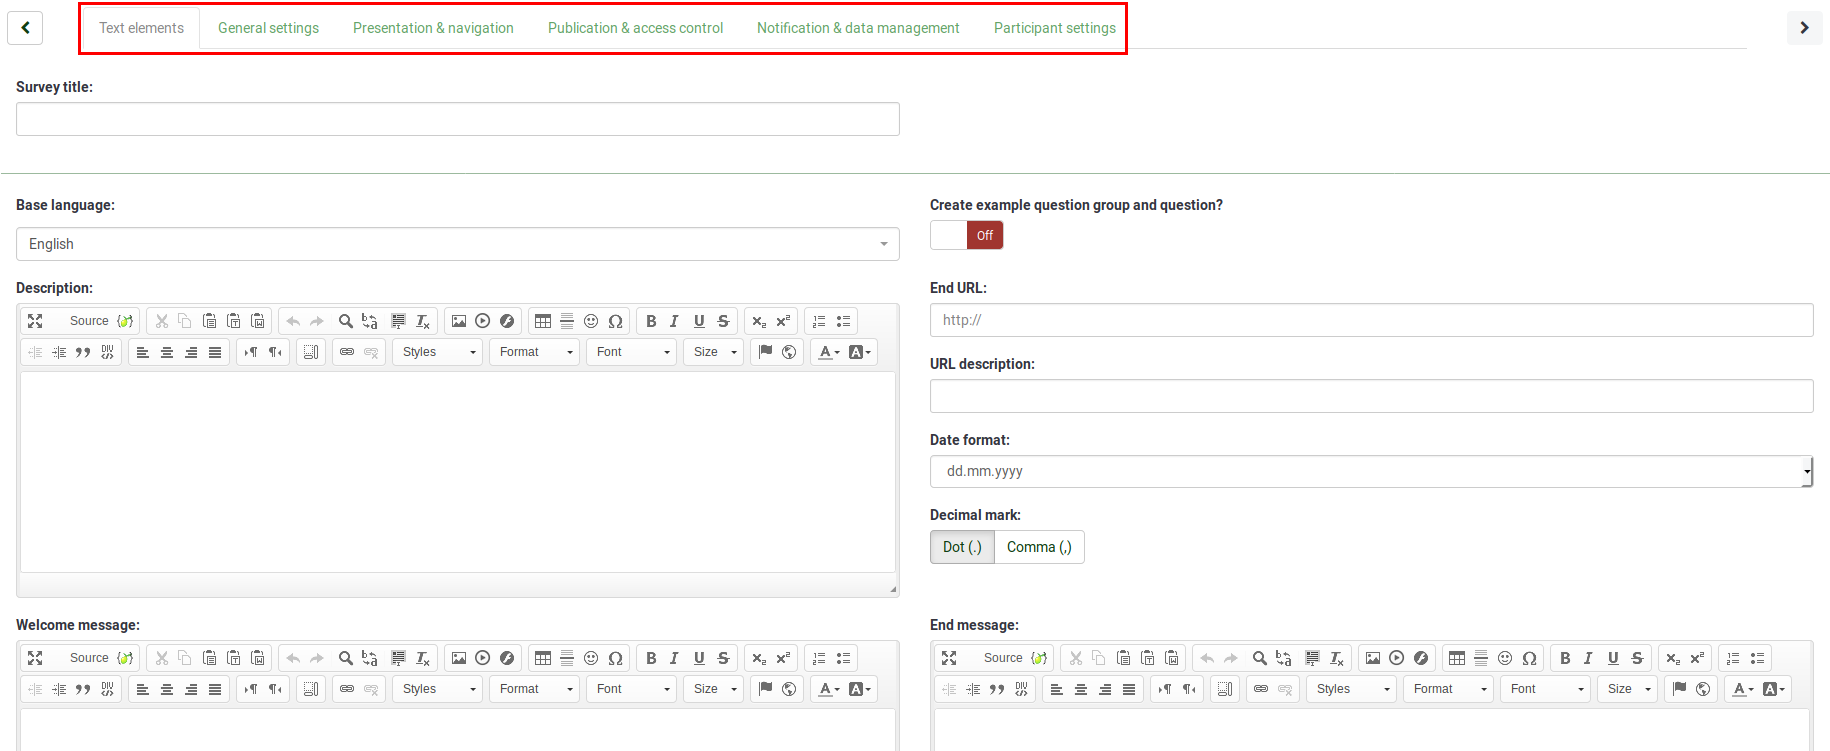
Om de enquête te optimaliseren, bekijk de optie die per tab beschikbaar zijn op de taakbalk Een enquête aanmaken:
- Enquête teksten
- Algemene instellingen
- Presentatie & Navigatie
- Publicatie & Toegangscontrole
- Melding & Datamanagement
- Instellingen deelnemer
Enquête teksten
Deze tab bevat de volgende opties:
- Titel van de enquête: Hier kun je de titel van de enquête wijzigen.
- Wilt u een voorbeeld van een vraaggroep toevoegen?: (Nieuw in 3.0) Indien ingeschakeld wordt er een vraag en een vraaggroep aangemaakt bij het aanmaken van een enquête.
- Beschrijving: Een beschrijving van de enquête. Indien de optie in de globale instellingen is ingeschakeld, kun je de HTML-editor gebruiken voor de opmaak van de tekst.
- Afsluiting-URL: Je kunt een deelnemer na het afronden van het invullen doorverwijzen naar een andere pagina. Vul dan hier de URL in en zorg ervoor dat de optie URL automatisch laden na afronding enquête is ingeschakeld. Deze optie staat op de tab Presentatie & Navigatie.
- URL-beschrijving: Een korte beschrijving indien de deelnemer naar een externe URL wordt doorverwezen. Dit is bedoeld als uitleg voor de enquête-beheerder van het doel van de URL.
- Datumformaat: Deze optie is belangrijk als er tijdstempels worden vastgelegd bij de antwoorden van de deelnemer. Het is een dropdownlijst, kies het gewenste formaat. Datumformaten verschillen vaak per land. Het wordt aanbevolen een ander formaat te kiezen als je bijvoorbeeld Amerikaanse deelnemers (mm-dd-yyyy) dan wanneer je Engelse deelnemers hebt (dd-mm-yy).
- Decimaal scheidingsteken: Kies de optie, punt of komma, die gebruikelijk is voor de deelnemers aan de enquête.
- Welkomsttekst: De tekst die deelnemers te zien krijgen na het starten van de enquête.
- Eindtekst: De tekst die de deelnemers te zien krijgen na het afronden van de enquête. Indien er door een Afsluiting-URL een doorverwijzing is, wordt de eindtekst niet getoond.
Algemene instellingen
Deze tab bevat de volgende opties:
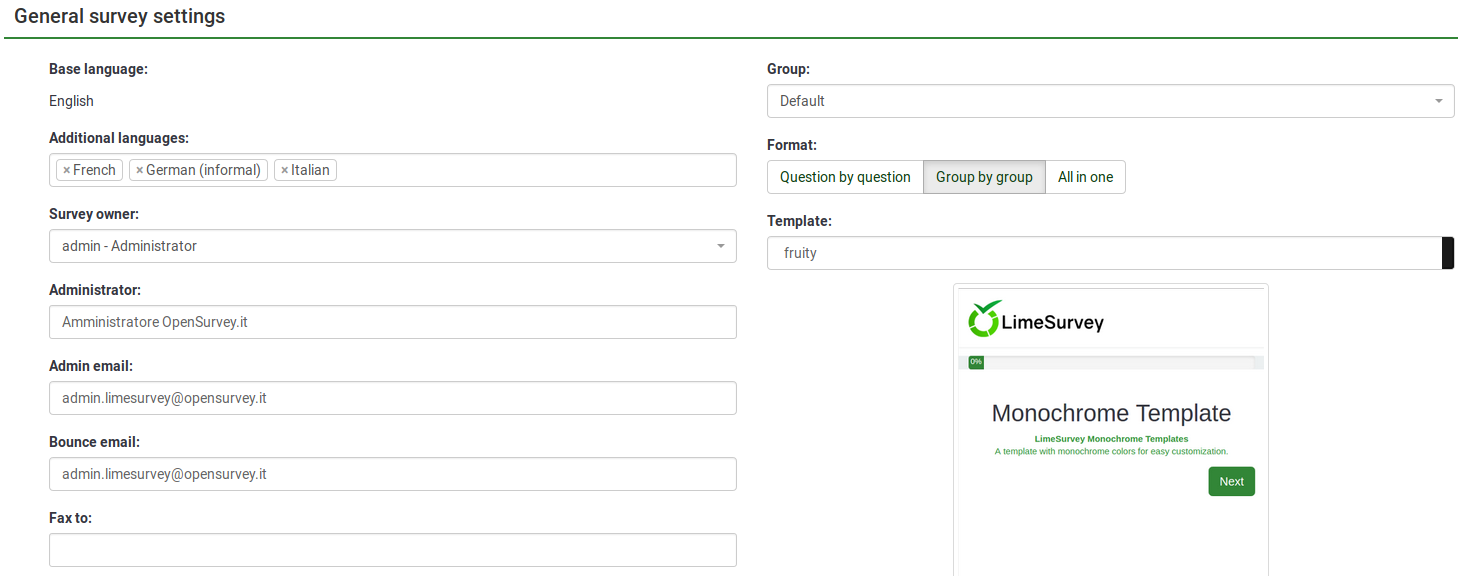
- Standaardtaal: De hoofdtaal van de enquête. De standaardtaal komt overeen met de standaardtaal van de website. Deze kan worden gewijzigd in de globale instellingen van LimeSurvey door de hoofdbeheerder.
- Additionele talen: Er kunnen talen worden toegevoegd aan de enquête. Dat doe je als je een meertalige enquête wilt maken. Als je bijvoorbeeld Engels, Duits en Roemeens wilt gebruiken dan zijn Duits en Roemeens additionele talen (want Engels is dan de standaardtaal). De hoofdbeheerder kan besluiten om niet alle talen beschikbaar te stellen in de globale instellingen van LimeSurvey.
- Eigenaar enquête
- Beheerder
- E-mail beheerder
- Bounce e-mail: Dit is het e-mailadres waar de notificaties van niet verzonden e-mails heen verzonden worden (delivery error notification emails).
- Fax naar: Hiermee kan een faxnummer worden geplaatst op de enquête als de enquête wordt afgedrukt omdat de deelnemer de enquête op papier wil invullen.
- Group (Nieuw in 3.0): Kies de enquête groep waarin de nieuwe enquête wordt ingedeeld.
- Formaat: Hoe moeten de vragen worden getoond aan de deelenemer:
- Vraag voor vraag : Per scherm wordt er een vraag getoond. Er is dan ook een apart welkomstscherm en een apart eindscherm.
- Groep voor groep : Per scherm wordt er een vraaggroep getoond met de daarbij behorende vragen. Er is dan ook een apart welkomstscherm en een apart eindscherm.
- Alles ineens : Er is een scherm met zowel het welkomstgedeelte, de vragen per vraaggroep en de eindtekst.
- Sjabloon: Het standaardsjabloon is eenvoudig maar functioneel. Je kunt zelf een sjabloon aanmaken.
Op deze tab staan de volgende opties:
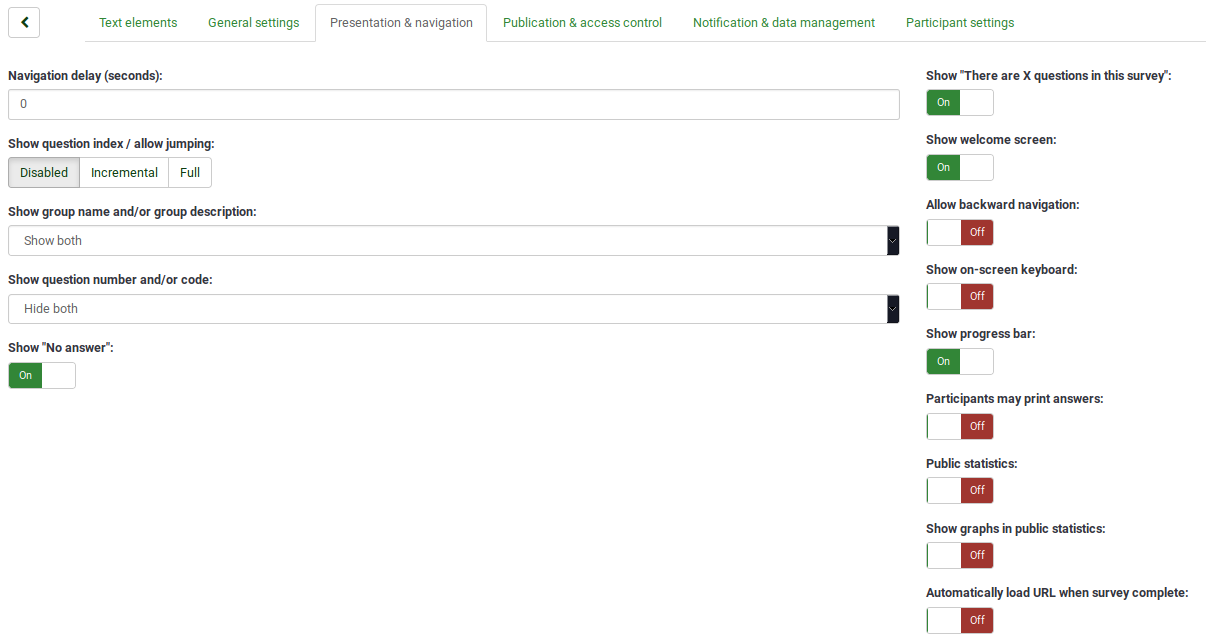
- Vertraging van navigatie (seconden): Het aantal seconden voordat de knoppen (Vorige, Volgende, Verzenden) worden ingeschakeld. Standaard 0, knoppen direct beschikbaar.
- Toon vragenindex / toestaan vrije volgorde: De opties zijn:
- Uitgeschakeld : Er wordt geen vragenindex getoond.
- Incrementeel : De vragenindex wordt opgebouwd, de deelnemer kan alleen springen naar al beantwoorde / benaderde vraaggroepen.
- Volledig : De deelnemer kan via de vragenindex van de ene vraaggroep naar de ander springen.
- Toon "Er zijn X vragen in deze enquête"
- Toon groepsnaam en/of beschrijving
- Toon vraagnummer en/of code: Wat moet er getoond worden aan de deelnemers, het vraagnummer, de code, beide of geen van beide. Het aantal vragen wordt bij het starten van de enquête getoond. De vraagcode wordt getoond naast de vraag.
- Toon "Geen antwoord": Bij radioknoppen of een vraagtype met keuzes met wijzigbare antwoorden (bijv.: Lijsten of arrayvragen) is deze optie ingeschakeld bij niet verplichte vragen. Het antwoord "Geen antwoord" wordt getoond bij elke (sub)vraag. De deelnemer kan dan kiezen om die (sub)vraag dan niet te beantwoorden. De enquête-beheerder heeft de opties:
- Aan : de deelnemer kan de keuze "Geen antwoord" maken bij een niet verplichte vraag.
- Uit : de keuze "Geen antwoord" wordt niet getoond bij een niet verplichte vraag.
- Welkomstpagina tonen: Indien ingeschakeld wordt de welkomstpagina getoond aan het begin van het invullen van de enquête.
- Terugbladeren toestaan: Is het toegestaan dat een deelnemer terug gaat bladeren en de al ingevulde antwoorden eventueel wijzigt.
- Toetsenbord op scherm tonen:Indien ingeschakeld wordt er een toetsenbord getoond als er tekst ingevuld kan worden.
- Toon voortgang: Het is gebruikersvriendelijk als de deelnemer in een balk kan zien hoe ver hij/zij is met het invullen van de vragen.
- Afdrukken van antwoorden door respondenten toestaan: indien ingeschakeld kan de deelnemer aan het eind zijn enquête met antwoorden afdrukken.
- Openbare statistieken: Indien ingeschakeld wordt er aan het eind van het invullen een link getoond waarop wat statistieken worden getoond.
- Toon diagrammen in openbare statistieken: Indien ingeschakeld wordt er in de openbare statistieken ook grafieken getoond. Dit heeft dus alleen zin als de optie "Openbare statistieken" ook ingeschakeld is.
- URL automatisch laden na afronding enquête: De afsluiting-URL wordt een doorverwijzing als deze optie is ingeschakeld.
Publicatie & Toegangscontrole
Deze tab bevat de volgende opties:
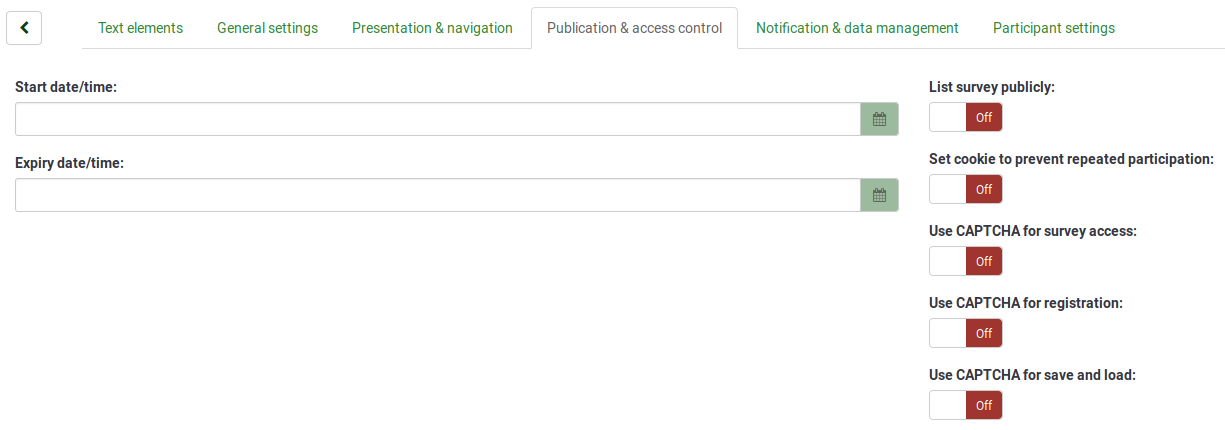
- Ingangsdatum/tijd: Het begintijdstip van de enquête.
- Vervaldatum/tijd: Je kunt hier optioneel een tijdstip invullen waarna de enquête niet meer ingevuld kan worden. (Voorbeeld: Als je het op 31 december zet dan de enquête op 1 januari niet meer worden ingevuld.)
- Toon openbaarheid: De standaardwaarde is "Nee". De enquête wordt dan niet getoond in de lijst "beschikbare enquêtes" aan alle LimeSurvey gebruikers;
- Cookie gebruiken om herhaald invullen te voorkomen: Indien ingeschakeld kan een deelnemer de enquête maar één keer geheel invullen.
- Gebruik CAPTCHA voor toegang tot enquête: Moet de deelnemer een CAPTCHA-code intikken om de enquête te starten?
- Gebruik CAPTCHA voor registratie: Moet de deelnemer een CAPTCHA-code intikken om zich voor de enquête te registreren?
- Gebruik CAPTCHA voor opslaan en laden: Moet de deelnemer een CAPTCHA-code intikken om voor opslaan en laden van de enquête?
Melding & Datamanagement
De volgende opties zijn beschikbaar:
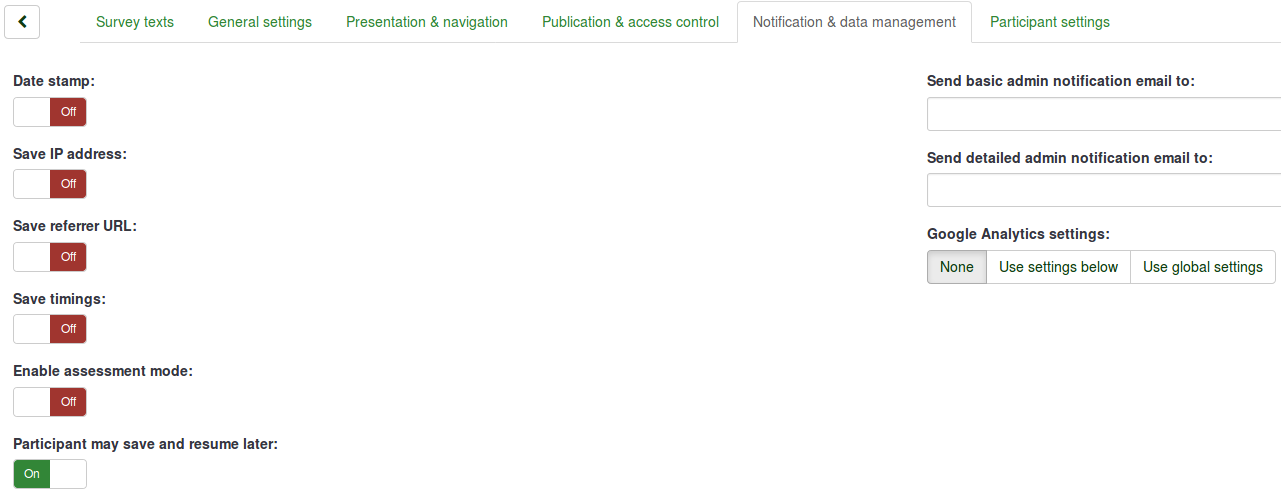
- Datestamp: Schakel dit in als je de tijd waarop de antwoorden zijn verzonden wilt vastleggen.
- IP-adres opslaan: Moet het IP-adres worden opgeslagen bij het opslaan van de antwoorden?
- Verwijzer-URL opslaan: Moet de verwijzer-URL worden opgeslagen bij het opslaan van de antwoorden?
- Timing-instellingen opslaan: Moet de door de deelnemer gebruikte tijd per pagina van de enquête worden opgeslagen?
- Beoordelingsmode aanzetten: Je kunt hiermee het beoordelen van de enquête aan- en uitzetten.
- Participant may save and resume later: This setting allows a participant to save his responses and resume to answer the survey questions at a later time. Please note that this makes most sense with open surveys or surveys with anonymized answer. If you are using tokens and the survey is not anonymous, in most cases it is better to activate token-based response persistence from the Participant tokens panel.
- Send basic admin notification email to and Send detailed admin notification email to: These two fields allow you to send notifications or survey responses to any email addresses once the survey is submitted. You can edit the templates for these emails from the Email templates menu. Multiple recipients can be set by separating the entries with a semicolon (;) (e.g "yourname@test.com; myname@test.com;hisname@test.com" or (if using placeholders) "yourname@test.com;{INSERTANS:82733X12X73};{TOKEN:EMAIL}").
There are different ways for entering an address:
- Enter a specific email address (ie: yourname@test.com);
- Enter a SGQA code and the response will be sent to an email address entered as an answer to that particular question (use the format {INSERTANS:9999X88X12} in the same way you would reuse information from previous answers);
- Enter a Token code (only possible if your survey is not anonymous) and the response will be sent to an email address retrieved from a token field (use the format {TOKEN:EMAIL} or {TOKEN:ATTRIBUTE_1} in the same way you would re-use Information from the Survey participants table).
- Google Analytics settings: If you would like to get further details about the survey web traffic, use Google Analytics. Three options are available:
- None : Google Analytics will not be used;
- Use settings below : If chosen, the survey owner can type in his or her Google Analytics Tracking ID to be stored only with the respective survey. You also have the possibility to choose one of the three Google Analytics styles:
- Do not use Google Analytics - so {GOOGLE_ANALYTICS_JAVASCRIPT} is an empty string;
- Default Google Analytics - {GOOGLE_ANALYTICS_JAVASCRIPT} uses the standard Google Analytics code, inserting the proper Google Analytics Key;
- SurveyName-[SID]/GroupName - {GOOGLE_ANALYTICS_JAVASCRIPT} contains customized Google Analytics code to log the URL as {SURVEYNAME}-[{SID}]/{GROUPNAME}. This can be helpful if you want to analyze navigation paths through your survey, time spent per page, and drop-off rates per page.
- Use global settings : If picked up, the survey will use the same Google Analytics Tracking ID as the one saved in the global settings and then you choose the desired Google Analytics style.
Instellingen deelnemer
De volgende opties zijn beschikbaar:
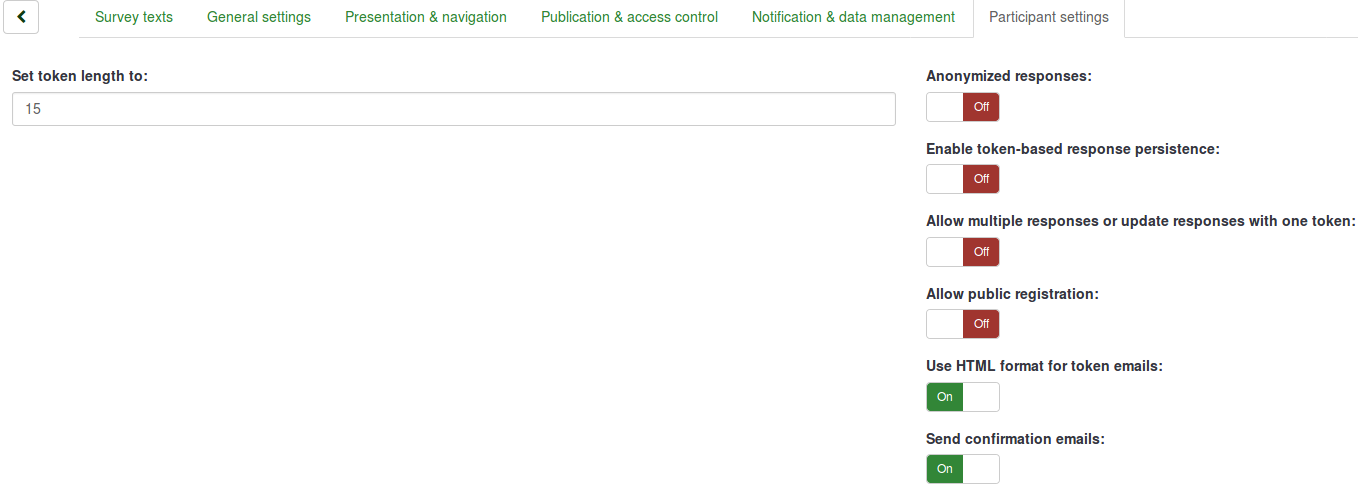
- Set token length to: Usually, the default value of 15 (max. supported value: 35) digits does not need to be changed. However, if you wish to change this setting, please enter a number (X) which is greater than 5. If the number entered is smaller than 5, it will be converted to the default value of 15. When generating tokens, all tokens will use a length of X digits;
- Anonymized responses: It allows you to determine whether responses to your survey are matched up with information from the Survey participants table (utilized in the respective survey) or are kept "anonymous". The default is "No". If you choose "Yes", then your survey is set to anonymize responses - there will be no way to connect answers and participants. Even the survey administrator will not be able to link response data and participant/token data. However, you will always be able to specifically view each response entered by your participants in the survey. Thus individual and anonymous analyses can still be done;
- Enable token-based response persistence: If your survey uses tokens and your responses are not anonymized, you may want to enable this feature. If you turn this on, your participants will be able to leave the survey and resume later at any time without using the Resume later function - for example, when they get distracted or their browser crashes. Upon clicking the invitation link again, they will find their survey answers still in place when they return to the survey and will even find themselves on the same page where they were before leaving;
- Allow multiple responses or update responses with one token: If this option is activated, participants will be able to return to their survey by clicking the invitation link, even if they have already submitted the survey. If the survey is anonymous or "Enable token-based response persistence" is set to "No", this will add a new response. If the survey is not anonymous and "Enable token-based response persistence" is enabled, the user will update the existing responses;
- Allow public registration: If you use tokens to control access to your survey, the only people who can use the survey are those who have an entry and a unique token code allocated in the Survey participants table. If you would like to use tokens, but also allow public registration, set this to "Yes". The "Yes" setting will allow visitors to register his or her name and email address. The script will create a new entry in your Survey participants table for this person, then send them an invitation email. The script will ensure that only one person per email address can complete your survey;
- Use HTML format for token emails: When enabled, all emails sent by the token management interface (invite, reminder, confirmation) will be formatted as HTML. You'll then be able to use rich formatting for these emails. The default value is "Yes";
- Send confirmation emails: If enabled, the participant will receive a confirmation email that the survey was submitted.
Enquête importeren
If you wish to import a survey, you can do that from the "Create, import, or copy survey" screen. To get there, click the Create, import, or copy a survey button and then on the Import tab. Next, click on browse to choose the file you wish to import, and then on the Import survey button.

The import process reads the following formats:
- .LSS files (XML-format created by LimeSurvey 1.90 or later);
- .LSA files (Survey archive which may include also token, responses and timings - available since LimeSurvey 2.0);
- .TXT files (Text-format created by Excel - available since LimeSurvey 2.0);
- .CSV files (Created by early LimeSurvey versions from 1.50 to 1.90).
The import function "intelligently" re-numbers the survey, groups, questions, answers, and condition IDs so that they all match each other. No existing survey is going to be overwritten during the import process.
By default, the resource links and expression fields are also imported. Basically, the more advanced type of questions are going to be also imported along questions that include complex branching, assessments, validation, and tailoring.
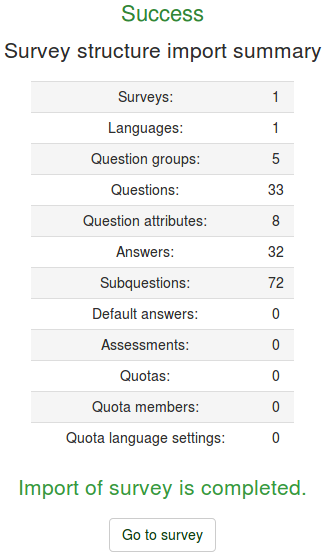
Once the import process is completed, a survey structure import summary will be displayed, showing whether it was successful or not:
Enquête kopiëren
The last tab contains the copy survey functionality and its options:
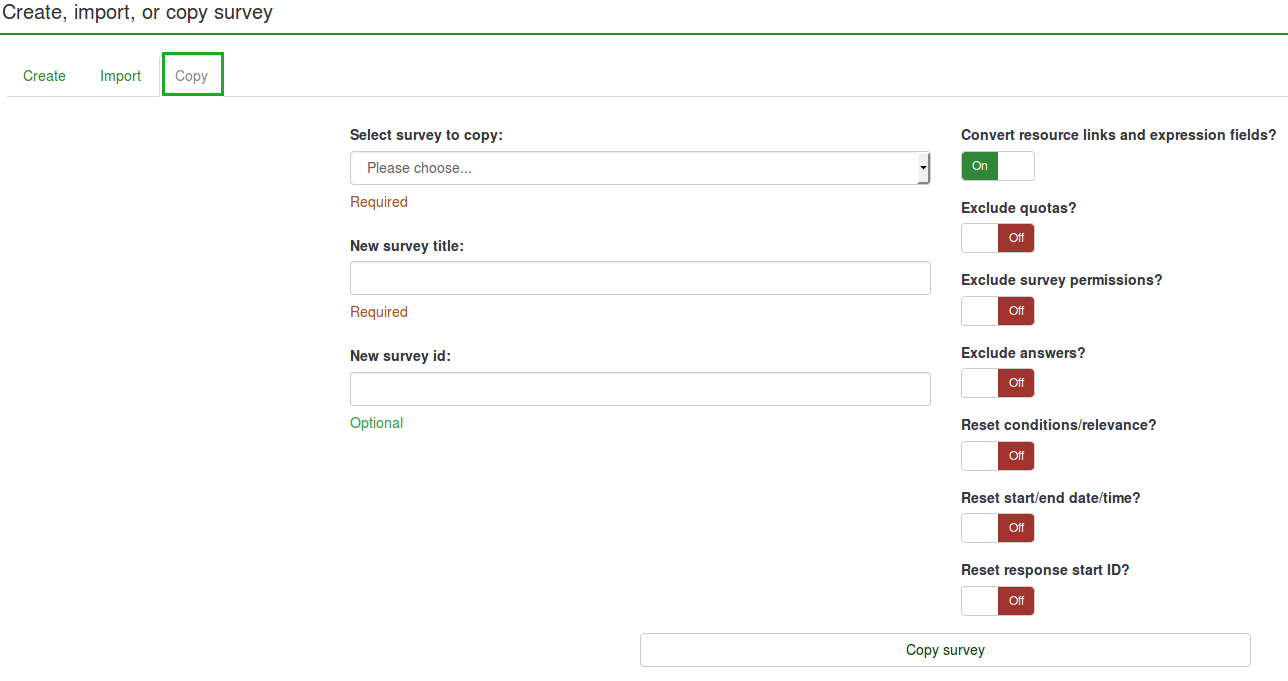
- Select survey to copy: Select from the drop-down list the survey you want to copy;
- New survey title: Type in the title you wish the copied survey to have;
- New survey id: You can complete it or let the field empty as it gets automatically assigned a survey id during the exporting process;
- Convert resource links and expression fields: If you disable it, the more advanced question types that use the expression manager will not be exported;
- Exclude quotas: The quotas are going to be excluded if this option is disabled;
- Exclude survey permissions: Exclude the survey users with survey permissions on the original survey to receive the same survey permissions in the copied version of the survey;
- Exclude answers: Exclude the already-stored answers;
- Reset conditions/relevance: Reset the conditions set in the original survey;
- Reset start/end date/time?: Reset the set start/end date/time;
- Reset response start ID?: Each response has a corresponding ID. If enabled, the ID of the responses will be reset. However, bear in mind that it is better not to have an id with two matching responses because it might influence the output of your survey.
Once you are done with the options, click on the Copy survey button located on the bottom of the page. A survey copy summary will be displayed:
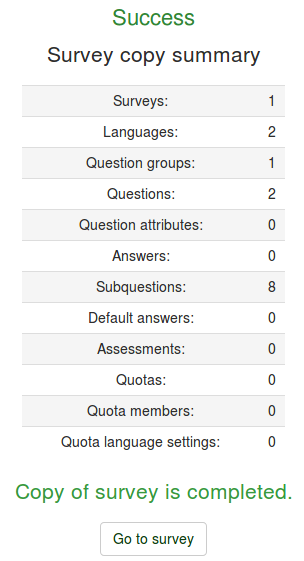
To access the copied survey, click Go to survey to be redirected to the settings of the newly added survey.
Enquêtes tonen
To get an overview of all your surveys, click on the Surveys button located on the toolbar of LimeSurvey home page:

- Survey ID: When created, the survey receives a unique id that is used to make the connection between different LimeSurvey tables;
- Status: It can be:
- Title: The title of the survey;
- Group: The survey group to which the survey belongs to;
- Created: The date when the survey was created;
- Owner: The name of the user that owns the survey;
- Anonymized responses: It shows whether the responses are anonymized when stored into the database or not;
- Partial: The number of surveys that were partially completed;
- Full: The number of surveys that were fully completed by the survey participants;
- Total: The number of partially and fully completed surveys;
- Closed group: It can be either "Yes" (if a Survey participants table is used) or "No";
- Actions: The last column presents the actions that are available for each survey:

If you want to look for a specific survey, use the search bar and filter the results via the survey status field ("active", "active and running inactive", "inactive", "active but expired", and "active but not yet started").
Enquête verwijderen
In order to delete a survey, you have to first access the survey list page. Then, select the survey(s) you wish to delete and click on the Selected survey(s)... button located on the bottom-left side of the page:
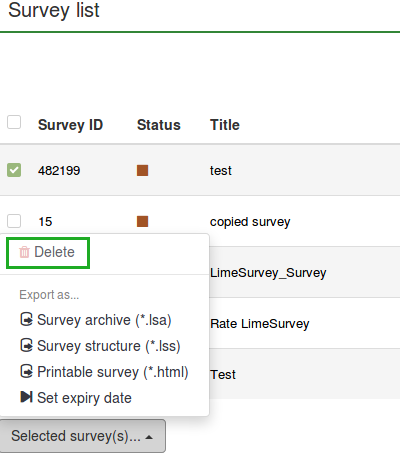
When you click Delete, a confirmation window will pop up in order to confirm your action.
Enquête exporteren
If you want to export a survey, you have to access the survey list table and select the survey(s) you wish to export:
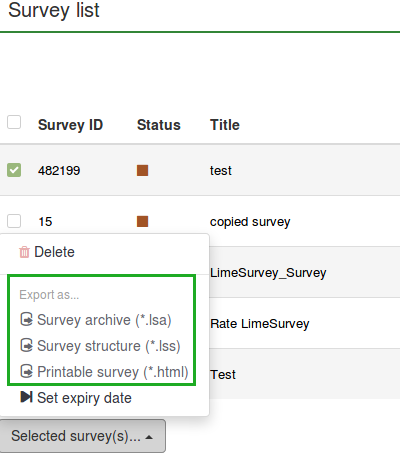
The following options are available:
- Survey archive (*.lsa);
- Survey structure (*.lss);
- Printable survey (*.html): if you would like to export the survey in a printable format in order to be filled out "offline".
For more details, check our wiki section on how to export a survey structure.
Groepen
In order to access the survey group functionalities, click on the Surveys button located on the main toolbar of the LimeSurvey home page. Then, access Survey groups:

De lijst enquête-groepen wordt getoond.
Op deze pagina kun je:
- een groep aanmaken - staat boven de groepstabel.
- een groep wijzigen - het icoontje groene pen in de laatste kolom.
- een groep verwijderen - het icoontje rode afvalbak in de laatste kolom.
Een groep aanmaken
To add a new survey group, click on the Create a new survey group button located above the survey groups list. The following columns have to be filled in:
- Name: Type in the name of the survey group;
- Title: Type in the title of the survey group;
- Description: Type in a short description of the survey group;
- Order: Helps you organize the order of the survey groups within a parent group;
- Parent: Choose the survey group that will be the parent survey group. The parent group option is used to ease the edit of template-related options of a high number of survey groups via a few clicks.
Groep wijzigen
The following options of a survey group can be edited:
Enquêtes in deze groep
If you click on the first tab, all the surveys from the respective group will be displayed.

Dit werkt als een filter, alleen enquêtes in de groep worden getoond. Selecteer de gewenste groep en pas die aan.
Instellingen van deze groep
The following fields can be edited from the Settings for this Surveygroup tab:
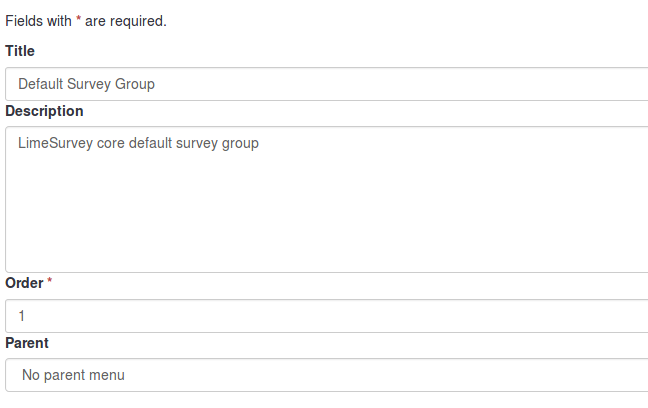
- Title: Type in the title of the survey group;
- Description: Type in a short description of the survey group;
- Order: Helps you organize the order of the survey groups within a parent group;
- Parent: Choose the survey group that will be the parent survey group. The parent group option is used to ease the edit of template-related options to a higher number of survey groups via a few clicks.
Sjabloonopties van deze groep
The template options functionalities are present in LimeSurvey 3.0+. It offers a set of various options that allows you to quickly and easily change the templates-related settings of the surveys that belong to the same survey group:
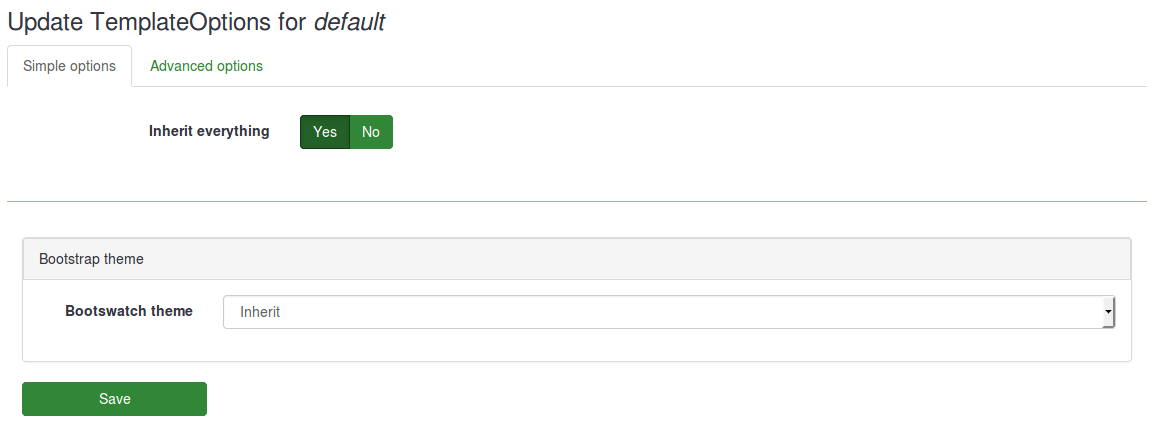
The Inherit everything functionality lets you decide whether you want the survey group to inherit everything or not from the parent survey group theme.
If you do not want this to happen, select "No". The following options will show up which will allow you to choose what should be inherited from the parent survey group theme:
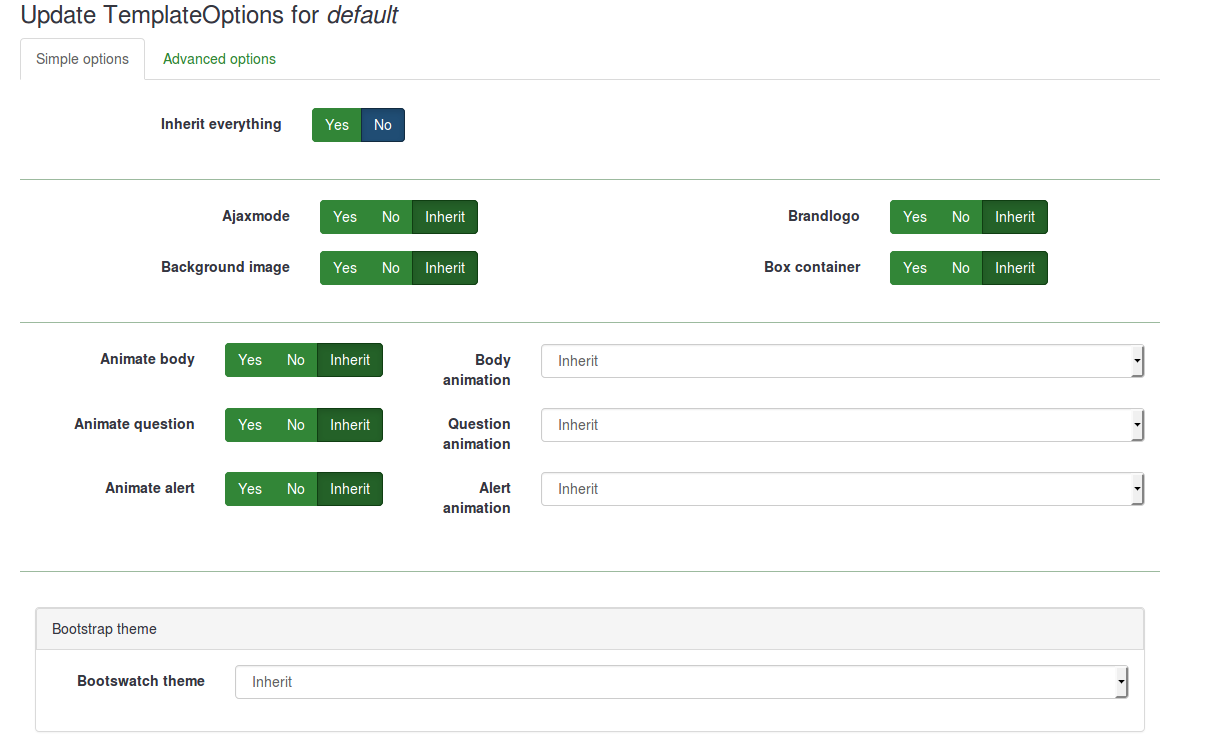
Below, you will see that you can choose a bootswatch theme for your survey group. Bootswatch themes can be used to quickly edit your templates. Basically, bootswatch is a collection of themed swatches which can be freely downloaded and dropped into your Bootstrap site. Some of these themes are already included into your LimeSurvey installation and they can be selected from the Bootswatch theme drop-down list.
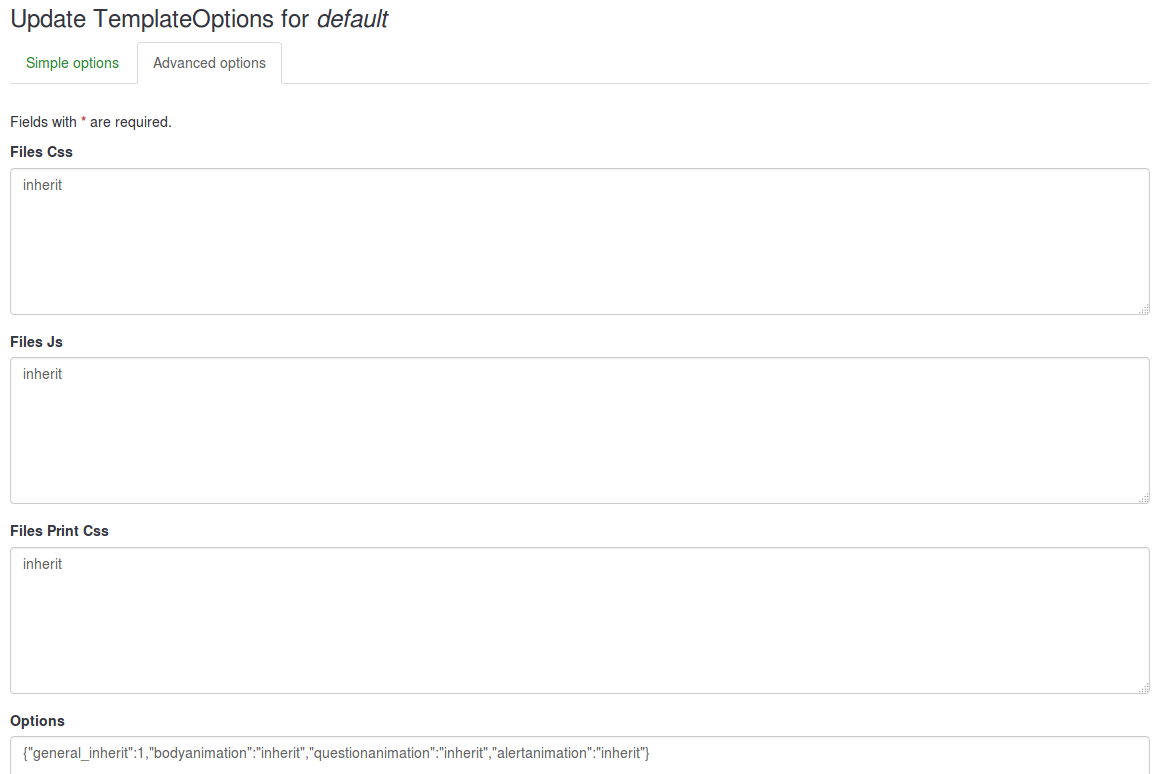
If you want to tweak more a survey group template options, click on the advanced option tab (recommended for advanced users):
Groep verwijderen
To delete a survey group, select the survey group you wish to remove and click on the red trash button located in the last column. Then, confirm the deletion.