FAQ - General
From LimeSurvey Manual
Primeros pasos
Si no desea tener que leer la mitad del manual de LimeSurvey para poder tener una idea de todo lo que se puede hacer con esta herramienta, le recomendamos que vea algunos de los vídeos que le mostramos a continuación.
- How to set up an account and survey installation
- Question type - Array
- Assessments
- Placeholder fields
- Radio list
- Copy/import survey
- Import question
Necesita una introducción rápida de LimeSurvey¡
For a quick text introduction to LimeSurvey, check the following two links:
Diseño de las encuestas.
How can I remove index.php from the URL path to get a shorter URL
If you want to use fancy URLs (not have /index.php in every URL), please edit /application/config/config.php and change
'showScriptName' => true,
to
'showScriptName' => false,
For this to work properly, you must use an Apache webserver with a properly installed mod_rewrite module.
If you are using the Nginx http server (with php running via FastCGI) and want to use the 'urlFormat' => 'path' setting (see config.php), consider the following Nginx website configuration:
server {
    set $host_path "/PATH/TO/LIMESURVEY";
    server_name  YOUR.SERVER.FQDN;
    root /PATH/TO/LIMESURVEY;
    charset utf-8;
    try_files $uri $uri/ /index.php?r=$uri&$args;
    #Disallow reading inside php script directory, see issue with debug > 1 on note
    location ~ ^/(application|protected|framework|themes/\w+/views) {
        deny  all;
    }
    #Disallow direct read user upload files
    location ~ ^/upload/surveys/.*/fu_[a-z0-9]*$ {
        return 444;
    }
    #Disallow uploaded potential executable files in upload directory
    location ~* /upload/.*\.(pl|cgi|py|pyc|pyo|phtml|sh|lua|php|php3|php4|php5|php6|pcgi|pcgi3|pcgi4|pcgi5|pcgi6|icn)$ {
        return 444;
    }
    #avoid processing of calls to unexisting static files by yii
    location ~ \.(js|css|png|jpg|gif|swf|ico|pdf|mov|fla|zip|rar)$ {
        try_files $uri =404;
    }
    location ~ \.php$ {
        fastcgi_split_path_info  ^(.+\.php)(.*)$;
        try_files $uri index.php;
        fastcgi_pass   127.0.0.1:9000; # Change this to match your settings
        fastcgi_index index.php;
        include fastcgi_params;
        fastcgi_param  SCRIPT_FILENAME  $document_root$fastcgi_script_name;
        fastcgi_param  SCRIPT_NAME      $fastcgi_script_name;
    }
}
'use_asset_manager' => 1, in your config file (or remove application from the directory list).The end result should look like this:

¿Cómo puedo ocultar el asterisco de color rojo (*) que indica que una pregunta es obligatoria?
Instructions for LimeSurvey 2
Desde la versión 1.80 en adelente de LimeSurvey el asterisco rojo indica que las preguntas obligatorias se encuentra definido dentro del archivo template.css, en la clase ("asterisk" ). Para ocultarlo siga los siguientes pasos:
- Abra el editor de plantillas.
- Cree una copia de la plantilla que desea modificar.
- Seleccione el archivo "template.css" y busque la clase asterisk.
- Añada la siguiente línea al final de la clase asterik ".asterisk {display: none;}".
- Guarde el archivo template.css
- Vacie la memoria caché de su navegator para que abra el archivo template.css que ha editor y no el que se encuentra almacenado dentro de la cache.
Instructions for LimeSurvey 3
The instructions are similar to the ones presented above for LimeSurvey 2.
- Access the desired theme. If it is a default theme, create a copy of it by clicking on the "extend" button.
- Access the list of themes and click on the theme editor that corresponds to the newly created theme.
- On the left side, you can visualise the corresponding CSS files of your theme.
- Click on custom.css and add the following line:
.asterisk {display: none;}
- Save the changes. The red asterisk that is usually displayed at the beginning of the question text is hidden.
¿Cómo puedo empotrar un archivo de vídeo flash?
Vaya a la Global settings y desactive la opción XSS-filter. Por favor, lea tambien las impLicaciones que conlleva desactivar el filtro XSS. Los siguiente pasos no funcionarán si este filtro está activo.
- Diríjase al lugar de su encuesta donde quiere insertar el archivo Flash. Este lugar puede ser cualquier parte donde puedas utilizar el editor HTML integrado, por ejemplo en las preguntas, sub preguntas, respuestas, texto de Bienvenida y mucho más.
- Abre el editor a pantalla completa haciendo clic en el botón 'LimeFitWin' situado en la barra de herramientas del editor.
- En la barra de tareas del editor a pantalla completa encontrará un pequeño botón con el logo de Flash. Haga clic sobre el. LimeSurvey le mostrará un cuadro de diálogo.
- En este cuadro de dialogo puede indicar la ruta a un archivo Flash ó hacer clic sobre el botón 'Explorar servidor'.
- Si ha hecho clic sobre el 'Explorar servidor' se mostrará el explorador de ficheros y campo para seleccionar y subir un archivo. Ahora puede seleccionar un archivo o subir primeramente uno al servidor.
¡Esto es todo! Si encuentra que esta descripción se encuentra incompleta, por favor, no dude en actualizarla.
¿Cómo puedo crear una encuesta que sea abierta para todo el mundo?
To create a survey that can be filled out by anyone, do not create a survey participants table! Share the survey link located on the overview panel.
Public registration - mandatory fields
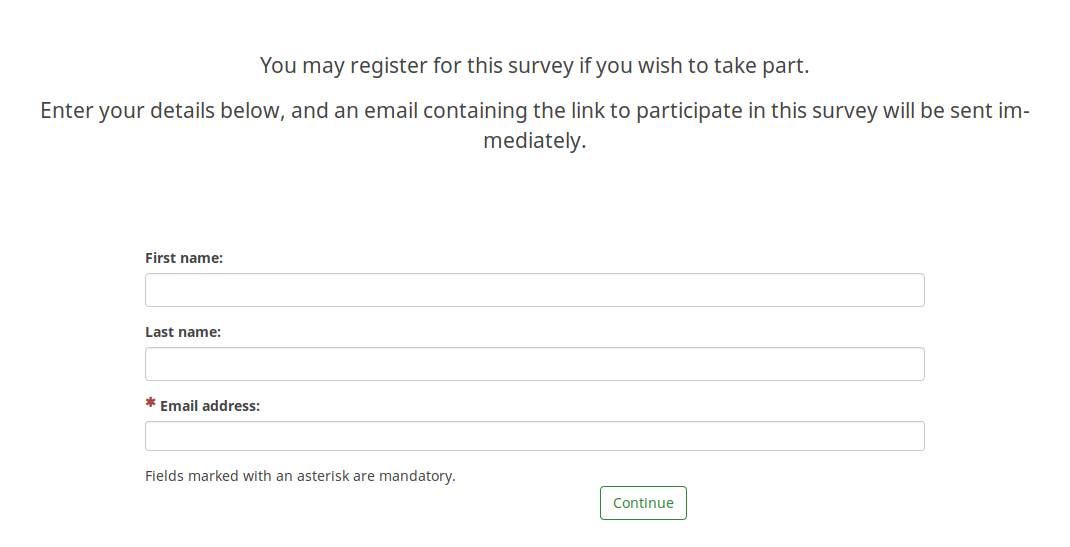
If you use a survey participants table and you also allow public registration, then users will be prompted by the following message:

As it can be observed above, only the email field is mandatory.
To have all three fields marked as being mandatory, please edit your survey theme accordingly. If you use Fruity, you have to go to the registration screen and see how the participants email field looks like:
        {# Participants email #}
        <div class='{{ aSurveyInfo.class.registerformcolrowc }} form-group row' {{ aSurveyInfo.attr.registerformcolrowc }}>
            <label {{ aSurveyInfo.attr.registerformcolrowclabel }} class='{{ aSurveyInfo.class.registerformcolrowclabel }}  control-label'> {{ gT("Email address:") }} {{ include('./subviews/registration/required.twig') }}</label>
            <div {{ aSurveyInfo.attr.registerformcolrowcdiv }}  >
                {{ C.Html.textField('register_email', aSurveyInfo.sEmail, ({'id' : 'register_email','class' : 'form-control input-sm','required' : true})) }}
            </div>
        </div>
After that, make sure to edit the first name and last name fields correspondingly by adding the label:
{{ include('./subviews/registration/required.twig') }}
and this line which makes the field mandatory to be filled out:
'required' : true
The edited file should look like this:
        {# Participants first name #}
        <div class='{{ aSurveyInfo.class.registerformcolrow }} form-group row' {{ aSurveyInfo.attr.registerformcolrow }}>
            <label for='register_firstname' class='{{ aSurveyInfo.class.registerformcolrowlabel }} control-label '>{{ gT("First name:") }} {{ include('./subviews/registration/required.twig') }}</label> {# extra label #}
            <div class="">
                {{ C.Html.textField('register_firstname', aSurveyInfo.sFirstName, ({'id' : 'register_firstname','class' : 'form-control', 'required' : true})) }} {# mandatory field #}
            </div>
        </div>

        {# Participants last name #}
        <div class='{{ aSurveyInfo.class.registerformcolrowb }} form-group row' {{ aSurveyInfo.attr.registerformcolrowb }}>
            <label {{ aSurveyInfo.attr.registerformcolrowblabel }}  class='{{ aSurveyInfo.class.registerformcolrowblabel }} control-label '>{{ gT("Last name:") }} {{ include('./subviews/registration/required.twig') }}</label> {# extra label #}
            <div {{ aSurveyInfo.attr.registerformcolrowbdiv }} >
                {{ C.Html.textField('register_lastname', aSurveyInfo.sLastName, ({'id' : 'register_lastname', 'class' : 'form-control', 'required' : true})) }} {# mandatory field #}
            </div>
        </div>
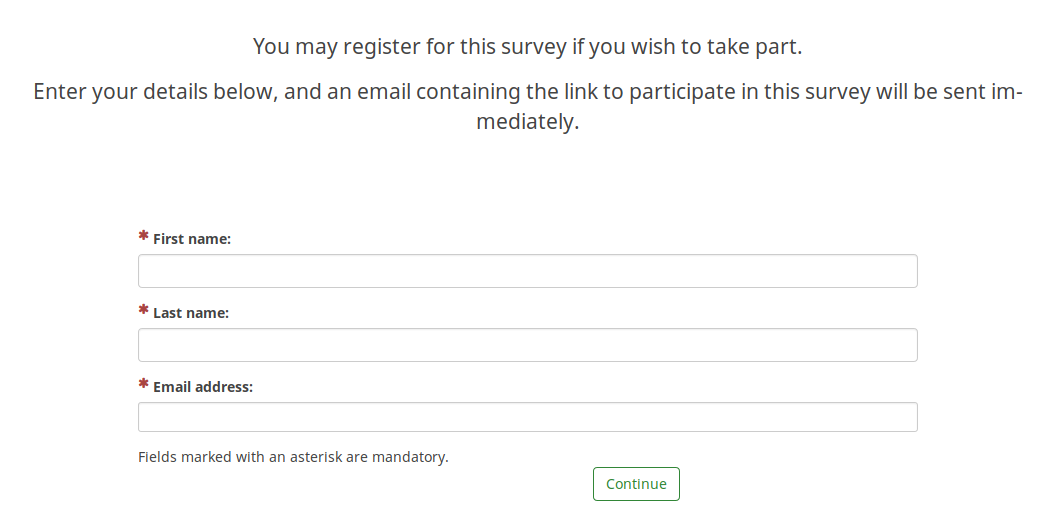
Now, the public registration page should look like this (all the fields being mandatory):

Hiding the language switcher
The steps to hide both the language switchers (near the survey title and on the top-right side of the page) are described in our wiki section dedicated to multilingual surveys.
Hiding "Exit and clear survey"
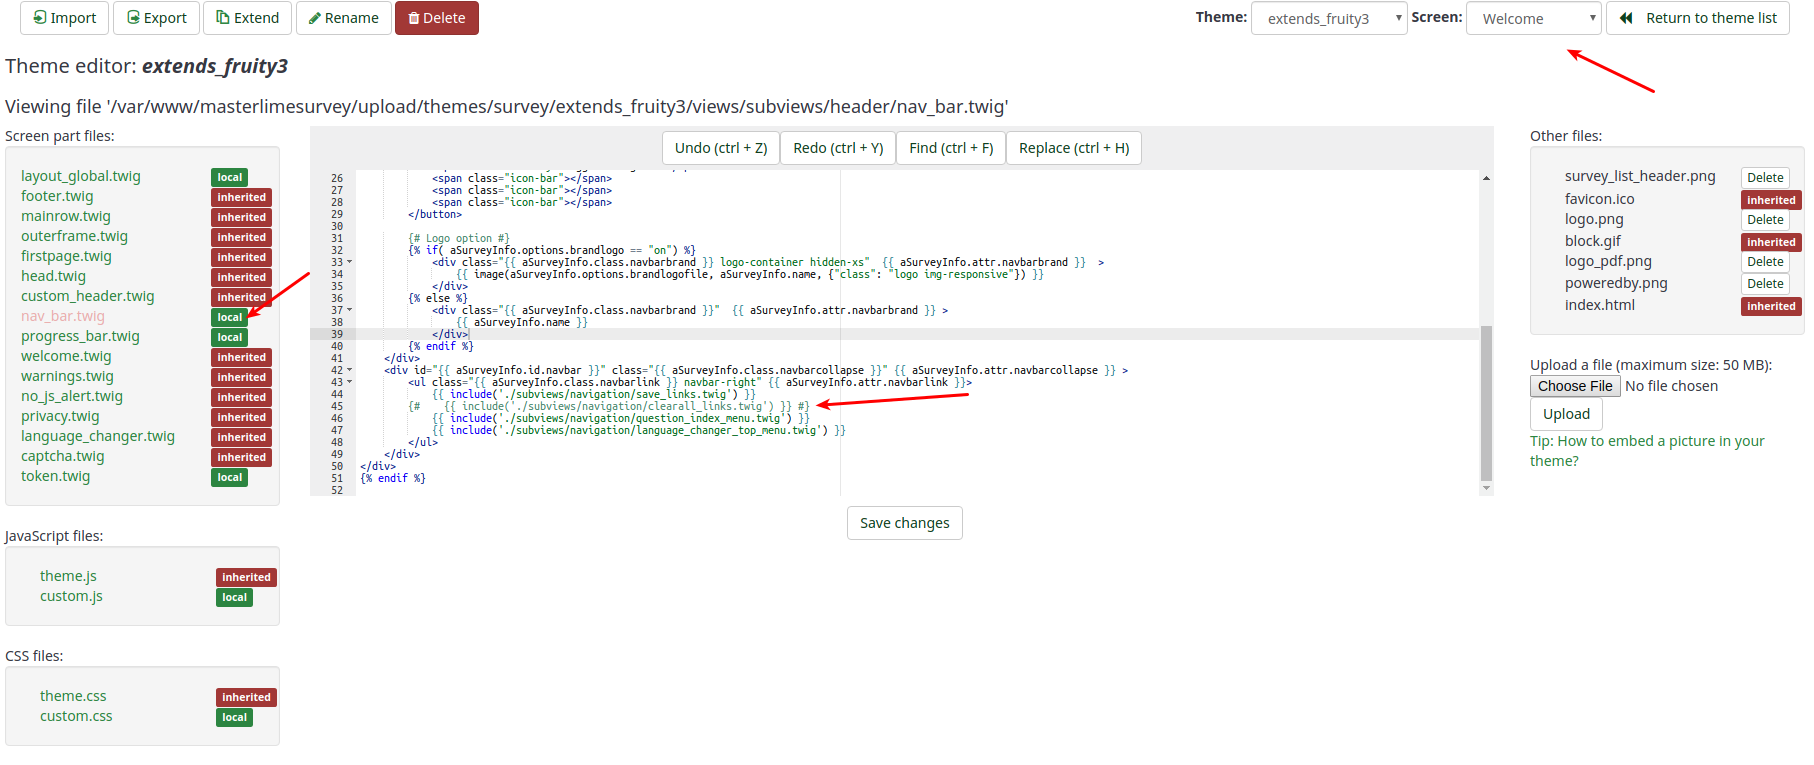
In case you wish to hide the button "Exit and clear survey", you have to edit the nav_bar.twig file located inside your survey theme.

The line that needs to be removed (or commented out) is:
{{ include('./subviews/navigation/clearall_links.twig') }}

Now, there is no option to exit and clear the survey.

¡Ayuda!, Accidentalmente...
He olvidado mi contraseña de administración. ¿Cómo puedo restablecerla de nuevo?
- Unicamente para las versiones de la 1.47 a 1.53: Descargue este archivo y cópielo a su carpeta de instalación de LimeSurvey, concretamente en siguiente ruta /<your limesurveydir>/admin/install/ .
- Para las versiones desde la 1.7 en adelante: Restaure el directorio /<your limesurveydir>/admin/install/ utilizando el paquete que ha descargado para realizar la instalación.
- Ejecute resetadminpw.php utilizando su navegador con la siguiente URL
http://www.your_domain.com/your_limesurvey_dir/admin/install/resetadminpw.php
- Una vez elimine el directorio /install debería poder iniciar una sesión de nuevo con los siguientes datos $defaultuser (Default: admin) y $defaultpass (Default: password) configurados dentro del archivo config.php.
Version 2.x
- Access to your server with a command line (ssh for example)
- Ensure you have php command line access (see http://php.net/features.commandline.php).
- Go to your LimeSurvey directory
- Launch this command
php application/commands/starter.php resetpassword NEW_ADMIN_NAME NEW_ADMIN_PASSorphp application/commands/console.php resetpassword NEW_ADMIN_NAME NEW_ADMIN_PASSThe php can need complete directory access, example /usr/bin/php
Version 2.x.x and newer with only FTP access
Directly change the password in the database
If you have direct access to the Limesurvey database you can change the old password there by uploading the new password as SHA256 hash. You can create the SHA256 hash of your password here.
For example, you can use this instruction to set password to password:
UPDATE lime_users SET password = 0x35653838343839386461323830343731353164306535366638646336323932373733363033643064366161626264643632613131656637323164313534326438 WHERE uid =1;
Here with prefix to lime_ and database selected.
¿Cómo puedo restaurar datos de una encuesta desactivada?
El equipo de LimSurvey siempre utiliza la opción time-out, en vez de desactivar la encuesta. Si accidentalmente ha cerrado su encuesta es importante que no cambie nada en su encuesta.
Entonces, y sólo entonces los siguientes pasos le ayudarán a recuperar la encuesta:
- Active su encuesta de nuevo.
- Diríjase al menú "Explorar las respuestas de esta encuesta".
- Haga clic en el botón "Importar respuestas desde una tabla de una encuesta desactivada" button.
- Selecciona la tabla de origen.
- Haga clic en el botón "Importar respuestas".
He borrado una pregunta/grupo de preguntas/encuesta!
¡Vaya! Eso si que es mala suerte. Si ha eliminado, realmente, ha perdido los datos. En este caso,es posible que una copia de seguridad le ayudé (cosa que por supuesto hace con regularidad, ¿no?)..
Requisitos de Hardware y Software.
Para requisitos ver los requisitos puede ver la siguiente información, instrucciones de instalación.
¿Qué limitaciones tiene LimSurvey?...
...en relación a la velocidad.
No hay ninguna limitación con la velocidad de LimeSurvey. Todo depende como rápido que sea su servidor y su conexión a Internet. Si está teniendo problemas con un gran número de usuarios en un espacio de tiempo corto y no sabe si su servidor esta preparado para manejar esta situación puede comprobar este hilo en el cual los usuarios comparten sus experiencias en relación a este problema.
...en relación al tamaño de las encuestas.
Nota: 'Tamaño de las encuestas' se refiere al número máximo de preguntas y respuestas de su encuesta - No confunda esto con el número de respuestas en su encuesta (no hay un límite en el número).
En teoría no habría ningún límite en el número máximo de preguntas y respuestas en LimeSurvey, pero el motor de base de datos que está utilizando puede que tenga algunos límites.
El más importante es el límite en el numero de campos (columnas) que se pueden crear en la tabla de resultados.
- MySQL ISAM: La suma de las longitudes de las columnas de tipo VARCHAR y CHAR en una tabla puede llegar hasta 64KB.
- MySQL InnoDB: El número máximo de columnas es 1000.
- MS SQL Server 2000: El número máximo de columnas es 1024.
- Postgres: El número máximo de columnas está entre 250-1600 dependiendo del tipo de columna. El número máximo de columnas puede cuadruplicarse si aumenta el tamaño de bloque por defecto a 32k. Vea el Installation FAQ y el PostgreSQL FAQ.
El motor mySQL ISAM es el más complicado. Solo le permite un máximo de 65,535 bytes por fila y los caracteres utf8 pueden necesitar hasta tres bytes por carácter con lo que el máximo puede ser solo de 21,844 caracteres (aunque esto depende en completamente de la codificación que utilice en su base de datos).
Puede hacerse una idea del tamaño de la encuesta calculándolo de la siguiente manera:
- Todas las preguntas numéricas múltiples: 20 caracteres por cada respuesta.
- Todas las preguntas de selección múltiple y las respuestas a un array de preguntas: 5 caracteres por cada respuesta.
- Cualquier otro tipo de pregunta: 5 caracteres.
- Para evitar problemas incremente un 10% el resultado obtenido.
¿Cómo incrementar el número máximo de columnas en PostgreSQL?.
En caso de que su encuesta contenga demasiadas preguntas, puede definir un tamaño de bloques diferente en PostgreSQL, con lo cual será posible crear más columnas. Es posible que esto sea más complicado porque debe compilar PostgreSQL y establecer BLCKSZ a un valor superior, como 16kiB o 32kiB. Para ello busque la opción de configuración "--with-blocksize=BLOCKSIZE". Para más detalles sobre este problema, puede ver los archivos de la lista de correo de PostgreSQL o preguntar en la siguiente dirección de correo electrónico(pgsql-patches(at)postgresql(dot)org).
Instrucciones para Debian (Gracias a Martin Pitt):
sudo apt-get build-dep postgresql-8.3
apt-get source postgresql-8.3
cd postgresql-8.3-*
debian/rules patch
sensible-editor build-tree/postgresql-8.3.5/src/include/pg_config_manual.h
dpkg-buildpackage -us -uc -b -nc
Note: the above could not be reproduced on Ubuntu 14.04 in August 2014. A patch is required (the configuration option is not enough). See (tested with PostgreSQL 9.3 on Linux): Instructions for increasing the maximum number of columns in PostgreSQL on Linux
Fatal error: Allowed memory size
Depending on your server configuration you might run into memory problems being reported by an error like "Fatal error: Allowed memory size of 8388608 bytes exhausted (tried to allocate 233472 bytes) in /path/to/htdocs/limesurvey/filename.php on line 7296".
You can try to raise the limit by adding an optional setting to LimeSurvey's config file.
Please bear in mind that changes in the default settings of an application can always be overruled by global server settings. To increase the memory limit of your sever to 128M:
- memory_limit = 128M to your server's main php.ini file (recommended, if you have access)
- memory_limit = 128M to a php.ini file in the LimeSurvey root
- php_value memory_limit 32M in a .htaccess file located in the LimeSurvey root folder
- " ini_set('memory_limit', '128M'); " in your config.php
Specific configuration
Under certain circumstances, you need to update the LimeSurvey configuration in application/config/config.php
IE 11 and Windows 7 / Windows 8
There is a known issue with the session with IE 11, that leads to users not being able to finish a survey.
It is solved by giving the session a unique name.
This is done by adding this to the config file.
       // Set the name of the session
        'session' => array (
            'sessionName' => "YOURUNIQUESESSIONNAME",
        ),
Two LimeSurvey instances on same domain
If you run 2 LimeSurvey instances on the same domain, but within different directories, you need to update the session configuration.
For example, if you have example.org/ls1 and example.org/ls2, update the ls1 config file:
        'session' => array (
            'cookieParams' => array(
                    'path' => '/ls1',
                ),
            ),
        'request' => array(
            'csrfCookie' => array( 'path' => '/ls1' )
        ),