Email bounce tracking system/nl: Difference between revisions
From LimeSurvey Manual
(Created page with "Zoek naar de imap sectie, het ziet er ongeveer als volgt uit:") |
(Created page with "Als er geen php5-imap geïnstalleerd is, en je mag ook niet naar de root van de server, dan kun je via de voor jouw geldende procedures proberen te installeren. In geval van: ...") |
||
| Line 14: | Line 14: | ||
[[File:phpinfo_imap.png]] | [[File:phpinfo_imap.png]] | ||
Als er geen php5-imap geïnstalleerd is, en je mag ook niet naar de root van de server, dan kun je via de voor jouw geldende procedures proberen te installeren. In geval van: http://www.electrictoolbox.com/install-php-imap-debian/ . Je moet dan wel je webserver opnieuw starten, bijvoorbeeld met "apache/usr/sbin/apache2ctl restart" | |||
=How it works= | =How it works= | ||
Revision as of 14:51, 20 June 2013
Inleiding
Het systeem voor het controleren van niet afgeleverde e-mail (beschikbaar vanaf versie v1.91) ziet welke e-mails niet bij de ontvangers/deelnemers afgeleverd zijn. Dit gaat via de "mail delivery notification failure report" en daarbij wordt het e-mailadres van de beheerder, dat gebruikt wordt om e-mails te verzenden, gebruikt of het speciale account dat alleen voor deze bounces gebruikt wordt. Ook de credentials en de connectie details van dit account worden gebruikt.
Vereisten
De php5-imap module moet op de server zijn geïnstalleerd. Dit kun je controleren, door te kijken in PHPInfo, dat je via LimeSurvey kunt bekijken op de Instellingen.
Zoek naar de imap sectie, het ziet er ongeveer als volgt uit:
Als er geen php5-imap geïnstalleerd is, en je mag ook niet naar de root van de server, dan kun je via de voor jouw geldende procedures proberen te installeren. In geval van: http://www.electrictoolbox.com/install-php-imap-debian/ . Je moet dan wel je webserver opnieuw starten, bijvoorbeeld met "apache/usr/sbin/apache2ctl restart"
How it works
The basic idea behind the development of the system was to reduce the manual work and reducing human errors in the way.
The basic working of this system is that when sending the mail, the mail bounce tracking system automatically adds an survey-id and token-id to the mail header without administrator notice.
These headers, also known as custom headers, are added to each invitation email that LimeSurvey sends to the participants.
When the mail is bounced back, the original header along with the Delievery notification header is received. The system then checks for new mails and parses the mails that have these custom headers and mark the wrong e-Mail id in the red font color in the tokens table.
Setting up the system
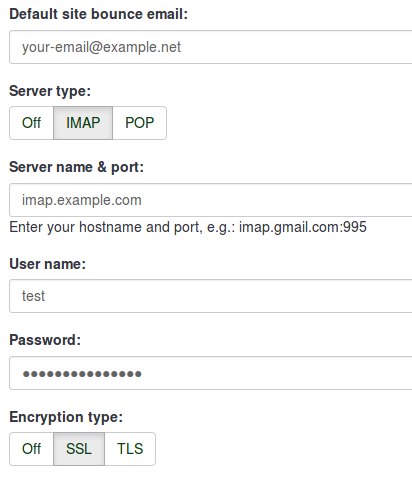
The system is capable of working at the global level or survey level, thus the settings can be saved accordingly. The global settings can be saved under Global Settings -> Bounce Settings.
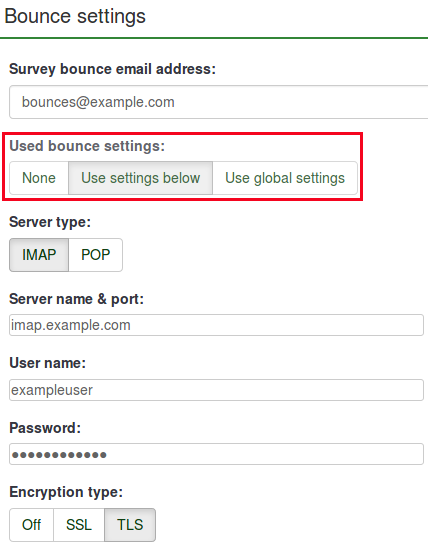
The local settings can be entered under the token management of that particular survey.
As you can see in the screenshot above the setting to be used in that particular survey is to be selected. Avilable options are
- No settings to be used
- Use settings below (survey-specific)
- Use global settings
Once the settings have been set you can start the bounce processing by clicking on the bounce processing icon in the Token browser toolbar as shown below.
After clicking the icon you will be presented with a popup which shows a progress meter.
Wait for it to complete. Once complete the result of the scan will be shown and after a refresh of the browse responses page (you might have to do that manually) all the entries whose invitation are bounced their e-mail address are marked in red font. Also their "Email status" is chanced from "OK" to "bounced".


