Vtičniki - napredno
From LimeSurvey Manual
Pregled
Od LimeSurvey 2.05 bo LimeSurvey uradno podpiral vtičnike. Nekatere vtičnike bo podprla ekipa LimeSurvey in bodo vključeni v jedro. Nekatere bodo podprli drugi zunaj ekipe LimeSurvey. Da jih boste lažje našli, si oglejte Razpoložljivi vtičniki tretjih oseb in jim dodajte svoj vtičnik!
Vtičniki omogočajo uporabnikom, da prilagodijo funkcionalnost svoje namestitve, medtem ko lahko še vedno izkoristijo redne posodobitve programske opreme.
Ta dokumentacija je namenjena razvijalcem, ki razširjajo LimeSurvey za lastno uporabo ali za svoje stranke; končnim uporabnikom ta dokumentacija ne bo v pomoč.
Vtičniki morajo izvajati vmesnik iPlugin. Priporočamo, da svoj razred vtičnika razširite iz razreda PluginBase.
Vtičniki so razviti na podlagi mehanizma event.
Nastavitve vtičnika
Z razširitvijo izkoristite skupno funkcionalnost, ki jo zahtevajo vtičniki, ki smo jih že implementirali za vas. Ena od teh funkcij je implementacija funkcije getPluginSettings. Ta funkcija mora vrniti matriko, ki opisuje konfiguracijske možnosti za uporabnika.
Primer vtičnika razkriva samo eno nastavljivo nastavitev, sporočilo, ki ga bo prikazal.
protected $settings = array(
 'logo' => array(
 'type' => 'logo',
 'path' => 'assets/logo.png'
 ) ,

'message' => array(
 'type' => 'string',
 'label' => 'Message'
 )
);
Matrika vsebuje ime za vsako nastavitev kot ključ. Vrednosti so nizi, ki vsebujejo zahtevane meta podatke.
Podprte vrste so:
- logotip
- int (celo število)
- niz (alfanumerično)
- besedilo
- html
- ustreznost
- info
- geslo
- datum
- izberite
Poleg vrste so na voljo številni drugi ključi:
- label, definira oznako
- privzeto, definira vrednost, ki se prikaže, če ni navedena nobena vrednost (samo za globalne nastavitve, ne za nastavitve ankete)
- current, definira trenutno vrednost.
- readOnly : prikazane nastavitve kot readonly
- htmlOptions, htmlOptions vhodnega dela (glejte priročnik Yii [[1]])
- pluginOptions, za nekatere nastavitve (html ali izberite) : nastavite možnost pripomočka
- labelOptions : htmlMožnosti oznake
- controlOptions : htmlMožnosti ovoja oznake in vnosa
Primer vtičnika z vsemi dejanskimi nastavitvami najdete na exampleSettings
Branje in pisanje nastavitev vtičnika
Možno je brati in pisati nastavitve vtičnika neposredno iz vaše kode vtičnika.
primer:
$mySetting = $this->get('mySetting');
$this->set('mySetting', $mySetting + 1);
Če je nastavitev ničelna, lahko dobite privzeto vrednost:
$mySetting = $this->get('mySetting', null, null, 10); // 10 je privzeto
Dogodki
Vtičniki se naročijo na dogodke in lahko komunicirajo z LimeSurvey, ko se dogodek sproži. Za seznam trenutno razpoložljivih dogodkov preverite Dogodki vtičnikov.
API
Vtičniki naj razširijo LimeSurvey samo prek njegovega "javnega" API-ja. To pomeni, da je neposredna uporaba razredov, najdenih v izvorni kodi, slaba praksa. Čeprav vas ne moremo prisiliti, da tega ne storite, tvegate, da boste imeli pokvarjen vtičnik z vsako našo manjšo posodobitvijo.
Kolikor je mogoče, komunicirajte z LimeSurvey samo prek metod, opisanih tukaj. Enako kot za dogodke.
Objekt API je na voljo prek $this->api pri razširitvi iz PluginBase, sicer pa ga lahko dobite iz instance PluginManager, ki je posredovana konstruktorju vaših vtičnikov.
Objektu API se na zahtevo lahko dodajo nove funkcije.
Razširitev obrazca (New in 6 )
Uvod
Sistem za razširitev obrazcev je bolj splošen način za razširitev obrazcev v jedru LimeSurvey brez dodajanja novega dogodka za vsak obrazec.
Sestavljen je iz naslednjih komponent:
- Globalni modul, imenovan FormExtensionService
- Knjižnica vhodnih razredov, ki jih vtičniki lahko dodajo zgornji inicializaciji modula
- widget, skupaj z upodabljalniki po meri, ki se uporabljajo v datotekah pogleda LimeSurvey
Vsaka oblika je označena z pozicijskim nizom, npr<form name><dot><tab name> . Primer: globalsettings.general ali globalsettings.security .
Bistvo sistema, ki temelji na razredu, brez HTML-ja, je, da avtorje vtičnika osvobodi, da posodobijo HTML, ko se spremeni osnovni HTML. Kljub temu lahko avtor po potrebi uporabi vrsto RawHtmlInput .
Ena stvar, ki je v tem sistemu ne morete narediti, je dodajanje novih zavihkov obrazca.
Primer
Če želite v obrazec dodati nov vnos iz vtičnika, uporabite naslednjo kodo iz vaše funkcije init() :
OPRAVILO: Shranite v nastavitvah vtičnika namesto globalno
// Na vrhu datoteke
use LimeSurvey\Libraries\FormExtension\Inputs\TextInput;
use LimeSurvey\Libraries\FormExtension\SaveFailedException;

// Znotraj init()
Yii::app()->formExtensionService->add(
 'globalsettings.general',
 new TextInput([
 'name' => 'myinput',
 'label' => 'Oznaka',
 'disabled' => res,
 'tooltip' => 'Moo moo moo',
 'help' => 'Nekaj besedila pomoči',
 'save' => function($request, $connection) {
 $value = $request->getPost('myinput');
 if ($value === 'nekatera neveljavna vrednost') {
 throw new SaveFailedException("Ni bilo mogoče shraniti vnosa po meri 'myinput'");
 } else {
 SettingGlobal::setSetting('myinput', $value);
 }
 } ,
 'load' => function () {
 return getGlobalSetting('myinput');
 }
 ])
);
Validacija
Preverjanje vnosa se izvede v funkciji save (glejte primer zgoraj). Če je objavljena vrednost neveljavna, vrzite SaveFailedException in uporabniku bo prikazano opozorilno hitro sporočilo.
Podprti obrazci
Naslednje obrazce je mogoče razširiti:
- globalsettings.general (New in 6.0.0 )
Če želite dodati podporo za drug osnovni obrazec, morate uporabiti naslednjo spremembo v zahtevi za vlečenje:
V datoteko pogleda dodajte:
 <?php
use LimeSurvey\Libraries\FormExtension\FormExtensionWidget;
use LimeSurvey\Libraries\FormExtension\Inputs\DefaultBaseRenderer;
?>
... več HTML
<?= FormExtensionWidget::render(
    App()-> formExtensionService->getAll('globalsettings.security'),
 nov DefaultBaseRenderer()
); ?>
Morda boste morali ustvariti nov razred upodabljalnika, ki temelji na DefaultBaseRenderer , če se obrazec HTML razlikuje od drugih obrazcev. Morda boste morali tudi razširiti privzeti razred upodabljalnika z vrstami vnosa, ki še niso dodani.
Druga sprememba, ki jo morate narediti, je dodati klic storitvenemu razredu razširitve obrazca v dejanju krmilnika, ki shrani obrazec:
$request = App()->request;
Yii::app()->formExtensionService->applySave('globalsettings', $request);
To je to!
Lokalizacija (New in 3 )
Vtičniki lahko dodajo lastne področne datoteke. Uporabljena oblika datoteke je .mo, enaka kot pri prevodih jedra. Datoteke morajo biti shranjene v
<plugin root folder>/lokacija/<language> /<language> .mo
kje "<language> " je beseda iz dveh črk, kot je "de" ali "fr".
Če želite uporabiti določeno področno datoteko, uporabite funkcijo vtičnika gT:
$this->gT("Besedilo vtičnika, ki ga je treba prevesti");
Če danega niza ni mogoče najti v področni datoteki, specifični za vtičnik, bo funkcija iskala v osnovnih področnih datotekah. Zato je varno uporabljati nize, kot je "Prekliči":
$to->gT("Prekliči"); // Bo prevedeno, tudi če "Cancel" ni v datoteki področne nastavitve vtičnika
Če uporabljate poglede skupaj s svojim vtičnikom, uporabite
$plugin->gT("Prevedi me");
to do plugin specific translation in your view.
You can use the limesurvey.pot file as an example of how a pot file can look like. This is imported into your translation tool.
Tools
One open-source tool to edit po- and mo-files is Poedit.
Logging (New in 3 )
If you want to log something from your plugin, just write
$this->log("Your message");
The default logging level is trace, but you can give another log level as an optional second argument:
$this->log("Something went wrong!", CLogger::LEVEL_ERROR);
The log file can be found in folder
<limesurvey root folder>/tmp/runtime/plugin.log
Your plugin name is automatically used as category. A nice way to see only the errors from your plugin is using grep (on Linux):
$ tail -f tmp/runtime/plugin.log | grep <your plugin name>
More info about configuring logging in Yii 1: Optional_settings#Logging_settings.
Extension updates (New in 4 )
Since LimeSurvey version 4.0.0, there's a system in place to deal with plugin and other extension updates. To use this system, your extension config.xml file needs to include updater configuration.
<updaters>
    <updater>
        <stable>1</stable>
        <type>rest</type>
        <source>https://comfortupdate.limesurvey.org/index.php?r=limestorerest</source>
        <manualUpdateUrl>https://somedownloadlink.com/maybegithub</manualUpdateUrl>
    </updater>
</updaters>
(The source tag above points to the LimeStore REST API, which will be used for all extensions available in our LimeStore.)
| Tag | Description |
|---|---|
| stable | "1" if this source only gives you stable version numbers; "0" if the source will also provide unstable versions, like 0.3.3-beta.
|
| type | For now, only type rest is supported. It's easy to add new updater types (version checkers), like git, wget, etc.
|
| source | The URL to fetch new versions from. |
| manualUpdateUrl | URL which the user can go to to update the latest version of the extension. |
| automaticUpdateUrl | TODO |
If you don't want to supply an updater, you should put the following text in your config XML file:
<updaters disabled="disabled">
</updaters>
This way, you tell the system that you purposefully disabled the update system, and didn't just forget to add it.
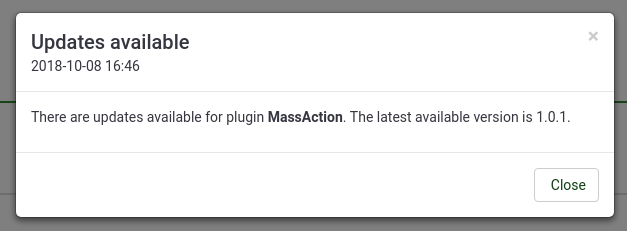
The new plugin UpdateCheck - installed and activated by default - checks for new updates for all installed extensions when a super admin logs in, asynchronously, max one time every 24 hours. If any new versions are found, a notification is pushed.
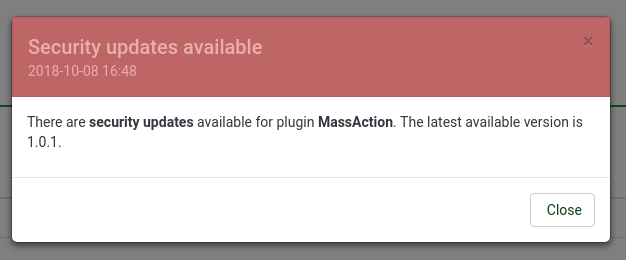
If a new security update is found, the notification will open automatically and be styled in "danger" class.
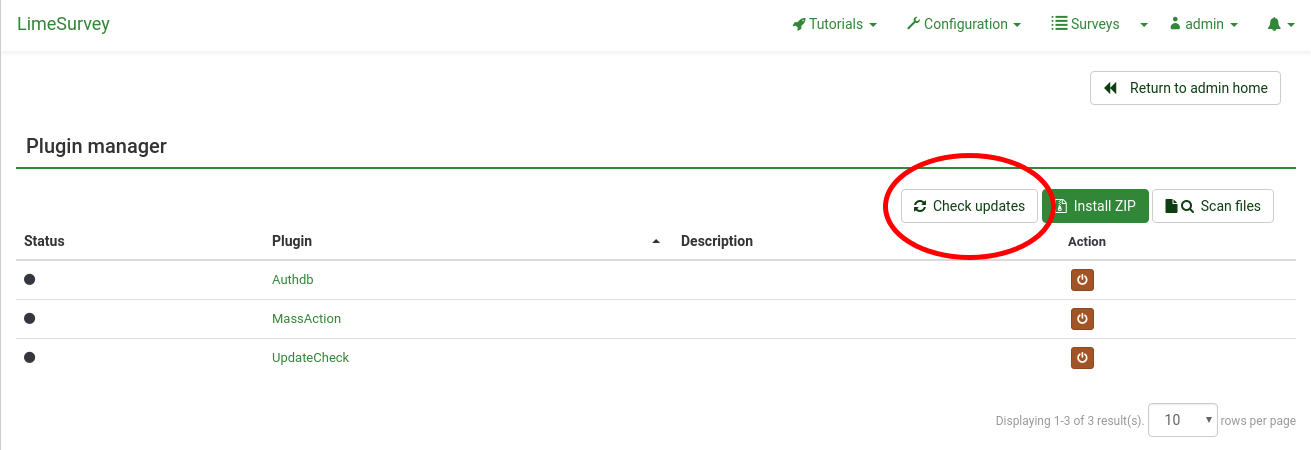
You can manually check for updates by going to the plugin manager view and click on "Check updates". Note that this button is only visible if the UpdateCheck plugin is activated.
Under the hood
This section provides a brief overview over the extension updater implementation.
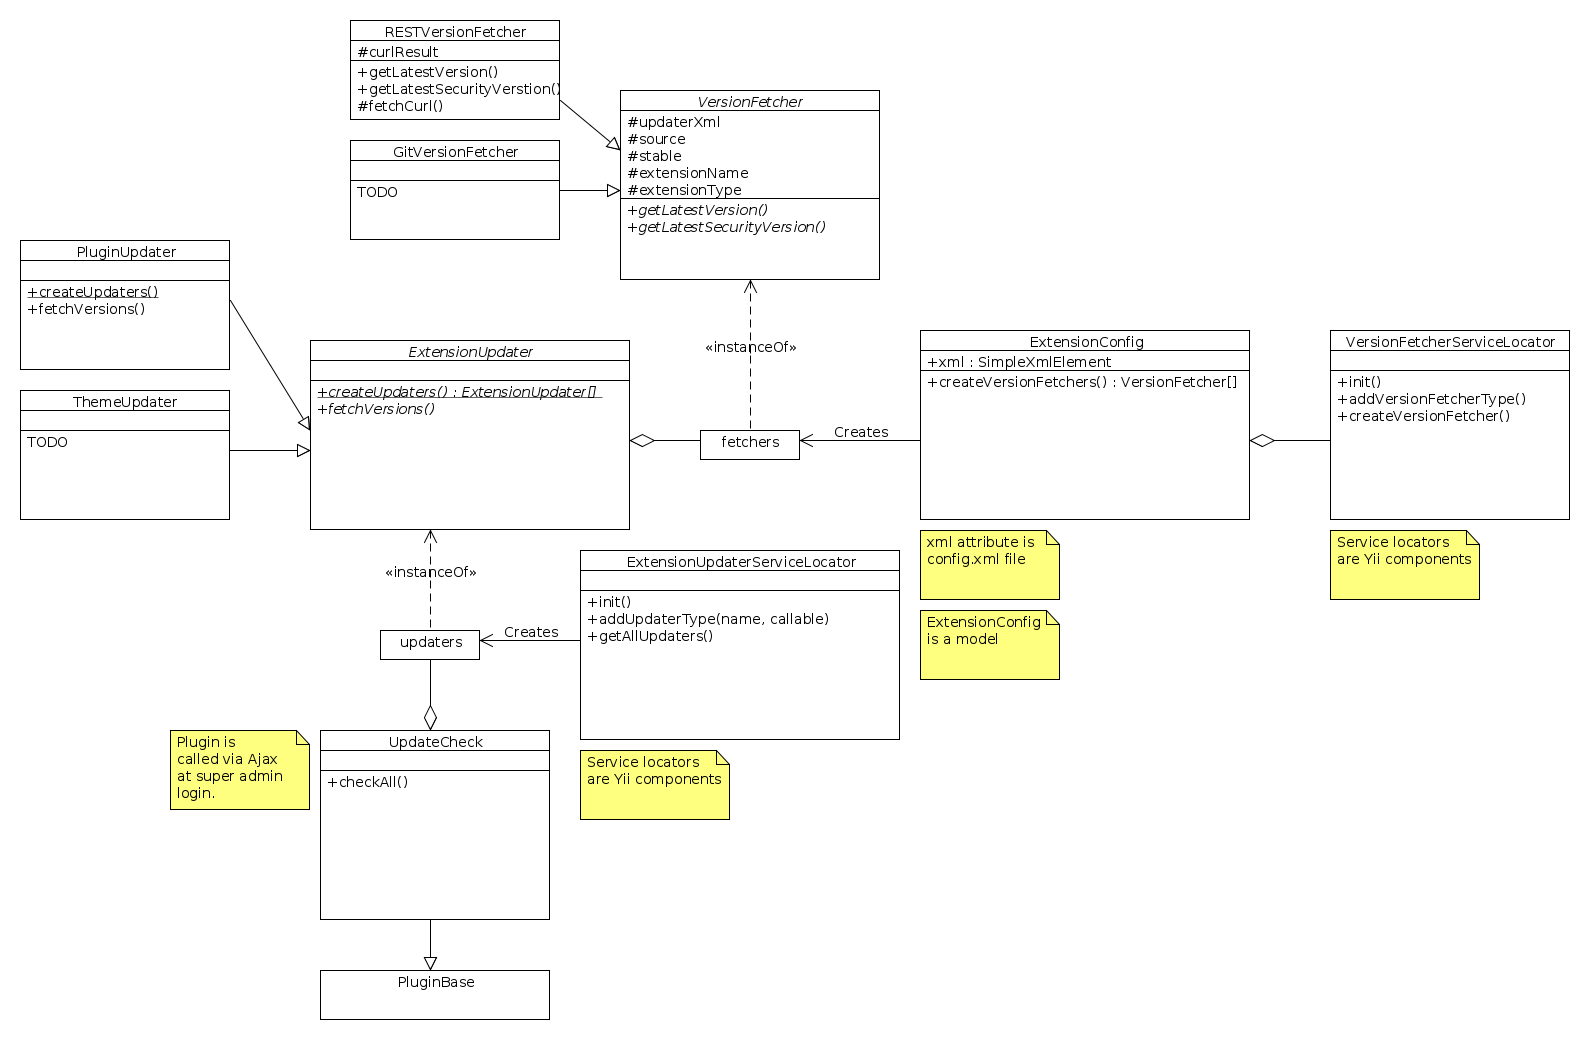
The extension updater is part of the ExtensionInstaller library. Below is a UML diagram for the classes related to the updater process.
Program flow when Yii starts:
 Yii init
   VersionFetcherServiceLocator->init()
     Add REST version fetcher
   ExtensionUpdaterServiceLocator->init()
     Add PluginUpdater
     TODO: Add an updater for each extension type (theme, question template, ...)
Program flow when running the UpdaterCheck plugin:
 Get all updaters from ExtensionUpdaterServiceLocator
 Loop each updater
   For each updater, loop through version fetchers configured by <updater> XML
     For each version fetcher, contact remote source and get version information
 Compose all versions into a notification
The checkAll method in the UpdateCheck plugin provides an example of how to query all extensions for new versions.
Adding new version fetchers
To add a new custom version fetcher, run this during Yii initialization:
$service = \Yii::app()->versionFetcherServiceLocator
$service->addVersionFetcherType(
  'myNewVersionFetcherType',
  function (\SimpleXMLElement $updaterXml) {
    return new MyNewVersionFetcher($updaterXml);
  }
);
Of course, the class MyNewVersionFetcher has to subclass VersionFetcher.
To use your new version fetcher, configure the type tag in the updater XML to use
myNewVersionFetcherType (instead of e.g. rest).
Adding new extension updaters
To add a new custom extension updater, run this during Yii initialization:
$service = \Yii::app()->extensionUpdaterServiceLocator;
$service->addUpdaterType(
  'myNewExtensionUpdater',
  function () {
    return MyNewExtensionUpdater::createUpdaters();
  }
);
Class MyNewExtensionUpdater has to subclass ExtensionUpdater.
The top type tag in config.xml ('plugin', 'theme', ...) will control which extension updater are used for this extension. The system is not fully customizable yet, since you also need to add a custom ExtensionInstaller, menu items, etc. But in theory, and maybe in the future, it should be possible to add a new type of extension this way.
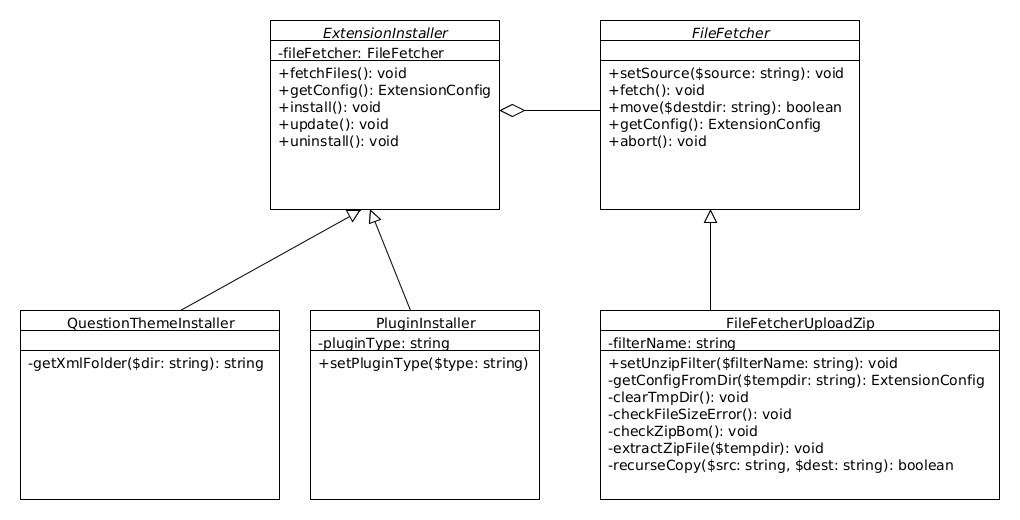
Extension installer
The extension installer library consists of two abstract classes:
- ExtensionInstaller
- FileFetcher
The ExtensionInstaller is subclassed for each extension type, like PluginInstaller, QuestionThemeInstaller, etc.
The FileFetcher is subclassed for each different way to fetch files. Currently, only uploaded zip files are supported, but in the future, there could be a Github or LimeStore fetcher too.
Special plugins
Available plugins
Tutorial
This step-by-step tutorial shows how to create a plugin that sends a post request on every survey response submission. The tutorial shows you how to create and save global and per-survey settings, how to register events and more.
