Plugins - advanced
From LimeSurvey Manual
Overview
Starting from LimeSurvey 2.05, LimeSurvey will officially support plugins. Some plugins will be supported by the LimeSurvey team and will go into core. Some will be supported by others outside the LimeSurvey team. To help find them, check out the Available third party plugins and add your own plugin to it!
Plugins allow users to customize the functionality of their installation while still being able to benefit from regular software updates.
This documentation is meant for developers that are extending LimeSurvey for their own use or for their clients; end users will not be helped by this documentation.
Plugins must implement the iPlugin interface. We recommend extending your plugin class from the PluginBase class.
Plugins are developed around an event mechanism.
Plugin settings
By extending you benefit from common functionality required by plugins that we already have implemented for you. One of these function is the implementation of the getPluginSettings function. This function must return an array describing the configuration options for the user.
The example plugin exposes just 1 configurable setting, the message it'll show.
protected $settings = array(
    'logo' => array(
          'type' => 'logo',
          'path' => 'assets/logo.png'
     ),

     'message' => array(
          'type' => 'string',
          'label' => 'Message'
     )
);
The array contains a name for each setting as a key. The values are arrays containing the required meta data.
Supported types are:
- logo
- int (integer number)
- string (alphanumeric)
- text
- html
- relevance
- info
- password
- date
- select
Besides type a number of other keys are available:
- label, defines a label
- default, defines a value to show if no value is specified (only for global settings, not for survey settings)
- current, defines the current value.
- readOnly : shown the settings as readonly
- htmlOptions, the htmlOptions of the input part ( see Yii manual [[1]])
- pluginOptions, for some settings (html or select) : set the widget option
- labelOptions : htmlOptions of the label
- controlOptions : htmlOptions of the wrapper of label and input
You can find a plugin example using all actual settings at exampleSettings
Read and write plugin settings
It's possible to read and write plugin settings directly from your plugin code.
Example:
$mySetting = $this->get('mySetting');
$this->set('mySetting', $mySetting + 1);
You can get a default value if the setting happens to be null:
$mySetting = $this->get('mySetting', null, null, 10); // 10 is default
Survey specific plugin settings
Two events are used to create survey specific plugin settings:
- newSurveySettings
- beforeSurveySettings
Example to disable a plugin for a specific survey:
    public function init()
    {
        $this->subscribe('beforeSurveySettings');
        $this->subscribe('newSurveySettings');
        // Other events...
    }

    public function beforeSurveySettings()
    {
	    $event = $this->event;
	    $surveyId = intval($event->get('survey'));

        $event->set(
            "surveysettings.{$this->id}",
            [
                'name' => get_class($this),
                'settings' => [
                    'isActive' => [
                        'type' => 'boolean',
                        'label' => 'isActive',
                        'current' => $this->getIsActive($surveyId),
                        'help' => 'Activate plugin for this survey'
                    ],
                ]
            ]
        );
    }

    public function newSurveySettings()
    {
        $event = $this->event;
        foreach ($event->get('settings') as $name => $value)
        {
            $this->set($name, $value, 'Survey', $event->get('survey'), false);
        }
    }

    private function getIsActive(int $sid): bool
    {
        return (bool) $this->get('isActive', 'Survey', $sid, false);
    }
Events
Plugins subscribe to events and can interact with LimeSurvey when the event is fired. For a list of currently available events check Plugin events.
API
Plugins should only extend LimeSurvey via its "public" API. This means that directly using classes found in the source code is a bad practice. Though we can't force you not to, you risk having a broken plugin with every minor update we do.
As much as possible interact with LimeSurvey only via methods described here. Same as for events.
The API object is available via $this->api when extending from PluginBase, otherwise you can get it from the PluginManager instance that is passed to your plugins' constructor.
New functions can be added to the API object upon request.
Form extension (New in 6 )
Introduction
The form extension system is a more general way to extend forms in core LimeSurvey without adding a new event for each form.
It consists of the following components:
- A global module called FormExtensionService
- A library of input classes that plugins can add to above module initialization
- A widget, together with custom renderers, that are used in the LimeSurvey view files
Each form is identified by a position string, like <form name><dot><tab name>. Example: globalsettings.general or globalsettings.security.
The point behind a class-based system without HTML is to free the plugin authors of the work to update the HTML when the core HTML changes. Still, the author can use the RawHtmlInput type if needed.
One thing you cannot do in this system is to add new form tabs.
Example
To add a new input to a form from a plugin, use the following code from your init() function:
TODO: Save in plugin settings instead of global
// At top of file
use LimeSurvey\Libraries\FormExtension\Inputs\TextInput;
use LimeSurvey\Libraries\FormExtension\SaveFailedException;

// Inside init()
Yii::app()->formExtensionService->add(
    'globalsettings.general',
    new TextInput([
        'name' => 'myinput',
        'label' => 'Label',
        'disabled' => true,
        'tooltip' => 'Moo moo moo',
        'help' => 'Some help text',
        'save' => function($request, $connection) {
            $value = $request->getPost('myinput');
            if ($value === 'some invalid value') {
                throw new SaveFailedException("Could not save custom input 'myinput'");
            } else {
                SettingGlobal::setSetting('myinput', $value);
            }
        },
        'load' => function () {
            return getGlobalSetting('myinput');
        }
    ])
);
Validation
Validation of the input is done in the save function (see example above). If the posted value is invalid, throw a SaveFailedException, and a warning flash message will be shown to the user.
Supported forms
The following forms can be extended:
- globalsettings.general (New in 6.0.0 )
If you want to add support for another core form, you need to apply the following change in a pull-request:
In the view file, add:
<?php
use LimeSurvey\Libraries\FormExtension\FormExtensionWidget;
use LimeSurvey\Libraries\FormExtension\Inputs\DefaultBaseRenderer;
?>
... more HTML
<?= FormExtensionWidget::render(
    App()->formExtensionService->getAll('globalsettings.security'),
    new DefaultBaseRenderer()
); ?>
You might have to create a new renderer class based on DefaultBaseRenderer, if the form HTML is different than other forms. You might also need to extend the default renderer class with input types not yet added.
The second change you have to do is add a call to the form extension service class in the controller action that saves the form:
$request = App()->request;
Yii::app()->formExtensionService->applySave('globalsettings', $request);
That's it!
Localization (New in 3 )
It's possible for plugins to add their own locale files. File format used is .mo, same as core translations. The files must be stored in
<plugin root folder>/locale/<language>/<language>.mo
where "<language>" is a two letter word like "de" or "fr".
To use the specific locale file, use the plugin function gT:
$this->gT("A plugin text that needs to be translated");
If the given string can't be found in the plugin specific locale file, the function will look in the core locale files. So it's safe to use strings like "Cancel":
$this->gT("Cancel"); // Will be translated even if "Cancel" is not in the plugin locale file
If you are using views together with your plugin, you should use
$plugin->gT("Translate me");
to do plugin specific translation in your view.
You can use the limesurvey.pot file as an example of how a pot file can look like. This is imported into your translation tool.
Tools
One open-source tool to edit po- and mo-files is Poedit.
Logging (New in 3 )
If you want to log something from your plugin, just write
$this->log("Your message");
The default logging level is trace, but you can give another log level as an optional second argument:
$this->log("Something went wrong!", CLogger::LEVEL_ERROR);
The log file can be found in folder
<limesurvey root folder>/tmp/runtime/plugin.log
Your plugin name is automatically used as category. A nice way to see only the errors from your plugin is using grep (on Linux):
$ tail -f tmp/runtime/plugin.log | grep <your plugin name>
More info about configuring logging in Yii 1: Optional_settings#Logging_settings.
Extension updates (New in 4 )
Since LimeSurvey version 4.0.0, there's a system in place to deal with plugin and other extension updates. To use this system, your extension config.xml file needs to include updater configuration.
<updaters>
    <updater>
        <stable>1</stable>
        <type>rest</type>
        <source>https://comfortupdate.limesurvey.org/index.php?r=limestorerest</source>
        <manualUpdateUrl>https://somedownloadlink.com/maybegithub</manualUpdateUrl>
    </updater>
</updaters>
(The source tag above points to the LimeStore REST API, which will be used for all extensions available in our LimeStore.)
| Tag | Description |
|---|---|
| stable | "1" if this source only gives you stable version numbers; "0" if the source will also provide unstable versions, like 0.3.3-beta.
|
| type | For now, only type rest is supported. It's easy to add new updater types (version checkers), like git, wget, etc.
|
| source | The URL to fetch new versions from. |
| manualUpdateUrl | URL which the user can go to to update the latest version of the extension. |
| automaticUpdateUrl | TODO |
If you don't want to supply an updater, you should put the following text in your config XML file:
<updaters disabled="disabled">
</updaters>
This way, you tell the system that you purposefully disabled the update system, and didn't just forget to add it.
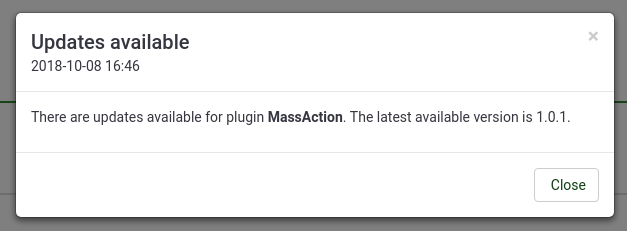
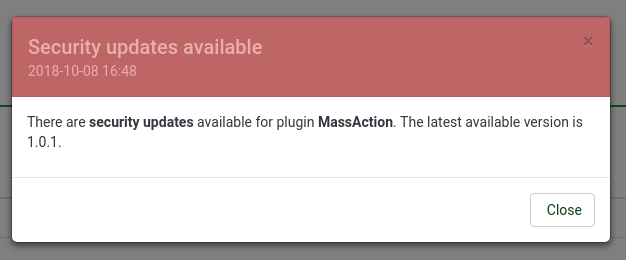
The new plugin UpdateCheck - installed and activated by default - checks for new updates for all installed extensions when a super admin logs in, asynchronously, max one time every 24 hours. If any new versions are found, a notification is pushed.
If a new security update is found, the notification will open automatically and be styled in "danger" class.
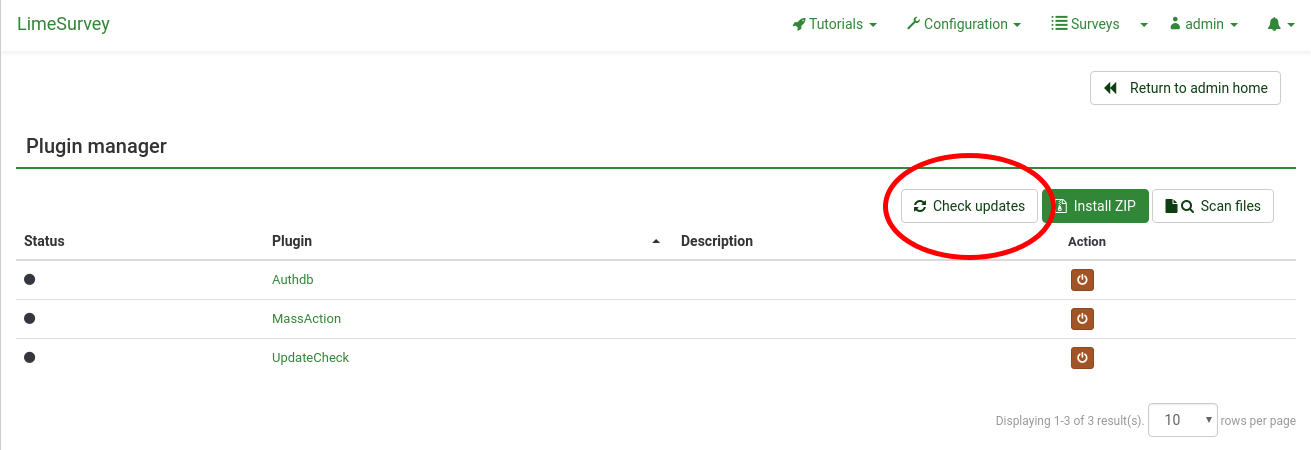
You can manually check for updates by going to the plugin manager view and click on "Check updates". Note that this button is only visible if the UpdateCheck plugin is activated.
Under the hood
This section provides a brief overview over the extension updater implementation.
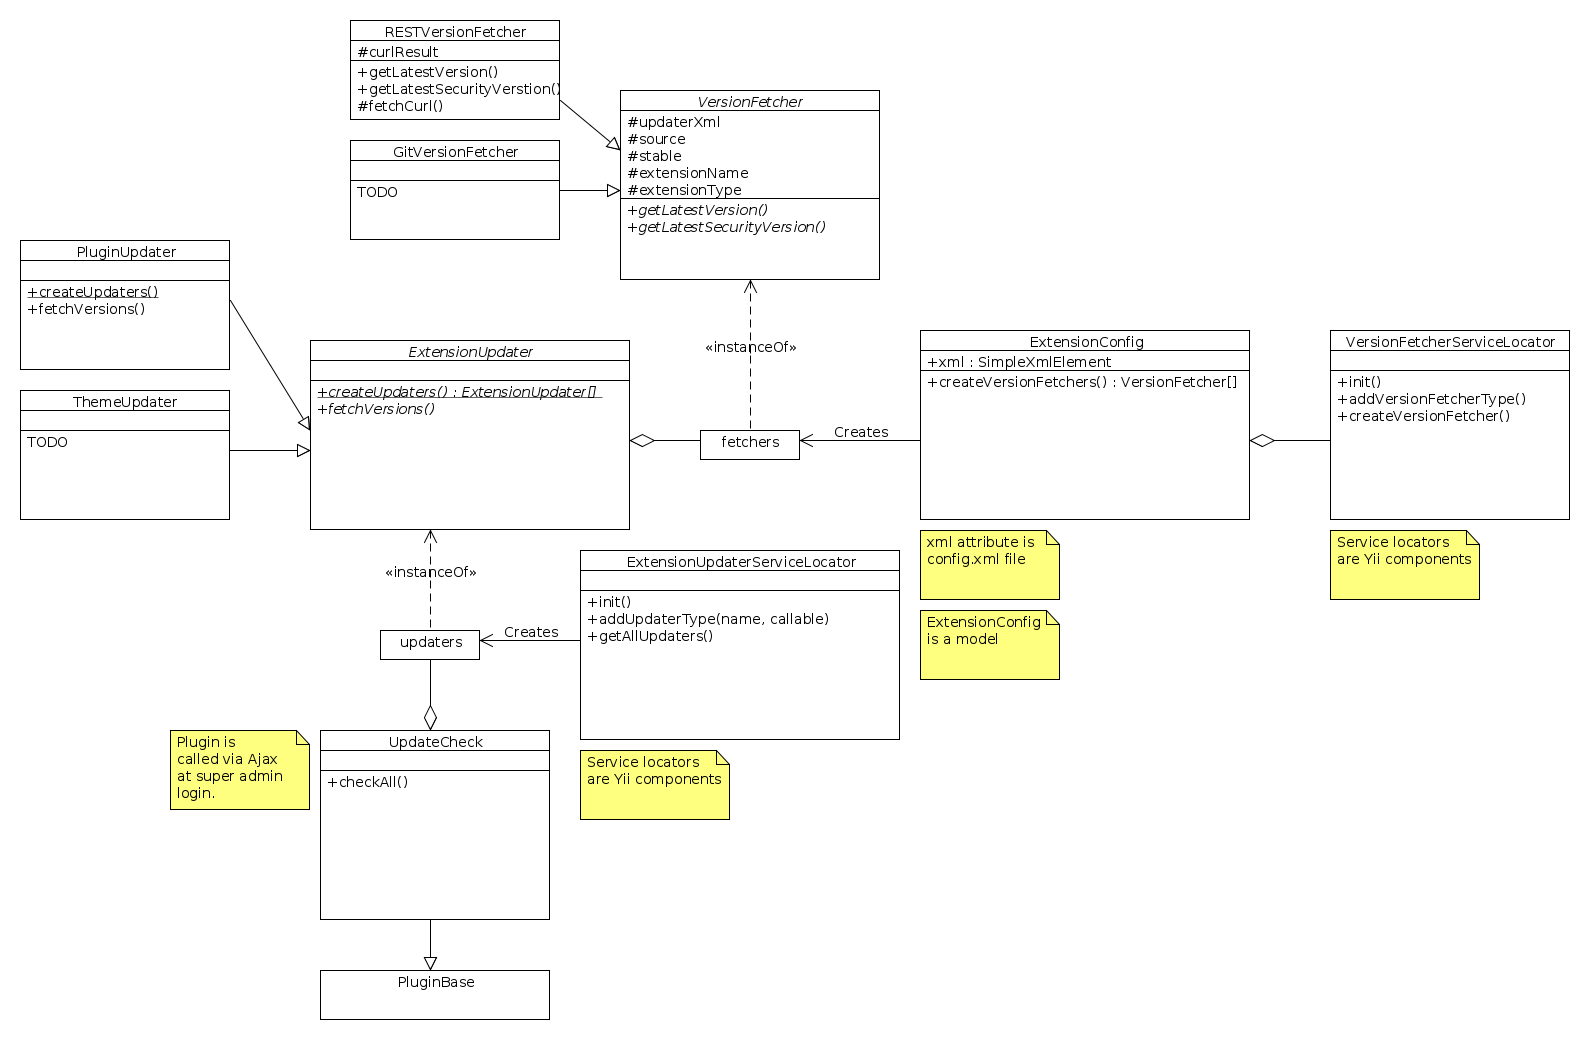
The extension updater is part of the ExtensionInstaller library. Below is a UML diagram for the classes related to the updater process.
Program flow when Yii starts:
 Yii init
   VersionFetcherServiceLocator->init()
     Add REST version fetcher
   ExtensionUpdaterServiceLocator->init()
     Add PluginUpdater
     TODO: Add an updater for each extension type (theme, question template, ...)
Program flow when running the UpdaterCheck plugin:
 Get all updaters from ExtensionUpdaterServiceLocator
 Loop each updater
   For each updater, loop through version fetchers configured by <updater> XML
     For each version fetcher, contact remote source and get version information
 Compose all versions into a notification
The checkAll method in the UpdateCheck plugin provides an example of how to query all extensions for new versions.
Adding new version fetchers
To add a new custom version fetcher, run this during Yii initialization:
$service = \Yii::app()->versionFetcherServiceLocator
$service->addVersionFetcherType(
  'myNewVersionFetcherType',
  function (\SimpleXMLElement $updaterXml) {
    return new MyNewVersionFetcher($updaterXml);
  }
);
Of course, the class MyNewVersionFetcher has to subclass VersionFetcher.
To use your new version fetcher, configure the type tag in the updater XML to use
myNewVersionFetcherType (instead of e.g. rest).
Adding new extension updaters
To add a new custom extension updater, run this during Yii initialization:
$service = \Yii::app()->extensionUpdaterServiceLocator;
$service->addUpdaterType(
  'myNewExtensionUpdater',
  function () {
    return MyNewExtensionUpdater::createUpdaters();
  }
);
Class MyNewExtensionUpdater has to subclass ExtensionUpdater.
The top type tag in config.xml ('plugin', 'theme', ...) will control which extension updater are used for this extension. The system is not fully customizable yet, since you also need to add a custom ExtensionInstaller, menu items, etc. But in theory, and maybe in the future, it should be possible to add a new type of extension this way.
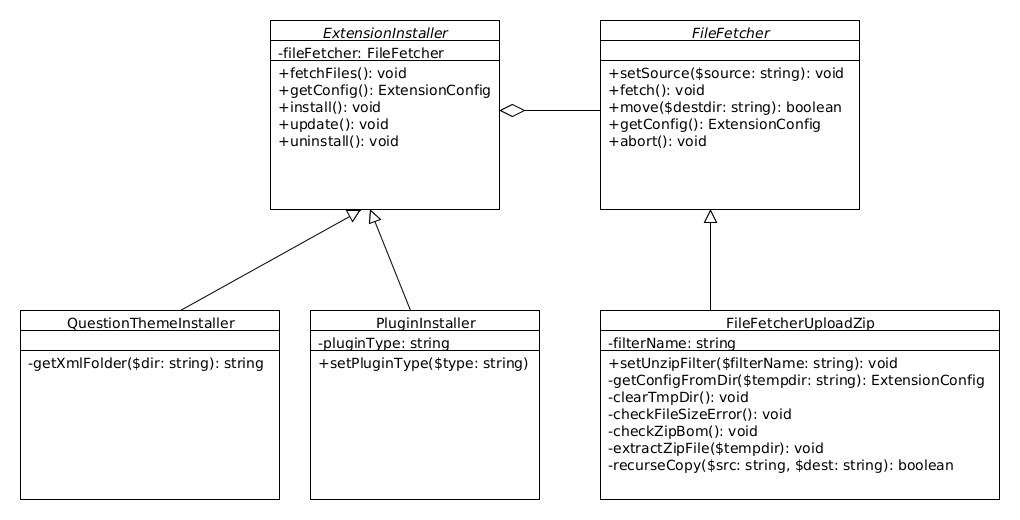
Extension installer
The extension installer library consists of two abstract classes:
- ExtensionInstaller
- FileFetcher
The ExtensionInstaller is subclassed for each extension type, like PluginInstaller, QuestionThemeInstaller, etc.
The FileFetcher is subclassed for each different way to fetch files. Currently, only uploaded zip files are supported, but in the future, there could be a Github or LimeStore fetcher too.
Special plugins
Available plugins
Tutorial
This step-by-step tutorial shows how to create a plugin that sends a post request on every survey response submission. The tutorial shows you how to create and save global and per-survey settings, how to register events and more.
