Quản lý người dùng
From LimeSurvey Manual
Quản lý người dùng
Công cụ quản lý người dùng cho phép bạn thêm người dùng quản trị bổ sung vào LimeSurvey. Chúng tôi gọi họ là 'người dùng'. Đừng nhầm lẫn chúng với người tham gia khảo sát (người trả lời).
Tạo người dùng
Để tạo người dùng mới, hãy mở hộp thoại quản lý người dùng bằng cách nhấp vào Cấu hình (nằm trên thanh công cụ LimeSurvey chính) -> Quản lý người dùng.
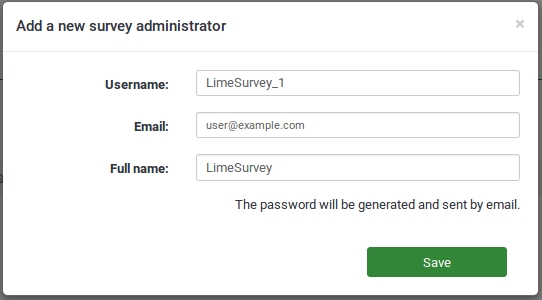
Sau đó, nhấp vào Thêm người dùng nằm ở khu vực phía trên bên phải của bảng Kiểm soát người dùng. Một cửa sổ sẽ được hiển thị yêu cầu bạn:
- Nhập tên người dùng mong muốn vào trường Tên người dùng.
- Nhập địa chỉ email vào trường Email. Xin lưu ý rằng:
- LimeSurvey gửi email xác nhận đến địa chỉ đã nhập vào trường Email. Địa chỉ email này sẽ được sử dụng làm địa chỉ email liên hệ tiêu chuẩn cho các cuộc khảo sát do người dùng tương ứng tạo.
- Nếu bạn không muốn người dùng nhận email xác nhận có liên kết đến ứng dụng LimeSurvey, tên người dùng và mật khẩu, bạn có thể sử dụng địa chỉ email của chính mình để gửi email xác nhận cho bạn. Sau đó, bạn có thể thay đổi địa chỉ email thành địa chỉ của người dùng.
- Nhập tên đầy đủ của người dùng vào trường Tên đầy đủ. Xin lưu ý rằng tên đầy đủ được nhập ở đây sẽ được sử dụng làm tên người liên hệ tiêu chuẩn cho các cuộc khảo sát do người dùng tương ứng tạo ra.
- Nhấp vào Lưu để tạo người dùng mới.
Lưu ý rằng độ phức tạp của mật khẩu được thực thi và xác thực bởi plugin Yêu cầu mật khẩu.

Bây giờ bạn đã tạo người dùng đầu tiên của mình. Để tìm hiểu thêm về đặt quyền cho người dùng, vui lòng đọc tiếp.

Bên dưới, bạn có thể thấy bốn tùy chọn trong cột Hành động cho phép bạn:

- chỉnh sửa các khía cạnh chung của người dùng - bằng cách nhấp vào biểu tượng cây bút.
- xóa người dùng khỏi cơ sở dữ liệu quản trị viên khảo sát - bằng cách nhấp vào nút thùng rác.
- đặt quyền chung cho người dùng - bằng cách nhấp vào biểu tượng khóa .
- đặt quyền chủ đề cho người dùng - bằng cách nhấp vào biểu tượng bút và khóa.
Chỉnh sửa người dùng
Nhấn vào biểu tượng cây bút để chỉnh sửa thông tin người dùng.
Bạn có thể nhập địa chỉ email, tên mới và thay đổi mật khẩu của họ. Nhấp vào Lưu để xác nhận thay đổi.
Xóa người dùng
Để xóa tài khoản người dùng, hãy nhấp vào biểu tượng thùng rác tương ứng (nằm trên cùng dòng với tài khoản người dùng bạn muốn xóa) và nhấp vào OK.
Đặt quyền chung cho người dùng
Để đặt quyền chung cho người dùng, hãy nhấp vào biểu tượng khóa.
Hệ thống CRUD (tạo, đọc, cập nhật và xóa) được sử dụng (như trong cài đặt quyền khảo sát). Để có thêm tùy chọn về quyền của người dùng, chúng tôi khuyên bạn nên mở rộng ma trận bằng cách sử dụng đầu mũi tên kép bên phải, nằm ở góc trên bên phải. Nếu bạn chọn hộp đầu tiên, tất cả các quyền CRUD trong hàng đó sẽ tự động được kiểm tra.
Bây giờ bạn có thể thêm hoặc xóa các quyền sau:
- Bảng điều khiển người tham gia: Để biết thêm chi tiết, hãy tiếp tục đọc về cơ sở dữ liệu người tham gia trung tâm tại đây.
- Bộ nhãn: Quyền tạo, xem, cập nhật, xóa, xuất và nhập bộ nhãn. Bộ nhãn không có quyền cụ thể (không giống như chủ đề).
- Cài đặt & Plugin: Với quyền này, người dùng có thể kiểm tra tính toàn vẹn dữ liệu, lưu cơ sở dữ liệu SQL vào tệp .sql, quản lý cài đặt chung, xem thông tin PHP trong cài đặt chung và quản lý tất cả các plugin.
- Nhóm khảo sát (New in 4.4.0 ): Cấp quyền truy cập vào tất cả các nhóm khảo sát. Để cho phép người dùng quản lý nhóm khảo sát của riêng họ, hãy cấp cho người dùng quyền 'tạo'. Người tạo nhóm khảo sát (theo mặc định) là chủ sở hữu của nhóm khảo sát này.
- Khảo sát: Cấp quyền truy cập vào tất cả các cuộc khảo sát. Để cho phép người dùng chỉ tạo và quản lý khảo sát của riêng họ, hãy cấp cho người dùng quyền 'tạo'. Người tạo khảo sát là chủ sở hữu của khảo sát và sẽ luôn có thể quản lý khảo sát đó. Hãy nhớ rằng mỗi cuộc khảo sát có thể cấp các quyền khác nhau.
- Themes: Cho phép người dùng sử dụng tất cả các chủ đề thiết kế có sẵn và chỉnh sửa tất cả các chủ đề không chuẩn. Người có quyền này phải có đủ kiến thức về HTML, Javascript và CSS. Nếu người dùng không quen với những thứ này và phải sử dụng một chủ đề thiết kế cụ thể, tốt hơn là chỉ cấp cho họ quyền 'đọc'. Mỗi chủ đề có thể có quyền cụ thể.
- Nhóm người dùng: Cho phép người dùng tạo/xem/cập nhật/xóa nhóm người dùng.
- Người dùng: Người dùng có thể tạo, sửa đổi và xóa người dùng quản trị của mình với quyền này. Người dùng mới được tạo không thể có quyền cao hơn người dùng chính. Bạn cũng sẽ không thể chỉnh sửa người dùng thuộc sở hữu của người dùng quản trị khác. Nếu việc này phải được thực hiện thì phải được cấp quyền Quản trị viên cấp cao.
- Siêu quản trị viên: Chỉ có Quản trị viên cấp cao khác mới có thể thêm cài đặt này làm bản cập nhật và cấp toàn quyền cho toàn bộ ứng dụng LimeSurvey, bao gồm cài đặt plugin và sử dụng bất kỳ loại nội dung nào (bao gồm cả JavaScript) trong nội dung khảo sát. (xem thêm cài đặt bảo mật toàn cầu)
- Sử dụng xác thực cơ sở dữ liệu nội bộ: Cho phép người dùng truy cập bảng điều khiển của LimeSurvey thông qua trang xác thực (ví dụ http://domain/admin/authentication/sa/login). Nếu nó không được chọn và người dùng tương ứng cố gắng kết nối với bảng điều khiển của LimeSuvey, họ sẽ gặp lỗi sau: 'Phương thức xác thực cơ sở dữ liệu nội bộ không được phép đối với người dùng này'.
Đặt quyền chủ đề cho người dùng
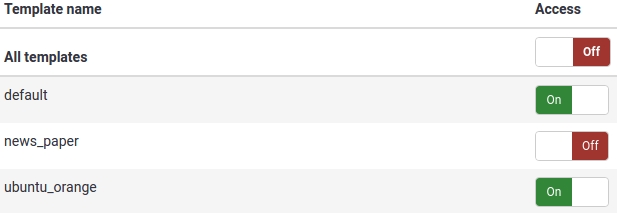
Với quyền chủ đề, bạn có thể quyết định người dùng có thể chọn chủ đề thiết kế nào khi tạo hoặc chỉnh sửa khảo sát.
Nếu bạn có chủ đề thiết kế cụ thể cho một nhóm người dùng hoặc khách hàng, bạn có thể hạn chế quyền truy cập của họ vào các chủ đề khác để đảm bảo rằng họ chỉ sử dụng các chủ đề được tạo cho họ.
Để đặt hoặc chỉnh sửa quyền chủ đề cho người dùng, hãy nhấp vào biểu tượng bút và khóa cho chủ đề thiết kế.

Select the design themes to which the respective user or user groups should have access. After you finished your selection or deselection, do not forget to click Save: ![]() .
.
To better understand this function, view the examples provided below.
Use one-time passwords
A user can call the LimeSurvey login at /limesurvey/admin and enter a username and a one-time password (which was previously written into the users table - column one_time_pw - by an external application).
To enable this login method, the line 'use_one_time_passwords' => true; has to be added to config.php (it is 'false' by default) .
The URL has to contain the following variables:
- user: The username normally used to login into LimeSurvey. This username has to exist in the 'users' table of the database.
- onepass: The plain text password which is then compared to the password in the 'users' table
A valid URL to login using a one-time password will look like this:
Things to watch out for:
- To enable this login method, the line
'use_one_time_passwords' => truehas to be added in config.php (it is 'false' by default). - The passed username has to exist in the LimeSurvey users table.
- The one-time password (which can be set via an external application) has to be stored as MD5 hash in the column one_time_pw of table users.
- The passed plain text password will be hashed using the sha256 function and will then compared to the stored hash in column one_time_pw of table users. Both passwords have to match.
- After the first login with the one-time password, it gets deleted from the database. The user won't be able to log in with that respective password a second time.
Set permissions for a single survey
These permissions only apply for a single survey. If you want to set permissions for the whole system, you can use global permissions. These permissions can be offered either to a single user or to a user group.
To change the survey permissions, click the Settings tab. Then, click Survey permissions and choose to whom would you like to offer permissions. The permissions can be offered either separately to specific users or to a user group.


Grant survey permissions to a user
In the next step, select the user that will receive survey permissions and click Add user.

After you click Set survey permissions, the user's survey permissions matrix will be shown.

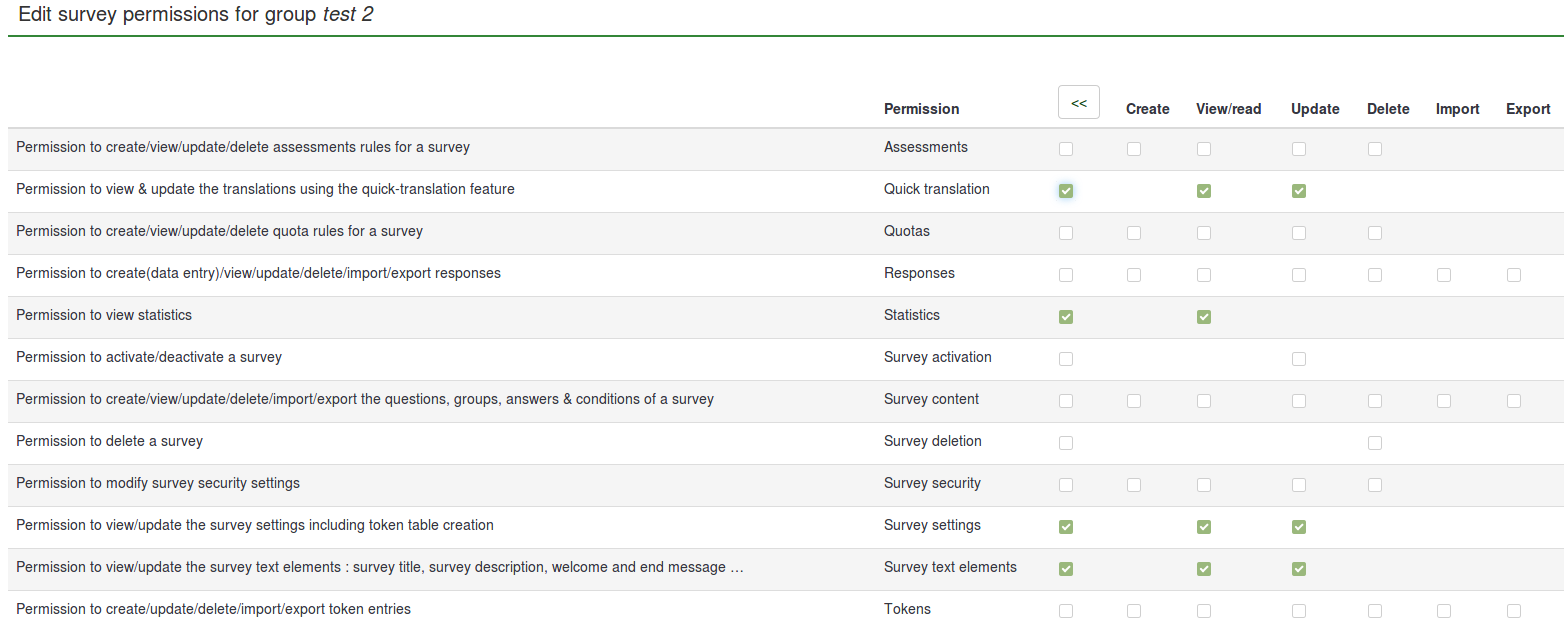
You can set in this matrix the user's survey permissions. Checking a box grants survey permissions to the respective user. If you click a checkbox from the first column, all the permissions of the corresponding line will be selected/removed.
Click the double-right arrowhead to access the extended version of the matrix to choose specifically the actions that can be performed by a user. After you finished editing the survey permissions, click Save, which is located in the upper right corner of the screen.
Some examples are provided below in order to help you get a better understanding of Limesurvey's survey permissions system.
Grant survey permissions to a user group
Click add a user group and select the user group to which you would like to add the permission permissions.
In the next step, select the permissions that you will allocate to the members of that user group. Do not forget to click the double right arrowhead to get an extended view of the permissions matrix.

After you have finished editing the survey permissions, click Save, which is located in the upper right part of the screen.
Some examples are provided below to help you get a better understanding of the Limesurvey's survey permissions system.
Examples
Different scenarios are presented below. They provide some advice about which permissions are necessary for some specific tasks and how they can be granted to the users.
Add new LimeSurvey adminisrator
- Log in as admin.
- Create a new user account.
- Grant that user the Superadministrator permission.
- Not necessary : Setting the theme permissions (Superadministrator has all permissions for all themes).
- Not necessary : Setting the survey permissions (Superadministrator has all permissions for all surveys).
A new user wants to create their own surveys
- Log in as admin (or as a user that has the Superadministrator permission).
- Create a new user account.
- Set global permissions for that user to Create survey.
- Optional : Set theme permissions - select which theme(s) should be used by the user/user group.
The creator of a survey needs to give another person permission to edit their survey
- Log in as admin (or as a user that has the Superadministrator permission).
- Create a new user account.
- Set no global permissions for user.
- Set no theme permissions for user.
- Set the survey permissions the way you want. If he/she should receive all the survey permissions, you can check the first box from each row. Otherwise, click on the double-right arrowhead to see the expanded matrix (upper right corner) and select only those permissions you believe the respective user should have.
A person responsible for the survey wants to view and export survey results
- Log in as admin (or as a user that has the Superadministrator permission).
- Create a new user account.
- Set no global permissions for user.
- Set no theme permissions for user.
- Set survey permissions to: Responses -> View/read and export, and Statistics: View/read.

Granting permission for help with translation of a survey
- Log in as admin (or as a user that has the Superadministrator permission).
- Create n user accounts (where n is the number of translators).
- Create a user group called Translators and add the n accounts to this group.
- Go to the Survey permissions and click on Add a user group.
- If they only do translations, then offer them the Quick translation permission.