Manage users/da: Difference between revisions
From LimeSurvey Manual
Maren.fritz (talk | contribs) (Created page with "==Slet bruger==") |
Maren.fritz (talk | contribs) (Created page with "For at slette en brugerkonto skal du klikke på det tilsvarende papirkurvsikon (placeret på samme linje som den brugerkonto, du vil slette) og klikke på '''OK'''.") |
||
| Line 57: | Line 57: | ||
For at slette en brugerkonto skal du klikke på det tilsvarende papirkurvsikon (placeret på samme linje som den brugerkonto, du vil slette) og klikke på '''OK'''. | For at slette en brugerkonto skal du klikke på det tilsvarende papirkurvsikon (placeret på samme linje som den brugerkonto, du vil slette) og klikke på '''OK'''. | ||
== | ==Indstil globale tilladelser for en bruger== | ||
{{Alert|Global permissions apply to the whole LimeSurvey application. If you want to set permissions only for a specific survey, you can use the [[Manage users#Setting permissions for a single survey|survey permissions settings]].}} | {{Alert|Global permissions apply to the whole LimeSurvey application. If you want to set permissions only for a specific survey, you can use the [[Manage users#Setting permissions for a single survey|survey permissions settings]].}} | ||
Revision as of 12:32, 2 January 2024
Brugeradministration
Brugerstyringsværktøjet giver dig mulighed for at tilføje yderligere administrationsbrugere til LimeSurvey. Vi omtaler dem som 'brugere'. Forveksle dem ikke med undersøgelsesdeltagere (respondenter).
Opret brugere
For at oprette en ny bruger skal du åbne brugeradministrationsdialogen ved at klikke på Konfiguration (placeret på LimeSurvey-værktøjslinjen) -> Brugeradministration.

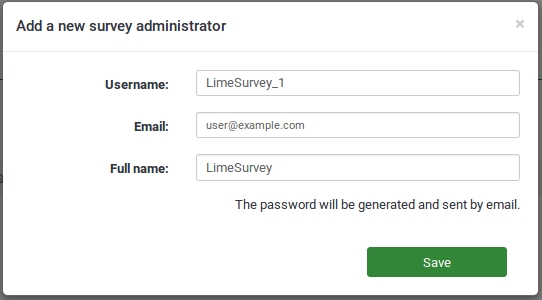
Klik derefter på Tilføj bruger i det øverste højre område af Brugerkontrol-tabellen. Et vindue vil blive vist, der beder dig om at:
- Indtast det ønskede brugernavn i Brugernavn-feltet.
- Indtast e-mail-adressen i E-mail-feltet. Bemærk venligst, at:
- LimeSurvey sender en bekræftelses-e-mail til den adresse, der er indtastet i E-mail-feltet. Denne e-mailadresse vil blive brugt som standard kontakt-e-mailadresse for undersøgelser, der er oprettet af den respektive bruger.
- Hvis du ikke ønsker, at brugeren skal modtage bekræftelses-e-mailen med et link til LimeSurvey-applikationen, brugernavn og adgangskode, du kan bruge din egen e-mailadresse til at sende bekræftelsesmailen til dig. Derefter kan du ændre e-mailadressen til brugerens adresse.
- Indtast brugerens fulde navn i feltet Fuldt navn. Bemærk venligst, at det fulde navn, der indtastes her, vil blive brugt som standard kontaktpersonnavn for undersøgelser oprettet af den respektive bruger.
- Klik Gem for at oprette den nye bruger.
Bemærk, at adgangskodens kompleksitet håndhæves og valideres af PasswordRequirement-pluginnet.

Du har nu oprettet din første bruger. For at finde ud af mere om indstiller brugertilladelser, læs venligst videre.

Nedenfor kan du se fire muligheder under kolonnen Handling, der giver dig mulighed for at:

- rediger de generelle aspekter af en bruger - ved at klikke på pennesymbolet.
- slet brugeren fra undersøgelsesadministratorens database - ved at klikke på papirkurven.
- indstil globale tilladelser for en bruger - ved at klikke på låsesymbolet .
- indstil tematilladelser for en bruger - ved at klikke på pen-og-lås-symbolet.
Rediger bruger
Klik på penikonet for at redigere brugeroplysninger.
Du kan indtaste en ny e-mailadresse, navn og ændre deres adgangskode. Klik på Gem for at bekræfte ændringer.
Slet bruger
For at slette en brugerkonto skal du klikke på det tilsvarende papirkurvsikon (placeret på samme linje som den brugerkonto, du vil slette) og klikke på OK.
Indstil globale tilladelser for en bruger
To set global permissions for a user, click the lock symbol.

The CRUD (create, read, update, and delete) system is employed (as it is in the survey permission settings). For more user permission options, we recommend extending the matrix using the double-right arrowhead, which is located in its upper right corner. If you check the first box, all the CRUD permissions in that row are automatically checked.

You can now add or remove the following permissions:
- Participant panel: For more details, continue reading about the central participant database here.
- Label sets: Permission to create, view, update, delete, export, and import label sets. The label sets do not have specific permissions (unlike themes).
- Settings & Plugins: With this permission a user can check data integrity, save the SQL database to an .sql file, manage global settings, view the PHP info in the global settings, and manage all plugins.
- Survey groups (New in 4.4.0 ): Give access to all surveys' group. To allow user to manage their own surveys' group, give the user the 'create' permission. A creator of a surveys' group are (by default) the owner of this surveys' group.
- Surveys: Gives access to all surveys. To allow a user to only create and manage their own survey, give the user the 'create' permission. A creator of a survey is the owner of the survey and will always be able to manage it. Remember that each survey can grant different permissions .
- Themes: Allows the user to use all the available design themes and edit all non-standard themes. A person with this permission should have sufficient knowledge in terms of HTML, Javascript, and CSS. If a user is not familiar with these things and is supposed to use a specific design themes, it would be better to only give them 'read' permission. Each theme can have specific permissions.
- User groups: Allows a user to create/view/update/delete user groups.
- Users: A user can create, modify, and delete their own administration users with this permission. The newly created users cannot have higher permissions than the parent user. You will also not be able to edit users owned by other administration users. If this has to be done, then a Superadministrator permission must be granted.
- Superadministrator: Can only be added by other Superadministrator with this setting as update and grants full permission to the whole LimeSurvey application, including installing plugins and using any kind of content (including JavaScript) in survey content. (see also global security settings)
- Use internal database authentication: Allows users to access LimeSurvey's panel via the authentication page (e.g. http://domain/admin/authentication/sa/login). If it is unchecked and the respective user tries to connect to LimeSuvey's panel, they will get the following error: 'Internal database authentication method is not allowed for this user'.
Set theme permissions for a user
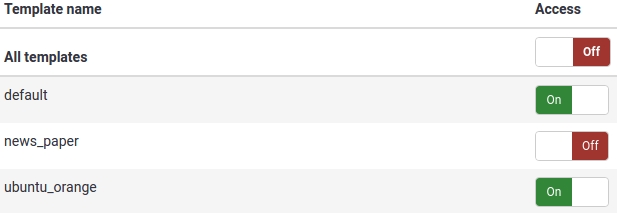
With theme permissions, you can decide which design themes a user can select when creating or editing a survey.
If you have specific design themes for a group of users or customers, you can restrict their access to other themes to ensure that they use only themes created for them.
To set or edit the themes permissions for a user, click the pen-and-lock symbol for design themes.

Select the design themes to which the respective user or user groups should have access. After you finished your selection or deselection, do not forget to click Save: ![]() .
.
To better understand this function, view the examples provided below.
Use one-time passwords
A user can call the LimeSurvey login at /limesurvey/admin and enter a username and a one-time password (which was previously written into the users table - column one_time_pw - by an external application).
To enable this login method, the line 'use_one_time_passwords' => true; has to be added to config.php (it is 'false' by default) .
The URL has to contain the following variables:
- user: The username normally used to login into LimeSurvey. This username has to exist in the 'users' table of the database.
- onepass: The plain text password which is then compared to the password in the 'users' table
A valid URL to login using a one-time password will look like this:
Things to watch out for:
- To enable this login method, the line
'use_one_time_passwords' => truehas to be added in config.php (it is 'false' by default). - The passed username has to exist in the LimeSurvey users table.
- The one-time password (which can be set via an external application) has to be stored as MD5 hash in the column one_time_pw of table users.
- The passed plain text password will be hashed using the sha256 function and will then compared to the stored hash in column one_time_pw of table users. Both passwords have to match.
- After the first login with the one-time password, it gets deleted from the database. The user won't be able to log in with that respective password a second time.
Set permissions for a single survey
These permissions only apply for a single survey. If you want to set permissions for the whole system, you can use global permissions. These permissions can be offered either to a single user or to a user group.
To change the survey permissions, click the Settings tab. Then, click Survey permissions and choose to whom would you like to offer permissions. The permissions can be offered either separately to specific users or to a user group.


Grant survey permissions to a user
In the next step, select the user that will receive survey permissions and click Add user.

After you click Set survey permissions, the user's survey permissions matrix will be shown.

You can set in this matrix the user's survey permissions. Checking a box grants survey permissions to the respective user. If you click a checkbox from the first column, all the permissions of the corresponding line will be selected/removed.
Click the double-right arrowhead to access the extended version of the matrix to choose specifically the actions that can be performed by a user. After you finished editing the survey permissions, click Save, which is located in the upper right corner of the screen.
Some examples are provided below in order to help you get a better understanding of Limesurvey's survey permissions system.
Grant survey permissions to a user group
Click add a user group and select the user group to which you would like to add the permission permissions.
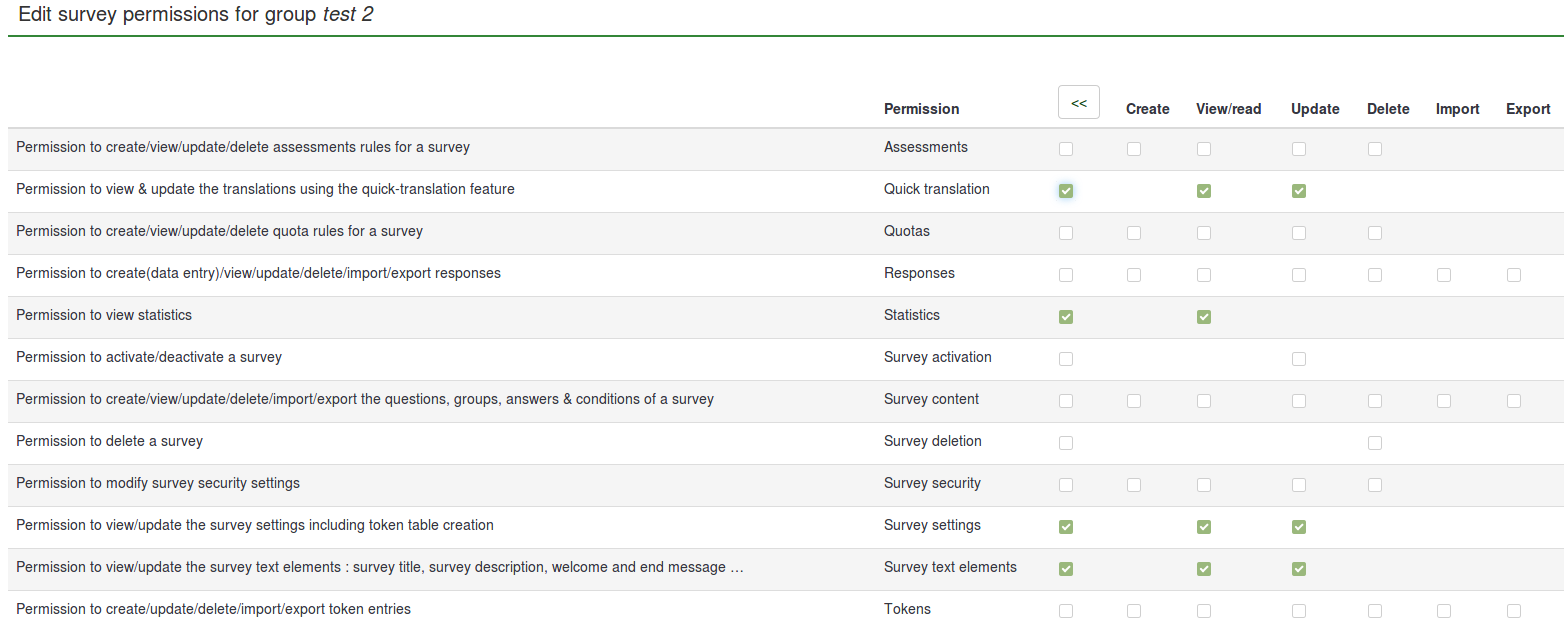
In the next step, select the permissions that you will allocate to the members of that user group. Do not forget to click the double right arrowhead to get an extended view of the permissions matrix.

After you have finished editing the survey permissions, click Save, which is located in the upper right part of the screen.
Some examples are provided below to help you get a better understanding of the Limesurvey's survey permissions system.
Examples
Different scenarios are presented below. They provide some advice about which permissions are necessary for some specific tasks and how they can be granted to the users.
Add new LimeSurvey adminisrator
- Log in as admin.
- Create a new user account.
- Grant that user the Superadministrator permission.
- Not necessary : Setting the theme permissions (Superadministrator has all permissions for all themes).
- Not necessary : Setting the survey permissions (Superadministrator has all permissions for all surveys).
A new user wants to create their own surveys
- Log in as admin (or as a user that has the Superadministrator permission).
- Create a new user account.
- Set global permissions for that user to Create survey.
- Optional : Set theme permissions - select which theme(s) should be used by the user/user group.
The creator of a survey needs to give another person permission to edit their survey
- Log in as admin (or as a user that has the Superadministrator permission).
- Create a new user account.
- Set no global permissions for user.
- Set no theme permissions for user.
- Set the survey permissions the way you want. If he/she should receive all the survey permissions, you can check the first box from each row. Otherwise, click on the double-right arrowhead to see the expanded matrix (upper right corner) and select only those permissions you believe the respective user should have.
A person responsible for the survey wants to view and export survey results
- Log in as admin (or as a user that has the Superadministrator permission).
- Create a new user account.
- Set no global permissions for user.
- Set no theme permissions for user.
- Set survey permissions to: Responses -> View/read and export, and Statistics: View/read.

Granting permission for help with translation of a survey
- Log in as admin (or as a user that has the Superadministrator permission).
- Create n user accounts (where n is the number of translators).
- Create a user group called Translators and add the n accounts to this group.
- Go to the Survey permissions and click on Add a user group.
- If they only do translations, then offer them the Quick translation permission.