Label sets/ja: Difference between revisions
From LimeSurvey Manual
(Updating to match new version of source page) |
Bravehorse (talk | contribs) No edit summary |
||
| (110 intermediate revisions by 3 users not shown) | |||
| Line 3: | Line 3: | ||
__TOC__ | __TOC__ | ||
=General= | <span id="General"></span> | ||
=概要= | |||
ラベルセットはリストのテンプレートであり、各リストにはラベル付きのコードセットがあり、ほとんどの質問タイプで回答またはサブ質問として使用できます。LimeSurveyのラベルセットは、サブ質問や回答として質問にコピーされるだけであることにご留意ください。したがって、アンケートでラベルセットを使用した後にラベルセットを変更しても、各ラベルセットを使用しているアンケートの質問には反映されません。 | |||
この新しいラベルセットを使用することにより、将来の開発に柔軟性が増し、質問の構造がより論理的になります。 | |||
{{Alert|title= | {{Alert|title=注意|text=ラベルセットにはアンケートと同じ基本言語が含まれていなければなりません。そうでない場合は、アンケートの質問には使用できません。}} | ||
以下のラベルセットの例は、概念をよりよく理解することができます。LimeSurveyのラベルセット管理機能に直接移動したい場合は、[[Label sets/ja#Label sets - how to...|ここをクリック]]してください。 | |||
自作の7点スケールを定義する場合、ラベルセットがこの機能を果たします。下の例では、コード/ラベルのペア('''ラベルは実際の質問に表示されます''')で設定された非常に単純なカスタムラベルです。 | |||
{|class=wikitable | {|class=wikitable | ||
|''' | |'''コード'''||'''ラベル''' | ||
|- | |- | ||
|1|| | |1||役に立たない | ||
|- | |- | ||
|2||2 | |2||2 | ||
| Line 24: | Line 25: | ||
|3||3 | |3||3 | ||
|- | |- | ||
|4|| | |4||やや役に立った | ||
|- | |- | ||
|5||5 | |5||5 | ||
| Line 30: | Line 31: | ||
|6||6 | |6||6 | ||
|- | |- | ||
|7|| | |7||とても役に立った | ||
|} | |} | ||
ラベルテキストの代わりに3つの異なるスマイリーが使用されるグラフィカルな例を以下に示します。 | |||
<center>[[File:3xSmiley-Question.gif]]</center> | <center>[[File:3xSmiley-Question.gif]]</center> | ||
= | <span id="Label_sets_-_how_to..."></span> | ||
=ラベルセットの使い方= | |||
ラベルセットを編集、作成、削除、インポート、エクスポートするには、'''設定'''メニューの'''ラベルセット管理'''をクリックします。 | |||
<center>[[File:labels.png]]</center> | <center>[[File:labels.png]]</center> | ||
<span id="...create_or_import_new_label_set(s)"></span> | |||
==ラベルセットの作成、インポート== | |||
ページの左上にある'''新規ラベルセットを作成/インポート'''ボタンをクリックします。新しいラベルセットを作成したり、別のソースからインポートしたりすることもできます。 | |||
*''' | *'''新しいラベルセット:''' ラベルセットを手動で作成します。 | ||
**''' | **'''名前を設定:''' 新しいラベルセットに付ける名前を設定します。 | ||
**''' | **'''言語:''' ラベルセットは言語を指定する必要があります。メニューから言語を選択することができます。 | ||
*''' | *'''ラベルセットをインポート:''' ラベルセットをインポートするには、'''ファイルを選択'''をクリックし、ラベルセットファイル'''.lsl'''を追加します。以前にラベルセットを作成していた場合は、''同じラベルセットが既に存在している場合は、インポートされません''をオフにしない限りインポートできません。'''[https://www.limesurvey.org/index.php/downloads/category/19-templates LimeSurveyのウェブサイト]では、便利なラベルセットがあります。''' | ||
ラベルをインポートまたは作成したら、画面の右上にある保存ボタンをクリックします。 | |||
<center>[[File:Save_Close.jpg]]</center> | <center>[[File:Save_Close.jpg]]</center> | ||
= | {{Note|アンケート全体をインポートすると、質問とともにラベルセットもインポートされます。重複したラベルセットは無視されます。}} | ||
<span id="...edit,_delete,_or_export_a_label_set"></span> | |||
==ラベルセットの編集、削除、エクスポート== | |||
'''ラベルセット'''リストのそれぞれのエントリーには、対応するメニューがあり、次の4つのオプションがあります。 | |||
<center>[[File:Edit menu labels.png|150px]]</center> | <center>[[File:Edit menu labels.png|150px]]</center> | ||
==... | *'''ラベル表示:''' ラベルセットのラベルを表示します。 | ||
*'''ラベルセットの編集:''' ラベルセットの名前を変更したり、言語の追加/削除を行うことができます。 | |||
*'''ラベルセット出力:''' ラベルを.lslファイルにエクスポートします。 | |||
*'''ラベルセットの削除:''' ラベルセットを削除するかどうかを確認するためのウィンドウがポップアップ表示されます。 | |||
<span id="Labels_-_how_to..."></span> | |||
=ラベルの使い方= | |||
<span id="...add_a_label"></span> | |||
==ラベルの追加== | |||
ラベルのコード、評価値、題名を入力する必要があります。 | |||
<center>[[File:Labels table.png]]</center> | <center>[[File:Labels table.png]]</center> | ||
<syntaxhighlight lang="html4strict | |||
次に、プラス記号のアイコン[[File:Add label.png]]をクリックし、新しいラベルを追加します。ラベルテキストの代わり、またはテキストに加えてグラフィックを使用することも可能です。これには、HTMLコードを使用して、必要なグラフィックを含める必要があります。例は以下のとおりです。 | |||
<syntaxhighlight lang="html4strict"> | |||
<img border="0" src="http://www.yourdomain.at/pics/pic.gif"> | <img border="0" src="http://www.yourdomain.at/pics/pic.gif"> | ||
</syntaxhighlight> | </syntaxhighlight> | ||
{{Note| | {{Note|[[Assessments/ja|評価]]に関するウィキも参照してください。すべての値を0に設定すると、列は無視されます。}} | ||
HTMLコードを編集するには、ラベルテキストボックスの最後にあるLimeSurveyのHTMLエディターを使用します(緑色のペンボタン[[File: HTML editor.png|0.85px]]をクリックします)。 | |||
<center>[[File:Labels HTML editor.png]]</center> | <center>[[File:Labels HTML editor.png]]</center> | ||
=== | {{Note|LimeSurveyで使用されるHTMLエディターについては、[[First_login_-_your_user_preferences/ja#Your_account_preferences#Your_personal_settings#HTML_editor_mode|次のページ]]を確認してください。}} | ||
<span id="Quick_add"></span> | |||
===素早く追加する=== | |||
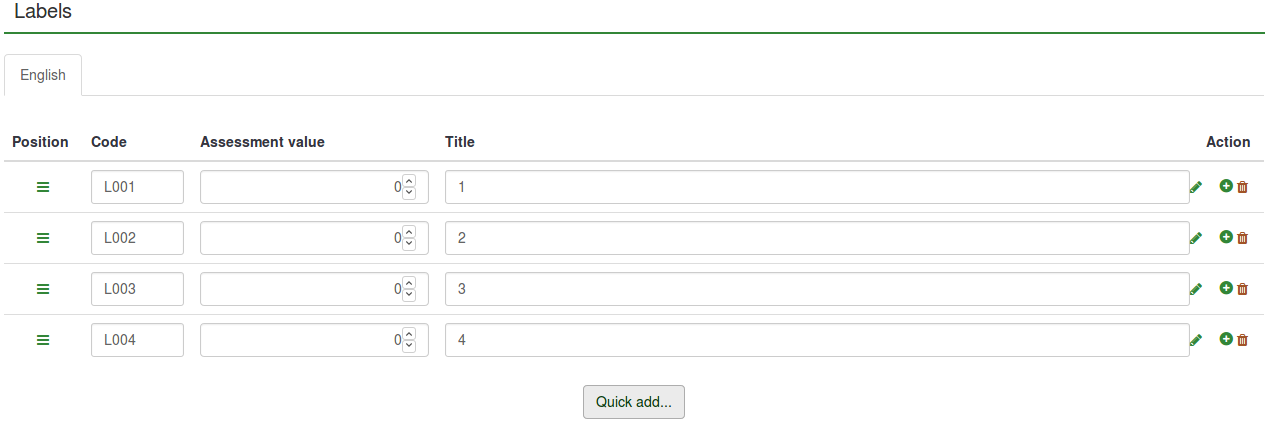
ラベルを追加する別の方法として、'''素早く追加...'''ボタンを使用する方法もあります。クリックすると、ウィンドウが表示されます。動作させるには、次の書式で記述します。'''コード ; 題名''' | |||
<center>[[File:QuickAddCodeLabel.png|0.8px]]</center> | <center>[[File:QuickAddCodeLabel.png|0.8px]]</center> | ||
ラベルを置き換えたり、追加したりできます。'''入れ替え'''をクリックすると、既存のラベルがすべて削除され、入力したラベルに置き換えられます。'''追加'''をクリックすると、新しいラベルがラベルセットに追加されます(既存のラベルは影響を受けません)。 | |||
<center>[[File:QuickAddResultsCodeandTitle.png|0.8px]]</center> | <center>[[File:QuickAddResultsCodeandTitle.png|0.8px]]</center> | ||
新たなエントリーが作成される場合、'''コード'''が自動的に追加されます。したがって、ラベルのタイトルだけを入力し、自動的にコードが割り当てることができます。 | |||
<center>[[File:QuickAddLabel.png|0.8px]]</center> | <center>[[File:QuickAddLabel.png|0.8px]]</center> | ||
<center>[[File:QuickAddLabelResults.png|0.8px]]</center> | <center>[[File:QuickAddLabelResults.png|0.8px]]</center> | ||
{{Alert|title= | '''評価値'''は、ここから入力/編集することはできません。ラベルのリストから手動で変更する必要があります。 | ||
{{Alert|title=注意|text='''素早く追加...'''機能を使ってラベルを翻訳するには、同じ行に翻訳を追加し、セミコロンで区切ります。}} | |||
<span id="...delete_a_label"></span> | |||
==ラベルの削除== | |||
ラベルを削除するには、'操作'の欄の下にある赤いゴミ箱のボタン([[File:Delete label.png|0.85px]])をクリックします。 | |||
<span id="...rearrange_a_label"></span> | |||
==ラベルの並べ替え== | |||
ラベルの順序を並べ替えるには、'場所'の欄の下にある緑色の記号([[File:Reorder labels.png|0.85px]])をクリックし、ラベルの位置を変更します。 | |||
<span id="...add_a_new_language"></span> | |||
==言語の追加== | |||
新しい言語を追加するには、'''新規ラベルセットを作成/インポート''' -> '''言語'''から追加する言語を選択します。 | |||
ラベルを別の言語に翻訳するには、ラベルを翻訳する言語をテーブルの上部から選択します。 | |||
[[File:Labels switch language.png]] | [[File:Labels switch language.png]] | ||
[[File:Labels 4lang ro.png]] | [[File:Labels 4lang ro.png]] | ||
前述のとおり、すべてのラベルには、コード、評価値、題名が必要です。ラベルの題名はすべての言語オプションで編集できますが、ラベルコードと評価値は、テーブルの言語ツールバーにある最初の言語からのみ編集できます。言語の順序はアルファベット順であり、変更することはできません。 | |||
この例の場合、ラベルのコードと評価値を変更できる言語は英語です。ルーマニアのタブが選択されている場合は、ラベルの題名のみを編集できます。これは、英語のラベルに対応するルーマニア語のラベルの翻訳となります。 | |||
変更が完了したら、画面の右上にある'変更を保存'ボタンをクリックしてください。 | |||
[[File:Save_changes_close.png]] | [[File:Save_changes_close.png]] | ||
=Examples= | <span id="Examples"></span> | ||
=例= | |||
{{Box|''さらに読み進む前に、[[Surveys - introduction/ja|アンケートを作成する方法に関するウィキ]]を見てください。以下の例では、すでにアンケートを作成していることを前提にしています。''}} | |||
ラベルセットオプションの理解を深めるために、以下の例を見てみましょう。 | |||
*[[Label_sets/ja#I_want_to_use_a_label_set_as_an_answer_list_for_one_question|質問に対する回答リストとしてラベルセットを使用したい]] | |||
*[[Label sets/ja#I want to use labels in another language as answers|回答として別の言語のラベルを使いたい]] | |||
*[[Label sets/ja#I want to use emoticons instead of label text|ラベルテキストの代わりに絵文字を使いたい]] | |||
*[[Label sets/ja#I want to import a label set and use it as a subquestion list|ラベルセットをインポートし、それをサブ質問リストとして使用したい]] | |||
{{Box|下記のスクリーンショットは、LimeSurvey 3.0のものです。このインターフェースは、最後のLimeSurvey 2.xxリリースと少し異なります。}} | |||
<span id="I_want_to_use_a_label_set_as_an_answer_list_for_one_question"></span> | |||
==質問に対する回答リストとしてラベルセットを使用したい== | |||
*[[ | |||
<div class='simplebox'>[[File:help.png]] '''構成''' - '''ラベルセット'''に表示されるすべてのラベルセットは、''定義済みのラベルセット''と呼ばれ、サブ質問または回答として使用することができます。</div> | |||
'''[[Label sets/ja#General|ラベルセット]]と[[Surveys - introduction/ja|アンケート]]が作成されたとします。''' | |||
*アンケートの構成に進み、[[Creating a question group/ja|質問グループ]](''About LimeSurvey'' - LimeSurveyについて')を作成します。 | |||
<center>[[File:CreateQuestionGroup.png]]</center> | <center>[[File:CreateQuestionGroup.png]]</center> | ||
* | |||
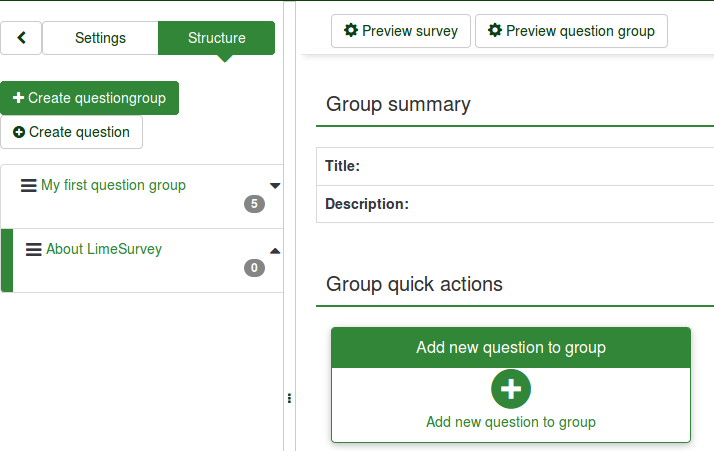
*構成タブをクリックして、新しく作成した質問グループ(この例では''About LimeSurvey'')をクリックします。グループのクイック操作から、'''新しい質問をグループに追加'''を選択します。 | |||
<center>[[File:AddNewQuestiontoGroup.png]]</center> | <center>[[File:AddNewQuestiontoGroup.png]]</center> | ||
* | |||
* | |||
*質問のコードとテキストを入力します。 | |||
*ラベルセットを回答のセットとして使用するには、ラベルセットを使用できる質問タイプを選択します。 この例では、 ''配列''質問タイプが選択されています。 | |||
<center>[[File:ArrayQuestionTypeLabelSets.png]]</center> | <center>[[File:ArrayQuestionTypeLabelSets.png]]</center> | ||
* | |||
* | |||
*質問を保存して質問グループに追加します。 | |||
*作成したら、サブ質問と回答を追加する必要があります。 | |||
<center>[[File:EditSubquestionsandAnswerOptions.png]]</center> | <center>[[File:EditSubquestionsandAnswerOptions.png]]</center> | ||
* | <div class='simplebox'>[[File:help.png]] すべての質問タイプでサブ質問や回答が必要であるとは限りません。</div> | ||
*少なくとも1つのサブ質問を追加します。 | |||
<center>[[File:ArraySubquestions.png]]</center> | <center>[[File:ArraySubquestions.png]]</center> | ||
* | |||
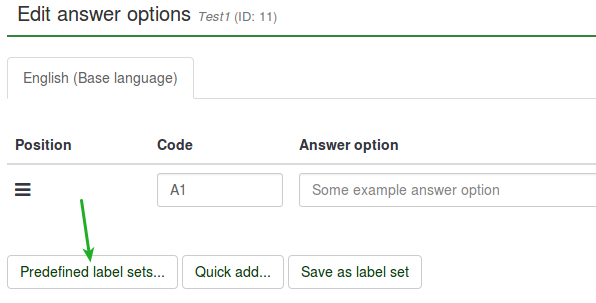
*回答オプションを追加します。'''定義済みのラベルセット...'''オプションを使います。 | |||
<center>[[File:EditAnswerOptions.png]]</center> | <center>[[File:EditAnswerOptions.png]]</center> | ||
* | |||
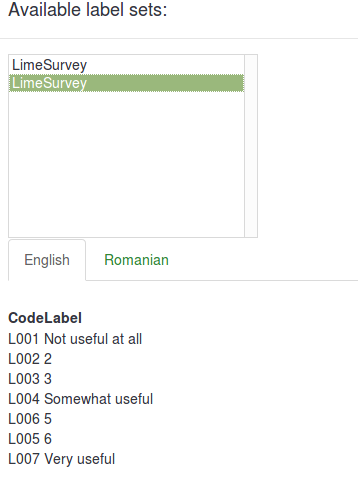
*使用するラベルセットを選択します。 | |||
<center>[[File:AvailableLabelSetsEnglish.png|0.7px]]</center> | <center>[[File:AvailableLabelSetsEnglish.png|0.7px]]</center> | ||
結果は次のようになります。 | |||
<center>[[File:EditAnswerOptionsResults.png]]</center> | <center>[[File:EditAnswerOptionsResults.png]]</center> | ||
* | |||
*質問を保存してプレビューします。 | |||
<center>[[File:LabelSetsFinal.png]]</center> | <center>[[File:LabelSetsFinal.png]]</center> | ||
== | <span id="I_want_to_use_labels_in_another_language_as_answers"></span> | ||
==他の言語の回答としてラベルを使用する== | |||
{{Box|この例を読む前に... | |||
#ラベルセットを作成し、アンケートに使用する他の言語を選択します。詳細については、[[Label sets/ja#...add a new language|他の言語のラベルセットの翻訳方法]]に関するウィキを読んでください。 | |||
#翻訳したい言語を追加して、アンケートを編集します('''設定''' -> 一般設定)。アンケートの作成方法の詳細については、[[Surveys - introduction/ja|こちらのウィキ]]をお読みください。}} | |||
'''[[Label sets/ja#General|ラベルセット]]と[[Surveys - introduction/ja|アンケート]]が作成されているものとします。''' | |||
*ラベルセットを利用できる質問を作成します(例えば''配列''質問タイプ)。 | |||
{{Alert|title=注意|text=言語ツールバーから翻訳したい言語を選択してください。}} | |||
*''配列''質問タイプが選択されているため、サブ質問と回答の両方を翻訳する必要があります。 | |||
<center>[[File:EditSubquestionsandAnswerOptions.png]]</center> | <center>[[File:EditSubquestionsandAnswerOptions.png]]</center> | ||
* | |||
*サブ質問を翻訳してください。翻訳する言語タブを選択してください。 | |||
<center>[[File:ExampleAddLanguageSubquestions.png]]</center> | <center>[[File:ExampleAddLanguageSubquestions.png]]</center> | ||
* | |||
*回答を翻訳してください。 ただし、定義済みのラベルセットを使用するため、適切な言語タブを選択して、翻訳されたラベルセットを回答オプションとして追加します。 | |||
<center>[[File:AvailableLabelSetsRomanian.png]]</center> | <center>[[File:AvailableLabelSetsRomanian.png]]</center> | ||
<center>[[File:ExampleEditAnswerOptionsRomanian.png]]</center> | <center>[[File:ExampleEditAnswerOptionsRomanian.png]]</center> | ||
* | |||
*アンケートを保存してプレビューします。 | |||
<center>[[File:PreviewAddRomanianLabels.png]]</center> | <center>[[File:PreviewAddRomanianLabels.png]]</center> | ||
== | <span id="I_want_to_use_emoticons_instead_of_label_text"></span> | ||
==ラベルテキストの代わりに絵文字を使う== | |||
{{Box|絵文字(またはその他のグラフィックス)を使用するには、ラベルを作成するときに組み込みのHTMLエディターを使用する必要があります。}} | |||
'''[[Surveys - introduction/ja|アンケート]]を作成済みとします。''' | |||
*[[Label sets/ja#...add a label|ラベルセットを作成してアクセスします]]。 ''題名''列にテキストを書き込む代わりに、緑のペンをクリックしてHTMLエディターを開いてグラフィックスを追加します。 | |||
<center>[[File:GreenPenButtonHTMLLabels.png]]</center> | <center>[[File:GreenPenButtonHTMLLabels.png]]</center> | ||
<center>[[File:InlineMode1.PNG]]</center> | <center>[[File:InlineMode1.PNG]]</center> | ||
HTMLエディターでは、さまざまなオプションを使用してアンケートを拡張する方法が包括的に表示されます。ツールバーが直感的なので、HTML知識は必要ありません(詳細を調べるには、マウスをオプションの上に置くか、そのオプションをクリックします)。このエディターで、オンラインまたはサーバー上でホストされているスマイリー、画像、ビデオなどを追加することもできます。 | |||
この例では、3つのスマイリーが追加されています。 | |||
<center>[[File:SmileysLabelsExample.png]]</center> | <center>[[File:SmileysLabelsExample.png]]</center> | ||
* | |||
*ラベルセットを定義済みの回答として利用できる質問を作成します(例: ''配列''質問タイプ)。 | |||
<center>[[File:New Question Label Sets Emoticons.png]]</center> | <center>[[File:New Question Label Sets Emoticons.png]]</center> | ||
* | |||
*サブ質問と回答オプションを編集します。 | |||
<center>[[File:EditSubquestionsandAnswerOptions.png]]</center> | <center>[[File:EditSubquestionsandAnswerOptions.png]]</center> | ||
*Set predefined labels as answer | |||
*Set predefined labels as answer 定義済みのラベルを回答オプションとして設定します。 | |||
<center>[[File:SmileysLabelsExample.png|SmileysLabelsExample.png]]</center> | <center>[[File:SmileysLabelsExample.png|SmileysLabelsExample.png]]</center> | ||
* | |||
*質問を保存してプレビューします。 | |||
<center>[[File:Preview Label Set Emoticons.png]]</center> | <center>[[File:Preview Label Set Emoticons.png]]</center> | ||
== | <span id="I_want_to_import_a_label_set_and_use_it_as_a_subquestion_list"></span> | ||
==ラベルセットをインポートし、サブ質問リストとして使用する== | |||
''' | '''[[Surveys - introduction/ja|アンケート]]が作成されているものとします。''' | ||
{{Box|'' | {{Box|''オプション'': [https://www.limesurvey.org/index.php/downloads/category/19-templates '''LimeSurveyテンプレートデータベース''']にアクセスして、使用する.lsl形式のファイル(この例では''オーストラリアの州'')をダウンロードします。}} | ||
* | *'''構成'''に移動し、'''ラベルセットの管理'''ボタンをクリックします。 | ||
* | *'''新規ラベルセットを作成/インポート'''(画面左上) -> '''ラベルセットをインポート'''。 '''ファイルを選択'''から、.lslファイル(ラベルセット形式)を選択します。 | ||
<center>[[File:ImportaNewLabel.png]]</center> | <center>[[File:ImportaNewLabel.png]]</center> | ||
* | * ラベルセットがアップロードされたので、サブ質問を使用する質問('''配列'''質問タイプ)を作成します。 | ||
* | * サブ質問を編集します。 | ||
<center>[[File:EditSubquestionsandAnswerOptions.png]]</center> | <center>[[File:EditSubquestionsandAnswerOptions.png]]</center> | ||
* | * インポートされたラベルセットを読み込みます。 | ||
<center>[[File:Australia Code Label.png]]</center> | <center>[[File:Australia Code Label.png]]</center> | ||
<center>[[File:Australia Label Set.png]]</center> | <center>[[File:Australia Label Set.png]]</center> | ||
* | * 保存してプレビューします。 | ||
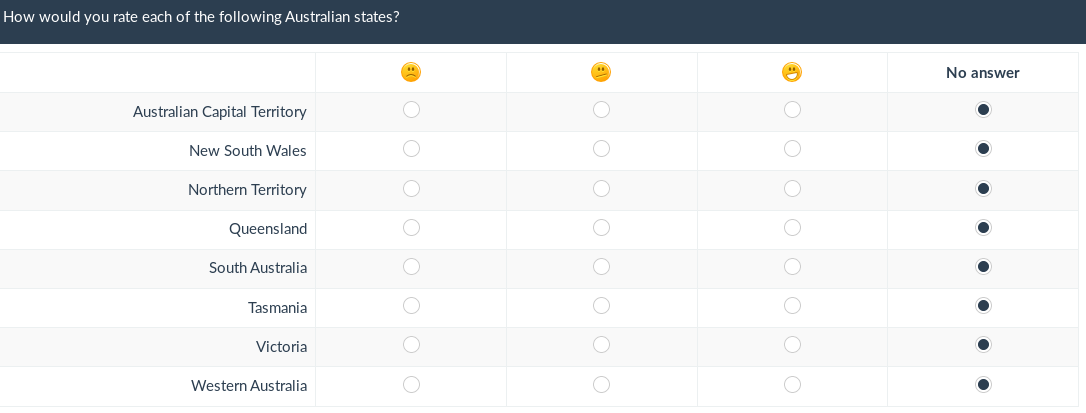
<center>[[File:Australia Save and Preview.png]]</center> | <center>[[File:Australia Save and Preview.png]]</center> | ||
Latest revision as of 01:13, 13 April 2024
概要
ラベルセットはリストのテンプレートであり、各リストにはラベル付きのコードセットがあり、ほとんどの質問タイプで回答またはサブ質問として使用できます。LimeSurveyのラベルセットは、サブ質問や回答として質問にコピーされるだけであることにご留意ください。したがって、アンケートでラベルセットを使用した後にラベルセットを変更しても、各ラベルセットを使用しているアンケートの質問には反映されません。 この新しいラベルセットを使用することにより、将来の開発に柔軟性が増し、質問の構造がより論理的になります。
以下のラベルセットの例は、概念をよりよく理解することができます。LimeSurveyのラベルセット管理機能に直接移動したい場合は、ここをクリックしてください。
自作の7点スケールを定義する場合、ラベルセットがこの機能を果たします。下の例では、コード/ラベルのペア(ラベルは実際の質問に表示されます)で設定された非常に単純なカスタムラベルです。
| コード | ラベル |
| 1 | 役に立たない |
| 2 | 2 |
| 3 | 3 |
| 4 | やや役に立った |
| 5 | 5 |
| 6 | 6 |
| 7 | とても役に立った |
ラベルテキストの代わりに3つの異なるスマイリーが使用されるグラフィカルな例を以下に示します。

ラベルセットの使い方
ラベルセットを編集、作成、削除、インポート、エクスポートするには、設定メニューのラベルセット管理をクリックします。

ラベルセットの作成、インポート
ページの左上にある新規ラベルセットを作成/インポートボタンをクリックします。新しいラベルセットを作成したり、別のソースからインポートしたりすることもできます。
- 新しいラベルセット: ラベルセットを手動で作成します。
- 名前を設定: 新しいラベルセットに付ける名前を設定します。
- 言語: ラベルセットは言語を指定する必要があります。メニューから言語を選択することができます。
- ラベルセットをインポート: ラベルセットをインポートするには、ファイルを選択をクリックし、ラベルセットファイル.lslを追加します。以前にラベルセットを作成していた場合は、同じラベルセットが既に存在している場合は、インポートされませんをオフにしない限りインポートできません。LimeSurveyのウェブサイトでは、便利なラベルセットがあります。
ラベルをインポートまたは作成したら、画面の右上にある保存ボタンをクリックします。
ラベルセットの編集、削除、エクスポート
ラベルセットリストのそれぞれのエントリーには、対応するメニューがあり、次の4つのオプションがあります。
- ラベル表示: ラベルセットのラベルを表示します。
- ラベルセットの編集: ラベルセットの名前を変更したり、言語の追加/削除を行うことができます。
- ラベルセット出力: ラベルを.lslファイルにエクスポートします。
- ラベルセットの削除: ラベルセットを削除するかどうかを確認するためのウィンドウがポップアップ表示されます。
ラベルの使い方
ラベルの追加
ラベルのコード、評価値、題名を入力する必要があります。

次に、プラス記号のアイコン![]() をクリックし、新しいラベルを追加します。ラベルテキストの代わり、またはテキストに加えてグラフィックを使用することも可能です。これには、HTMLコードを使用して、必要なグラフィックを含める必要があります。例は以下のとおりです。
をクリックし、新しいラベルを追加します。ラベルテキストの代わり、またはテキストに加えてグラフィックを使用することも可能です。これには、HTMLコードを使用して、必要なグラフィックを含める必要があります。例は以下のとおりです。
<img border="0" src="http://www.yourdomain.at/pics/pic.gif">HTMLコードを編集するには、ラベルテキストボックスの最後にあるLimeSurveyのHTMLエディターを使用します(緑色のペンボタン![]() をクリックします)。
をクリックします)。

素早く追加する
ラベルを追加する別の方法として、素早く追加...ボタンを使用する方法もあります。クリックすると、ウィンドウが表示されます。動作させるには、次の書式で記述します。コード ; 題名
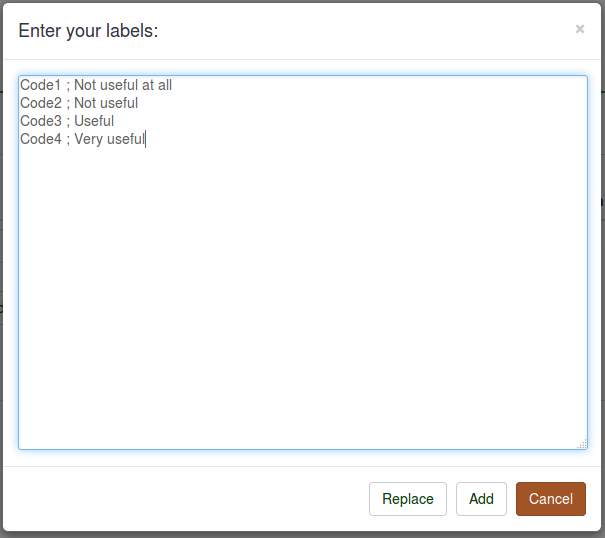
ラベルを置き換えたり、追加したりできます。入れ替えをクリックすると、既存のラベルがすべて削除され、入力したラベルに置き換えられます。追加をクリックすると、新しいラベルがラベルセットに追加されます(既存のラベルは影響を受けません)。
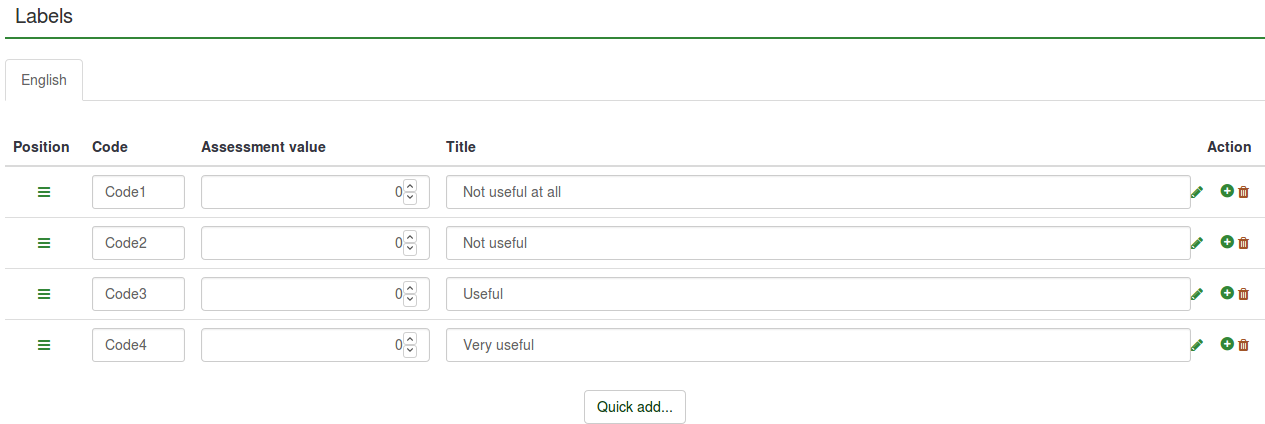
新たなエントリーが作成される場合、コードが自動的に追加されます。したがって、ラベルのタイトルだけを入力し、自動的にコードが割り当てることができます。
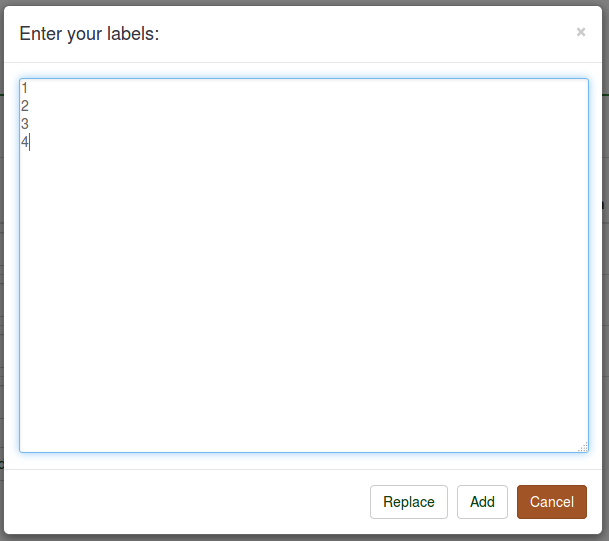
評価値は、ここから入力/編集することはできません。ラベルのリストから手動で変更する必要があります。
ラベルの削除
ラベルを削除するには、'操作'の欄の下にある赤いゴミ箱のボタン(![]() )をクリックします。
)をクリックします。
ラベルの並べ替え
ラベルの順序を並べ替えるには、'場所'の欄の下にある緑色の記号(![]() )をクリックし、ラベルの位置を変更します。
)をクリックし、ラベルの位置を変更します。
言語の追加
新しい言語を追加するには、新規ラベルセットを作成/インポート -> 言語から追加する言語を選択します。
ラベルを別の言語に翻訳するには、ラベルを翻訳する言語をテーブルの上部から選択します。
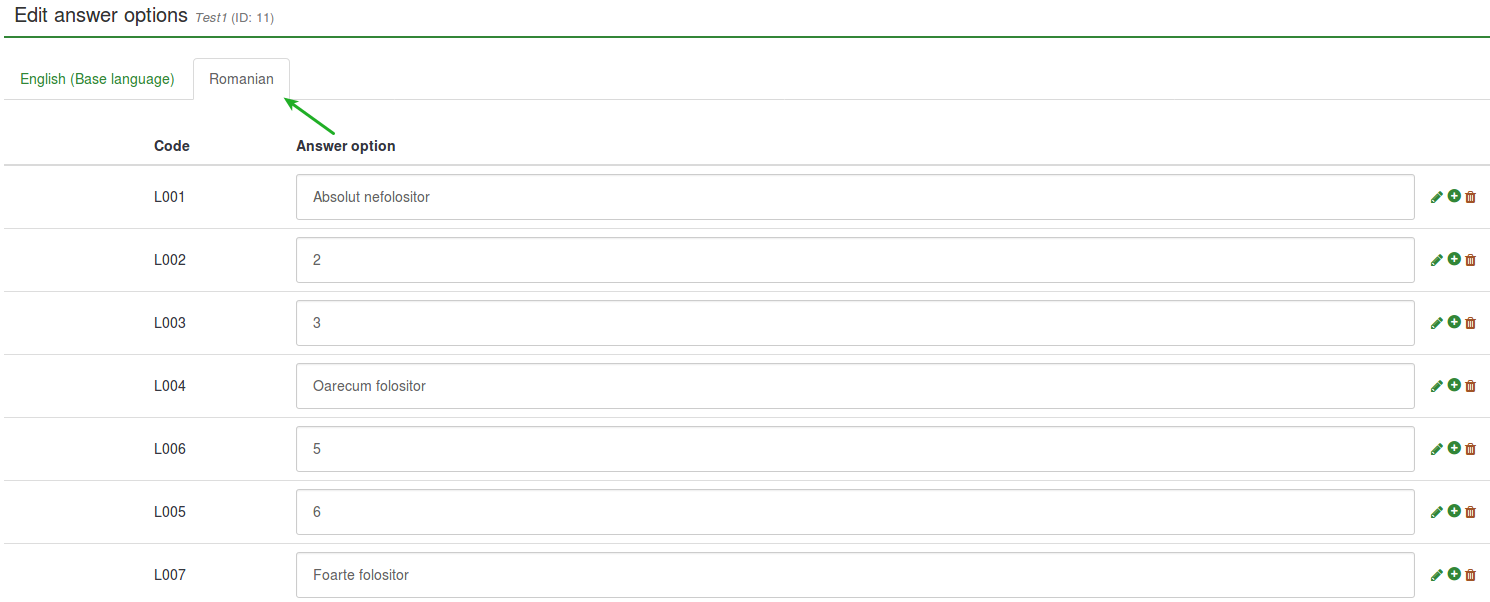
前述のとおり、すべてのラベルには、コード、評価値、題名が必要です。ラベルの題名はすべての言語オプションで編集できますが、ラベルコードと評価値は、テーブルの言語ツールバーにある最初の言語からのみ編集できます。言語の順序はアルファベット順であり、変更することはできません。
この例の場合、ラベルのコードと評価値を変更できる言語は英語です。ルーマニアのタブが選択されている場合は、ラベルの題名のみを編集できます。これは、英語のラベルに対応するルーマニア語のラベルの翻訳となります。
変更が完了したら、画面の右上にある'変更を保存'ボタンをクリックしてください。
例
ラベルセットオプションの理解を深めるために、以下の例を見てみましょう。
質問に対する回答リストとしてラベルセットを使用したい
- アンケートの構成に進み、質問グループ(About LimeSurvey - LimeSurveyについて')を作成します。

- 構成タブをクリックして、新しく作成した質問グループ(この例ではAbout LimeSurvey)をクリックします。グループのクイック操作から、新しい質問をグループに追加を選択します。
- 質問のコードとテキストを入力します。
- ラベルセットを回答のセットとして使用するには、ラベルセットを使用できる質問タイプを選択します。 この例では、 配列質問タイプが選択されています。

- 質問を保存して質問グループに追加します。
- 作成したら、サブ質問と回答を追加する必要があります。

- 少なくとも1つのサブ質問を追加します。

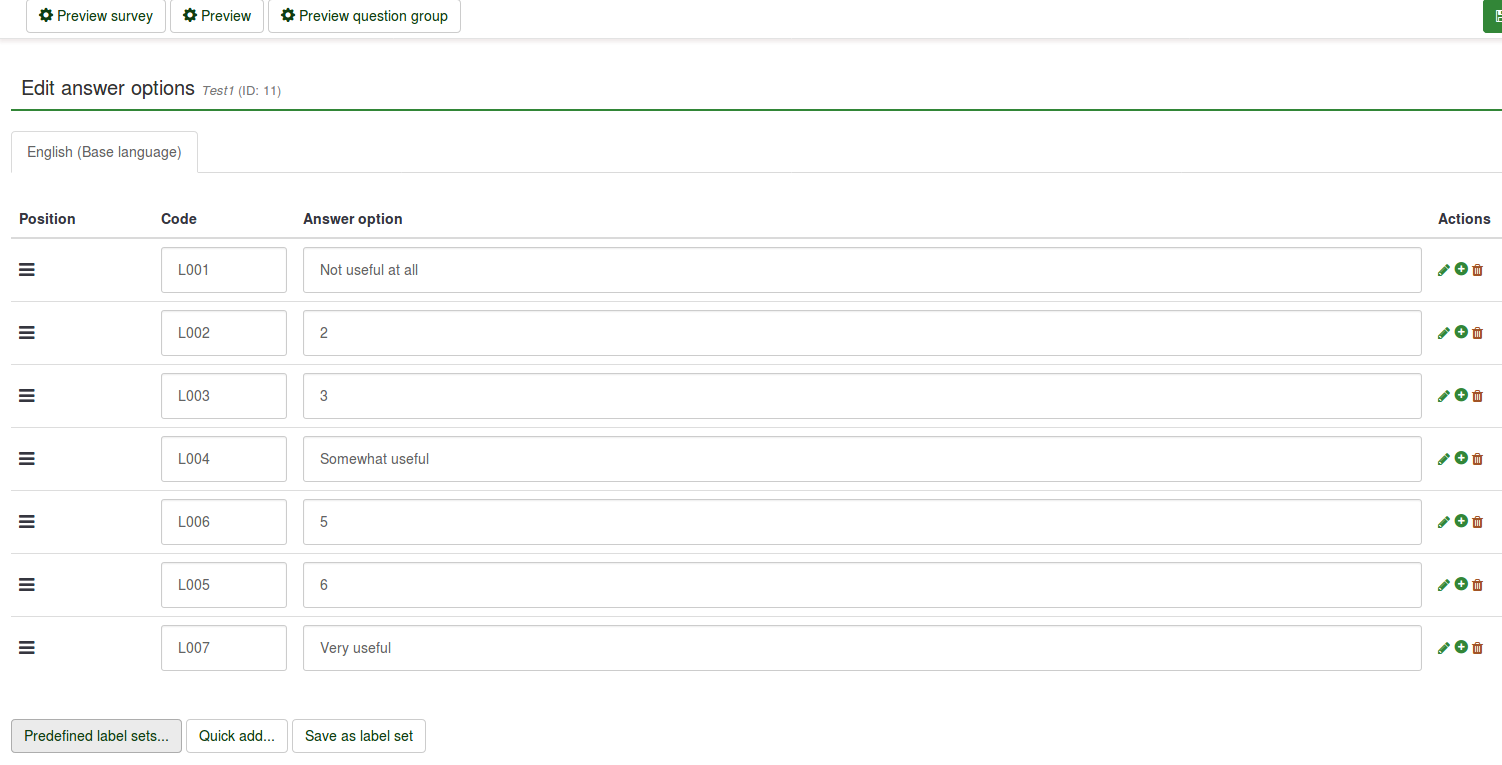
- 回答オプションを追加します。定義済みのラベルセット...オプションを使います。
- 使用するラベルセットを選択します。
結果は次のようになります。
- 質問を保存してプレビューします。

他の言語の回答としてラベルを使用する
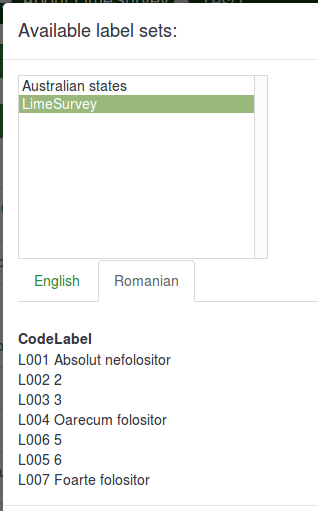
- ラベルセットを作成し、アンケートに使用する他の言語を選択します。詳細については、他の言語のラベルセットの翻訳方法に関するウィキを読んでください。
- 翻訳したい言語を追加して、アンケートを編集します(設定 -> 一般設定)。アンケートの作成方法の詳細については、こちらのウィキをお読みください。
- ラベルセットを利用できる質問を作成します(例えば配列質問タイプ)。
- 配列質問タイプが選択されているため、サブ質問と回答の両方を翻訳する必要があります。

- サブ質問を翻訳してください。翻訳する言語タブを選択してください。

- 回答を翻訳してください。 ただし、定義済みのラベルセットを使用するため、適切な言語タブを選択して、翻訳されたラベルセットを回答オプションとして追加します。
- アンケートを保存してプレビューします。

ラベルテキストの代わりに絵文字を使う
アンケートを作成済みとします。
- ラベルセットを作成してアクセスします。 題名列にテキストを書き込む代わりに、緑のペンをクリックしてHTMLエディターを開いてグラフィックスを追加します。


HTMLエディターでは、さまざまなオプションを使用してアンケートを拡張する方法が包括的に表示されます。ツールバーが直感的なので、HTML知識は必要ありません(詳細を調べるには、マウスをオプションの上に置くか、そのオプションをクリックします)。このエディターで、オンラインまたはサーバー上でホストされているスマイリー、画像、ビデオなどを追加することもできます。
この例では、3つのスマイリーが追加されています。

- ラベルセットを定義済みの回答として利用できる質問を作成します(例: 配列質問タイプ)。
- サブ質問と回答オプションを編集します。

- Set predefined labels as answer 定義済みのラベルを回答オプションとして設定します。

- 質問を保存してプレビューします。
ラベルセットをインポートし、サブ質問リストとして使用する
アンケートが作成されているものとします。
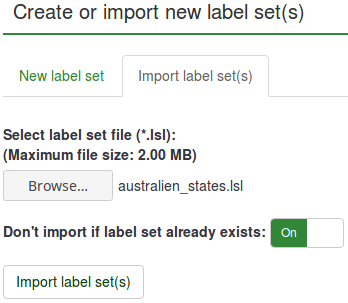
- 構成に移動し、ラベルセットの管理ボタンをクリックします。
- 新規ラベルセットを作成/インポート(画面左上) -> ラベルセットをインポート。 ファイルを選択から、.lslファイル(ラベルセット形式)を選択します。
- ラベルセットがアップロードされたので、サブ質問を使用する質問(配列質問タイプ)を作成します。
- サブ質問を編集します。

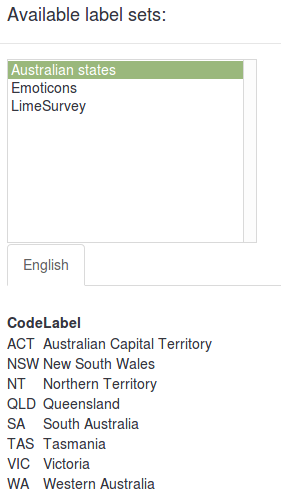
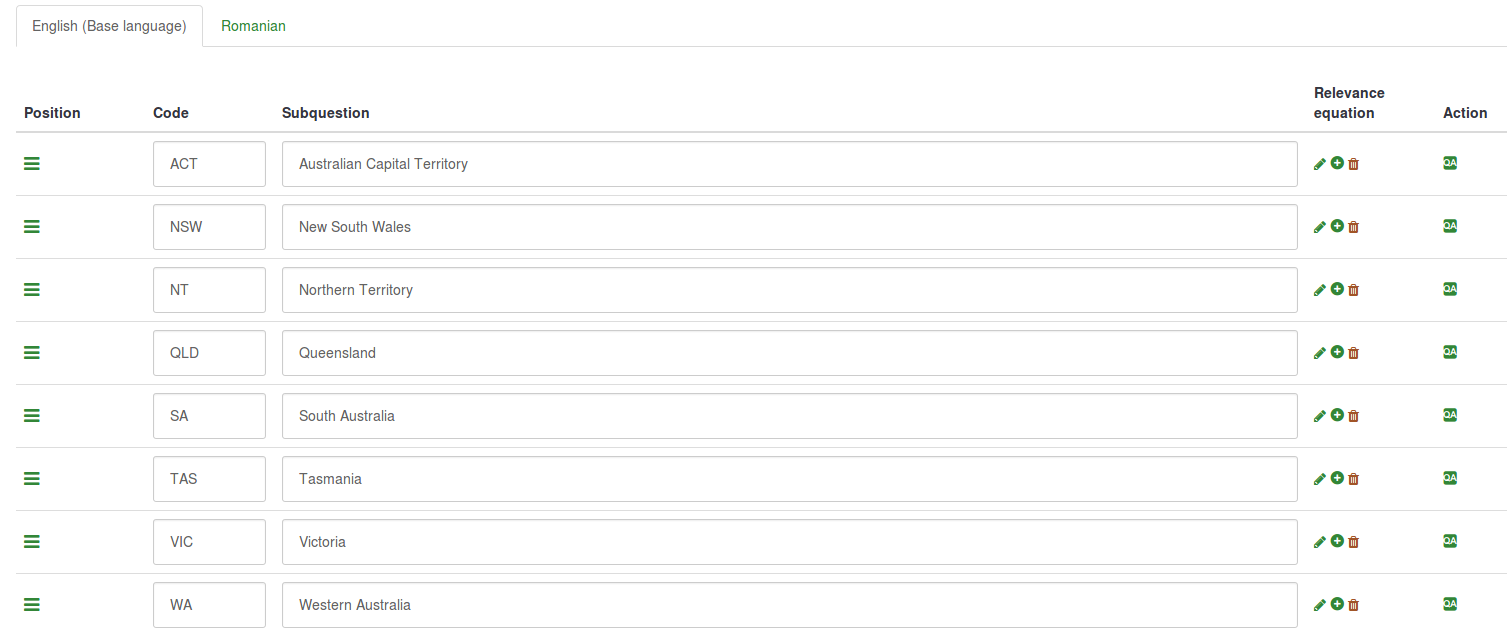
- インポートされたラベルセットを読み込みます。
- 保存してプレビューします。
