General FAQ/ja: Difference between revisions
From LimeSurvey Manual
Bravehorse (talk | contribs) (Created page with "を次のように変更します。") |
Bravehorse (talk | contribs) No edit summary |
||
| (235 intermediate revisions by 4 users not shown) | |||
| Line 1: | Line 1: | ||
<languages /> | <languages /> | ||
__TOC__ | __TOC__ | ||
{{Note|以下の回答は LimeSurvey ユーザーコミュニティーで提供されたものです。何かわからないことがあった場合、次にすべきことについて自信がない場合は、コミュニティのメンバーにあなたの質問を送信できます ( https://forums.limesurvey.org )。専門家のサポートが必要な場合は、認定パートナーの一覧をご確認ください : https://limesurvey.com}} | |||
=はじめに= | =はじめに= | ||
マニュアルはなるべく読みたくないけど、LimeSurvey でできることを感じたい場合、YouTube でチュートリアル動画を見ることをお勧めします。 | |||
*[https://www.youtube.com/watch?v=oyoq14XpkwA アカウントの設定・アンケートの設置する方法] | |||
*[https://www.youtube.com/watch?v=7134QebOQzY 質問タイプ - 配列] | |||
*[https://www.youtube.com/watch?v=aeb93vAe7R4 評価] | |||
*[https://www.youtube.com/watch?v=s5OOzDoPjIU プレースホルダー項目] | |||
*[https://www.youtube.com/watch?v=7N4xUQMWbJY ラジオリスト] | |||
*[https://www.youtube.com/watch?v=UI01hwrsiVk アンケートのコピーとインポート] | |||
*[https://www.youtube.com/watch?v=QEHyH1YbNEQ 質問のインポート] | |||
{{Note|優れた動画をご存じでしたら、遠慮なく私たちにお知らせください。}} | |||
==LimeSurvey の簡単な説明を== | |||
LimeSurvey の簡単な説明は、次の 2 つのリンクをご覧ください。 | |||
*[[Quick start guide - LimeSurvey 2.50+/ja|LimeSurvey 2.50+]] | |||
*[[Quick start guide - LimeSurvey 3.0+/ja|Limesurvey 3+]] | |||
{{Alert|現在、LimeSurvey の紹介ビデオの制作に取り組んでいます。}} | |||
=アンケートのデザインとレイアウト= | =アンケートのデザインとレイアウト= | ||
==より短い URL にしたい。URL から index.php を削除するにはどうすればいい?== | |||
親しみやすい URL ( それぞれの URL に /index.php を含めない ) をご希望の場合は、 /application/config/config.php を編集して変更してください。 | |||
<syntaxhighlight lang="php | <syntaxhighlight lang="php">'showScriptName' => true,</syntaxhighlight> | ||
を次のように | |||
<syntaxhighlight lang="php">'showScriptName' => false,</syntaxhighlight> | |||
これを正しく動作させるには、Apache Web サーバーに mod_rewrite モジュールを適切にインストールしなくてはなりません。 | |||
===nginx Webサーバーを使用する場合=== | |||
[http://nginx.com/products/ nginx] http サーバーで ( FastCGI 経由で PHP を実行 )、''''urlFormat' => 'path''''設定 ( 詳しくは config.php を参照 ) を使用する場合は、次の Nginx Web サイト設定をご検討ください。 | |||
<syntaxhighlight lang="apache">server { | <syntaxhighlight lang="apache">server { | ||
| Line 51: | Line 61: | ||
root /PATH/TO/LIMESURVEY; | root /PATH/TO/LIMESURVEY; | ||
charset utf-8; | charset utf-8; | ||
try_files $uri /index.php?$args; | try_files $uri /index.php?$uri&$args; | ||
location ~ ^/(protected| | # Disallow reading inside php script directory, see issue with debug > 1 on note | ||
location ~ ^/(application|docs|framework|locale|protected|tests|themes/\w+/views) { | |||
deny all; | |||
} | |||
# Disallow reading inside runtime directory | |||
location ~ ^/tmp/runtime/ { | |||
deny all; | deny all; | ||
} | |||
# Allow access to well-known directory, different usage, for example ACME Challenge for Let's Encrypt | |||
location ~ /\.well-known { | |||
allow all; | |||
} | |||
# Deny all attempts to access hidden files | |||
# such as .htaccess, .htpasswd, .DS_Store (Mac). | |||
location ~ /\. { | |||
deny all; | |||
} | |||
#Disallow direct read user upload files | |||
location ~ ^/upload/surveys/.*/fu_[a-z0-9]*$ { | |||
return 444; | |||
} | |||
#Disallow uploaded potential executable files in upload directory | |||
location ~* /upload/.*\.(pl|cgi|py|pyc|pyo|phtml|sh|lua|php|php3|php4|php5|php6|pcgi|pcgi3|pcgi4|pcgi5|pcgi6|icn)$ { | |||
return 444; | |||
} | } | ||
#avoid processing of calls to unexisting static files by yii | #avoid processing of calls to unexisting static files by yii | ||
| Line 70: | Line 103: | ||
}</syntaxhighlight> | }</syntaxhighlight> | ||
== | {{Note|この設定では、アプリケーション内のファイルアクセスを無効にします。アプリケーション内の JavaScript および CSS ファイルの一部には、debug> 0 で読み取り可能にしなくてはならないものがあります。デバッグモードを有効にし、設定ファイルに <code><nowiki>'use_asset_manager' => 1,</nowiki></code> と設定する ( または <code><nowiki>application</nowiki></code> from the directory list</code>を削除する ) ことでアセットマネージャーの使用を強制できます。}} | ||
結果は次のようになります。 | |||
<center>[[File:Remove index.php steps.png]]</center> | |||
==回答必須の質問の <span style='color:red'>*</span> ( 赤いアスタリスク ) を取り除くには?== | |||
===LimeSurvey 2でのやり方=== | |||
LimeSurvey 2.xでは、必須であることを示す赤いアスタリスクはtemplate.cssファイル("asterisk"クラス)内に設定されています。それを隠すには、 | |||
*テンプレートエディタを開く | |||
*変更したいテンプレートのコピーを作成する | |||
*"template.css"ファイルを選択して、asteriskクラスを検索する | |||
*asteriskクラスの最後に次の設定を追加する: ".asterisk {display: none;}" | |||
*template.cssを保存する | |||
*編集したtemplate.cssが再読み込みされ、キャッシュから取得されないように、ブラウザのキャッシュをクリアする | |||
===LimeSurvey 3 でのやり方=== | |||
上記の LimeSurvey 2 の手順と似ています。 | |||
* 希望のテーマにアクセスします。既定のテーマの場合は、"拡張" ボタンをクリックしてコピーを作成します。 | |||
* テーマのリストにアクセスして、新たに作成したテーマに対応する'''テーマエディター'''をクリックします。 | |||
* 左側に、対応するテーマに対応する CSS ファイルが表示されます。 | |||
* custom.css をクリックし、以下の行を追加します。 | |||
<syntaxhighlight lang="css">.asterisk {display: none;}</syntaxhighlight> | |||
*変更を保存します。通常、質問テキストの先頭に表示される赤いアスタリスクが非表示になります。 | |||
==Flash ファイルを埋め込むには?== | |||
まず[[Global settings/ja|全体設定]]に行き、XSSフィルターを無効にします。また、そのフィルターを無効にすることどうなるかは理解しておいてください。フィルターが有効な場合、次の手順は機能'''しません'''。 | |||
#Flashファイルを挿入する場所に移動します。これは、質問、サブ質問、回答、アンケートのようこそ/終了のテキストなど、統合されたHTMLエディタを使用できる場所であればどこでもかまいません。 | |||
#エディターツールバーの'LimeFitWin'ボタンをクリックし、[[First login - Your user preferences/ja#Popup|フルスクリーンエディタモード]]を開きます。 | |||
#フルスクリーンエディタのツールバーには、Flashシンボル付きの小さなボタンがあります。クリックすると、ダイアログボックスが開きます。 | |||
#このボックスでは、既存のFlashファイルのパスを指定するか、'サーバーを閲覧'ボタンをクリックします。 | |||
#'サーバーを閲覧'ボタンをクリックすると、ファイルブラウザが表示され、下部にはファイルアップロードフィールドが表示されます。既存のファイルを選択するか、ファイルをアップロードしてください。 | |||
それでおしまいです。この説明が不完全な場合は、適宜更新してください。 | |||
{{Alert|title=注意|text=LimeSurvey 3での利用手順も同様です。ただし、flashファイルを使用することはお勧めしません。}} | |||
==だれでも参加できる一般公開のアンケートを作るには?== | |||
だれでも参加できる一般公開のアンケートを作る場合は、[[Survey participants/ja|アンケート参加者テーブル]]を作成しないでください! [[Overview/ja|概要パネル]]にあるアンケートリンクを共有 ( 公開 ) します。 | |||
==登録の公開 - そのための必須項目== | |||
[[Survey participants/ja|アンケート参加者テーブル]]を使うとともに[[Participant_settings/ja#.E5.8F.82.E5.8A.A0.E7.99.BB.E9.8C.B2.E8.A8.B1.E5.8F.AF|参加登録]]も許可している場合は、参加者がアンケートを開くと次のメッセージを表示します。 | |||
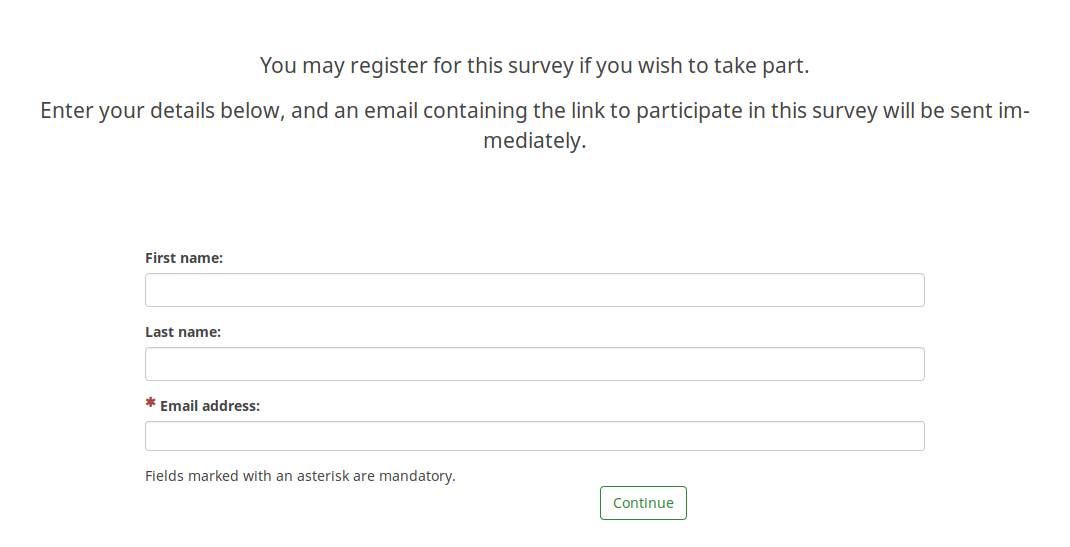
<center>[[File:non-mandatory public reg.png]]</center> | |||
上図のように、メールアドレスの項目のみ、必須です。 | |||
3 つの項目すべてを必須にするには、以下のようにアンケート テーマを編集してください。 「Fruity」テーマを使っている場合は、'''登録'''画面に移動して、参加者のメールアドレス項目がどう表示されるかを確認してください。 | |||
<syntaxhighlight lang="twig"> | |||
{# Participants email #} | |||
<div class='{{ aSurveyInfo.class.registerformcolrowc }} form-group row' {{ aSurveyInfo.attr.registerformcolrowc }}> | |||
<label {{ aSurveyInfo.attr.registerformcolrowclabel }} class='{{ aSurveyInfo.class.registerformcolrowclabel }} control-label'> {{ gT("Email address:") }} {{ include('./subviews/registration/required.twig') }}</label> | |||
<div {{ aSurveyInfo.attr.registerformcolrowcdiv }} > | |||
{{ C.Html.textField('register_email', aSurveyInfo.sEmail, ({'id' : 'register_email','class' : 'form-control input-sm','required' : true})) }} | |||
</div> | |||
</div> | |||
</syntaxhighlight> | |||
その後、姓と名の項目を編集し、次のようにラベルを追加 : <syntaxhighlight lang="twig">{{ include('./subviews/registration/required.twig') }}</syntaxhighlight> そして、この行を記入必須項目にします。 <syntaxhighlight lang="twig">'required' : true</syntaxhighlight> | |||
編集したファイルは次のようになります : | |||
<syntaxhighlight lang="twig"> | |||
{# Participants first name #} | |||
<div class='{{ aSurveyInfo.class.registerformcolrow }} form-group row' {{ aSurveyInfo.attr.registerformcolrow }}> | |||
<label for='register_firstname' class='{{ aSurveyInfo.class.registerformcolrowlabel }} control-label '>{{ gT("First name:") }} {{ include('./subviews/registration/required.twig') }}</label> {# extra label #} | |||
<div class=""> | |||
{{ C.Html.textField('register_firstname', aSurveyInfo.sFirstName, ({'id' : 'register_firstname','class' : 'form-control', 'required' : true})) }} {# mandatory field #} | |||
</div> | |||
</div> | |||
{# Participants last name #} | |||
<div class='{{ aSurveyInfo.class.registerformcolrowb }} form-group row' {{ aSurveyInfo.attr.registerformcolrowb }}> | |||
<label {{ aSurveyInfo.attr.registerformcolrowblabel }} class='{{ aSurveyInfo.class.registerformcolrowblabel }} control-label '>{{ gT("Last name:") }} {{ include('./subviews/registration/required.twig') }}</label> {# extra label #} | |||
<div {{ aSurveyInfo.attr.registerformcolrowbdiv }} > | |||
{{ C.Html.textField('register_lastname', aSurveyInfo.sLastName, ({'id' : 'register_lastname', 'class' : 'form-control', 'required' : true})) }} {# mandatory field #} | |||
</div> | |||
</div> | |||
</syntaxhighlight> | |||
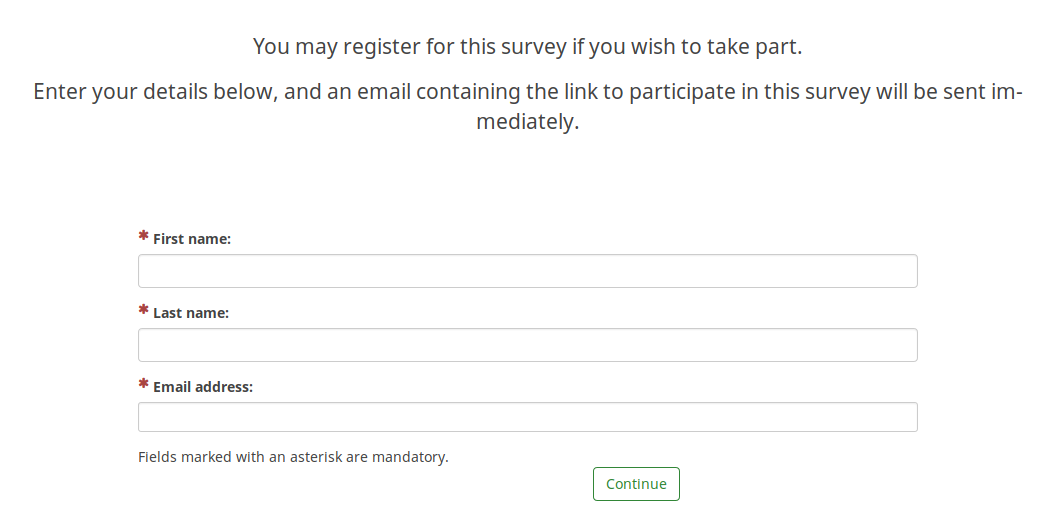
これで、公開の参加登録ページは次のようになりました ( すべての項目が入力必須です ) 。 | |||
<center>[[File:mandatory public reg.png]]</center> | |||
==言語切り替えを非表示に== | |||
2 つの言語切り替えスイッチ ( アンケートのタイトルの近くとページの右上 ) を非表示にする手順は、[[Multilingual_survey/ja#.E3.83.92.E3.83.B3.E3.83.88.E3.81.A8TIP|多言語アンケート]]についての Wiki セクションで説明しています。 | |||
==「回答を破棄して終了」を非表示にするには?== | |||
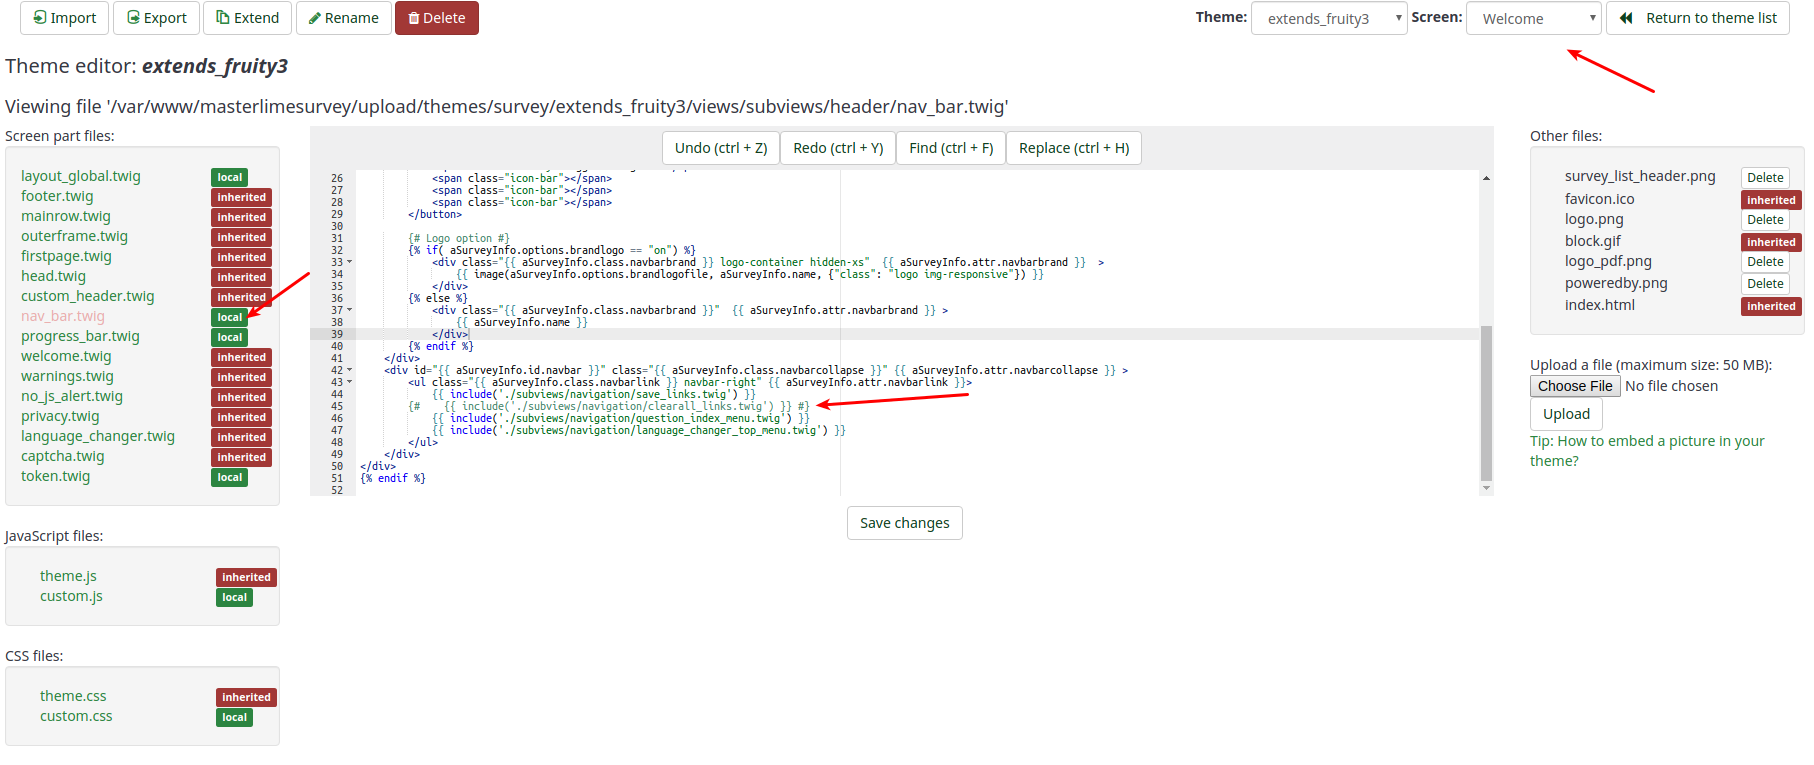
「回答を破棄して終了」ボタンを非表示にしたい場合は、アンケートテーマ内の nav_bar.twig ファイルを編集します。 | |||
<center>[[File:exit and clear survey pic.png]]</center> | |||
削除 ( またはコメントアウト ) する必要がある行 : | |||
<syntaxhighlight lang="twig"> | |||
{{ include('./subviews/navigation/clearall_links.twig') }} | |||
</syntaxhighlight> | |||
<center>[[File:Hide exit and clear survey.png]]</center> | |||
これで、「回答を破棄して終了」する選択肢はなくなりました。 | |||
<center>[[File:no exit clear survey.png]]</center> | |||
<div class="simplebox">[[File:help.png]] '''注意 : '''このカスタマイズは、長いアンケートについて、回答者には途中であっても回答を保存して後で再開してほしい場合に活用できます。そのままではユーザーは「回答を破棄して終了」ボタンをクリックする傾向があり、部分的な回答をテーブルから削除してしまうためです。</div> | |||
= | =助けて。うっかりと…= | ||
==管理者パスワードを忘れた。リセットするには?== | |||
== | === バージョン2.x === | ||
# コマンドラインでサーバーにアクセスします(例:SSH) | |||
# PHPにコマンドラインでアクセスできるか確認します(see http://php.net/features.commandline.php) | |||
# LimeSurveyディレクトリーに移動します | |||
# 次のコマンドを入力します <code>php application/commands/starter.php resetpassword NEW_ADMIN_NAME NEW_ADMIN_PASS</code> または <code>php application/commands/console.php resetpassword NEW_ADMIN_NAME NEW_ADMIN_PASS</code><sup>/usr/bin/phpなどphpへの完全なディレクトリーアクセス権が必要です</sup> | |||
= | {{Alert|Title=警告|text=この方法は LimeSurvey 3.x では機能しません。}} | ||
=== | ===バージョン2.x.x 以降で FTP アクセスのみの場合=== | ||
[https://gitlab.com/SondagesPro/coreAndTools/ResetPasswordController ResetPasswordController]を参照。 | |||
=== データベースのパスワードを直接変更する === | === データベースのパスワードを直接変更する === | ||
Limesurvey のデータベースに直接アクセスできる場合、古いパスワードに対して新しいパスワードを SHA256 ハッシュ符号化して更新することで、上書きすることができます。[http://www.xorbin.com/tools/sha256-hash-calculator ここでパスワードの SHA256 ハッシュを生成]できます。 | |||
例として、次の操作でパスワードを password に : | |||
<syntaxhighlight lang="sql | <syntaxhighlight lang="sql"> | ||
UPDATE lime_users SET password = 0x35653838343839386461323830343731353164306535366638646336323932373733363033643064366161626264643632613131656637323164313534326438 WHERE uid =1; | UPDATE lime_users SET password = 0x35653838343839386461323830343731353164306535366638646336323932373733363033643064366161626264643632613131656637323164313534326438 WHERE uid =1; | ||
</syntaxhighlight> | </syntaxhighlight> | ||
これは、使用するデータベースを選択していて、接頭辞が lime_ の場合の例です。 | |||
==停止したアンケートからデータを復元するには?== | |||
常に、アンケートは「停止」するのではなく、「受付期間終了」にすることをお勧めします。'''誤ってアンケートを停止した場合は、アンケートに変更を加えないことが重要です!''' | |||
つづいて、次の手順で復元します : | |||
#アンケートを再度、有効化 | |||
#アンケートのツールバーから[[Responses/ja|回答]]を選択 | |||
#[[Import responses/ja|インポート]]をクリックし、「停止したアンケートテーブルから回答をインポート」メニューを選択 | |||
#元となるテーブルを選択 | |||
#画面右上の「インポート」ボタンをクリック | |||
{{Note|"受付期間終了"と"停止"の違いを理解するには、次の [https://manual.limesurvey.org/Closing_a_survey Wiki セクション]を参照してください。}} | |||
== | ==アンケートの質問や質問グループ、アンケートそのものを削除した!== | ||
削除したら、なくなります。バックアップだけが救いです。 | |||
''' | {{Note|[https://limesurvey.org LimeSurvey GmbH] のプロユーザーであれば、サポートチケットを開いて、チームにあなたのアカウントのバックアップを提供するよう依頼してください。'''このサービスは無料ではないのでご注意をお願いします。'''}} | ||
=ハードウェアおよびソフトウェアの要求条件は?= | |||
一般的な要件は、[[Installation/ja#Make sure you can use LimeSurvey on your website|インストール手順]]を参照してください。 | |||
==LimeSurvey にはどんな制約がありますか?== | |||
===速度=== | |||
LimeSurvey には処理速度の制限はありません。すべてはサーバーの処理速度とサーバーへの接続速度に依存します。短時間に大勢のユーザーからの回答が予想され、サーバーが処理できるかどうかわからない場合は、'''フォーラムで類似のトピックを参照!'''するか、'''LimeSurvey の認定パートナーにお問い合わせください''' : https://limesurvey.com | |||
=== アンケートの規模=== | |||
==== MySQL と MariaDB ==== | |||
注意 : 「アンケートのサイズ」とは、アンケートの質問 ( と選択肢 ) の最大数のことで、'''アンケートへの回答数の最大値と混同しませんように ( こちらは制限なし ) '''。理論的には、LimeSurvey には質問・選択肢の最大数に制限はありません。しかし、使用しているデータベースエンジンにはいくつかの制限があります。最も重要なのは、結果テーブルのフィールド ( 列 ) 数の制限です。 | |||
* MySQL ISAM : テーブル内の VARCHAR 列と CHAR 列の長さの合計は最大 64KB 。 | |||
*MySQL InnoDB : 最大 1000 列 | |||
*MS SQL Server 2000 : 最大1024列。[https://docs.microsoft.com/en-us/sql/sql-server/maximum-capacity-specifications-for-sql-server 1行のサイズは最大 8,060 バイト]で、アンケートを稼働させても、多くのテキストデータがある場合 : 参加者は回答を送信できません。 | |||
*Postgres : 列の型に応じて最大 250 〜 1600 列。デフォルトのブロックサイズを 32k に増やすと、最大列数を 4 倍にできます。[[Installation FAQ/ja|インストールについてのよくある質問]]と[http://www.postgresql.org/docs/faqs.FAQ.html#item4.4 PostgreSQL FAQ]を参照してください。 | |||
{{Alert|title=Attention|text=行動する前によく考えてください! 10 × 10項目の配列質問は、それだけで 100 列を要します。経験則 : 画面上の記入したり選択したりするアイテムは、それぞれ 1 列を使います!}} | |||
mySQL ISAM エンジンは最も注意が必要です(詳細は [http://dev.mysql.com/doc/refman/5.0/en/column-count-limit.html mysql ドキュメント]を参照)。1行あたり最大65,535バイトまでですが、1文字あたり最大3バイト必要なutf8の文字のみが許容されているため、21,844が最大の文字数になることもあります(ただしDBエンコーディングによって異なります)。 | |||
アンケートのサイズの大まかな見積もり : | |||
*すべての複数の数値質問 : '''選択肢ごとに''' 20 文字 | |||
*すべての複数選択と配列質問の選択肢 : '''選択肢ごとに''' 5 文字 | |||
*その他のすべての質問タイプ : 5文字 | |||
*一般的に余裕として 10% を追加 | |||
==== Microsoft SQL の場合 ==== | |||
MSSQL には固定の制限はありません。一部、[https://docs.microsoft.com/en-us/sql/sql-server/maximum-capacity-specifications-for-sql-server?view=sql-server-ver15 Microsoft の Web サイトの情報]を参照してください。 | |||
アンケートの稼働後、回答とデータを参照する際、1 行あたり 8,060 バイトしか表示しません。回答のテキストではなく回答コードをエクスポートするか、一部の項目だけのエクスポートを試してください。 | |||
====PostgreSQL の場合==== | |||
回答をエクスポートする際 : SQLSTATE[54000] エラーが発生する可能性があります。一部の項目をエクスポートすることもできます。[https://forums.limesurvey.org/forum/french-forum/125447-erreur-sqlstate-54000 フォーラムへの投稿]を参照してください。 | |||
=====PostgreSQL の最大列数を増やす方法===== | |||
アンケートにたくさんの質問がある場合、PostgreSQL に別のブロックサイズを定義することで、より多くの列を作ることができます。ただしこれは「裏技」的なもので、PostgreSQL の再コンパイル、BLCKSZを 16KB や 32KB などのより高い値に設定する必要があります。設定オプション、"--with-blocksize=BLOCKSIZE" に注意してください。詳細は PostgreSQL メーリングリストで、アーカイブを参照するか、問い合わせてください ( pgsql-patches(at)postgresql(dot)org )。 | |||
Debian での手順 ( Martin Pitt に感謝) : | |||
<syntaxhighlight lang="bash">sudo apt-get build-dep postgresql-8.3 | <syntaxhighlight lang="bash">sudo apt-get build-dep postgresql-8.3 | ||
| Line 204: | Line 364: | ||
dpkg-buildpackage -us -uc -b -nc</syntaxhighlight> | dpkg-buildpackage -us -uc -b -nc</syntaxhighlight> | ||
注意 : 2014年8月、Ubuntu 14.04 では'''上記では成功を再現できませんでした'''。 ( 設定オプションでは不十分なため ) パッチが必要です。以下、参照 ( Linux 上の PostgreSQL 9.3 でテスト済み ) : [[Instructions for increasing the maximum number of columns in PostgreSQL on Linux|Linux上の PostgreSQL で最大列数を増やす手順]] | |||
[[Instructions for increasing the maximum number of columns in PostgreSQL on Linux]] | |||
==Fatal error: Allowed memory size== | ==Fatal error: Allowed memory size== | ||
サーバーの構成によっては、メモリーの問題が発生し、''"Fatal error: Allowed memory size of 8388608 bytes exhausted (tried to allocate 233472 bytes) in /path/to/htdocs/limesurvey/filename.php on line 7296"'' ――「致命的エラー: /path/to/htdocs/limesurvey/filename.php の 7296 行で、許容メモリー サイズ 8388608 バイトを使い果たしました ( 233472 バイトを割り当てようとしました) 」といったエラーが報告される場合があります。 | |||
LimeSurvey の設定ファイルに[[Optional settings/ja#Resources|オプションの設定を追加]]することで、制限を引き上げを試すことができます。 | |||
* | |||
* | アプリケーションの既定の設定の変更は、グローバルサーバー設定によって常に無効になる可能性があることに注意してください。あなたのサーバー上でメモリ制限を直接128Mに増やすには、以下を追加してみてください。 | ||
* | *サーバのメインのphp.iniファイルで、memory_limit = 128Mとする(アクセス権がある場合はお勧めします) | ||
*ini_set('memory_limit', '128M'); | *LimeSurveyルートのphp.iniファイルで、memory_limit = 128Mとする。 | ||
*LimeSurveyルートフォルダーにある.htaccessファイルで、php_value memory_limitを32Mとする。 | |||
*config.phpで、"ini_set('memory_limit', '128M'); "とする。 | |||
=特定の設定= | |||
特定の状況下では、application/config/config.phpでLimeSurveyの設定を更新する必要があります。 | |||
== IE 11とWindows 7 / Windows 8 == | |||
IE 11とのセッションには既知の問題があり、ユーザーがアンケートを完了できなくなる可能性があります。 | |||
この問題はセッションに一意の名前を付けることで解決します。 | |||
configファイルに以下を追加します。 | |||
<syntaxhighlight lang="php" enclose="pre"> | |||
// Set the name of the session | |||
'session' => array ( | |||
'sessionName' => "YOURUNIQUESESSIONNAME", | |||
), | |||
</syntaxhighlight> | |||
= | == 同じドメイン上に2つのLimeSurveyインスタンスがある場合 == | ||
同じドメイン上に2つのLimeSurveyインスタンスが別のディレクトリーにある場合、[[Optional_settings/ja#Yii_settings|セッション設定]]を更新する必要があります。 | |||
たとえば、example.org/ls1とexample.org/ls2がある場合は、ls1設定ファイルを更新します。 | |||
<syntaxhighlight lang="php" enclose="pre"> | <syntaxhighlight lang="php" enclose="pre"> | ||
'session' => array ( | 'session' => array ( | ||
Latest revision as of 23:50, 10 December 2023
はじめに
マニュアルはなるべく読みたくないけど、LimeSurvey でできることを感じたい場合、YouTube でチュートリアル動画を見ることをお勧めします。
LimeSurvey の簡単な説明を
LimeSurvey の簡単な説明は、次の 2 つのリンクをご覧ください。
アンケートのデザインとレイアウト
より短い URL にしたい。URL から index.php を削除するにはどうすればいい?
親しみやすい URL ( それぞれの URL に /index.php を含めない ) をご希望の場合は、 /application/config/config.php を編集して変更してください。
'showScriptName' => true,
を次のように
'showScriptName' => false,
これを正しく動作させるには、Apache Web サーバーに mod_rewrite モジュールを適切にインストールしなくてはなりません。
nginx Webサーバーを使用する場合
nginx http サーバーで ( FastCGI 経由で PHP を実行 )、'urlFormat' => 'path'設定 ( 詳しくは config.php を参照 ) を使用する場合は、次の Nginx Web サイト設定をご検討ください。
server {
    set $host_path "/PATH/TO/LIMESURVEY";
    server_name  YOUR.SERVER.FQDN;
    root /PATH/TO/LIMESURVEY;
    charset utf-8;
    try_files $uri /index.php?$uri&$args;
    # Disallow reading inside php script directory, see issue with debug > 1 on note
    location ~ ^/(application|docs|framework|locale|protected|tests|themes/\w+/views) {
        deny  all;
    }
    # Disallow reading inside runtime directory
    location ~ ^/tmp/runtime/ {
        deny  all;
    }

    # Allow access to well-known directory, different usage, for example ACME Challenge for Let's Encrypt
    location ~ /\.well-known {
        allow all;
    }
    # Deny all attempts to access hidden files
    # such as .htaccess, .htpasswd, .DS_Store (Mac).
        location ~ /\. {
        deny all;
    }
    #Disallow direct read user upload files
    location ~ ^/upload/surveys/.*/fu_[a-z0-9]*$ {
        return 444;
    }
    #Disallow uploaded potential executable files in upload directory
    location ~* /upload/.*\.(pl|cgi|py|pyc|pyo|phtml|sh|lua|php|php3|php4|php5|php6|pcgi|pcgi3|pcgi4|pcgi5|pcgi6|icn)$ {
        return 444;
    }
    #avoid processing of calls to unexisting static files by yii
    location ~ \.(js|css|png|jpg|gif|swf|ico|pdf|mov|fla|zip|rar)$ {
        try_files $uri =404;
    }
    location ~ \.php$ {
        fastcgi_split_path_info  ^(.+\.php)(.*)$;
        try_files $uri index.php;
        fastcgi_pass   127.0.0.1:9000; # Change this to match your settings
        fastcgi_index index.php;
        include fastcgi_params;
        fastcgi_param  SCRIPT_FILENAME  $document_root$fastcgi_script_name;
        fastcgi_param  SCRIPT_NAME      $fastcgi_script_name;
    }
}
'use_asset_manager' => 1, と設定する ( または application from the directory listを削除する ) ことでアセットマネージャーの使用を強制できます。結果は次のようになります。

回答必須の質問の * ( 赤いアスタリスク ) を取り除くには?
LimeSurvey 2でのやり方
LimeSurvey 2.xでは、必須であることを示す赤いアスタリスクはtemplate.cssファイル("asterisk"クラス)内に設定されています。それを隠すには、
- テンプレートエディタを開く
- 変更したいテンプレートのコピーを作成する
- "template.css"ファイルを選択して、asteriskクラスを検索する
- asteriskクラスの最後に次の設定を追加する: ".asterisk {display: none;}"
- template.cssを保存する
- 編集したtemplate.cssが再読み込みされ、キャッシュから取得されないように、ブラウザのキャッシュをクリアする
LimeSurvey 3 でのやり方
上記の LimeSurvey 2 の手順と似ています。
- 希望のテーマにアクセスします。既定のテーマの場合は、"拡張" ボタンをクリックしてコピーを作成します。
- テーマのリストにアクセスして、新たに作成したテーマに対応するテーマエディターをクリックします。
- 左側に、対応するテーマに対応する CSS ファイルが表示されます。
- custom.css をクリックし、以下の行を追加します。
.asterisk {display: none;}
- 変更を保存します。通常、質問テキストの先頭に表示される赤いアスタリスクが非表示になります。
Flash ファイルを埋め込むには?
まず全体設定に行き、XSSフィルターを無効にします。また、そのフィルターを無効にすることどうなるかは理解しておいてください。フィルターが有効な場合、次の手順は機能しません。
- Flashファイルを挿入する場所に移動します。これは、質問、サブ質問、回答、アンケートのようこそ/終了のテキストなど、統合されたHTMLエディタを使用できる場所であればどこでもかまいません。
- エディターツールバーの'LimeFitWin'ボタンをクリックし、フルスクリーンエディタモードを開きます。
- フルスクリーンエディタのツールバーには、Flashシンボル付きの小さなボタンがあります。クリックすると、ダイアログボックスが開きます。
- このボックスでは、既存のFlashファイルのパスを指定するか、'サーバーを閲覧'ボタンをクリックします。
- 'サーバーを閲覧'ボタンをクリックすると、ファイルブラウザが表示され、下部にはファイルアップロードフィールドが表示されます。既存のファイルを選択するか、ファイルをアップロードしてください。
それでおしまいです。この説明が不完全な場合は、適宜更新してください。
だれでも参加できる一般公開のアンケートを作るには?
だれでも参加できる一般公開のアンケートを作る場合は、アンケート参加者テーブルを作成しないでください! 概要パネルにあるアンケートリンクを共有 ( 公開 ) します。
登録の公開 - そのための必須項目
アンケート参加者テーブルを使うとともに参加登録も許可している場合は、参加者がアンケートを開くと次のメッセージを表示します。

上図のように、メールアドレスの項目のみ、必須です。
3 つの項目すべてを必須にするには、以下のようにアンケート テーマを編集してください。 「Fruity」テーマを使っている場合は、登録画面に移動して、参加者のメールアドレス項目がどう表示されるかを確認してください。
        {# Participants email #}
        <div class='{{ aSurveyInfo.class.registerformcolrowc }} form-group row' {{ aSurveyInfo.attr.registerformcolrowc }}>
            <label {{ aSurveyInfo.attr.registerformcolrowclabel }} class='{{ aSurveyInfo.class.registerformcolrowclabel }}  control-label'> {{ gT("Email address:") }} {{ include('./subviews/registration/required.twig') }}</label>
            <div {{ aSurveyInfo.attr.registerformcolrowcdiv }}  >
                {{ C.Html.textField('register_email', aSurveyInfo.sEmail, ({'id' : 'register_email','class' : 'form-control input-sm','required' : true})) }}
            </div>
        </div>
その後、姓と名の項目を編集し、次のようにラベルを追加 :
{{ include('./subviews/registration/required.twig') }}
そして、この行を記入必須項目にします。
'required' : true
編集したファイルは次のようになります :
        {# Participants first name #}
        <div class='{{ aSurveyInfo.class.registerformcolrow }} form-group row' {{ aSurveyInfo.attr.registerformcolrow }}>
            <label for='register_firstname' class='{{ aSurveyInfo.class.registerformcolrowlabel }} control-label '>{{ gT("First name:") }} {{ include('./subviews/registration/required.twig') }}</label> {# extra label #}
            <div class="">
                {{ C.Html.textField('register_firstname', aSurveyInfo.sFirstName, ({'id' : 'register_firstname','class' : 'form-control', 'required' : true})) }} {# mandatory field #}
            </div>
        </div>

        {# Participants last name #}
        <div class='{{ aSurveyInfo.class.registerformcolrowb }} form-group row' {{ aSurveyInfo.attr.registerformcolrowb }}>
            <label {{ aSurveyInfo.attr.registerformcolrowblabel }}  class='{{ aSurveyInfo.class.registerformcolrowblabel }} control-label '>{{ gT("Last name:") }} {{ include('./subviews/registration/required.twig') }}</label> {# extra label #}
            <div {{ aSurveyInfo.attr.registerformcolrowbdiv }} >
                {{ C.Html.textField('register_lastname', aSurveyInfo.sLastName, ({'id' : 'register_lastname', 'class' : 'form-control', 'required' : true})) }} {# mandatory field #}
            </div>
        </div>
これで、公開の参加登録ページは次のようになりました ( すべての項目が入力必須です ) 。

言語切り替えを非表示に
2 つの言語切り替えスイッチ ( アンケートのタイトルの近くとページの右上 ) を非表示にする手順は、多言語アンケートについての Wiki セクションで説明しています。
「回答を破棄して終了」を非表示にするには?
「回答を破棄して終了」ボタンを非表示にしたい場合は、アンケートテーマ内の nav_bar.twig ファイルを編集します。

削除 ( またはコメントアウト ) する必要がある行 :
{{ include('./subviews/navigation/clearall_links.twig') }}

これで、「回答を破棄して終了」する選択肢はなくなりました。

助けて。うっかりと…
管理者パスワードを忘れた。リセットするには?
バージョン2.x
- コマンドラインでサーバーにアクセスします(例:SSH)
- PHPにコマンドラインでアクセスできるか確認します(see http://php.net/features.commandline.php)
- LimeSurveyディレクトリーに移動します
- 次のコマンドを入力します
php application/commands/starter.php resetpassword NEW_ADMIN_NAME NEW_ADMIN_PASSまたはphp application/commands/console.php resetpassword NEW_ADMIN_NAME NEW_ADMIN_PASS/usr/bin/phpなどphpへの完全なディレクトリーアクセス権が必要です
バージョン2.x.x 以降で FTP アクセスのみの場合
データベースのパスワードを直接変更する
Limesurvey のデータベースに直接アクセスできる場合、古いパスワードに対して新しいパスワードを SHA256 ハッシュ符号化して更新することで、上書きすることができます。ここでパスワードの SHA256 ハッシュを生成できます。
例として、次の操作でパスワードを password に :
UPDATE lime_users SET password = 0x35653838343839386461323830343731353164306535366638646336323932373733363033643064366161626264643632613131656637323164313534326438 WHERE uid =1;
これは、使用するデータベースを選択していて、接頭辞が lime_ の場合の例です。
停止したアンケートからデータを復元するには?
常に、アンケートは「停止」するのではなく、「受付期間終了」にすることをお勧めします。誤ってアンケートを停止した場合は、アンケートに変更を加えないことが重要です!
つづいて、次の手順で復元します :
- アンケートを再度、有効化
- アンケートのツールバーから回答を選択
- インポートをクリックし、「停止したアンケートテーブルから回答をインポート」メニューを選択
- 元となるテーブルを選択
- 画面右上の「インポート」ボタンをクリック
アンケートの質問や質問グループ、アンケートそのものを削除した!
削除したら、なくなります。バックアップだけが救いです。
ハードウェアおよびソフトウェアの要求条件は?
一般的な要件は、インストール手順を参照してください。
LimeSurvey にはどんな制約がありますか?
速度
LimeSurvey には処理速度の制限はありません。すべてはサーバーの処理速度とサーバーへの接続速度に依存します。短時間に大勢のユーザーからの回答が予想され、サーバーが処理できるかどうかわからない場合は、フォーラムで類似のトピックを参照!するか、LimeSurvey の認定パートナーにお問い合わせください : https://limesurvey.com
アンケートの規模
MySQL と MariaDB
注意 : 「アンケートのサイズ」とは、アンケートの質問 ( と選択肢 ) の最大数のことで、アンケートへの回答数の最大値と混同しませんように ( こちらは制限なし ) 。理論的には、LimeSurvey には質問・選択肢の最大数に制限はありません。しかし、使用しているデータベースエンジンにはいくつかの制限があります。最も重要なのは、結果テーブルのフィールド ( 列 ) 数の制限です。
- MySQL ISAM : テーブル内の VARCHAR 列と CHAR 列の長さの合計は最大 64KB 。
- MySQL InnoDB : 最大 1000 列
- MS SQL Server 2000 : 最大1024列。1行のサイズは最大 8,060 バイトで、アンケートを稼働させても、多くのテキストデータがある場合 : 参加者は回答を送信できません。
- Postgres : 列の型に応じて最大 250 〜 1600 列。デフォルトのブロックサイズを 32k に増やすと、最大列数を 4 倍にできます。インストールについてのよくある質問とPostgreSQL FAQを参照してください。
mySQL ISAM エンジンは最も注意が必要です(詳細は mysql ドキュメントを参照)。1行あたり最大65,535バイトまでですが、1文字あたり最大3バイト必要なutf8の文字のみが許容されているため、21,844が最大の文字数になることもあります(ただしDBエンコーディングによって異なります)。
アンケートのサイズの大まかな見積もり :
- すべての複数の数値質問 : 選択肢ごとに 20 文字
- すべての複数選択と配列質問の選択肢 : 選択肢ごとに 5 文字
- その他のすべての質問タイプ : 5文字
- 一般的に余裕として 10% を追加
Microsoft SQL の場合
MSSQL には固定の制限はありません。一部、Microsoft の Web サイトの情報を参照してください。
アンケートの稼働後、回答とデータを参照する際、1 行あたり 8,060 バイトしか表示しません。回答のテキストではなく回答コードをエクスポートするか、一部の項目だけのエクスポートを試してください。
PostgreSQL の場合
回答をエクスポートする際 : SQLSTATE[54000] エラーが発生する可能性があります。一部の項目をエクスポートすることもできます。フォーラムへの投稿を参照してください。
PostgreSQL の最大列数を増やす方法
アンケートにたくさんの質問がある場合、PostgreSQL に別のブロックサイズを定義することで、より多くの列を作ることができます。ただしこれは「裏技」的なもので、PostgreSQL の再コンパイル、BLCKSZを 16KB や 32KB などのより高い値に設定する必要があります。設定オプション、"--with-blocksize=BLOCKSIZE" に注意してください。詳細は PostgreSQL メーリングリストで、アーカイブを参照するか、問い合わせてください ( pgsql-patches(at)postgresql(dot)org )。
Debian での手順 ( Martin Pitt に感謝) :
sudo apt-get build-dep postgresql-8.3
apt-get source postgresql-8.3
cd postgresql-8.3-*
debian/rules patch
sensible-editor build-tree/postgresql-8.3.5/src/include/pg_config_manual.h
dpkg-buildpackage -us -uc -b -nc
注意 : 2014年8月、Ubuntu 14.04 では上記では成功を再現できませんでした。 ( 設定オプションでは不十分なため ) パッチが必要です。以下、参照 ( Linux 上の PostgreSQL 9.3 でテスト済み ) : Linux上の PostgreSQL で最大列数を増やす手順
Fatal error: Allowed memory size
サーバーの構成によっては、メモリーの問題が発生し、"Fatal error: Allowed memory size of 8388608 bytes exhausted (tried to allocate 233472 bytes) in /path/to/htdocs/limesurvey/filename.php on line 7296" ――「致命的エラー: /path/to/htdocs/limesurvey/filename.php の 7296 行で、許容メモリー サイズ 8388608 バイトを使い果たしました ( 233472 バイトを割り当てようとしました) 」といったエラーが報告される場合があります。
LimeSurvey の設定ファイルにオプションの設定を追加することで、制限を引き上げを試すことができます。
アプリケーションの既定の設定の変更は、グローバルサーバー設定によって常に無効になる可能性があることに注意してください。あなたのサーバー上でメモリ制限を直接128Mに増やすには、以下を追加してみてください。
- サーバのメインのphp.iniファイルで、memory_limit = 128Mとする(アクセス権がある場合はお勧めします)
- LimeSurveyルートのphp.iniファイルで、memory_limit = 128Mとする。
- LimeSurveyルートフォルダーにある.htaccessファイルで、php_value memory_limitを32Mとする。
- config.phpで、"ini_set('memory_limit', '128M'); "とする。
特定の設定
特定の状況下では、application/config/config.phpでLimeSurveyの設定を更新する必要があります。
IE 11とWindows 7 / Windows 8
IE 11とのセッションには既知の問題があり、ユーザーがアンケートを完了できなくなる可能性があります。
この問題はセッションに一意の名前を付けることで解決します。
configファイルに以下を追加します。
       // Set the name of the session
        'session' => array (
            'sessionName' => "YOURUNIQUESESSIONNAME",
        ),
同じドメイン上に2つのLimeSurveyインスタンスがある場合
同じドメイン上に2つのLimeSurveyインスタンスが別のディレクトリーにある場合、セッション設定を更新する必要があります。
たとえば、example.org/ls1とexample.org/ls2がある場合は、ls1設定ファイルを更新します。
        'session' => array (
            'cookieParams' => array(
                    'path' => '/ls1',
                ),
            ),
        'request' => array(
            'csrfCookie' => array( 'path' => '/ls1' )
        ),