Email bounce tracking system/sl: Difference between revisions
From LimeSurvey Manual
Maren.fritz (talk | contribs) (Created page with "{{Box|Če je vaše ime gostitelja 'smtp.server.net' in so vrata 143, potem kot ime gostitelja napišite 'smtp.server.net:143'. Zaradi varnosti trenutno dovoljujemo samo nasled...") |
Maren.fritz (talk | contribs) (Created page with "*''''Uporabniško ime:'''' Uporabniško ime za račun POP/IMAP. *'''Geslo:'''' Geslo za račun POP/IMAP. *''''Vrsta šifriranja :''' Če je uporabljeno šifriranje, tukaj nast...") |
||
| Line 62: | Line 62: | ||
{{Box|Če je vaše ime gostitelja 'smtp.server.net' in so vrata 143, potem kot ime gostitelja napišite 'smtp.server.net:143'. Zaradi varnosti trenutno dovoljujemo samo naslednje številke vrat: 110, 143, 587, 993 in 995.}} | {{Box|Če je vaše ime gostitelja 'smtp.server.net' in so vrata 143, potem kot ime gostitelja napišite 'smtp.server.net:143'. Zaradi varnosti trenutno dovoljujemo samo naslednje številke vrat: 110, 143, 587, 993 in 995.}} | ||
*''' | *''''Uporabniško ime:'''' Uporabniško ime za račun POP/IMAP. | ||
*''' | *'''Geslo:'''' Geslo za račun POP/IMAP. | ||
*''' | *''''Vrsta šifriranja :''' Če je uporabljeno šifriranje, tukaj nastavite pravo (SSL ali TLS). | ||
Revision as of 08:22, 15 December 2023
Uvod
Sistem za sledenje zavrnjenih e-poštnih sporočil je sposoben izslediti in označiti e-poštna sporočila, ki niso bila dostavljena prejemnikom (udeležencem ankete). Sistem se zanaša na "poročilo o napaki obveščanja o dostavi e-pošte". Zato potrebuje e-poštni naslov, na katerega se lahko pošiljajo e-poštna sporočila, da bi lahko spremljal odklone. Poleg naslova računa so potrebne tudi poverilnice računa in podrobnosti o povezavi.
Zahteve
Modul php5-imap mora biti nameščen na vašem strežniku. Če je temu tako, lahko preverite tako, da pogledate gumb 'Prikaži informacije o PHP, ki ga najdete na strani globalne nastavitve vaše namestitve LimeSurvey pod Pregled zavihek:
Nato poiščite razdelek imap (za hitro iskanje uporabite Control+F). Če je prikazan razdelek slike, ste pripravljeni:

Če nimate nameščenega php5-imap in imate korenski dostop do strežnika, ga lahko namestite po postopku, značilnem za vašo distribucijo. Na primer, preverite to povezavo, če uporabljate Debian. Samo ne pozabite znova zagnati spletnega strežnika, ko je nameščen (npr. zaženite "apache/usr/sbin/apache2ctl restart" v terminalu).
Kako deluje
Osnovna ideja razvoja sistema je bila zmanjšati ročno delo in zmanjšati možne človeške napake, ki bi lahko nastale zaradi ročnega urejanja vsakega polja.
Osnovna ideja tega sistema je, da ob pošiljanju e-pošte sistem za sledenje zavrnjenih e-poštnih sporočil samodejno doda ID ankete in ID žetona v glavo e-pošte brez obvestila skrbnika.

Te glave (znane tudi kot glave po meri) so dodane vsakemu e-poštnemu sporočilu z vabilom, poslanemu prek LimeSurvey udeležencem ankete.
Ko je e-poštno sporočilo vrnjeno, je prejeta izvirna glava skupaj z »glavo obvestila o dostavi«. Sistem nato preveri nova e-poštna sporočila in razčleni e-poštna sporočila, ki imajo te glave po meri. Spremeni barvo pisave napačnih e-poštnih naslovov iz tabele udeležencev ankete v rdečo.
Nastavitev sistema
Sistem lahko deluje globalno (za vse ankete) ali lokalno (samo za posamezno anketo), zato lahko nastavitve ustrezno shranite. Globalne nastavitve odbijanja lahko shranite pod Globalne nastavitve -> Nastavitve odbijanja'. Prikazane bodo naslednje možnosti:
- 'Privzeta zavrnjena e-pošta spletnega mesta:' To je e-poštni naslov, na katerega bodo poslana zavrnjena e-poštna sporočila. Za hitrejšo obdelavo zavrnjenih e-poštnih sporočil priporočamo uporabo e-poštnega naslova, ki se uporablja samo za sistem za sledenje zavrnjenih e-poštnih sporočil LimeSurvey.
- 'Vrsta strežnika:' Če je nastavljeno na "Izklopljeno", ne bodo na voljo nobene funkcije za obdelavo odklonov. Izberite "POP" ali "IMAP", če želite uporabiti sistem za sledenje zavrnjenih e-poštnih sporočil LimeSurvey.
- 'Ime strežnika in vrata:' Ime strežnika in (če je potrebno) vrata, ločena z dvopičjem. Številka vrat običajno ni potrebna, razen če gostitelj e-pošte uporablja nestandardna vrata.
- 'Uporabniško ime:' Uporabniško ime za račun POP/IMAP.
- Geslo:' Geslo za račun POP/IMAP.
- 'Vrsta šifriranja : Če je uporabljeno šifriranje, tukaj nastavite pravo (SSL ali TLS).
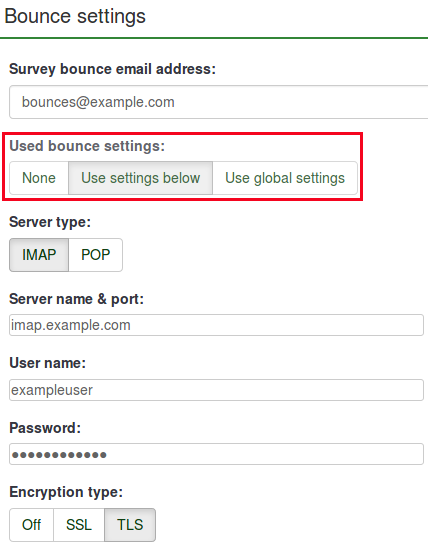
If you want to apply bounce settings only to a single survey, access the desired survey -> go to the survey menu and click on the Survey participants tab -> check the main toolbar of the page and click on Invitations & reminders option -> click on Bounce settings. The following page will be loaded:

The additional option is represented by the Used bounce settings. Here, you can choose whether you use:
- no bounce settings;
- the local bounce settings. If picked up, you will have to fill out the rest of the local bounce settings fields;
- the global bounce settings. In this case, the bounce settings of your LimeSurvey installation will be used.
Using LimeSurvey Cloud email server
If you are using the LimeSurvey Cloud email server, all your emails will have the sender address "noreply@limesurvey.org". However, these emails will have a Reply-to header with your email address. So, in case someone tries to reply, they can write to you directly.
Bounces are automatically processed if you are using the LimeSurvey Cloud server. You don't need to set up anything, and you don't need to start the bounce processing at all, just leave the default settings untouched. It all happens magically in the background. Please note that it might take 10-15 minutes until a bounced email is processed, and the related entry is marked.
Starting Bounce Processing
Before starting the bounce processing, do not forget to first send the email invitations to your survey participants.
In version 3.0+, once the email bounce tracking system has been set up, you can start bounce processing by accessing the survey home page -> click on the Survey participants tab from the survey menu -> click on Invitations & reminders (located on the toolbar) -> Start bounce processing.

After selecting this option, a progress indicator will be displayed during the process, followed by a final processing status summary.
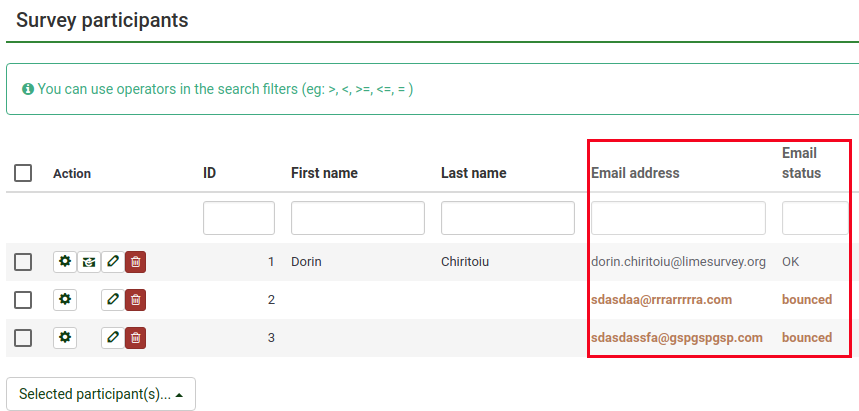
The sent email invitations will start to be examined. The scan results will be shown on the Survey participants table (you may have to manually refresh the page to actualize it). All the entries whose invitations were bounced will have their email addresses marked in red font. Also, their Email status is changed from "OK" to "bounced".

Starting Bounce Processing in v2.5
In version 2.50+, once the bounce processing system has been set up, you can start bounce processing. from the survey home page: Invitations & reminders -> Start bounce processing.

After selecting this option, a progress indicator will be displayed during the process, followed by a final processing status summary.
The sent email invitations will start to be examined. The scan results will be shown on the Survey participants table (you may have to manually refresh the page to actualize it). All the entries whose invitations were bounced will have their email addresses marked in red font. Also, their Email status is changed from "OK" to "bounced".
Example
To better understand how the LimeSurvey email bounce tracking system is working, check the below example:
1. Introduce your respondents to the survey participants table. Make sure that each of them has an assigned token and email address.
2. Select the respondents to whom you wish to send the survey invitation:

Click on the Selected participant(s)... button, and choose the send email invitations option.
3. Wait for some moments in order to make sure that the emails were sent to the survey respondents.
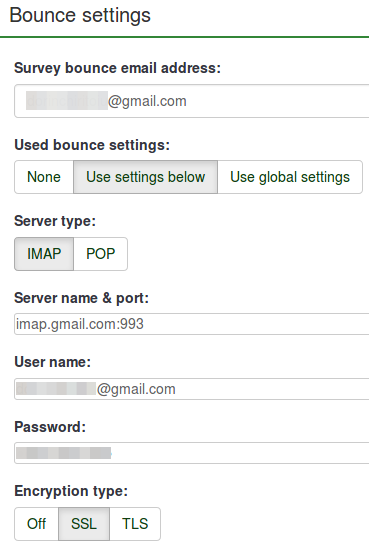
4. Now, you can make use of LimeSurvey email bounce tracking system. Click on Invitations & reminders and fill in the bounce email settings fields with the connection and account details of your personal email account:

You could also leave the fields empty. The bounce processing will still work, only that you will not get any bounce-processing-related email. However, the email status of the entries from the survey participants table will get updated.
As you may observe below, we use the email bounce tracking system with the help of a free Gmail account. To find out about the Gmail-related connection settings, access the following link. Also, do not forget to enable IMAP/POP from the settings of your Gmail account.

Fill in the fields. Select the desired server and encryption settings. Once done, click on the Save button located on the upper-right part of the screen.
5. Now, you can click on start bounce processing button:

The email bounce tracking system will start to look for the survey-id, token-id, and delivery notification which are attached to the email header of each bounced email. If these custom headers exist, the system will change the font color of the wrong email addresses from the survey participants table in red. Also, the email status of the respective entries will be switched from OK to bounced.
