電子メールバウンストラッキングシステム
From LimeSurvey Manual
はじめに
電子メールバウンストラッキングシステムは、受信者(アンケート参加者)に配信されなかった電子メールを追跡してマークすることができます。このシステムは、"電子メール配信通知失敗レポート"に依存しています。したがって、バウンスを追跡するために電子メールを受け取れる電子メールアドレスが必要です。アカウントのアドレスとともに、アカウントの資格情報と接続の詳細も必要です。
要件
php5-imapのモジュールは、サーバーにインストールする必要があります。LimeSurveyの全体設定ページにある概要タブのPHPInfoを表示から確認できます。
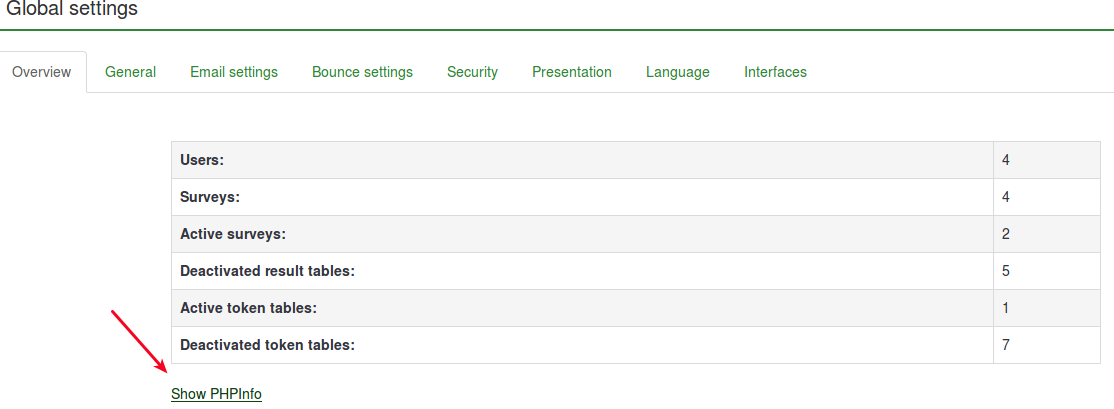
次に、imapセクションを探します(検索する場合はcontrol+Fを使います)。imapセクションが表示されていれば、そこで確認できます。

php5-imapをインストールしておらず、サーバーへのrootアクセス権がある場合は、ディストリビューション固有の手順に従ってインストールすることができます。たとえば、Debianを使用している場合は、このリンクをチェックしてください。インストールしたら、ウェブサーバーを再起動してください(例えば、ターミナルで "apache/usr/sbin/apache2ctl restart"を実行します)。
仕組み
このシステムの開発の背後にある基本的な考え方は、手作業を減らし、フィールドを手動で編集することによって生じる人為的ミスを減らすことにあります。
このシステムの背後にある基本的な考え方は、電子メールを送信するとき、電子メールのバウンストラッキングシステムが管理者の通知なしで自動的にsurvey-idとtoken-idを電子メールヘッダーに追加することです。

これらのヘッダー(カスタムヘッダーとも呼ばれます)は、LimeSurveyからアンケート参加者に送信する招待メールに追加されます。
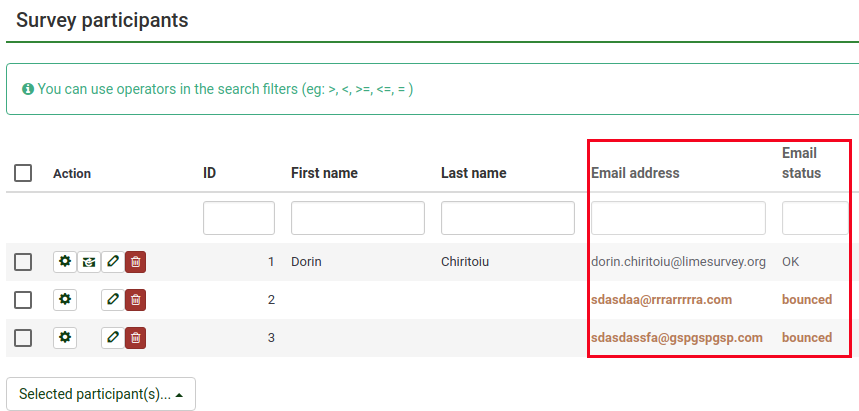
電子メールが返送されると、元のヘッダーと配信通知ヘッダーを受信します。システムは新しい電子メールをチェックし、これらのカスタムヘッダーを持つ電子メールを解析します。アンケート参加者テーブルでは、不達の電子メールアドレスが赤色に変更されています。
システムのセットアップ
システムは全体(すべてのアンケート)または個別のアンケートで機能させることができるため、それぞれ設定することができます。バウンスグローバル設定は、全体設定 -> バウンス設定で保存することができます。次のオプションが表示されます。
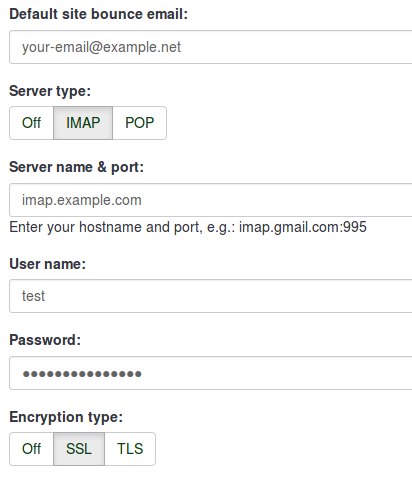
- 既定のサイトバウンス(エラー)メールアドレス: バウンスされたメールを送信するメールアドレスです。返送されたメールの処理を高速化するには、電子メールアドレスを電子メールバウンストラッキングシステム専用にすることをお勧めします。
- サーバータイプ: "オフ"に設定すると、バウンス処理機能は使用できません。バウンス処理機能を有効にするには、これを"POP"または"IMAP"に設定します。
- サーバー名、ポート: サーバーの名前と(必要に応じて)ポートをコロンで区切って指定します。電子メールホストが非標準のポートを使用しない限り、ポート番号は通常は必要ありません。
- ユーザ名: POP/IMAPアカウントのユーザー名。
- パスワード: POP/IMAPアカウントのパスワード。
- 暗号化タイプ: 暗号化を使用する場合は、ここで正しいタイプ(SSLまたはTLS)を設定してください。
1つのアンケートだけにバウンス設定を適用する場合は、当該のアンケートメニューにアクセスしてアンケート参加者タブをクリックし、ページのメインツールバーの案内&催促オプションをクリックしバウンス設定を選択します。次のページが表示されます。
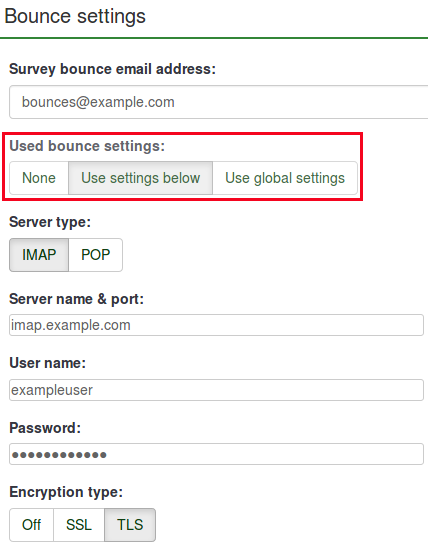
追加のオプションがバウンス設定を使用設定に表示されます。ここでは、次のいずれかを選択できます。
- なし
- ローカルバウンス設定(次の設定を適用)。選択すると、残りのローカルバウンス設定フィールドに入力する必要があります。
- 全体バウンス設定(全体設定を適用)。選択すると、LimeSurveyの全体バウンス設定が適用されます。
LimeSurvey PROメールサーバーの使用について
LimeSurvey Professionalの電子メールサーバーを使用している場合、すべての電子メールの送信者アドレスは "noreply@limesurvey.org"になります。ただし、これらのメールにはReply-toヘッダーにはあなたのメールアドレスが記載されています。誰かが返事をしようとすると、あなたに直接返信することができます。
このシステムは簡単に設定できます(バウンス設定フィールドを空白のままにしておく)が、1つ欠点があります。電子メールが送信できずに戻ってきた場合は、通知は一切受け取ることができません。
v3.0でバウンス処理を開始する
バウンス処理を開始する前に、最初にアンケート参加者に電子メールで案内を送信してください。
バージョン3.0+では、電子メールのバウンストラッキングシステムが設定された後、アンケートのホームページのアンケートメニューから、アンケート参加者タブのツールバーにある案内と催促をクリックし、バウンス処理開始を選択することによりバウンス処理を開始することができます。

このオプションを選択すると、処理の進行状況に関するインジケータが表示され、最後に処理ステータスの概要が表示されます。
The sent email invitations will start to be examined. The scan results will be shown on the Survey participants table (you may have to manually refresh the page to actualize it). All the entries whose invitations were bounced will have their email addresses marked in red font. Also, their Email status is changed from "OK" to "bounced".

Starting Bounce Processing in v2.5
In version 2.50+, once the bounce processing system has been set up, you can start bounce processing. from the survey home page: Invitations & reminders -> Start bounce processing.

After selecting this option, a progress indicator will be displayed during the process, followed by a final processing status summary.
The sent email invitations will start to be examined. The scan results will be shown on the Survey participants table (you may have to manually refresh the page to actualize it). All the entries whose invitations were bounced will have their email addresses marked in red font. Also, their Email status is changed from "OK" to "bounced".
Example
To better understand how the LimeSurvey email bounce tracking system is working, check the below example:
1. Introduce your respondents to the survey participants table. Make sure that each of them has an assigned token and email address.
2. Select the respondents to whom you wish to send the survey invitation:

Click on the Selected participant(s)... button, and choose the send email invitations option.
3. Wait for some moments in order to make sure that the emails were sent to the survey respondents.
4. Now, you can make use of LimeSurvey email bounce tracking system. Click on Invitations & reminders and fill in the bounce email settings fields with the connection and account details of your personal email account:

You could also leave the fields empty. The bounce processing will still work, only that you will not get any bounce-processing-related email. However, the email status of the entries from the survey participants table will get updated.
As you may observe below, we use the email bounce tracking system with the help of a free Gmail account. To find out about the Gmail-related connection settings, access the following link. Also, do not forget to enable IMAP/POP from the settings of your Gmail account.
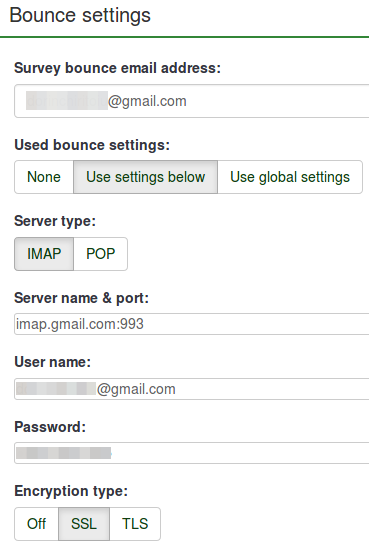
Fill in the fields. Select the desired server and encryption settings. Once done, click on the Save button located on the upper-right part of the screen.
5. Now, you can click on start bounce processing button:

The email bounce tracking system will start to look for the survey-id, token-id, and delivery notification that are attached to the email header of each bounced email. If these custom headers exist, the system will change the font color of the wrong email addresses from the survey participants table in red. Also, the email status of the respective entries will be switched from OK to bounced.
