Behandlung von E-Mail-Rückläufern
From LimeSurvey Manual
Einleitung
Das E-Mail-Bounce-Tracking-System kann E-Mails aufspüren und markieren, die nicht an die Empfänger (Umfrageteilnehmer) ausgeliefert wurden. Das System stützt sich auf den "Fehlerbericht zur Benachrichtigung bei E-Mail-Zustellung". Daher benötigt es eine E-Mail-Adresse, an die die E-Mails gesendet werden können, um die Bounces zu identifizieren. Neben der Adresse des Kontos sind auch die Anmeldeinformationen des Kontos sowie die Verbindungsdetails erforderlich.
Voraussetzungen
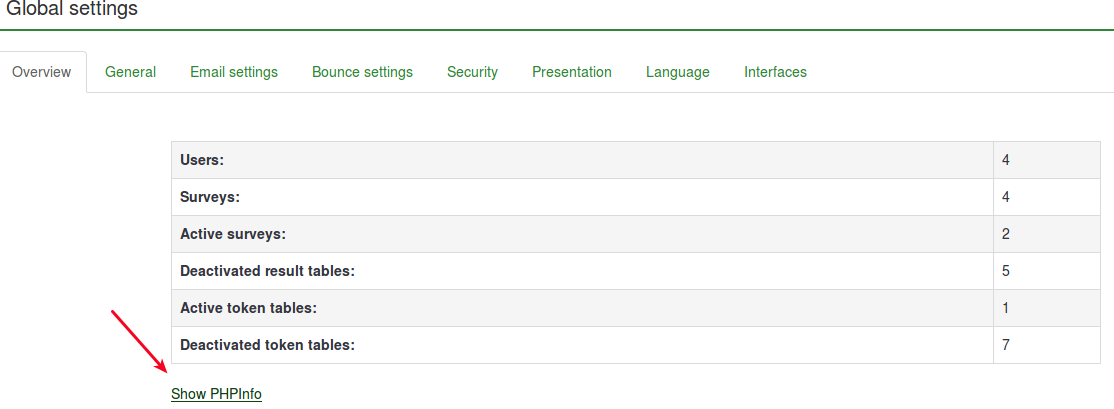
Das php5-imap- Modul muss auf Ihrem Server installiert sein. Sie können überprüfen, ob dies der Fall ist, indem Sie auf die Schaltfläche "PHPinfo anzeigen" klicken, die sich auf der Seite Globale Einstellungen Ihrer LimeSurvey-Installation unter Übersicht befindet:
Suchen Sie als Nächstes nach einem imap-Abschnitt (verwenden Sie Strg + F für eine schnelle Suche). Wenn ein IMAP-Abschnitt angezeigt wird, können Sie loslegen:

Wenn Sie php5-imap nicht installiert haben und Root-Zugriff auf den Server haben, können Sie es gemäß dem für Ihre Distribution spezifischen Verfahren installieren. Werfen Sie beispielsweise einen Blick auf diesen Link, wenn Sie Debian verwenden. Denken Sie daran, Ihren Webserver nach der Installation neu zu starten (z. B. "service apache2 restart" im Terminal ausführen).
Wie es funktioniert
Die Grundidee hinter der Entwicklung des Systems bestand darin, die manuelle Arbeit zu reduzieren und die möglichen menschlichen Fehler zu reduzieren, die durch die manuelle Bearbeitung jedes Feldes entstehen können.
Die Grundidee hinter diesem System ist, dass das E-Mail-Bounce-Tracking-System beim Senden der E-Mail automatisch eine Umfrage-ID und eine Token-ID zum E-Mail-Header hinzufügt, ohne dass der Administrator dies sieht.

Diese Header (auch benutzerdefinierte Header genannt) werden jeder Einladungs-E-Mail hinzugefügt, die über LimeSurvey an die Umfrageteilnehmer gesendet wird.
Wenn die E-Mail zurückgesendet wird, wird der ursprüngliche Header zusammen mit dem „Zustellungsbenachrichtigungs-Header“ empfangen. Das System sucht dann nach neuen E-Mails und analysiert die E-Mails, die diese benutzerdefinierten Header enthalten. Es ändert die Schriftfarbe der falschen E-Mail-Adressen aus der Umfrageteilnehmertabelle in Rot.
System einrichten
The system is capable of working globally (for all the surveys) or locally (only for a specific survey), thus the settings can be saved accordingly. The bounce global settings can be saved under Global Settings -> Bounce Settings. The following options will be displayed:
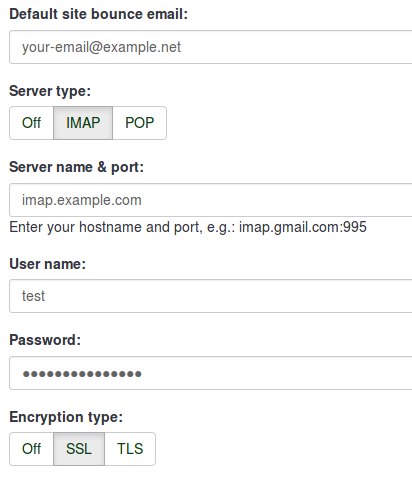
- Default site bounce email: This is the email address where bounced emails will be sent to. For a faster processing of the bounced emails, we recommend the usage of an email address that is used only for the LimeSurvey email bounce tracking system.
- Server type: If set to "Off", no bounce processing functions will be available. Choose either "POP" or "IMAP" to make use of LimeSurvey email bounce tracking system.
- Server name & port: Name of the server and (if needed) the port separated by a colon. The port number isn't typically needed unless the email host uses a non-standard port.
- User name: The user name for the POP/IMAP account.
- Password: The password for the POP/IMAP account.
- Encryption type: If encryption is used, please set the right one here (SSL or TLS).
If you want to apply bounce settings only to a single survey, access the desired survey -> go to the survey menu and click on the Survey participants tab -> check the main toolbar of the page and click on Invitations & reminders option -> click on Bounce settings. The following page will be loaded:
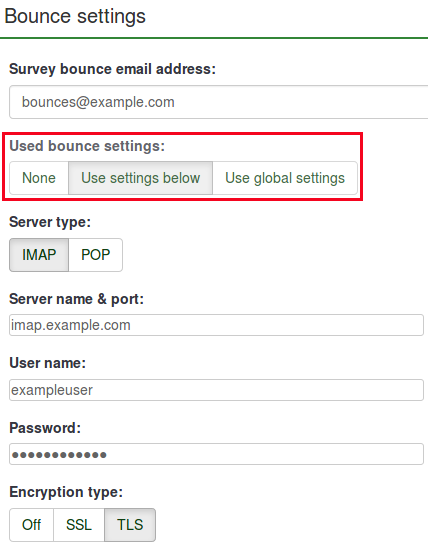
The additional option is represented by the Used bounce settings. Here, you can choose whether you use:
- no bounce settings;
- the local bounce settings. If picked up, you will have to fill out the rest of the local bounce settings fields;
- the global bounce settings. In this case, the bounce settings of your LimeSurvey installation will be used.
Using LimeSurvey Cloud email server
If you are using the LimeSurvey Cloud email server, all your emails will have the sender address "noreply@limesurvey.org". However, these emails will have a Reply-to header with your email address. So, in case someone tries to reply, they can write to you directly.
Bounces are automatically processed if you are using the LimeSurvey Cloud server. There is no need to set up anything and you should leave the default settings untouched.
Starting Bounce Processing in v3.0
Before starting the bounce processing, do not forget to first send the email invitations to your survey participants.
In version 3.0+, once the email bounce tracking system has been set up, you can start bounce processing by accessing the survey home page -> click on the Survey participants tab from the survey menu -> click on Invitations & reminders (located on the toolbar) -> Start bounce processing.

After selecting this option, a progress indicator will be displayed during the process, followed by a final processing status summary.
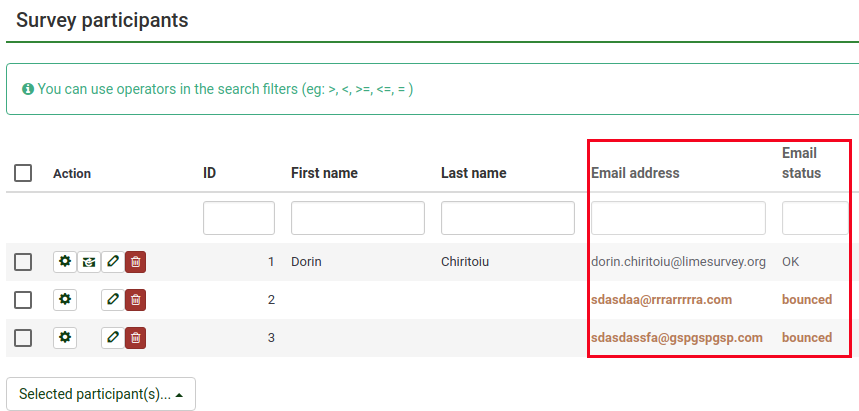
The sent email invitations will start to be examined. The scan results will be shown on the Survey participants table (you may have to manually refresh the page to actualize it). All the entries whose invitations were bounced will have their email addresses marked in red font. Also, their Email status is changed from "OK" to "bounced".

Starting Bounce Processing in v2.5
In version 2.50+, once the bounce processing system has been set up, you can start bounce processing. from the survey home page: Invitations & reminders -> Start bounce processing.

After selecting this option, a progress indicator will be displayed during the process, followed by a final processing status summary.
The sent email invitations will start to be examined. The scan results will be shown on the Survey participants table (you may have to manually refresh the page to actualize it). All the entries whose invitations were bounced will have their email addresses marked in red font. Also, their Email status is changed from "OK" to "bounced".
Example
To better understand how the LimeSurvey email bounce tracking system is working, check the below example:
1. Introduce your respondents to the survey participants table. Make sure that each of them has an assigned token and email address.
2. Select the respondents to whom you wish to send the survey invitation:

Click on the Selected participant(s)... button, and choose the send email invitations option.
3. Wait for some moments in order to make sure that the emails were sent to the survey respondents.
4. Now, you can make use of LimeSurvey email bounce tracking system. Click on Invitations & reminders and fill in the bounce email settings fields with the connection and account details of your personal email account:

You could also leave the fields empty. The bounce processing will still work, only that you will not get any bounce-processing-related email. However, the email status of the entries from the survey participants table will get updated.
As you may observe below, we use the email bounce tracking system with the help of a free Gmail account. To find out about the Gmail-related connection settings, access the following link. Also, do not forget to enable IMAP/POP from the settings of your Gmail account.
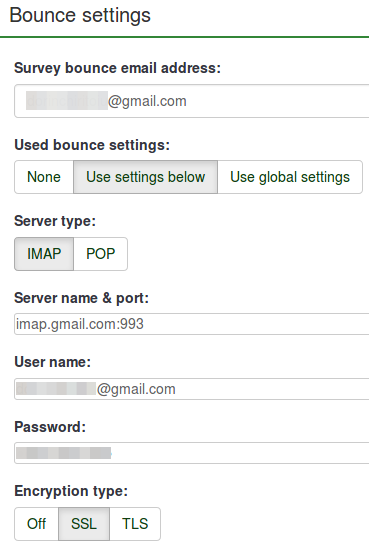
Fill in the fields. Select the desired server and encryption settings. Once done, click on the Save button located on the upper-right part of the screen.
5. Now, you can click on start bounce processing button:

The email bounce tracking system will start to look for the survey-id, token-id, and delivery notification which are attached to the email header of each bounced email. If these custom headers exist, the system will change the font color of the wrong email addresses from the survey participants table in red. Also, the email status of the respective entries will be switched from OK to bounced.
