Email bounce tracking system/da: Difference between revisions
From LimeSurvey Manual
Maren.fritz (talk | contribs) (Created page with "Systemet er i stand til at arbejde globalt (for alle undersøgelser) eller lokalt (kun for en specifik undersøgelse), så indstillingerne kan gemmes tilsvarende. De globale a...") |
Maren.fritz (talk | contribs) (Created page with "*'''Standard afvisnings-e-mail for websted:''' Dette er den e-mailadresse, som afviste e-mails vil blive sendt til. For en hurtigere behandling af de afviste e-mails anbefaler...") |
||
| Line 56: | Line 56: | ||
*''' | *'''Standard afvisnings-e-mail for websted:''' Dette er den e-mailadresse, som afviste e-mails vil blive sendt til. For en hurtigere behandling af de afviste e-mails anbefaler vi brugen af en e-mailadresse, der kun bruges til LimeSurvey e-mail-afvisningssporingssystem. | ||
*''' | *'''Servertype:''' Hvis indstillet til "Fra", vil ingen afvisningsbehandlingsfunktioner være tilgængelige. Vælg enten "POP" eller "IMAP" for at gøre brug af LimeSurvey e-mail afvisningssporingssystem. | ||
*'''Server name & port:''' Name of the server and (if needed) the port separated by a colon. The port number isn't typically needed unless the email host uses a non-standard port. | *'''Server name & port:''' Name of the server and (if needed) the port separated by a colon. The port number isn't typically needed unless the email host uses a non-standard port. | ||
Revision as of 11:39, 2 January 2024
Introduktion
E-mail-bounce tracking-systemet er i stand til at spore og markere de e-mails, der ikke blev leveret til modtagerne (undersøgelsesdeltagere). Systemet er afhængigt af "fejlrapporten om e-mailleveringsmeddelelse". Derfor skal den have en e-mailadresse, som e-mails kan sendes til for at kunne spore afvisningerne. Sammen med kontoens adresse er kontoens legitimationsoplysninger også påkrævet samt forbindelsesoplysningerne.
Krav
php5-imap modulet skal være installeret på din server. Du kan kontrollere, om dette er tilfældet ved at se på knappen Vis PHPinfo, som findes på siden globale indstillinger i din LimeSurvey-installation under Oversigt] fane:
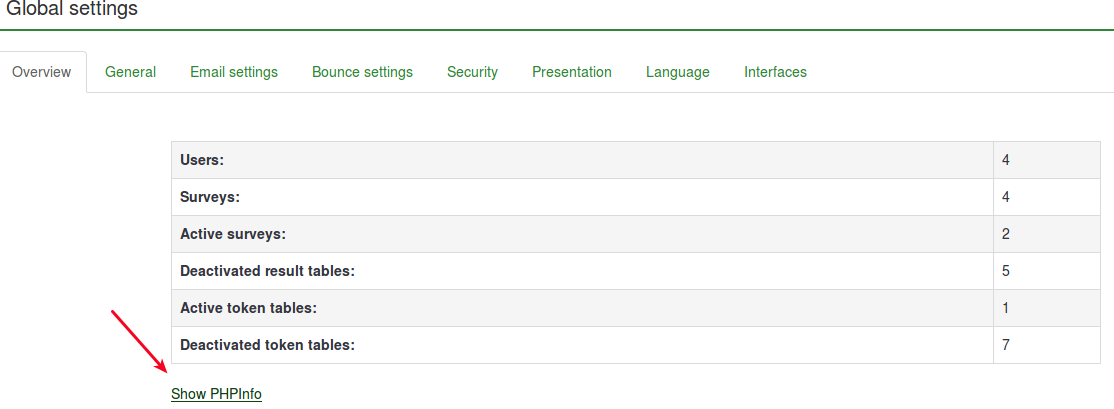
Se derefter efter en imap-sektion (brug kontrol+F for en hurtig søgning). Hvis en imap-sektion vises, er du klar:

Hvis du ikke har php5-imap installeret, og du har root-adgang til serveren, kan du installere den ved at følge proceduren, der er specifik for din distribution. Tjek for eksempel dette link, hvis du bruger Debian. Bare husk at genstarte din webserver, når den er installeret (kør f.eks. "apache/usr/sbin/apache2ctl restart" i terminalen).
Sådan virker det
Grundtanken bag udviklingen af systemet var at reducere det manuelle arbejde og reducere de mulige menneskelige fejl, der måtte opstå ved manuel redigering af hvert felt.
Den grundlæggende idé bag dette system er, at når du sender e-mailen, tilføjer e-mail-afvisningssporingssystemet automatisk et survey-id og token-id til e-mail-headeren uden varsel fra administratoren.

Disse overskrifter (også kendt som brugerdefinerede overskrifter) føjes til hver invitations-e-mail, der sendes via LimeSurvey til undersøgelsens deltagere.
Når e-mailen returneres, modtages den originale header sammen med leveringsmeddelelsesheaderen. Systemet tjekker derefter for nye e-mails og analyserer de e-mails, der har disse tilpassede overskrifter. Den ændrer skriftfarven på de forkerte e-mailadresser fra undersøgelsesdeltagertabellen i rødt.
Opsætning af systemet
Systemet er i stand til at arbejde globalt (for alle undersøgelser) eller lokalt (kun for en specifik undersøgelse), så indstillingerne kan gemmes tilsvarende. De globale afvisningsindstillinger kan gemmes under Globale indstillinger -> Bounceindstillinger. Følgende muligheder vil blive vist:
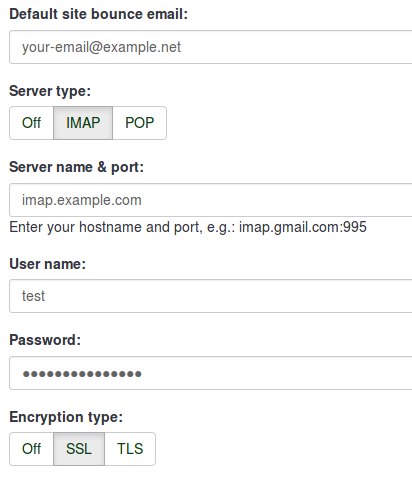
- Standard afvisnings-e-mail for websted: Dette er den e-mailadresse, som afviste e-mails vil blive sendt til. For en hurtigere behandling af de afviste e-mails anbefaler vi brugen af en e-mailadresse, der kun bruges til LimeSurvey e-mail-afvisningssporingssystem.
- Servertype: Hvis indstillet til "Fra", vil ingen afvisningsbehandlingsfunktioner være tilgængelige. Vælg enten "POP" eller "IMAP" for at gøre brug af LimeSurvey e-mail afvisningssporingssystem.
- Server name & port: Name of the server and (if needed) the port separated by a colon. The port number isn't typically needed unless the email host uses a non-standard port.
- User name: The user name for the POP/IMAP account.
- Password: The password for the POP/IMAP account.
- Encryption type: If encryption is used, please set the right one here (SSL or TLS).
If you want to apply bounce settings only to a single survey, access the desired survey -> go to the survey menu and click on the Survey participants tab -> check the main toolbar of the page and click on Invitations & reminders option -> click on Bounce settings. The following page will be loaded:
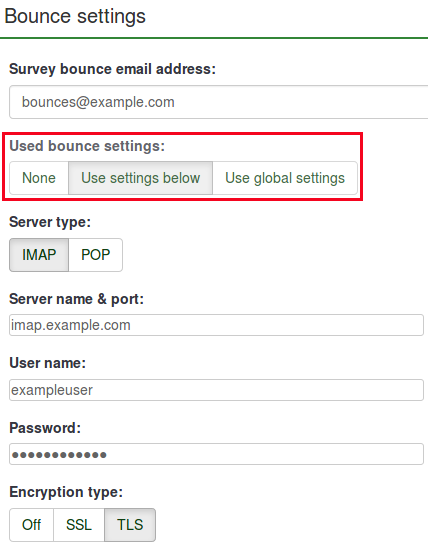
The additional option is represented by the Used bounce settings. Here, you can choose whether you use:
- no bounce settings;
- the local bounce settings. If picked up, you will have to fill out the rest of the local bounce settings fields;
- the global bounce settings. In this case, the bounce settings of your LimeSurvey installation will be used.
Using LimeSurvey Cloud email server
If you are using the LimeSurvey Cloud email server, all your emails will have the sender address "noreply@limesurvey.org". However, these emails will have a Reply-to header with your email address. So, in case someone tries to reply, they can write to you directly.
Bounces are automatically processed if you are using the LimeSurvey Cloud server. You don't need to set up anything, and you don't need to start the bounce processing at all, just leave the default settings untouched. It all happens magically in the background. Please note that it might take 10-15 minutes until a bounced email is processed, and the related entry is marked.
Starting Bounce Processing
Before starting the bounce processing, do not forget to first send the email invitations to your survey participants.
In version 3.0+, once the email bounce tracking system has been set up, you can start bounce processing by accessing the survey home page -> click on the Survey participants tab from the survey menu -> click on Invitations & reminders (located on the toolbar) -> Start bounce processing.

After selecting this option, a progress indicator will be displayed during the process, followed by a final processing status summary.
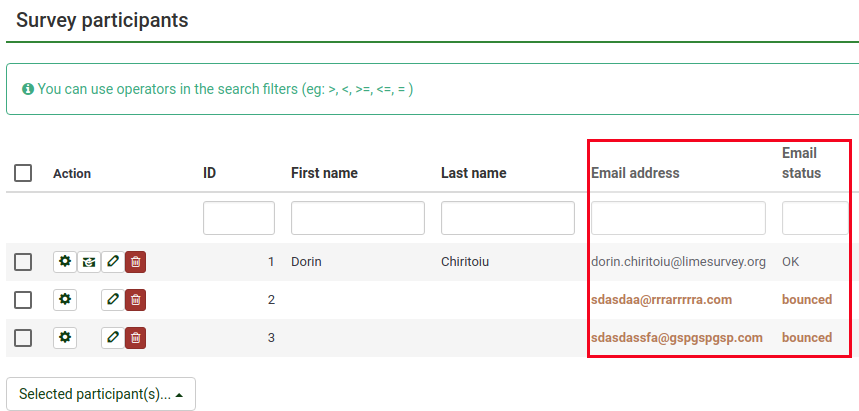
The sent email invitations will start to be examined. The scan results will be shown on the Survey participants table (you may have to manually refresh the page to actualize it). All the entries whose invitations were bounced will have their email addresses marked in red font. Also, their Email status is changed from "OK" to "bounced".

Starting Bounce Processing in v2.5
In version 2.50+, once the bounce processing system has been set up, you can start bounce processing. from the survey home page: Invitations & reminders -> Start bounce processing.

After selecting this option, a progress indicator will be displayed during the process, followed by a final processing status summary.
The sent email invitations will start to be examined. The scan results will be shown on the Survey participants table (you may have to manually refresh the page to actualize it). All the entries whose invitations were bounced will have their email addresses marked in red font. Also, their Email status is changed from "OK" to "bounced".
Example
To better understand how the LimeSurvey email bounce tracking system is working, check the below example:
1. Introduce your respondents to the survey participants table. Make sure that each of them has an assigned token and email address.
2. Select the respondents to whom you wish to send the survey invitation:

Click on the Selected participant(s)... button, and choose the send email invitations option.
3. Wait for some moments in order to make sure that the emails were sent to the survey respondents.
4. Now, you can make use of LimeSurvey email bounce tracking system. Click on Invitations & reminders and fill in the bounce email settings fields with the connection and account details of your personal email account:

You could also leave the fields empty. The bounce processing will still work, only that you will not get any bounce-processing-related email. However, the email status of the entries from the survey participants table will get updated.
As you may observe below, we use the email bounce tracking system with the help of a free Gmail account. To find out about the Gmail-related connection settings, access the following link. Also, do not forget to enable IMAP/POP from the settings of your Gmail account.
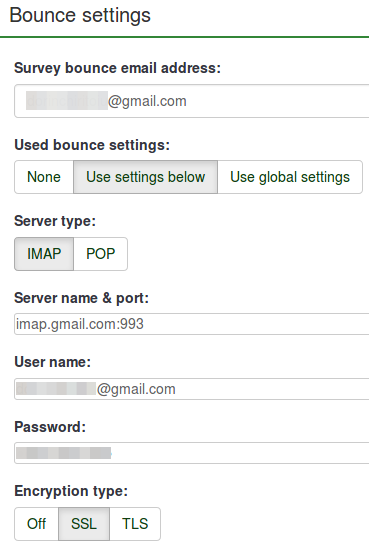
Fill in the fields. Select the desired server and encryption settings. Once done, click on the Save button located on the upper-right part of the screen.
5. Now, you can click on start bounce processing button:

The email bounce tracking system will start to look for the survey-id, token-id, and delivery notification which are attached to the email header of each bounced email. If these custom headers exist, the system will change the font color of the wrong email addresses from the survey participants table in red. Also, the email status of the respective entries will be switched from OK to bounced.
