Email bounce tracking system: Difference between revisions
From LimeSurvey Manual
mNo edit summary |
mNo edit summary |
||
| Line 52: | Line 52: | ||
<!--T:16--> | <!--T:16--> | ||
The system is capable of working at the global level or survey level, thus the settings can be saved accordingly. The global settings can be saved under '''Global Settings -> bounce Settings. The following options are available: | The system is capable of working at the global level or survey level, thus the settings can be saved accordingly. The global settings can be saved under '''Global Settings -> bounce Settings. The following options are available: | ||
<!--T:17--> | <!--T:17--> | ||
<center>[[File:limesurvey_index_php_admin_globalsettings_bouncesettings.png]]</center> | <center>[[File:limesurvey_index_php_admin_globalsettings_bouncesettings.png]]</center> | ||
*'''Default site bounce email:''' This is the email address where bounced emails will be sent to. For faster bounce back processing, the email address box should be limited to bounce back only. | |||
*'''Server type:''' If set to 'Off', no bounce processing functions will be available. Set this to 'POP' or 'IMAP' to check a related account for bounces. | |||
*'''Server name & port:''' Name of the server and (if needed) the port separated by a colon. The port number isn't typically needed unless the email host uses a non-standard port. | |||
*'''User name:''' The user name for the POP/IMAP account. | |||
*'''Password:''' The password for the POP/IMAP account. | |||
*'''Encryption type:''' If encryption is used, please set the right one here (SSL or TLS). | |||
<!--T:18--> | <!--T:18--> | ||
In the case in which you want to apply some specific bounce settings only locally, access the desired survey -> go to the survey menu and click on the Survey participants tab -> check the main toolbar of the page and click on '''Invitations & reminders''' option -> select from the dialog '''Bounce settings'''. The following page will be loaded: | In the case in which you want to apply some specific bounce settings only locally, access the desired survey -> go to the survey menu and click on the Survey participants tab -> check the main toolbar of the page and click on '''Invitations & reminders''' option -> select from the dialog '''Bounce settings'''. The following page will be loaded: | ||
<!--T:19--> | <!--T:19--> | ||
<center>[[File:limesurvey_admin_tokens_bouncesettings.png]]</center> | <center>[[File:limesurvey_admin_tokens_bouncesettings.png]]</center> | ||
The | |||
<!--T:20--> | |||
The additional option is represented by the '''Used bounce settings'''. Here, you can choose whether you use: | |||
*no bounce settings; | *no bounce settings; | ||
*the local bounce settings. If picked up, you will have to fill out the rest of the local bounce settings fields; | *the local bounce settings. If picked up, you will have to fill out the rest of the local bounce settings fields; | ||
*the global bounce settings. In this case, the bounce settings of your LimeSurvey installation will be used. | *the global bounce settings. In this case, the bounce settings of your LimeSurvey installation will be used. | ||
==Starting Bounce Processing in v3.0== | ==Starting Bounce Processing in v3.0== | ||
Revision as of 12:38, 30 October 2017
Introduction
The mail bounce tracking system (available in v1.91 or later) is capable of tracking down and marking the emails that were not delivered to the recipients (survey participants). The system relies on the "mail delivery notification failure report". Therefore, it needs an email address where the emails can be sent to in order to track the bounces. Along with the address of the account, the credentials of the account are also required as well as the connection details.
Requirements
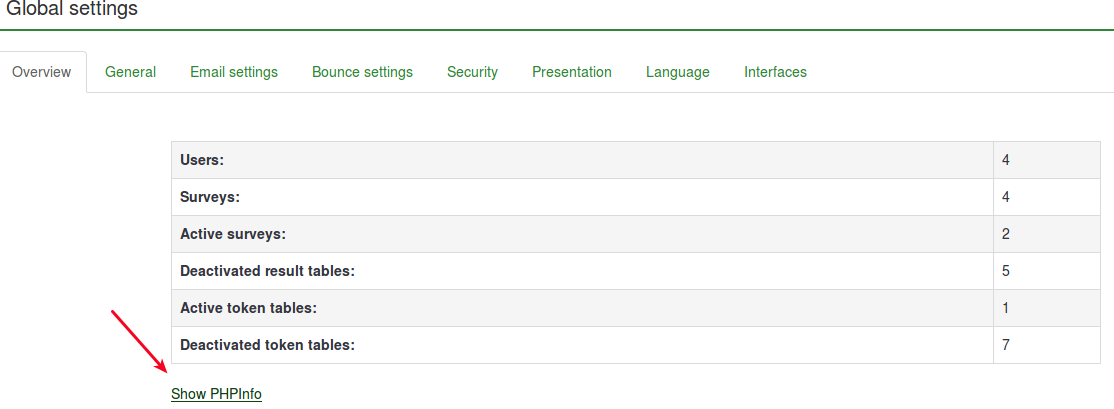
The php5-imap module must be installed on your server. You can check if this is the case by looking at the Show PHPinfo button, found on the global settings page of your LimeSurvey installation, under the Overview tab:

Next, look for an imap section, like this. If an imap section is shown, you are good to go:

If you don't have php5-imap installed and you have root access to the server, you can install it following the proceudure specific to your distribution. For example, check this link if you use Debian. Just remember to restart your web server once it is installed (e.g. run "apache/usr/sbin/apache2ctl restart" in terminal).
How it works
The basic idea behind the development of the system was to reduce the manual work and reduce the possible human errors that might arise from manually editing every field.
The basic idea behind this system is that when sending the email, the mail bounce tracking system automatically adds a survey-id and token-id to the mail header without the notice of the administrator.

These headers (also known as custom headers) are added to each invitation email sent via LimeSurvey to the survey participants.
When the mail is bounced back, the original header along with the delivery notification header is received. The system then checks for new mails and parses the mails that have these custom headers and mark the wrong e-mail addresses in a red font color in the survey participants table.
Setting up the system
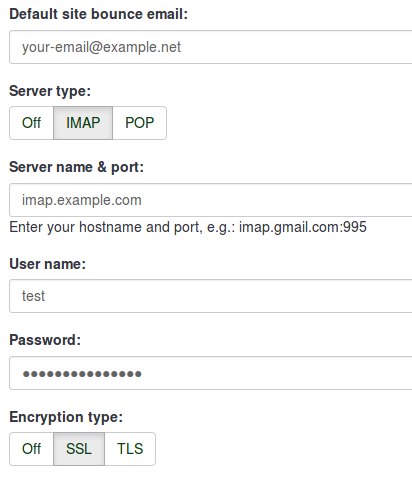
The system is capable of working at the global level or survey level, thus the settings can be saved accordingly. The global settings can be saved under Global Settings -> bounce Settings. The following options are available:

- Default site bounce email: This is the email address where bounced emails will be sent to. For faster bounce back processing, the email address box should be limited to bounce back only.
- Server type: If set to 'Off', no bounce processing functions will be available. Set this to 'POP' or 'IMAP' to check a related account for bounces.
- Server name & port: Name of the server and (if needed) the port separated by a colon. The port number isn't typically needed unless the email host uses a non-standard port.
- User name: The user name for the POP/IMAP account.
- Password: The password for the POP/IMAP account.
- Encryption type: If encryption is used, please set the right one here (SSL or TLS).
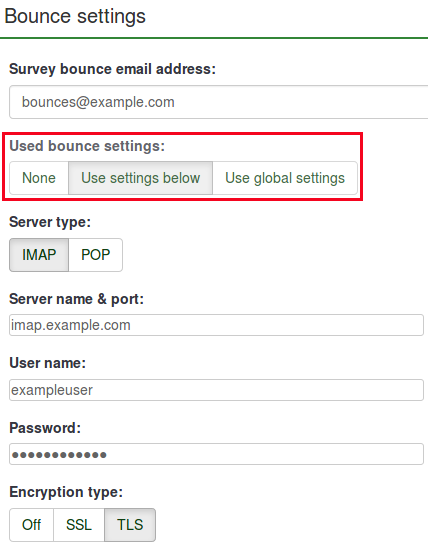
In the case in which you want to apply some specific bounce settings only locally, access the desired survey -> go to the survey menu and click on the Survey participants tab -> check the main toolbar of the page and click on Invitations & reminders option -> select from the dialog Bounce settings. The following page will be loaded:

The additional option is represented by the Used bounce settings. Here, you can choose whether you use:
- no bounce settings;
- the local bounce settings. If picked up, you will have to fill out the rest of the local bounce settings fields;
- the global bounce settings. In this case, the bounce settings of your LimeSurvey installation will be used.
Starting Bounce Processing in v3.0
Starting Bounce Processing in v2.5
In version 2.50+, once the bounce processing system has been set up, you can start bounce processing. from the Survey home page: Invitations & reminders -> Start bounce processing.

After selecting this option, a progress indicator will be displayed during the process, followed by a final processing status summary.
{{Alert|title=Attention|text=Some releases of v2.50+ do not correctly display this menu choice and the issue was fixed in build 160714 released on July 14, 2016
Starting Bounce Processing in earlier versions
Once the settings have been set, you can start the bounce processing by clicking on the bounce processing icon located on the Token browser toolbar as shown below:
After clicking the icon, you will be presented with a popup which shows a progress meter.

Wait till the process is done. Once completed, the result of the scan will be shown on the browse responses page (you might have to manually refresh the page to actualize it). All the entries whose invitations were bounced will have their e-mail addresses marked in red font. Also, their Email status is changed from "OK" to "bounced":
