Surveys - introduction/es: Difference between revisions
From LimeSurvey Manual
Maren.fritz (talk | contribs) (Created page with "{{Box|Para enviar un correo electrónico al administrador de la encuesta, '''debe utilizar {ADMINEMAIL}'''.") |
Maren.fritz (talk | contribs) (Created page with "Hay diferentes formas de ingresar una dirección de correo electrónico: #Ingrese una dirección de correo electrónico específica (es decir: sunombre@test.com). #Ingrese un...") |
||
| Line 201: | Line 201: | ||
{{Box|Para enviar un correo electrónico al administrador de la encuesta, '''debe utilizar {ADMINEMAIL}'''. | {{Box|Para enviar un correo electrónico al administrador de la encuesta, '''debe utilizar {ADMINEMAIL}'''. | ||
Hay diferentes formas de ingresar una dirección de correo electrónico: | |||
# | #Ingrese una dirección de correo electrónico específica (es decir: sunombre@test.com). | ||
# | #Ingrese un código SGQA y la respuesta se enviará a una dirección de correo electrónico ingresada como responda a esa pregunta en particular (use el formato {INSERTANS:9999X88X12} de la misma manera que reutilizaría la información de respuestas anteriores). | ||
#''' | #'''Lo siguiente sólo es posible si su encuesta no es anónima'''. Ingrese un código de token y la respuesta se enviará a una dirección de correo electrónico recuperada de un campo de token. Utilice el formato {TOKEN:EMAIL} o {TOKEN:ATTRIBUTE_1} de la misma manera que reutilizaría la información de la tabla '''Participantes de la encuesta'''.}} | ||
*'''Google Analytics Settings:''' If you would like to get details about the survey web traffic, use Google Analytics. Three options are available: | *'''Google Analytics Settings:''' If you would like to get details about the survey web traffic, use Google Analytics. Three options are available: | ||
Revision as of 16:32, 4 September 2023
General
Una encuesta incluye, a través de diferentes bases de datos interconectadas: idiomas, preguntas, grupos de preguntas, atributos de preguntas, subpreguntas, respuestas, respuestas predeterminadas, evaluaciones y configuraciones de cuotas. Para facilitar la gestión de encuestas, recientemente se agregó la funcionalidad grupo de encuestas (New in 3.0 ).
Encuestas
Hay dos formas de llegar a la página crear una nueva encuesta:
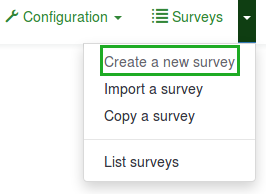
1. La primera forma es hacer clic en la flecha al lado de Encuestas ubicada en la barra de herramientas principal de la página de inicio de instalación de LimeSurvey. Se mostrará una lista desplegable. En la lista desplegable, elija Crear una nueva encuesta.
2. La segunda forma es hacer clic en el cuadro Crear encuesta en la página de inicio de instalación de LimeSurvey.

Se mostrará la página Crear una nueva encuesta.

Crear una nueva encuesta
En la página Crear una nueva encuesta:
(1) Ingrese el Título de la encuesta.
Nota: El campo Título de la encuesta es obligatorio. Los campos restantes son opcionales. Para obtener una explicación detallada de cada campo, consulte la sección Elementos de texto a continuación.
(2) Haga clic en Guardar (en la parte superior derecha, justo debajo de su Nombre de usuario).
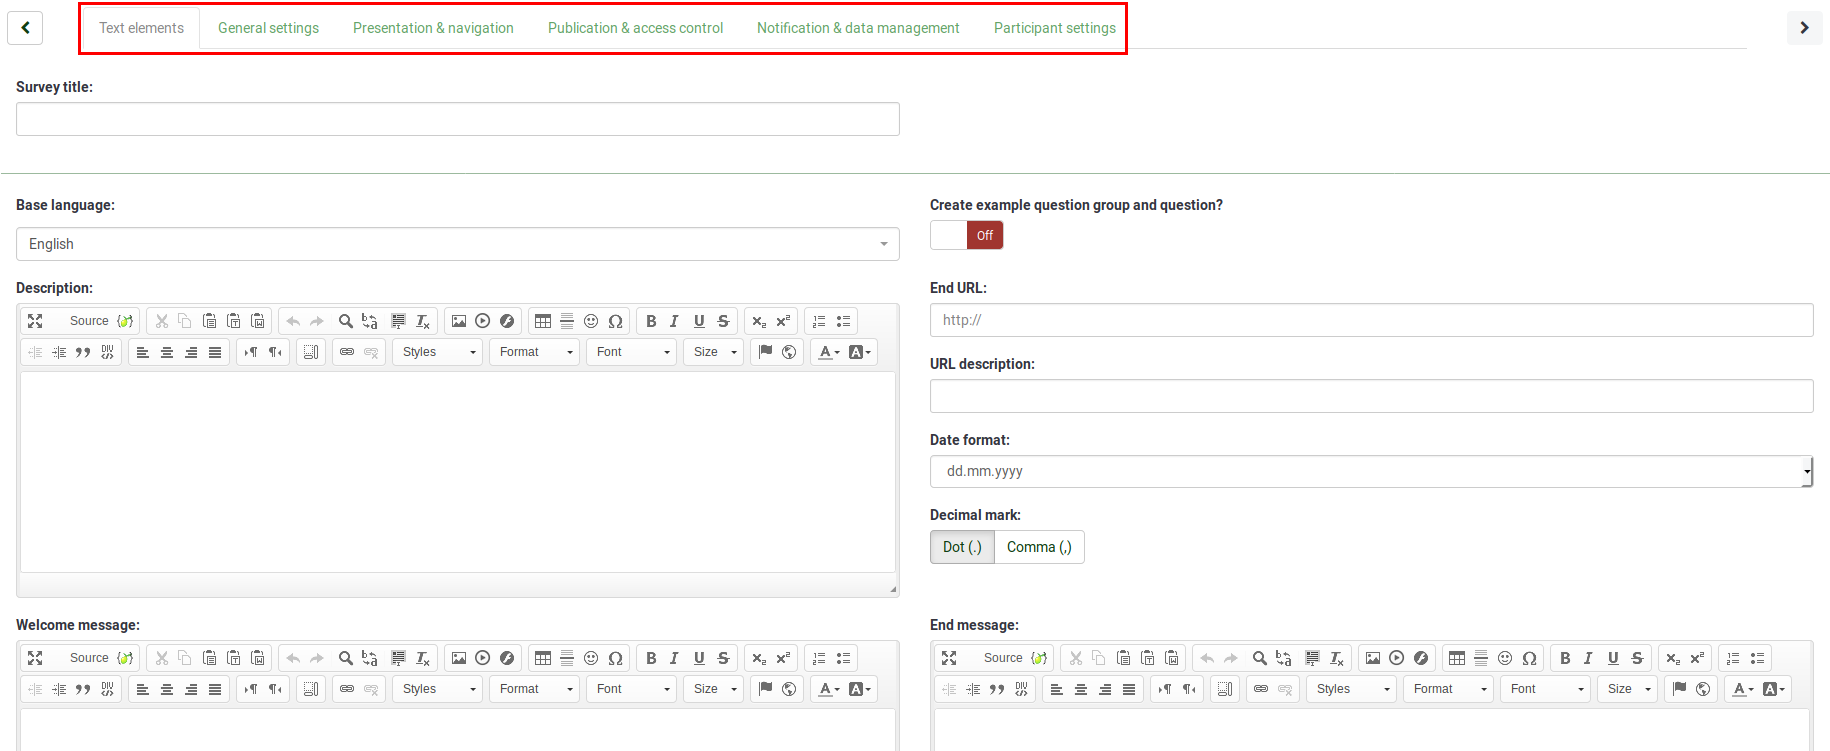
Para optimizar su encuesta, verifique las opciones disponibles en cada pestaña ubicada en la barra de herramientas Crear una nueva encuesta:
- Elementos de texto
- Configuración general
- Presentación y navegación
- Publicación y control de acceso
- Notificación y gestión de datos
- Configuración del participante
Elementos de texto
Las siguientes opciones se encuentran en la pestaña Elementos de texto:
- Título de la encuesta: El título de la encuesta se puede cambiar desde este campo.
- ¿Crear una pregunta y un grupo de preguntas de ejemplo?: (New in 3.0 ) Si está habilitado, se agregarán una pregunta y un grupo de preguntas de ejemplo a su encuesta de manera predeterminada cuando cree una encuesta. Esta pregunta y grupo de preguntas de ejemplo se mostrarán cuando se haga clic en el botón Guardar para crear la encuesta.
- Idioma base': Representa el idioma principal de la encuesta. Si desea agregar otros idiomas a la encuesta, primero cree una encuesta, luego acceda a la configuración general de la encuesta recién creada y agregue idiomas adicionales.
- Descripción: Puede escribir una descripción de la encuesta. Si está habilitado desde la configuración global, puede usar el editor HTML para personalizar mejor el campo de descripción.
- URL final: Tienes la posibilidad de redirigir a los usuarios a otra página cuando terminen de completar el cuestionario. Si desea redirigirlas, escriba la URL y active la opción cargar URL automáticamente que se encuentra debajo de la Pestaña Presentación y navegación.
- Descripción de URL: Se puede agregar una descripción de URL final corta en los casos en que el usuario es redirigido a una página web de encuesta no relacionada. Puede ser útil que el administrador de la encuesta agregue notas relacionadas con el uso de la URL respectiva.
- Formato de fecha: Esta opción es importante cuando desea registrar marcas de tiempo junto con las respuestas de los participantes de la encuesta. Si hace clic en él, aparecerá una lista desplegable con varios formatos de fecha. Elija el formato de fecha utilizado en la ubicación geográfica de sus encuestados. No olvide que se utilizan diferentes formatos de fecha en todo el mundo. Por ejemplo, se recomienda utilizar un formato de hora diferente si su cuestionario se centra en el mercado estadounidense (dd-mm-aaaa) y no en el mercado británico (dd-mm-aa).
- Marca decimal: Hay dos opciones disponibles: punto (.) y coma (,). Elija el que se ajuste al lugar (la ubicación geográfica) donde realiza su estudio (por ejemplo, EE. UU. o Alemania).
- Mensaje de bienvenida: Escriba un mensaje que dé la bienvenida a los participantes de la encuesta cuando accedan al enlace de su encuesta.
- Finalizar mensaje: Escriba un mensaje que se mostrará a los participantes de la encuesta una vez que terminen el cuestionario. Si el campo URL final es cargado automáticamente, el mensaje final ya no se muestra.
Configuración general
Las siguientes opciones se pueden encontrar en la pestaña Configuración general:
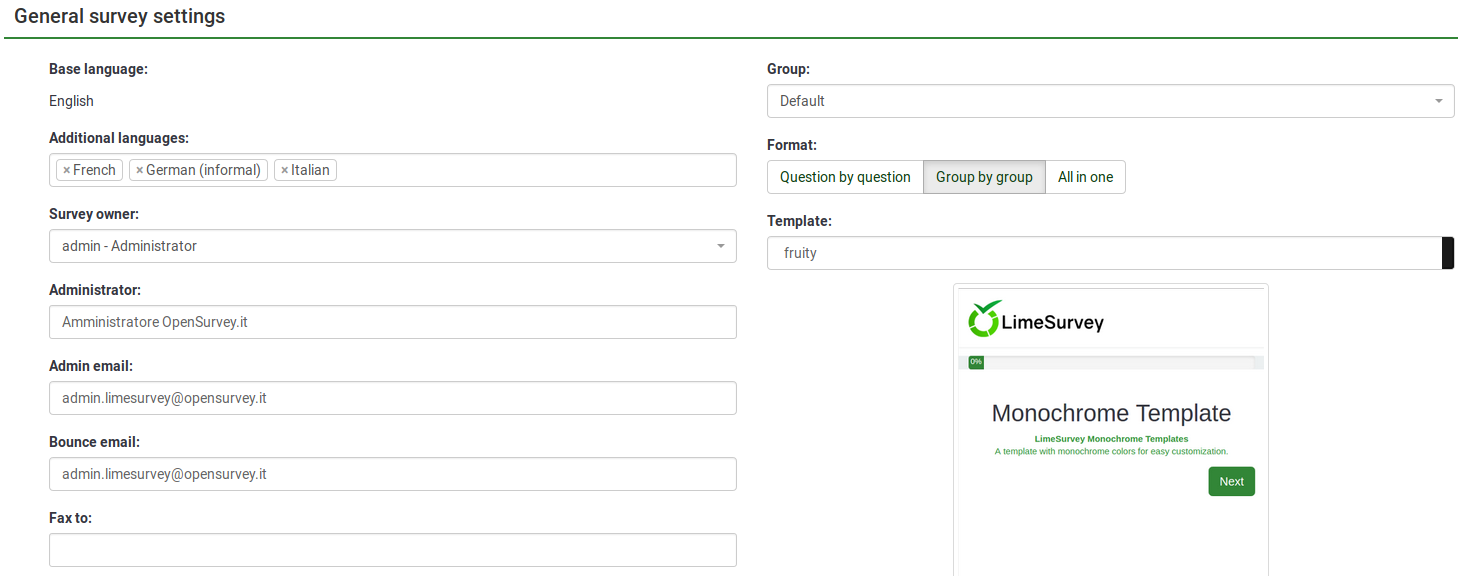
- Propietario de la encuesta: Escriba el nombre real del propietario de la encuesta.
- Administrador: El nombre del administrador.
- 'Correo electrónico del administrador: 'Escriba la dirección de correo electrónico del administrador de la encuesta.
- Correo electrónico de rebote: Esta es la dirección de correo electrónico a la que se enviarán los correos electrónicos de notificación de error de entrega (correos electrónicos devueltos).
- Enviar por fax a: Este campo se utiliza para imprimir un número de fax en la "encuesta imprimible", es decir, cuando desea enviarle a alguien una copia impresa porque no puede utilizar la encuesta en línea.
- Grupo (New in 3.0 ): Seleccione el grupo de encuestas al que se debe agregar la encuesta recién creada.
- Formato: Esta función le permite elegir la forma en que se mostrarán las preguntas a los encuestados. Hay tres opciones disponibles:
- Pregunta por pregunta: Las preguntas se mostrarán una por una (una pregunta por página). Si se elige esta opción, se mostrarán una página de "bienvenida" y una página de "finalización" separadas al realizar la encuesta.
- Grupo por grupo: Cada página de la encuesta mostrará un grupo de preguntas. Además, se mostrarán una página de "bienvenida" y una página de "finalización" separadas al realizar la encuesta, al igual que con las encuestas "Pregunta por pregunta".
- Todo en uno: si se elige, todas las páginas se mostrará en una sola página. Si selecciona esta opción, no se mostrarán páginas separadas para las páginas de "bienvenida" y "final": todas aparecerán en la misma página, junto con las preguntas.
- Plantilla: La plantilla predeterminada es bastante simple, pero funcional. Más información sobre cómo crear sus propias plantillas está disponible aquí.
Las siguientes opciones se pueden encontrar en la pestaña Presentación y navegación:
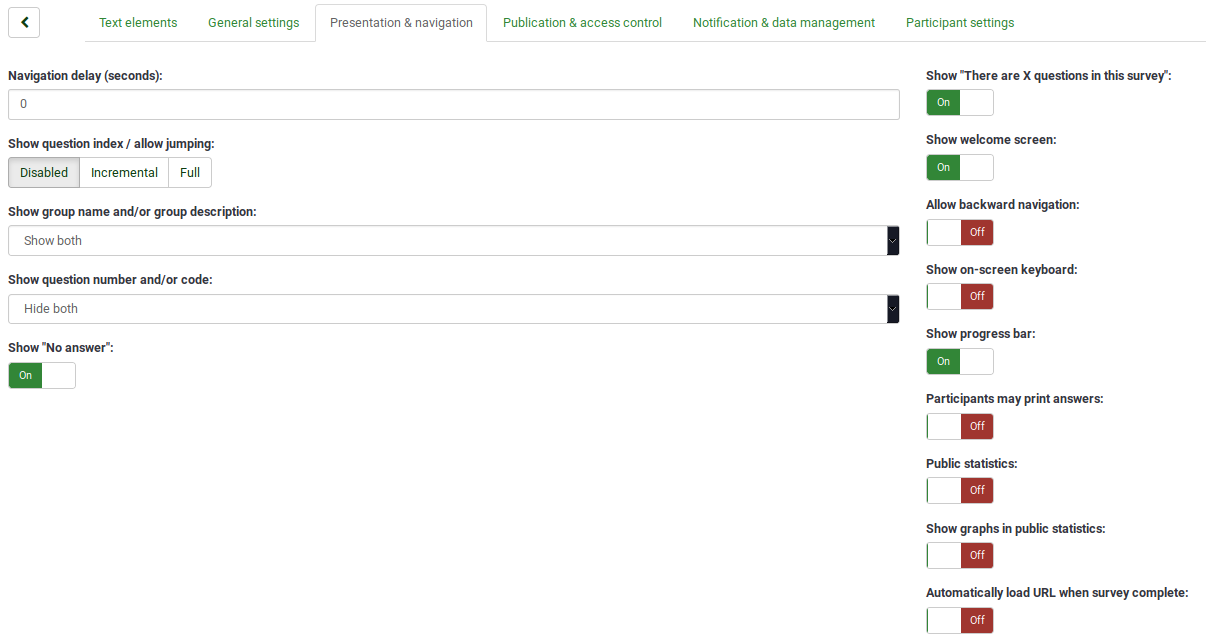
- Retraso de navegación (segundos): Esta función muestra el número de segundos antes de que se habiliten los botones anterior, siguiente y enviar. Si no se especifica ninguno, la opción utilizará el valor predeterminado, que es "0" (segundos).
- Mostrar índice de preguntas/Permitir salto: Se puede mostrar un índice de preguntas en la encuesta si esta función está habilitada, lo que permite al usuario saltar de un grupo de preguntas a otro. Puede elegir lo siguiente:
- Disabled : Si se selecciona esta opción, no se muestra ningún índice en la encuesta.
- Incremental : Si se selecciona esta opción, la pregunta Los grupos se mostrarán de forma incremental en un menú índice ubicado en la página de la encuesta. Se le permite "regresar" solo a los grupos de preguntas que fueron visitados/accedidos previamente.
- Completo: Se permite saltar de un grupo de preguntas a otro a través del menú de índice.
- Mostrar "Hay X preguntas en esta encuesta": Esto muestra el número total de preguntas en su encuesta.
- Mostrar nombre del grupo y/o descripción del grupo: Esta función le permite elegir si su encuesta mostrará a los participantes solo el nombre del grupo de preguntas, solo la descripción del grupo o ambos. También puedes optar por ocultar ambos.
- Mostrar número de pregunta y/o código: Esta función le permite elegir si su encuesta mostrará a los participantes solo el número de pregunta, solo el código de pregunta o ambos. También puedes optar por ocultar ambos. Tenga en cuenta que el número de pregunta se muestra en el momento en que alguien comienza la encuesta, mientras que el código de pregunta se muestra junto a cada pregunta de la encuesta.
- Mostrar "Sin respuesta": Cuando una pregunta "botón de opción" o "seleccionar tipo" que contiene respuestas editables (por ejemplo: preguntas de lista y matriz) tiene el Mostrar la opción "Sin respuesta" habilitada y también no obligatoria, se muestra una entrada adicional "Sin respuesta" para cada pregunta/subpregunta. De esta manera, los encuestados podrán optar por no responder la pregunta/subpregunta respectiva. Las siguientes dos opciones están disponibles para los administradores de encuestas:
- Activado: Si se selecciona esta opción, los encuestados pueden elegir la opción "Sin respuesta" para una pregunta no obligatoria.
- Desactivado: Si se selecciona, la opción "Sin respuesta" La opción no se mostrará como posible respuesta a ninguna pregunta no obligatoria.
- Mostrar pantalla de bienvenida: Si está desactivado, el mensaje de texto de bienvenida no se mostrará al comienzo del cuestionario.
- Permitir navegación hacia atrás: Si está habilitado, esto permitirá a los usuarios navegar hacia atrás y cambiar sus respuestas anteriores.
- Mostrar teclado en pantalla: Si está activado, se mostrará un teclado en pantalla al responder preguntas que requieran escribir información.
- Mostrar barra de progreso: Cuando está habilitada, esta función muestra una barra de progreso que muestra a los participantes cuánto de la encuesta han completado y cuánto queda por completar.
- Los participantes pueden imprimir las respuestas: Si está activado, los participantes de la encuesta pueden elegir al final de la encuesta imprimir sus respuestas.
- Estadísticas públicas: Se mostrará un enlace a un conjunto de estadísticas al final de la encuesta si esta opción está habilitada.
- Mostrar gráficos en estadísticas públicas: Si está habilitado, los gráficos también se mostrarán en las estadísticas públicas al final de la encuesta. Tenga en cuenta que la opción "Estadísticas públicas" debe estar habilitada para permitir que los participantes de la encuesta vean los gráficos.
- Cargar URL automáticamente cuando se completa la encuesta: La URL final se convierte en un enlace de redireccionamiento una vez que se completa la encuesta si esta opción está activada.
Publicación y control de acceso
Las siguientes opciones se pueden encontrar en la pestaña Publicación y control de acceso:
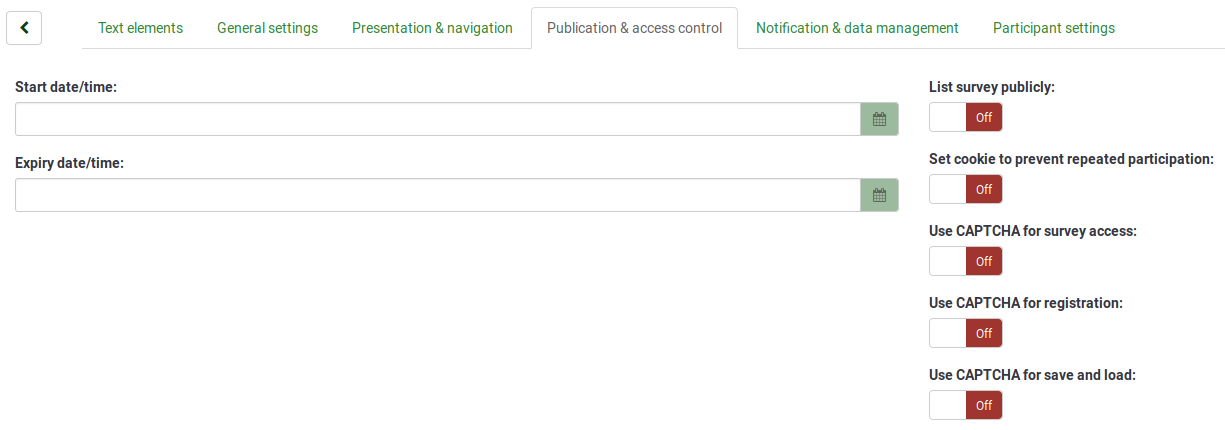
- Fecha/hora de inicio: Esta es la fecha/hora en que comienza la encuesta.
- Fecha/hora de vencimiento: Esta función le permite elegir una fecha para que expire su encuesta. Esta es la última fecha en la que el guión de la encuesta pública permitirá que la gente participe. (Ejemplo: si establece la fecha de vencimiento para el 31 de diciembre, las personas ya no podrán completar la encuesta el 1 de enero). Para eliminar una fecha de vencimiento, simplemente borre la fecha del campo de entrada.
- Listar encuesta públicamente: El valor predeterminado es "No". Cuando se establece en "Sí", su encuesta aparecerá en el portal "Encuestas disponibles", donde podrán verla todos los Usuarios de LimeSurvey.
- Configurar cookie para evitar la participación repetida: Si esto está activado, un participante de la encuesta no podrá completar una encuesta por segunda vez.
- Usar CAPTCHA para acceder a la encuesta: Para acceder a la encuesta, el participante de la encuesta debe ingresar un código CAPTCHA.
- Usar CAPTCHA para registrarse: Para registrarse en la encuesta, el participante de la encuesta debe ingresar un código CAPTCHA.
- Usar CAPTCHA para guardar y cargar: Habilite esta función si desea que un participante de la encuesta escriba un código CAPTCHA cuando cargue la encuesta nuevamente después de completar solo una parte (para evitar respuestas automáticas).
Notificación y gestión de datos
Las siguientes opciones se pueden encontrar en la pestaña Notificación y administración de datos:
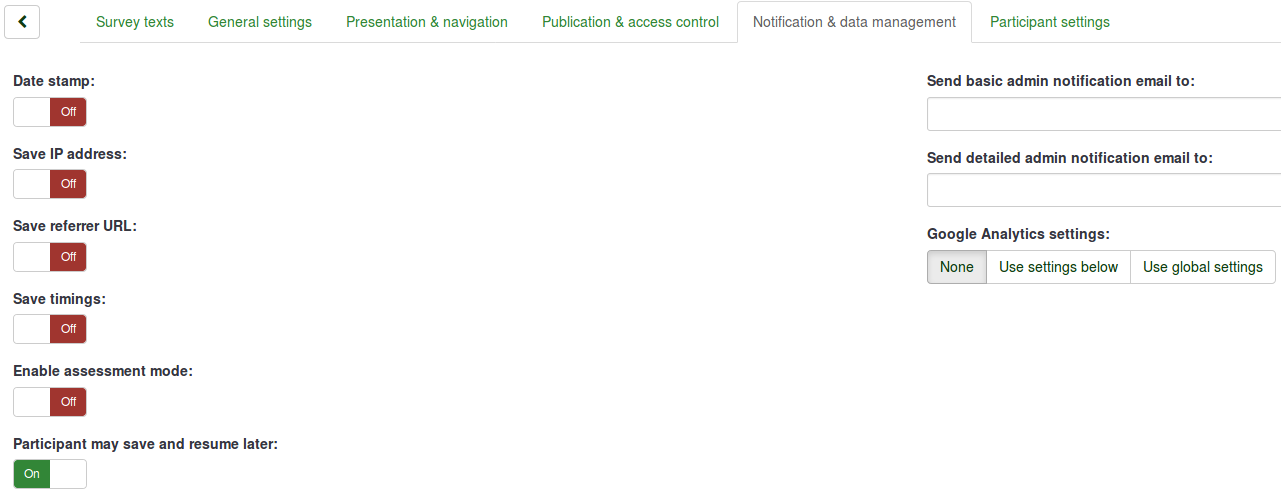
- Sello de fecha: Habilite esta funcionalidad si desea ver la hora en que se enviaron las respuestas.
- Guardar dirección IP: Si se selecciona "sí", la dirección IP del encuestado se almacenará junto con sus respuestas.
- Guardar URL de referencia: Si se selecciona "sí", la URL de referencia se almacenará junto con las respuestas.
- Guardar tiempos: Si esta funcionalidad está habilitada, se registra el tiempo que cada participante dedica a cada página de la encuesta.
- Habilitar modo de evaluación: Puede habilitar/deshabilitar evaluaciones para esta encuesta con esta configuración.
- El participante puede guardar y reanudar más tarde: Esta configuración permite que un participante guarde sus respuestas y reanude la encuesta más tarde. Tenga en cuenta que esto es más útil con encuestas abiertas o encuestas en las que los participantes son anónimos. Si está utilizando tokens y la encuesta no es anónima, en la mayoría de los casos es mejor activar persistencia de respuesta basada en tokens desde el [Participante] configuración.
- Enviar correo electrónico de notificación de administrador básica a y Enviar correo electrónico de notificación de administrador detallada a: Estas dos funciones le permiten enviar notificaciones o respuestas a cualquier dirección de correo electrónico una vez enviada la encuesta. Puede editar las plantillas para estos correos electrónicos desde el Menú de plantillas de correo electrónico. Puede elegir la opción de enviar correos electrónicos a varios destinatarios simultáneamente separando las entradas de la dirección de correo electrónico con un punto y coma (;) (por ejemplo, "sunombre@prueba.com; minombre@prueba.com; sunombre@prueba.com" o (si usa marcadores de posición ) "tunombre@prueba.com;{INSERTANS:82733X12X73};{TOKEN:EMAIL}").
Hay diferentes formas de ingresar una dirección de correo electrónico:
- Ingrese una dirección de correo electrónico específica (es decir: sunombre@test.com).
- Ingrese un código SGQA y la respuesta se enviará a una dirección de correo electrónico ingresada como responda a esa pregunta en particular (use el formato {INSERTANS:9999X88X12} de la misma manera que reutilizaría la información de respuestas anteriores).
- Lo siguiente sólo es posible si su encuesta no es anónima. Ingrese un código de token y la respuesta se enviará a una dirección de correo electrónico recuperada de un campo de token. Utilice el formato {TOKEN:EMAIL} o {TOKEN:ATTRIBUTE_1} de la misma manera que reutilizaría la información de la tabla Participantes de la encuesta.
- Google Analytics Settings: If you would like to get details about the survey web traffic, use Google Analytics. Three options are available:
- None : Google Analytics will not be used.
- Use Settings Below : If this option is chosen, the survey owner can type in his or her Google Analytics Tracking ID to be stored only with the respective survey. You also have the ability to choose one of the three Google Analytics styles.
- Do Not Use Google Analytics - so {GOOGLE_ANALYTICS_JAVASCRIPT} is an empty string.
- Default Google Analytics - {GOOGLE_ANALYTICS_JAVASCRIPT} uses the standard Google Analytics code, inserting the proper Google Analytics Key.
- SurveyName-[SID]/GroupName - {GOOGLE_ANALYTICS_JAVASCRIPT} contains customized Google Analytics code to log the URL as {SURVEYNAME}-[{SID}]/{GROUPNAME}. This can be helpful if you want to analyze navigation paths through your survey, time spent per page, and drop-off rates per page.
- Use Global Settings : If this option is chosen, the survey will use the same Google Analytics Tracking ID as the one saved in the global settings and then you choose the desired Google Analytics style.
Participant settings
The following options can be found under the Participant Settings tab:
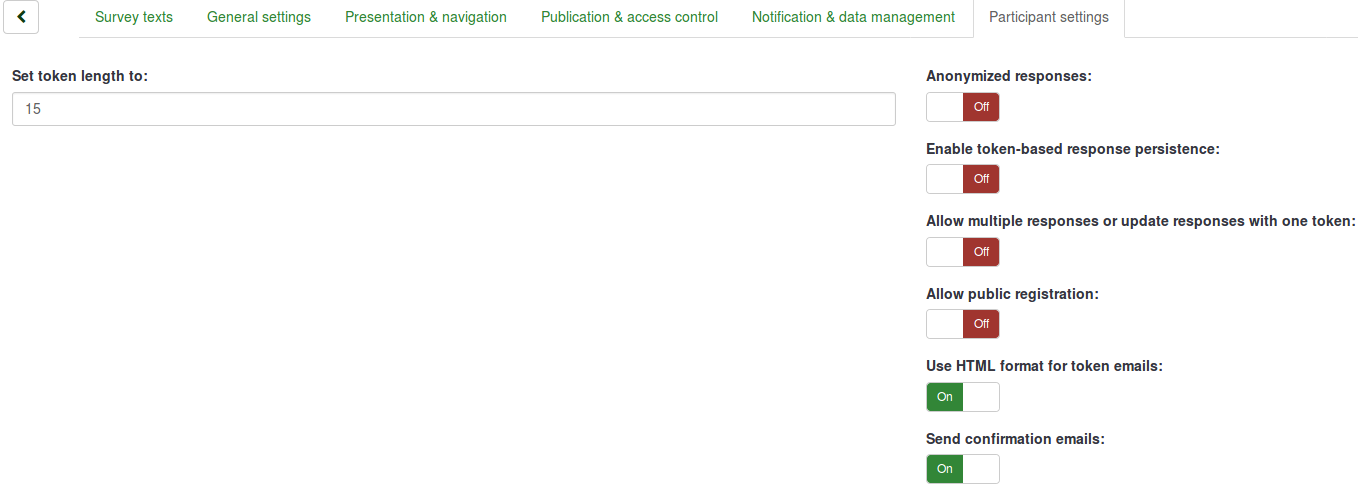
- Set Token Length To: Usually, the default value of 15 digits does not need to be changed (the maximum supported value is 35). However, if you wish to change this setting, please enter a number (X) which is greater than 5. If the number entered is less than 5, it will be converted to the default value of 15. When generating tokens, all tokens will use a length of X digits.
- Anonymized Responses: This functionality allows you to determine whether responses to your survey are matched with information from the Survey Participants table (utilized in the respective survey) or are kept "anonymous". The default is "No". If you choose "Yes", then your survey is set to anonymize responses - there will be no way to connect answers and participants. Even the survey administrator will not be able to link response data and participant/token data. However, you will always be able to specifically view each response entered by your participants in the survey. Thus individual and anonymous analyses can still be done.
- Enable Token-Based Response Persistence: If your survey uses tokens and your responses are not anonymized, you may want to enable this feature. If you enable this feature, your participants will be able to leave the survey and resume later at any time without using the Resume Later function - for example, when they get distracted or their browser crashes. Upon clicking the invitation link again, they will be returned to the point in the survey where they left off with previous entries saved.
- Allow Multiple Responses or Update Responses With One Token: If this option is activated, participants will be able to return to their survey by clicking the invitation link, even if they have already submitted the survey. If the survey is anonymous or "Enable Token-Based Response Persistence" is set to "No", this will add a new response. If the survey is not anonymous and "Enable Token-Based Response Persistence" is enabled, the user will update the existing responses.
- Allow Public Registration: If you use tokens to control access to your survey, the only people who can use the survey are those who have an entry and a unique token code allocated in the Survey participants table. If you would like to use tokens, but also allow public registration, set this to "Yes". The "Yes" setting will allow visitors to register his or her name and email address. The script will create a new entry in your Survey Participants table for this person, then send them an invitation email. The script will ensure that only one person per email address can complete your survey.
- Use HTML Format For Token Emails: When enabled, all emails sent by the token management interface (invite, reminder, confirmation) will be formatted as HTML. You will then be able to use rich formatting for these emails. The default value is "Yes".
- Send Confirmation Emails: If enabled, the participant will receive a confirmation email that the survey was submitted.
Import a survey
You can import a survey from the Create, import, or copy survey screen.
(1) From the Surveys dropdown options (on the top toolbar of your Limesurvey homepage) select Import a survey.
(2) On the Import tab, click Browse and choose the file you wish to import.
(3) Click the Import survey button.

Choose from the following formats:
- .LSS files (XML-format created by LimeSurvey 1.90 or later);
- .LSA files (Survey archive which may include also token, responses and timings - available since LimeSurvey 2.0);
- .TXT files (Text-format created by Excel - available since LimeSurvey 2.0);
- .CSV files (Created by early LimeSurvey versions from 1.50 to 1.90).
The import function "intelligently" re-numbers the survey, groups, questions, answers, and condition IDs so that they all match each other. No existing survey is going to be overwritten during the import process.
By default, the resource links and expression fields are also imported. Basically, the more advanced type of questions are going to be also imported along questions that include complex branching, assessments, validation, and tailoring.
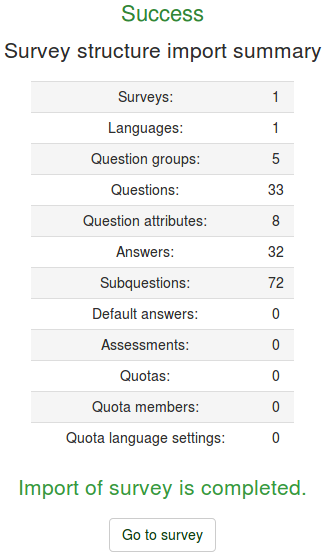
Once the import process is completed, a survey structure import summary will be displayed, showing whether it was successful or not:
Copy a survey
(1) Access your LimeSurvey homepage and from the Surveys dropdown options (on the top toolbar) select Copy a survey.
(2) From the Copy tab, choose the survey that want to copy from the Select survey to copy options.
(3) Complete the required fields and set preferred options.
(4) Once you are done selecting the preferred options, click the Copy survey button located on the bottom of the page. A survey copy summary will be displayed:
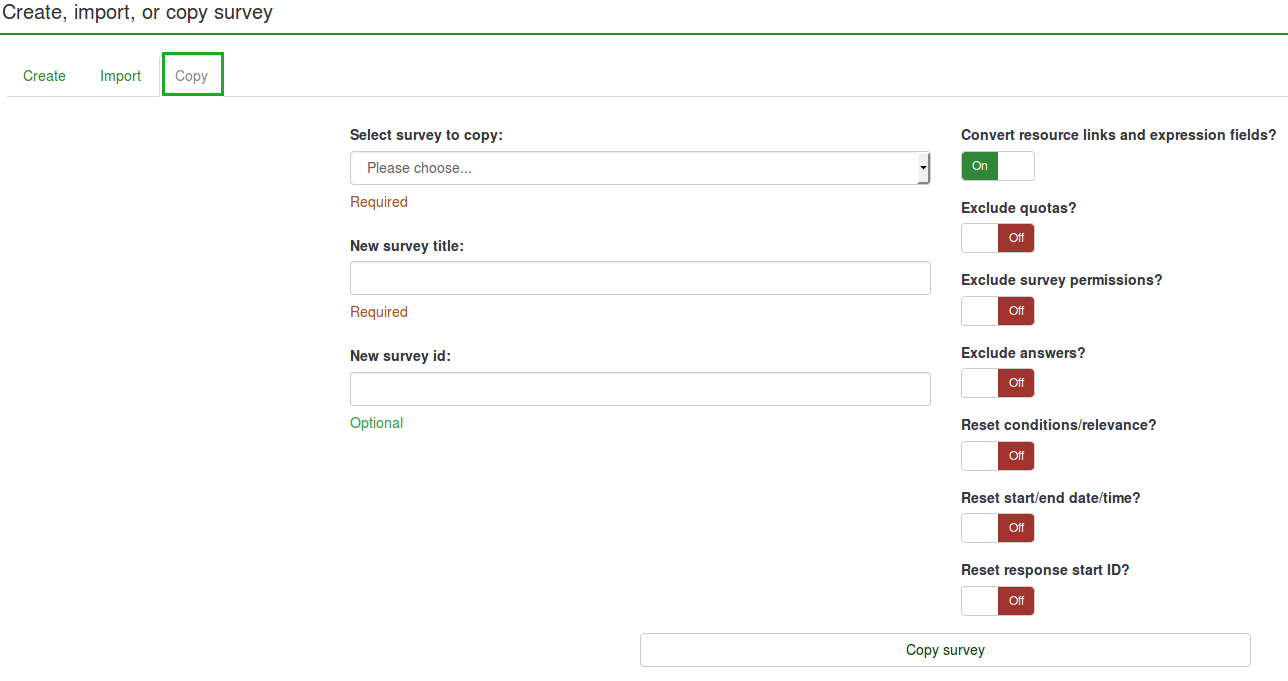
Copy Survey Fields:
- New survey title: Type in the title you wish the copied survey to have.
- New survey id: You can type in a new survey ID or leave the field empty. If the field is left empty, a survey ID will be automatically assigned.
- Convert resource links and expression fields: If you disable this option, the more advanced question types that use the expression manager will not be copied.
- Exclude quotas: The quotas are going to be excluded if this option is disabled.
- Exclude survey permissions: If enabled, no survey permissions will be copied into the new survey.
- Exclude answers: Exclude the answer options.
- Reset conditions/relevance: You can choose to reset the conditions that were set in the original survey.
- Reset start/end date/time?: You can choose to reset the survey start/end date/time.
- Reset response start ID?: Each response has a corresponding ID. If enabled, the ID of the responses will be reset. However, bear in mind that it is better not to have an ID with two matching responses because it might influence the output of your survey.
Below is a screenshot of the Survey Copy Summary.
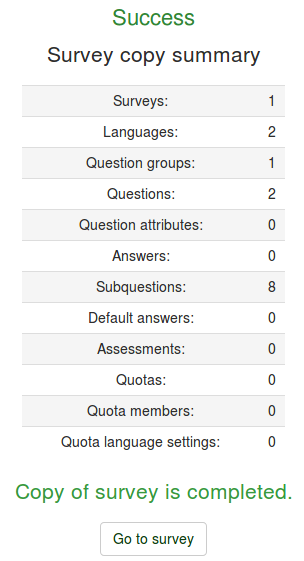
To access the copied survey, click Go to survey to be redirected to the settings of the newly added survey.
List surveys
There are now two ways to see a list of available surveys.
(1) From the Surveys options (on the top toolbar of your LimeSurvey homepage) select List surveys.
(2) Or click the List surveys box on your LimeSurvey homepage.
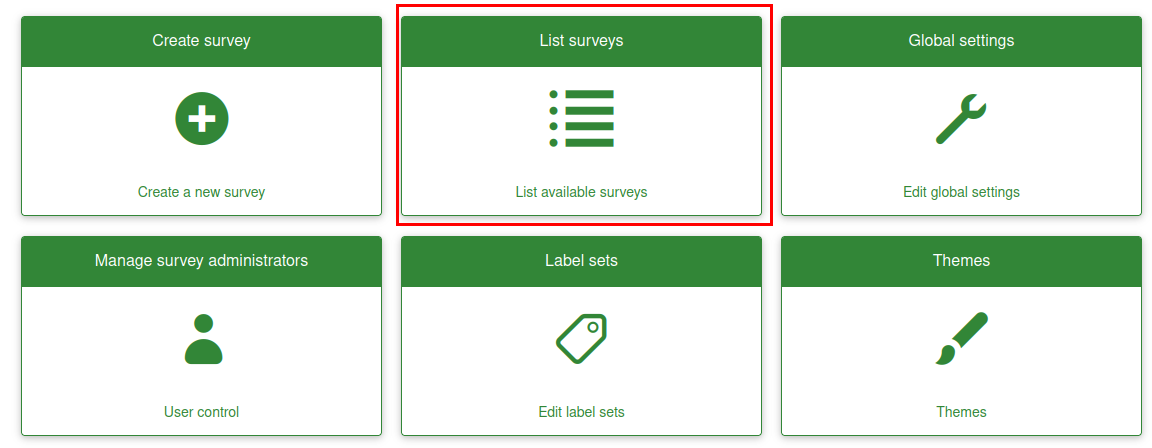
A list of surveys will be displayed.

- Survey ID: When created, the survey receives a unique id that is used to make the connection between different LimeSurvey tables.
- Status: Status of available surveys:
- Title: The title of the survey.
- Group: The survey group to which the survey belongs to.
- Created: The date when the survey was created.
- Owner: The name of the user that owns the survey.
- Anonymized responses: This shows whether the responses are anonymized when stored into the database or not.
- Partial: The number of surveys that were partially completed.
- Full: The number of surveys that were fully completed.
- Total: The number of partially and fully completed surveys.
- Closed group: This is either "Yes" (if a Survey participants table is used) or "No".
- Actions: The last column presents the actions that are available for each survey:

If you want to look for a specific survey, use the search bar and filter the results via the survey status field ("active", "active and running", "inactive", "active but expired", and "active but not yet started").
Delete a survey
(1) From the list of Surveys dropdown options (on the top toolbar of your LimeSurvey homepage) select List surveys.
(2) Select the survey(s) you wish to delete (by ticking the box to the left of the survey ID).
(3) Click on the Selected survey(s)... button located on the bottom-left side of the page.
(4) Select Delete.
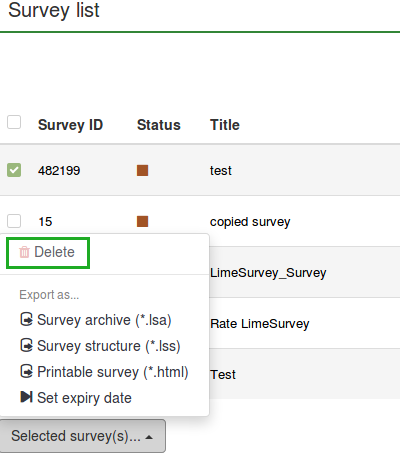
(5) When you click Delete, a confirmation window will appear asking you to confirm your action. Select Yes to confirm.
Export a survey
(1) From the Surveys dropdown options (on the top toolbar of your LimeSurvey homepage) select List Surveys.
(2) Select the survey(s) that you want to export by ticking the box to the left of the survey ID.
(3) Click the Selected survey(s)... box at the bottom of the list of surveys.
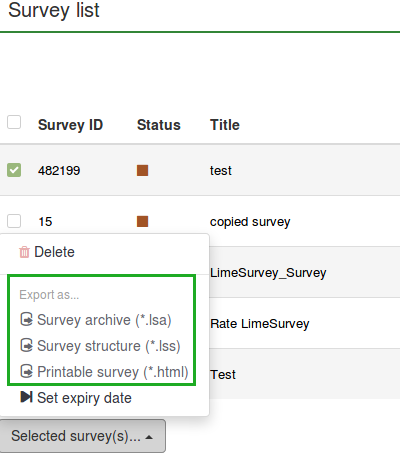
The following options are available:
- Survey archive (*.lsa);
- Survey structure (*.lss);
- Printable survey (*.html): This option allows you to export the survey in a printable format in order to be filled out "offline".
(4) Select the export file type that you want to export the survey as.
For more details, check how to export a survey structure.
Survey groups
(1) To access the survey group functionalities, click Surveys located on the main toolbar of the LimeSurvey home page.
(2) Then click the Survey groups tab:

A survey groups list will be displayed.
On this page you can:
- Create a survey group - located above the survey groups table;
- Edit a survey group - located on the last column (the green pencil icon);
- Delete a survey group - located on the last column (the red trash icon).
Create a survey group
To create a new survey group:
(1) Click Surveys located on the main toolbar of the LimeSurvey home page.
(2) Click the Survey groups tab.
(3) Click the Create a new survey group button located above the survey groups list.
(4) Complete the following fields and Save:
- Name: Type in the name of the survey group;
- Title: Type in the title of the survey group;
- Description: Type in a short description of the survey group;
- Order: Helps you organize the order of the survey groups within a parent group;
- Parent: Choose the survey group that will be the parent survey group. The parent group option is used to ease the edit of template-related options of a high number of survey groups via a few clicks.
To add surveys to the group:
(1) Go to the General settings tab of a survey.
(2) Click the arrow in the Group field to display a list of survey groups.
(3) Select the survey group and Save.
Edit survey group
The following options of a survey group can be edited:
- Surveys in this group;
- Settings for this survey group;
- Template options for this survey group (New in 3.0 ).
(1) From the top toolbar of your LimeSurvey homepage, click Surveys.
(2) Click the Survey group tab.
(3) Select the survey group that you want to edit, by clicking the edit icon under the Actions column.
The survey group will be displayed in edit mode.
Surveys in this group
If you click on the first tab, all the surveys from the respective group will be displayed.

This works as a filtering function, filtering out all the surveys not listed in the chosen survey group. You can now select the desired survey and start editing it. To see which survey-editing functionalities are available, check the list surveys section.
Settings for this survey group
The following fields can be edited from the Settings for this Surveygroup tab:
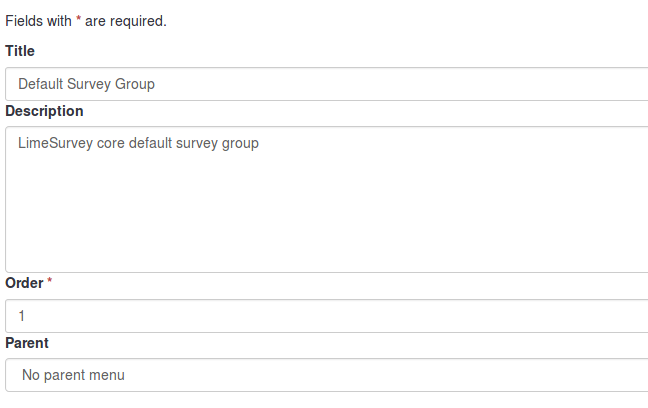
- Title: Type in the title of the survey group;
- Description: Type in a short description of the survey group;
- Order: Helps you organize the order of the survey groups within a parent group;
- Parent: Choose the survey group that will be the parent survey group. The parent group option is used to ease the edit of template-related options to a higher number of survey groups via a few clicks.
Template options for this survey group
The template options functionalities are present in LimeSurvey 3.0+. It offers a set of various options that allows you to quickly and easily change the templates-related settings of the surveys that belong to the same survey group:
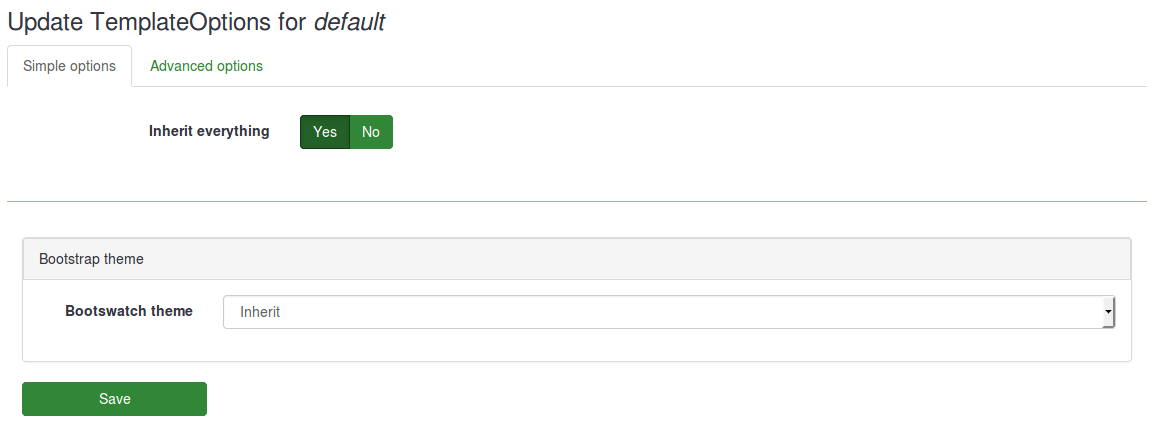
The Inherit everything functionality lets you decide whether you want the survey group to inherit everything or not from the parent survey group theme.
If you do not want this to happen, select "No". The following options will show up which will allow you to choose what should be inherited from the parent survey group theme:
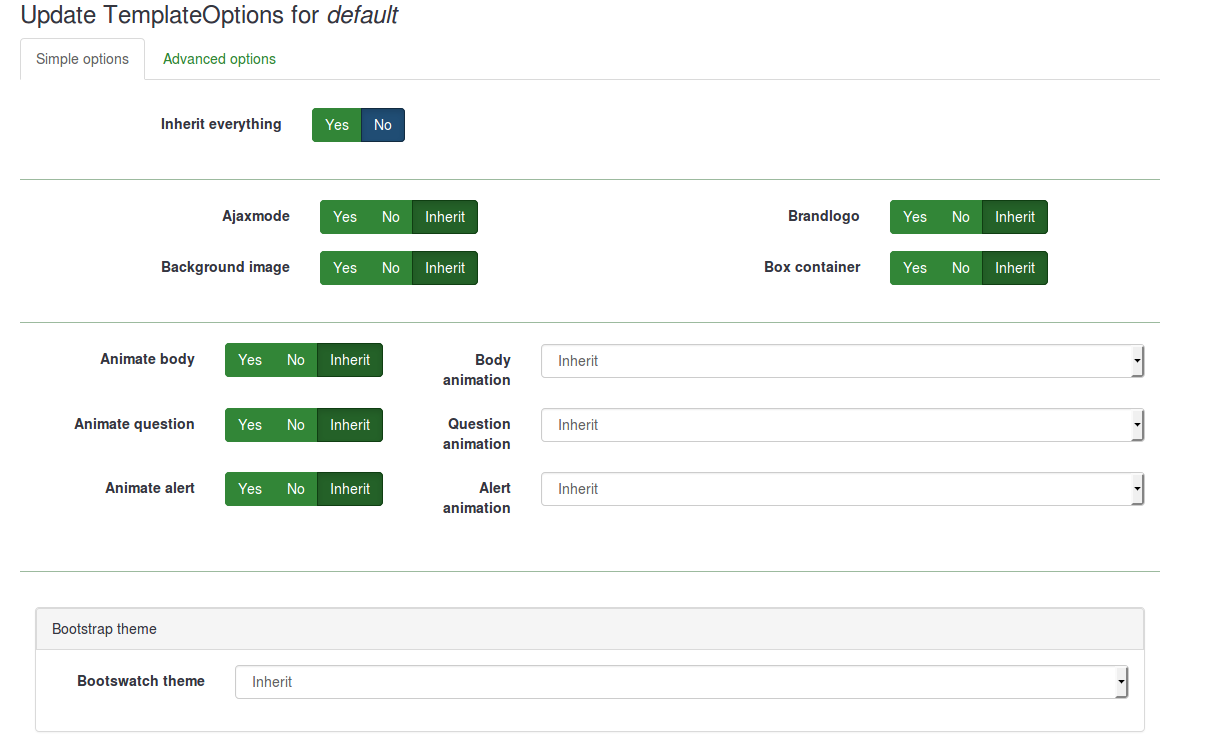
Below, you will see that you can choose a bootswatch theme for your survey group. Bootswatch themes can be used to quickly edit your templates. Basically, bootswatch is a collection of themed swatches which can be freely downloaded and dropped into your Bootstrap site. Some of these themes are already included into your LimeSurvey installation and they can be selected from the Bootswatch theme drop-down list.
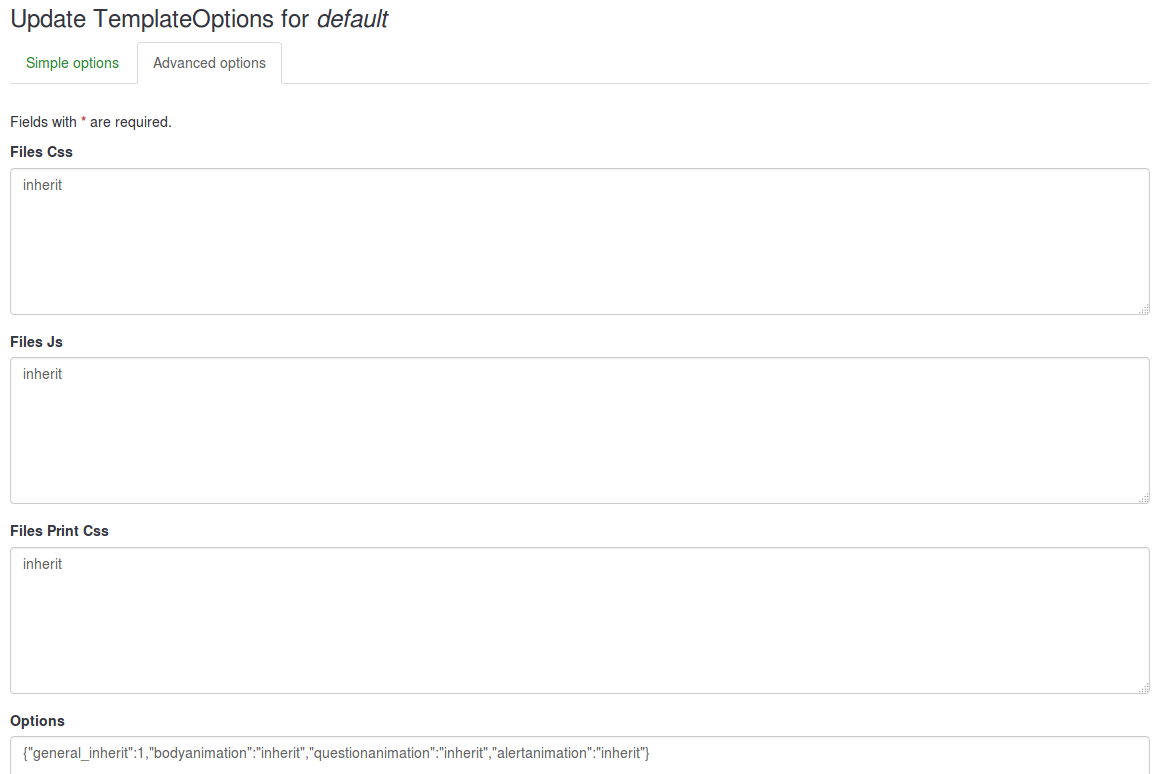
If you want to tweak more a survey group template options, click on the advanced option tab (recommended for advanced users):
Delete a survey group
(1) Display a list of your surveys. (From the Surveys tab on the top toolbar of your LimeSurvey homepage, click List surveys or click the List surveys box).
(2) Click the Survey group tab.
(3) Select the survey group you want to delete and click the Delete icon located in the Actions column.
(4) Confirm the deletion by clicking Yes.
