Enquête deelnemers
From LimeSurvey Manual
Inleiding
Vaak wil je een groep mensen uitnodigen om je enquête in te vullen. Je wilt bijhouden wie de enquête heeft ingevuld en er voor zorgen dat iedereen maar een keer de enquête kan invullen. Met tokens kun je het volgende doen:
- Importeren van een lijst met namen en e-mailadressen van deelnemers (invoer is een CSV bestand of een LDAP query)
- Genereren van een unieke toegangscode voor elke gewenste deelnemer
- Een e-mail versturen naar elke gewenste deelnemer met de uitnodiging om deel te nemen (per groep of individueel).
- Een herinnering e-mailen aan elke deelnemer die de enquête nog niet ingevuld heeft.
- Bijhouden wie de enquête ingevuld heeft.
- Voorkomen dat niet uitgenodigde mensen de enquête invullen, en zorgen dat de uitgenodigde deelnemers dat maar een keer doen.
- Wijzigen details in je lijst.
- Sjablonen aanmaken voor de e-mails (uitnodiging / herinnering)
Nadat je van je enquête een besloten enquête hebt gemaakt, (je hebt tokens ingeschakeld voor je enquête), dan kunnen alleen de mensen met een geldige toegangscode (token) die nog niet gebruikt is, de enquête invullen.
Als je Openbare aanmeldingen toestaat in de enquête instellingen, dan kunnen deelnemers zichzelf als deelnemer aanmelden, er wordt dan automatisch een token aangemaakt.
Is de enquête anoniem?
Ja, je kunt ook met het gebruik van toegangscodes de enquête anoniem houden. Je bepaalt bij het aanmaken van de enquête of die anoniem is of niet anoniem. Als de enquête niet anoniem is worden de toegangscodes gebruikt om de respons te koppelen aan de deelnemer. Bij een anonieme enquête met toegangscodes, wordt deze link (foreign key relatie) niet gelegd.
Tokens activeren
Je kunt op twee manieren tokens activeren:
- Bij het activeren enquête, krijg je de vraag of je tokens wilt activeren:

- OF klik op het icoon tokens
 - voordat de enquête is geactiveerd.
Beheer toegangscodes
Na het aanmaken van de toegangscode-tabel kun je klikken op het icoon tokens om de tokens te gaan beheren. Hieronder worden beknopt de functies weergegeven:
- Keer terug naar beheer: Je gaat terug naar enquête-scherm.
- Toon samenvatting: Er wordt een korte samenvatting getoond over de toegangscodes in de enquête (aantal, aantal uitnodigingen, aantal die ingevuld hebben). Ook heb je toegang tot wat functie van de administratie (zie onder). Het standaard scherm.
- Toon toegangscodes: Toont alle deelnemers in de toegangscode-tabel, van hieruit kun je een specifieke toegangscode wijzigen of verwijderen, maar je kunt hier ook andere functies uitvoeren (zie onderstaande functie toon).
- Voeg nieuwe toegangscode toe: je kunt een nieuwe toegangscode toevoegen.
- Maak dummy toegangscodes: je kunt 1 of meer toegangscodes toevoegen.
- Beheer extra attributen: Je kunt extra velden toevoegen aan de tokens om gegevens van deelnemers vast te leggen.
- Importeren uit CSV: Je kunt toegangscodes importeren uit een csv-bestand.
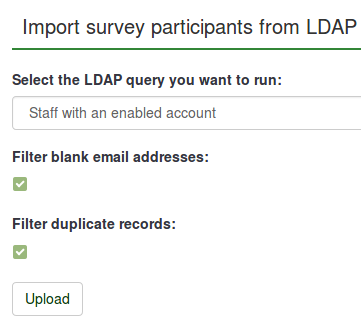
- Importeer uit LDAP zoekopdracht: Importeren toegangscodes uit een LDAP-query (alleen getest op openLdap maar zou ook op andere LDAP vergelijkbare omgevingen, zoals ActiveDirectory, moeten werken).
- Exporteer tokens naar CSV: maakt een standaard csv-bestand aan met alle deelnemers
- Bewerk e-mail sjabloon: gebruikt om de eigen sjablonen voor de uitnodiging, herinneringen en registratie e-mails te beheren.
- Verstuur e-mail uitnodiging: Alle deelnemers aan de enquête, die nog geen uitnodiging hebben gehad, krijgen een uitnodiging per e-mail.
- Verstuur e-mail herinnering: Alle gewenste deelnemers die de enquête nog niet hebben voltooid, maar al wel een eerste uitnodiging hebben gekregen, krijgen een herinnering per e-mail.
- Toegangscodes aanmaken: Elke deelnemer in de toegangscodetabel krijgt een unieke toegangscode, als die deelnemer er nog geen heeft.
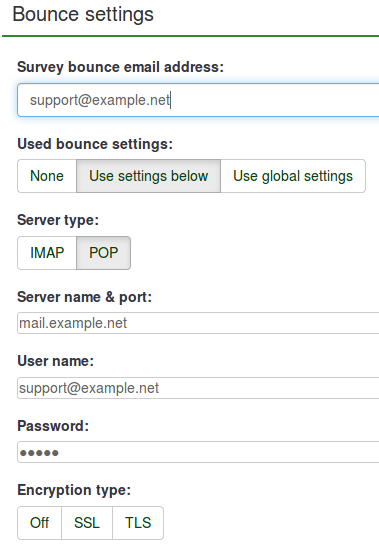
- Bounce instellingen: Deze e-mail instellingen kunnen op enquête niveau of op systeem niveau worden gezet. (Toegevoegd in versie 1.91).
- Verwijder toegangscodetabel: verwijderd de toegangscodetabel, de enquête wordt openbaar.
Wijzigen/toevoegen toegangscode
Je krijgt ongeveer het onderstaande scherm:
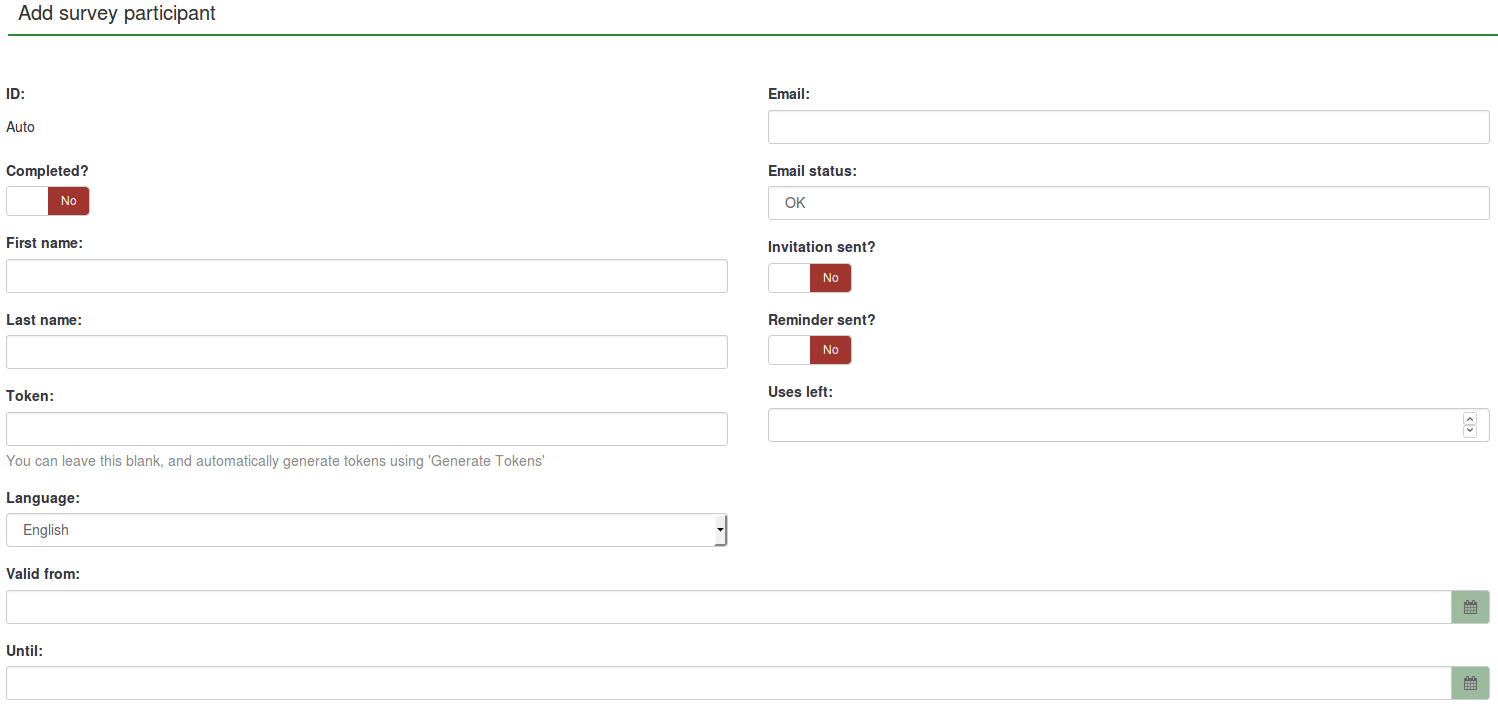
- Voornaam en Achternaam: van de deelnemer (kan gebruikt worden in e-mails en enquête)
- E-mail: e-mailadres van deelnemer
- E-mail status: Gebruikt voor blokkeren foute e-mailadressen. Als de beheerder een bounce ontvangt van een naar deze deelnemer gestuurde e-mail, dan kan de status gewijzigd worden in iets ongelijk 'OK' (bijvoorbeeld: 'gebruiker onbekend' of 'mailbox vol'). Door iets anders dan 'OK' hier in te zetten, wordt deze deelnemer overgeslagen bij het sturen van herinneringen en uitnodigingen. NB. dit is dus een handmatig actie, behalve als je een script hebt gemaakt die dit doet.
- Toegangscodes: de uitnodigingscode, aangemaakt bij het genereren van de toegangscodes.
- Taal: je kunt de standaardtaal per deelnemer instellen.
- Uitnodiging verzonden?: standaard een 'N', anders de datum waarop de uitnodiging is verzonden.
- Herinnering verzonden?: standaard een N, anders de datum waarop de herinnering is verzonden.
- Voltooid?: standaard een 'N', anders de datum waarop de enquête is ingezonden (niet anoniem) of 'Y' (anoniem)
- Resterend aantal pogingen: Aantal keren dat de toegangscode nog gebruikt kan worden. NB.: Als je dit verhoogd na het afronden van de eerste keer invullen door de deelnemer, dan moet je ook "Voltooid?" op "N"zetten. (standaard 1).
- Geldig van & tot : Je kunt de periode dat de toegangscode gebruikt mag worden beperken tot deze periode. Laat deze velden leeg, als je de deelnemers niet in de periode dat ze de enquête inzenden wilt beperken. NB.: Als de periode eindigt terwijl de deelnemer bezig is met invullen, dan is het verder invullen niet meer mogelijk.
- Attribuut1 tot Attribuut x: Optionele velden die door de beheerder van de enquête zijn toegevoegd (zie een volgende paragraaf).
Dummy toegangscodes
Dummy toegangscodes zijn toegevoegd in versie 1.91. Het scherm is ongeveer als volgt:
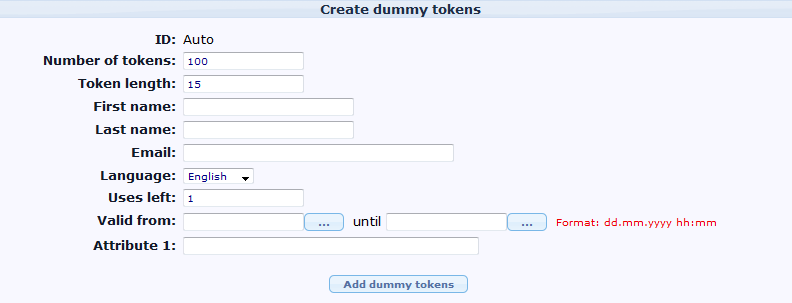
- Aantal toegangscodes: Aantal toe te voegen dummy toegangscodes (standaard 100).
- Lengte toegangscode: Aantal tekens van de toegangscode. Standaard 15
- Voornaam en achternaam
- Taal
- Resterend aantal pogingen
- Geldig van & tot
- Attribuut1 tot Attribuut x
NB. alle dummy toegangscodes hebben dezelfde voornaam, achternaam, e-mailadres en taal.
Bounce Instellingen
E-mail bounce verwerking is toegevoegd in versie 1.91.
- Enquête bounce e-mail: Een geldig e-mailadres voor niet afgeleverde e-mail. Voor de snelheid van verwerken is het handig als dit e-mailadres alleen gebruikt wordt voor dit doel.
- Te gebruiken bounce instellingen: Opties: 1- Geen (standaard), 2- Gebruik onderstaande instellingen (instellingen op enquête niveau), 3- Gebruik algemene instellingen (systeem niveau).
- Server type: Opties: 1- Uit, 2- IMAP, 3- POP
- Server naam en poort: Host naam en poort. Voorbeeld: mail.example.net:25 of imap.gmail.com:995
- Gebruikersnaam: Gebruikersnaam of User ID van het e-mail account
- Wachtwoord: van het e-mail account
- Encryptie type: opties: 1- Geen (standaard), 2- SSL, 3- TLS
Extra attributen
Je kunt attributen toevoegen aan de toegangscodetabel om extra gegevens per deelnemer vast te leggen. Klik op de knop Beheer extra attributen in de tokens toolbar. Standaard hebben deze velden een lengte van 255 tekens. Je kunt een extra veld ook een beschrijving geven, dat is gemakkelijker als je tokens gaat beheren / bekijken, of bij het toevoegen van condities op grond van deze attributen, of wanneer je resultaten van niet anonieme enquêtes gaat exporteren.
Een beschrijving hoe je extra attributen toevoegt en daarop condities kunt gebruiken, staat hier: "Conditions based on token attributes".
Gebruik overzicht en wijzigen tokens
Het overzicht toont alle toegangscodes in een lijstvorm. Er zijn een aantal knoppen met een 'actie' die op een specifieke toegangscode kan worden uitgevoerd.
De bovenste regel heeft drie onderdelen: bladeren, zoeken en selectie (aantal tonen en beginpunt).
De volgende regel (zie onderstaand plaatje) geeft verschillende criteria om de tokens te sorteren. Je kunt op een groene pijl klikken om op het bijbehorende veld te sorteren.
Bij "Bewerking" staan de specifieke acties die op elke toegangscode uitgevoerd kan worden:
- Invullen van de enquête
- Wijzigen
- verwijderen
- Verstuur een uitnodiging/herinnering
- Bij een niet anonieme enquête is er ook een knop om de respons te bekijken.
Alle acties zijn dus voor een specifieke toegangscode.
Database Administratie
Het overzicht "Toon samenvatting" toont niet alleen informatie over de tokens, maar geeft ook toegang tot database administratie opties als:
- Wis uitnodigingen: Alle tokens waarvoor een uitnodiging is verzonden, worden op 'N' gezet. Je beseft dat dit een buitengewone actie is.
- Wis tokens: Wist alle tokens. Ook een buitengewone actie.
- Verwijder tokens: De hele token tabel voor deze enquête wordt verwijderd. Iedereen die de URL kent, kan nu de enquête invullen.
Importeren/exporteren
CSV importeren
When you click the icon to import tokens you will be presented with the following screen:
Your CSV file must be a standard CSV (Comma Separated Value) file. The first line of text is always the header information and will be used to identify the field data. Possible data fields are:
firstname,lastname,email,emailstatus,token,language code,tid,attribute_1,attribute_2, attribute_...
To obtain a full list of token field names, export an existing token table.
The fields can be in any order but firstname, lastname and email are mandatory, and they must contain at least one character. Empty data (such as "") is not sufficient. If you would like to import data for attribute fields, you must add the desired attribute fields to the token table prior to importing token data.
A bare minimum CSV file could look like this:
   firstname,lastname,email
   John,Doe,john@doe.net
Datumformaat bij importeren
Het datumformaat voor de begin geldigheid en de eind geldigheid in het invoerbestand is "YYYY-MM-DD HH:MM", voorbeeld:
2012-01-01 00:00
--betekent 1 Januar1 2012 12:00 VM.
Filteren dubbele
If you activate the option to filter for duplicates you can set which fields are used to identify duplicates. By default First name, Last name & Email-address are pre-selected. If a duplicate is found while importing the related line is omitted.
Probleemoplossing
A common error when users try to import tokens is an invalid CSV file. This is often caused by Microsoft Excel. Many users have a list of e-mail addresses saved as an XLS document. A file can be saved as CSV in Excel, however, Microsoft uses semi-colon (;) as the comma separator, while a standard CSV file uses comma (,) as the separator. If you try to import an Excel saved CSV file you will get an error message. A simple solution is to save your XLS document as a CSV file in Excel and then open the file in a raw text editor and replace all semi-colon characters with commas.
Recommended free raw text editors are: PSPad, NotePad2 or Notepad++ for Windows, and TextWrangler for Macintosh.
You can use LibreOffice Calc to export import your xls file and export your csv file.
Add additional attributes at import It is also possible to add new custom attributes when import a CSV file. It is still needed to define what attributes will be added. The way to do this is:
   firstname,lastname,email
   attribute_1 <Casenr>; token; attribute_2 <Title>; attribute_3 <destination>; lastname; firstname; attribute_4 <Sender>;
Aanmaken CSV bestand met Excel op de Mac
When you create a CSV file with Excel 2011 on the MAC and use the standard "save as" option, you loose special characters such as ü, ë, é etc. when importing into LimeSurvey Token Table.
To make this work properly choose to save the file as a Windows text CSV file (tested on the Dutch version of Excel, saved as "Door lijstscheidingstekens gescheiden Windows tekst (.CSV)").
Then when importing the file in the LimeSurvey token table, under "character set of file" choose "Mac West European". The special characters will be imported correctly.
Tested on LimeSurvey 2.0 only.
CSV exporteren
Als je tokens exporteert dan is de volgorde van de velden:
tid,voornaam,achternaam,e-mailadres,e-mail status,token,taalcode,attribuut_1,attribuut_2,...
LDAP import
- Queries are manually defined by the system administrator in the config-ldap.php file
- Duplicates are identified by First Name, Last Name & Email-Address. If a duplicate is found while importing the related line is omitted, unless you have unchecked the Filter Duplicates checkbox.
A tip for generating a large number of fake e-mail addresses
Sometimes you may need a large number of fake e-mail addresses and tokens. You can use functions in a spreadsheet (e.g. OpenOffice Calc) to generate them. Let's assume you want thousands addresses in a form: 1@test.com, 2@test.com, 3@test.com... Put consecutive numbers in column A: 1 in the A1, then insert function =A1+1 in A2, then copy A2 down as many times as you need. In B1 use concatenation function to join A1 and "@test.com", which is =CONCATENATE(A1;"@test.com"). Then copy B1 down for each copied A. You may generate fake names in a similar way. Finally, save the file as CSV for import in LS.
Vanaf versie 1.91 kun je dummy toegangscodes genereren.
A tip for generating a large number of individual links which include the token already
The structure of the survey link is the following:
http://url-to-your-limesurvey-installation/index.php?sid=XXXX⟨=en&token;={TOKEN}
So you proceed similar to the example above for generating email adresses.
- First column: http://url-to-your-limesurvey-installation/index.php?sid=XXXX⟨=en&token;= (the same for all, as long as the language is the same!)
- Second column: {TOKEN} (put your tokens here, of course they must be individual)
- Third column: use the CONCATENATE funtion to joint the first column with the second column.
Emailing
Email placeholders
De volgende velden kunnen in een e-mail uitnodiging/herinnering e-mail sjablonen worden gebruikt en moeten worden gevuld bij de enquête eigenschappen. Bij het versturen worden de velden al bij het voorvertonen vervangen door de voor die e-mail geldende waarden.
| {ADMINEMAIL} | Email of the Survey admin |
| {ADMINNAME} | Name of Survey Admin |
| {SURVEYNAME} | Title of your survey |
| {SURVEYDESCRIPTION} | Description of your survey |
The following field names are allowed in invitation/reminder emails (subject and/or body) and will be replaced while sending out the mails:
| {EMAIL} | Email of the recipient |
| {FIRSTNAME} | First Name |
| {LASTNAME} | Last Name |
| {SURVEYURL} | The URL pointing to the survey start - if you are sending HTML emails this will be a fully linked HTML version |
| @@SURVEYURL@@ | The URL pointing to the survey start - this is the barebone link. Use this if you want to integrate the link in your custom HTML elements somewhere (available in v1.90 and later) |
| {OPTOUTURL} | The URL to deactivate sending of mail for this survey - this will be a fully linked HTML version |
| {TOKEN} | Token to access the survey |
| {ATTRIBUTE_1} | Attribute 1 |
| {ATTRIBUTE_2} | Attribute 2 (...and so on for more attribute fields) |
If your survey is NOT anonymous, the following field names are available to insert token data in survey text and javascript:
| {TOKEN:EMAIL} | Email of the recipient |
| {TOKEN:FIRSTNAME} | First Name |
| {TOKEN:LASTNAME} | Last Name |
| {TOKEN} | Token to access the survey |
| {TOKEN:ATTRIBUTE_1} | Attribute 1 |
| {TOKEN:ATTRIBUTE_2} | Attribute 2 (and so on for more attribute fields) |
Bekijk voorbeelden van gebruik van token informatie.
Emails settings
- Invitation Email Subject: The subject line for the invitation email that gets sent out when tokens are used with your survey.
- Invitation Email: This is the text for the invitation email that gets sent out when tokens are used with your survey. This is initially filled by the default invitation message (from the language files) but you can modify it to suit yourself. If you are using English as your base language, the default invitation and reminder text can be found in the limesurvey/tokens.php file. Of course if you don't plan to use tokens on your survey, whatever is in this field is irrelevant. You can use the following "form" fields to insert individualized information in each email:
- {FIRSTNAME} - gets replaced with the token table's "firstname" value
- {LASTNAME} - gets replaced with the token table's "lastname" value
- {SURVEYNAME} - gets replaced with your surveys name
- {SURVEYDESCRIPTION} - gets replaced with your surveys description
- {ATTRIBUTE_1} - gets replaced with the token table's "attribute_1" value
- {ATTRIBUTE_2} - gets replaced with the token table's "attribute_2" value and so on
- {SURVEYURL} - gets replaced with the fully qualified URL to this particular survey - in HTML emails this is a fully linked HTML link
- @@SURVEYURL@@ - Gets replaced with the survey barebone link. Use this if you want to integrate the link in your custom email HTML (available in v1.90 and later)
- {OPTOUTURL} - gets replaced with the URL for a respondent to opt-out of this particular survey
Note that these "form fields" apply to the following email fields.
- Email Reminder Subject: The subject line for the reminder email that gets sent out from the tokens tool
- Email Reminder: This is the text for the reminder email that gets sent out when tokens are used with your survey. See "invitation email" for specific details on how this field is used.
- Confirmation Email Subject: When tokens are used, this is the subject line of the email that gets automatically sent to participants after completion of the survey
- Confirmation Email: This is the text of the email that gets sent to users after completion of the survey. Delete/blank this text remove the confirmation email sending.
- Public Registration Email Subject: This is the subject line for the invitation email sent to members of the public who register for a survey.
- Public Registration Email: This is the text for the invitation email sent to members of the public who register for a survey. The same "form fields" apply in this email as in the earlier ones.
Sending emails
Send invitations
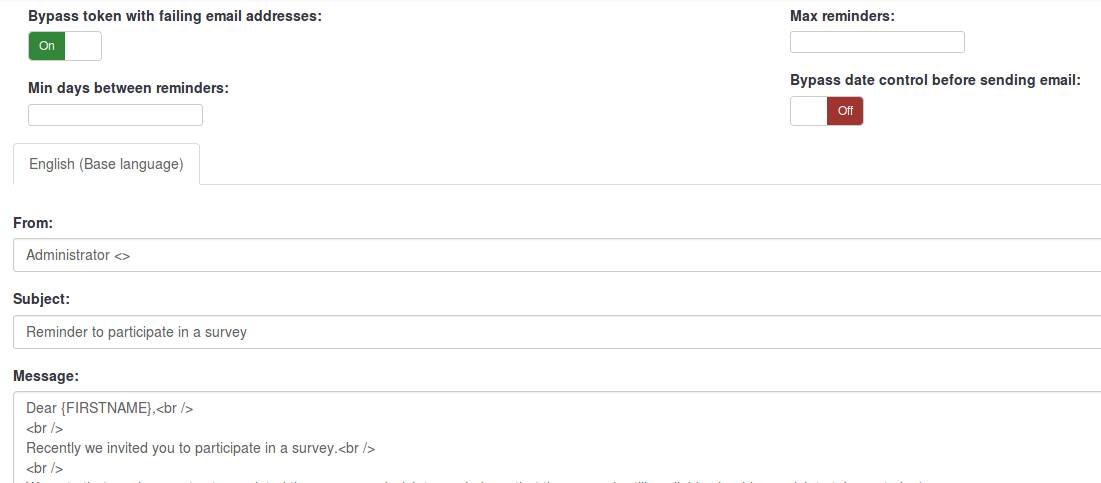
You can skip tokens for which the email status field is different from 'OK', by choosing the 'Bypass token with failing email addresses' option.
Resending invitations
Sometimes you might want to send invitations again to certain token entries / persons. When you use the send invitations-function only e-mail addresses that has not previously received an invitation will get one. This means that if you add new addresses to the token list after the first time you sent invitations, only these new addresses will receive an invitation the second time you send invitations.
This means that you can also edit/change an e-mail in a particular token entry that you got a bounce from and then send to only this edited address. Just substitute the date Invite sent? for a capital N (no) and click send invitations again.
Participant opt-out
When you use the {OPTOUTURL} tag in your invitation/reminder email, your participants have the possibility to opt out of this particular survey by just clicking on the related URL in the email - so you don't harrass them with reminder emails. A participant that opted out of your survey will have the email status 'OptOut' set in the token.
Send reminders
When sending reminders you can:
- bypass tokens with failing email addresses
- skip tokens for which an email has been 'recently' sent
- skip tokens for which a given number of emails have already been sent
Note: A reminder will only be send to tokens where the "completed" field is not "N" (this means the respondent has either not taken or has not completed the survey).
Sending emails by batch
When you have to send a lot of emails at the same time, LimeSurvey will only send a first batch of N emails (this threshold is set by the administrator in the Global Settings).
You'll then need to click "Next" to send the next batch, and so on untill all emails have been sent.
Confirmation email
If you are using tokens and a participant fills out the survey, a confirmation email is sent to his/her email address.
Als je niet wil dat dit bericht wordt gestuurd, leeg dan de velden "Confirmation email subject" en "Confirmation email" - instructie.
Spam problems
Often users complain not having received an invitation/reminder email because the user’s spam filter treated the email as spam.
If an email is treated as spam mostly depends on the spam filter being used and its settings. A spam filter usually checks the sender address and the email subject and content, so there are ways and means to influence how they treat your LimeSurvey invitation and reminder emails.
At this blog post on limesurvey-consulting.com a lot of possible issues and solutions are listed.
Wrong domain in invitation/reminder email link
LimeSurvey automatically tries to determine the URL for the invitation link by looking at the URL by which you logged in to the LimeSurvey administration. However with some server (mis-)configurations this might not work properly and you will have to set this manually.
You can edit /path/to/application/config/config.php to change the default base URL value. Add hostInfo property like this to the existing 'components' array.
    'components' => array(
       ...
       'request' => array(
           'hostInfo' => 'http://www.example.com',
       ),
   )
Regarding the source of the problem: LimeSurvey tried to determine the domain from the server PHP variable $_SERVER['HTTP_HOST']] or $_SERVER['SERVER_NAME']].
Some web server software do not properly seem to provide this information or are mis-configured.
Public registration
Allowing public registration
You may want to open your survey to the public, but utilize the sort of respondent control available when using tokens. This is possible: If you initialize your tokens table, and have chosen to Allow Public Registration in the main survey setup, people who visit your survey's URL without a token, will be given the opportunity to register. If they provide an email address that is not already in the current survey's tokens table, an entry in the tokens table will be created, and they will be emailed an invitation containing their unique Token. All tokens provided to "registering" visitors will begin with the letter "R".
Captchas in public registration
Om je enquête te beschermen tegen registratie door robots kun je de captcha functie gebruiken op alle registratie, bewaar en laad schermen. (vanaf versie 1.48) Deze functie is alleen beschikbaar als GD-support geactiveerd is in je PHP configuratie. (lees de Installatie eisen)
