New Template System in LS3.x/nl: Difference between revisions
From LimeSurvey Manual
No edit summary |
No edit summary |
||
| Line 85: | Line 85: | ||
[[File:After edition.png|center|''net na het klikken op de knop'']] | [[File:After edition.png|center|''net na het klikken op de knop'']] | ||
<br> | <br> | ||
Als je naar de map upload/templates/extends_monochrome/views/, gaat, dan zie je dat daar maar een bestand in staat, het bestand layout_global.twig met de tekst “TEST”. | |||
[[File:Tree with layout global arrow.png|center|'' | [[File:Tree with layout global arrow.png|center|''Het bestand is aanwezig in je sjabloon'']] | ||
<br><br> | <br><br> | ||
We voegen nu een afbeelding toe in plaats van een tekst. Klik op de link ''tip'': | |||
<br> | <br> | ||
Om een afbeelding in een twig-bestand te gebruiken: | |||
'''{{ image('./files/myfile.png', 'alt-text for my file', {"class": "myclass"}) }}''' | '''{{ image('./files/myfile.png', 'alt-text for my file', {"class": "myclass"}) }}''' | ||
<br> | <br> | ||
Je hebt natuurlijk de Twig-documentatie al eens een keer gelezen en je weet dan ook dat bij '''{{ }}<nowiki />''' de inhoud tussen de haakjes, dus hier het resultaat van de function image( ) op het scherm wordt getoond. | |||
<div class="simplebox">[[File:help.png]] If you’re curious to know what it does, you can find it in the code here (version of RC3): [https://github.com/LimeSurvey/LimeSurvey/blob/f3737a75e428f604d68d2e5ba958f3eba3eba2e1/application/core/LS_Twig_Extension.php#L219-L237 image() function in RC3] | <div class="simplebox">[[File:help.png]] If you’re curious to know what it does, you can find it in the code here (version of RC3): [https://github.com/LimeSurvey/LimeSurvey/blob/f3737a75e428f604d68d2e5ba958f3eba3eba2e1/application/core/LS_Twig_Extension.php#L219-L237 image() function in RC3] | ||
Revision as of 12:58, 31 March 2018
Inleiding
Op deze pagina leggen we uit hoe je:
- gebruik maakt van het nieuwe sjabloonsysteem van LimeSurvey 3.0.
- gebruik maakt van overerving (inheritance) bij je eigen sjablonen.
- een afbeelding toevoegt
- sjabloon-opties beheert voor je enquêtes en enquête-groepen
In LimeSurvey 3 is er een geheel nieuw sjabloonsysteem, gebaseerd op Twig 1.29, Bootstrap, waarin overerving van sjablonen en sjabloonopties mogelijk zijn. Het oude systeem met keywords is vervangen, 100% van de frontend HTML kan nu aangepast worden. Vroeger was er een keyword {ASSESSMENTS} dat vervangen werd door een stukje HTML op het moment van uitvoering. Een ontwikkelaar kon dit alleen aanpassen met JavaScript. Nu is er een bestand assessments.twig met de logica (geschreven in Twig) om de HTML aan te maken. Op deze pagina beschrijven we hoe je dit systeem kunt gebruiken.
Aanpassen met gebruik van het beheerinterface
Sjablonenlijst
Op het administratiescherm is er een box om de sjablonenlijst te benaderent:

De lijst heeft 5 kolommen:
- een voorvertoning van het sjabloon: dit is alleen het plaatje “preview.png” in de rootmap van het sjabloon
- de naam van het sjabloon: de mapnaam. Voordat we de LS3 master vrijgeven wordt het de “Titel” (kan afwijken van de mapnaam, het kan speciale cgunnarhars bevatten)
- een beschrijving: een tekst in het manifest
- type sjabloon: Core (aangeleverd bij LimeSurvey), User (toegevoegd in map upload), XML (niet geladen in de database)
- Extends: indien het een uitbreiding is van een ander sjabloon, de naam van dat sjabloon
- Enkele knoppen voor acties
- Installatie: Het laad het manifest van een sjabloon om het toe te voegen aan de database zodat het beschikbaar voor selectie bij een enquête
- Verwijderen: de registratie van het sjabloon in de database wordt verwijderd
- Sjablooneditor: link naar de sjablooneditor
- Sjabloon-opties: link naar de globale configuratie van sjabloon-opties
Sjablooneditor
De sjablooneditor is zo veel als mogelijk gelijk gebleven. Als je een standaardsjabloon opent dan kun je het wijzigen. Er is nu echter geen knop kopieer maar een knop uitbreiden (extend).

Overerving (inheritance)
In versie 3, kan een sjabloon overerven van een ander sjabloon, het is een uitbreiding van een ander sjabloon. Dit betekent dat de sjaloonmap bijna leeg is, het bevat alleen de bestanden (views, style sheets, scripts, resources enz.) die anders zijn dan het origineel. Hierdoor kun je snel veel sjablonen maken voor je verschillende gebruikers zonder veel werk te krijgen aan het onderhoud van veel sjablonen. Je kunt een eigen sjabloon maken en daar dan per bedrijf een variant van maken (met een ander logo, style, misschien een link naar een website in de footer enz.). Als je dan de CSS of de globale lay-out van je eigen basissjabloon wijzigt dan worden alle wijzigingen geërft door de bedrijfssjablonen. Je kunt onbeperkt overerven, een onderdeel van een bedrijf kan een eigen sjabloon hebben en dan is kan het het bedrijfssjabloon weer de basis van het onderdeel zijn.
Toevoegingen in de gebruikersinterface
Om het Monochrome sjabloon van LimeSurvey uit te breiden, ga naar de Sjablonenlijst, klik op de knop “Sjablooneditor” van dit sjabloon. Klik daarna op “uitbreiden” en pas de naam “extends_monochrome” aan.
Als je nu naar de uploadmap gaat (eventueel met je file/ftp client), zie je dat er een map upload/templates/extends_monochrome is aangemaakt. Het bevat een XML-bestand en mappen, maar de meeste zijn leeg. Er zijn geen views, CSS of JavaScript. Maar je kunt het nieuwe sjabloon al wel selecteren bij een enquête, het is nu nog 100% gelijk aan het sjabloon monochrome.

De sjablooneditor voor het sjabloon extends_monochrome ziet er uit als:

De belangrijkste verschillen met de oude versie zijn:
- Het keyword inherited op de bestandslijst. Het geeft geen bestand in de sjabloonmap aan, maar dat het bestand van het originele sjabloon wordt gebruikt.

- De editor zelf ( ACE editor ) toont de inhoud van het geselecteerde bestand. Een bestand bevat naast HTML, CSS en JavaScript ook Twig-statements. Deze Twig-statements maken het mogelijk om logica vanuit de oude core naar de views te verplaatsen, die logica kan nu worden aangepast.

- Hierdoor heb je nu meer schermtypes beschikbaar in de dropdownlijst van het menu. Er zijn nu pagina's als ‘Survey List’, ‘Load’, ‘Save’, ‘Error’, ‘Registration’, ‘Assessments’, ‘Print Answers’ beschikbaar gekomen die eerder nauwelijks gewijzigd konden worden.

- De link ‘tip’ onderaan de bestandlijst geeft je de mogelijkheid om op de Twig-manier een afbeelding in je HTML toe te voegen.

- De knop ‘Bewaar wijzigingen’ heeft nu als tekst Kopieer naar lokaal sjabloon en wijzigingen opslaan

Voorbeeld: toevoegen van een afbeelding
De knop Kopieer naar lokaal sjabloon en wijzigingen opslaan doet wat het zegt. Als je iets in het bestand wijzigt dan wordt de wijziging in dat bestand opgeslagen.
Als je klikt op het bestand layout_global.twig, en net voor de regel met {% block content %}'' de tekst “TEST” toevoegt en dan op de knop tikt, dan zie je dat het keyword bij dit bestand is gewijzigd van “inherited” in “local”, de knoptekst is nu ook weer Bewaar wijzigingen.

Als je naar de map upload/templates/extends_monochrome/views/, gaat, dan zie je dat daar maar een bestand in staat, het bestand layout_global.twig met de tekst “TEST”.
We voegen nu een afbeelding toe in plaats van een tekst. Klik op de link tip:
Om een afbeelding in een twig-bestand te gebruiken:
{{ image('./files/myfile.png', 'alt-text for my file', {"class": "myclass"}) }}
Je hebt natuurlijk de Twig-documentatie al eens een keer gelezen en je weet dan ook dat bij {{ }} de inhoud tussen de haakjes, dus hier het resultaat van de function image( ) op het scherm wordt getoond.
If you don’t understand the code: don’t worry, you don’t need to know how it works, but why to use it and how to use it.
You should use the function image() for two reasons:
- The function image loops through the template to find the image. If the template you’re working on is extended to another template, and if you copy the file to where you inserted the picture locally, but that picture is not copied in the local template, it will loop through the template inheritance tree to find where that picture is.
- It will use the asset manager, so it will improve the performance of your template. See the Yii Asset Manager documentation for more information about it: http://www.yiiframework.com/wiki/148/understanding-assets/
So, to add a picture to your template:
- just upload it as usual with the file uploader on the right and then add it to where you want it in any twig file:
{{ image('./files/myfile.png') }}
- If you want to add an alternate text for your picture (for screen readers and HTML validation), add:
{{ image('./files/myfile.png'), ‘my alternative text’ }}
- If you want to add a class attribute and add an id to it:
{{ image('./files/myfile.png'), ‘my alternative text’, {“class”: “a_nice_css_class”, “id”: “any_id”} }}
Onze wensen (TO-DO lijst)
- De gebruikers een aangepaste voorvertoningsbestand in de editor laten upladen.
- Een knop om het lokale bestand te verwijderen en terug te keren naar de opdracht inherited.
- Alleen de afbeeldingen in de CSS-bestanden laten kopiëren (door een lijst toe te voegen in het manifest)
- Herinneren welke sjablonen het huidige als basis gebruiken (indien die er zijn).
Sjabloon opties
Ook nieuw in versie 3 is de pagina sjabloon optie. Iemand die een sjabloon maakt kan eigen opties maken en zelfs een eigen optie-pagina, dat lichten we later toe. Eerst laten we zien doe de optie-pagina bij de standaardsjablonen werkt. Klik op : “sjabloon opties” in de sjabloonlijst
Geavanceerde opties
Op de tab Thema opties kun je kiezen tussen de Eenvoudige opties en de Geavanceerde opties. De Geavanceerde opties is alleen maar een scherm waarop je de hoofdvelden van de thema-instellingen van de database kunt benaderen. Als je de werking beter wilt begrijpen lees dan over het XML-bestand en het aanmaken vanaf het begin van een thema. Echt iets voor op dat punt ervaren gebruikers.
Maar je kunt natuurlijk op de tab Geavanceerde opties klikken

- Files css: De CSS-bestanden die toegevoegd moeten worden aan het template.
- Files js: De JavaScript-bestanden die toegevoegd moeten worden aan het template.
- Files Print Css: De CSS-bestanden die gebruikt moeten worden bij het afdrukken van een template.
- Options: Dit veld bevat de opties (en hun waarde) die doorgegeven moeten worden aan de template view.
- CssFramework Name: De naam van het te laden CSS-framework. Dit enige mogelijke waarden zijn nu : Bootstrap of niet ingevuld.
- Cssframework Css: Je kunt de standaard bootstrap.css vervangen door hier een eigen versie daarvan hier in te vullen.
- Cssframework Js: Je kunt de standaard bootstrap.js vervangen door hier een eigen versie daarvan hier in te vullen.
- Packages To Load: Als je nog wat core asset packages van LimeSurvey wilt laden, dan kan dat hier.
Je ziet bovenaan een knop upload, waarmee je een bestand kunt toevoegen aan de map met het thema. De parameters kunnen gebruikt worden om de werking van het thema in te stellen.
Eenvoudige opties
The Simple option page comes from the Template itself. It’s made via a twig file and some javascript inside the template/options/ directory: https://github.com/LimeSurvey/LimeSurvey/tree/develop/templates/default/options

The simple option page simply fills in the advanced form inputs. You can see it by turning on or off a setting in the simple page, and see how the related input in the advanced form is modified accordingly. For example, in Default Template’s simple options,, if you change the Bootswatch theme to “Darkly” and then click on the tab for advanced options (even without saving) you’ll see that the field “Cssframework Css” changed from
{"replace": [["css/bootstrap.css","css/flatly.css"]]}
to
{"replace": [["css/bootstrap.css","css/darkly.css"]]}
Here are the different simple options for the Core templates:
- Ajax mode: Should the next page be loaded via ajax (faster) or via page reload (better for debugging purpose)
- Background image: if set to Yes, the image called pattern.png will be loaded (will be replaced by a file selector in Master)
- Box container: if set to No, the questions will not be contained in a box (so you can use large arrays bigger than the screen width)
- Brandlogo: if set to no, the name of the survey will be shown in top bar, else, you can select one of the pictures inside the file directory to be used as logo picture.
- Animate body: if set to yes, you can choose one of the animations to apply when the body of the survey is loaded
- Animate question: same with questions
- Animate alerts: same with alerts
- Bootstrap theme: here, you can choose a Bootstrap theme to load. They come from Bootswatch https://bootswatch.com/3/
The library used for animations is animate.css: https://daneden.github.io/animate.css/
Of course, a template provider could add his own animation library or no animation library at all.
Inheritance system
In the previous part, we’ve seen that a template can extend another template. A template configuration can also inherit from another template configuration. It means that for a given template, you can have a configuration at
- global level (the one we’ve just seen accessible from the template list)
- at survey group level
- a last one at survey level.
Each parameter at a certain level can inherit from the upper level: survey group inheritance. First, let’s see the survey group level.
At survey group level
Indeed, one of the other great novelties of LS3 is the survey group system. You can now create different groups to organize your surveys. To access it, go to the survey list and then click on the survey group tab:

In this list, you have two action buttons. If the group is empty, you can delete it. Else, you can always edit it. By clicking on the edit button, you reach the Survey Group configuration page:

The third tab of this page is called “Template options for this survey group”. If you click on it, you’ll see the same list of templates than in the template list, except that here only the option button is visible (template editor can be reached only from the main list).
Now, if you click on the option for Default Template, you’ll see this:

- Inherit everything means that all the configuration will be inherited from the Global configuration level.
- If you go to the advanced options page, you’ll see that all the fields are set to inherit.
- If you click on "no" for "Inherit everything" in the simple options, you’ll again see a very similar page to the global option page. The only difference is that for each field, you can set it to yes, no, or inherit; and each dropdown selector has an inherit' value.

At survey level
When editing a survey, in the left bar menu, you’ll see a new entry “Template Options”. It will lead you to the option page of the Template selected for the current survey. You’ll find the same inheritance system as in the survey group, but this time, inherit means that the setting will be inherited from the Survey Group of the survey.

Use case example
Let’s say you’re using a single template for different companies (A and B). You set your favorites options at global level (e.g.: ajax on, animate body with a slide in, alerts with a pulse). Then you create a survey group for each company: a survey group for company A that will host all the surveys for this company, and a survey for company B that will host all the surveys for company B. At this level, you’ll set the logo and the background only, and you will let the other options to inherit. So, all the surveys in group A will use the logo from the company A, and all the survey from group B the logo from company B. For one of the surveys of company A, you could use a different background in relation with the topic of the survey: you just change the background in options at survey level. If someone in company B tells you that the pulsing alert is too aggressive and he would prefer something smoother like a fade in, you just change the alert animation at the Survey Group B level and all the surveys of this group will now use this animation. If the company A changes its logo, you can change it at the level of Survey Group A, and all the surveys of this group will use the new logo.
FAQ about theme customization
You'll find here some answers to questions that have been asked in the forum and that could help you to customize your theme.
Customizing CSS: deal with the asset manager ("why my changes are not applied?")
If you're trying to update the CSS of a theme by directly editing the code with your favorite editor, you could be surprised that your changes are not applied.
Since 2.50, LS use the Yii asset manager:
Yii Documentation about Assets
It moves the CSS files of a theme to a tmp/ sub-directory with a random string (eg: "tmp/1ef64ml/"). So if you make any change to a css file, and tell it to the asset manager, the files are copied to a new sub-directory with a new name so the user browser's cache is updated and they see the new css. Else, they would have to clean their browser cache.
Here the CSS links in header when asset manager is on:
![]()
As you can see they all refer to the tmp/ subfolders.
Here the CSS links in header when asset manager is off:
![]()
As you can see they point to the real files of the theme.
So, when you're editing CSS of a theme you have various possibilities:
- You can use the the LS Theme Editor: it deals with the asset manager and you don't have to worry about anything
- You can turn debug mode on: it will turn asset manager off, so the real css/js files of your themes are called (but then, you have to refresh your browser cache at each load)
- You can refresh the assets cache: from Global Settings -> General -> Clear asset cache
![]()
Using the theme editor will help you to understand the architecture of the new theme engine.
Also, if your customizing fruity, be careful with CSS specifity: most of the definitions use the selector ".fruity" (one of the class of the body element)
Adding custom fonts to my theme
The easy way: using Google Font CDN
Bootswatch Survey Theme uses Google Font CDN. Let's have a look to how ti works: https://github.com/LimeSurvey/LimeSurvey/blob/70a1d99cd2ebe411597231a8bc746b4ca9e19584/themes/survey/bootswatch/css/variations/flatly.min.css
@import url("https://fonts.googleapis.com/css?family=Lato:400,700,400italic");
Then the Lato font is used via CSS rules: https://github.com/thomaspark/bootswatch/blob/master/dist/flatly/bootstrap.css#L72
body {
  ...
 font-family: "Lato";
 ...
}
You can use any google font that way in your custom theme. Of course, you should remove the font selector from the options of your theme. Delete those lines in options.twig: https://github.com/LimeSurvey/LimeSurvey/blob/70a1d99cd2ebe411597231a8bc746b4ca9e19584/themes/survey/vanilla/options/options.twig#L209-L230
Using local font
Of course, you can also download the font files and use them from local server rather than from Google CDN (better for privacy). To have an example of how to it, here our local version of noto font: https://github.com/LimeSurvey/LimeSurvey/blob/70a1d99cd2ebe411597231a8bc746b4ca9e19584/assets/fonts/noto.css
@font-face {
  font-family: 'Noto Sans';
  font-weight: 300;
  font-style: normal;
  src: url('./font-src/Noto/NotoSans-Regular.ttf');
}
...
You can use a very similar definition in your theme css file, and then by copying the file NotoSans-Regular.ttf in your theme css/font-src/ folder.
Then, apply that font to your body (or any other element) like above, and remove the default option font selector.
Creating your own font selector in options
For now, you can't easily use the core font selector to add your own font in options. We need first to give the possibility to end user to upload custom packages (see next paragraph: A look into the Fruity Font Selector )
Here how to proceed:
- Add two fonts (my_custom_font and my_custom_other_font) into your theme, using CDN or local server
- Then, in your css file, add two new classes:
.font-my_custom_font {
 font-family: 'my_custom_font ';
}
.font-my_custom_other_font {
 font-family: 'my_custom_other_font';
}
- In the XML file of your theme, add a font option (default one will be my_custom_font) :
    <options>
        ....
        <font>my_custom_font</font>
    </options>
- in option.twig, add you font picker adding those lines (untested for now, so come complain to the forum if it doesn't work):
            <div class='row ls-space margin top-15 bottom-15 action_hide_on_inherit'>
                <hr/>
            </div>
            <div class='row action_hide_on_inherit'>
                <div class='col-sm-12'>
                    <div class='panel panel-default'>
                        <div class='panel-heading'>{{ "My custom fonts" | t }}</div>
                        <div class='panel-body'>
                            <div class='form-group row'>
                                <label for='simple_edit_font' class='control-label'>{{ "Select font:" | t }}</label>
                                <div class='col-sm-12'>
                                    <select class='form-control selector_option_value_field' id='simple_edit_font' name='font'>
                                    {% if templateConfiguration.sid is not empty or templateConfiguration.gsid is not empty %}
                                        {% set fontOptions = fontOptions ~ '<option value = "inherit" > Inherit</option>' %}
                                    {% endif %}
                                   <optgroup  label="{{ "My Custom fonts" | t }}">
                                   <option class="font-my_custom_font"     value="custom_font"   data-font-package=""  >Custom</option>
                                  <option class="font-my_custom_other_font" value="my_custom_other_font" data-font-package=""  >Other</option>
                                  </optgroup>

                                    </select>
                                </div>
                            </div>
                        </div>
                    </div>
                </div>
            </div>
Now your users should be able to choose between those two fonts.
A look into the Fruity Font Selector
In the future, we'll give the possibility to final user to upload their own asset packages, including font packages. It will make very easy any customization of fonts.
To understand Yii Packages:
http://www.yiiframework.com/doc/api/1.1/CClientScript#packages-detail
LimeSurvey packages are defined in different files. Fonts packages are defined here:
https://github.com/LimeSurvey/LimeSurvey/blob/4c40b61afb0dba8fd80154b50f5831045df8d814/application/config/fonts.php
For example, the Noto font package is defined here:
https://github.com/LimeSurvey/LimeSurvey/blob/4c40b61afb0dba8fd80154b50f5831045df8d814/application/config/fonts.php#L47-L53
    'font-noto' => array(
        'devBaseUrl' => 'assets/fonts/',
        'basePath' => 'fonts',
        'css' => array(
            'noto.css',
        ),
    ),
The noto.css file it contains is here:
https://github.com/LimeSurvey/LimeSurvey/blob/4c40b61afb0dba8fd80154b50f5831045df8d814/assets/fonts/noto.css
Notice the definition of the css class ".font-noto" at the end of it:
@font-face {
  font-family: 'Noto Sans';
  ...
}
...
.font-noto{
    font-family: 'Noto Sans';
}
Then, in Vanilla Theme, noto font is used by adding the noto package and defining the font option to noto:
https://github.com/LimeSurvey/LimeSurvey/blob/70a1d99cd2ebe411597231a8bc746b4ca9e19584/themes/survey/vanilla/config.xml#L79
        <packages>
             ....
            <add>font-noto</add>
        </packages>
    <options>
        ....
        <font>noto</font>
    </options>
Then, the body class font is defined using this value:
https://github.com/LimeSurvey/LimeSurvey/blob/70a1d99cd2ebe411597231a8bc746b4ca9e19584/themes/survey/vanilla/views/layout_global.twig#L76
<body class=" ... font-{{ aSurveyInfo.options.font }} ... " ... >
Of course, the XML file only contains the default values for your template configuration. But indeed, those values are defined and read inside the database (table "template_configuration") as json strings. The option.js file just use the value of the font selector of the simple option to change the value inside the advanced tab form: https://github.com/LimeSurvey/LimeSurvey/blob/70a1d99cd2ebe411597231a8bc746b4ca9e19584/themes/survey/vanilla/options/options.js#L148-L174
So when the "upload asset package" functionality will be available, it will be easy to add a script that scan all the existing font packages to add them in the selector.
Adding theme options to control positioning and display of survey elements
This tutorial will show how to add options to an extended theme to display survey elements in various locations. In this case, we will create theme options to show the survey title in two different locations.
Create a custom theme
- Extend the "bootswatch" theme as described above.
- Copy custom.css to the local template as described above.
Create new template options
- Copy the contents of /themes/survey/bootswatch/options/ to /upload/themes/survey/yourThemeName/options/.
- Open /upload/themes/survey/yourThemeName/options/options.twig in an editor and find "{# Bootstrap Bootswatch theme #}". Directly before its parent <div class='row'> element, add this:
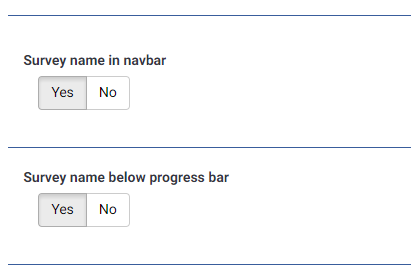
{# Custom survey name in navbar #} <div class='row'> <div class='col-sm-12 col-md-6'> <div class='form-group row'> <label for='simple_edit_options_surveyname1' class='control-label'>Survey name in navbar</label> <div class='col-sm-12'> <div class="btn-group" data-toggle="buttons"> <label class="btn btn-default"> <input name='surveyname1' type='radio' value='on' class='selector_option_radio_field ' data-id='simple_edit_options_surveyname1'/> Yes </label> <label class="btn btn-default"> <input name='surveyname1' type='radio' value='off' class='selector_option_radio_field ' data-id='simple_edit_options_surveyname1'/> No </label> </div> </div> </div> </div> </div> <div class='row'> <hr/> </div> {# Custom survey name below progress bar #} <div class='row'> <div class='col-sm-12 col-md-6'> <div class='form-group row'> <label for='simple_edit_options_surveyname2' class='control-label'>Survey name below progress bar</label> <div class='col-sm-12'> <div class="btn-group" data-toggle="buttons"> <label class="btn btn-default"> <input name='surveyname2' type='radio' value='on' class='selector_option_radio_field ' data-id='simple_edit_options_surveyname2'/> Yes </label> <label class="btn btn-default"> <input name='surveyname2' type='radio' value='off' class='selector_option_radio_field ' data-id='simple_edit_options_surveyname2'/> No </label> </div> </div> </div> </div> </div> <div class='row'> <hr/> </div> - Open /upload/themes/survey/yourThemeName/config.xml and add two items to the "options" block so it looks like this:
    <options>
        <ajaxmode>on</ajaxmode>
        ...
        <surveyname1>on</surveyname1>
        <surveyname2>on</surveyname2>
    </options>
- This should give you two new options in the Theme Options screen like this:

- Create a new directory /upload/themes/survey/yourThemeName/views/subviews/header/.
- Copy /themes/survey/vanilla/views/subviews/header/nav_bar.twig to that new directory.
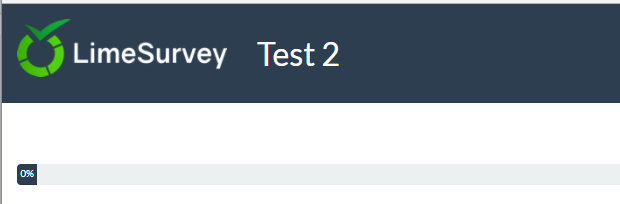
- Open /themes/survey/vanilla/views/subviews/header/nav_bar.twig and find "{# Logo option #}". Under that, modify the IF statement for the logo/survey-name, so it looks like this:
{# Logo option #} {% if( aSurveyInfo.options.brandlogo == "on") %} <div class="{{ aSurveyInfo.class.navbarbrand }} logo-container" {{ aSurveyInfo.attr.navbarbrand }} > {{ image(aSurveyInfo.options.brandlogofile, aSurveyInfo.name, {"class": "logo img-responsive"}) }} </div> {% endif %} {% if( aSurveyInfo.options.surveyname1 == "on") %} <div class="{{ aSurveyInfo.class.navbarbrand }}" {{ aSurveyInfo.attr.navbarbrand }} > {{ aSurveyInfo.name }} </div> {% endif %} - Add something like this to /upload/themes/survey/yourThemeName/css/custom.css:
.navbar-brand {
    line-height: 60px;
    font-size: 32px;
}
- Toggle the "Survey name in navbar" theme option to "Yes"
- You should see this:

Modifed view for Survey Title under progress bar
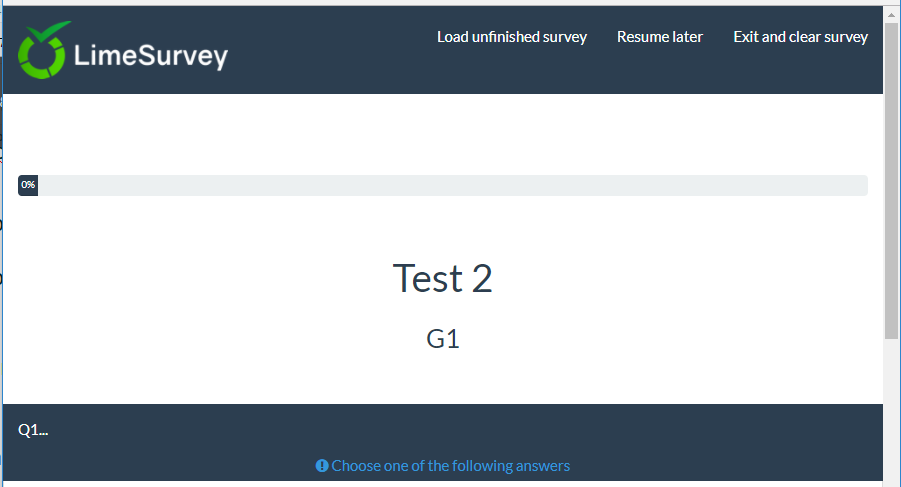
- Create a new directory /upload/themes/survey/yourThemeName/views/subviews/survey/group_subviews.
- Copy /themes/survey/vanilla/views/subviews/survey/group_subviews/group_container.twig to that new directory.
- Open /themes/survey/vanilla/views/subviews/survey/group_subviews/group_container.twig and add an <h1> element for the survey name. So it looks like this:
<div class="{{ aSurveyInfo.class.groupcontainer }} space-col" {{ aSurveyInfo.attr.groupcontainer }}>

    {# Custom survey name #}
    {% if( aSurveyInfo.options.surveyname2 == "on") %}
    	<h1 class="custom-survey-name">{{ aSurveyInfo.name }}</h1>
    {% endif %}

    {# Group Name #}
    {{ include('./subviews/survey/group_subviews/group_name.twig') }}

    {# Group Description #}
    {{ include('./subviews/survey/group_subviews/group_desc.twig') }}

    {#
        PRESENT THE QUESTIONS

        This is the main part. It will render each question for this group
     #}

    <!-- PRESENT THE QUESTIONS -->
    {% for  aQuestion in aGroup.aQuestions %}
         {{ include('./subviews/survey/question_container.twig') }}
    {% endfor %}

    <!-- Hidden inputs -->
    {% if aGroup.show_last_group == true %}
        <input type='hidden' name='lastgroup' value='{{ aGroup.lastgroup }}' id='lastgroup' />
    {% endif %}

    {% if aGroup.show_last_answer == true %}
        <input type='hidden' name='lastanswer' value='{{ aGroup.lastanswer }}' id='lastanswer' />
    {% endif %}
</div>
- Add something like this to /upload/themes/survey/yourThemeName/css/custom.css:
.navbar-brand {
    line-height: 60ph1.custom-survey-name {
	margin: 0;
	text-align: center;
}
- Toggle the "Survey name below progress bar" theme option to "Yes"
- You should see this:

Downloads
- Sample extended theme: Media:Test_survey_names.zip
Creating a template from scratch
Documentation coming soon...
NOTE: if you edit the XML file of a theme, you must uninstall and reinstall the theme so it's taken into account.
NOTE: to avoid that, you can force the use to the XML rather than DB. In config.php turn debug mode on and uncommment:
'force_xmlsettings_for_survey_rendering' => true, // Uncomment if you want to force the use of the XML file rather than DB (for easy theme development)
Becareful: everything will be loaded from the XML (included options, etc)
NOTE: if you manually edit the CSS/JS files (without using the Teeme Editor), and if debug mode is off, you can now force the asset to be flushed. In "Global Settings", "General tab", click the button "Clear assets cache:"