LS3.xの新しいテンプレートシステム
From LimeSurvey Manual
はじめに
このページでは、以下の方法について学習します。
- LimeSurvey 3.0の新しいテーマシステムの使用
- 継承による独自テーマの管理
- テーマへの画像追加
- アンケートとアンケートグループのテーマオプション管理
LimeSurvey 3では、Twig 1.29、Bootstrapに基づいた完全な新しいテンプレートエンジンシステムを導入し、テンプレートの継承とテンプレートオプションが利用可能になりました。これにより、古い置換キーワードシステムが完全にいらなくなり、フロントエンドHTMLの100%をカスタマイズすることができます。たとえば、古いテンプレートシステムでは、実行時に評価用HTMLに置き換えられるキーワード{ASSESSMENTS}がありました。テンプレートデザイナーは、JavaScriptを使用する以外にこのHTMLをカスタマイズする方法がありませんでした。今では、このHTMLを生成するためのロジック(Twigで書かれています)を含むassessmentments.twigというファイルがあります。こらのページでは、この新しいテンプレートエンジンの使用方法について説明します。
管理インタフェースを使用した編集
テンプレートリスト
管理ダッシュボードに、テンプレートリストにアクセスするためのボックスが追加されました。

リストは5つの列に分かれています。
- テンプレートのプレビュー: テンプレートのルートにある“preview.png”という画像ファイルです。
- マニフェストで指定されているテンプレートの“タイトル”(テンプレートのルートにあるconfig.xml)
- テンプレートの説明: マニフェストに設定された文字列
- テンプレートのタイプ: コアテンプレート(LimeSurvey提供)、ユーザーテンプレート(アップロードディレクトリに追加)、XMLテンプレート(データベースに読み込まれない)
- 拡張: テンプレートが別のテンプレートを拡張する場合は、その名前がここに表示されます。
- アクションボタン:
- インストール: テンプレートのマニフェストを読み込んでデータベースに追加し、アンケートレベルで選択できるようにします。
- アンインストール:データベース内のテンプレートの設定エントリーを削除します。
- テンプレートエディター: テンプレートエディターにリダイレクトされます。
- テンプレートオプション:テンプレートオプションのグローバル設定を行います。
テンプレートエディター
テンプレートエディターは元のものにできるだけ近づけて維持されています。コアテンプレートを開いても編集できません。“コピー”ボタンではなく、“拡張ボタン”があります。

テンプレート継承の考え方について
LS3では、テンプレートは別のテンプレートから継承できるようになり、別のテンプレートを“拡張”することができます。これは、テンプレートディレクトリーは最初は空で、元のものと異なるファイル(ビュー、スタイルシート、スクリプト、リソースなど)のみが保存されます。そうすることで、多くのテンプレートを維持することなく、多くのユーザー向けのテンプレートを簡単に作成できます。たとえば、独自の自家製テンプレートを持つとともに、ある会社向けのバージョン(ロゴ、そのスタイル、フッターなどに配置するWebサイトへのリンクなど)、さらに別の会社向けのバージョンを持つことができます。カスタムテンプレートのCSSまたはグローバルレイアウトを更新すると、それを継承するすべてのテンプレートが自動的に更新されます。テンプレートは他のテンプレートを拡張するテンプレートを拡張することができる、といった具合に、継承は再帰的になります。
ユーザーインターフェイスの新規性
LimeSurveyのMonochromeテンプレートを拡張するには、Templateリストに移動して、Monochromeテンプレートの“テンプレートエディター”ボタンをクリックします。次に、“拡張”をクリックして、新しい名前が“extends_monochrome”となっていることを確認します。
ファイル/ftpクライアントを使用してアップロードディレクトリに移動すると、新しいディレクトリupload/templates/extends_monochromeが作成されていることがわかります。これにはXMLファイルとディレクトリが含まれていますが、ほとんどのディレクトリは空です。ビューもCSSもJSもありません。しかし、このテンプレートはアンケートから正常なテンプレートとして選択することができ、monochromeテンプレートとまったく同じように見えます。

extend_monochromeテンプレートのテンプレートエディタは次のようになります。

古いテンプレートエディターと大きな違いはありません。主なものを挙げます。
- ファイルリストにある継承というキーワード。これは、ファイルがテンプレートディレクトリーに存在せず、元のテンプレートのファイルが使用されることを意味します。

- メインエディター(ACE editor )には、選択したファイルの内容が表示されます。ファイルには、HTML、CSS、またはJSだけでなく、Twigステートメントも含まれています。これらのTwigステートメントは、以前はコアの深いところに位置していたテンプレートビューにいくつかのロジックをプッシュできるようになり、カスタマイズすることができます。

- このため、トップメニューのドロップダウンセレクタで、より多くの画面タイプを利用できるようになりました。以前には利用もカスタマイズもできなかった‘アンケートリスト’、‘読み込み’、‘保存’、‘エラー’、‘登録’、‘評価’、‘回答の印刷’などのページがあります。

- ファイルリストの一番下にある‘tip’リンクは、HTMLに画像をTwigで追加する方法を表示します。

- ‘変更を保存’ボタンはローカルのテンプレートにコピーし、変更を保存するボタンになっています。

簡単な例: 画像の追加
The button Copy to local template and save changes will do exactly what it says: if you edit anything inside the file and then click on that button, it will copy the file to the template you’re editing, and save your changes.
For example: click on the file layout_global.twig, then just before the block content ( {% block content %}) add the text “TEST” and click the button. You can see that the label of the file changed from “inherited” to “local” and now the button is a simple button save changes.

If you open a file explorer and go to the directory upload/templates/extends_monochrome/views/, you will see that it contains only one file, the file layout_global.twig and that the string “TEST” is there.
Now instead of addind a random text, we will add a picture. If you click on the tip link, it will tell you:
To use a picture in a .twig file:
{{ image('./files/myfile.png', 'alt-text for my file', {"class": "myclass"}) }}
If you have read the Twig documentation (and you should have done so at this point), you know that {{ function( ) }} will echo the result of a function on screen. Here, the function is image( ).
If you don’t understand the code: don’t worry, you don’t need to know how it works, but why to use it and how to use it.
You should use the function image() for two reasons:
- The function image loops through the template to find the image. If the template you’re working on is extended to another template, and if you copy the file to where you inserted the picture locally, but that picture is not copied in the local template, it will loop through the template inheritance tree to find where that picture is.
- It will use the asset manager, so it will improve the performance of your template. See the Yii Asset Manager documentation for more information about it: http://www.yiiframework.com/wiki/148/understanding-assets/
So, to add a picture to your template:
- just upload it as usual with the file uploader on the right and then add it to where you want it in any twig file:
{{ image('./files/myfile.png') }}
- If you want to add an alternate text for your picture (for screen readers and HTML validation), add:
{{ image('./files/myfile.png'), ‘my alternative text’ }}
- If you want to add a class attribute and add an id to it:
{{ image('./files/myfile.png'), ‘my alternative text’, {“class”: “a_nice_css_class”, “id”: “any_id”} }}
Some things on our TO-DO list
- Give users the possibility to upload a custom preview file from the editor itself
- Add a button to delete the local file and return to the inherited statement
- Only copy the picture used in the CSS files (by listing them in the manifest as file to copy)
- Remind which template the current one extends (if any)
Template options
Another novelty of LS3 is the template option page. As we’ll see later, template creators can create their own options and even their own admin option page. Here, we’ll quickly see how the option page of the Core Templates work. To access the template options at global level: click on “template options” in the template list
Advanced options
When you open the theme options tab, you can choose to edit either its simple options or its advanced options. “Advanced options” is just a naked form that gives you access to the main theme configuration fields from the database. To understand how it works, you should also read about the XML file and the creation of a theme from scratch. So, it’s rather complex and made for advanced users.
However, if you do wish to perform advanced settings editing, click on the advanced options tab

- Files css: The CSS files that should be added to the template;
- Files js: The JS files that should be added to the template;
- Files Print Css: The CSS files to load when printing a template;
- Options: This field includes the options (and their value) that should be parsed to the template view;
- CssFramework Name: The name of the CSS framework to load. For now, only Bootstrap or nothing;
- Cssframework Css: You can replace the core bootstrap.css in this field by a different custom version of it;
- Cssframework Js: The field core boostrap.js can be replaced from here by a different custom version of it;
- Packages To Load: You can load from this setting some core asset packages from LimeSurvey.
You’ll notice an upload input at the top, which gives you the possibility to upload a file into the file directory of the theme. These parameters can be used to change the entire appearance of the theme.
Simple options
The Simple option page comes from the Template itself. It’s made via a twig file and some javascript inside the template/options/ directory: https://github.com/LimeSurvey/LimeSurvey/tree/develop/templates/default/options

The simple option page simply fills in the advanced form inputs. You can see it by turning on or off a setting in the simple page, and see how the related input in the advanced form is modified accordingly. For example, in Default Template’s simple options,, if you change the Bootswatch theme to “Darkly” and then click on the tab for advanced options (even without saving) you’ll see that the field “Cssframework Css” changed from
{"replace": [["css/bootstrap.css","css/flatly.css"]]}
to
{"replace": [["css/bootstrap.css","css/darkly.css"]]}
Here are the different simple options for the Core templates:
- Ajax mode: Should the next page be loaded via ajax (faster) or via page reload (better for debugging purpose)
- Background image: if set to Yes, the image called pattern.png will be loaded (will be replaced by a file selector in Master)
- Box container: if set to No, the questions will not be contained in a box (so you can use large arrays bigger than the screen width)
- Brandlogo: if set to no, the name of the survey will be shown in top bar, else, you can select one of the pictures inside the file directory to be used as logo picture.
- Animate body: if set to yes, you can choose one of the animations to apply when the body of the survey is loaded
- Animate question: same with questions
- Animate alerts: same with alerts
- Bootstrap theme: here, you can choose a Bootstrap theme to load. They come from Bootswatch https://bootswatch.com/3/
The library used for animations is animate.css: https://daneden.github.io/animate.css/
Of course, a template provider could add his own animation library or no animation library at all.
Inheritance system
In the previous part, we’ve seen that a template can extend another template. A template configuration can also inherit from another template configuration. It means that for a given template, you can have a configuration at
- global level (the one we’ve just seen accessible from the template list)
- at survey group level
- a last one at survey level.
Each parameter at a certain level can inherit from the upper level: survey group inheritance. First, let’s see the survey group level.
At survey group level
Indeed, one of the other great novelties of LS3 is the survey group system. You can now create different groups to organize your surveys. To access it, go to the survey list and then click on the survey group tab:

In this list, you have two action buttons. If the group is empty, you can delete it. Else, you can always edit it. By clicking on the edit button, you reach the Survey Group configuration page:

The third tab of this page is called “Template options for this survey group”. If you click on it, you’ll see the same list of templates than in the template list, except that here only the option button is visible (template editor can be reached only from the main list).
Now, if you click on the option for Default Template, you’ll see this:

- Inherit everything means that all the configuration will be inherited from the Global configuration level.
- If you go to the advanced options page, you’ll see that all the fields are set to inherit.
- If you click on "no" for "Inherit everything" in the simple options, you’ll again see a very similar page to the global option page. The only difference is that for each field, you can set it to yes, no, or inherit; and each dropdown selector has an inherit' value.

At survey level
When editing a survey, in the left bar menu, you’ll see a new entry “Template Options”. It will lead you to the option page of the Template selected for the current survey. You’ll find the same inheritance system as in the survey group, but this time, inherit means that the setting will be inherited from the Survey Group of the survey.

Use case example
Let’s say you’re using a single template for different companies (A and B). You set your favorites options at global level (e.g.: ajax on, animate body with a slide in, alerts with a pulse). Then you create a survey group for each company: a survey group for company A that will host all the surveys for this company, and a survey for company B that will host all the surveys for company B. At this level, you’ll set the logo and the background only, and you will let the other options to inherit. So, all the surveys in group A will use the logo from the company A, and all the survey from group B the logo from company B. For one of the surveys of company A, you could use a different background in relation with the topic of the survey: you just change the background in options at survey level. If someone in company B tells you that the pulsing alert is too aggressive and he would prefer something smoother like a fade in, you just change the alert animation at the Survey Group B level and all the surveys of this group will now use this animation. If the company A changes its logo, you can change it at the level of Survey Group A, and all the surveys of this group will use the new logo.
FAQ about theme customization
You'll find here some answers to questions that have been asked in the forum and that could help you to customize your theme.
Customizing CSS/JS: deal with the asset manager ("why are my changes not applied?")
If you're trying to update the CSS/JS of a theme by directly editing the code with your favorite editor, you could be surprised that your changes are not applied.
Since 2.50, LS use the Yii asset manager:
Yii Documentation about Assets
It moves the CSS/JS files of a theme to a tmp/ sub-directory with a random string (eg: "tmp/1ef64ml/"). So if you make any change to a css/js file, and tell it to the asset manager, the files are copied to a new sub-directory with a new name so the user browser's cache is updated and they see the new css/js. Else, they would have to clean their browser cache.
Here the CSS links in header when asset manager is on:
![]()
As you can see they all refer to the tmp/ subfolders.
Here the CSS links in header when asset manager is off:
![]()
As you can see they point to the real files of the theme.
So, when you're editing CSS/JS of a theme you have various possibilities:
- You can use the the LS Theme Editor: it deals with the asset manager and you don't have to worry about anything
- You can turn debug mode on: it will turn asset manager off, so the real css/js files of your themes are called (but then, you have to refresh your browser cache at each load)
- You can refresh the assets cache: from Global Settings -> General -> Clear asset cache
![]()
Using the theme editor will help you to understand the architecture of the new theme engine.
Also, if your customizing fruity, be careful with CSS specifity: most of the definitions use the selector ".fruity" (one of the class of the body element)
Adding custom fonts to my theme
The easy way: using Google Font CDN
Bootswatch Survey Theme uses Google Font CDN. Let's have a look to how it works: https://github.com/LimeSurvey/LimeSurvey/blob/70a1d99cd2ebe411597231a8bc746b4ca9e19584/themes/survey/bootswatch/css/variations/flatly.min.css
@import url("https://fonts.googleapis.com/css?family=Lato:400,700,400italic");
Then the Lato font is used via CSS rules: https://github.com/thomaspark/bootswatch/blob/master/dist/flatly/bootstrap.css#L72
body {
  ...
 font-family: "Lato";
 ...
}
You can use any google font that way in your custom theme. Of course, you should remove the font selector from the options of your theme. Delete those lines in options.twig: https://github.com/LimeSurvey/LimeSurvey/blob/70a1d99cd2ebe411597231a8bc746b4ca9e19584/themes/survey/vanilla/options/options.twig#L209-L230
Using local font
Of course, you can also download the font files and use them from local server rather than from Google CDN (better for privacy). To have an example of how to it, here our local version of noto font: https://github.com/LimeSurvey/LimeSurvey/blob/70a1d99cd2ebe411597231a8bc746b4ca9e19584/assets/fonts/noto.css
@font-face {
  font-family: 'Noto Sans';
  font-weight: 300;
  font-style: normal;
  src: url('./font-src/Noto/NotoSans-Regular.ttf');
}
...
You can use a very similar definition in your theme css file, and then by copying the file NotoSans-Regular.ttf in your theme css/font-src/ folder.
Then, apply that font to your body (or any other element) like above, and remove the default option font selector.
Creating your own font selector in options
For now, you can't easily use the core font selector to add your own font in options. We need first to give the possibility to end user to upload custom packages (see next paragraph: A look into the Fruity Font Selector )
Here how to proceed:
- Add two fonts (my_custom_font and my_custom_other_font) into your theme, using CDN or local server
- Then, in your css file, add two new classes:
.font-my_custom_font {
 font-family: 'my_custom_font ';
}
.font-my_custom_other_font {
 font-family: 'my_custom_other_font';
}
- In the XML file of your theme, add a font option (default one will be my_custom_font) :
    <options>
        ....
        <font>my_custom_font</font>
    </options>
- in option.twig, add you font picker adding those lines (untested for now, so come complain to the forum if it doesn't work):
            <div class='row ls-space margin top-15 bottom-15 action_hide_on_inherit'>
                <hr/>
            </div>
            <div class='row action_hide_on_inherit'>
                <div class='col-sm-12'>
                    <div class='panel panel-default'>
                        <div class='panel-heading'>{{ "My custom fonts" | t }}</div>
                        <div class='panel-body'>
                            <div class='form-group row'>
                                <label for='simple_edit_font' class='control-label'>{{ "Select font:" | t }}</label>
                                <div class='col-sm-12'>
                                    <select class='form-control selector_option_value_field' id='simple_edit_font' name='font'>
                                    {% if templateConfiguration.sid is not empty or templateConfiguration.gsid is not empty %}
                                        {% set fontOptions = fontOptions ~ '<option value = "inherit" > Inherit</option>' %}
                                    {% endif %}
                                   <optgroup  label="{{ "My Custom fonts" | t }}">
                                   <option class="font-my_custom_font"     value="custom_font"   data-font-package=""  >Custom</option>
                                  <option class="font-my_custom_other_font" value="my_custom_other_font" data-font-package=""  >Other</option>
                                  </optgroup>

                                    </select>
                                </div>
                            </div>
                        </div>
                    </div>
                </div>
            </div>
Now your users should be able to choose between those two fonts.
A look into the Fruity Font Selector
In the future, we'll give the possibility to final user to upload their own asset packages, including font packages. It will make very easy any customization of fonts.
To understand Yii Packages:
http://www.yiiframework.com/doc/api/1.1/CClientScript#packages-detail
LimeSurvey packages are defined in different files. Fonts packages are defined here:
https://github.com/LimeSurvey/LimeSurvey/blob/4c40b61afb0dba8fd80154b50f5831045df8d814/application/config/fonts.php
For example, the Noto font package is defined here:
https://github.com/LimeSurvey/LimeSurvey/blob/4c40b61afb0dba8fd80154b50f5831045df8d814/application/config/fonts.php#L47-L53
    'font-noto' => array(
        'devBaseUrl' => 'assets/fonts/',
        'basePath' => 'fonts',
        'css' => array(
            'noto.css',
        ),
    ),
The noto.css file it contains is here:
https://github.com/LimeSurvey/LimeSurvey/blob/4c40b61afb0dba8fd80154b50f5831045df8d814/assets/fonts/noto.css
Notice the definition of the css class ".font-noto" at the end of it:
@font-face {
  font-family: 'Noto Sans';
  ...
}
...
.font-noto{
    font-family: 'Noto Sans';
}
Then, in Vanilla Theme, noto font is used by adding the noto package and defining the font option to noto:
https://github.com/LimeSurvey/LimeSurvey/blob/70a1d99cd2ebe411597231a8bc746b4ca9e19584/themes/survey/vanilla/config.xml#L79
        <packages>
             ....
            <add>font-noto</add>
        </packages>
    <options>
        ....
        <font>noto</font>
    </options>
Then, the body class font is defined using this value:
https://github.com/LimeSurvey/LimeSurvey/blob/70a1d99cd2ebe411597231a8bc746b4ca9e19584/themes/survey/vanilla/views/layout_global.twig#L76
<body class=" ... font-{{ aSurveyInfo.options.font }} ... " ... >
Of course, the XML file only contains the default values for your template configuration. But indeed, those values are defined and read inside the database (table "template_configuration") as json strings. The option.js file just use the value of the font selector of the simple option to change the value inside the advanced tab form: https://github.com/LimeSurvey/LimeSurvey/blob/70a1d99cd2ebe411597231a8bc746b4ca9e19584/themes/survey/vanilla/options/options.js#L148-L174
So when the "upload asset package" functionality will be available, it will be easy to add a script that scan all the existing font packages to add them in the selector.
Adding theme options to control positioning and display of survey elements
This tutorial will show how to add options to an extended theme to display survey elements in various locations. In this case, we will create theme options to show the survey title in two different locations.
Create a custom theme
- Extend the "bootswatch" theme as described above.
- Copy custom.css to the local template as described above.
Create new template options
- Copy the contents of /themes/survey/bootswatch/options/ to /upload/themes/survey/yourThemeName/options/.
- Open /upload/themes/survey/yourThemeName/options/options.twig in an editor and find "{# Bootstrap Bootswatch theme #}". Directly before its parent <div class='row'> element, add this:
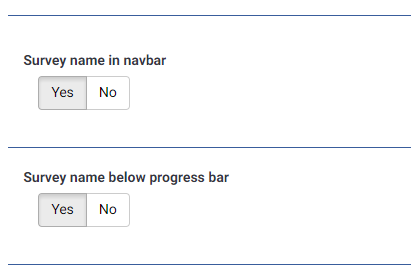
{# Custom survey name in navbar #} <div class='row'> <div class='col-sm-12 col-md-6'> <div class='form-group row'> <label for='simple_edit_options_surveyname1' class='control-label'>Survey name in navbar</label> <div class='col-sm-12'> <div class="btn-group" data-toggle="buttons"> <label class="btn btn-default"> <input name='surveyname1' type='radio' value='on' class='selector_option_radio_field ' data-id='simple_edit_options_surveyname1'/> Yes </label> <label class="btn btn-default"> <input name='surveyname1' type='radio' value='off' class='selector_option_radio_field ' data-id='simple_edit_options_surveyname1'/> No </label> </div> </div> </div> </div> </div> <div class='row'> <hr/> </div> {# Custom survey name below progress bar #} <div class='row'> <div class='col-sm-12 col-md-6'> <div class='form-group row'> <label for='simple_edit_options_surveyname2' class='control-label'>Survey name below progress bar</label> <div class='col-sm-12'> <div class="btn-group" data-toggle="buttons"> <label class="btn btn-default"> <input name='surveyname2' type='radio' value='on' class='selector_option_radio_field ' data-id='simple_edit_options_surveyname2'/> Yes </label> <label class="btn btn-default"> <input name='surveyname2' type='radio' value='off' class='selector_option_radio_field ' data-id='simple_edit_options_surveyname2'/> No </label> </div> </div> </div> </div> </div> <div class='row'> <hr/> </div> - Open /upload/themes/survey/yourThemeName/config.xml and add two items to the "options" block so it looks like this:
    <options>
        <ajaxmode>on</ajaxmode>
        ...
        <surveyname1>on</surveyname1>
        <surveyname2>on</surveyname2>
    </options>
- This should give you two new options in the Theme Options screen like this:

- Create a new directory /upload/themes/survey/yourThemeName/views/subviews/header/.
- Copy /themes/survey/vanilla/views/subviews/header/nav_bar.twig to that new directory.
- Open /themes/survey/vanilla/views/subviews/header/nav_bar.twig and find "{# Logo option #}". Under that, modify the IF statement for the logo/survey-name, so it looks like this:
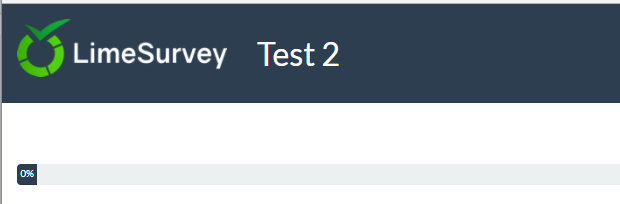
{# Logo option #} {% if( aSurveyInfo.options.brandlogo == "on") %} <div class="{{ aSurveyInfo.class.navbarbrand }} logo-container" {{ aSurveyInfo.attr.navbarbrand }} > {{ image(aSurveyInfo.options.brandlogofile, aSurveyInfo.name, {"class": "logo img-responsive"}) }} </div> {% endif %} {% if( aSurveyInfo.options.surveyname1 == "on") %} <div class="{{ aSurveyInfo.class.navbarbrand }}" {{ aSurveyInfo.attr.navbarbrand }} > {{ aSurveyInfo.name }} </div> {% endif %} - Add something like this to /upload/themes/survey/yourThemeName/css/custom.css:
.navbar-brand {
    line-height: 60px;
    font-size: 32px;
}
- Toggle the "Survey name in navbar" theme option to "Yes"
- You should see this:

Modifed view for Survey Title under progress bar
- Create a new directory /upload/themes/survey/yourThemeName/views/subviews/survey/group_subviews.
- Copy /themes/survey/vanilla/views/subviews/survey/group_subviews/group_container.twig to that new directory.
- Open /themes/survey/vanilla/views/subviews/survey/group_subviews/group_container.twig and add an <h1> element for the survey name. So it looks like this:
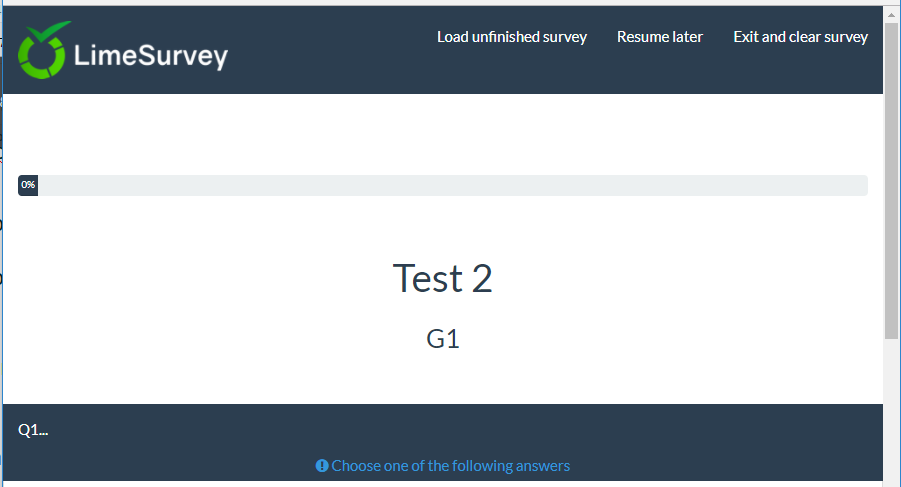
<div class="{{ aSurveyInfo.class.groupcontainer }} space-col" {{ aSurveyInfo.attr.groupcontainer }}>

    {# Custom survey name #}
    {% if( aSurveyInfo.options.surveyname2 == "on") %}
    	<h1 class="custom-survey-name">{{ aSurveyInfo.name }}</h1>
    {% endif %}

    {# Group Name #}
    {{ include('./subviews/survey/group_subviews/group_name.twig') }}

    {# Group Description #}
    {{ include('./subviews/survey/group_subviews/group_desc.twig') }}

    {#
        PRESENT THE QUESTIONS

        This is the main part. It will render each question for this group
     #}

    <!-- PRESENT THE QUESTIONS -->
    {% for  aQuestion in aGroup.aQuestions %}
         {{ include('./subviews/survey/question_container.twig') }}
    {% endfor %}

    <!-- Hidden inputs -->
    {% if aGroup.show_last_group == true %}
        <input type='hidden' name='lastgroup' value='{{ aGroup.lastgroup }}' id='lastgroup' />
    {% endif %}

    {% if aGroup.show_last_answer == true %}
        <input type='hidden' name='lastanswer' value='{{ aGroup.lastanswer }}' id='lastanswer' />
    {% endif %}
</div>
- Add something like this to /upload/themes/survey/yourThemeName/css/custom.css:
.navbar-brand {
    line-height: 60ph1.custom-survey-name {
	margin: 0;
	text-align: center;
}
- Toggle the "Survey name below progress bar" theme option to "Yes"
- You should see this:

Downloads
- Sample extended theme: Media:Test_survey_names.zip
Creating a template from scratch
Documentation coming soon...
NOTE: if you edit the XML file of a theme, you must uninstall and reinstall the theme so it's taken into account.
NOTE: to avoid that, you can force the use to the XML rather than DB. In config.php turn debug mode on and uncommment:
'force_xmlsettings_for_survey_rendering' => true, // Uncomment if you want to force the use of the XML file rather than DB (for easy theme development)
Becareful: everything will be loaded from the XML (included options, etc)
NOTE: if you manually edit the CSS/JS files (without using the Theme Editor), and if debug mode is off, you can now force the asset to be flushed. In "Global Settings", "General tab", click the button "Clear assets cache".