New Template System in LS3.x/es: Difference between revisions
From LimeSurvey Manual
No edit summary |
No edit summary |
||
| Line 54: | Line 54: | ||
Si ahora va al directorio de carga (con su cliente de archivos/ftp), verá que se ha creado un nuevo directorio: '''upload/themes/extend_monochrome''' que contiene un archivo XML y algunos directorios, pero la mayoría de los directorios estarán vacíos. No tiene vistas ni CSS ni JS. Sin embargo, aún puede seleccionar este tema como uno normal de una encuesta y se verá exactamente como el tema monocromo. | Si ahora va al directorio de carga (con su cliente de archivos/ftp), verá que se ha creado un nuevo directorio: '''upload/themes/extend_monochrome''' que contiene un archivo XML y algunos directorios, pero la mayoría de los directorios estarán vacíos. No tiene vistas ni CSS ni JS. Sin embargo, aún puede seleccionar este tema como uno normal de una encuesta y se verá exactamente como el tema monocromo. | ||
[[File: | [[File:Extends monochrome empty.jpg|center|baseline|border|''El árbol de temas (directorio y archivos) justo después de su creación. Está prácticamente vacío'']] | ||
<div class="simplebox"> [[File:help.png]] Los recursos (jpg, png, etc.) del tema original se copian al extender un tema. Esto se debe a que si copia un archivo CSS del tema original localmente, y si se refiere a esos archivos (como en la declaración de imagen de fondo), necesitará encontrar esas imágenes en la ruta del tema actual. </div> | <div class="simplebox"> [[File:help.png]] Los recursos (jpg, png, etc.) del tema original se copian al extender un tema. Esto se debe a que si copia un archivo CSS del tema original localmente, y si se refiere a esos archivos (como en la declaración de imagen de fondo), necesitará encontrar esas imágenes en la ruta del tema actual. </div> | ||
Revision as of 18:32, 20 November 2019
__TOC __
Introducción
En esta página aprenderá a:
- Usar el nuevo sistema de temas de LimeSurvey 3.0.
- Usar la herencia para administrar sus propios temas.
- Agregar una imagen a su tema.
- Administrar opciones del tema para sus encuestas y grupos de encuestas.
LimeSurvey 3 presenta un nuevo sistema de motor de temas completo, basado en Twig 1.29, Bootstrap, y que permite la herencia de temas y las opciones de temas. Elimina por completo el antiguo sistema de reemplazar palabras clave . Ahora, el 100% del HTML del frontend se puede personalizar. Por ejemplo, en el antiguo sistema de temas, había una palabra clave {EVALUACIONES} que fue reemplazada por evaluaciones en HTML en el momento de la ejecución. Un diseñador de temas no tenía forma de personalizar este HTML (aparte de usar JavaScript). Ahora, hay un archivo llamado evaluaciones.twig que contiene la lógica (escrita en Twig) para generar este HTML. En estas páginas, le daremos una explicación sobre cómo usar este nuevo motor de temas.
Edición usando la interfaz de administración
Lista de temas
En el panel de administración, ahora hay un cuadro para acceder a la lista de temas:

La lista se divide en 5 columnas:
- Una vista previa del tema: es solo un archivo de imagen llamado "preview.png" en la raíz del tema.
- El "título" del tema como está especificado en el manifiesto (config.xml en la raíz del tema).
- La descripción del tema: una cadena establecida en su manifiesto.
- El tipo de tema: tema principal (proporcionado con LimeSurvey), tema de usuario (agregado en el directorio de carga), tema XML (no cargado en la base de datos).
- Extenciones: si el tema se extiende otro tema, su nombre se indicará aquí.
- Algunos botones de acción:
- Instalar: cargará el manifiesto de un tema para agregarlo a la base de datos y lo hará disponible para su selección en el nivel de la encuesta.
- Desinstalar: eliminará las entradas de configuración de un tema en la base de datos.
- Editor de temas: lo redirigirá al editor de temas.
- Opción de tema: lo llevará a la configuración global de las opciones de tema.
Editor de temas
El Editor de plantillas se ha mantenido lo más parecido del original. Así que, cuando abra una plantilla principal, no podrá editarla. Ahora, en lugar de un botón de "copia", tiene un botón de "Extender".

Una descripción rápida del concepto de herencia de temas
En LS3, un tema ahora se puede heredar de otro tema, puede "extender" otro tema. Esto significa que el directorio de temas estará prácticamente vacío, solo contendrá los archivos (vistas, hojas de estilo, scripts, recursos, etc.) que difieran de los originales. Al hacerlo así, será fácil para usted crear un conjunto de temas para sus diferentes usuarios sin tener que mantener muchos temas diferentes. Por ejemplo: puede tener su propio tema personalizado y luego una versión para una empresa (con su logotipo, su estilo, quizás un enlace a su sitio web en el pie de página, etc.), otra versión para otra empresa, etc. Si actualiza el CSS o el diseño global de su tema personalizado, todos los temas que hereden de él se actualizarán automáticamente. Tenga en cuenta que la herencia es recursiva: un tema puede extender un tema que extiende otro, etc.
Novedades en la interfaz de usuario
Para extender el tema Monocromo de LimeSurvey, vaya a la lista de Plantillas, haga clic en el botón "Editor de plantillas" del tema Monocromo. Luego, haga clic en "extender" y valide el nuevo nombre "extend_monochrome".
Si ahora va al directorio de carga (con su cliente de archivos/ftp), verá que se ha creado un nuevo directorio: upload/themes/extend_monochrome que contiene un archivo XML y algunos directorios, pero la mayoría de los directorios estarán vacíos. No tiene vistas ni CSS ni JS. Sin embargo, aún puede seleccionar este tema como uno normal de una encuesta y se verá exactamente como el tema monocromo.

El editor de temas para el tema extend_monochrome se ve así:

No hay gran diferencia con el antiguo editor de temas. Hagamos una lista de los principales cambios:
- La palabra clave heredada en la lista de archivos. Significa que el archivo no está presente en el directorio de temas y que se usará el archivo del tema original.

- El editor principal (ACE editor) muestra el contenido del archivo seleccionado. Los archivos no solo contienen HTML, CSS o JS, sino también declaraciones Twig. Esas declaraciones de Twig nos dan la posibilidad de llevar algo de lógica a las vistas de temas que se encontraban en el núcleo antes, y que ahora se pueden personalizar.

- Es por eso que ahora tiene más tipos de pantallazos disponibles en el selector desplegable del menú superior. Verá páginas como 'Lista de encuestas', 'Cargar', 'Guardar', 'Error', 'Registro', 'Evaluaciones', 'Imprimir respuestas' que no estaban disponibles antes, o que realmente no podía personalizar antes.

- El enlace 'sugerencia' en la parte inferior de la lista de archivos le ofrece la forma Twig de agregar una imagen en su HTML.

- El botón 'guardar cambios' se convirtió en el botón Copiar al tema local y guardar cambios

Quick example: adding a picture
The button Copy to local theme and save changes will do exactly what it says: if you edit anything inside the file and then click on that button, it will copy the file to the theme you’re editing, and save your changes.
For example: click on the file layout_global.twig, then just before the block content ( {% block content %}) add the text “TEST” and click the button. You can see that the label of the file changed from “inherited” to “local” and now the button is a simple button save changes.

If you open a file explorer and go to the directory upload/themes/extends_monochrome/views/, you will see that it contains only one file, the file layout_global.twig and that the string “TEST” is there.
Now instead of addind a random text, we will add a picture. If you click on the tip link, it will tell you:
To use a picture in a .twig file:
{{ image('./files/myfile.png', 'alt-text for my file', {"class": "myclass"}) }}
If you have read the Twig documentation (and you should have done so at this point), you know that {{ function( ) }} will echo the result of a function on screen. Here, the function is image( ).
If you don’t understand the code: don’t worry, you don’t need to know how it works, but why to use it and how to use it.
You should use the function image() for two reasons:
- The function image loops through the theme to find the image. If the theme you’re working on is extended to another theme, and if you copy the file to where you inserted the picture locally, but that picture is not copied in the local theme, it will loop through the theme inheritance tree to find where that picture is.
- It will use the asset manager, so it will improve the performance of your theme. See the Yii Asset Manager documentation for more information about it: http://www.yiiframework.com/wiki/148/understanding-assets/
So, to add a picture to your theme:
- just upload it as usual with the file uploader on the right and then add it to where you want it in any twig file:
{{ image('./files/myfile.png') }}
- If you want to add an alternate text for your picture (for screen readers and HTML validation), add:
{{ image('./files/myfile.png'), ‘my alternative text’ }}
- If you want to add a class attribute and add an id to it:
{{ image('./files/myfile.png'), ‘my alternative text’, {“class”: “a_nice_css_class”, “id”: “any_id”} }}
Some things on our TO-DO list
- Give users the possibility to upload a custom preview file from the editor itself
- Add a button to delete the local file and return to the inherited statement
- Only copy the picture used in the CSS files (by listing them in the manifest as file to copy)
- Remind which theme the current one extends (if any)
Template options
Another novelty of LS3 is the theme option page. As we’ll see later, theme creators can create their own options and even their own admin option page. Here, we’ll quickly see how the option page of the Core Templates work. To access the theme options at global level: click on “theme options” in the theme list
Advanced options
When you open the theme options tab, you can choose to edit either its simple options or its advanced options. “Advanced options” is just a naked form that gives you access to the main theme configuration fields from the database. To understand how it works, you should also read about the XML file and the creation of a theme from scratch. So, it’s rather complex and made for advanced users.
However, if you do wish to perform advanced settings editing, click on the advanced options tab

- Files css: The CSS files that should be added to the template;
- Files js: The JS files that should be added to the template;
- Files Print Css: The CSS files to load when printing a template;
- Options: This field includes the options (and their value) that should be parsed to the template view;
- CssFramework Name: The name of the CSS framework to load. For now, only Bootstrap or nothing;
- Cssframework Css: You can replace the core bootstrap.css in this field by a different custom version of it;
- Cssframework Js: The field core boostrap.js can be replaced from here by a different custom version of it;
- Packages To Load: You can load from this setting some core asset packages from LimeSurvey.
You’ll notice an upload input at the top, which gives you the possibility to upload a file into the file directory of the theme. These parameters can be used to change the entire appearance of the theme.
Simple options
The Simple option page comes from the Template itself. It’s made via a twig file and some javascript inside the theme's /options directory: https://github.com/LimeSurvey/LimeSurvey/tree/develop/templates/default/options (Broken link)

The simple option page simply fills in the advanced form inputs. You can see it by turning on or off a setting in the simple page, and see how the related input in the advanced form is modified accordingly. For example, in Default Template’s simple options,, if you change the Bootswatch theme to “Darkly” and then click on the tab for advanced options (even without saving) you’ll see that the field “Cssframework Css” changed from
{"replace": [["css/bootstrap.css","css/flatly.css"]]}
to
{"replace": [["css/bootstrap.css","css/darkly.css"]]}
Here are the different simple options for the Core themes:
- Ajax mode: Should the next page be loaded via ajax (faster) or via page reload (better for debugging purpose)
- Background image: if set to Yes, the image called pattern.png will be loaded (will be replaced by a file selector in Master)
- Box container: if set to No, the questions will not be contained in a box (so you can use large arrays bigger than the screen width)
- Brandlogo: if set to no, the name of the survey will be shown in top bar, else, you can select one of the pictures inside the file directory to be used as logo picture.
- Animate body: if set to yes, you can choose one of the animations to apply when the body of the survey is loaded
- Animate question: same with questions
- Animate alerts: same with alerts
- Bootstrap theme: here, you can choose a Bootstrap theme to load. They come from Bootswatch https://bootswatch.com/3/
The library used for animations is animate.css: https://daneden.github.io/animate.css/
Of course, a theme provider could add his own animation library or no animation library at all.
Inheritance system
In the previous part, we’ve seen that a theme can extend another theme. A theme configuration can also inherit from another theme configuration. It means that for a given theme, you can have a configuration at
- global level (the one we’ve just seen accessible from the theme list)
- at survey group level
- a last one at survey level.
Each parameter at a certain level can inherit from the upper level: survey group inheritance. First, let’s see the survey group level.
At survey group level
Indeed, one of the other great novelties of LS3 is the survey group system. You can now create different groups to organize your surveys. To access it, go to the survey list and then click on the survey group tab:

In this list, you have two action buttons. If the group is empty, you can delete it. Else, you can always edit it. By clicking on the edit button, you reach the Survey Group configuration page:

The third tab of this page is called “Template options for this survey group”. If you click on it, you’ll see the same list of themes than in the theme list, except that here only the option button is visible (theme editor can be reached only from the main list).
Now, if you click on the option for Default Template, you’ll see this:

- Inherit everything means that all the configuration will be inherited from the Global configuration level.
- If you go to the advanced options page, you’ll see that all the fields are set to inherit.
- If you click on "no" for "Inherit everything" in the simple options, you’ll again see a very similar page to the global option page. The only difference is that for each field, you can set it to yes, no, or inherit; and each dropdown selector has an inherit' value.

At survey level
When editing a survey, in the left bar menu, you’ll see a new entry “Template Options”. It will lead you to the option page of the Template selected for the current survey. You’ll find the same inheritance system as in the survey group, but this time, inherit means that the setting will be inherited from the Survey Group of the survey.

Use case example
Let’s say you’re using a single theme for different companies (A and B). You set your favorites options at global level (e.g.: ajax on, animate body with a slide in, alerts with a pulse). Then you create a survey group for each company: a survey group for company A that will host all the surveys for this company, and a survey for company B that will host all the surveys for company B. At this level, you’ll set the logo and the background only, and you will let the other options to inherit. So, all the surveys in group A will use the logo from the company A, and all the survey from group B the logo from company B. For one of the surveys of company A, you could use a different background in relation with the topic of the survey: you just change the background in options at survey level. If someone in company B tells you that the pulsing alert is too aggressive and he would prefer something smoother like a fade in, you just change the alert animation at the Survey Group B level and all the surveys of this group will now use this animation. If the company A changes its logo, you can change it at the level of Survey Group A, and all the surveys of this group will use the new logo.
FAQ about theme customization
You'll find here some answers to questions that have been asked in the forum and that could help you to customize your theme.
Customizing CSS/JS: deal with the asset manager ("why are my changes not applied?")
If you're trying to update the CSS/JS of a theme by directly editing the code with your favorite editor, you could be surprised that your changes are not applied.
Since 2.50, LS use the Yii asset manager:
Yii Documentation about Assets
It moves the CSS/JS files of a theme to a tmp/ sub-directory with a random string (eg: "tmp/1ef64ml/"). So if you make any change to a css/js file, and tell it to the asset manager, the files are copied to a new sub-directory with a new name so the user browser's cache is updated and they see the new css/js. Else, they would have to clean their browser cache.
Here the CSS links in header when asset manager is on:
![]()
As you can see they all refer to the tmp/ subfolders.
Here the CSS links in header when asset manager is off:
![]()
As you can see they point to the real files of the theme.
So, when you're editing CSS/JS of a theme you have various possibilities:
- You can use the the LS Theme Editor: it deals with the asset manager and you don't have to worry about anything
- You can turn debug mode on: it will turn asset manager off, so the real css/js files of your themes are called (but then, you have to refresh your browser cache at each load)
- You can refresh the assets cache: from Global Settings -> General -> Clear asset cache
![]()
Using the theme editor will help you to understand the architecture of the new theme engine.
Also, if your customizing fruity, be careful with CSS specifity: most of the definitions use the selector ".fruity" (one of the class of the body element)
Adding custom fonts to my theme
The easy way: using Google Font CDN
Bootswatch Survey Theme uses Google Font CDN. Let's have a look to how it works: https://github.com/LimeSurvey/LimeSurvey/blob/70a1d99cd2ebe411597231a8bc746b4ca9e19584/themes/survey/bootswatch/css/variations/flatly.min.css
@import url("https://fonts.googleapis.com/css?family=Lato:400,700,400italic");
Then the Lato font is used via CSS rules: https://github.com/thomaspark/bootswatch/blob/master/dist/flatly/bootstrap.css#L72
body {
  ...
 font-family: "Lato";
 ...
}
You can use any google font that way in your custom theme. Of course, you should remove the font selector from the options of your theme. Delete those lines in options.twig: https://github.com/LimeSurvey/LimeSurvey/blob/70a1d99cd2ebe411597231a8bc746b4ca9e19584/themes/survey/vanilla/options/options.twig#L209-L230
Using local font
Of course, you can also download the font files and use them from local server rather than from Google CDN (better for privacy). To have an example of how to it, here our local version of noto font: https://github.com/LimeSurvey/LimeSurvey/blob/70a1d99cd2ebe411597231a8bc746b4ca9e19584/assets/fonts/noto.css
@font-face {
  font-family: 'Noto Sans';
  font-weight: 300;
  font-style: normal;
  src: url('./font-src/Noto/NotoSans-Regular.ttf');
}
...
You can use a very similar definition in your theme css file, and then by copying the file NotoSans-Regular.ttf in your theme css/font-src/ folder.
Then, apply that font to your body (or any other element) like above, and remove the default option font selector.
Creating your own font selector in options
For now, you can't easily use the core font selector to add your own font in options. We need first to give the possibility to end user to upload custom packages (see next paragraph: A look into the Fruity Font Selector )
Here how to proceed:
- Add two fonts (my_custom_font and my_custom_other_font) into your theme, using CDN or local server
- Then, in your css file, add two new classes:
.font-my_custom_font {
 font-family: 'my_custom_font ';
}
.font-my_custom_other_font {
 font-family: 'my_custom_other_font';
}
- In the XML file of your theme, add a font option (default one will be my_custom_font) :
    <options>
        ....
        <font>my_custom_font</font>
    </options>
- in option.twig, add you font picker adding those lines (untested for now, so come complain to the forum if it doesn't work):
            <div class='row ls-space margin top-15 bottom-15 action_hide_on_inherit'>
                <hr/>
            </div>
            <div class='row action_hide_on_inherit'>
                <div class='col-sm-12'>
                    <div class='panel panel-default'>
                        <div class='panel-heading'>{{ "My custom fonts" | t }}</div>
                        <div class='panel-body'>
                            <div class='form-group row'>
                                <label for='simple_edit_font' class='control-label'>{{ "Select font:" | t }}</label>
                                <div class='col-sm-12'>
                                    <select class='form-control selector_option_value_field' id='simple_edit_font' name='font'>
                                    {% if templateConfiguration.sid is not empty or templateConfiguration.gsid is not empty %} //Shouldn't this be "theme" in stead of "template"?
                                        {% set fontOptions = fontOptions ~ '<option value = "inherit" > Inherit</option>' %}
                                    {% endif %}
                                   <optgroup  label="{{ "My Custom fonts" | t }}">
                                   <option class="font-my_custom_font"     value="custom_font"   data-font-package=""  >Custom</option>
                                  <option class="font-my_custom_other_font" value="my_custom_other_font" data-font-package=""  >Other</option>
                                  </optgroup>

                                    </select>
                                </div>
                            </div>
                        </div>
                    </div>
                </div>
            </div>
Now your users should be able to choose between those two fonts.
A look into the Fruity Font Selector
In the future, we'll give the possibility to final user to upload their own asset packages, including font packages. It will make very easy any customization of fonts.
To understand Yii Packages:
http://www.yiiframework.com/doc/api/1.1/CClientScript#packages-detail
LimeSurvey packages are defined in different files. Fonts packages are defined here:
https://github.com/LimeSurvey/LimeSurvey/blob/4c40b61afb0dba8fd80154b50f5831045df8d814/application/config/fonts.php
For example, the Noto font package is defined here:
https://github.com/LimeSurvey/LimeSurvey/blob/4c40b61afb0dba8fd80154b50f5831045df8d814/application/config/fonts.php#L47-L53
    'font-noto' => array(
        'devBaseUrl' => 'assets/fonts/',
        'basePath' => 'fonts',
        'css' => array(
            'noto.css',
        ),
    ),
The noto.css file it contains is here:
https://github.com/LimeSurvey/LimeSurvey/blob/4c40b61afb0dba8fd80154b50f5831045df8d814/assets/fonts/noto.css
Notice the definition of the css class ".font-noto" at the end of it:
@font-face {
  font-family: 'Noto Sans';
  ...
}
...
.font-noto{
    font-family: 'Noto Sans';
}
Then, in Vanilla Theme, noto font is used by adding the noto package and defining the font option to noto:
https://github.com/LimeSurvey/LimeSurvey/blob/70a1d99cd2ebe411597231a8bc746b4ca9e19584/themes/survey/vanilla/config.xml#L79
        <packages>
             ....
            <add>font-noto</add>
        </packages>
    <options>
        ....
        <font>noto</font>
    </options>
Then, the body class font is defined using this value:
https://github.com/LimeSurvey/LimeSurvey/blob/70a1d99cd2ebe411597231a8bc746b4ca9e19584/themes/survey/vanilla/views/layout_global.twig#L76
<body class=" ... font-{{ aSurveyInfo.options.font }} ... " ... >
Of course, the XML file only contains the default values for your theme configuration. But indeed, those values are defined and read inside the database (table "template_configuration" (Question: "template_" of "theme_"?) as json strings. The option.js file just use the value of the font selector of the simple option to change the value inside the advanced tab form: https://github.com/LimeSurvey/LimeSurvey/blob/70a1d99cd2ebe411597231a8bc746b4ca9e19584/themes/survey/vanilla/options/options.js#L148-L174
So when the "upload asset package" functionality will be available, it will be easy to add a script that scan all the existing font packages to add them in the selector.
Adding theme options to control positioning and display of survey elements
This tutorial will show how to add options to an extended theme to display survey elements in various locations. In this case, we will create theme options to show the survey title in two different locations.
Create a custom theme
- Extend the "bootswatch" theme as described above.
- Copy custom.css to the local theme as described above.
Create new theme options
- Copy the contents of /themes/survey/bootswatch/options/ to /upload/themes/survey/yourThemeName/options/.
- Open /upload/themes/survey/yourThemeName/options/options.twig in an editor and find "{# Bootstrap Bootswatch theme #}". Directly before its parent <div class='row'> element, add this:
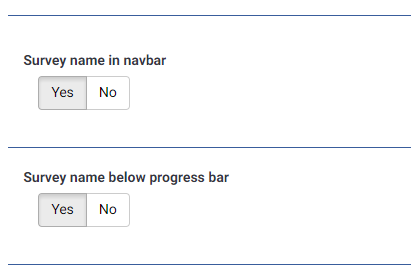
{# Custom survey name in navbar #} <div class='row'> <div class='col-sm-12 col-md-6'> <div class='form-group row'> <label for='simple_edit_options_surveyname1' class='control-label'>Survey name in navbar</label> <div class='col-sm-12'> <div class="btn-group" data-toggle="buttons"> <label class="btn btn-default"> <input name='surveyname1' type='radio' value='on' class='selector_option_radio_field ' data-id='simple_edit_options_surveyname1'/> Yes </label> <label class="btn btn-default"> <input name='surveyname1' type='radio' value='off' class='selector_option_radio_field ' data-id='simple_edit_options_surveyname1'/> No </label> </div> </div> </div> </div> </div> <div class='row'> <hr/> </div> {# Custom survey name below progress bar #} <div class='row'> <div class='col-sm-12 col-md-6'> <div class='form-group row'> <label for='simple_edit_options_surveyname2' class='control-label'>Survey name below progress bar</label> <div class='col-sm-12'> <div class="btn-group" data-toggle="buttons"> <label class="btn btn-default"> <input name='surveyname2' type='radio' value='on' class='selector_option_radio_field ' data-id='simple_edit_options_surveyname2'/> Yes </label> <label class="btn btn-default"> <input name='surveyname2' type='radio' value='off' class='selector_option_radio_field ' data-id='simple_edit_options_surveyname2'/> No </label> </div> </div> </div> </div> </div> <div class='row'> <hr/> </div> - Open /upload/themes/survey/yourThemeName/config.xml and add two items to the "options" block so it looks like this:
    <options>
        <ajaxmode>on</ajaxmode>
        ...
        <surveyname1>on</surveyname1>
        <surveyname2>on</surveyname2>
    </options>
- This should give you two new options in the Theme Options screen like this:

- Create a new directory /upload/themes/survey/yourThemeName/views/subviews/header/.
- Copy /themes/survey/vanilla/views/subviews/header/nav_bar.twig to that new directory.
- Open /themes/survey/vanilla/views/subviews/header/nav_bar.twig and find "{# Logo option #}". Under that, modify the IF statement for the logo/survey-name, so it looks like this:
{# Logo option #} {% if( aSurveyInfo.options.brandlogo == "on") %} <div class="{{ aSurveyInfo.class.navbarbrand }} logo-container" {{ aSurveyInfo.attr.navbarbrand }} > {{ image(aSurveyInfo.options.brandlogofile, aSurveyInfo.name, {"class": "logo img-responsive"}) }} </div> {% endif %} {% if( aSurveyInfo.options.surveyname1 == "on") %} <div class="{{ aSurveyInfo.class.navbarbrand }}" {{ aSurveyInfo.attr.navbarbrand }} > {{ aSurveyInfo.name }} </div> {% endif %} - Add something like this to /upload/themes/survey/yourThemeName/css/custom.css:
.navbar-brand {
    line-height: 60px;
    font-size: 32px;
}
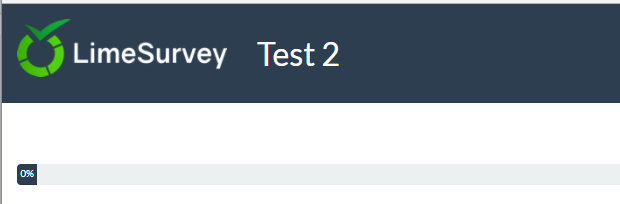
- Toggle the "Survey name in navbar" theme option to "Yes"
- You should see this:

Modifed view for Survey Title under progress bar
- Create a new directory /upload/themes/survey/yourThemeName/views/subviews/survey/group_subviews.
- Copy /themes/survey/vanilla/views/subviews/survey/group_subviews/group_container.twig to that new directory.
- Open /themes/survey/vanilla/views/subviews/survey/group_subviews/group_container.twig and add an <h1> element for the survey name. So it looks like this:
<div class="{{ aSurveyInfo.class.groupcontainer }} space-col" {{ aSurveyInfo.attr.groupcontainer }}>

    {# Custom survey name #}
    {% if( aSurveyInfo.options.surveyname2 == "on") %}
    	<h1 class="custom-survey-name">{{ aSurveyInfo.name }}</h1>
    {% endif %}

    {# Group Name #}
    {{ include('./subviews/survey/group_subviews/group_name.twig') }}

    {# Group Description #}
    {{ include('./subviews/survey/group_subviews/group_desc.twig') }}

    {#
        PRESENT THE QUESTIONS

        This is the main part. It will render each question for this group
     #}

    <!-- PRESENT THE QUESTIONS -->
    {% for  aQuestion in aGroup.aQuestions %}
         {{ include('./subviews/survey/question_container.twig') }}
    {% endfor %}

    <!-- Hidden inputs -->
    {% if aGroup.show_last_group == true %}
        <input type='hidden' name='lastgroup' value='{{ aGroup.lastgroup }}' id='lastgroup' />
    {% endif %}

    {% if aGroup.show_last_answer == true %}
        <input type='hidden' name='lastanswer' value='{{ aGroup.lastanswer }}' id='lastanswer' />
    {% endif %}
</div>
- Add something like this to /upload/themes/survey/yourThemeName/css/custom.css:
.navbar-brand {
    line-height: 60ph1.custom-survey-name {
	margin: 0;
	text-align: center;
}
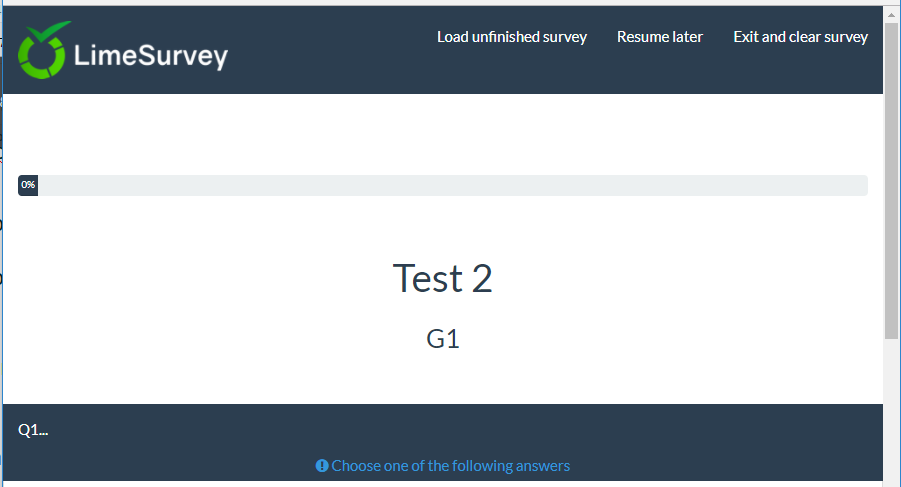
- Toggle the "Survey name below progress bar" theme option to "Yes"
- You should see this:

Downloads
- Sample extended theme: Media:Test_survey_names.zip
Creating a theme from scratch
Documentation coming soon.
For now, just giving few tips.
theme structure
Files and directories
When you create a Theme from scratch, you don't need to respect the file/directory structure/css/js from Vanilla. The mandatory css/js is added by core (you can still remove it if needed)
The only files your theme must have are the layout files:
- layout_global.twig : render the pages for survey taking
- layout_survey_list.twig : render the survey list (if this theme is set as default)
- layout_errors.twig : used to render errors that block survey rendering. ( wrong survey id, empty group in preview group, etc.)
- layout_user_forms.twig: renders the user forms such as: token (survey participant), and register.
- layout_print.twig : used to print the survey to pdf
- layout_printanswers.twig: print the answers
The content of those files, the files they include or not, is entirely up to you. All the other files and directories that you find on Vanilla are purely optional, feel free to organize your code the way you want.
Content
In Vanilla's layout_global.twig, you'll see we use a variable called "include_content" to decide what to show https://github.com/LimeSurvey/LimeSurvey/blob/2398dda3b425da1a37d4611cd7963d39ac739987/themes/survey/vanilla/views/layout_global.twig#L114-L115
                    {% set sViewContent =  './subviews/content/' ~ aSurveyInfo.include_content ~ '.twig' %}
                    {% include './subviews/content/outerframe.twig' with {'include_content': sViewContent } %}
aSurveyInfo.include_content tell you what action is currently going on: showing questions? showing submit result? showing clear all? etc As you can see, in vanilla, we create one file to include by action. So if you want to know the list of actions, just check the vanilla's directory views/subviews/content, and remove the "twig" extension : https://github.com/LimeSurvey/LimeSurvey/tree/2398dda3b425da1a37d4611cd7963d39ac739987/themes/survey/vanilla/views/subviews/content
- clearall.twig
- firstpage.twig
- load.twig
- mainrow.twig
- main.twig
- optin.twig
- optout.twig
- outerframe.twig
- printanswers.twig
- quotas.twig
- register.twig
- save.twig
- submit_preview.twig
- submit.twig
- userforms.twig
If you already created a them for 2.x versions of LimeSurvey, you'll notice that most of them corresponds to the old pstpl files for limesurvey 2.x. Again, there is no obligation for you in your theme to create those files, with those names, in this directory. You could for example just add a giant switch in layout_global.twig with the wanted HTML for each action.
The manifest config.xml
The manifest of the theme contains the main informations about your theme. When you install a theme, the content of the manifest will be loaded in the database, in two different tables: template and template_configuration. So each time you modify the manifest of a theme, you must uninstall and reinstall it (or just reset it). Because this process is annoying while developing a theme you can force the direct usage of the XML file rather than the DB entries. To do so, in config.php turn on debug mode and 'force_xmlsettings_for_survey_rendering' to true.
The metadata section
Nothing complex: just the main infos about your theme. It will be pushed in the table templates_configuration
    <metadata>
        <name>the_name_of_your_theme</name>
        <title>The Title of your theme</title>
        <creationDate>16/10/2017</creationDate>
        <author>Your Name</author>
        <authorEmail>your@email.org</authorEmail>
        <authorUrl>http://www.yourwebsite.org</authorUrl>
        <copyright>Your Copyright </copyright>
        <license>Licence of your theme</license>
        <version>version of your theme</version>
        <apiVersion>3</apiVersion>
        <description>Description of your theme</description>
        <extends>parent_theme</extends>
    </metadata>
Few remarks:
- name: will be used as a key in the db. So it must be unique, and it should not have any special chars (no spaces). Note that cases will not be taken in account
- Title: will be used to display your theme name in the different lists. It can have special chars
- description: will be used in the main list of survey theme. It can contains special chars, and even HTML code by using
- extends: optional, it defines the parent themes. So if any file is not present in this theme (twig/js/css/jpg, etc) it will look for it in the parent theme
The files section
This one is an important one. It will be pushed in the table template_configuration, in the field files_css, files_js, files_print_css as json arrays.
Eg: the files section of the Material Premium Theme:
    <files>
        <css>
            <add>css/bootstrap-material-design.css</add>
            <add>css/ripples.min.css</add>
            <replace>css/ajaxify.css</replace>
            <replace>css/theme.css</replace>
            <replace>css/custom.css</replace>
            <remove>awesome-bootstrap-checkbox/awesome-bootstrap-checkbox.css</remove>
        </css>
        <js>
            <replace>scripts/theme.js</replace>
            <replace>scripts/ajaxify.js</replace>
            <add>scripts/material.js</add>
            <add>scripts/ripples.min.js</add>
            <replace>scripts/custom.js</replace>
        </js>
        <print_css>
            <add>css/print_theme.css</add>
        </print_css>
    </files>
All the CSS/JS files present in this section will be loaded at the launch of the survey (in ajax mode. If ajax mode is off, then of course all the files are reloaded at each page).
They will be added to a Yii Asset Packet based on the name of the theme. So when Asset Manager is on (debug mode being off), those files will be copied to the tmp directory with the rest of the theme (so you can use relative path in the CSS and JS to reach the image files).
About the Asset manager in Yii: https://www.yiiframework.com/wiki/148/understanding-assets
About packages in Yii: http://www.yiiframework.com/doc/api/1.1/CClientScript#packages-detail
They will use the inheritance system. It means that if you add a CSS/JS file to a theme, but it's not present in the theme, then the engine will look into all the mother themes of this theme and will use the first one it finds. So if a user extends your theme via the theme editor, all those files will be inherited in his theme. The keywords refer to this inheritance system.
- add : it will add the file to the theme, and to all its inherited theme
- replace: it will replace the the file of its mother theme
- remove: it will remove the file from any package, even the core package (since 3.14)
Few remarks on those keywords:
Inheritance tips
As explained before, the "add" keyword can refer to a file being in one of the mother theme. So you can "add" a file in this section, and still not having this file in your theme, but in one of its parents theme. The engine will look into all its parent themes and will use the first one it finds. If it can't find the file, and debug mode is on in config, and js frontend debug mode is on in global setting, a message in console will warn you. Eg: if we add in a my_theme: <add>css/unexisting.css</add>, in the console we'll see:
 (¯`·._.·(¯`·._.· Theme Configuration Error  ·._.·´¯)·._.·´¯)

Can't find file 'css/unexisting.css' defined in theme 'my_theme'
If the debug mode is off, then no error at all will be seen. The engine will just ignore the wrong add statements.
When to use add, when to use replace, when can I just leave it to the parent theme?
First: add and replace are the very same keyword. You can use the one or the other, the engine will just do the same. They are distinct for human readers, so they understand what was your intention.
You can't add a file with the same name as the mother theme: it will always replace it. eg: If you have a file called "my_mother_theme/foo.css" and you add a file called "foo.cs" in the daughter theme, only "daughter_theme/foo.css" will be added to the theme. If you want to keep "my_mother_theme/foo.css", just choose another name for "daughter_theme/foo.css", like "daughter_theme/bar.css". So the keyword "add" can be used as a "replace" keyword.
If you wonder why: this make much easier the automatic generation of inherited theme, copying the file section works out of the box (no need to rename "add" to "replace" when extending one the file).
To make it clear, let's take the Fruity example. Here its css file section:
        <css>
            <add>css/variations/sea_green.css</add>
            <replace>css/animate.css</replace>
            <replace>css/theme.css</replace>
            <replace>css/custom.css</replace>
        </css>
If you look to the custom.css file in fruity, it is exactly the same as the vanilla one. We could delete the custom.css file inside fruity, the one of vanilla would loaded. We could remove the statement <replace>custom.css</replace> from the Fruity manifest, the statement from vanilla will be used, and the vanilla custom.css would be loaded.
So why do we use the statement <replace>custom.css</replace> inside the fruity manifest? The answer is easy: because we want the end user to be able to extend the fruity theme, to modify the file in his local theme, and to load this modified file from his inherited theme. To understand, just extend fruity and have a look to the extended theme. THe extended theme doesn't even have the file custom.css. So the one of fruity will be used. But: if the user create this file in the extended theme (by clicking on "extend" in the theme editor), then this file will be loaded from his theme.
So in general:
if you create a theme from scratch not extending any theme, just use the add statement to add your css/js files. Easy peasy.
if you create a theme extending another theme, and you don't want the users to be able to extends the css/js file from the mother theme: don't use the add statement in your manifest. THe files will still be loaded from the mother theme configuration.
if you create a theme extending another theme, and you want to replace a file from the mother theme: use the replace keyword (the add keyword will have the same result)
if you create a theme extending another theme, if you don't replace a given file from css/js, but you want the users to be able to extend this file: then use the "replace" statement in your manifest for this file. Even if you don't replace the file, by using the keyword replace in the manifest: you allow the user to do it if he wants to do it.
Only this very last case needs a bit of mental gymnastic ot understand, all the other cases are trivial.
You can also register CSS and JS files directly from the twig code. Those files will be loaded only when the twig file is asked. If you want the users to be able to inherit those JS/Css files from the theme editor, remember to use the functions Template:RegisterTemplateCssFile('my style.css') and Template:RegisterTemplateScript('my script.js'). If you don't use those functions, your theme may work, but inheritance on it will be broken. It is the same logic as the Template:Image('my picture.jpg') function
&action=edit&redlink=1)
The remove keyword
The remove keyword is available only since 3.14. With this one, you can remove any css/file from any package, even the core ones. It is used in Material Premium Theme to remove the Awseome Bootstrap Checkbox's files:
<remove>awesome-bootstrap-checkbox/awesome-bootstrap-checkbox.css</remove>
so you should use the very same syntax as the package's file (eg: "awesome-bootstrap-checkbox.css" alone without it's folder path would not work). You'll find the complete list of core packages and their files in /application/config/packages.php and config/third_party.php. For example, for awesome-bootstrap-checkbox.css: https://github.com/LimeSurvey/LimeSurvey/blob/2398dda3b425da1a37d4611cd7963d39ac739987/application/config/packages.php#L54-L56
        'css'=> array(
            'awesome-bootstrap-checkbox/awesome-bootstrap-checkbox.css',
        ),
Another way to find the exact name to use in the remove tag is to turn asset manager on (turning debug mode off or setting 'use_asset_manager'=>true in the config). Then, the path to use will be the one just after the random directory in the tmp directory. For example, for awesome-bootstrap-checkbox.css:
<link rel="stylesheet" type="text/css" href="/tmp/assets/cbc4e3cb/awesome-bootstrap-checkbox/awesome-bootstrap-checkbox.css" />
Files you should not remove:
jquery-3.1.1.min.js : needed
jquery-migrate-3.0.0.min.js : needed
survey.js : needed
moment-with-locales.min.js : needed for date question type (and some other i think)
em_javascript.js : needed for all Expression Manager javascript
The options section
This section is relative to the option of your theme. It will be used to feed the filed "options" of the table template_configuration as a json array.
Further information
Some notes
NOTE: if you edit the XML file of a theme, you must uninstall and reinstall the theme so it's taken into account.
NOTE: to avoid that, you can force the use to the XML rather than DB. In config.php turn debug mode on and uncommment:
'force_xmlsettings_for_survey_rendering' => true, // Uncomment if you want to force the use of the XML file rather than DB (for easy theme development)
Becareful: everything will be loaded from the XML (included options, etc)
NOTE: if you manually edit the CSS/JS files (without using the Theme Editor), and if debug mode is off, you can now force the asset to be flushed. In "Global Settings", "General tab", click the button "Clear assets cache".
NOTE: if you remove the section