Label sets/ru: Difference between revisions
From LimeSurvey Manual
Dobleancho (talk | contribs) (Created page with "<div class="simplebox">Функционал и использование меток существенно изменились с версии 1.90. Эта страница ...") |
(Updating to match new version of source page) |
||
| (40 intermediate revisions by 4 users not shown) | |||
| Line 1: | Line 1: | ||
<languages /> | <languages /> | ||
__ОГЛАВЛЕНИЕ__ | |||
= | =General= | ||
<div class=" | <div class="mw-translate-fuzzy"> | ||
Наборы меток в основном представляют собой шаблоны списков где каждый список содержит набор кодов с метками и может быть использован в большинстве типов вопросов или ответов в виде подвопросов. В отличие от ранних версий LimeSurvey наборы меток просто копируются в вопросы как подворосы или ответы. Если Вы измените набор меток после того как Вы его использовали, то изменения не распространятся на вопросы где набор меток был использован как шаблон. | |||
</div> | |||
<div class="mw-translate-fuzzy"> | |||
<div class="simplebox">'''Подсказка:''' Набор меток должен содержать слов на том же языке, что и основной опрос, иначе Вы не сможете использовать данный набор в любом вопросе Вашего опроса.</div> | |||
</div> | |||
<div class="mw-translate-fuzzy"> | |||
Пример использования набора меток выглядит следующим образом. Если кто либо хочет объявить свою 7-бальную шкалу оценок, то набор меток обеспечит эту функцию. В данном примере очень простой пользовательский набор меток изображенными парами код/метка. Обратите внимание на то, что метка отображается в актуальном вопросе. | |||
</div> | |||
If you want to define a custom 7-point scale, a label set provides this function. In the example below, a very simple custom label set with the code/label pairs ('''the label is what appears in the actual questions'''). | |||
{|class=wikitable | |||
|'''Код'''||'''Метка''' | |||
{| | |||
|''' | |||
|- | |- | ||
|1|| | |1||Абсолютно бесполезно | ||
|- | |- | ||
|2||2 | |2||2 | ||
| Line 23: | Line 28: | ||
|3||3 | |3||3 | ||
|- | |- | ||
|4|| | |4||Можно использовать | ||
|- | |- | ||
|5||5 | |5||5 | ||
| Line 29: | Line 34: | ||
|6||6 | |6||6 | ||
|- | |- | ||
|7|| | |7||Очень полезно | ||
|} | |} | ||
<div class="mw-translate-fuzzy"> | |||
Другой графический пример: | |||
</div> | |||
<div class="mw-translate-fuzzy"> | |||
[[File:3xSmiley-Question.gif]] | [[File:3xSmiley-Question.gif]] | ||
</div> | |||
<div class="mw-translate-fuzzy"> | |||
=Руководство к применению= | |||
</div> | |||
<div class="mw-translate-fuzzy"> | |||
Кликните по значку [[File:LimeSurvey2.05_LabelSet_ru.jpg]] в меню административной панели для редактирования, создания, удаления, импорта или экспорта набора меток используемых в вопросах с 'гибкими' метками. | |||
</div> | |||
<center>[[File:labels.png]]</center> | |||
<div class="mw-translate-fuzzy"> | |||
==Добавление набора меток== | |||
*'''Установить имя:''' каждый новый набор меток должен иметь свои имя. | |||
*'''Языки:''' каждый набор меток должен быть специализирован для языков в которых он может использоваться. Вы можете выбрать множество языков из меню. | |||
</div> | |||
Click the '''Create or import new label set(s)''' button located in the upper-left corner of the page. You can either create a new label set or import it from [https://www.limesurvey.org/index.php/downloads/category/19-templates another source]: | |||
*'''New label set:''' Label sets must be manually created. | |||
**'''Set Name:''' Each new label set has to be given a name. | |||
**'''Languages:''' Every label set must be specified for the language it's used for. You can choose as many languages from the menu as you want. | |||
*'''Import label set(s):''' In order to import a label set, click browse and add the '''.lsl''' label set file. If you have previously created a label set, then LimeSurvey will not allow you import a similar external label set unless you turn off the ''Don't import if label set already exists'' option. '''Some useful label sets are available on the [https://www.limesurvey.org/index.php/downloads/category/19-templates LimeSurvey website]'''. | |||
Once the label has been imported or created, click the Save button located in the right-upper part of the screen. | |||
<center>[[File:Save_Close.jpg]]</center> | |||
{{Note|If you import a whole survey, the label sets are imported too (with the questions). Duplicated label sets are ignored.}} | |||
==Редактирование, удаление или экспорт набора меток== | |||
<div class="mw-translate-fuzzy"> | |||
Выберите существующий набор меток в выпадающем списке набора меток на панели администрирования для редактирования, удаления или экспорта набора меток. | |||
*'''Редактировать набор меток:''' здесь возможно переименовать набор меток и добавить/удалить языки для данного набора. | |||
*'''Удалить набор меток:''' после появления окна, Вы можете удалить выбранные набор меток. | |||
*'''Экспорт набора меток:''' экспортировать текущий набор меток в .lsl файл. | |||
*'''Панель меток:''' | |||
</div> | |||
<center>[[File:Edit menu labels.png|150px]]</center> | |||
*'''View labels:''' Allows the user to view the existing labels located in the respective label set. | |||
*''' | *'''Edit label set:''' The user can rename the label set and/or add/remove languages. | ||
*''' | *'''Export label set:''' Export label set to a .lsl file. | ||
*'''Delete label set:''' A window will pop up in order to confirm whether you want to delete the respective label set or not. | |||
== | <div class="mw-translate-fuzzy"> | ||
<div class="simplebox">(:idea:) '''Подсказка:''' некоторые полезные наборы меток доступны на [http://www.limesurvey.org/en/add-ons/viewcategory/8-label-set-templates сайте LimeSurvey]</div> | |||
</div> | |||
==... | ==...add a label== | ||
<div class="mw-translate-fuzzy"> | |||
+ Для добавления новой метки Вы заполняете код метки, значение оценки ответов и название и затем жмете '''Добавить метку'''. После этого метка должна быть отображена в списке выше. Возможно использовать графику вместо или в дополнение к текстовым меткам. Для этого необходимо использовать HTML-код, например: | |||
</div> | |||
<center>[[File:Labels table.png]]</center> | |||
Then, click the plus sign [[File:Add label.png]] to add the new label. It's possible to use a graphic instead of (or in addition to) a label text. To do that, you must use HTML-code to include the graphic you want, e.g.: | |||
<div class="mw-translate-fuzzy"> | |||
<syntaxhighlight lang="html4strict" enclose="div"> | <syntaxhighlight lang="html4strict" enclose="div"> | ||
<img border="0" src="http://www. | <img border="0" src="http://www.<ваш_домен>.at/pics/pic.gif"> | ||
</syntaxhighlight> | </syntaxhighlight> | ||
</div> | |||
{{Note|Read also our wiki on [[Assessments|assessments]]. The column is ignored if you set all the values to 0.}} | |||
To help with the editing process of the HTML-code, use the embedded HTML editor of LimeSurvey, which is located at the end of the label-text box (click on the green pen button ->[[File: HTML editor.png|0.85px]]). | |||
<center>[[File:Labels HTML editor.png]]</center> | |||
{{Note|For a short introduction on the HTML editor utilized by LimeSurvey, check [[First_login_-_your_user_preferences#Your_account_preferences#Your_personal_settings#HTML_editor_mode|the following page]].}} | |||
===Quick add=== | |||
Another way to add labels is to use the '''Quick add...''' button. When you click it, a window be displayed. It works under the following form: '''Code ; Title'''. | |||
<center>[[File:QuickAddCodeLabel.png|0.8px]]</center> | |||
You can either replace or add labels. If you click '''Replace''', all the preexisting labels will be deleted and replaced by the ones entered by you. If you click '''Add''', the new labels will be added into the label set (the preexisting ones not being affected). | |||
<center>[[File:QuickAddResultsCodeandTitle.png|0.8px]]</center> | |||
The '''Code''' is automatically added if new entrances are created. Therefore, you can type in only the title of the labels which will automatically be assigned a code: | |||
<center>[[File:QuickAddLabel.png|0.8px]]</center> | |||
<center>[[File:QuickAddLabelResults.png|0.8px]]</center> | |||
The ''assessment values'' cannot be edited/entered via this option - it has to be changed manually from the list of labels. | |||
{{Alert|title=Attention|text=If you wish to translate labels by using the '''Quick add...''' function, you need to add the translation on the same line(s) and be separated by a semicolon.}} | |||
==...delete a label== | |||
To delete a label, click the red trash button ([[File:Delete label.png|0.85px]]) located under the 'Action' column. | |||
==...rearrange a label== | |||
To rearrange the order of the labels, click the green sign ([[File:Reorder labels.png|0.85px]]) located under the column called 'Position' and re-position the label. | |||
<div class="mw-translate-fuzzy"> | |||
Если Ваш набор меток имеет более одного языка, то Вы можете выбрать какой язык Вы ходите отредактировать. Каждой метке необходим код, значение оценки ответов и название. Код может быть изменен только для базового языка набора меток. Значение оценки ответов может быть проигнорировано (значение 0) если Вы не хотите использовать [[Assessments|оценки]]. Название это текст, который отображается в вопросе. | |||
*'''Удалить эту метку''': удаляет метку. | |||
*'''Добавить метку после этой''': создает новую метку и помещает ее после данной. | |||
*'''Запустить редактор HTML-во всплывающем окне''': запускает редактор HTML, который поможет пользователю подготовить HTML-код для вставки в поле название. | |||
</div> | |||
To add a new language: '''Create or import new label set(s)''' -> '''Languages''' -> select the languages you wish to add. | |||
To start translating the labels into another language, select the language in which you would like to translate the labels to from the upper part of the matrix. | |||
[[File:Labels switch language.png]] | |||
[[File:Labels 4lang ro.png]] | |||
<div class="mw-translate-fuzzy"> | |||
=Управление загруженными ресурсами= | |||
</div> | |||
In our case, the language from where the label codes and assessment values can be changed is English. Only the label description can be edited when the Romanian tab is selected - which represents the corresponding Romanian label translation of the English label. | |||
Once you are done with the changes, do not forget to click on the 'Save changes' button located in the upper-right part of the screen. | |||
[[File:Save_changes_close.png]] | |||
<div class="mw-translate-fuzzy"> | |||
Данная вкладка позволяет Вам управлять файлами (картинки, медиа-файлы) которые загружены в HTML-редакторе. | |||
</div> | |||
{{Box|''Before reading further, take a look at our [[Surveys - introduction|wiki on how to create surveys]] since it is already assumed in the examples from below that you have already created your survey.''}} | |||
For a better understanding of the label sets option, let's take a look at the following examples: | |||
*[[Label_sets#I_want_to_use_a_label_set_as_an_answer_list_for_one_question| I want to use a label set as an answer list for one question]]; | |||
*[[Label sets#I want to use labels in another language as answers|I want to use labels in another language as answers]]; | |||
*[[Label sets#I want to use emoticons instead of label text|I want to use emoticons instead of label text]]; | |||
*[[Label sets#I want to import a label set and use it as a subquestion list|I want to import a label set and use it as a subquestion list]]. | |||
{{Box|The screenshots used below are from LimeSurvey 3.0, the interface being slightly different from the last LimeSurvey 2.xx release.}} | |||
==I want to use a label set as an answer list for one question== | |||
<div class='simplebox'>[[File:help.png]] All the label sets that are displayed under '''Configuration''' -> '''Label sets''' are called ''predefined label sets''. They can be used either as subquestions or as answers.</div> | |||
'''Assuming that the [[Label sets#General|label set]] and [[Surveys - introduction|survey]] are created:''' | |||
*Go to the structure of the survey and create a [[Creating a question group|question group]] - ''About LimeSurvey''. | |||
<center>[[File:CreateQuestionGroup.png]]</center> | |||
*Click the Structure tab and then on the newly created question group (''About LimeSurvey'' in our case). Look for group quick actions and choose '''Add new question to group''': | |||
<center>[[File:AddNewQuestiontoGroup.png]]</center> | |||
*Type in the code and text of the question. | |||
*To use a label set as a set of answers, pick the right type of question that can make use of label sets. The ''array'' question type is selected in our example: | |||
<center>[[File:ArrayQuestionTypeLabelSets.png]]</center> | |||
*Save the question to add it into your question group. | |||
*Once created, you will have to add subquestions and answers: | |||
<center>[[File:EditSubquestionsandAnswerOptions.png]]</center> | |||
<div class='simplebox'>[[File:help.png]] Please note that not all question types ask for subquestions and/or answers!</div> | |||
*Add at least one subquestion: | |||
<center>[[File:ArraySubquestions.png]]</center> | |||
*Add answer options. '''Predefined label sets...''' option will be used: | |||
<center>[[File:EditAnswerOptions.png]]</center> | |||
*Select the label set you want to use: | |||
<center>[[File:AvailableLabelSetsEnglish.png|0.7px]]</center> | |||
The result should look like this: | |||
<center>[[File:EditAnswerOptionsResults.png]]</center> | |||
*Save & preview the question: | |||
<center>[[File:LabelSetsFinal.png]]</center> | |||
==I want to use labels in another language as answers== | |||
{{Box|Before reading this example: | |||
#Create a label set and select the other languages you would like to use in your survey. For further details, read our wiki on [[Label sets#...add a new language|how to translate a label set in other languages.]] | |||
#Edit your survey ('''Settings''' -> '''General Settings''') by adding the additional languages you want to translate to. For more details on how to create a survey, read [[Surveys - introduction|the following wiki]].}} | |||
'''Assuming that the [[Label sets#General|label set]] and [[Surveys - introduction|survey]] are created:''' | |||
*Create a question that can make use of label sets (e.g. ''array'' question type): | |||
{{Alert|title=Attention|text=Do not forget to select the language you want to translate to from the languages toolbar!}} | |||
*Because the ''array'' question type is selected, both the subquestions and answers need to be translated. | |||
<center>[[File:EditSubquestionsandAnswerOptions.png]]</center> | |||
*Translate the subquestions. Do not forget to select the right language tab for translation: | |||
<center>[[File:ExampleAddLanguageSubquestions.png]]</center> | |||
*Translate the answers. However, because we use predefined label sets, select the right language tab to add the translated label set as answer options: | |||
<center>[[File:AvailableLabelSetsRomanian.png]]</center> | |||
<center>[[File:ExampleEditAnswerOptionsRomanian.png]]</center> | |||
*Save & Preview the survey: | |||
<center>[[File:PreviewAddRomanianLabels.png]]</center> | |||
==I want to use emoticons instead of label text== | |||
{{Box|To use emoticons (or any other graphics) , you have to use the embedded HTML editor when creating labels.}} | |||
'''Assuming that the [[Surveys - introduction|survey]] is created:''' | |||
*[[Label sets#...add a label|Create a label set and access it]]. Instead of writing in the ''Title'' column, open the HTML editor by clicking on the green pen and add graphics instead of text: | |||
<center>[[File:GreenPenButtonHTMLLabels.png]]</center> | |||
<center>[[File:InlineMode1.PNG]]</center> | |||
The HTML editor offers you a more comprehensive view on how different options can be used to enhance your survey. It is not necessary to have HTML knowledge because the toolbar is self-explaining (for further details you can either hover the mouse over the options or click on that option for more details). By using such an editor, you can also add (for example) smileys, images and/or videos that are either hosted online or on your server. | |||
In this example. three smileys have been added: | |||
<center>[[File:SmileysLabelsExample.png]]</center> | |||
*Create a question that can make use of label sets as predefined answers (e.g. ''array'' question type): | |||
<center>[[File:New Question Label Sets Emoticons.png]]</center> | |||
*Edit the subquestions and the answer options | |||
<center>[[File:EditSubquestionsandAnswerOptions.png]]</center> | |||
*Set predefined labels as answer options. | |||
<center>[[File:SmileysLabelsExample.png|SmileysLabelsExample.png]]</center> | |||
*Save and preview the question: | |||
<center>[[File:Preview Label Set Emoticons.png]]</center> | |||
==I want to import a label set and use it as a subquestion list== | |||
'''Assuming that the [[Surveys - introduction|survey]] is created:''' | |||
{{Box|''Optional'': Access [https://www.limesurvey.org/index.php/downloads/category/19-templates '''LimeSurvey templates database'''] and download the one you wish to use - .lsl file format (''Australian states'' in our example).}} | |||
* | *Go to '''Configuration''' and click '''Manage label sets''' button. | ||
*Click '''Create or import new label set(s)''' (in the upper-left side of the screen) -> '''Import label set(s)'''. '''Browse''' your computer and select the .lsl file (the label set format). | |||
* | <center>[[File:ImportaNewLabel.png]]</center> | ||
* | * Now that the label set was uploaded, create a question that requires the usage of subquestions (''array'' question types). | ||
* | * Edit subquestions. | ||
<center>[[File:EditSubquestionsandAnswerOptions.png]]</center> | |||
* Load the imported label set: | |||
<center>[[File:Australia Code Label.png]]</center> | |||
<center>[[File:Australia Label Set.png]]</center> | |||
* Save and preview. | |||
<center>[[File:Australia Save and Preview.png]]</center> | |||
Latest revision as of 21:38, 17 February 2022
__ОГЛАВЛЕНИЕ__
General
Наборы меток в основном представляют собой шаблоны списков где каждый список содержит набор кодов с метками и может быть использован в большинстве типов вопросов или ответов в виде подвопросов. В отличие от ранних версий LimeSurvey наборы меток просто копируются в вопросы как подворосы или ответы. Если Вы измените набор меток после того как Вы его использовали, то изменения не распространятся на вопросы где набор меток был использован как шаблон.
Пример использования набора меток выглядит следующим образом. Если кто либо хочет объявить свою 7-бальную шкалу оценок, то набор меток обеспечит эту функцию. В данном примере очень простой пользовательский набор меток изображенными парами код/метка. Обратите внимание на то, что метка отображается в актуальном вопросе.
If you want to define a custom 7-point scale, a label set provides this function. In the example below, a very simple custom label set with the code/label pairs (the label is what appears in the actual questions).
| Код | Метка |
| 1 | Абсолютно бесполезно |
| 2 | 2 |
| 3 | 3 |
| 4 | Можно использовать |
| 5 | 5 |
| 6 | 6 |
| 7 | Очень полезно |
Другой графический пример:
Руководство к применению
Кликните по значку ![]() в меню административной панели для редактирования, создания, удаления, импорта или экспорта набора меток используемых в вопросах с 'гибкими' метками.
в меню административной панели для редактирования, создания, удаления, импорта или экспорта набора меток используемых в вопросах с 'гибкими' метками.

Добавление набора меток
- Установить имя: каждый новый набор меток должен иметь свои имя.
- Языки: каждый набор меток должен быть специализирован для языков в которых он может использоваться. Вы можете выбрать множество языков из меню.
Click the Create or import new label set(s) button located in the upper-left corner of the page. You can either create a new label set or import it from another source:
- New label set: Label sets must be manually created.
- Set Name: Each new label set has to be given a name.
- Languages: Every label set must be specified for the language it's used for. You can choose as many languages from the menu as you want.
- Import label set(s): In order to import a label set, click browse and add the .lsl label set file. If you have previously created a label set, then LimeSurvey will not allow you import a similar external label set unless you turn off the Don't import if label set already exists option. Some useful label sets are available on the LimeSurvey website.
Once the label has been imported or created, click the Save button located in the right-upper part of the screen.
Редактирование, удаление или экспорт набора меток
Выберите существующий набор меток в выпадающем списке набора меток на панели администрирования для редактирования, удаления или экспорта набора меток.
- Редактировать набор меток: здесь возможно переименовать набор меток и добавить/удалить языки для данного набора.
- Удалить набор меток: после появления окна, Вы можете удалить выбранные набор меток.
- Экспорт набора меток: экспортировать текущий набор меток в .lsl файл.
- Панель меток:
- View labels: Allows the user to view the existing labels located in the respective label set.
- Edit label set: The user can rename the label set and/or add/remove languages.
- Export label set: Export label set to a .lsl file.
- Delete label set: A window will pop up in order to confirm whether you want to delete the respective label set or not.
...add a label
+ Для добавления новой метки Вы заполняете код метки, значение оценки ответов и название и затем жмете Добавить метку. После этого метка должна быть отображена в списке выше. Возможно использовать графику вместо или в дополнение к текстовым меткам. Для этого необходимо использовать HTML-код, например:

Then, click the plus sign ![]() to add the new label. It's possible to use a graphic instead of (or in addition to) a label text. To do that, you must use HTML-code to include the graphic you want, e.g.:
to add the new label. It's possible to use a graphic instead of (or in addition to) a label text. To do that, you must use HTML-code to include the graphic you want, e.g.:
<img border="0" src="http://www.<ваш_домен>.at/pics/pic.gif">To help with the editing process of the HTML-code, use the embedded HTML editor of LimeSurvey, which is located at the end of the label-text box (click on the green pen button ->![]() ).
).

Quick add
Another way to add labels is to use the Quick add... button. When you click it, a window be displayed. It works under the following form: Code ; Title.
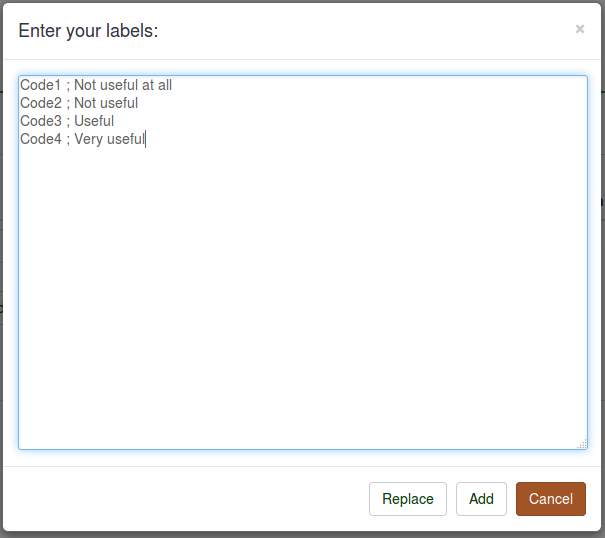
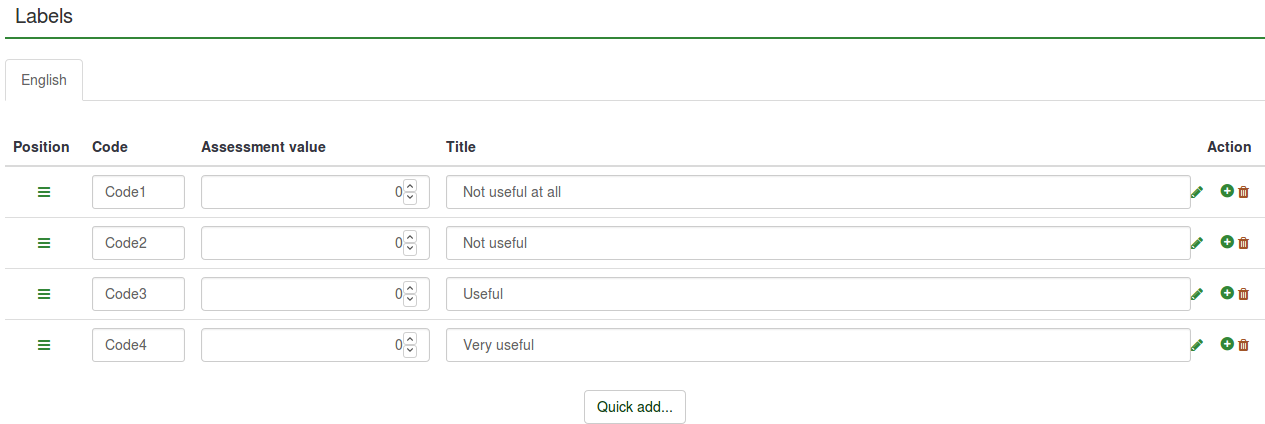
You can either replace or add labels. If you click Replace, all the preexisting labels will be deleted and replaced by the ones entered by you. If you click Add, the new labels will be added into the label set (the preexisting ones not being affected).
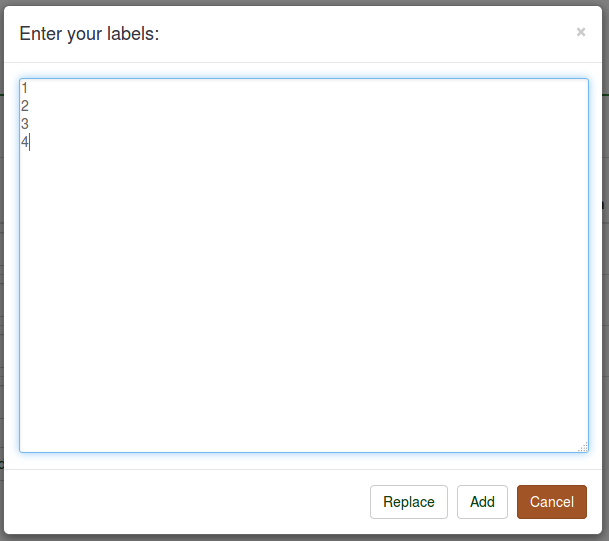
The Code is automatically added if new entrances are created. Therefore, you can type in only the title of the labels which will automatically be assigned a code:
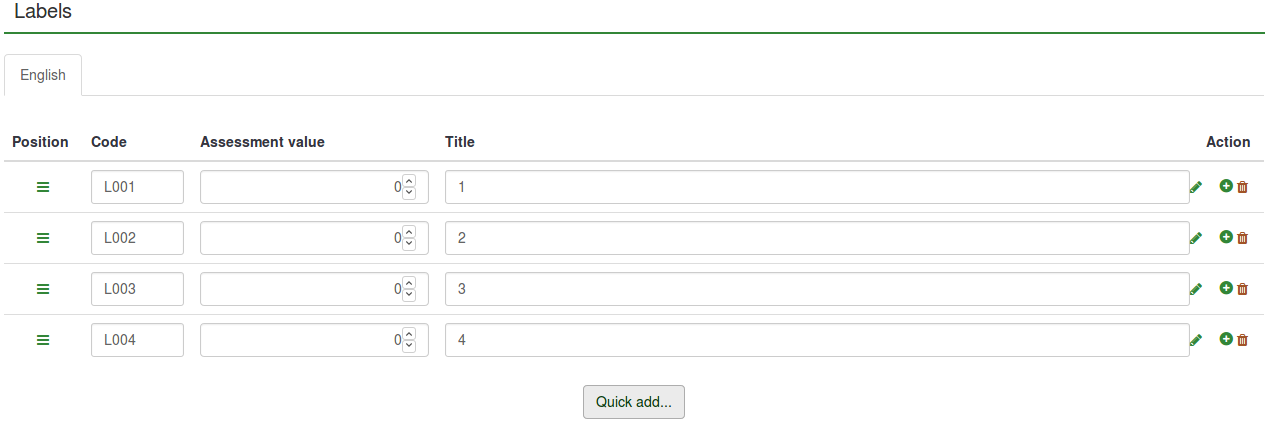
The assessment values cannot be edited/entered via this option - it has to be changed manually from the list of labels.
...delete a label
To delete a label, click the red trash button (![]() ) located under the 'Action' column.
) located under the 'Action' column.
...rearrange a label
To rearrange the order of the labels, click the green sign (![]() ) located under the column called 'Position' and re-position the label.
) located under the column called 'Position' and re-position the label.
Если Ваш набор меток имеет более одного языка, то Вы можете выбрать какой язык Вы ходите отредактировать. Каждой метке необходим код, значение оценки ответов и название. Код может быть изменен только для базового языка набора меток. Значение оценки ответов может быть проигнорировано (значение 0) если Вы не хотите использовать оценки. Название это текст, который отображается в вопросе.
- Удалить эту метку: удаляет метку.
- Добавить метку после этой: создает новую метку и помещает ее после данной.
- Запустить редактор HTML-во всплывающем окне: запускает редактор HTML, который поможет пользователю подготовить HTML-код для вставки в поле название.
To add a new language: Create or import new label set(s) -> Languages -> select the languages you wish to add.
To start translating the labels into another language, select the language in which you would like to translate the labels to from the upper part of the matrix.
Управление загруженными ресурсами
In our case, the language from where the label codes and assessment values can be changed is English. Only the label description can be edited when the Romanian tab is selected - which represents the corresponding Romanian label translation of the English label.
Once you are done with the changes, do not forget to click on the 'Save changes' button located in the upper-right part of the screen.
Данная вкладка позволяет Вам управлять файлами (картинки, медиа-файлы) которые загружены в HTML-редакторе.
For a better understanding of the label sets option, let's take a look at the following examples:
- I want to use a label set as an answer list for one question;
- I want to use labels in another language as answers;
- I want to use emoticons instead of label text;
- I want to import a label set and use it as a subquestion list.
I want to use a label set as an answer list for one question
Assuming that the label set and survey are created:
- Go to the structure of the survey and create a question group - About LimeSurvey.

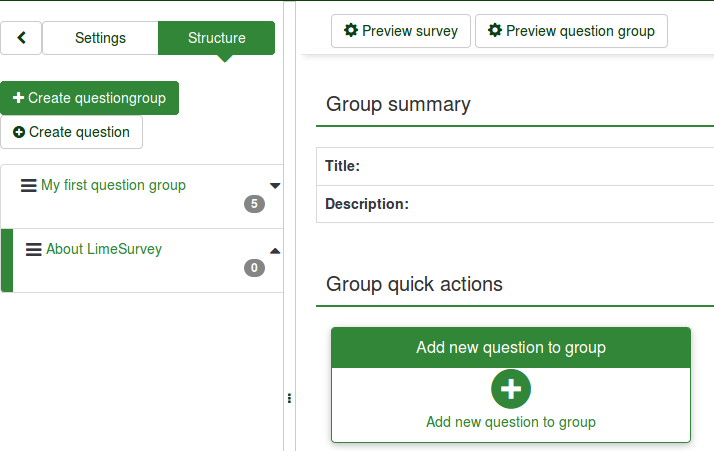
- Click the Structure tab and then on the newly created question group (About LimeSurvey in our case). Look for group quick actions and choose Add new question to group:
- Type in the code and text of the question.
- To use a label set as a set of answers, pick the right type of question that can make use of label sets. The array question type is selected in our example:

- Save the question to add it into your question group.
- Once created, you will have to add subquestions and answers:

- Add at least one subquestion:

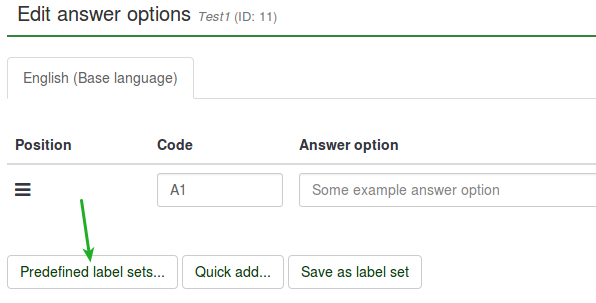
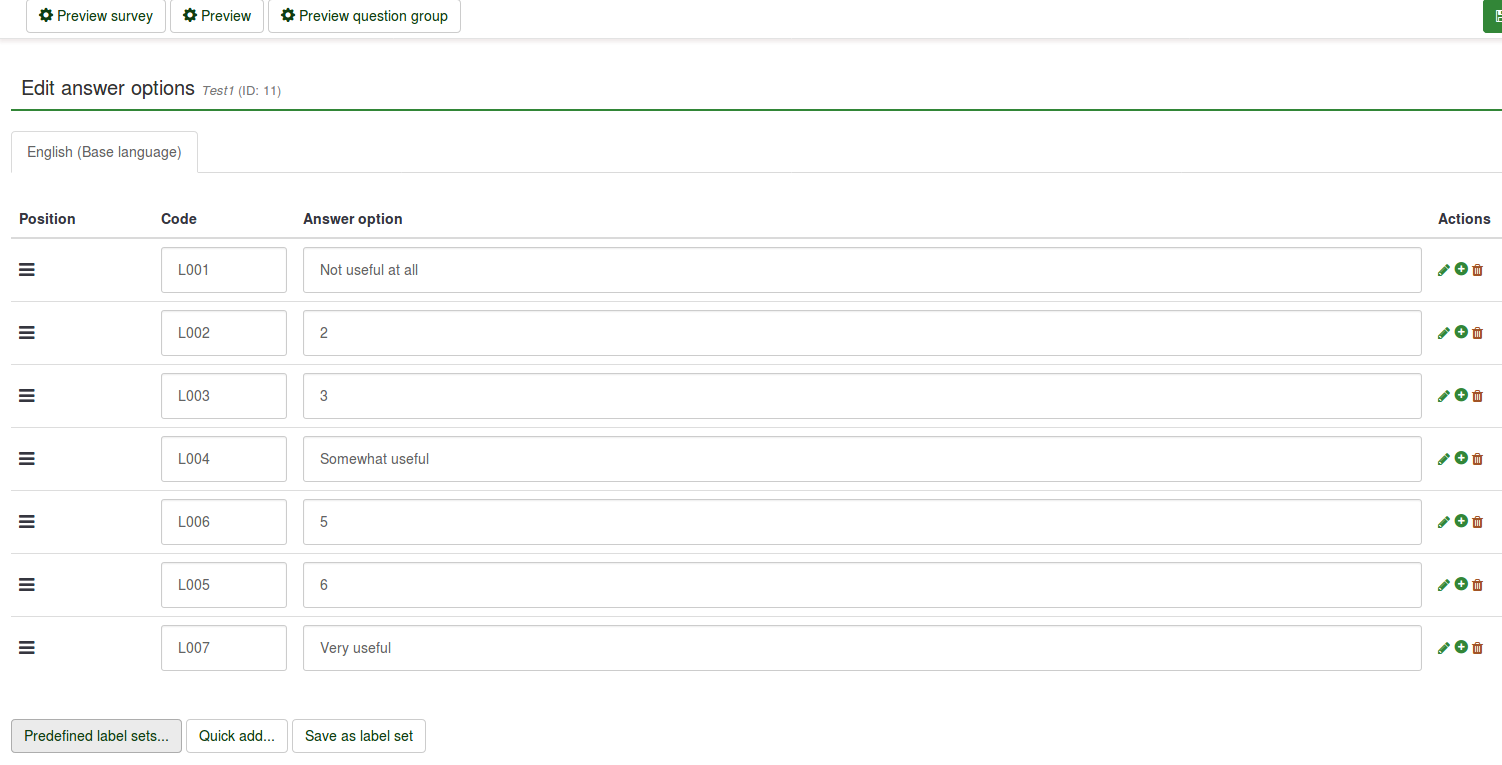
- Add answer options. Predefined label sets... option will be used:
- Select the label set you want to use:
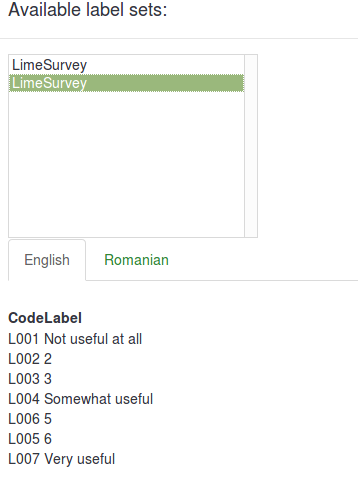
The result should look like this:
- Save & preview the question:

I want to use labels in another language as answers
- Create a label set and select the other languages you would like to use in your survey. For further details, read our wiki on how to translate a label set in other languages.
- Edit your survey (Settings -> General Settings) by adding the additional languages you want to translate to. For more details on how to create a survey, read the following wiki.
Assuming that the label set and survey are created:
- Create a question that can make use of label sets (e.g. array question type):
- Because the array question type is selected, both the subquestions and answers need to be translated.

- Translate the subquestions. Do not forget to select the right language tab for translation:

- Translate the answers. However, because we use predefined label sets, select the right language tab to add the translated label set as answer options:
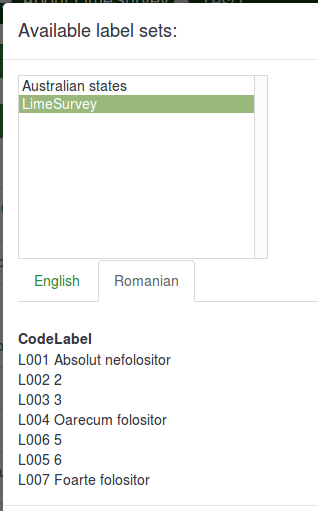
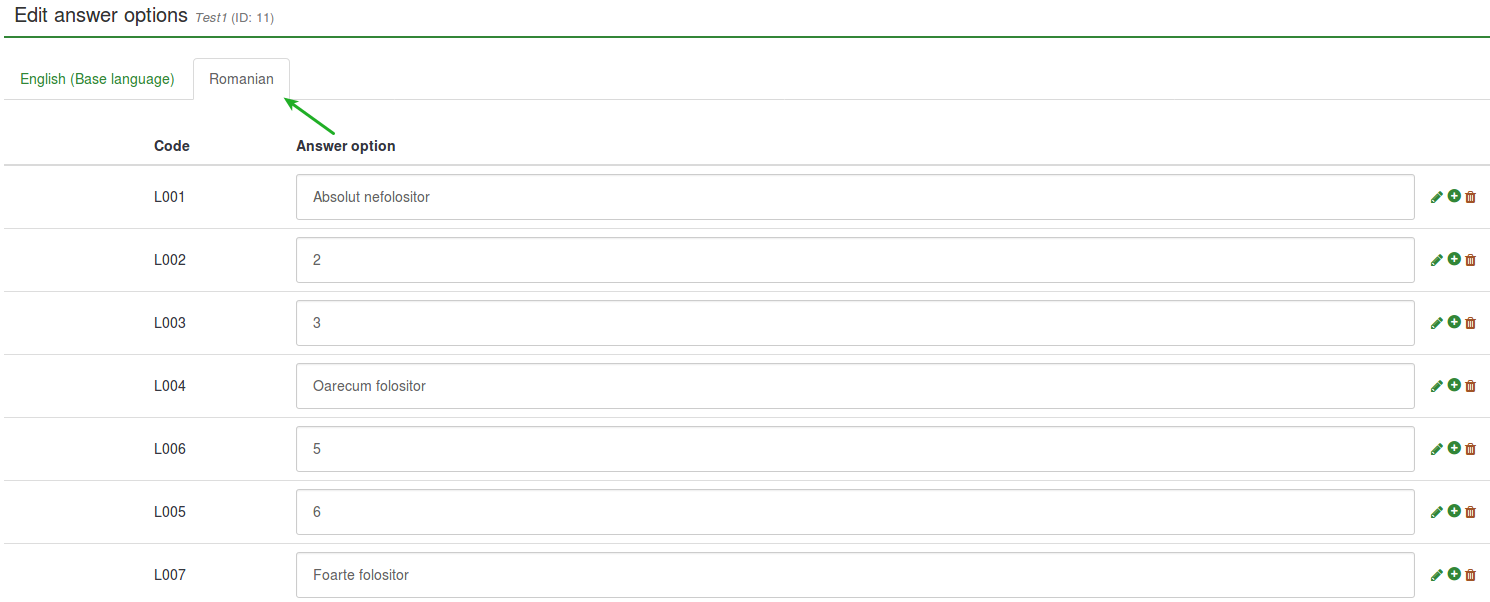
- Save & Preview the survey:

I want to use emoticons instead of label text
Assuming that the survey is created:
- Create a label set and access it. Instead of writing in the Title column, open the HTML editor by clicking on the green pen and add graphics instead of text:


The HTML editor offers you a more comprehensive view on how different options can be used to enhance your survey. It is not necessary to have HTML knowledge because the toolbar is self-explaining (for further details you can either hover the mouse over the options or click on that option for more details). By using such an editor, you can also add (for example) smileys, images and/or videos that are either hosted online or on your server.
In this example. three smileys have been added:

- Create a question that can make use of label sets as predefined answers (e.g. array question type):
- Edit the subquestions and the answer options

- Set predefined labels as answer options.

- Save and preview the question:
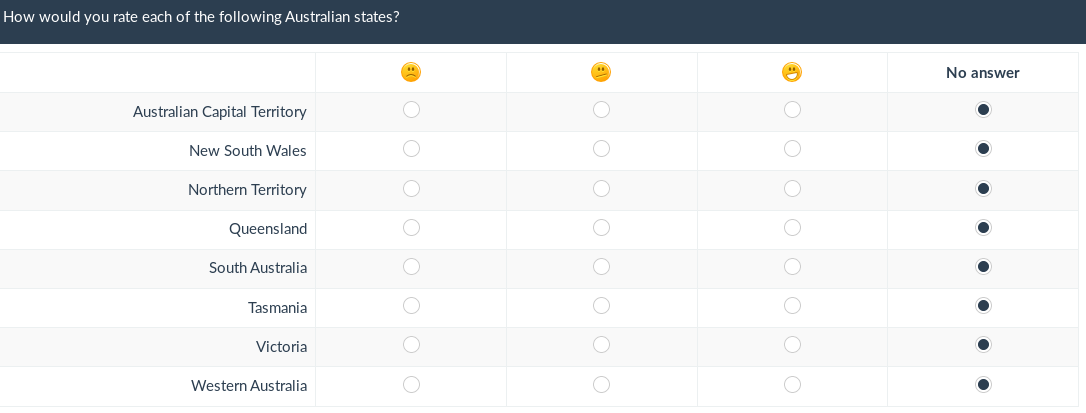
I want to import a label set and use it as a subquestion list
Assuming that the survey is created:
- Go to Configuration and click Manage label sets button.
- Click Create or import new label set(s) (in the upper-left side of the screen) -> Import label set(s). Browse your computer and select the .lsl file (the label set format).
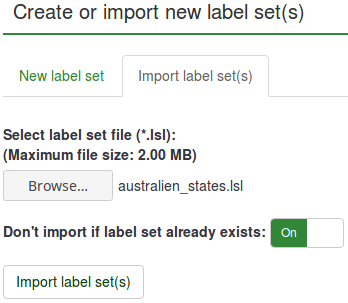
- Now that the label set was uploaded, create a question that requires the usage of subquestions (array question types).
- Edit subquestions.

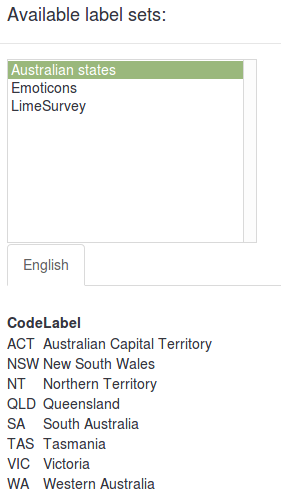
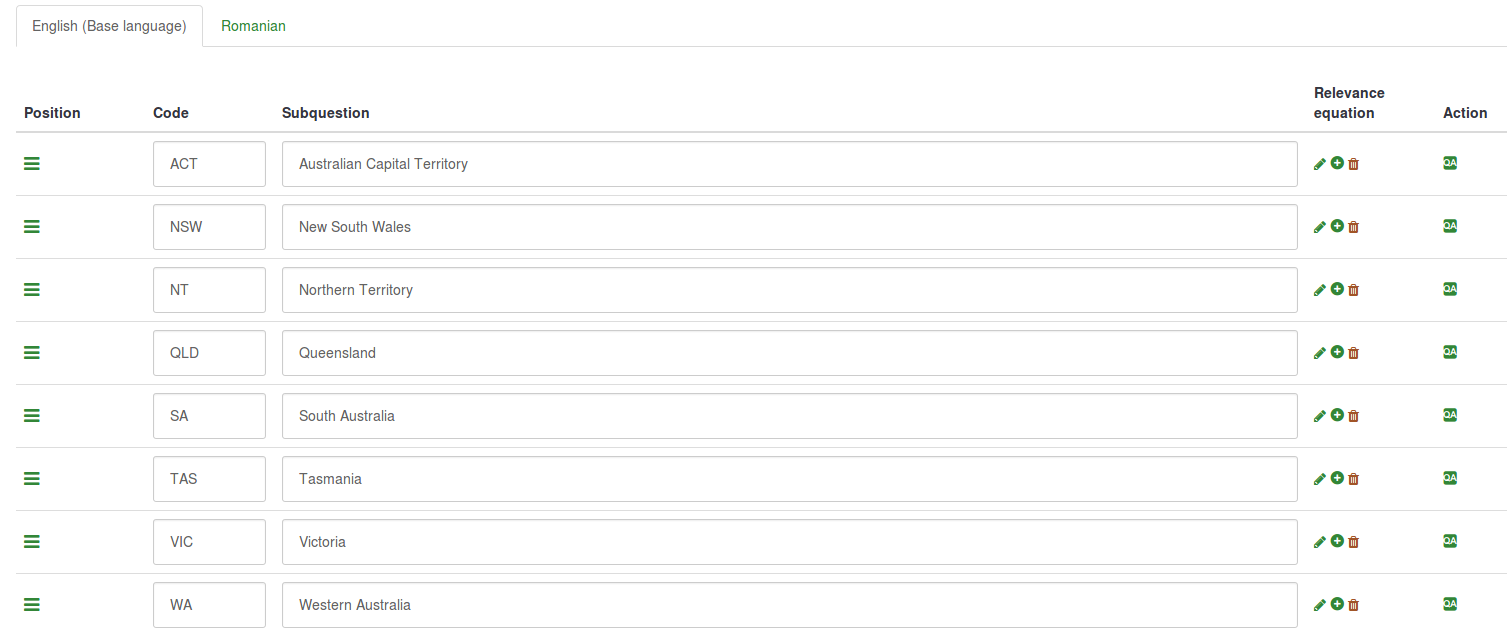
- Load the imported label set:
- Save and preview.
