Export responses/ja: Difference between revisions
From LimeSurvey Manual
Bravehorse (talk | contribs) (Created page with "{{Note|わかりやすいGUIでRでデータを操作するには、[https://www.rstudio.com/products/rstudio/download/ RStudio](無料のオープンソースソリュー...") |
Bravehorse (talk | contribs) (Created page with "選択肢が限定された質問の回答は、質問のコードと一致するラベルと選択肢と一致するラベルに分解されます。") |
||
| Line 100: | Line 100: | ||
選択肢が限定された質問の回答は、質問のコードと一致するラベルと選択肢と一致するラベルに分解されます。 | |||
Questions with "other" as an option will have the question field with _Other appended as a new column for the other data. | Questions with "other" as an option will have the question field with _Other appended as a new column for the other data. | ||
Revision as of 01:15, 18 February 2019
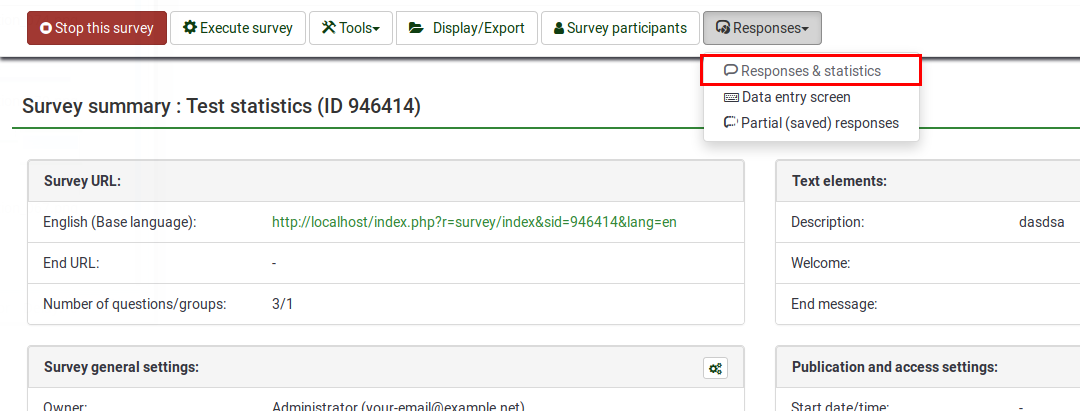
アンケートをアクティブにしたあとは、回答の閲覧、分析用にエクスポートすることができるようになります。エクスポート機能にアクセスするには、(アンケート関連パネルに表示される)回答をクリックし、次にドロップダウンメニューから回答と統計をクリックします。
回答概要ページが読み込まれます。ここで、一番上のツールバーにある エクスポートオプションを探します。
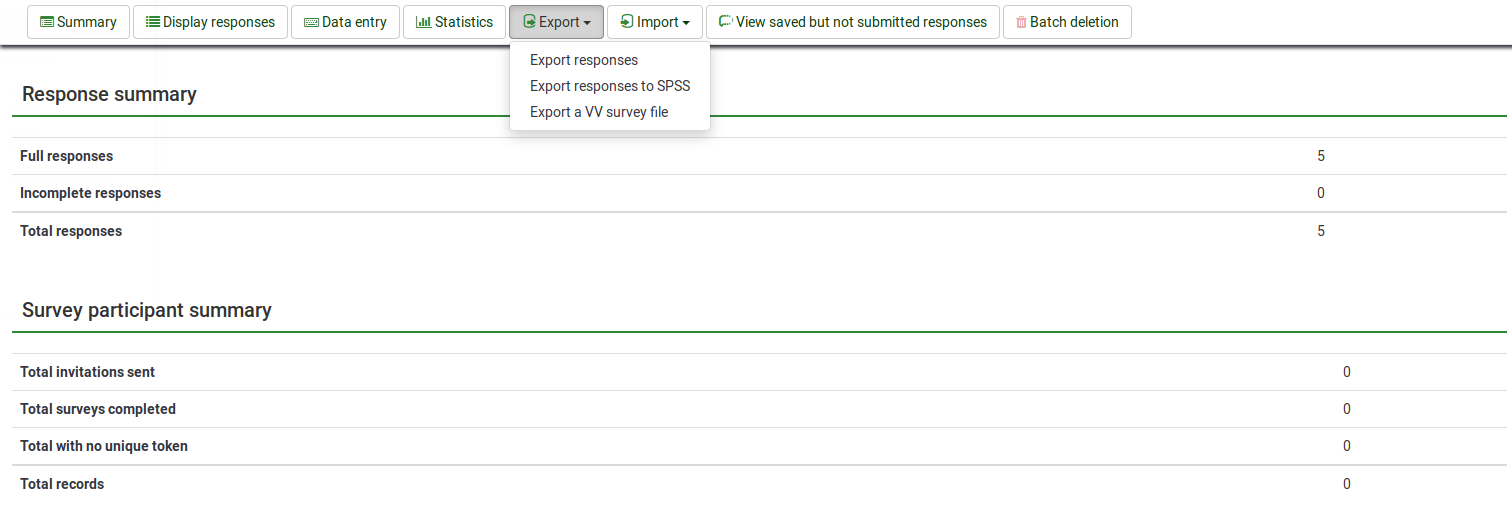
いくつかのオプションがあります。
回答の出力
次のパネルは、ドロップダウンメニューから最初のエクスポート関連オプションが選択されたときに表示されます。
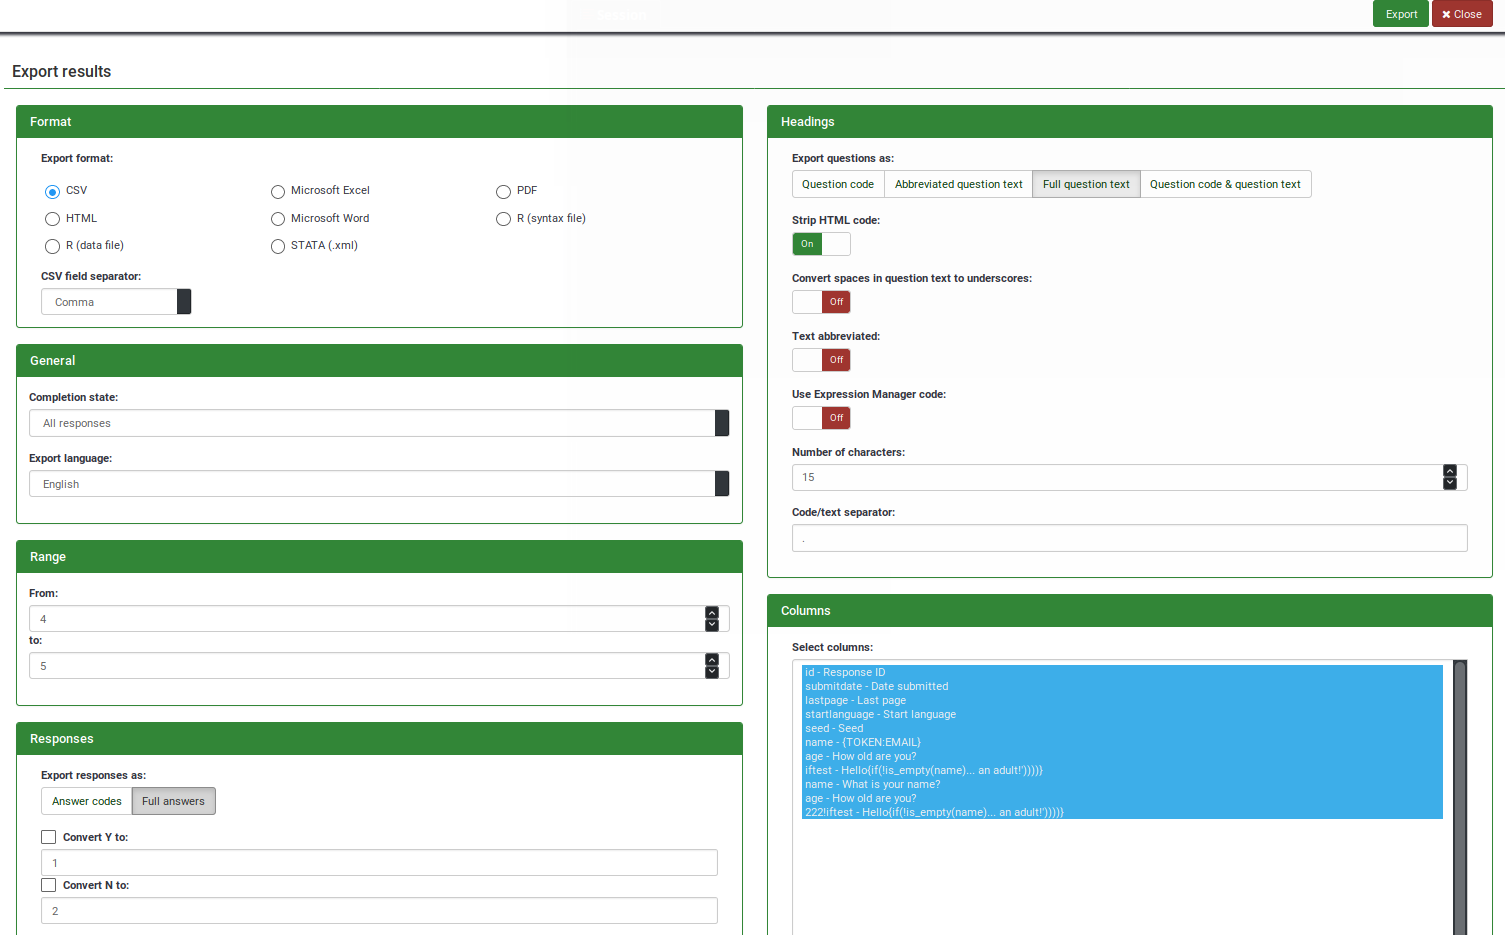
フィルタオプションは次のように分かれています。
- 出力形式: 結果を出力する形式を選択します。以下の出力形式が利用可能です。
- CSVファイル(すべての文字セット): フォーマットタブの下段にある"CSVフィールド区切り"オプションと合わせて設定してください。既定は"コンマ"です。そのほか、"セミコロン"、"タブ"があります。
- HTML
- R(データファイル): このオプションを選択する場合は、R(シンタックスファイル)も併せて出力してください。Rでデータを分析する方法の詳細については、こちらのウィキセクションを参照してください。
- Microsoft Word(ラテン文字セット)
- Microsoft Excel(すべての文字セット)
- STATA(.xml): STATAでデータを分析する方法の詳細については、こちらのウィキセクションを参照してください。
- R(シンタックスファイル): このオプションを選択する場合は、R(データファイル)も併せて出力してください。Rでデータを分析する方法の詳細については、こちらのウィキセクションを参照してください。
- 全般
- 完了状態: 全ての回答、完了された回答のみ、未完了回答のみから選択します。それぞれの意味については、こちらのウィキセクションを参照してください。
- 言語エクスポート: 既定のオプションはアンケートのベース言語です。
- 範囲: 回答テーブルに保存されている回答IDを指定します。回答を出力する際、入力した値に問題がある場合(範囲内のIDがないなど)、テーブルに存在するIDを入力するようポップアップが表示されます。
- 回答
- 回答を出力: 回答をそのまま出力するか回答コードに変換して出力することができます。後者を選択すると、回答者が送信した回答は、それぞれの回答コードに置き換えられます。"はい"と"いいえ"の回答は、どのような表現であっても"Y"、"N"に変換されます。 "Y/Nを次の文字に変換"を使用すると、Y/Nで表現される回答コードは、対応するボックスに入力された文字列に変換されます。既定では、Yは1、Nは2となっています。
- 見出し
- 質問を出力: 出力ファイルの見出しを設定します。以下のオプションで選択します。
- 質問コード
- 簡略化された質問のテキスト: このオプションを選択すると質問の長さが短くなります。長い質問を扱うときに役に立ちます。
- 質問テキスト全文(既定)
- 質問コードと質問テキスト
- ストリップHTMLコード: 質問のテキストボックスで使用されているHTMLを出力しないよう、既定ではオンになっています。
- 質問テキストのスペースを下線に変換します: 既定ではオフになっています。オンにすると質問テキストのスペースが下線に変換されます。
- 短縮テキスト: 既定ではオフになっています。オンにすると、質問テキストが短縮されます。質問テキストの長さは、"文字数"に入力した数値で指定します。見出しとして"質問テキスト全文"や"質問コードと質問テキスト"を選択したときに出力される質問テキストを短縮することができます。
- EMコードを使用: 既定ではオフになっています。オンにすると、質問とサブ質問がExpressionScriptで使用したもので出力されます。したがって、見出しは、Qcode変数の命名に従います。本設定を使用するには、見出しとして"質問コード"か"質問コードと質問テキスト"を選択する必要があります。
- 文字数 見出しに表示される最大文字数を設定します。このオプションは、質問として短縮テキストを出力するときに機能します。既定値は15です。
- コード/テキスト区切り: 質問のコードとテキストを区切る文字を指定します。既定では、"ピリオド"+空白文字(<SPACE>)です。
- 質問を出力: 出力ファイルの見出しを設定します。以下のオプションで選択します。
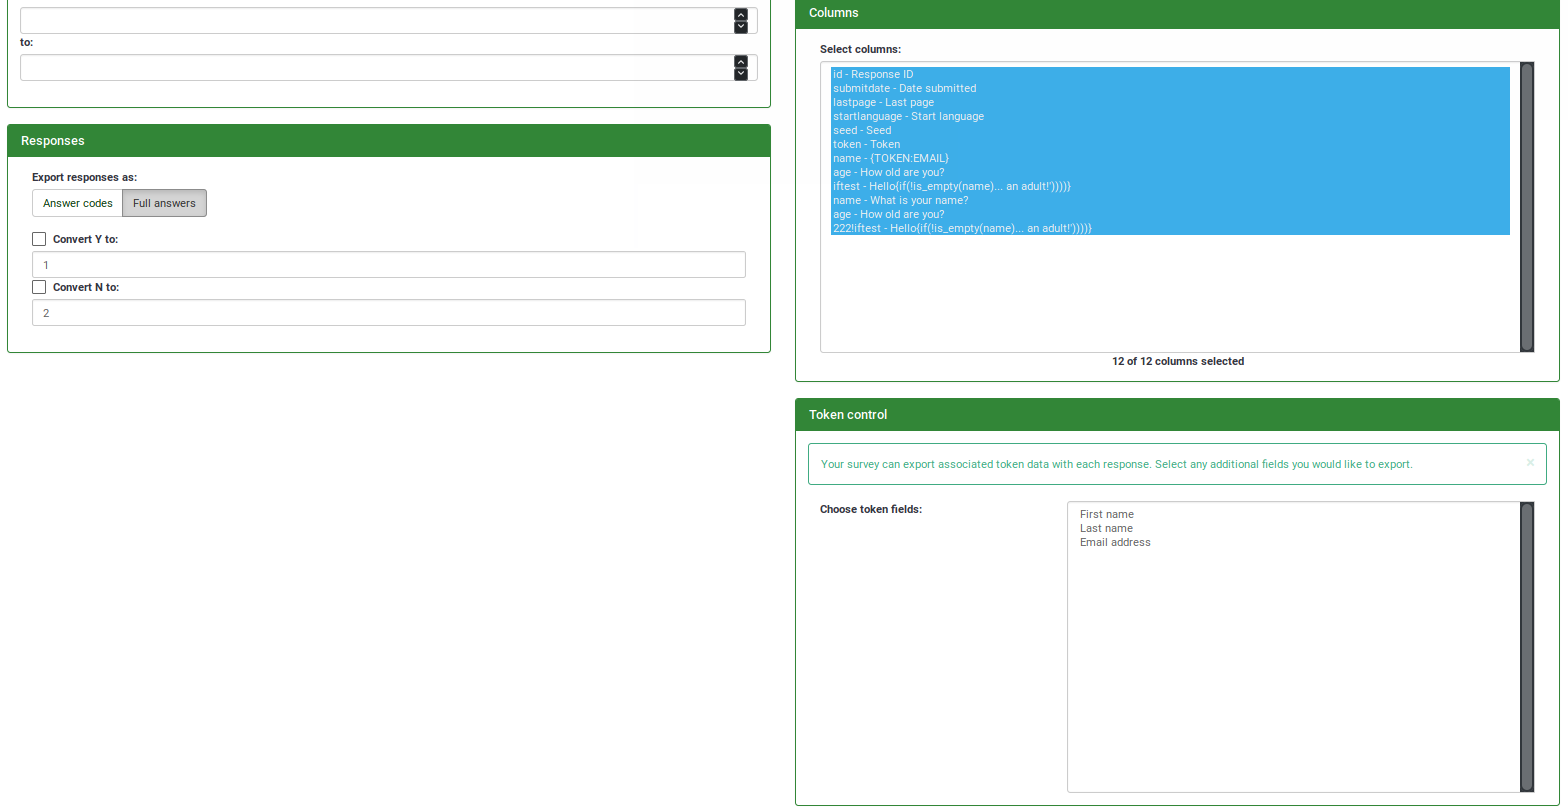
- カラム選択: 出力する質問(と対応する回答)を選択します。質問コードと質問テキストがリストに表示されます。既定では、すべてのカラムが出力されます。複数のカラムを選択するには、CTRLやSHIFTキーを使用します。
R形式での出力
フリーソフトウェア環境のRは、統計計算とグラフィックスに使用されるSPSSの代替手段です。
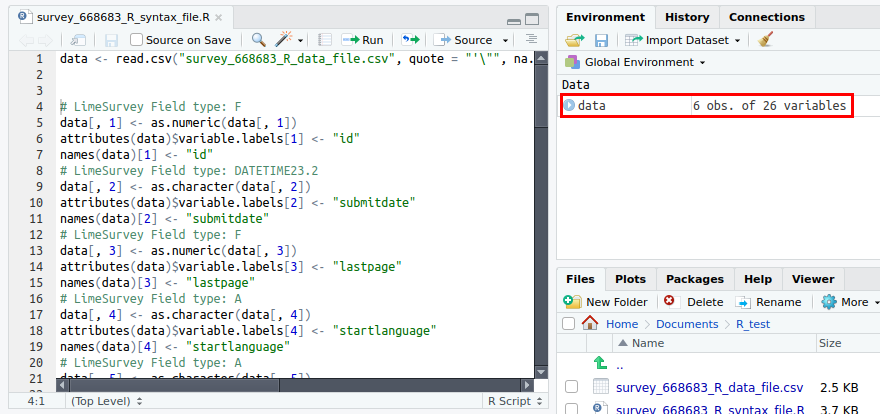
データセットをRにインポートするには、以下の手順に従ってください。
- シンタックスファイルとデータファイルの両方をダウンロードします。
- 両方のファイルをRの作業ディレクトリーに保存します(作業ディレクトリーを取得・設定するには、Rのコマンドウィンドウでgetwd()やsetwd()を使用します)。
- Rコマンドウィンドウで
source("File_name_syntax.R")と入力します。"data"というデータフレームに正しい形式でインポートします。
選択肢が限定された質問の回答は、質問のコードと一致するラベルと選択肢と一致するラベルに分解されます。
Questions with "other" as an option will have the question field with _Other appended as a new column for the other data.

STATA-xmlでの出力
STATA is a commercial data analysis and statistical software package.
This export routine was created to facilitate rapid analysis of data collected with LimeSurvey. It creates an XML-file in STATAs proprietary format. This format offers several advantages over importing plain CSV files:
- Data sets are fully labelled including variable labels (question, subquestion) and value labels (answers, if applicable).
- Dates are already transformed to STATAs internal date format and thus can directly be used to calculate differences between days etc.
- Variable names are, if necessary, converted to a STATA compatible format.
- Data formats of variables (string, integer, float, etc.) are already set according to the underlying data (no more numbers encoded as strings!).
How to load the file in STATA:
- In STATA's menu, click on File, Import, xml-data
- Choose browse to navigate to your exported file and click 'OK'.
- Due to a limitation in STATA's data format, the length of string (text) variables have a maximum of 244 characters (Stata versions 8-12) and 2045 characters (Stata version 13 and above). Please indicate your Stata version in the settings of the export plugin:


- STATA only supports attaching value labels to numerical values. So, to achieve short answers (usually one or two digits) and have these properly labelled, one should use numerical answer-codes in LimeSurvey (1=Totally agree). If non-numerical answer codes are used (A=Totally agree), then the complete answer text will be used as answer (eg., 'Totally agree').
回答をSPSSへ出力
SPSS Statistics is a software package used for logical batched and non-batched statistical analysis. You can use the official SPSS package or GNU PSPP replacement for the proprietary program SPSS.
To export your response data to SPSS, go to Responses & statistics section and select the SPSS-corresponding option located under the Export menu:

The following page is displayed:

The following options are displayed in the panel:
- Data selection: you can select which data should be selected for export: all responses OR only complete responses OR only incomplete responses
- SPSS version: check your SPSS installation version. Two different export options can be chosen: prior to version 16 and 16 or up
- Language: acts like a filter that allows you to filter the exported responses based on the language used to fill out the survey
- Limit: type in any numerical value to get exported only the first "n" entries from your response table
- Offset: type in any numerical value to get exported your response table without the first "n" entries from your response table
- No answer: if left empty, an empty string is stored as answer for the questions that have not been answered by respondents. Type in this box any string of characters to replace the empty string. The set of characters will be displayed in the exported .dat file
SPSS export includes two files:
- a syntax file (survey_xxxx_SPSS_syntax_file.sps)
- and a data file (survey_xxxx_SPSS_data_file.dat).
After having downloaded these files you can open them using a raw text editor like notepad to take a look how the exported data looks like. The syntax file holds the commands that should be run to import the data. It is like a programming language inside SPSS. The .dat file contains a comma separated file with all data. We recommend you not to import your data as csv because there is the risk of loosing information about questions, label sets, and so on.
SPSSへのLimeSurvey回答インポート
To import your data to SPSS, pursue these steps:
- Download the data and the syntax file.
- Open the syntax file in SPSS in Unicode mode.
- Edit the 'FILE=' line and complete the filename with a full path to the downloaded data file.
- Choose 'Run/All' from the menu to run the import.
- Done
VVExport
Once you've begun collecting responses, there may be occasions where you need to be able to directly edit and modify large quantities of data from your responses table (where a spreadsheet tool may be more useful).
VVExport (the "VV" stands for vertical verification) allows you to export your responses table into a .csv file. So long as the general structure of the file remains intact, you can then edit values within it, and then import the file again into your responses table using the "VVImport" feature.
It is often used in three scenarios:
- In the first one, it is used to combine large amounts of data in one LimeSurvey installation. Imagine that you run two similar surveys on two different machines. In order to combine the two response tables, you will have to use VVExport, VVImport, and a third-party app (e.g., spreadsheet apps) to combine your data and put it on one LimeSurvey installation.
- It may also be used to edit the response table of a survey. For small edits, you can access the response table and edit the desired answers. Still, for "macro-editing", VVExport and VVImport are recommended because a spreadsheet program can help you quickly edit dozens of responses at the same time.
- A "vv survey file" allows you to import the responses to a survey when the question/answer combinations have changed. Effectively, this allows you to add or remove questions in an active survey. To add, remove or edit questions, you have to deactivate your survey, do the changes, and then activate it again. The old response table that was created as a result of the response table deactivation can be imported into the newly activated survey by selecting Import -> Import responses from a deactivated survey table. For more details, check this wiki subsection.
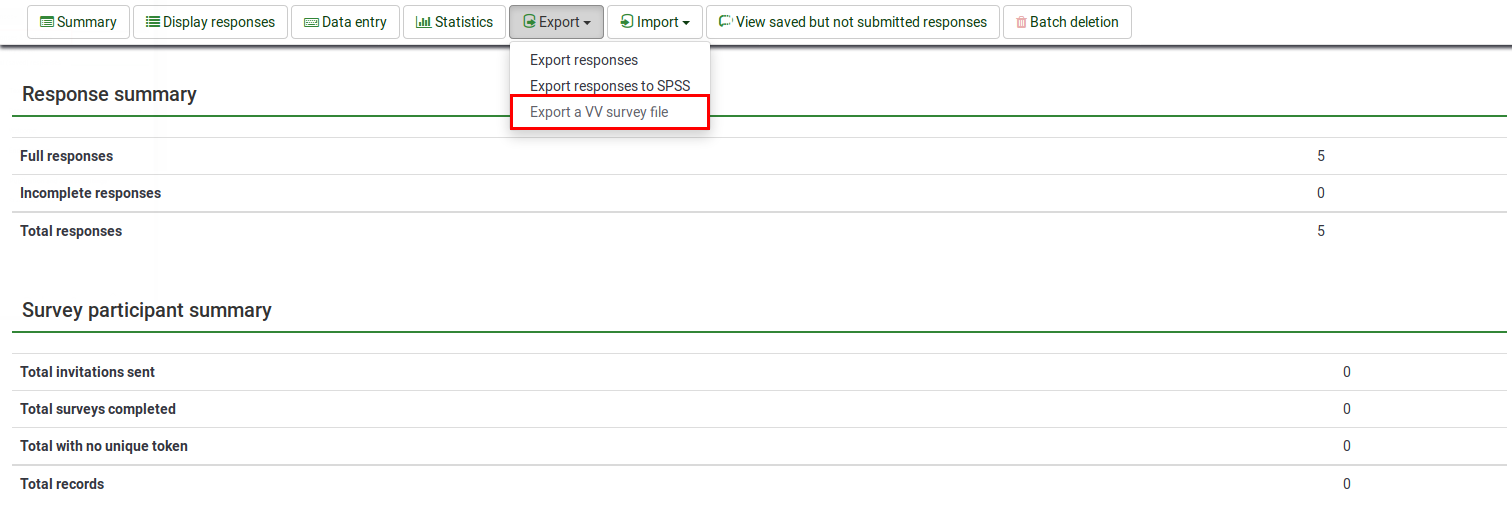
To export your data via VVExport, go to Responses & statistics section and select the VV-corresponding option located under the Export menu:
The following page will be loaded:

- Survey ID:: The ID of the survey to be exported
- Export: The completion state of the responses to be exported:
- Completed responses only: if a respondent reaches the last page of a survey and clicks the Submit button, then his or her response is marked as being complete
- Incomplete responses only: if a respondent does not click on that Submit button located before the end page, then the response is marked as being incomplete
- All responses: export both completed and incomplete responses
- File extension: The file extension. The file is a TSV (tab-separated values) file. For easy opening in MS-Excel set the extension to .txt. If you use LibreOffice, OpenOffice or any other spreadsheet program, you can leave it to .csv (default format)
- VV export version: The 1.0 version (Old VV version uses database column headers, version 2.0 (Last VV version) uses Qcode Variable Naming. Version 2.0 is selected by default if all of your question code are unique.
- If you want to import responses using "VVImport" make sure to check whether the responses should be added to the existing responses or all responses should be overwritten.
- If you are trying to import responses from a different yet identical (e.g., identical questions/answers from another survey), make sure you are using the correct vv file and that the first two lines of the .csv file are correct.
- If you import a survey to your LimeSurvey installation the SID will not change (if possible). The group id and question id however might change. So you might have to adjust the first two heading lines to match the new group id/question id.
VVアンケートファイルを出力
When you choose to export responses using VVExport, you will be given the option to choose whether you want to export all responses or complete responses only or incomplete responses only. The file extension allows you to choose which extension the exported file will have. For easy use, .csv should be chosen.
The first two rows of the spreadsheet/tab-delimited file are the column labels. The first row is a "human readable" column heading that details the name of the question/answer field. The second row is the internal PHP/database column name for that response.
You should not modify the first two rows of this spreadsheet if you want to be able to "import" the data back into LimeSurvey at a later point.
VVファイルの構造 - 例
VVバージョン1 TSVファイル
Response ID	Date submitted	Last page	Start language	Token	please vote from 1 to 6 (1 - super, 6 - worst)
id	submitdate	lastpage	startlanguage	token	46492X40X1991
183	09.11.11 11:44	3	de	jsfhusdgqfygqsy	4
184	09.11.11 11:53	3	de	sdfhsifgsyergze	2
190	09.11.11 11:44	3	de	qsdqshkfhkdsjhj	1
VVバージョン2 TSVファイル
Response ID	Date submitted	Last page	Start language	Token	please vote from 1 to 6 (1 - super, 6 - worst)
id	submitdate	lastpage	startlanguage	token	QCODE
183	09.11.11 11:44	3	de	jsfhusdgqfygqsy	4
184	09.11.11 11:53	3	de	sdfhsifgsyergze	2
190	09.11.11 11:44	3	de	qsdqshkfhkdsjhj	1
In this example, the SQGA identifiers are not used - instead, the Qcode variable naming QCODE is used in the second line.
We generally recommend our users to use question codes since they are much easier to be used (it represents an addition to the SGQA system used in the earlier versions of LimeSurvey.
予約名
A .vv file uses left and right brackets for reserved names. When importing, this string is replaced by:
{question_not_shown}: NULL value in database. LimeSurvey uses [empty string] for not answered question, and NULL value for questions not shown.{quote}: " (a double quote){cr}: Carriage return{newline}: A new line{lbrace}: Left bracket (for example, if you want to have {cr} in response : use{lbrace}cr})
VVアンケートファイルの編集
When a .vv file has been successfully exported you can use a spreadsheet tool to open and edit the file. If you have to choose a column separator when opening the file please use the "Tab" character. If you are using non-ASCII characters make sure you set "UTF-8" as character set.
If you simply wish to simply edit your data, then be careful at the first two columns so that you can later easily VVImport your data back into your LimeSurvey installation!
If you combine data from two different surveys, please note that the old VV version uses SGQA which will most probably give you different "question ids". Therefore, be careful how you merge the data!
The alternative would be to use the last VV version because question codes can be constant throughout different LimeSurvey installations (if you use the same survey structure across multiple LimeSurvey instances).
When importing the VV file, if two response IDs match and the Exclude record IDs is disabled, you can make LimeSurvey:
- Report and skip the new record
- Renumber the new record
- Replace the existing record
- Replace answers in file in the existing record
その他の出力オプション
In case you do not need to export the whole survey, you can also choose to export only:
単一の回答を出力する
If you want to export an individual response, you can do it in two ways:
1. Login to LimeSurvey, choose your survey, click on Notifications & data tab and make sure you receive basic email notifications:
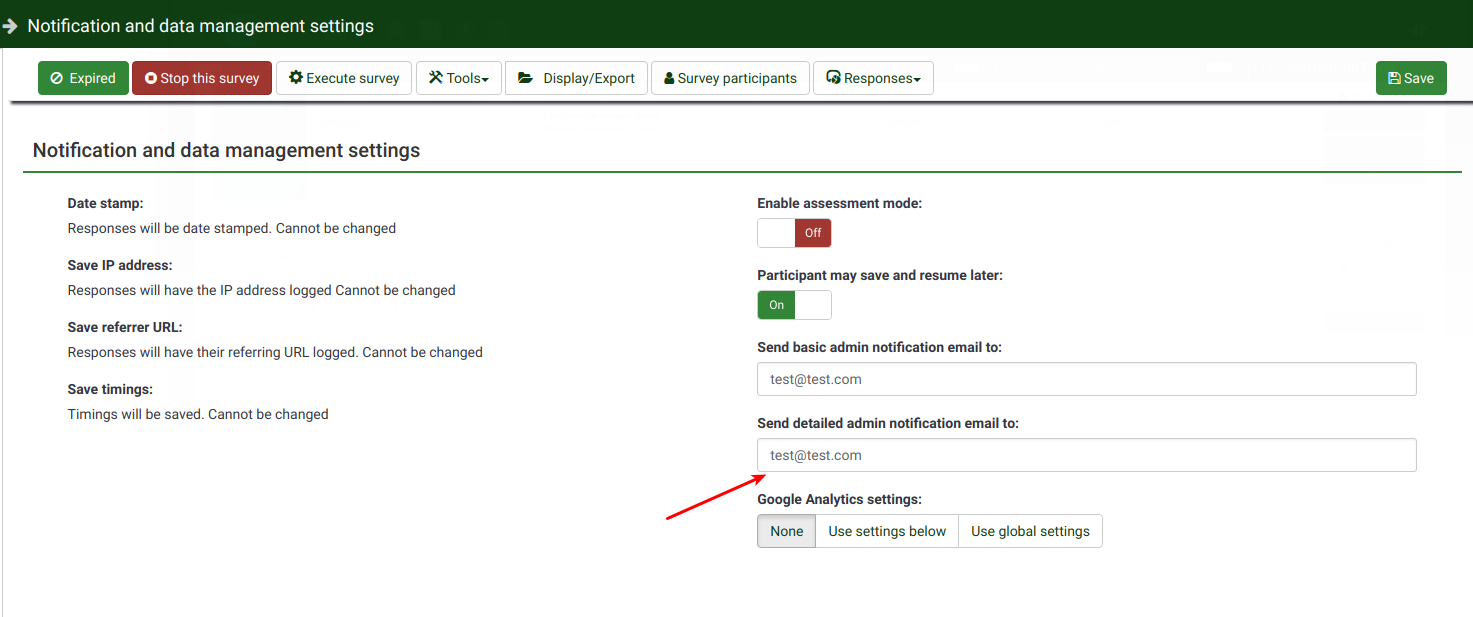
Every time someone has completed a survey, you will receive an email with a link: "Click the following link to see the individual response". This will take you to a page with a button above the response data saying "Export this response":

Choose how the single response will be exported:

2. Login to your LimeSurvey installation/instance, choose your survey. Select tab Responses located under the settings tab:
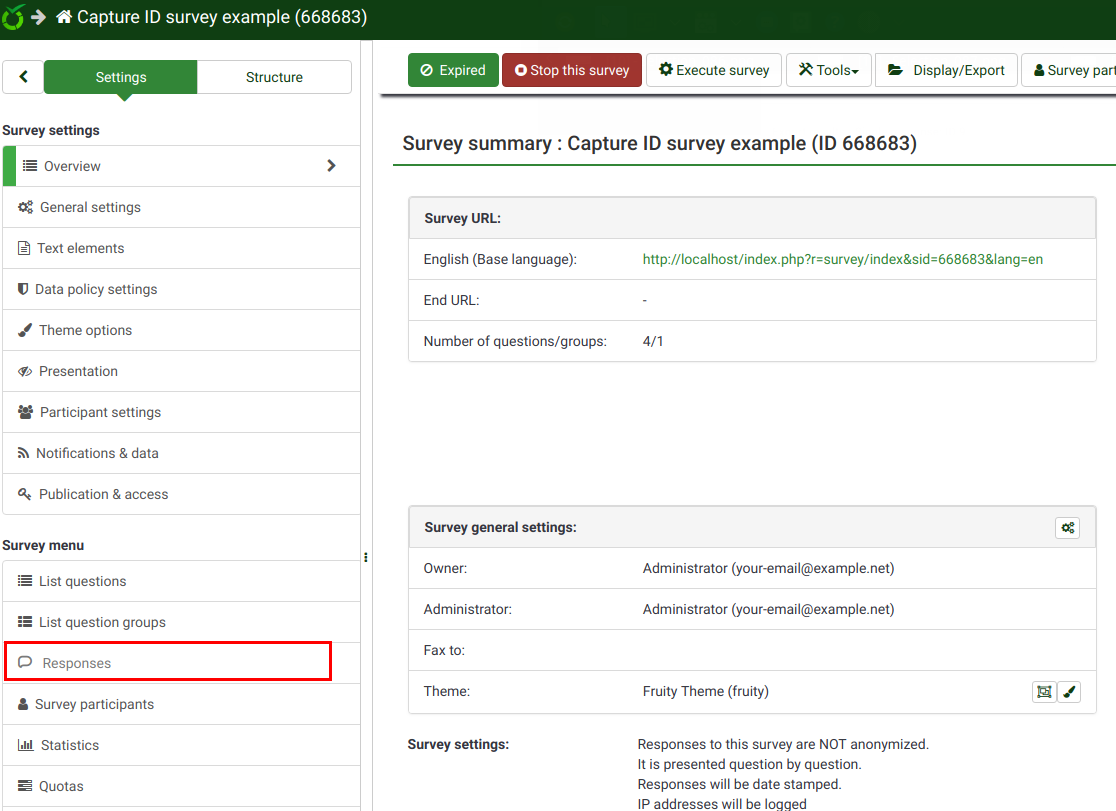
See the "action" column. Hover the mouse over each option and see which one allows you to see the response details (the first button):
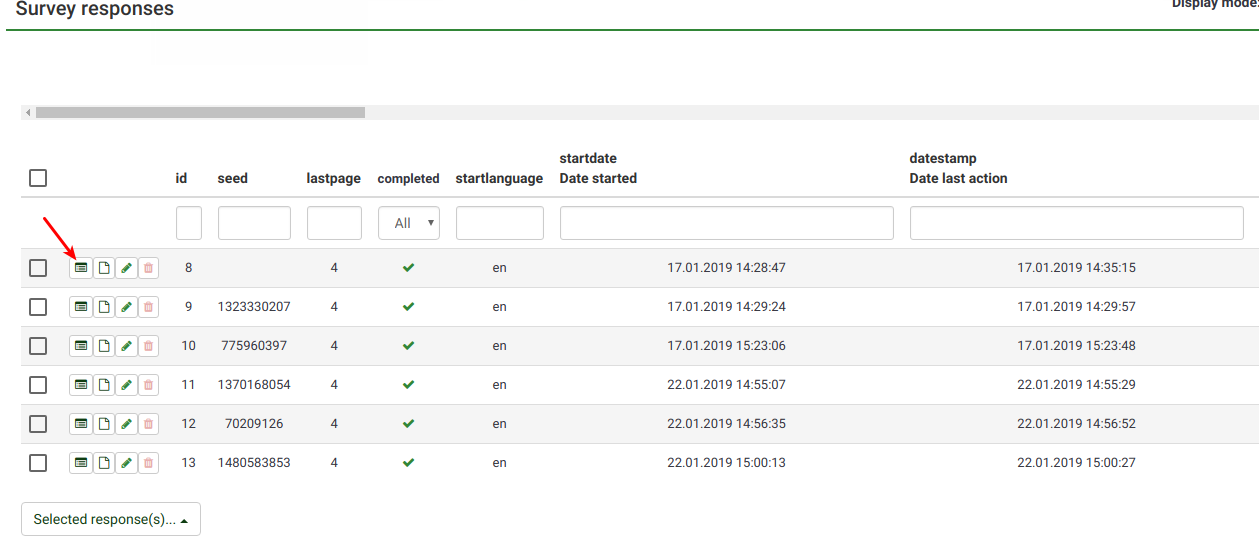
The response entry will be loaded. Click on the "Export this response" button. You will be redirected to a panel from where you can select how the exported file should look like:

As you can observe, you can also export the response as a pdf file:

This option is usually needed when you wish to share to one of your respondents his/her results. In the case in which you wish to share only certain parts of his/her answer, check the pdf export option located in the Statistics panel. In this way, you can hide your hidden questions and/or different assessments you run "in the background".
回答のグループを出力する
This option is useful in the case in which you wish to export a certain group of filtered responses.
To do it, access your Responses table table:

You can either order the responses according to the value from each column by clicking on the column label or you can type in the empty boxes located below the column labels a string of characters according to which you wish your data to be filtered to.

Once done, your table should look like the one below. Now, tick all the filtered responses, click on the Selected response(s)... button located in the bottom left side of the response table, and select the Export button:
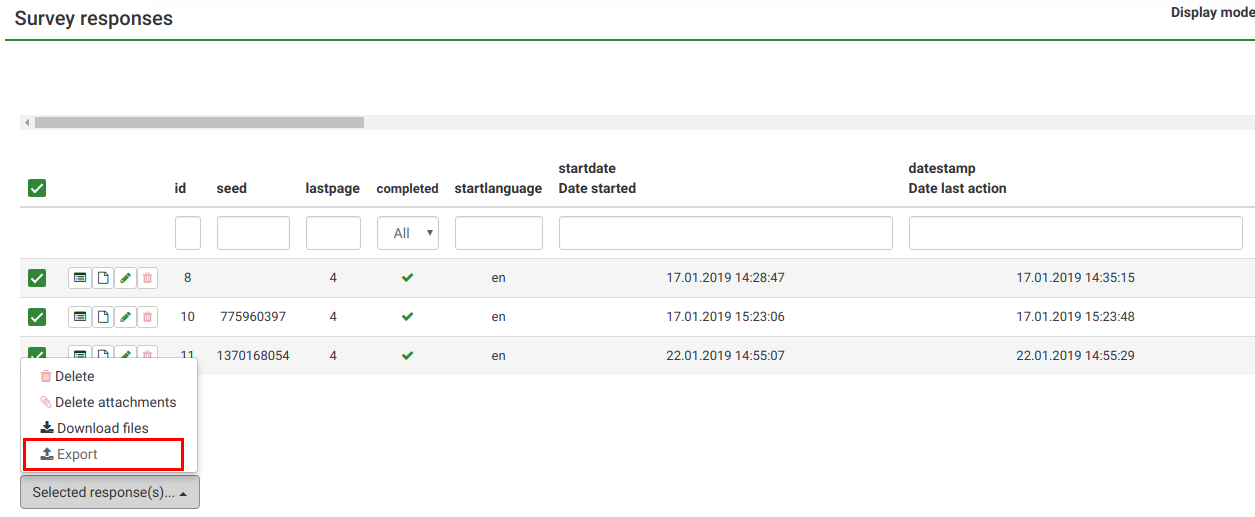
The export responses pages will be loaded:
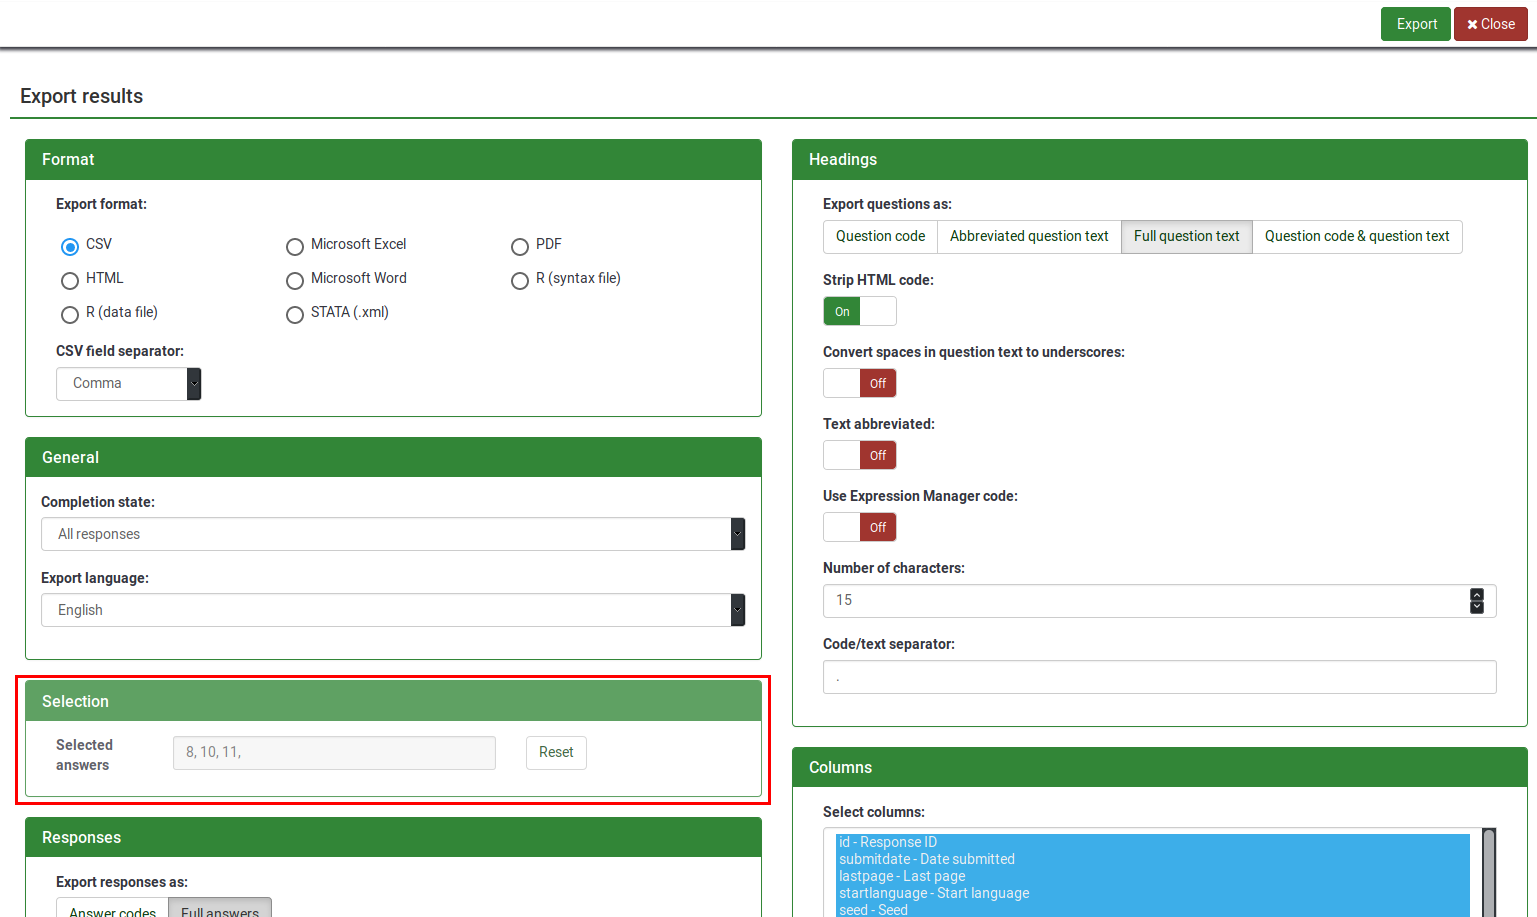
The Range column is not displayed since you have already selected the entries you wish to export. To check those IDs, check Selection (see the above screenshot). You can click on Reset if you wish to export all your data instead.
