テーマエディター
From LimeSurvey Manual
はじめに
LimeSurveyには、アンケートの外観を効率的にカスタマイズできる高度なテーマとスタイルのシステムがあります。LS3以降、以前のバージョンで"テンプレート"と称していたものを"テーマ"と呼びます。テーマは、アンケート中のページの見た目をコントロールします。アンケート管理者は、既定のテーマを選択し、個々のアンケートをカスタマイズし、見た目を改善することができます。テーマには、プログラミングのスキルを要することなく、ようこそ画面にロゴを追加したり、背景色を変更したり、フォントを選択したりできるオプションがあります。
LimeSurveyには、初期状態で3つのテーマがあります。これらの初期テーマは、"themes/survey/"ディレクトリーにあります。それぞれのテーマは個々にディレクトリーを持っています。テーマのメインディレクトリーには、XMLで記述された設定ファイルのほか、themes (.twig)、cascading style sheets (.css)、scripts、images ('.jpg or .png)など多くのディレクトリーがあります。
LimeSurvey 2.50以降、テーマエンジンはCSSフレームワークとして、Bootstrap 3を使用しています。Bootstrap 3は標準的なフレームワークなので、開発者はインターネットで関連のドキュメント、チュートリアル、フォーラムスレッドを利用することができます。
LimeSurvey 3以降、テーマエンジンは、Twigを使用しており、テーマ開発者は安全かつ簡易な方法でアンケートレンダリングのロジックを変えることができます。Twigは、以前のバージョンで使われていた置換キーワードシステムに代わるものです。キーワードのHTMLを生成するために使用されるロジックは、テーマビューの中で利用できます。
Vanillaテーマのスニペット:
<div class="{{ aSurveyInfo.class.answercontainer }} col-xs-12" {{ aSurveyInfo.attr.answercontainer }}>
    {# NOTE: If you want to customize the question rendering, use a question theme #}
    {{ aQuestion.answer | raw }}
</div>
テーマは、HTMLとTwigコードからなり、表示されるテキストの位置と形式、ページの同様の構造的特徴を定義します。テーマには他のファイルを参照したり取り込んだりすることが多くあります。ほとんどの場合、アンケートのすべてのページで共通に利用するフォントスタイル、色、背景や同様のパラメーターについて定義したカスケーディング・スタイル・シート(CSS)ファイルを参照します。スタイルシートは、HTMLコードに含まれる様々なオブジェクトタイプに関連づけられたクラスパラメーターを参照します。これにより、スタイルシートは、複数の場所に現れるテキストや他のオブジェクトをどのように表示させるかを記述できます。LimeSurveyでは質問タイプごとに固有のクラスがあり、それぞれの見た目を細かく規定することができます。ロゴや進捗バーで使用する画像ファイルもテーマファイルの中で参照されます。最後に、中括弧に挟まれた特別なキーワードは、対応する言語の翻訳として定義されたテキストに置き換えられます(例えば、それぞれの言語で書かれた'アンケートタイトル'、'質問文'など)。
新しいカスタムテーマを作成したら、LimeSurveyコミュニティーに共有し、他の人が使えるようにすることを検討してください。あなたの貢献によって、テーマ、アンケート、その他のアドオンが豊富になり、LimeSurveyがよりよいものになります。 テンプレートの共有については、LimeSurveyテンプレートリポジトリーを参照してください。
新しいテーマの作成
新しいテーマを作成する(既存のテーマを編集する)には、LimeSurveyでテーマ編集ユーザー権限を設定する必要があります。また、LimeSurveyをインストールしているOSのファイル操作権限も併せて設定します。
新しいテーマを作成するには、設定ダイアログにあるテーマエディター(下記参照)を通じて行うのが望ましいやり方です。ウェブインターフェースではなく、お気に入りのテキストエディターを使ってテーマファイルを編集したい人もいるでしょう。この場合でも、新しいテーマを作成するときはテーマエディターを使います。これにより、LimeSurvey_web_root/upload/themes/survey/your_new_templateディレクトリーに必要なすべてのファイルが配置され、基礎となるテーマが作成されます。この後、好みのテキストエディターを使ってテンプレートファイルを編集することができます。
LimeSurveyの'public'エレメントの多くはテーマによって調整することができます。次のセクションでは、テーマテンプレートについて簡単に説明します。
LimeSurveyテーマエディター
テーマの理解を容易にし、手早く更新するため、LimeSurveyでは 管理ツールバーからテーマエディターを利用することができます。テーマエディターは、テンプレートパーミッションを有するユーザーとスーパー管理者だけが利用することができます。
LimeSurveyテーマエディターは、テーマのコンテンツをオンラインで編集できます。テーマエディターを起動するには、設定メニューのテーマリンクをクリックし、編集したいテーマの隣にある"テーマエディター"ボタンをクリックします。


テンプレートエディターページでは、編集/閲覧したいテンプレートを選択します。

下記のオプションが使用できます。
- 作成: 新しいテンプレートを作成します。ゼロから作るのでなければ、'default'がコピーされます。
- インポート: ZIPファイルでテンプレートをインポートします。
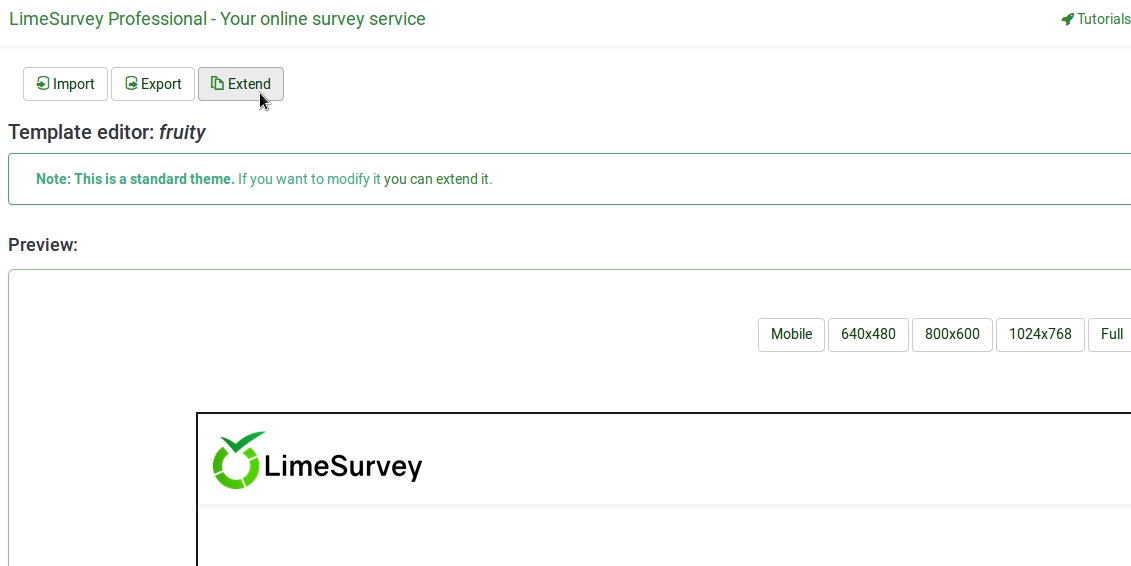
- エクスポート: 現在のテンプレートをZIPファイルにエクスポートします。
- コピー: 現在のテンプレートを新しいテンプレートとしてコピーします。
- 名前を変更: テンプレートの名前を変更します。通常、コピーやインポートした後に使います。
- テンプレート: LimeSurveyで利用できる状態にあるテンプレートをドロップダウンリストで表示します。
- 画面: It is a drop-down list which allows you to choose which particular survey page of that template you want to look at.
- 管理パネルに戻る.
テンプレートのインポート/エクスポート/コピー
テンプレートをエクスポートするとき、テンプレートを構成するすべてのファイル(.pstplファイル、画像、cssファイルなど)がアーカイブされたZIPファイルが生成されます。エクスポートしたZIPファイルをインポート機能を使って他のLimeSurveyにインポートするか、他のLimeSurveyに手動でコピーして対応するテンプレートディレクトリーに展開します。
ただし、LimeSurveyのテンプレートエディターで、テンプレート のインポート/エクスポート/コピー機能を使うことを推奨します。
ページ構成 / テンプレートの利用
- ようこそページ: startpage.pstpl、welcome.pstpl、privacy.pstpl、navigator.pstpl、endpage.pstpl
- 質問ページ: startpage.pstpl、survey.pstpl、startgroup.pstpl、groupdescription.pstpl、question.pstpl、endgroup.pstpl、endpage.pstpl
- 最終ページ: startpage.pstpl、assessment.pstpl、completed.pstpl、endpage.pstpl
テンプレートファイル
以下のテンプレートファイルは、アンケート作成時に使用され、新たに作成したテンプレートフォルダーになければなりません。
- startpage.pstpl: HTMLページのスタート部分を形成します。"<head>"タグで始まります("<html>"タグを含んではなりません)。この、標準的なHTMLページの'冒頭部分'はスクリプトで書かれています。startpage.pstplファイルには<body>タグを含めます。多くのブラウザーは、W3 HTML標準に厳格に従わないことも許容していますが、LimeSurveyスクリプトでは、JavaScriptエレメントを実行するため、<body>タグがなければなりません。startpage.pstplファイルに、多くの'キーワード'を入れる必要はありませんが、タイトルに{SURVEYNAME}を入れたいと思うでしょう。startpage.pstplファイルには、対応するendpage.pstplファイルで閉じるコードを入れることができます。例えば、このファイルでテーブルを開始し、endpage.pstplファイルで閉じるような場合です。LimeSurveyで使用されるあらゆるページはstartpage.pstplとendpage.pstplファイルに挟まれます。
- survey.pstpl: このテンプレートは、ほとんどのページで使用されるもので、アンケートの名前と説明を表示させます。このテンプレートは、対応する'閉じる'テンプレートはなく、このテンプレートファイルで開いたタグはすべてこのファイルの中で閉じなければなりません(例えば、閉じるものがなくなるので、テーブルを開いたままにしてはいけません)。
- welcome.pstpl: このテンプレートはようこそ画面で使用されます(全体が1ページで構成されるアンケート画面を含みます)。歓迎のテキストのほか、アンケートを始める前に提供すべき情報を表示できます。'survey.pstpl'と同様、対応する'閉じる'テンプレートはないので、このテンプレートファイルで開いたタグは同様に閉じなければなりません。
- startgroup.pstpl: このテンプレートは、グループの質問をくるむものです。このファイルで開いたタグを閉じることができる'endgroup.pstpl'テンプレートがあるので、この中でテーブルを開くことができます。
- groupdescription.pstpl: このテンプレートファイルは、グループの説明を表示するために使用します。ただし、アンケート設定(プレゼンテーションタブの表示とナビゲーション設定からアクセス)によって、グループ説明を表示するかどうかが決まります。表示しない設定の場合、このファイルは無視されます。
- question.pstpl: このファイルは、アンケートの質問、回答、ヘルプテキストから構成されます。"グループごと"と"一括"型のアンケートでは、このテンプレートは質問ごとに繰り返されます。対応する'閉じる'ファイルがないので、すべてのタグを閉じる必要があります。
- question_start.pstpl: このファイルには、質問の初めに表示される個々のエレメントが含まれます。{QUESTION}キーワードによって、'question.pstpl'ファイルに取り込まれます。これは、テンプレートデザイナーが質問のレイアウトをもっとコントロールしたい場合に使用します。このテンプレートは通常のテンプレートシステムの外にあり、LimeSurvey 1.87以降置き換えられています。このテンプレートのキーワードは、question.pstplで直接利用できます。
- completed.pstpl: このページは、アンケートの回答が保存され、アンケートが終了したときに、最終ページとして表示されます。アンケート設計時に設定した"転送リンク"を表示する場合に使用します。
- endgroup.pstpl: このファイルはグループを閉じるもので、startgroup.pstplファイルで開いたすべてのタグを閉じます。
- navigator.pstpl: このファイルには、アンケートをナビゲートするための"次へ"、"前へ"、"最終"、"送信"、"保存"、"クリア"ボタンが含まれます。最終ページ以外のすべてのページで使用されます。
- printanswers.pstpl: このファイルには、アンケートの印刷バージョンで必要なHTMLラッパーが含まれます。
- print_group.pstpl: このファイルはstartgroup.pstplとendgroup.pstplファイルと同様で、印刷バージョンで使われます。
- print_question.pstpl: このファイルはquestion.pstplと同様で、印刷バージョンで使われます。
- print_survey.pstpl: このファイルはsurvey.pstplと同様で、印刷バージョンで使われます。
CSSとJavascript
template.css(CSS用)とtemplate.js(Javascript用)の二つは、テンプレートで必ず使われます。
- {TEMPLATECSS}: 既定のCSSであるtemplate.css(RTL言語ではtemplate-rtl.css)へのリンクに置き換えられます。
- {TEMPLATEJS}: 既定のJavascriptファイルであるtemplate.jsとLimeSurveyに必要なすべてのjsファイルへのリンクに置き換えられます。
Bootstrapの利用
LimeSurveyはBootstrap 3を組み込んでいるので、正しく記述されたBootstrapクラスによってテンプレートにスタイルを適用することができます。 詳細は、Bootstrapドキュメントを参照してください。
Awesome-Bootstrap-Checkboxプラグインも組み込まれています。これにより、Bootstrapのcolor-class(info、warning、dangerなど)と"-checkbox"や"-radio"で終わるクラスを使い、チェックボックスやラジオボタンを好きなデザインにすることができます。
既定のCSS、Javascriptを置き換える
特別なJavascript、CSSファイルを使用することができます。functionを置き換えたい場合は、カスケードシステムを使用します。Javascriptのfunctionでは、最後に読み込まれたものが使用されます。
その他のテンプレートファイル
privacy.pstpl、invitationemail.pstpl、reminderemail.pstpl、confirmationemail.pstplはLimeSurveyではもう使われておらず、既定値は言語ファイルに収録されています。メールメッセージはアンケートごとに編集することができるようになりました。
標準ページ
アンケート参加者がLimeSurveyのアプリケーションにアクセスするときに目にする標準ページが10個あります。それぞれ、アンケートの設定で指定したテンプレートの共通のファイルから構成されます。次の表はどのテンプレートファイルがそれぞれのページを構成するかを示したものです。
| アンケートページ/ テンプレートファイル |
アンケートリスト |
ようこそ | 質問 | 完了 | すべてクリア | 登録 | 読込み | 保存 | 回答 印刷 |
アンケート 印刷 |
|---|---|---|---|---|---|---|---|---|---|---|
| SurveyList | ||||||||||
| Welcome | ||||||||||
| Privacy | ||||||||||
| Navigator | ||||||||||
| Survey | ||||||||||
| StartGroup | ||||||||||
| GroupDescription | ||||||||||
| Question* | ||||||||||
| EndGroup | ||||||||||
| Assessment | ||||||||||
| Completed | ||||||||||
| ClearAll | ||||||||||
| Register | ||||||||||
| Load | ||||||||||
| Save | ||||||||||
| PrintAnswers | ||||||||||
| Print Survey | ||||||||||
| Print Group | ||||||||||
| Print Question | ||||||||||
| StartPage EndPage Template.css |
*注意: バージョン1.90+では、question.pstplとquestion_start.pstplが置き換えられています。古いカスタムテンプレートを使用している場合は、question.pstplの初めに次の行を追加します。
<div {QUESTION_ESSENTIALS} class="{QUESTION_CLASS}{QUESTION_MAN_CLASS}{QUESTION_INPUT_ERROR_CLASS}">
さらに、question.pstplの終わりに対応する閉じるタグを追加します。
</div>
*注意: バージョン1.91以前では、LimeSurveyのjsファイルはテンプレートに含まれません。バージョン2では、jsファイルにリンクさせるため、テンプレートファイルのひとつに{TEMPLATEJS}を入れなければなりません。startpage.pstplかendpage.pstplに追加することができます。{TEMPLATEURL}/template.jsの行を削除し、パーソナルテンプレートを更新するため、{TEMPLATEJS}に置き換えなければなりません、
ファイルコントロールセクション
左側の"ファイルコントロール"ウィンドウで、ページを編集するために使われるテンプレートファイルをクリックします。画面パーツ、JavaScript、CSSファイルがあります。そのファイルの中央のHTMLコードが"編集中"ウィンドウに表示されます。テンプレートが編集可能な場合(ディレクトリーに設定された権限による)、好きなように変更して保存することができます。

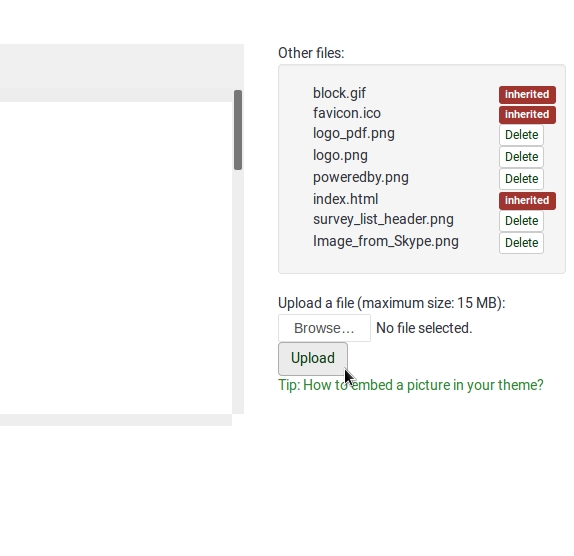
"その他のファイル"ウィンドウでは、テンプレートディレクトリーにあるその他のファイルの一覧が表示されます。右側からテンプレートを作成するために必要な画像ファイル(画像、ロゴなど)やその他のファイルのアップロードや選択ができます。
それぞれの画像へのリンクを使わずに、{TEMPLATEURL}という文字列を使います。つまり、
img src='/limesurvey/templates/yourtemplate/files/mypicture.jpg'ではなく、次のようにします (New in 2.50 )。
img src='{TEMPLATEURL}files/mypicture.jpg'LimeSurveyのバージョン2.50以前では、次のようにします。
img src='{TEMPLATEURL}mypicture.jpg'編集中のテンプレートページの"例"は、画面下部に表示されます。テンプレートエディタでテンプレートを削除することはできません。ディレクトリーにアクセスし、そこから手動でファイルを削除する必要があります。テンプレートの見た目をさらに評価するため、他の画面解像度を選択することもできます。
テンプレートファイルの場所
LimeSurveyでは、他のpublicファイルが格納されているpublicディレクトリーに"/templates"ディレクトリーがあり、その中のテンプレートごとのサブディレクトリーに個々の'標準'テンプレートが格納されています。カスタマイズされたユーザーテンプレートは、/upload/templatesディレクトリーに格納されています。
テンプレートディレクトリーには、必ず"default"ディレクトリーがあります。このテンプレートは、既定として使われ、テンプレートフォルダーが見つからない場合の代理として使用されます。デフォルトでインストールされています。
次の構文を使用して、テンプレート管理領域にアップロードした画像ファイルを使用することができます。
{TEMPLATEURL}filename.xyz
CSSによる質問のスタイリング
CSSによる質問のスタイリングは簡単になりました。それぞれの質問タイプには固有のクラスがあります。必須の質問は更に必須項目としてのクラスがあります。例えば、必須ではない質問では、
<div id="question5" class="gender">
...
</div>
となっていて、一方、必須の質問では、
<div id="question5" class="gender mandatory">
...
</div>
となります。必須の質問でユーザーが回答しなかったり、質問で検証が設定されている場合、
<div id="question5" class="gender mandatory input-error">
...
</div>
となります。質問に検証が適用され、回答が正しくない場合、
<div id="question6" class="text-short input-error">
...
</div>
Global classes for question part
These classes are used for each question type. Some question types use only one or two classes, while others may use much more.
| Class name | Part | Question type | Examples | Note | |
|---|---|---|---|---|---|
| .question (Obsolete since 3.0) | All question block | All question type | <p class="question">, <ul class="question">, <table class="question"> | ||
| .ls-answers (New in 3.0 ) | All question block | All question type | <div class="ls-answers ">, <ul class="ls-answers ">, <table class="ls-answers"> | ||
| .subquestions-list | List of subquestion | Multi choice question, array question type | <ul class="subquestions-list">, <table class="subquestions-list"> | .questions-list is used too | |
| .answers-list | List of answers | Single choice question, array question type, Multi input text question | <ul class="answers-list">, <table class="answers-list"> | ||
| .answer-item | The answer part: one answer | Single choice question, array question type, Multi input text question | <li class="answer-item">, <td class="answer-item"> | ||
| .noanswer-item | The answer part for no answer | Single choice question, array question type | <li class="noanswer-item">, <td class="noanswer-item"> | No answer is an answer too, then have double class noanswer-item and answer-item | |
| .question-item | The question part: one question | Multi text question, array question type | <li class="question-item">, <tr class="question-item"> | Some answers are questions too. Then we have a lot of class="question-item answer-item" | |
| .checkbox-list | A list of checkbox | Multi choice question, array number (checkbox) question type | <ul class="checkbox-list">, <tr class="checkbox-list"> | Some question types use multi-list class, like checkbox with comment: class="checkbox-list text-list" | |
| .checkbox-array (New in 3.0 ) | A array of checkbox | Array (numbers) with checkbox option | <table class="checkbox-list"> | ||
| .checkbox-item | The answer part with a checkbox | Multi choice question, array number (checkbox) question type | <li class="checkbox-item">, <td class="checkbox-item"> | ||
| .radio-list | A list of radio item | Single choice question, array question type (each row) | <ul class="radio-list">, <tr class="radio-list"> | ||
| .radio-array (New in 3.0 ) | A array of radio item | Array question type | <table class="radio-array"> | ||
| .radio-item | The answer part with a radio | Single choice question, array question type | <li class="radio-item">, | ||
| .text-list | A list of text input | Multi text question type, array of text | <ul class="text-list">, <tr class="text-list"> | ||
| .text-item | The answer part of a text input | Multi text question type, array of text | <li class="text-item">, | ||
| .numeric-list | A list of text input with numeric only answer | Multi numeric question type, array of number | <ul class="text-list numeric-list">, <tr class="text-list numeric-list"> | ||
| .number-list | A list of text input with numeric only answer (each row) | Multi numeric question type, array of number | <ul class="text-list numeric-list">, <tr class="text-list numeric-list"> | ||
| .number-array (New in 3.0 ) | The answer part of a numeric input | Array of number | <table class="number-array"> | ||
| .select-list (Obsolete since 2.50) | A list of select | Array numbers, Dual scale array (select) | <table class="select-list"> | ||
| .dropdown-list (New in 2.50 ) | A list of select | Array numbers, Dual scale array (select) (each row) | <table class="dropdown-list"> | ||
| .dropdown-array (New in 3.0 ) | A array of dropdown | Array numbers, Dual scale array (select) | <table class="dropdown-array"> | ||
| .select-item (Obsolete since 2.50) | The answer part of a select | Array numbers, Dual scale array (select), single choice with select | <p class="select-item">, <td class="select-item"> | ||
| .dropdown-item (New in 2.50 ) | The answer part of a select | Array numbers, Dual scale array (select), single choice with select | <p class="dropdown-item">, <td class="dropdown-item"> | ||
| .hide (Obsolete since 3.0) | Used for accessibility: hidden with css but read by screenreader, since 2.50 : you can use sr-only from bootstrap | Short text question | <label class="hide"> | Can be used for other purposes | |
| .ls-js-hidden (New in 3.0 ) | Used for part to be hidden if javascript is activated | Button for example | <div class="ls-js-hidden"> | LimeSurvey core used it, but you can use it too in your template | |
| .ls-js-hidden-sr (New in 3.0 ) | Used for accessibility: hide it if js is activated, but always show if user use a screenreader | Button for example | <a class="ls-js-hidden-sr"> | Button | |
| .ls-no-js-hidden (New in 3.0 ) | Used for part to be hidden if javascript is not activated | Link | <a class="ls-no-js-hidden"> | LimeSurvey core used it for inactive link if javascript is not activated | |
| .ls-label-xs-visibility (New in 3.0 ) | Label to be hidden in big screen, but show with little screen (with no more table) and to screenreader | label | <label class="ls-no-js-hidden"> | Used for label inside table cell of array question type | |
| .ls-input-group-extra (New in 3.0 ) | Same usage of boostrap input-group-addon, but without the border and the background. | right suffix | <div class="ls-input-group-extra"> | Used for right and left suffix (global) | |
| .checkbox (Obsolete since 3.0) | input[type=checkbox] | Question with checkbox | <input type="checkbox" class="checkbox"> | With modern browser: not needed, but some old browser need this | |
| .radio (Obsolete since 3.0) | input[type=radio] | Question with radio | <input type="radio" class="radio"> | With modern browser: not needed, but some old browser need this | |
| .text | input[type=text] | Question with input text, or textarea | <textarea class="text"> | ||
| .answertext | Array question type | Answer part of array question type | <th class="answertext"> | ||
| .col-answers | Array question type | Column of answers | <col class="col-answers"> | ||
| .odd .even (Obsolete since 2.50) | Array question type | Alternation for column | <col class="odd"> | ||
| .array1 .array2 (Obsolete since 3.0) | Array question type | Alternation for line | <tr class="array1"> | ||
| .ls-odd .ls-even (New in 3.0 ) | Array question type | Alternation for sub-question and Y axis | <tr class="ls-odd"> |
Some example of question part with classes
Text-short question type:
<p class="question answer-item text-item ">
<label class="hide label" for="answerSGQA">Answer</label><input type="text" value="" id="answerSGQA" name="SGQA" size="50" class="text  empty">
</p>
Multiple short text
<ul class="subquestions-list questions-list text-list">
  <li class="question-item answer-item text-item" id="javatbdSGQA">
    <label for="answerSGQA">Some example subquestion</label>
     <span><input type="text" value="" id="answerSGQA" name="SGQA" size="20" class="text empty"></span>
  </li>
</ul>
Array question type
<table class="question subquestion-list questions-list ">
<caption class="hide read">Some explanation for accessibility.</caption>
<colgroup class="col-responses">
<col width="50%" class="col-answers">
<col width="25%" class="odd">
<col width="13.3%" class="col-no-answer even">
</colgroup>
<thead>
<tr class="array1 dontread">
<td> </td>
<th>1</th>
<th>No answer</th>
</tr>
</thead>
<tbody>
<tr class="array2 answers-list radio-list" id="javatbdSGQ">
<th width="20%" class="answertext">Some example subquestion
</th>
<td class="answer_cell_001 answer-item radio-item">
<label for="answerSGQA" class="hide read">1</label>
<input type="radio" value="1" id="answerSGQA" name="SGQA" class="radio">
</td>
<td class="answer-item radio-item noanswer-item">
<label for="answerSGQA" class="hide read">No answer</label>
<input type="radio" value="" id="answerSGQA" name="SGQA" class="radio">
</td>
</tr>
</tbody>
</table>The full list of question classes
| Question Type | Question Class | Question ID |
| 5 point choice | .choice-5-pt-radio | 5 |
| Array (10 point choice) | .array-10-pt | B |
| Array (5 point choice) | .array-5-pt | A |
| Array (Flexible Labels) dual scale | .array-flexible-duel-scale | 1 |
| Array (Increase, Same, Decrease) | .array-increase-same-decrease | E |
| Array (Multi Flexible) (Numbers) | .array-multi-flexi | : |
| Array (Multi Flexible) (Text) | .array-multi-flexi-text | ; |
| Array (Yes/No/Uncertain) | .array-yes-uncertain-no | C |
| Array (flexible labels) | .array-flexible-row | F |
| Array (flexible labels) by column | .array-flexible-column | H |
| Boilerplate question | .boilerplate | X |
| Date | .date | D |
| Gender | .gender | G |
| Huge free text | .text-huge | U |
| Language switch | .language | I |
| List (dropdown) | .list-dropdown | ! |
| List (radio) | .list-radio | L |
| List with comment | .list-with-comment | O |
| Long free text | .text-long | T |
| Multiple numerical input | .numeric-multi | K |
| Multiple options | .multiple-opt | M |
| Multiple options with comments | .multiple-opt-comments | P |
| Multiple short text | .multiple-short-txt | Q |
| Numerical input | .numeric | N |
| Ranking | .ranking | R |
| Short free text | .text-short | S |
| Yes/No | .yes-no | Y |
The full list of validation classes
These apply to the help and/or validation tip messages so that each type can be individually styled.
The .hide-tip option and .input-error options interact by default so that you can have validation tips hidden. However, they do appear when there are validation errors and disappear again when those errors are rectified.
All of these are designed to eliminate the need for pop-up alert messages. Instead, tips can appear/disappear as needed and are color-coded to indicate whether the answers pass the validation criteria.
Furthermore, when you first visit a page that has unmet validation criteria, you can color-code the tips in a pleasing color to show which validation criteria have not been met yet; then re-display the page using a harsher color if the person submits the page with lingering validation errors.
| Purpose | CSS Class | Description |
| Mandatory | .mandatory | the question is mandatory |
| User input error | .input-error | the question had at least one validation error |
| Hide Tip | .hide-tip | added if you use the hide_tip option |
| Num answers | .em_num_answers | for for min_answers and max_answers |
| Value range | .em_value_range | for min/max_num_value_n and multiflexible_min/max |
| Sum range | .em_sum_range | for min/max/equals_num_value |
| Regex validation | .em_regex_validation | for regular-expression validation of the question |
| Question-level validation function | .em_q_fn_validation | for the em_validation_q option |
| Subquestion-level validation function | .em_sq_fn_validation | for the em_validation_sq option |
| Other comment mandatory | .em_other_comment_mandatory | for other_comment_mandatory option - shows when "other" is selected but associated comment is missing. |
Importing styles into your custom template
The custom question styles are near the bottom of each template's CSS file and start with:
/* --------------------------- START: Question styles ------------------------------ */
If you're styling your own custom template, you should be able to copy everything after the above one from templates/default/template.css (for table-based layouts) or /templates/limespired/template.css (for CSS-based layouts) into your own style sheet without any impact on your other styles.
Internet Explorer conditional style sheets
Because of the marked discrepancies in rendering between IE6 & IE7 and the other browsers, there are special IE conditional style sheets included for each template.
<!--[if IE]>
  <link rel="stylesheet" type="text/css" href="{TEMPLATEURL}IE_fix_all-versions.css" />
<![endif]-->
<!--[if lt IE 7]>
  <link rel="stylesheet" type="text/css" href="{TEMPLATEURL}IE_fix_older-than-7.css" />
<![endif]-->
<!--[if IE 8]>
		<link rel="stylesheet" type="text/css" href="{TEMPLATEURL}ie_fix_8.css" />
<![endif]-->
You should include the above code within your startpage.pstpl and copies of both the IE style sheets from either /templates/default/ or /templates/limespired for Tables base layout and CSS based layout respectively.
Alternative solution for Internet explorer
You can put a conditional class for body in startpage.pstpl and use this class in your template.css. This method is used in the citronade template (Obsolete since 2.06). Adding a js / no-js class to have javascript / no javascript system.
<!--[if lt IE 7 ]> <body class="lang-{SURVEYLANGUAGE} {SURVEYFORMAT} ie ie6 ielt7 ielt8 ielt9 no-js"> <![endif]-->
<!--[if IE 7 ]> <body class="lang-{SURVEYLANGUAGE} {SURVEYFORMAT} ie ie7 ielt8 ielt9 no-js"> <![endif]-->
<!--[if IE 8 ]> <body class="lang-{SURVEYLANGUAGE} {SURVEYFORMAT} ie ie8 ielt9  no-js"> <![endif]-->
<!--[if IE 9 ]> <body class="lang-{SURVEYLANGUAGE} {SURVEYFORMAT} ie ie9 no-js"> <![endif]-->
<!--[if gt IE 9]><!--><body id="body" class="lang-{SURVEYLANGUAGE} {SURVEYFORMAT} no-js"><!--<![endif]-->
<script type='text/javascript'>/*<![CDATA[*/(function(H){ H.className=H.className.replace(/\bno-js\b/,'js') })(document.getElementsByTagName('body')[0]);/*]]>*/</script>
And in template.css use:
.ie6{/*specific for internet explorer 6*/}
.ielt8{/*specific for internet explorer 6 and 7*/}
.ie{/*specific for all internet explorer */}
Right-to-Left (RTL) Languages and justify
The text editor within LimeSurvey is able to format RTL text. However, the editor itself shows the RTL language in a left to right format when justified. This is just an editor display issue. The RTL and justified question or text will display correctly from right to left, even when justified, in your survey or on preview.
Keywords
Keywords within a template file get replaced by the current survey information. They are surrounded by curly brackets, for example: {SURVEYNAME}.
The following strings will be replaced by LimeSurvey when parsing the template file and presenting it to survey users. These field strings will work on almost every template except for the 'Completed Page'. (Most of these strings can be found in the common.php file. If it's not there, look in the index.php file.)
| Keyword | Template files | Description |
|---|---|---|
| {SURVEYNAME} | All Files | The survey title |
| {SURVEYDESCRIPTION} | All Files | The survey description |
| {WELCOME} | All files (mainly for welcome.pstpl) | The survey 'welcome' text |
| {PERCENTCOMPLETE} | survey.pstpl | A small graph showing the percentage of the survey completed |
| {GROUPNAME} | startgroup.pstpl, groupdescription.pstpl, endgroup.pstpl | Displays the current group name |
| {GROUPDESCRIPTION} | startgroup.pstpl, groupdescription.pstpl, endgroup.pstpl | Displays the current group description |
| {NUMBEROFQUESTIONS} | welcome.pstpl | Displays the total number of questions in the survey (just the number) |
| {THEREAREXQUESTIONS} | welcome.pstpl | Displays the sentence "There are X questions in this survey" - from the relevant language file. The X is replaced with the number of questions. Note that this will also work appropriately for singular or plural. If there is only 1 question, it will print "There is 1 question in this survey". |
| {CHECKJAVASCRIPT} | All files (mainly for welcome.pstpl) | Warning message when end-user browser have javascript disabled |
| {QUESTION} | Question.pstpl | (Has been superseeded as of LS1.87) Displays the current question text (The format of {QUESTION} can customised by editing 'question_start.pstpl') Use the following: {QUESTION_TEXT}, {QUESTION_MANDATORY}, {QUESTION_HELP}, {QUESTION_MAN_MESSAGE}, {QUESTION_VALID_MESSAGE}, {QUESTION_INPUT_ERROR_CLASS}, and appropriate wrapping HTML instead of {QUESTION} |
| {ANSWER} | question.pstpl, print_question.pstpl | presents the answer form for the current question |
| {SGQ} | question.pstpl, question text | Can be used in the question text itself to reference the input field of the question dynamically by displaying the Survey-Group-Question id for the current question. (as of svn build 9755) |
| {QUESTIONHELP} | question.pstpl, print_question.pstpl | Displays help text (predefined tip for question type) for the current question |
| {QUESTION_CLASS} | question.pstpl, print_question.pstpl | unique class for each question type. (To be included in the question's wrapping tag.) |
| {QUESTION_CODE} | question.pstpl, print_question.pstpl | Displays the current question code |
| {QUESTION_ESSENTIALS} | question.pstpl | the question ID and (if a question is conditional), 'style="display:none;"'. (To be included in the question's wrapping tag.) |
| {QUESTION_HELP} | question.pstp, question_start.pstpl | Displays the user defined help text for the current question |
| {QUESTION_TYPE_HELP} | print_question.pstp | Displays the user defined help text for the current question |
| {QUESTION_INPUT_ERROR_CLASS} | question.pstp, question_start.pstpl | Provides a class if there was user input error |
| {QUESTION_ID} | print_question.pstp | Provides a unique ID for each question to allow styling for specific questions |
| {QUESTION_TEXT} | question.pstp, print_question.pstp, question_start.pstpl | Displays the text for the current question |
| {QUESTION_MANDATORY} | question.pstp, print_question.pstp, question_start.pstpl | Displays the translated 'Mandatory' text for the current question |
| {QUESTION_MAN_CLASS} | question.pstpl, print_question.pstpl | class if a question is mandatory. (To be included in the question's wrapping tag.) |
| {QUESTION_MAN_MESSAGE} | question.pstp, print_question.pstp, question_start.pstpl | Displays the translated 'Mandatory' help message text for the current question |
| {QUESTION_NUMBER} | print_question.pstpl | Incremental count of questions. |
| {QUESTION_VALID_MESSAGE} | question.pstp, print_question.pstp, question_start.pstpl | Displays the translated valid help message text for the current question |
| {QUESTION_SCENARIO} | print_question.pstp | Prints out the 'scenario' text for conditional questions. |
| {NAVIGATOR} | navigator.pstpl | Displays navigation buttons (next, prev, last) |
| {CLEARALL} | All files (but intended for navigator.pstpl) | Displays the "Exit and Clear Results" link |
| {COMPLETED} | completed.pstpl | Displays the 'completed' message for registering, will change depending on whether the attribute_1 and attribute_2 fields are set. |
| {URL} | completed.pstpl | Displays the survey 'url' and 'url text' |
| {PRIVACYMESSAGE} | privacy.pstpl | The privacy message is shown if you set your survey to be anonymous. The text can be edited/translated in the language files. This can also be changed manually by editing the privacy.pstpl template you wish to use. |
| {TEMPLATEURL} | All Files | The URL to the current template location (useful for referencing image files in your template) |
| {SURVEYRESOURCESURL} | All Files | The URL to the current uploaded files for this survey location (useful for referencing image files in your question, group, ....) |
| {SUBMITCOMPLETE} | endpage.pstpl | The statement (from the language files) that tells the user they have completed the survey, and to press the "Submit" button |
| {SUBMITREVIEW} | survey.pstpl | The statement (from the language files) that tells the user they can review/change the answers they have made by clicking "<< prev" |
| {SAVEDID} | All Files | Displays 'Response ID' of user |
| {QUEXMLPDF} | All Files | Displays button to export the queXML PDF of questionnaire including answers entered up until the point that has been completed in the survey. |
| {TOKEN:FIRSTNAME} | All Files | ***If survey answers are NOT ANONYMOUS - gets replaced with the users first name from the tokens table |
| {TOKEN:LASTNAME} | All Files | ***If survey answers are NOT ANONYMOUS - gets replaced with the users last name from the tokens table*** |
| {TOKEN:EMAIL} | All Files | ***If survey answers are NOT ANONYMOUS - gets replaced with the users email from the tokens table*** |
| {TOKEN:ATTRIBUTE_1} | All Files | ***If survey answers are NOT ANONYMOUS - gets replaced with the users attribute_1 from the tokens table*** |
| {TOKEN:ATTRIBUTE_2} | All Files | ***If survey answers are NOT ANONYMOUS - gets replaced with the users attribute_2 from the tokens table*** |
| {ANSWERSCLEARED} | Preferably in navigator.pstpl | The "Answers Cleared" statement from the language files |
| {RESTART} | clearall.pstpl | URL to restart the survey |
| {REGISTERERROR} | register.pstpl | Shows any error messages in the register page (ie: "You must include an email address") |
| {REGISTERMESSAGE1} | register.pstpl | The statement "You must be registered to complete this survey" from the language files |
| {REGISTERMESSAGE2} | register.pstpl | Details about registering from the language files |
| {REGISTERFORM} | register.pstpl | The actual form for registering, will change depending on whether the attribute_1 and attribute_2 fields are set. |
| {SAVE} | Works suitable on navigator.pstpl | Displays the 'Save your responses so far' button to offer the user to save and come back later to continue the survey. If the Save option is deactivated in the survey properties the tag will not be shown and ignored. |
| {LANGUAGECHANGER} | survey.pstpl | Displays a switch in multilingual surveys to change the question. |
Input/Buttons
Each "input" type in a survey has been given its own class name, so that you can add CSS to your "startpage.pstpl" file and have some control over the appearance of form buttons and inputs. These class names are as follows:
- submit (Submit Buttons)
- text (Text Inputs - for short free text, date, and numerical type)
- answertext (Text of answers)
- radio (Radio Buttons)
- checkbox (Check Boxes)
- select (Select / List Boxes)
- textarea (Large text inputs - for long free text)
- clearall (The "Exit and Clear Survey" link)
- rank (The rank style question. Doesn't set the colour of the select box or the text boxes, but it does allow the changing of background colour, text colour, size etc., for the rest of the ranking question)
- graph (The "percentage completed" graph table)
- innergraph (The table inside the graph table - this contains the 0% and 100% text. Use this for changing the size of this text)
- question (General settings for any question that is displayed within a table. Generally, you should use this to make sure that their font size and color is the same as you have used elsewhere as a default)
- mandatory (Mandatory questions)
- input-error (User input error - for if a user has made a mistake with a mandatory question or question with validation)
- array1 and array2 (These two styles are cycled when presenting the range of answers for an array type question. This allows you to set an alternating background color for these question types. Array1 is also used for the column headings in these question types)
- errormandatory (Sets the color and style of the "This question is mandatory" error message)
- warningjs (Sets the color and style of the warning message displayed if the participant's browser has javascript disabled)
There are also some elements that can be accessed using the ID of the element (#ID in CSS):
- surveycontact (The contact message shown on the start page)
- tokenmessage (used for messages inside the survey, e.g. the session expired error message)
Because you can edit all the HTML aspects, there's no reason to surround your templates with a
<div class='new_name'></div>
and then define a css for that new_name class.
Styling the progress bar
The progress bar appearance can be modified with CSS.
To change the background color of the bar, add something like the following to the end of your template.css file:
#progress-wrapper .ui-widget-header {
 background-color: #3300FF;
}
To change the border color of the bar, add something like the following to the end of your template.css file:
#progress-wrapper .ui-widget-content,
#progress-wrapper .ui-widget-header {
 border: 1px solid #FF0000;
}
Advanced Features Available to Developers
LimeSurvey has integrated some user-made patches that permits some special changes. These very advanced features (generally) require changes to the underlying code base of LimeSurvey and should be done carefully in order not to introduce security holes.
Support for your own Javascript functions
Some users may need to run Javascript on the survey pages, but calling checkconditions() in the BODY element made it impossible to do so. This call has been replaced with a small JavaScript function in the HEAD that sniffs for the existence of checkconditions() and template_onload() before calling them. In this way, a template author can create his or her own template_onload() function in the HEAD that replaces the default one.
- Disable XSS filter - in Global settings -> Security, set "Filter HTML for XSS" to No.
- Enter your script in the source of a question or group description.
Videos on Templates
This video will demonstrate the basic and advanced template functions that are available to all LimeSurvey users. This includes changing the appearance of certain forms and inserting custom graphics. Additionally, it will thoroughly walk you through on how to edit and preview specific page templates, importing/exporting templates, modify appearance of questions in the CSS, and customizing survey description page.
Video - needed
Tips & Tricks
Some language specific element
If you want to have some language specific sentence in a survey, for example a help at the end of each page, you can add in a .pstl file a sentence and hidding it for other language. If we hide it in the template.css, we can use the pseudo selector :lang, but we use some class for better compatibility.
Below, there are two help sentences, in French and English. Put this on endpage.pstpl:
<div class="fr" lang="fr">Pour de l'aide en direct appelez le 000000</div>
<div class="en" lang="en">For some help, please call 000000</div>
and in template.css:
.lang-fr .en{display:none}
.lang-en .fr{display:none}
Change the layout of the survey page
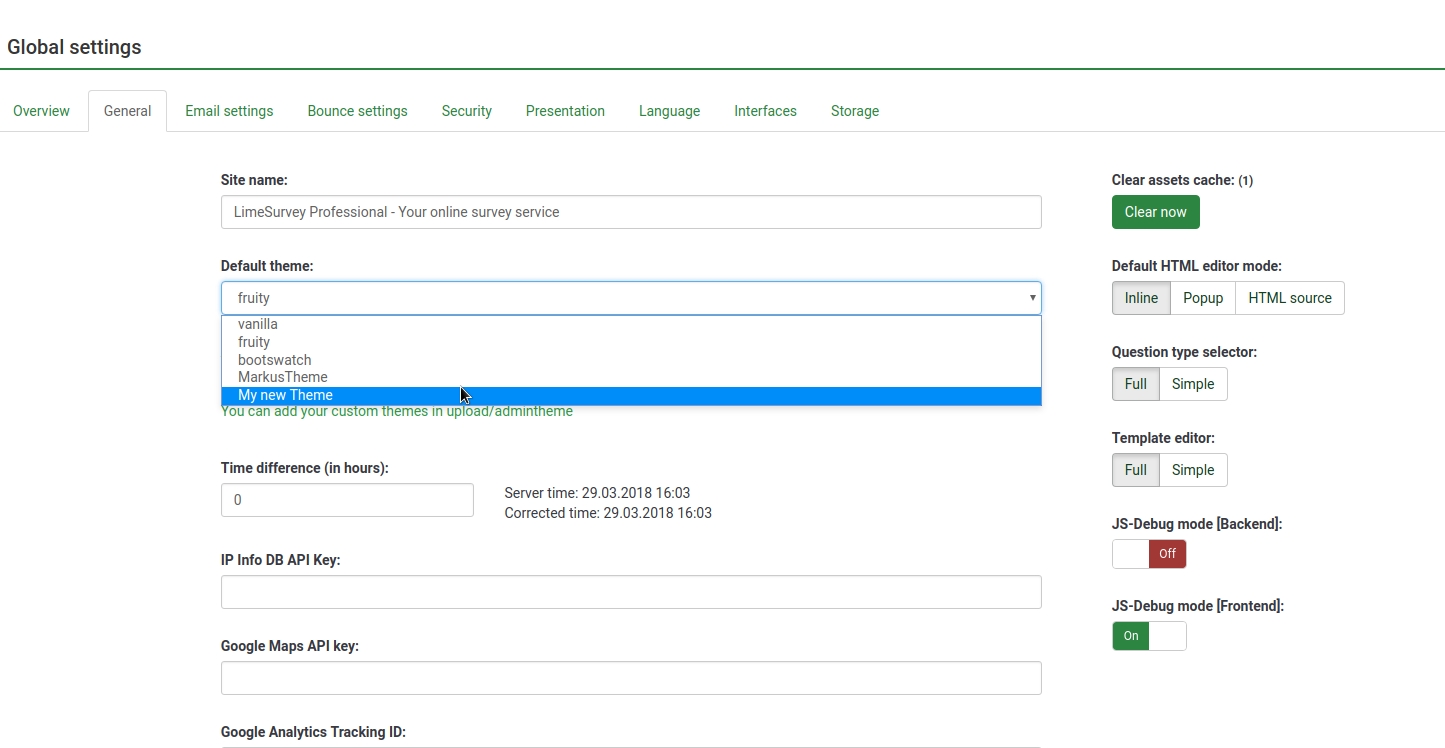
After editing and saving a template, it applies to a survey list page only if it is selected from the settings of the survey. To make it the default template, go under the General tab located in the Global settings of your LimeSurvey installation and choose the desired template. From now on, all the templates that use the "default" option as template plus the ones that are going to be newly created, will use the newly selected default template.
To use your current template for this page, you have to change the according setting from Global settings. In older versions, this change can be done by editing the $defaulttemplate setting from the config file: copy this setting from config-defaults.php to config.php which overrides config-defaults.php and edit this setting to $defaulttemplate = 'yourtemplatename';.
Import/Export of templates: Mac users
Mac users, please note that the Mac OSX default archive utility may have problems with zip folders "generated on the fly".
A workaround is to unix'es unzip from the command line:
$ unzip template.zip -d template
Archive: template.zip
inflating: template/startpage
inflating: ...
Another workaround is to use scripts in their mac-compiled counterparts.
Replacing the help icon (Obsolete since 2.50)
When a question help text is shown, then an help.gif image is used from the default template folder.
You can replace this image by uploading a new help.gif, help.png or help.jpg in your custom template folder. It will then be automatically used instead of the default help icon.
Replacing an existing logo (New in 2.50 ) (Obsolete since 3.0)
Note: In the default Template of 2.50, there is no preembedded logo. Read further our wiki on how to add your own logo.
1. To edit the logo go to the template.css file which you can find it here:

2. Click the search button to find occurrences of logo related styles and search for logo
3. Edit the main style file.
You will see something similar to:

If you want to change the image, just replace logo.gif with another image link. Example: (logo.png or logo.jpg).
If you want to change the image size, adjust width and height (in pixels) like this:
width:100px; height:100px;
Adding your own logo (Obsolete since 3.0)
1. Find and open the startpage.pstpl template file.

2. After this
<div id="topContainer" class="jumbotron">add this line to startpage.pstpl:
<div class="container"><img id='page_logo' src='{TEMPLATEURL}/files/logo.png' class="clearfix pull-right" /></div>3. To upload your own logo, go to the template editor and upload your logo.

To position your logo, please use one of the following css classes:
- If you want the logo to be placed on the left side:
clearfix pull-left
- If you want the logo to be placed on the right side:
clearfix pull-right
- If you want to center the logo
clearfix center-block
Use the same template with different logos
If you want to use the same template for all surveys and just want to change the logo for each survey, you can use the {SID} placeholder in the template .pstpl file and thereby refer to different images:
<img src="{TEMPLATEURL}files/logoImage-{SID}.png">
Remove the default help to all question (hide_tip) (Obsolete since 1.92)
There are 3 solutions to remove the default help:
- like a hide_tip attribute but for all question and survey.
- you can remove the {QUESTIONHELP} and its container from the file question.pstl. However, it can be a bad idea for the screenreader.
- for the default template and some other, add this at the end of tempate.css
span.questionhelp{display:none;}
Display custom favicon
A favicon is the little icon you see in the browser's address bar, list of bookmarks or tab. You can display your own icon as follows:
- Create a favicon - google will find you lots of free favicon generators.
- Name your new favicon "favicon.ico" and place it in your template /files directory.
- Add the following code to your startpage.pstpl before the </head> tag.
<link rel="shortcut icon" href="{TEMPLATEURL}files/favicon.ico" type="image/x-icon">
<link rel="icon" href="{TEMPLATEURL}files/favicon.ico" type="image/x-icon">
Different appearance for survey-/question-pages
If you want LimeSurvey to change the appearance of every second page (i.e. of even and odd survey pages), you can use .page-odd class in your CSS file to change the appearance of odd pages.
An example from default template of LimeSurvey 1.91+:
.page-odd table.question-group {
 background-color: #D2F2D3;
}
If you do not want differentiate even and odd pages, find all instances of .page-odd in template.css and remove those styles.
Create a vertical separator border for dual scale array
To create a vertical separator border for a dual scale array, you can add the following lines to your template.css-file.
table.question thead td.header_separator,
table.question tbody td.dual_scale_separator
{
   border-right:solid 1px #00A8E1;
}
header_separator is used to adress the separator for the header "td". The "dual_scale_separator" is used to address the separator column in the dual scale array.
Hide the survey contact message shown on the start page/survey list (Obsolete since 3.0)
To hide the "Please contact ..." message on the start page (with the survey list), you can add the following to the $(document).ready function in the template.js of your used design template:
$('#surveycontact').hide(); //Hides the survey contact message
Remove the survey contact message shown on error messages (Obsolete since 3.0)
If you want to remove the survey contact message from error messages, it'll be trickier. You can add the function from below. It calls the $(document).ready function in the template.css of your used design template:
removeContactAdressFromMessage(); //Removes the survey contact message from error messages
and add the following function to your *template.js* file
function removeContactAdressFromMessage()
{
if ($('#tokenmessage').length > 0)
   {
   var oldMessage = $('#tokenmessage').html();
   var indexContact = oldMessage.indexOf('Bitte kontaktieren');
   var newMessage = oldMessage.substr(0, indexContact);
   $('#tokenmessage').html(newMessage);
   }
}
It will probably not work for a survey in English language and has to be extended when used for multilingual surveys. But it's an idea/tip on how to solve this.
How to deal with multilingual question attributes (Obsolete since 2.50)
If you have a multilingual survey and e. g. want to use a different string for the "other" field, this could only be done for the base language (until this feature was added at LimeSurvey 2.0). To work around this, paste in the field to change the label for "other":
<span class="en">New label</span><span class="fr">Nouveau label</span>
Add in the template.css of your template (at /limesurvey/upload/templates/<yourtemplatename>/template.css):
html:lang(en) .fr{display:none}
html:lang(fr) .en{display:none}
Adding your own logo to the survey list (New in 3.0 )
- First please open the theme editor for the theme you like to use.
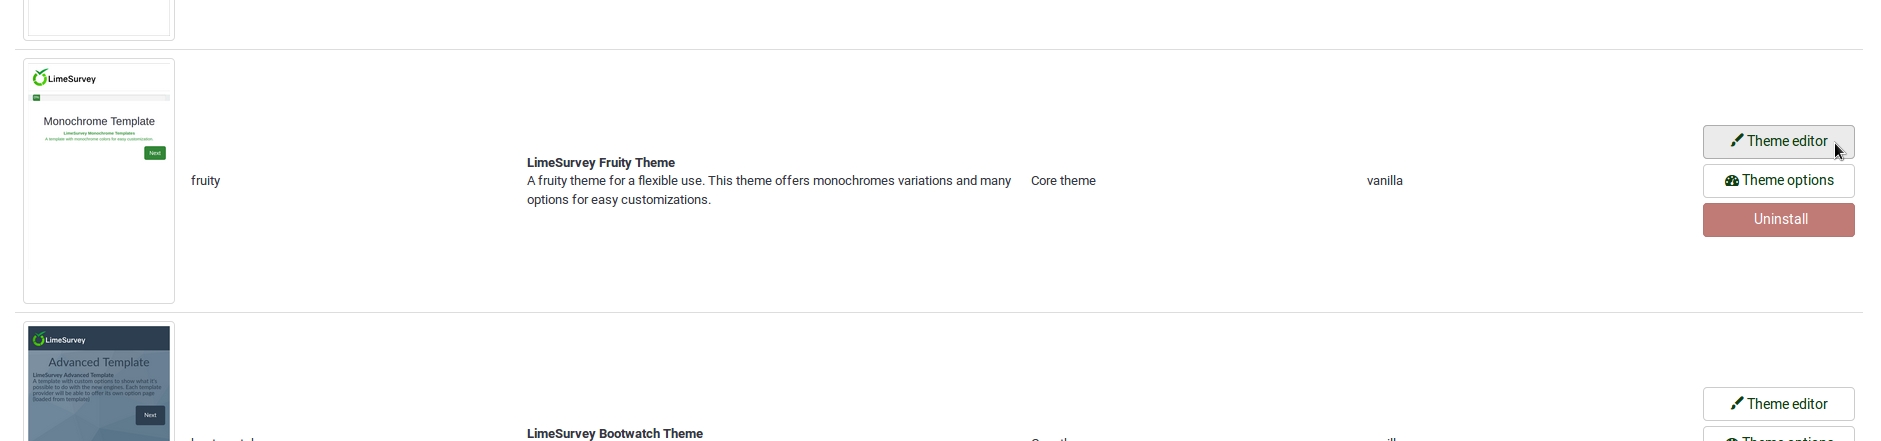
- We recommend to use fruity, it is our best theme currently.
- Then extend the theme and give it a name you will recognize.
- In the following view you may upload the logo you want to use.
- Select the editor screen `Survey List´ in the Screen dropdown in the top right corner.
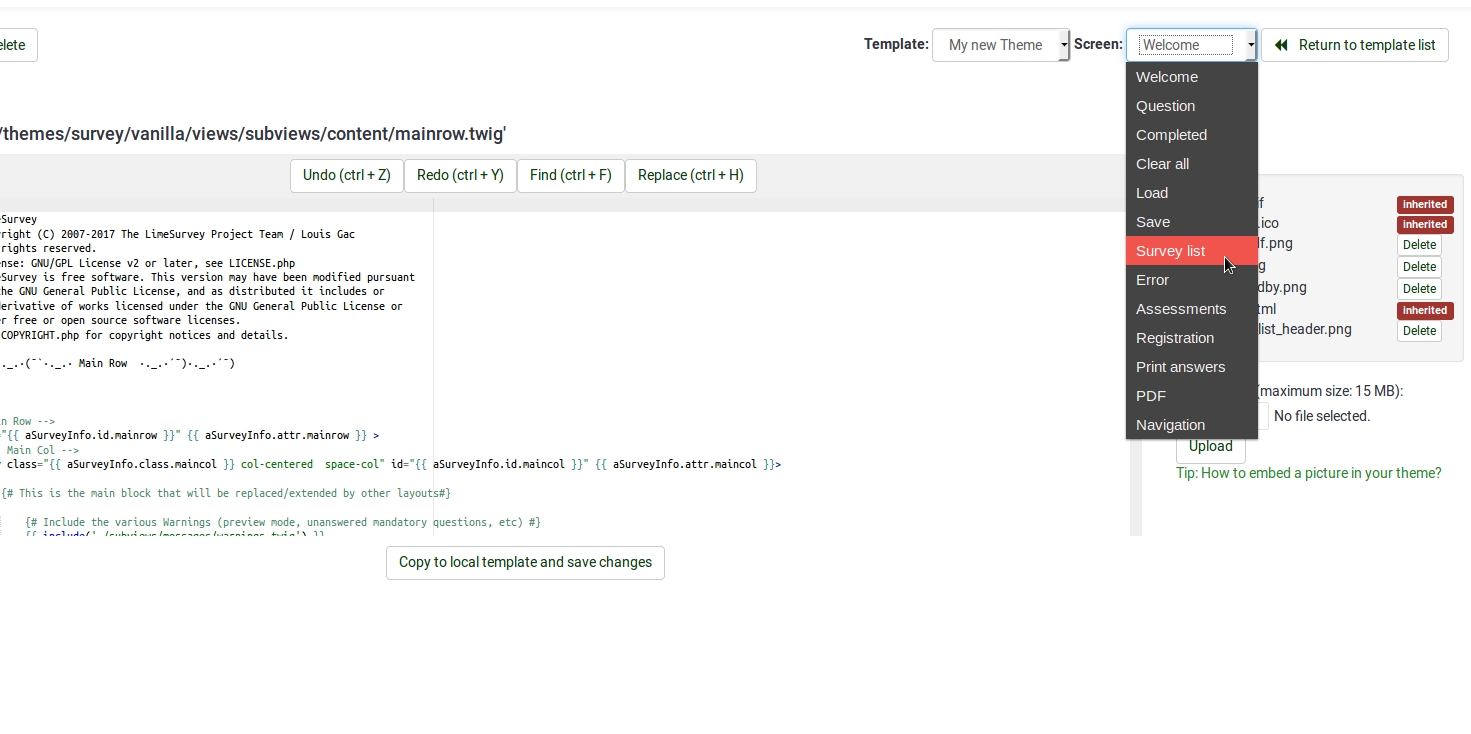
- Then select `layout_survey_list.twig´ in the left side menu.
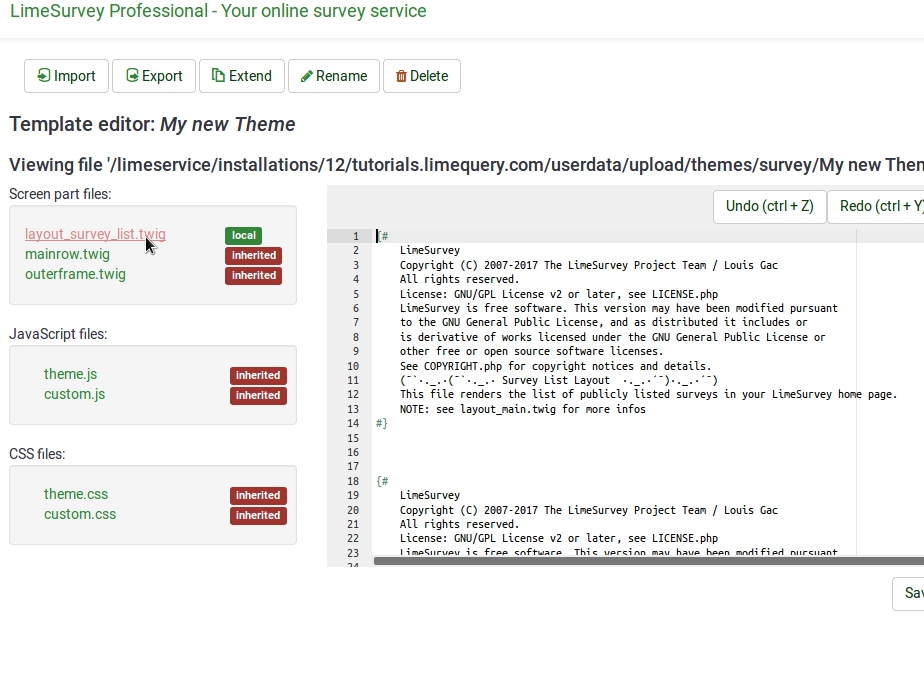
- In the editor scroll to line 126 and change the marked part to the filename of the image you uploaded to the theme before.
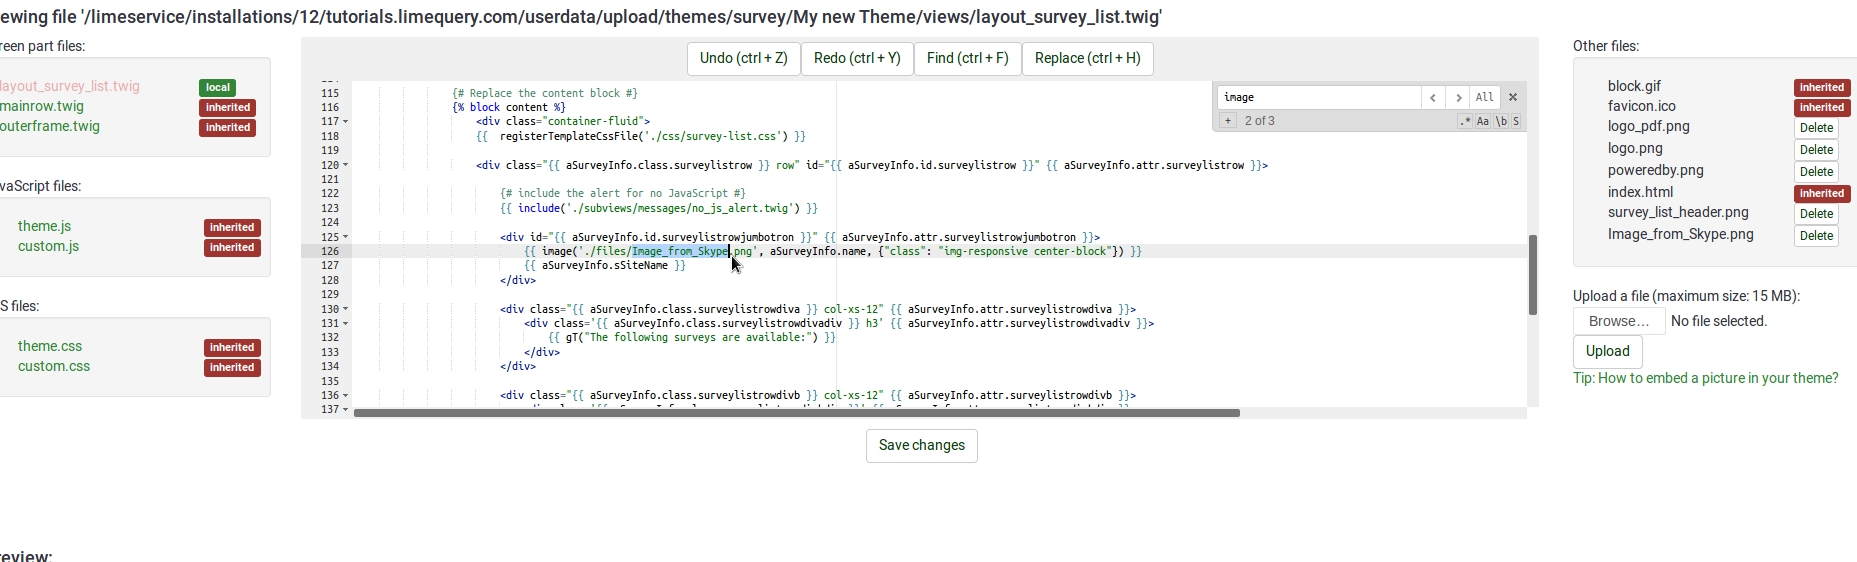
- Save your file.
- Change default theme to your extended theme.


Custom Question Views (New in 3.0 )
As of version 2.5, you can create template-specific custom views for questions and some of their incorporated elements. This is useful if you want to modify the HTML layout of a particular question type for one or more surveys.
- In application/config/config.php, find 'config'=>array and add this line to the array : 'allow_templates_to_overwrite_views'=>1
- In /{your_template}/config.xml, set "overwrite_question_views" to true
- Copy application/views/survey/* to template/{your_view_directory}/survey/
- Note that you only need to copy the files that you intend to modify but the file structure must remain the same as in application/views/survey/
Insert Custom CSS or JavaScript files for template (New in 2.50 )
As of version 2.50, you can use the config.xml file to automatically load plugin files.
- Upload your files to the template /css or /scripts folder
- In /{your_template}/config.xml, add the file paths to the <css> or <js> blocks, something like this:
<css>
	<filename>css/jquery-ui-custom.css</filename>
	<filename>css/bootstrap-slider.css</filename>

	<filename>css/awesome-bootstrap-checkbox/awesome-bootstrap-checkbox.css</filename>
	<filename>css/flat_and_modern.css</filename>

	<filename>css/template.css</filename>

	<filename>css/myCustomPlugin.css</filename>
</css>
<js>
	<filename>scripts/template.js</filename>
	<filename>scripts/bootstrap-slider.js</filename>

	<filename>scripts/myCustomPlugin.js</filename>
</js>