Skrócona instrukcja obsługi - LimeSurvey 3.0+
From LimeSurvey Manual
Wprowadzenie - czym jest LimeSurvey?
LimeSurvey to darmowa aplikacja do ankiet online o otwartym kodzie źródłowym, napisana w PHP i rozpowszechniana na licencji gpl-2.0.html Powszechna Licencja Publiczna GNU 2. Oprogramowanie umożliwia użytkownikom tworzenie i publikowanie ankiet online, zbieranie odpowiedzi, tworzenie statystyk i eksport wyników do innych aplikacji. Możesz zainstalować LimeSurvey na swoim własnym serwerze (LimeSurvey Community Edition) lub skorzystać z naszej usługi hostingowej (LimeSurvey Cloud).
Ten przewodnik szybkiego startu został napisany dla użytkowników LimeSurvey Cloud. Jeśli korzystasz z LimeSurvey Community Edition, zapoznaj się z sekcją Instalacja w podręczniku LimeSurvey, aby zainstalować LimeSurvey na własnym serwerze.
Utwórz darmowe konto LimeSurvey
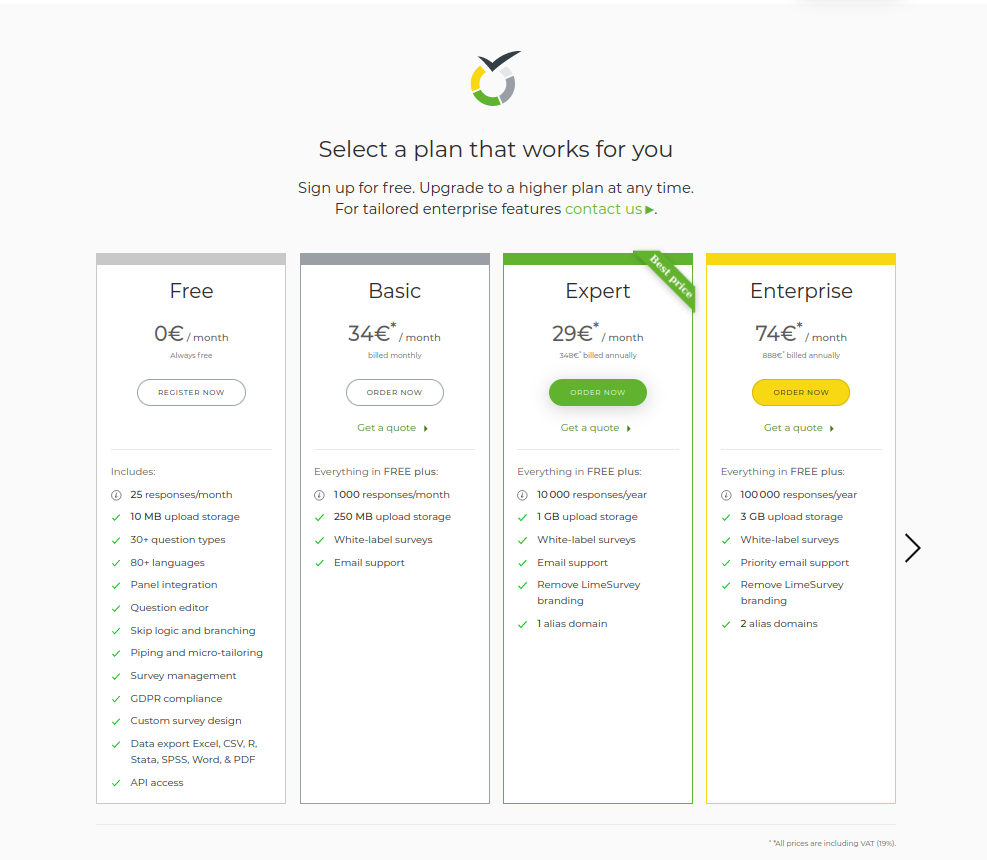
Wypróbuj teraz! Utwórz bezpłatne konto LimeSurvey, aby przetestować jego funkcje i podstawowe funkcje. Kliknij przycisk „Zarejestruj się bezpłatnie” lub wybierz opcję „Cennik” na stronie głównej witryny LimeSurvey i dokończ rejestrację.

Jeśli wybierzesz opcję „Zarejestruj się za darmo”, zostaniesz przeniesiony bezpośrednio na stronę rejestracji.
Po wybraniu opcji „Cennik” zostaną wyświetlone cztery opcje: „Bezpłatna”, „Podstawowa”, „Ekspert” i „Enterprise”. Kliknij „Zarejestruj się teraz” w polu opcji „BEZPŁATNIE”. Zostaniesz przekierowany na stronę rejestracji.
Następnie wypełnij następujące pola:
- Nazwa użytkownika: Wybierz nazwę użytkownika dla swojego konta. Twoja nazwa użytkownika będzie również używana w celu uzyskania dostępu do Twojej witryny LimeSurvey.
- E-mail: Link aktywacyjny zostanie wysłany e-mailem na podany adres e-mail.
- Hasło: Wybierz hasło, które będzie również używane do uzyskiwania dostępu do Twojej witryny LimeSurvey.
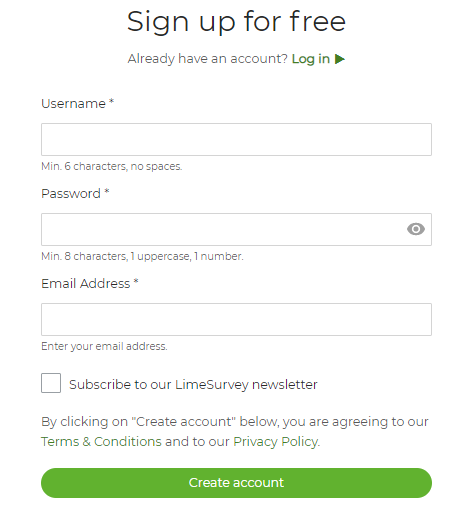
Kliknij każde pole tekstowe, aby wyświetlić szczegółowe informacje dotyczące wymaganych informacji dla każdego pola. Zapisz się do newslettera LimeSurvey, aby otrzymywać pomoc, wskazówki, aktualizacje, zniżki na usługi i najświeższe informacje.
Po utworzeniu konta LimeSurvey otrzymasz wiadomość e-mail. W tej wiadomości e-mail znajduje się link aktywacyjny konta. Kliknij link, aby uzyskać dostęp do nowo utworzonego konta. Kliknięcie linku przeniesie Cię do Twojego konta na LimeSurvey.
Konfigurowanie witryny z ankietami
Zanim zaczniesz tworzyć ankiety online i zarządzać nimi, musisz utworzyć witrynę z ankietami. Zaloguj się na swoje konto i kliknij „Utwórz witrynę z ankietami”.

Aby utworzyć witrynę LimeSurvey:
- Wprowadź nazwę swojej witryny.
- Wybierz nazwę domeny z menu rozwijanego.
- Wybierz lokalizację serwera.
- Kliknij Zapisz i skonfiguruj witrynę LimeSurvey”.
Proces może potrwać do 20 sekund. Po zakończeniu procesu okno zostanie zamknięte i nastąpi powrót do strony konta.

Możesz teraz uzyskać dostęp do swojej witryny ankiety, klikając opcję „Wyświetl witrynę ankiety” u góry strony. Zaloguj się na swoje konto przy użyciu danych uwierzytelniających LimeSurvey.org.
Zacznij korzystać z LimeSurvey
W prawym górnym rogu strony znajduje się pasek narzędzi. Na środku strony znajduje się sześć pól ze skrótami do najczęściej używanych funkcji LimeSurvey.
Pasek narzędzi zawiera następujące opcje:
- Samouczki: Tutaj (w dowolnej aplikacji LimeSurvey 3+) znajdziesz samouczek "Wycieczka dla początkujących", który pomoże Ci uzyskać podstawowe zrozumienie LimeSurvey i jego najważniejszych funkcji.
- Konfiguracja: Tutaj, w zakładkach Ustawienia, Użytkownicy i Zaawansowane, znajdziesz opcje pomagające dostosować aplikację LimeSurvey, zarządzać użytkownikami i uczestnikami ankiety, i dostosuj swoje ankiety.
- Ustawienia: Opcje dostosowywania aplikacji LimeSurvey.
- Ustawienia strony głównej: Opcje dostosowywania strony głównej.
- Ustawienia globalne: Wprowadzone tutaj zmiany dotyczą całej aplikacji LimeSurvey, łącznie z ustawieniami innych niż superadministrator dla wszystkich użytkowników.
- Menedżer wtyczek: Opcje aktywacji i zarządzania wszystkimi wtyczkami LimeSurvey , które są wspierane przez zespół LimeSurvey. Możesz także dodawać własne wtyczki.
- Konfiguracja menu: Opcje tworzenia nowych menu lub dodawania wpisów do istniejących menu.
- Konfiguracja wpisów menu: Opcje tworzenia , edycja lub usuwanie wpisów menu.
- Użytkownicy: Opcje związane z zarządzaniem użytkownikami i uczestnikami ankiety.
- Zarządzaj administratorami ankiet: Możesz dodać nowych administratorów ankiet stąd.
- Utwórz/edytuj grupy użytkowników: Ta funkcja pozwala na podzielenie użytkowników administracyjnych na grupy.
- Centralna baza danych uczestników: Ty, jako administrator, można użyć tej funkcji do przechowywania informacji o respondentach ankiety w centralnej tabeli/bazie danych, która jest niezależna od jakiejkolwiek tabeli uczestników.
- Ustawienia zaawansowane: Ustawienia niezwiązane z użytkownikiem lub ankietą, które pozwalają na ulepszenie twoja aplikacja LimeSurvey.
- Edytor motywów: Opcje umożliwiające dodawanie/edycję/usuwanie tematów ankiet, tematów administracyjnych lub tematów pytań. Możesz wybrać motyw, aby dostosować ankietę, a także interfejs LimeSurvey.
- Zarządzaj zestawami etykiet: Zestawy etykiet to lista kodów z etykietami, których w większości przypadków można używać jako odpowiedzi lub pytań podrzędnych typy pytań.
- Sprawdź integralność danych: Sprawdza spójność i redundancję danych.
- Utwórz kopię zapasową całej bazy danych: Opcja tworzenia kopii zapasowej danych LimeSurvey podczas następuje ważna aktualizacja lub przeniesienie aplikacji LimeSurvey na inny serwer.
- Ustawienia: Opcje dostosowywania aplikacji LimeSurvey.
- Ankiety: Ankieta obejmuje: języki, grupy pytań, pytania, atrybuty pytań, odpowiedzi, pytania podrzędne, odpowiedzi domyślne, oceny, przydziałów, członków przydziałów i ustawień języka przydziałów. Po kliknięciu zielonej strzałki pojawi się okno z następującymi opcjami:
- Utwórz nową ankietę: Tworzy nową ankietę.
- Importuj nową ankietę: Importuje nową ankietę.
- Kopiuj ankietę: Umożliwia łatwe skopiowanie ankiety, która pojawi się na liście ankiet. Po skopiowaniu można go edytować.
- Wyświetl ankiety: Wyświetla listę wszystkich istniejących ankiet.
- Saldo odpowiedzi: Pokazuje liczbę odpowiedzi pozostałych na Twoim koncie Subskrypcja. Ponieważ w tej chwili masz dostęp tylko do bezpłatnego konta, jesteś ograniczony do 25 odpowiedzi miesięcznie. Jeśli zabraknie Ci odpowiedzi, po prostu kup więcej, korzystając z tego linku.
- Pamięć: To jest ilość dostępnych MB do przechowywania Twoich odpowiedzi i ankiet. Na darmowym koncie masz 10 MB przestrzeni dyskowej. Jeśli chcesz zwiększyć przestrzeń dyskową, wybierz jednej z następujących płatnych opcji tutaj.
- Nazwa użytkownika: Tutaj możesz wyświetlić swoje preferencje użytkownika lub wyloguj się ze swojego konta.
- Ikona dzwonka: Kliknij zielony dzwonek, aby wyświetlić powiadomienia związane z Twoją aplikacją LimeSurvey.
Na stronie głównej aplikacji LimeSurvey znajduje się sześć pól.
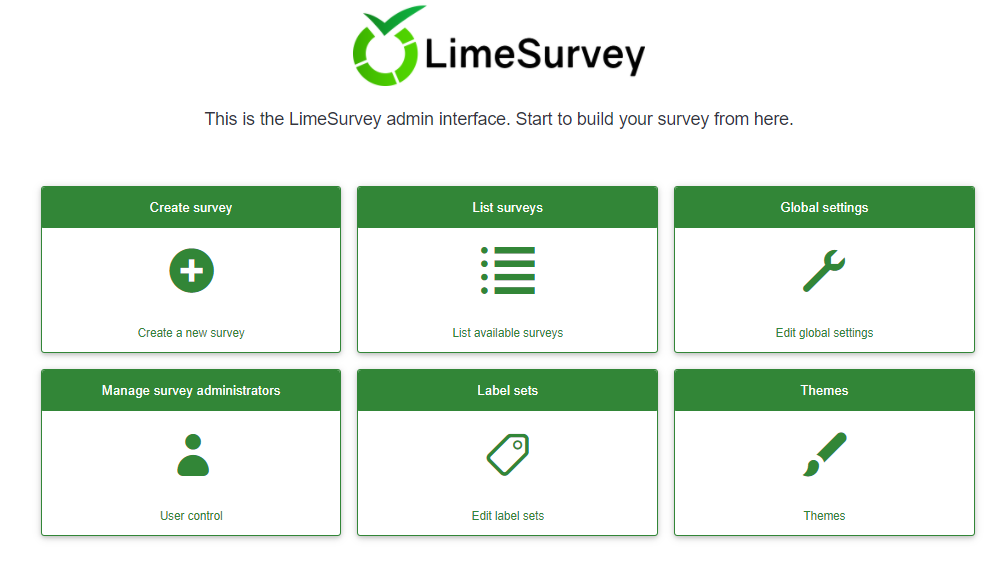
- Utwórz ankietę
- Wyświetl ankiety
- Ustawienia globalne
- 'Zarządzaj administratorami ankiet
- Zestawy etykiet
- Motywy
Create a survey
To create a survey, click the Create survey box.
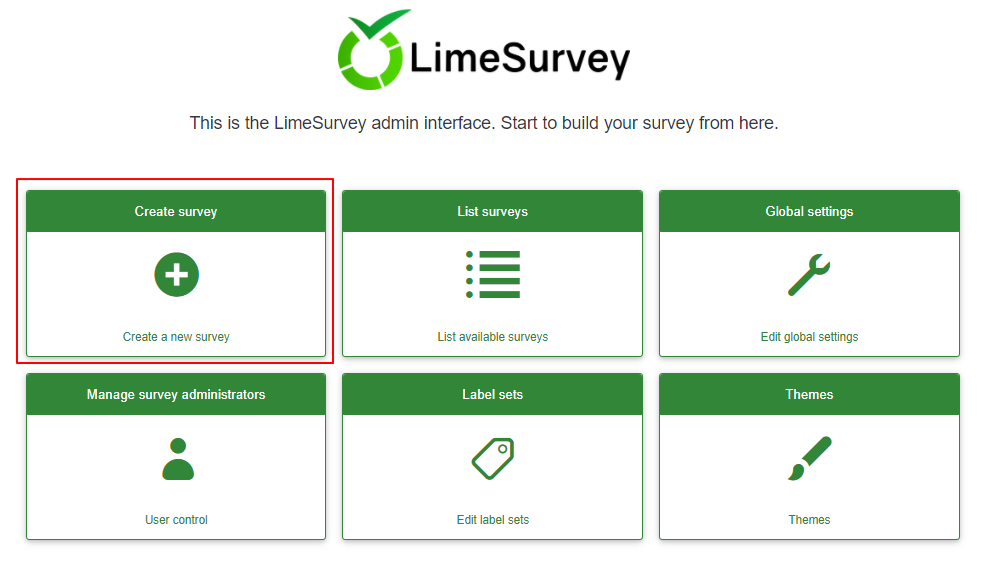
The Create survey page will be displayed.
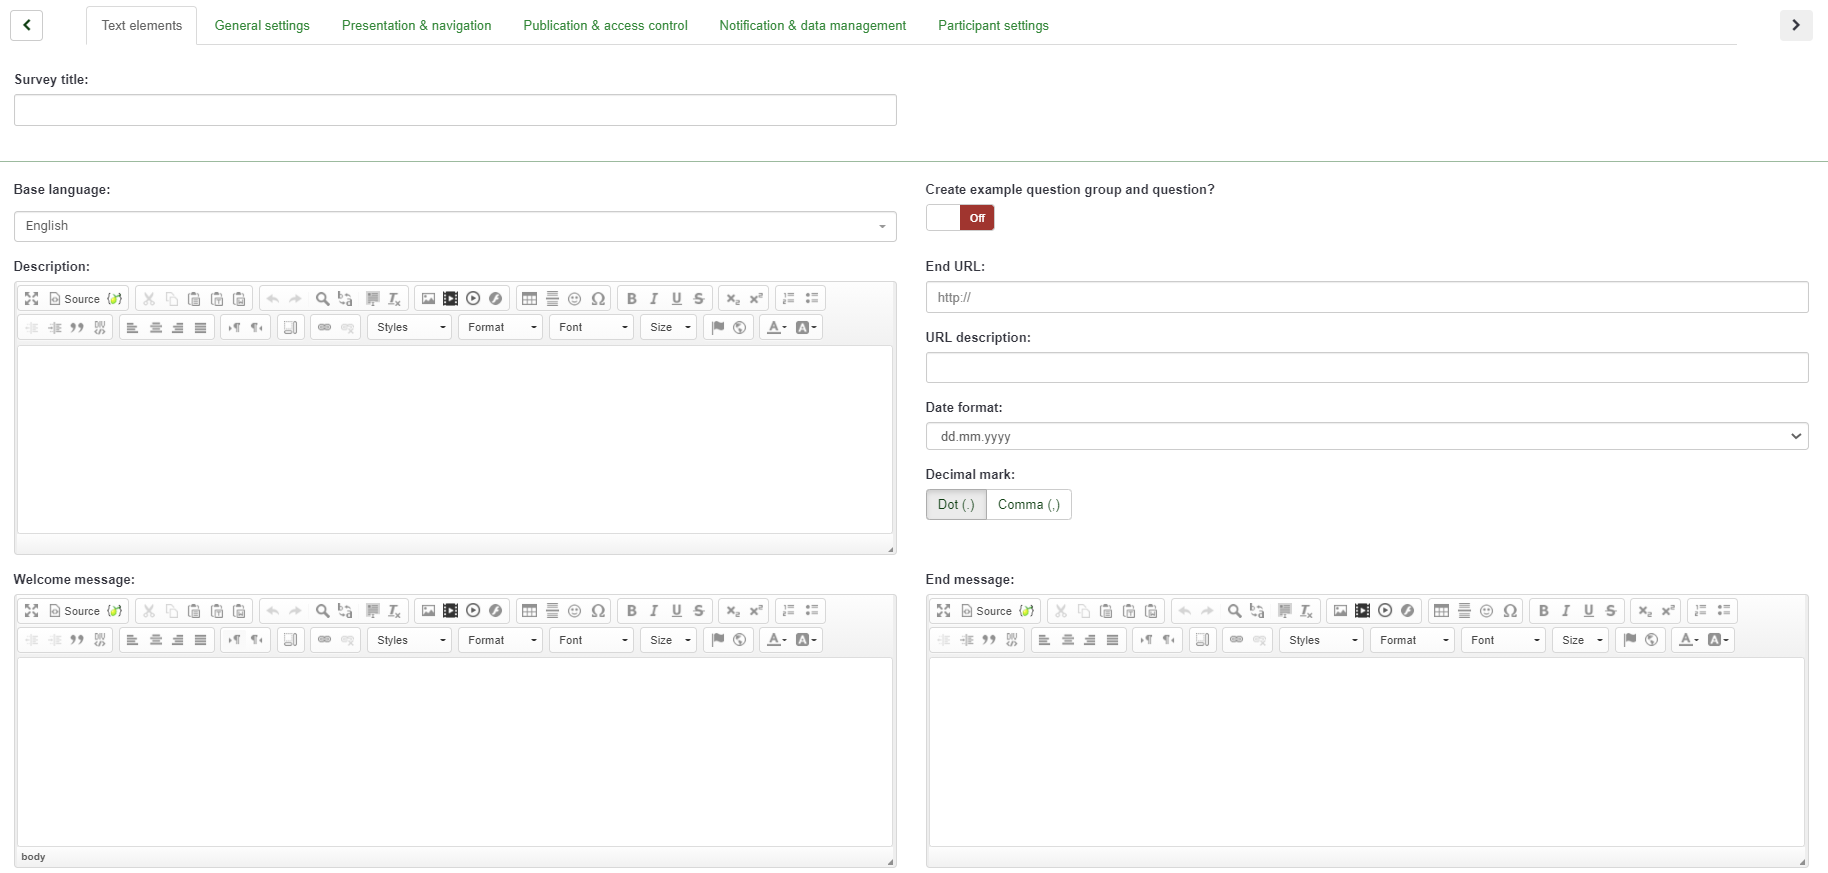
You will find the following on the Create survey page:
- Survey Title: Type in your survey title here. This is a required field. The title of the survey can be changed later.
- Basic Language This is the language used in the survey. The settings of the survey can be modified later to support additional languages.
- Sample Question: This feature is disabled by default. You can enable it to add a question group and question examples to your survey.
- End URL: If users finish filling out the questionnaire, you have the option to redirect them to another page. If you wish to redirect them, place the URL into the field and activate the "automatically load URL" option that is located under the Presentation & navigation tab.
- URL Description: A brief "End URL" description can be added if the user is re-directed to another webpage not related to the survey. It may be helpful to add a note (explaining the reason for the redirection to the respective URL).
- Date Format: This option is important when you want to record timestamps together with the survey participants' answers. You can click it to display a drop-down list of date formats. Choose the date format that your survey respondents will recognize (remember that different dates are used across the world).
- Decimal Format: Two options are available: dot (.) and comma (,). Select the one that is most widely used in the region where your survey will be conducted (e.g., US vs Germany).
- Description: A short description of the survey can be added here.
- Welcome Message: The survey participants will receive the welcome message that is entered here.
- End Message: Enter the message that participants will see once they submit their answers to the questionnaire (when the survey is complete).
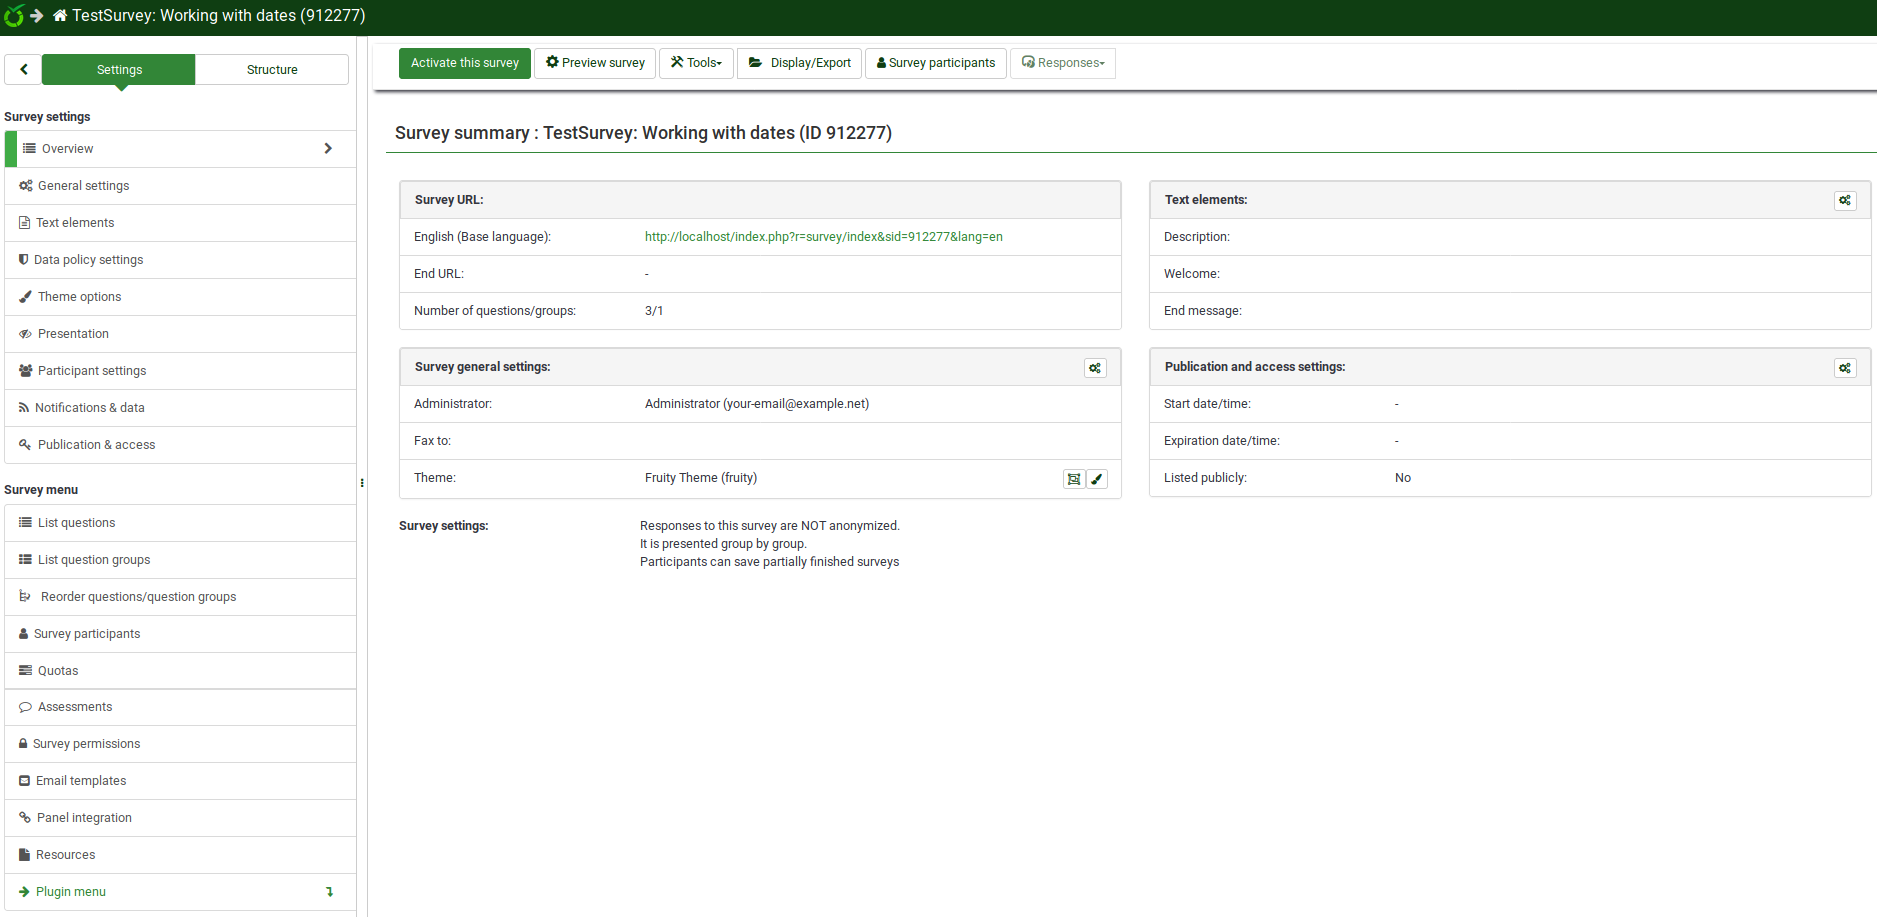
After completing the required fields for Text Elements, click Save in the upper-right corner of the window. You will be redirected to the home page of your newly created survey. From the home page of the new survey, you will be able to add question groups and questions.
Create a question group
Question Groups allow you to group questions together. You must add a question group before adding questions.
To create a question group, first choose the survey you want to add the question group to. You will find this option in the top toolbar of LimeSurvey's home page.
Click on the survey you wish to add the question group to. The survey page will be displayed. The menu on the left contains two tabs: Settings and Structure. It is necessary to work from the Structure tab when adding questions and question groups.
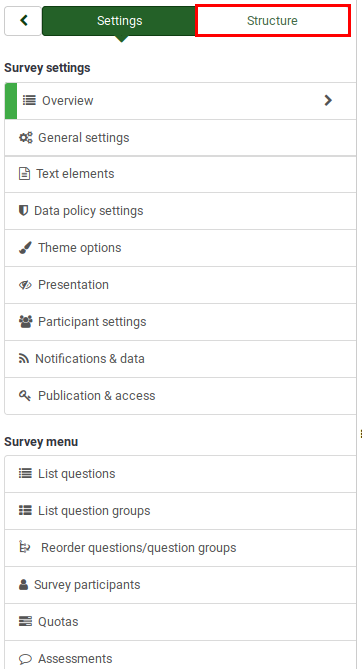
The menu will appear as follows when the Structure tab is selected.
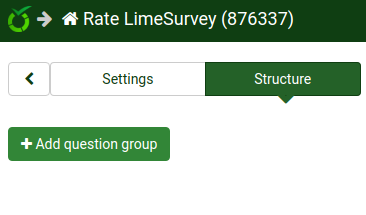
Next, click the Add question group button. The following page will be displayed.
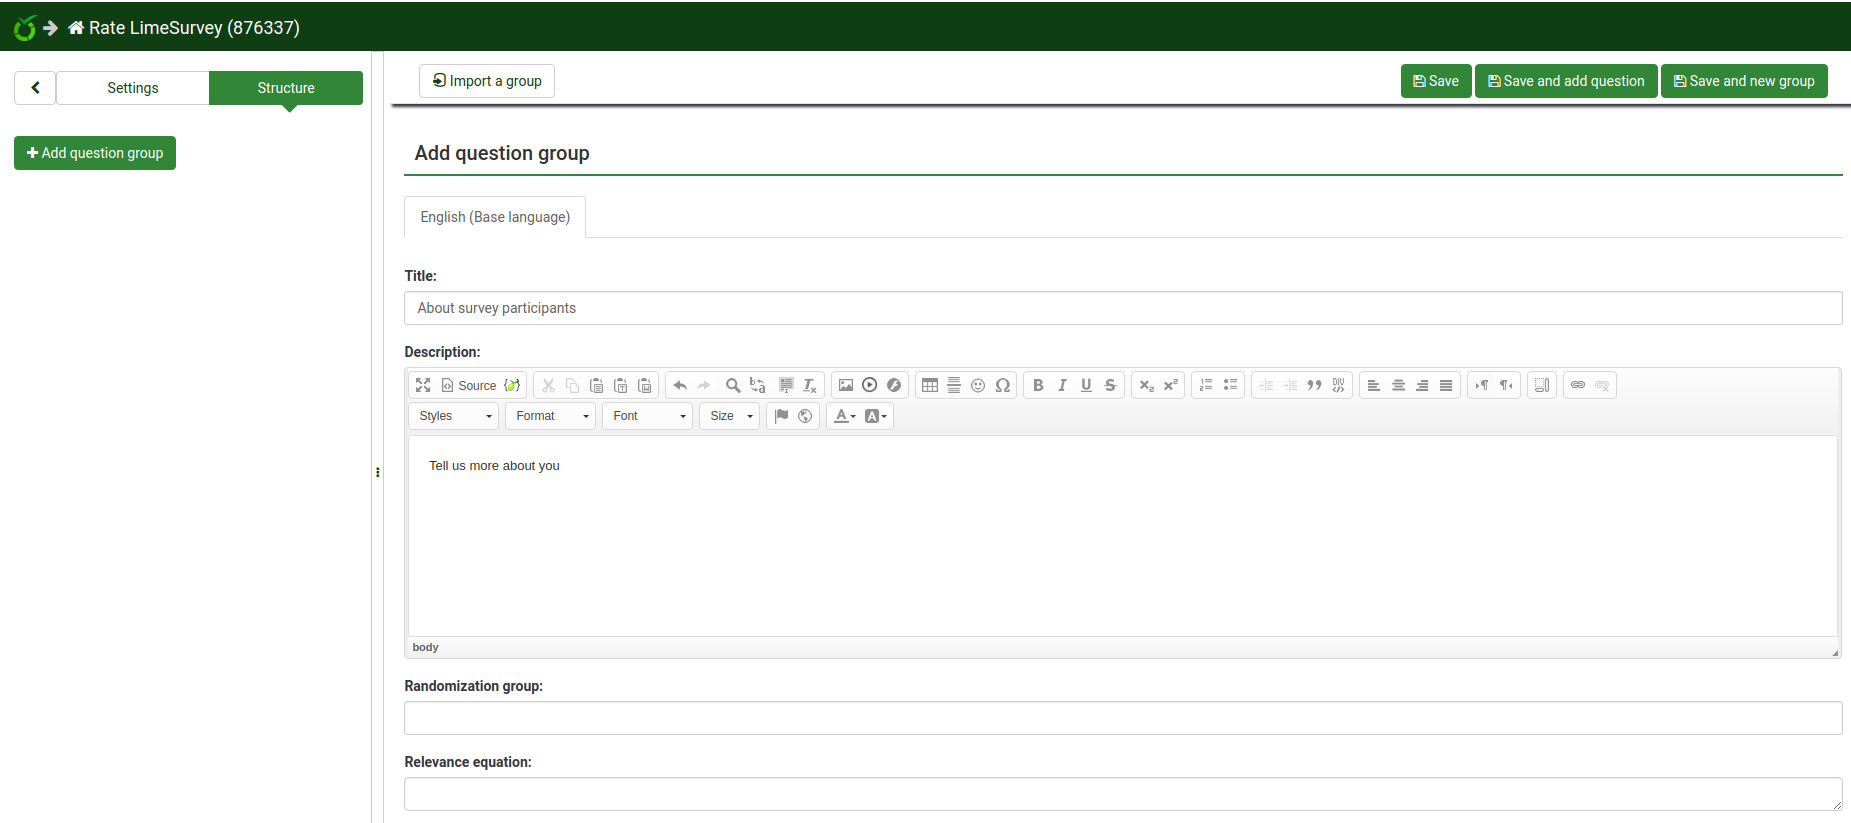
- Title: This is the name of the survey group.
- Description: A short description of the question group can be added. It will be displayed to the survey participants if the corresponding option is enabled from the settings of the survey.
- Randomization Group: This function is used to randomize certain question groups (the same must be allocated to the respective question groups).
- Relevance Equation This feature is used as a way to limit respondents to certain question groups based on their previous responses.
Click the Save button in the upper-right part of the window once you are done.
Create a question
Remember that you must first create a question group before you can add questions. Please review the steps presented above for adding question groups.
Once you have created the survey and added a question group, select the Structure tab again and click add question from the left menu bar or click add new question to group under the Group quick actions heading.

The Create question page will be displayed. It contains the following:
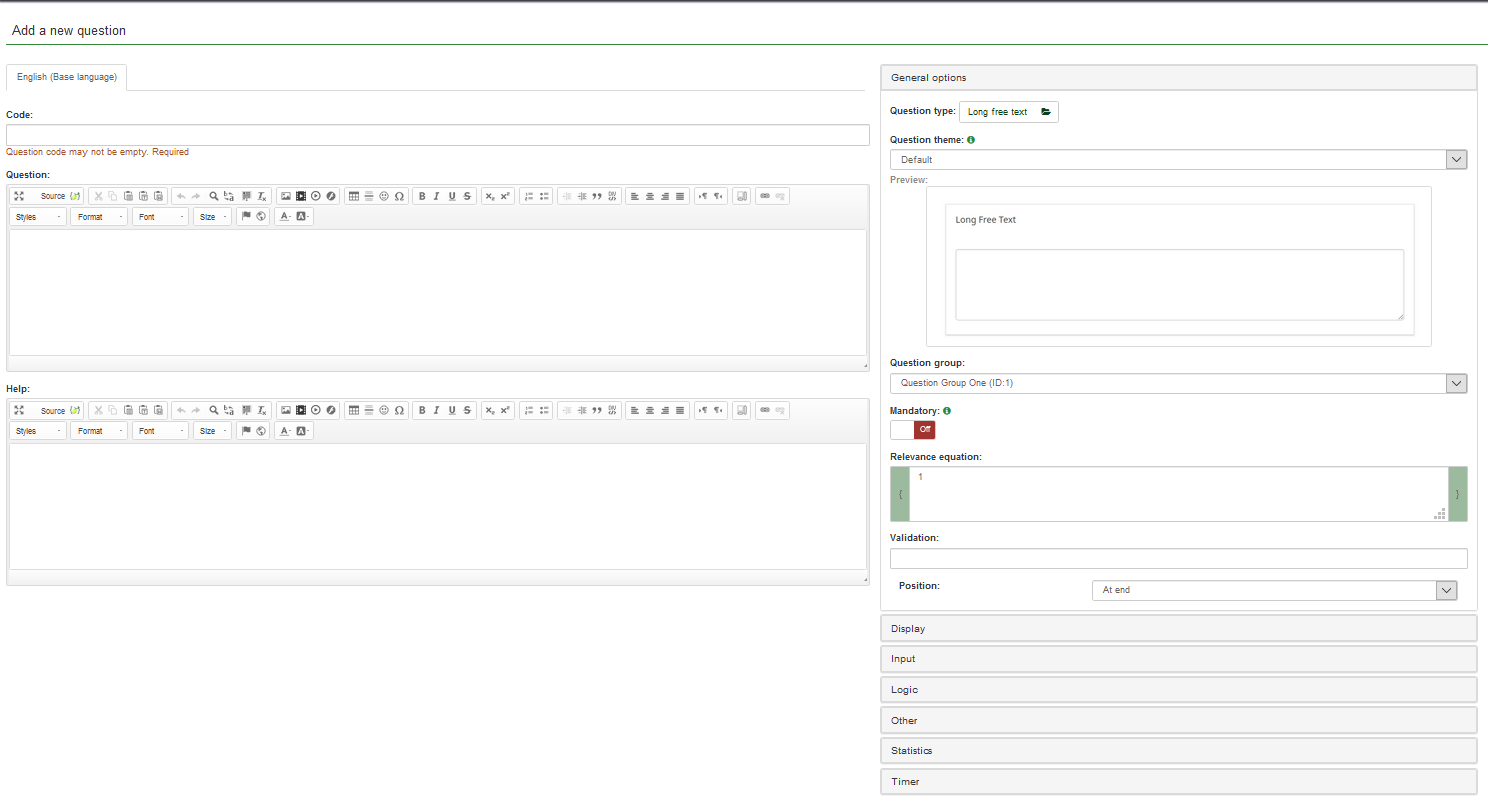
- Code is a representation of the individual question name/code with which the survey is stored in the database.
- Question: This is the question as it will appear to survey participants.
- Help: This is a short text that can be provided to help the survey participants better understand the question.
- General Options: The functionalities found in this option allow you to change the most important question-related settings. It includes seven options:
- Question Type: Many question types can be used in LimeSurvey. To better understand them, hover the mouse over each option or read our wiki on questions.
- Question Theme: You can choose a custom theme for the question (instead of the default).
- Question Group: Here you can choose which question group you would like to add the question to.
- Mandatory: This option is available for all question types. This setting allows you to require users to answer the question before they can move on to the next question.
- Validation: This feature is available on all free text type or numeric questions. It is used for response validation. If the response is not validated, the user will be prompted to try again before they can progress.
- Relevance Equation: This is a setting for advanced users. We recommend that the default value of "1" is used (it means that the item will always be shown).
- Position: Choose where you want to position the question in the group.
Please note that, depending on the type of question selected, different tabs will be displayed below the General settings tab. To find out more about this, we suggest that you to first read the following wiki section.
For example, if the Long free text question type is selected (the default option), then the following tabs will be displayed: General options, Display, Input, Logic, Other, Statistics, Timer.
Complete the required fields and click Save. You will be redirected to a page that contains the summary of the recently added question.
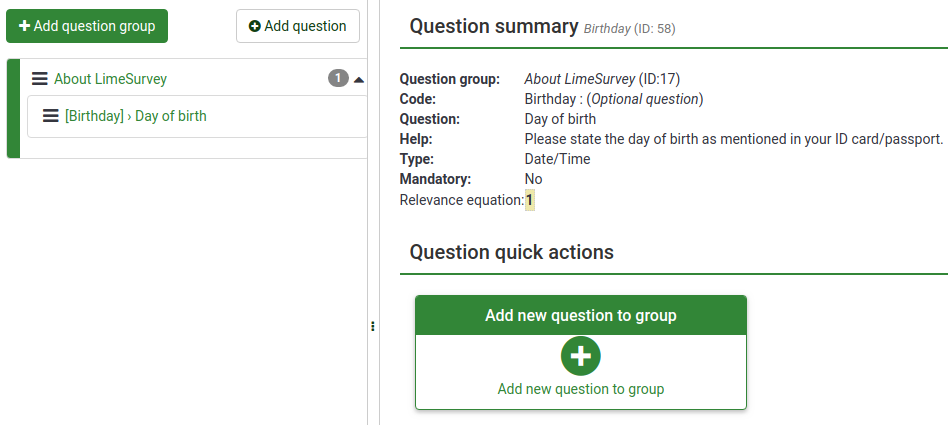
To add more questions, follow the same procedure described above.
Add subquestions and answers
Different types of questions may require subquestions, predefined sets of answers, both or neither. For example, a question that requires the age of a survey participant does not require a subquestion or predefined set of answers. On the other hand, a simple array question requires both subquestions and answers.
The next screenshot contains an array-type question.

Add subquestions
To add subquestions, go to the top toolbar and click Edit subquestions. Type in the subquestions you wish the survey participants to answer.

Add answers
To add a set of predefined answers, go to the top toolbar and click Edit answer options. Type in the answers.

Save the set of answers and preview the question (look for the Preview question button located on the top toolbar).
Our question looks like this:

Congratulations! You have successfully created your first array-type question.
Organize questions
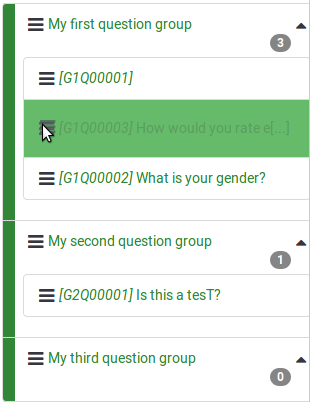
If your survey contains dozens of questions, it can be a time-consuming process to access each question and/or question group and edit the order one-by-one. The survey Structure menu allows you to quickly reorganize your questions and question groups. Select the Structure tab from the menu on the left and click the three-line symbol that is located in front of the question or group name and drag it to its new location.
Activate/Stop survey
Now that you have at least one question group and one question added to your survey, you can activate it. Select the Settings tab from the menu on the left and click on Overview. The following page will be displayed.
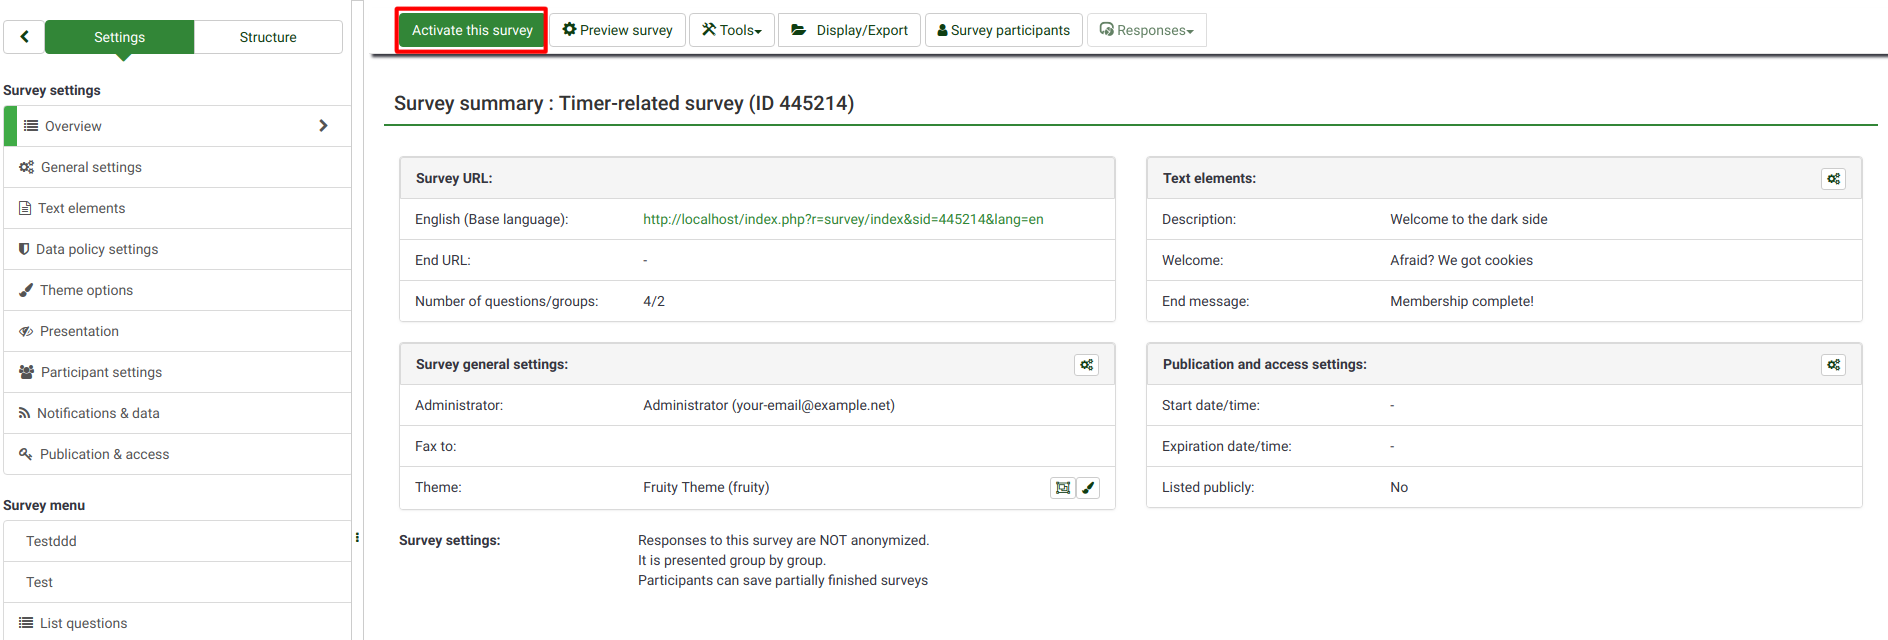
Click Activate this survey on the toolbar.
Before activation, a window will be displayed asking you about general survey settings.

- Anonymized Responses: This option allows you to decide if the information in your survey's token table is matched to the responses in your survey or kept anonymous. If you decide to enable it, your survey is set to anonymize responses. You will not be able to link answers to respondents.
- Save IP Address: If enabled, the IP address of the survey respondent will be stored together with his/her answers.
- Save Timings: If enabled, the time spent on each page of the survey by each survey participant is recorded.
- Date Stamp: Turn this option on if you would like to see the date the answers were submitted.
- Save Referrer URL: If enabled, the referrer URL will be stored together with the answers.
Once the desired functionalities have been enabled, click Save & activate survey. The following message will be displayed.

Select the option "No, thanks" to disable closed-access mode! This will allow everyone to access to your survey using the survey link.
Congratulations! You have activated your first survey! If you want to start sharing the survey URL, go to the home page of your survey, and look for the survey URL in the Survey summary section under Share your survey.
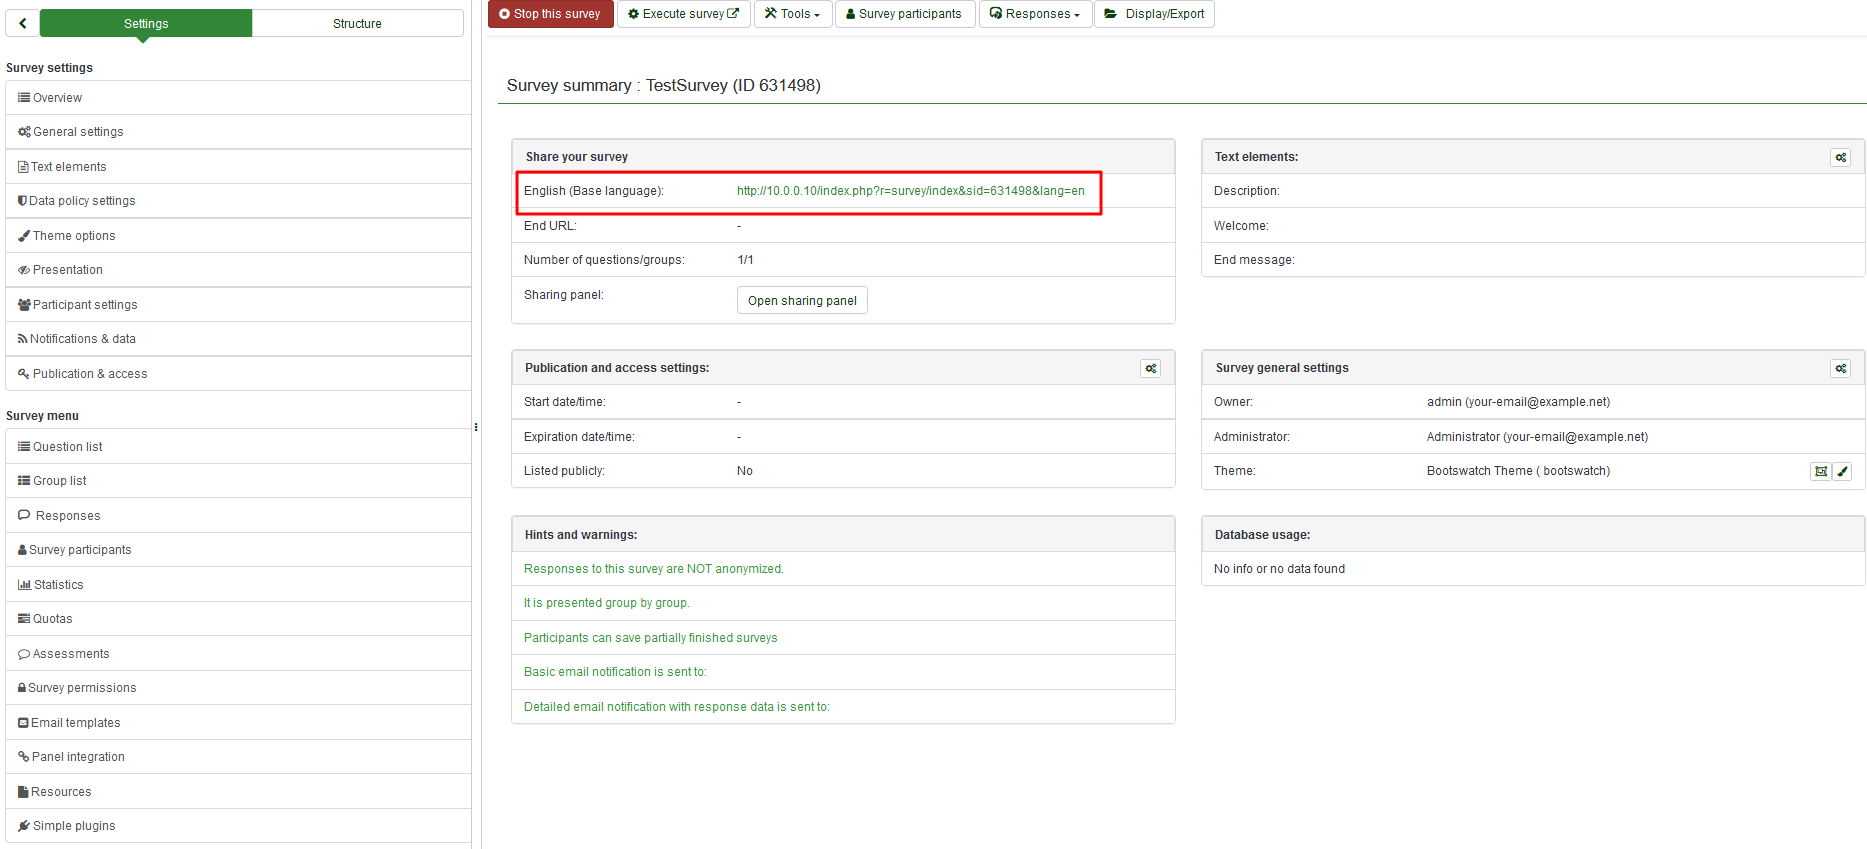
Copy the link and start sharing it.
If you want to deactivate (stop) the survey, click the Overview tab from the menu on the left and look for Stop this survey located on the top toolbar.

Statistics
To quickly view your survey statistics, click Survey located on the top toolbar of your LimeSurvey home page. A list with all the available surveys will be displayed. Next, go to the last column and click the Statistics button (![]() ) that corresponds to the row of the survey you wish to analyse.
) that corresponds to the row of the survey you wish to analyse.

A new window with a set of graphs will be displayed. If you would like to use them in a report, scroll to the bottom of the page and click Export images. Each chart will be saved separately in.png format and archived as a.zip file.
Click Expert mode in the upper-right part of the window to access more statistics-related filters.
Once you have chosen your filters, click View Statistics in the upper-right corner of the window.

The results are displayed in HTML, Excel, or PDF format based on which is chosen.
Exporting questions and responses
You can export survey results in different formats to produce statistics and graphs using apps such as SPSS, R, STATA, etc.. Access the survey you wish to analyze. Click Responses on the top toolbar, and then select Responses & Statistics.

Now you are on the Browse Responses page. Click Export from the top toolbar and select the desired export format. If you select the first option, all the available formats in which you can export the data will be displayed.

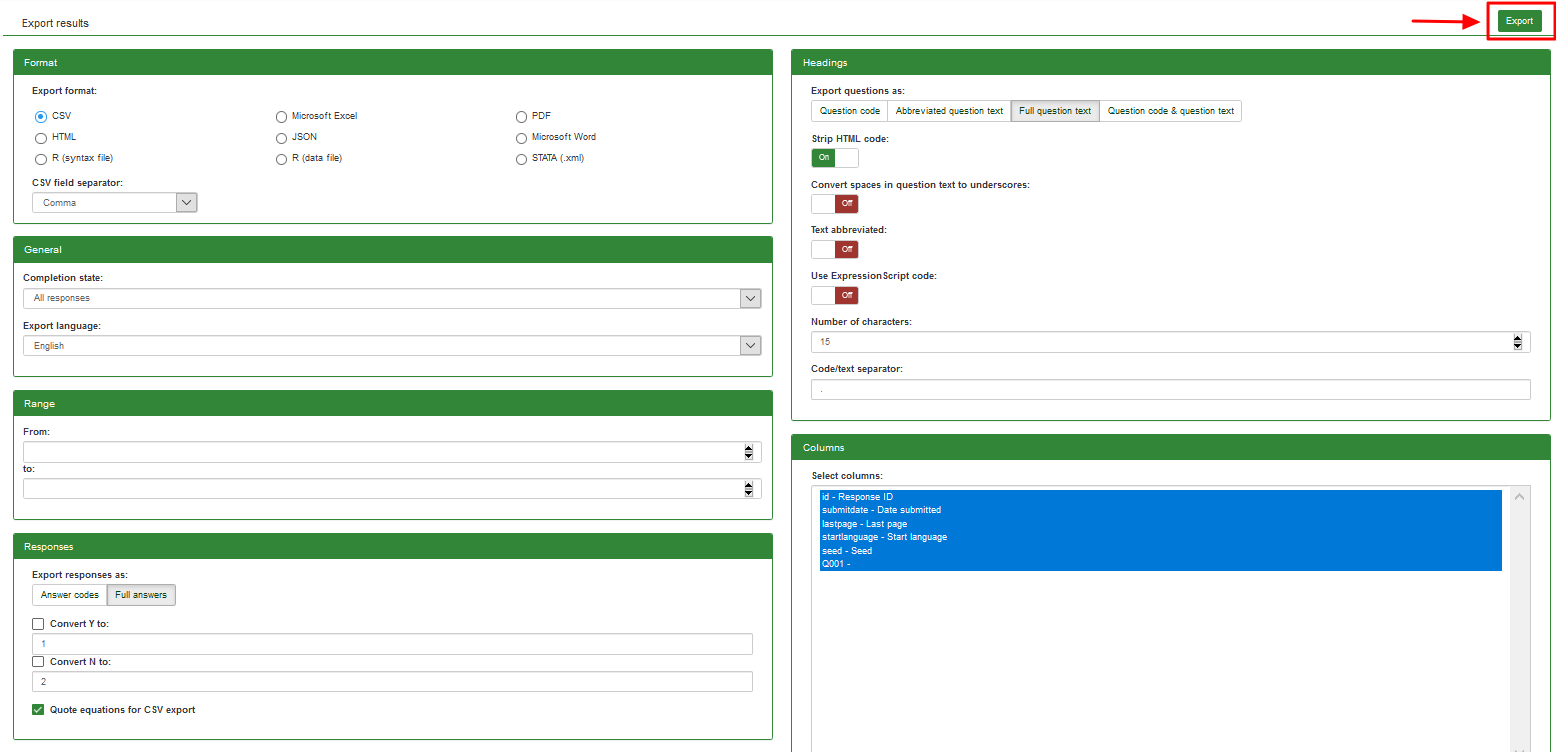
Once the filters are set, click Export located in the upper-right side of the window.
Other LimeSurvey features - advanced users
Check out the features of the LimeSurvey Cloud package.
Still have questions? Please join our LimeSurvey community chat on Discord.