Quick start guide - LimeSurvey 3.0+/pl: Difference between revisions
From LimeSurvey Manual
Maren.fritz (talk | contribs) No edit summary |
Maren.fritz (talk | contribs) No edit summary |
||
| Line 11: | Line 11: | ||
Ten przewodnik szybkiego startu został napisany dla użytkowników [https://www.limesurvey.org LimeSurvey Cloud]. Jeśli korzystasz z [https://community.limesurvey.org LimeSurvey Community Edition], zapoznaj się z sekcją [[Instalacja]] w podręczniku LimeSurvey, aby zainstalować LimeSurvey na własnym serwerze. | Ten przewodnik szybkiego startu został napisany dla użytkowników [https://www.limesurvey.org LimeSurvey Cloud]. Jeśli korzystasz z [https://community.limesurvey.org LimeSurvey Community Edition], zapoznaj się z sekcją [[Instalacja]] w podręczniku LimeSurvey, aby zainstalować LimeSurvey na własnym serwerze. | ||
=Utwórz darmowe konto LimeSurvey= | |||
= Utwórz darmowe konto LimeSurvey = | Wypróbuj teraz! Utwórz bezpłatne konto [https://www.limesurvey.org LimeSurvey], aby przetestować jego funkcje i podstawowe funkcje. Kliknij przycisk „Zarejestruj się bezpłatnie” lub wybierz opcję „Cennik” na stronie głównej [https://www.limesurvey.org witryny LimeSurvey] i dokończ rejestrację. | ||
[https://www.limesurvey.org LimeSurvey] | |||
Revision as of 09:40, 26 September 2023
Wprowadzenie - czym jest LimeSurvey?
LimeSurvey to darmowa aplikacja do ankiet online o otwartym kodzie źródłowym, napisana w PHP i rozpowszechniana na licencji gpl-2.0.html Powszechna Licencja Publiczna GNU 2. Oprogramowanie umożliwia użytkownikom tworzenie i publikowanie ankiet online, zbieranie odpowiedzi, tworzenie statystyk i eksport wyników do innych aplikacji. Możesz zainstalować LimeSurvey na swoim własnym serwerze (LimeSurvey Community Edition) lub skorzystać z naszej usługi hostingowej (LimeSurvey Cloud).
Ten przewodnik szybkiego startu został napisany dla użytkowników LimeSurvey Cloud. Jeśli korzystasz z LimeSurvey Community Edition, zapoznaj się z sekcją Instalacja w podręczniku LimeSurvey, aby zainstalować LimeSurvey na własnym serwerze.
Utwórz darmowe konto LimeSurvey
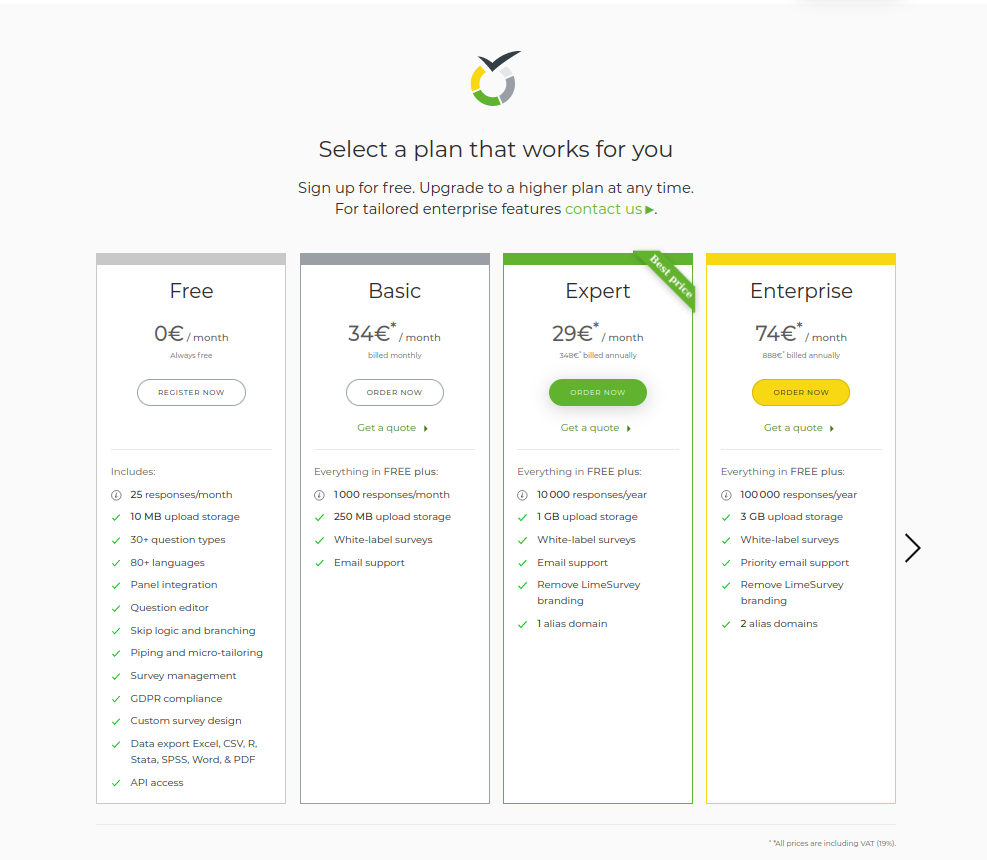
Wypróbuj teraz! Utwórz bezpłatne konto LimeSurvey, aby przetestować jego funkcje i podstawowe funkcje. Kliknij przycisk „Zarejestruj się bezpłatnie” lub wybierz opcję „Cennik” na stronie głównej witryny LimeSurvey i dokończ rejestrację.

Pojawią się cztery opcje: "free", "basic", "expert" i "enterprise" . Kliknij przycisk "Register Now" w polu wyboru "Free option box":
Four options will be displayed when Pricing is selected: Free, Basic, Expert, and Enterprise. Click Register Now in the FREE option box. You will be redirected to the registration page.
Następny krok obejmuje wypełnienie następujących pól:
- 'Nazwa użytkownika:' nazwa użytkownika twojego konta, która będzie również używana do uzyskania dostępu do instalacji LimeSurvey;
- 'Email:' adres e-mail, na który zostanie wysłana wiadomość z linkiem aktywacyjnym;
- 'Password:' hasło do konta, które będzie również używane do uzyskania dostępu do instalacji LimeSurvey.
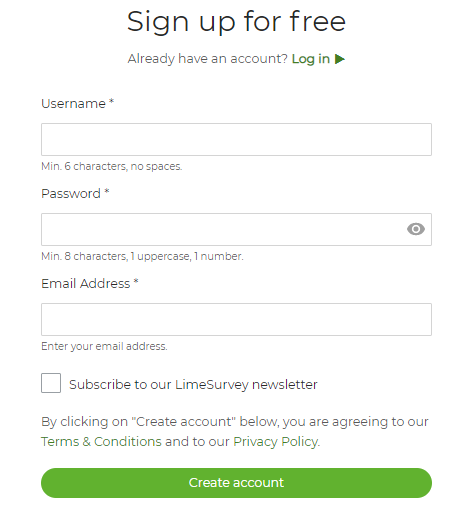
Po najechaniu myszką na każde z pól, pojawią się pola tekstowe z dalszymi szczegółami. Opcjonalnie możesz także subskrybować biuletyn LimeSurvey, aby uzyskać pomoc, porady i wskazówki, zniżki na usługi i najnowsze wiadomości.
Po utworzeniu konta LimeSurvey, klikając przycisk „ZAREJESTRUJ SIĘ”, otrzymasz od nas wiadomość e-mail. Ta wiadomość zawiera link aktywacyjny, który należy kliknąć, aby uzyskać dostęp do nowo utworzonego konta. Po kliknięciu zostaniesz przekierowany na stronę LimeSurvey, automatycznie logując się do swojego konta LimeSurvey.
Setting up your survey site
Aby uzyskać dostęp do linku ankiety, musisz najpierw utworzyć instalację. Kliknij swoją nazwę użytkownika na głównym pasku narzędzi, a następnie przejdź do 'your LimeSurvey profile' :

Wybierz 'Instalacje' z menu profilowego znajdującego się po lewej stronie ekranu i utwórz instalację:
The process can take up to 20 seconds. When the process is complete, the window will close and you will be taken back to your account page.

Możesz teraz uzyskać dostęp do swojego serwera, klikając „administracyjny adres URL”. Aby zalogować się do instalacji LimeSurvey, użyj poświadczeń LimeSurvey.org:
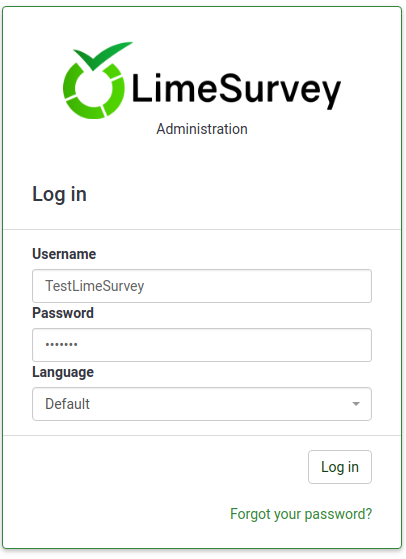
Zacznij korzystać z LimeSurvey
Po zalogowaniu znajdziesz się na stronie głównej instalacji LimeSurvey. Zawiera pasek narzędzi znajdujący się w prawej górnej części okna i zestaw pól, z których każdy odpowiada sześciu skrótom funkcji LimeSurvey, umieszczonym na środku strony głównej.
Pasek narzędzi zawiera następujące opcje:
- Poradniki: Jeśli klikniesz tę opcję, uzyskasz dostęp do wbudowanych samouczków LimeSurvey. Na przykład jeden samouczek, do którego można uzyskać dostęp z dowolnej instalacji LimeSurvey 3+, to ""Przewodnik dla początkujących""
- Konfiguracja: Po wybraniu pojawi się okno dialogowe, z którego można administrować twoją instalacja LimeSurvey.
- Ustawienia: W tej zakładce możesz znaleźć opcje, które pomogą Ci dostosować instalację LimeSurvey.
- Ustawienia strony startowej: Użytkownicy mogą użyć tej opcji, aby dostosować ustawienia strony głównej zgodnie ze swoimi potrzebami;
- Ustawienia globalne: Zmiany dokonane tutaj wpływają na całą instalację LimeSurvey;
- Menedżer wtyczek: Pozwala każdemu użytkownikowi aktywować szereg wtyczek zaprojektowanych przez zespół LimeSurvey. Nowe wtyczki mogą być również dodawane.
- Użytkownicy: W tej zakładce możesz znaleźć opcje związane z zarządzaniem użytkownikami i uczestnikami ankiet.
- Administratorzy ankiet: stąd można dodać nowych administratorów ankiet;
- Grupy użytkowników: Ta funkcja służy do grupowania użytkowników administracyjnych w poszczególne grupy;
- Centralna baza uczestników: " Pozwala każdemu administratorowi przechowywać informacje o uczestnikach w centralnej tabeli / bazie danych, która jest niezależna od każdej innej tabeli zawierającej dane uczestników badania.
- Zaawansowane: Zawiera opcje, które nie są związane z ustawieniami użytkownika lub ankiety. Mogą być one użyte do ulepszenia instalacji LimeSurvey.
- Motywy: Kliknij poniższą opcję, jeśli chcesz dodać / edytować / usunąć motywy ankiet, motywy administracyjne lub motywy pytań. Motywy pozwalają dostosować wygląd stron w ankiecie lub wygląd interfejsu użytkownika LimeSurvey;
- Zestawy etykiet: Zestawy etykiet są zasadniczo szablonami list, gdzie każda lista posiada zestaw kodów z etykietami. Listy te mogą być użyte w większości typów pytań jako odpowiedzi lub jako subpytania;
- Spójność danych: Sprawdza spójność i redundancję danych;
- Kopia bazy danych: Służy do tworzenia kopii zapasowych bazy danych LimeSurvey, podczas ważnych aktualizacji LimeSurvey lub gdy przenosisz instalację LimeSurvey na inny serwer;
- Szybka aktualizacja: Jest to narzędzie wykorzystywane do łatwej aktualizacji instalacji LimeSurvey z poziomu przeglądarki internetowej za pomocą kilku kliknięć myszką (zamiast przeprowadzania ręcznej ponownej instalacji LimeSurvey).
- Ustawienia: W tej zakładce możesz znaleźć opcje, które pomogą Ci dostosować instalację LimeSurvey.
- Ankiety: Ankieta obejmuje różne połączone ze sobą w bazie danych: języki, grupy pytań, pytania, atrybuty zapytań, odpowiedzi, subpytania, domyślne odpowiedzi, oceny, limity, itp. Po rozwinięciu za pomocą strzałki pokazują się następujące opcje:
- Utwórz ankietę: Nowe ankiety mogą zostać utworzone i dodane do listy ankiet;
- Importuj ankietę: Jeśli chcesz zaimportować ankietę do swojej listy ankiet, użyj tej funkcji;
- Kopiuj ankietę: Pozwala użytkownikowi szybko skopiować ankietę. Pojawi się ona następnie na liście ankiet dostępnych do edycji;
- Lista ankiet: Pozwala uzyskać przegląd wszystkich istniejących ankiet.
- Bilans odpowiedzi: Pokazuje liczbę odpowiedzi pozostawionych w subskrypcji. Ponieważ w tej chwili masz dostęp tylko do bezpłatnego konta, dostępnych jest 25 odpowiedzi miesięcznie. Jeśli zabraknie odpowiedzi, kup więcej na [1] ;
- Dostępne miejsce: reprezentuje ilość MB, które są do Twojej dyspozycji do przechowywania ankiet i odpowiedzi. Ponieważ utworzyłeś bezpłatne konto, otrzymujesz 10 MB miejsca na dysku. Jeśli chcesz otrzymać więcej miejsca, wybierz jedną z następujących opcji płatnych tutaj ;
- Nazwa użytkownika: Klikając na tą zakładkę, możesz uzyskać dostęp do preferencji i ustawień użytkownika lub wylogować się z konta;
- Powiadomienia: Jest reprezentowany przez ikonę dzwonka - W tym miejscu zostaną wyświetlone różne powiadomienia związane z instalacją LimeSurvey.
Domyślnie na stronie głównej Twojej instalacji LimeSurvey znajduje się sześć pól:
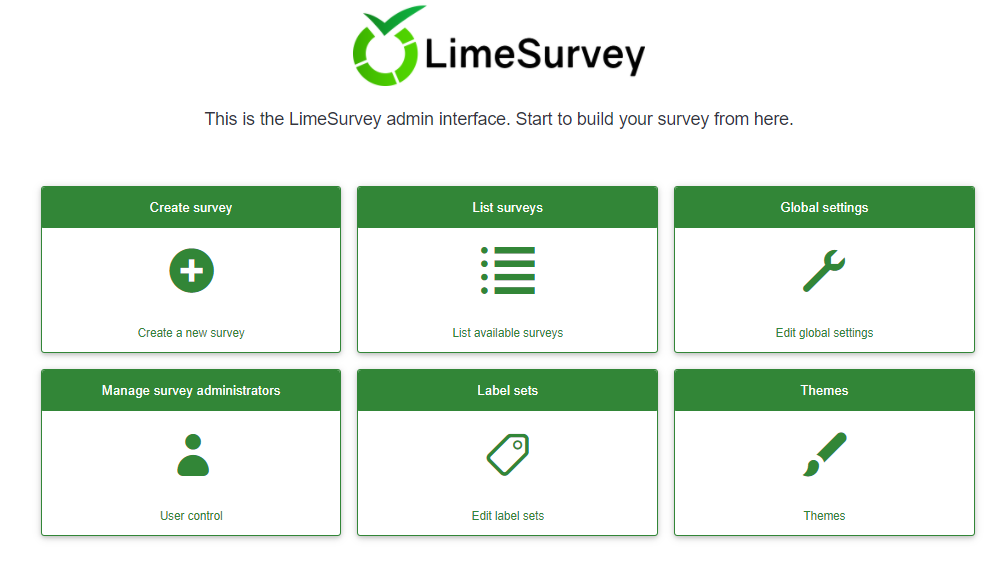
- Create survey
- List surveys
- Global settings
- Manage survey administrators
- Label sets
- Themes
Create a survey
To create a survey, click the Create survey box.
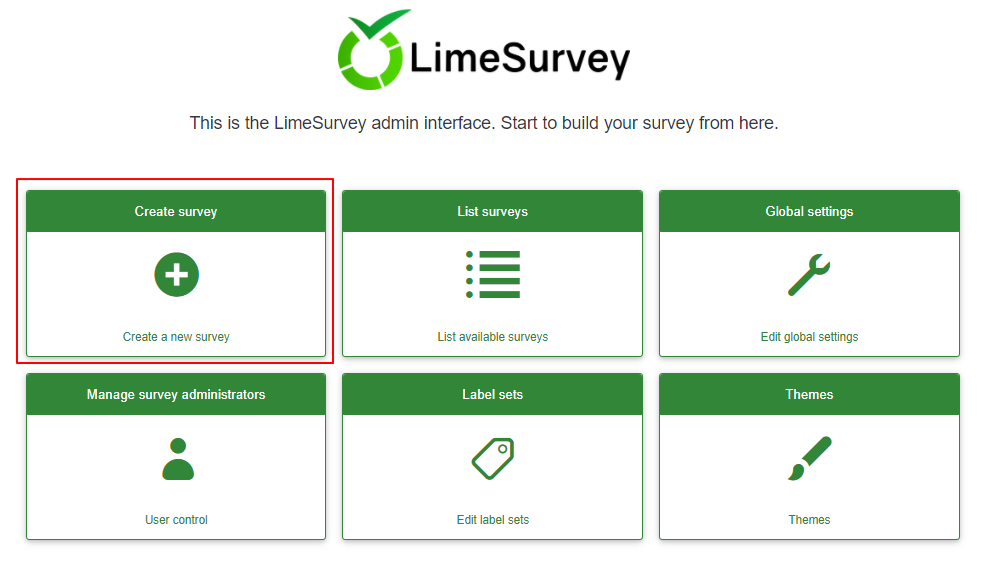
The Create survey page will be displayed.
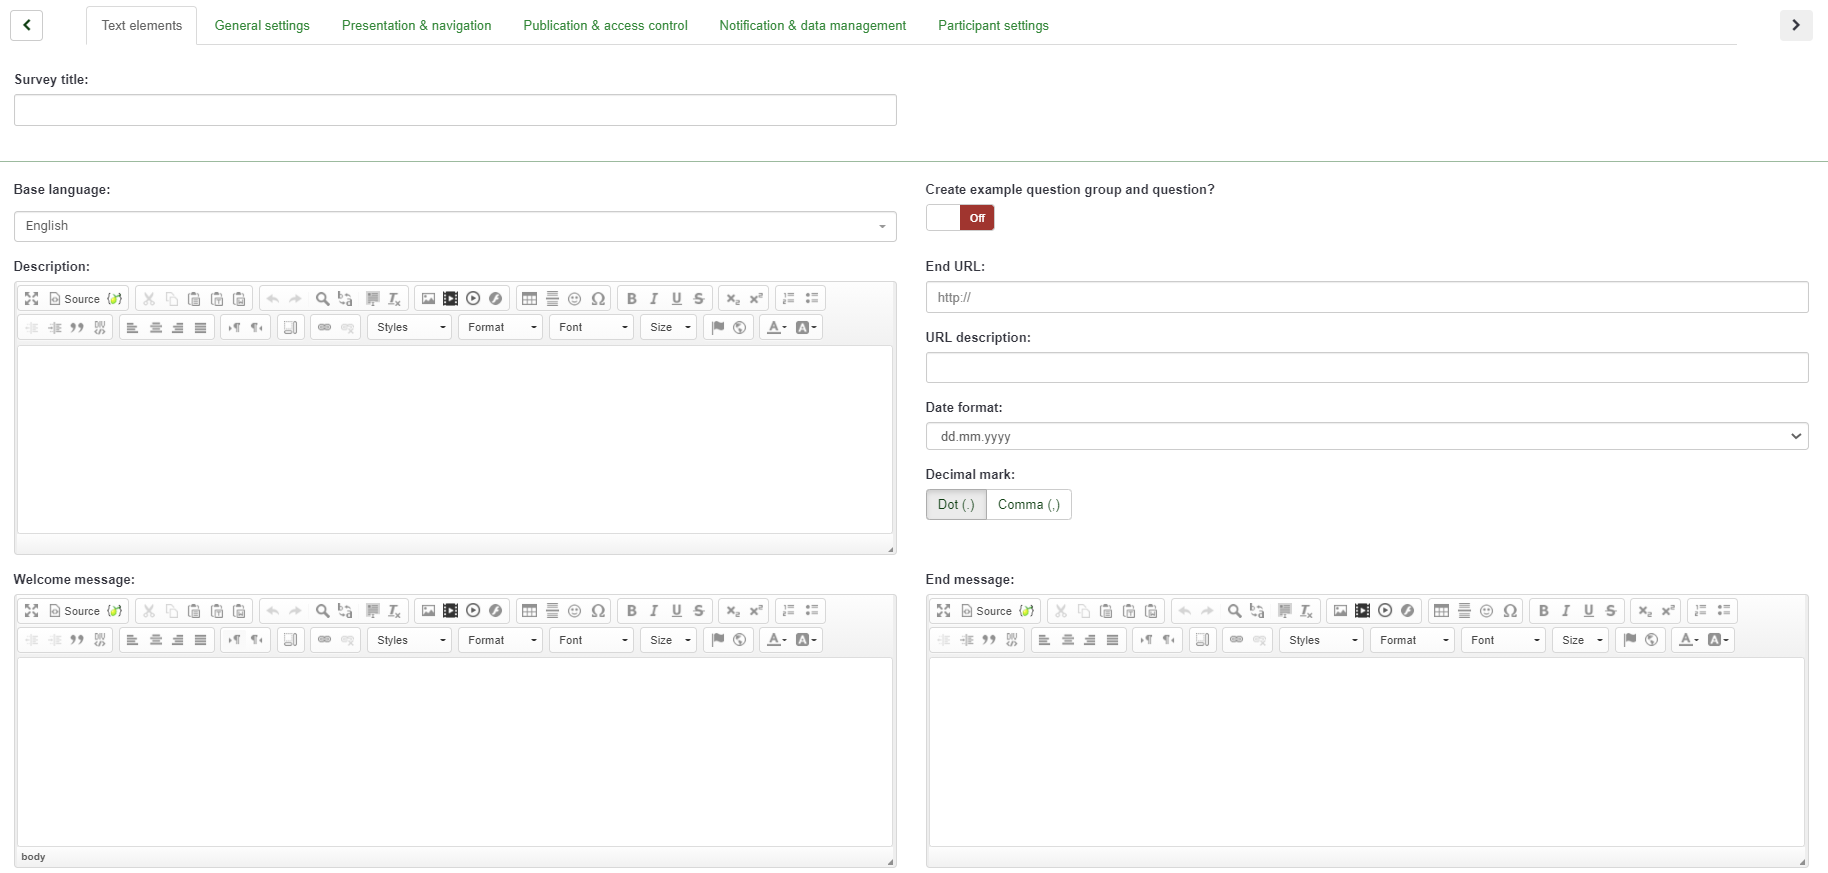
You will find the following on the Create survey page:
- Survey Title: Type in your survey title here. This is a required field. The title of the survey can be changed later.
- Basic Language This is the language used in the survey. The settings of the survey can be modified later to support additional languages.
- Sample Question: This feature is disabled by default. You can enable it to add a question group and question examples to your survey.
- End URL: If users finish filling out the questionnaire, you have the option to redirect them to another page. If you wish to redirect them, place the URL into the field and activate the "automatically load URL" option that is located under the Presentation & navigation tab.
- URL Description: A brief "End URL" description can be added if the user is re-directed to another webpage not related to the survey. It may be helpful to add a note (explaining the reason for the redirection to the respective URL).
- Date Format: This option is important when you want to record timestamps together with the survey participants' answers. You can click it to display a drop-down list of date formats. Choose the date format that your survey respondents will recognize (remember that different dates are used across the world).
- Decimal Format: Two options are available: dot (.) and comma (,). Select the one that is most widely used in the region where your survey will be conducted (e.g., US vs Germany).
- Description: A short description of the survey can be added here.
- Welcome Message: The survey participants will receive the welcome message that is entered here.
- End Message: Enter the message that participants will see once they submit their answers to the questionnaire (when the survey is complete).
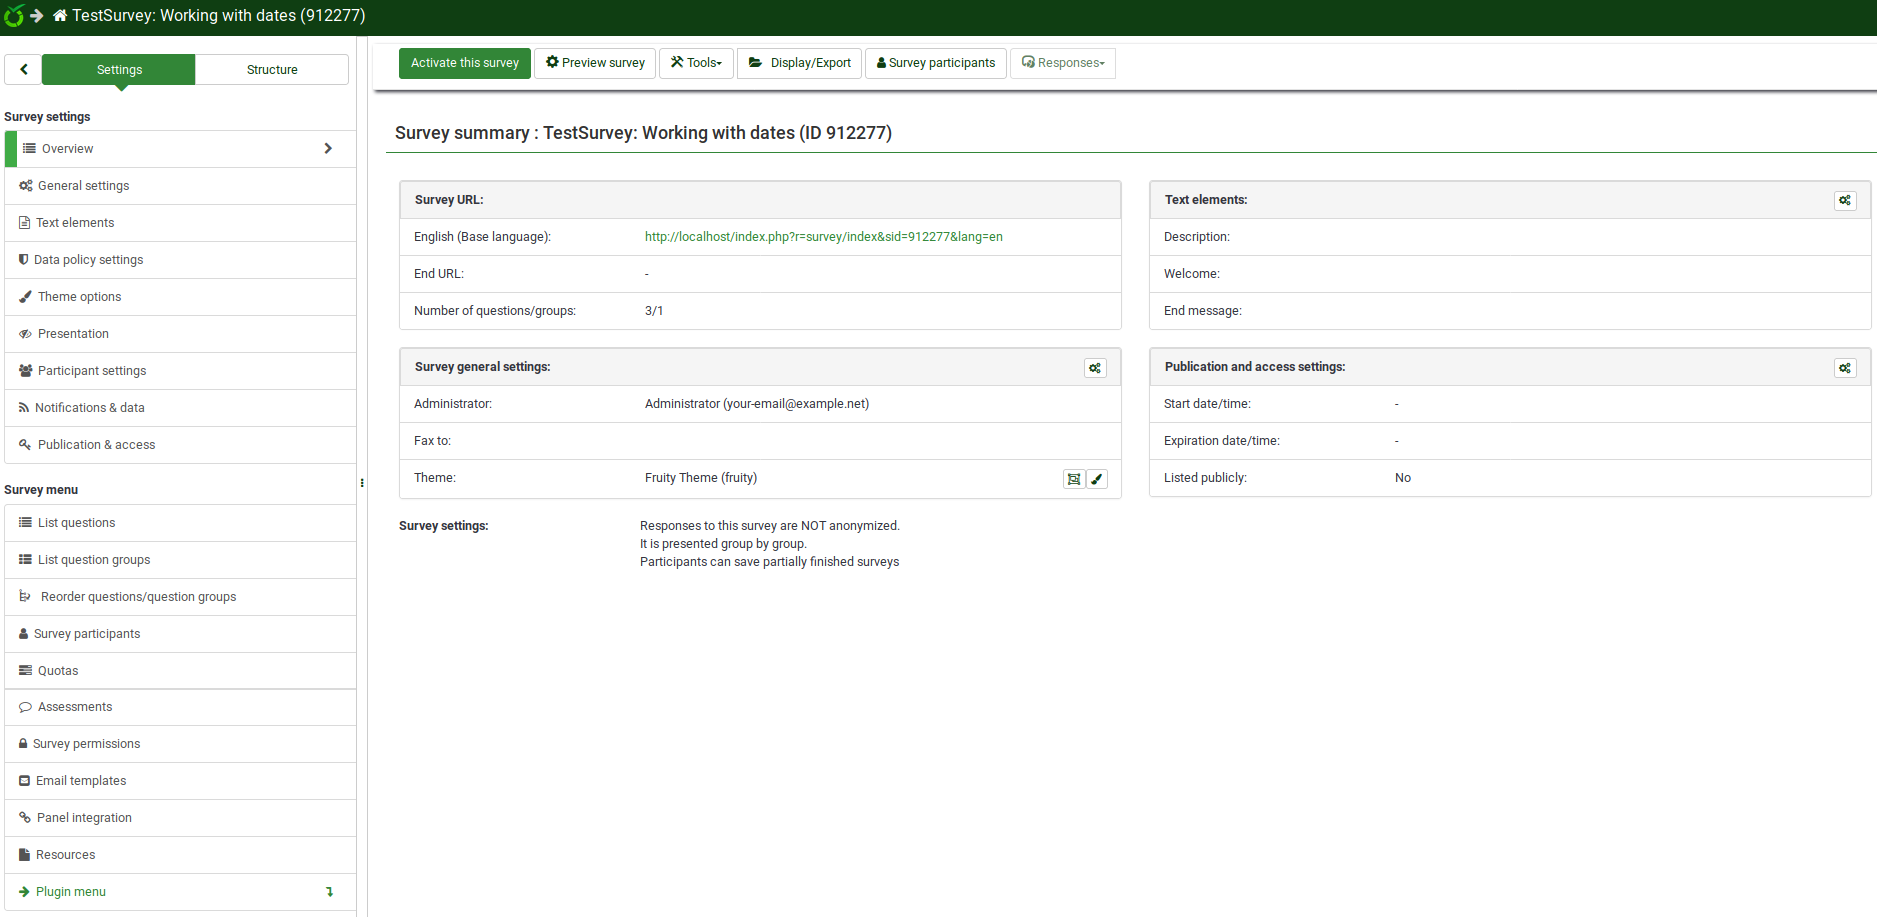
After completing the required fields for Text Elements, click Save in the upper-right corner of the window. You will be redirected to the home page of your newly created survey. From the home page of the new survey, you will be able to add question groups and questions.
Create a question group
Question Groups allow you to group questions together. You must add a question group before adding questions.
To create a question group, first choose the survey you want to add the question group to. You will find this option in the top toolbar of LimeSurvey's home page.
Click on the survey you wish to add the question group to. The survey page will be displayed. The menu on the left contains two tabs: Settings and Structure. It is necessary to work from the Structure tab when adding questions and question groups.
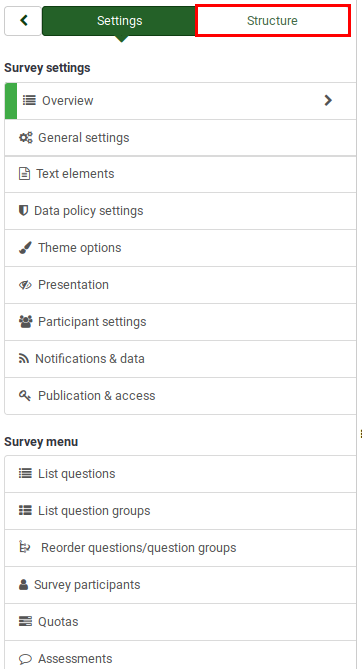
The menu will appear as follows when the Structure tab is selected.
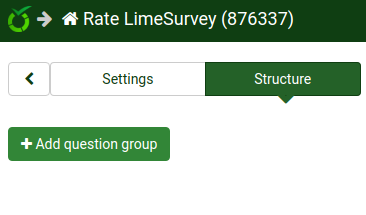
Next, click the Add question group button. The following page will be displayed.
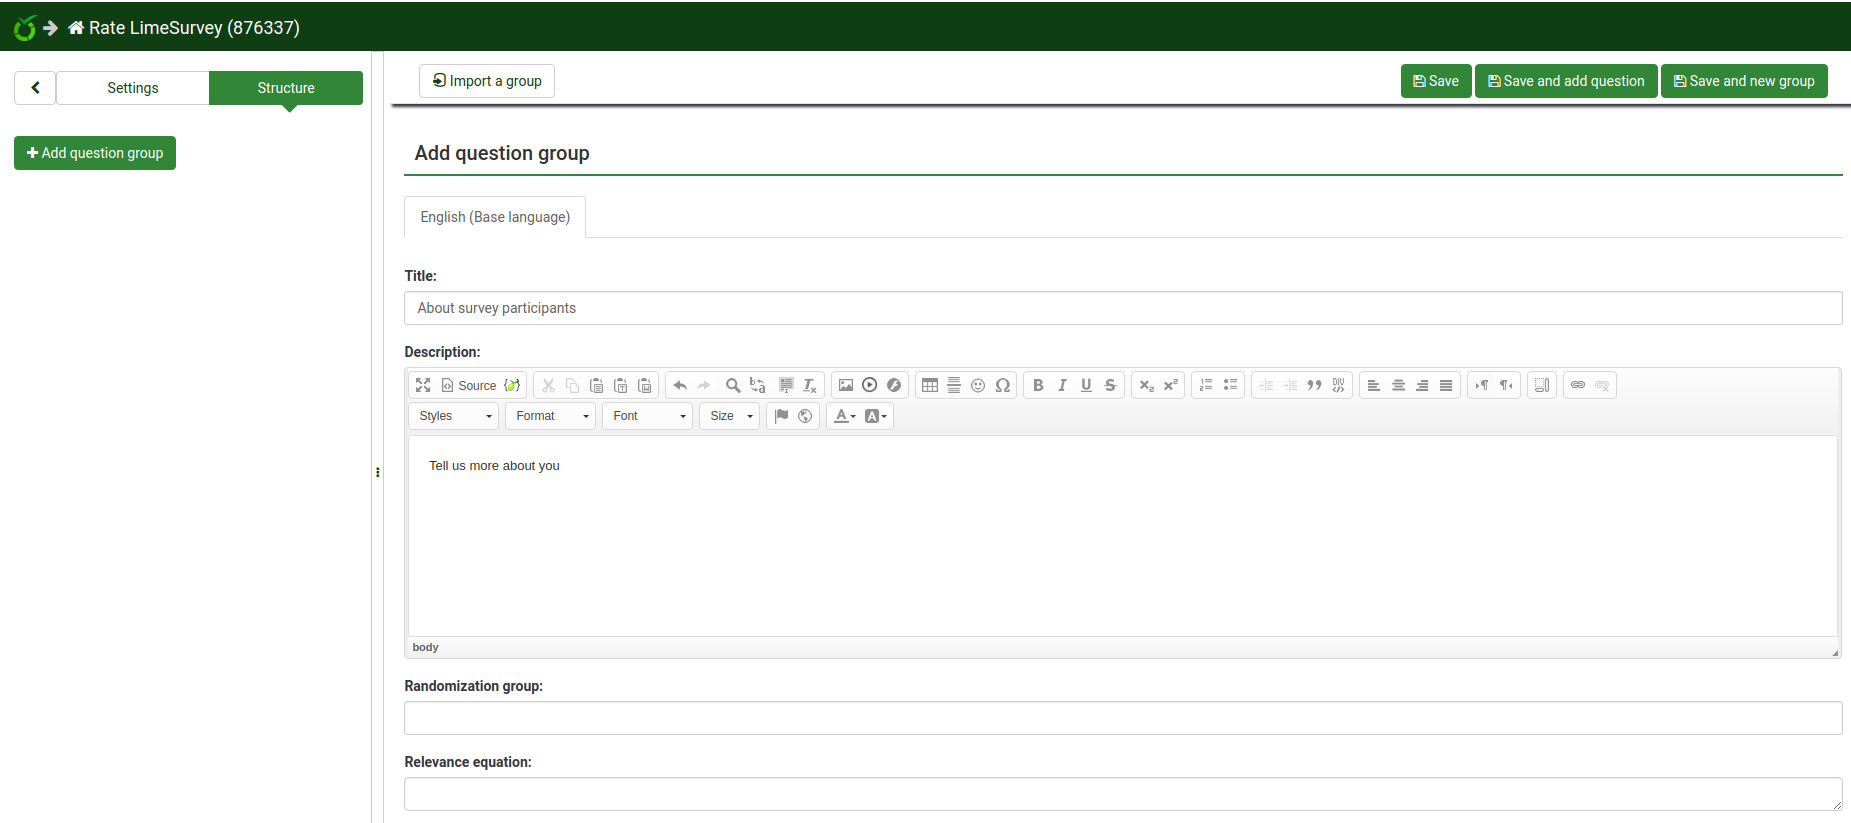
- Title: This is the name of the survey group.
- Description: A short description of the question group can be added. It will be displayed to the survey participants if the corresponding option is enabled from the settings of the survey.
- Randomization Group: This function is used to randomize certain question groups (the same must be allocated to the respective question groups).
- Relevance Equation This feature is used as a way to limit respondents to certain question groups based on their previous responses.
Click the Save button in the upper-right part of the window once you are done.
Create a question
Remember that you must first create a question group before you can add questions. Please review the steps presented above for adding question groups.
Once you have created the survey and added a question group, select the Structure tab again and click add question from the left menu bar or click add new question to group under the Group quick actions heading.

The Create question page will be displayed. It contains the following:
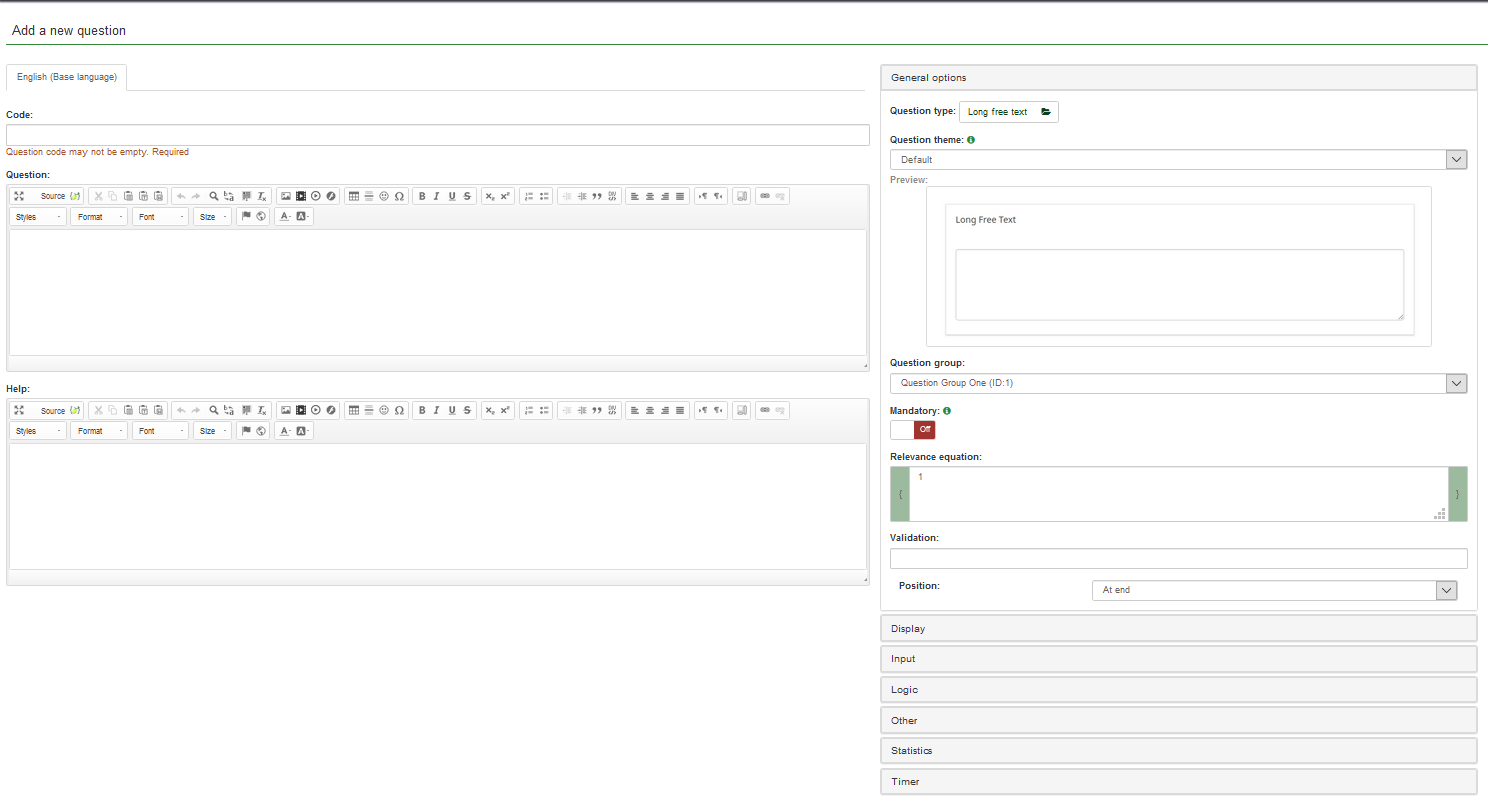
- Code is a representation of the individual question name/code with which the survey is stored in the database.
- Question: This is the question as it will appear to survey participants.
- Help: This is a short text that can be provided to help the survey participants better understand the question.
- General Options: The functionalities found in this option allow you to change the most important question-related settings. It includes seven options:
- Question Type: Many question types can be used in LimeSurvey. To better understand them, hover the mouse over each option or read our wiki on questions.
- Question Theme: You can choose a custom theme for the question (instead of the default).
- Question Group: Here you can choose which question group you would like to add the question to.
- Mandatory: This option is available for all question types. This setting allows you to require users to answer the question before they can move on to the next question.
- Validation: This feature is available on all free text type or numeric questions. It is used for response validation. If the response is not validated, the user will be prompted to try again before they can progress.
- Relevance Equation: This is a setting for advanced users. We recommend that the default value of "1" is used (it means that the item will always be shown).
- Position: Choose where you want to position the question in the group.
Please note that, depending on the type of question selected, different tabs will be displayed below the General settings tab. To find out more about this, we suggest that you to first read the following wiki section.
For example, if the Long free text question type is selected (the default option), then the following tabs will be displayed: General options, Display, Input, Logic, Other, Statistics, Timer.
Complete the required fields and click Save. You will be redirected to a page that contains the summary of the recently added question.
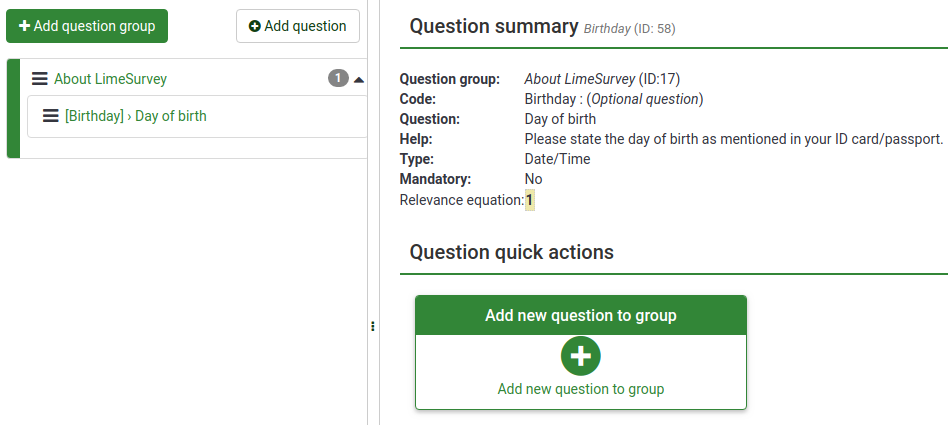
To add more questions, follow the same procedure described above.
Add subquestions and answers
Different types of questions may require subquestions, predefined sets of answers, both or neither. For example, a question that requires the age of a survey participant does not require a subquestion or predefined set of answers. On the other hand, a simple array question requires both subquestions and answers.
The next screenshot contains an array-type question.

Add subquestions
To add subquestions, go to the top toolbar and click Edit subquestions. Type in the subquestions you wish the survey participants to answer.

Add answers
To add a set of predefined answers, go to the top toolbar and click Edit answer options. Type in the answers.

Save the set of answers and preview the question (look for the Preview question button located on the top toolbar).
Our question looks like this:

Congratulations! You have successfully created your first array-type question.
Organize questions
If your survey contains dozens of questions, it can be a time-consuming process to access each question and/or question group and edit the order one-by-one. The survey Structure menu allows you to quickly reorganize your questions and question groups. Select the Structure tab from the menu on the left and click the three-line symbol that is located in front of the question or group name and drag it to its new location.
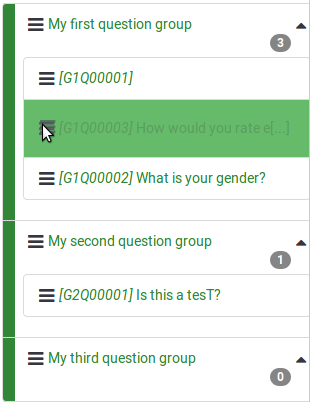
Activate/Stop survey
Now that you have at least one question group and one question added to your survey, you can activate it. Select the Settings tab from the menu on the left and click on Overview. The following page will be displayed.
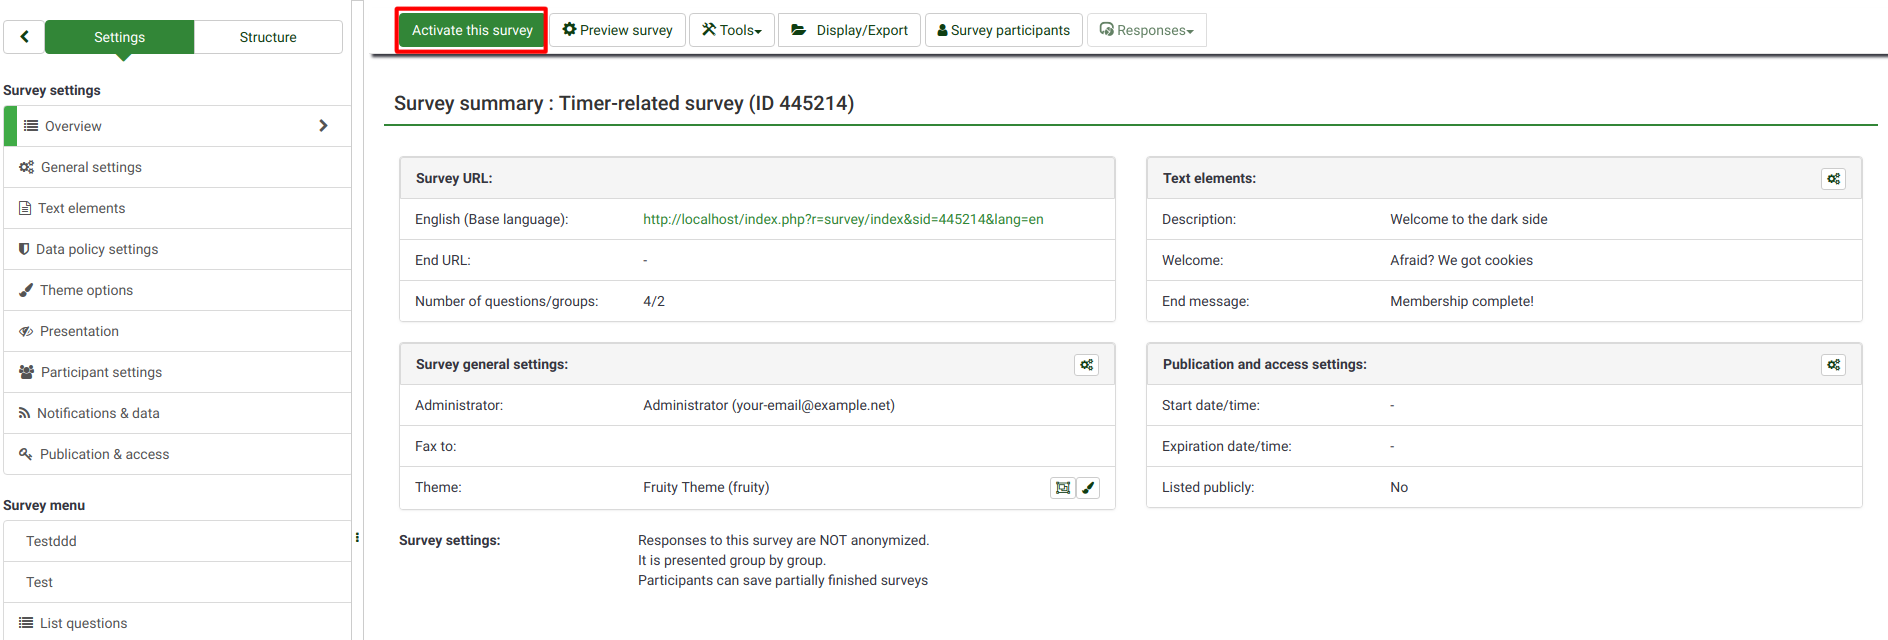
Click Activate this survey on the toolbar.
Before activation, a window will be displayed asking you about general survey settings.

- Anonymized Responses: This option allows you to decide if the information in your survey's token table is matched to the responses in your survey or kept anonymous. If you decide to enable it, your survey is set to anonymize responses. You will not be able to link answers to respondents.
- Save IP Address: If enabled, the IP address of the survey respondent will be stored together with his/her answers.
- Save Timings: If enabled, the time spent on each page of the survey by each survey participant is recorded.
- Date Stamp: Turn this option on if you would like to see the date the answers were submitted.
- Save Referrer URL: If enabled, the referrer URL will be stored together with the answers.
Once the desired functionalities have been enabled, click Save & activate survey. The following message will be displayed.

Select the option "No, thanks" to disable closed-access mode! This will allow everyone to access to your survey using the survey link.
Congratulations! You have activated your first survey! If you want to start sharing the survey URL, go to the home page of your survey, and look for the survey URL in the Survey summary section under Share your survey.
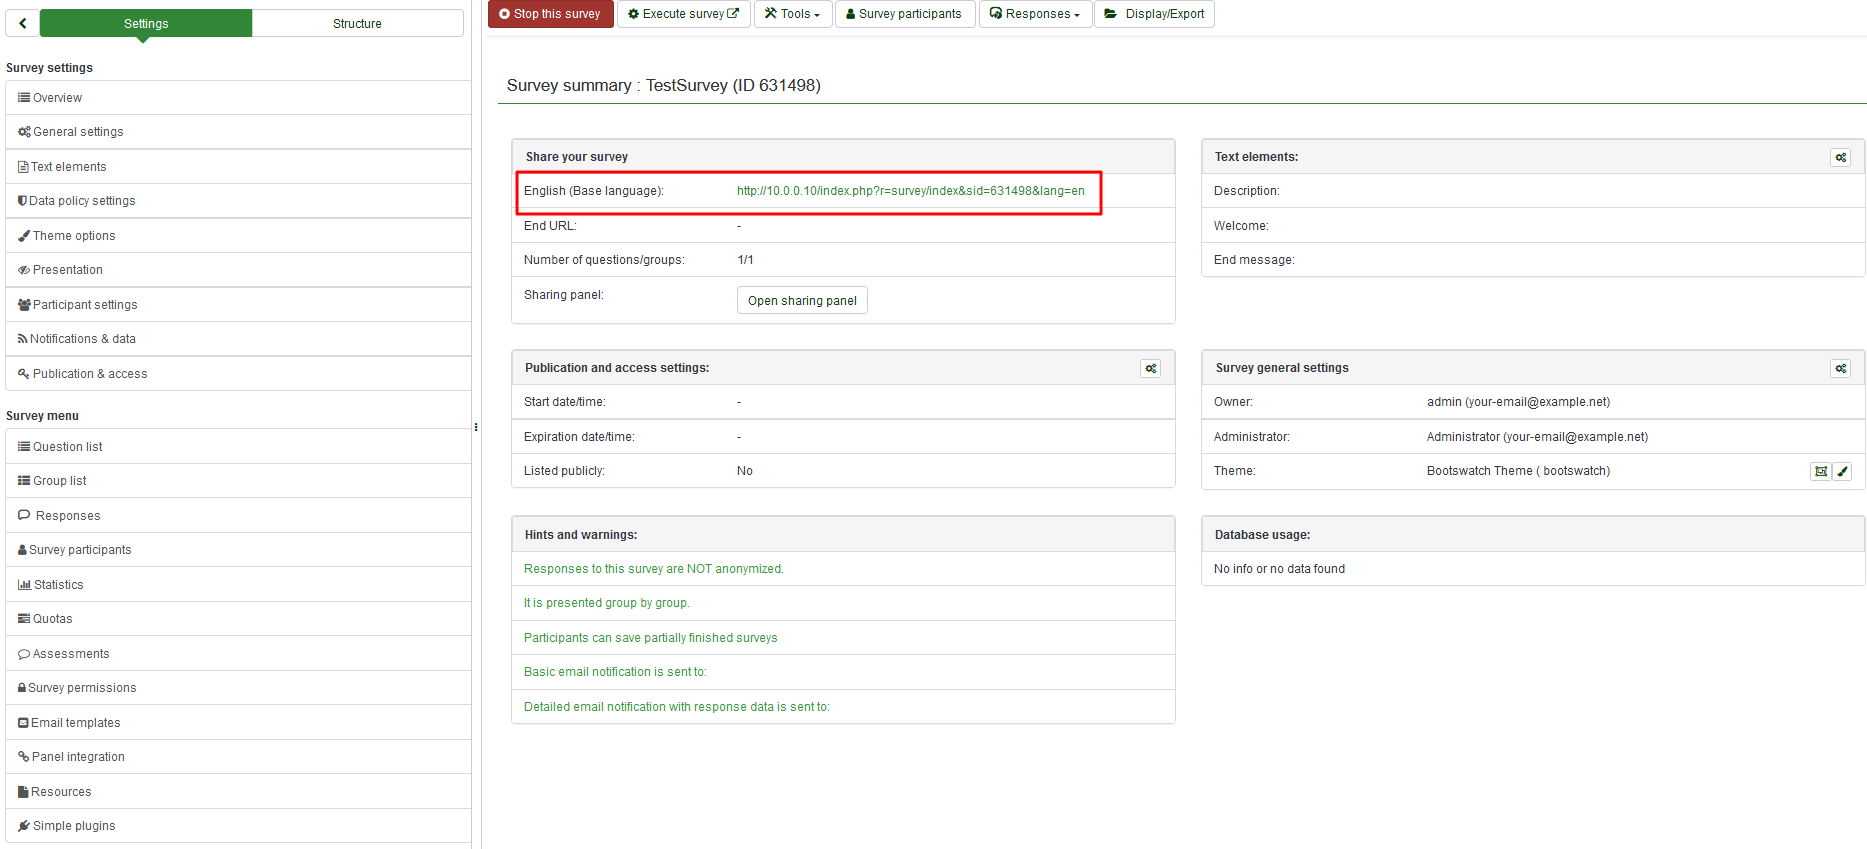
Copy the link and start sharing it.
If you want to deactivate (stop) the survey, click the Overview tab from the menu on the left and look for Stop this survey located on the top toolbar.

Statistics
To quickly view your survey statistics, click Survey located on the top toolbar of your LimeSurvey home page. A list with all the available surveys will be displayed. Next, go to the last column and click the Statistics button (![]() ) that corresponds to the row of the survey you wish to analyse.
) that corresponds to the row of the survey you wish to analyse.

A new window with a set of graphs will be displayed. If you would like to use them in a report, scroll to the bottom of the page and click Export images. Each chart will be saved separately in.png format and archived as a.zip file.
Click Expert mode in the upper-right part of the window to access more statistics-related filters.
Once you have chosen your filters, click View Statistics in the upper-right corner of the window.

The results are displayed in HTML, Excel, or PDF format based on which is chosen.
Exporting questions and responses
You can export survey results in different formats to produce statistics and graphs using apps such as SPSS, R, STATA, etc.. Access the survey you wish to analyze. Click Responses on the top toolbar, and then select Responses & Statistics.

Now you are on the Browse Responses page. Click Export from the top toolbar and select the desired export format. If you select the first option, all the available formats in which you can export the data will be displayed.

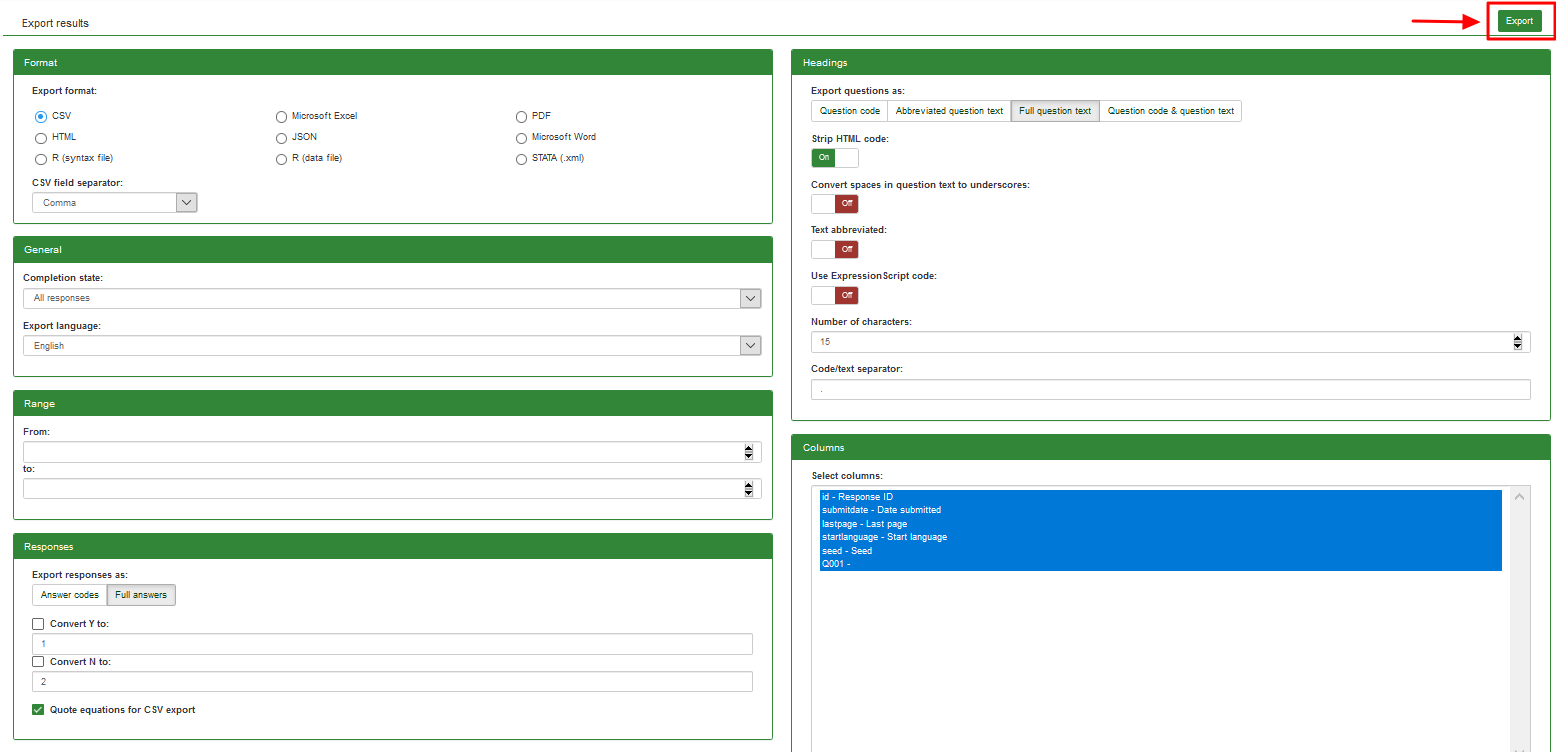
Once the filters are set, click Export located in the upper-right side of the window.
Other LimeSurvey features - advanced users
Check out the features of the LimeSurvey Cloud package.
Still have questions? Please join our LimeSurvey community chat on Discord.