Quick start guide - LimeSurvey 3.0+/ja: Difference between revisions
From LimeSurvey Manual
Bravehorse (talk | contribs) (Created page with "'''アンケート作成'''ページが表示されます。") |
Bravehorse (talk | contribs) (Created page with "次のオプションが表示されます。 *'''アンケートのタイトル:''' アンケートのタイトルを入力します。アンケートに名前を設定しな...") |
||
| Line 169: | Line 169: | ||
次のオプションが表示されます。 | |||
*''' | *'''アンケートのタイトル:''' アンケートのタイトルを入力します。アンケートに名前を設定しないと先に進むことはできません。その時点で思いついていなくても心配はありません。アンケートのタイトルは後で変更することができます。 | ||
*''' | *'''基本言語:''' アンケートの主たる言語です。後で追加の言語をアンケート設定から追加することができます。 | ||
*''' | *'''質問グループと質問の例を作成しますか?:''' 既定では無効になっています。これを有効にすると、質問グループと質問例がアンケートに追加されます。 | ||
*''' | *'''終了URL:''' アンケートの記入が完了したら、別のページにユーザーをリダイレクトしたい場合があります。その場合は、URLを入力し、[[Surveys_-_introduction/ja#Presentation_.26_navigation|プレゼンテーションとナビゲーションタブ]]にある「アンケート完了時自動読込URL」オプションを有効にします。 | ||
*''' | *'''URLの説明:''' アンケートに関連のないウェブページにリダイレクトする場合、終了URLに関する簡単な説明を追加できます。アンケート管理者は、URLの使用状況に応じてメモを追加することができます。 | ||
*''' | *'''日付フォーマット:''' このオプションは、アンケート参加者の回答とともに[[Notifications_%26_data/ja|タイムスタンプ]]を記録する場合に重要です。クリックすると、ドロップダウンリストに多数の日付形式が表示されます。アンケート回答者に合ったものを選んでください(世界中で異なる日付形式が使用されている点に注意してください)。 | ||
*''' | *'''小数点:''' ドット(.)とカンマ(,)の2つのオプションがあります。アンケートを行う場所に合ったものを選択してください(例えば、米国とドイツでは違う記号が使われます)。 | ||
*''' | *'''説明:''' ここにアンケートの簡単な説明を追加できます。 | ||
*''' | *'''ようこそメッセージ:''' ここに入力した文面がようこそメッセージとしてアンケート参加者に表示されます。 | ||
*''' | *'''終了メッセージ:''' アンケートへの回答を送信したときにアンケート参加者に表示されるメッセージを入力します。 | ||
{{Box|You can observe on the top toolbar six options. The one you just read about is [[Text elements]]. The other five are: [[General settings]], [[Presentation|Presentation & navigation]], [[Publication_%26_access|Publication & access control]], [[Notifications_%26_data|Notification & data management]], and [[Participant_settings|Participant settings]] (known as Tokens). By clicking on each of them, more advanced menus will be shown up. They are used to enhance your survey. We will not insist on them because they can be edited later from the settings of the survey once it is created.}} | {{Box|You can observe on the top toolbar six options. The one you just read about is [[Text elements]]. The other five are: [[General settings]], [[Presentation|Presentation & navigation]], [[Publication_%26_access|Publication & access control]], [[Notifications_%26_data|Notification & data management]], and [[Participant_settings|Participant settings]] (known as Tokens). By clicking on each of them, more advanced menus will be shown up. They are used to enhance your survey. We will not insist on them because they can be edited later from the settings of the survey once it is created.}} | ||
Revision as of 11:47, 15 July 2018
はじめに - LimeSurveとは何か?
LimeSurveyは、PHPで書かれ、GNU General Public License 2でライセンスされている、フリーなオープンソースのオンラインアンケートアプリケーションです。このソフトウェアは、オンラインアンケートの作成・公開し、回答収集、統計、他のアプリケーション向けの回答出力ができます。LimeSurveyは、自前のサーバーにインストールする(LimeSurvey CE)か、我々のホスティングサービス(LimeSurvey Pro)上で始めることができます。
このスタートガイドは、LimeSurvey Proの利用を前提にしたものです。LimeSurveyを自前のサーバーにインストールする方法については、LimeSurveyマニュアルのインストールを参照してください。
フリーのLimeSurveyアカウントを作成する
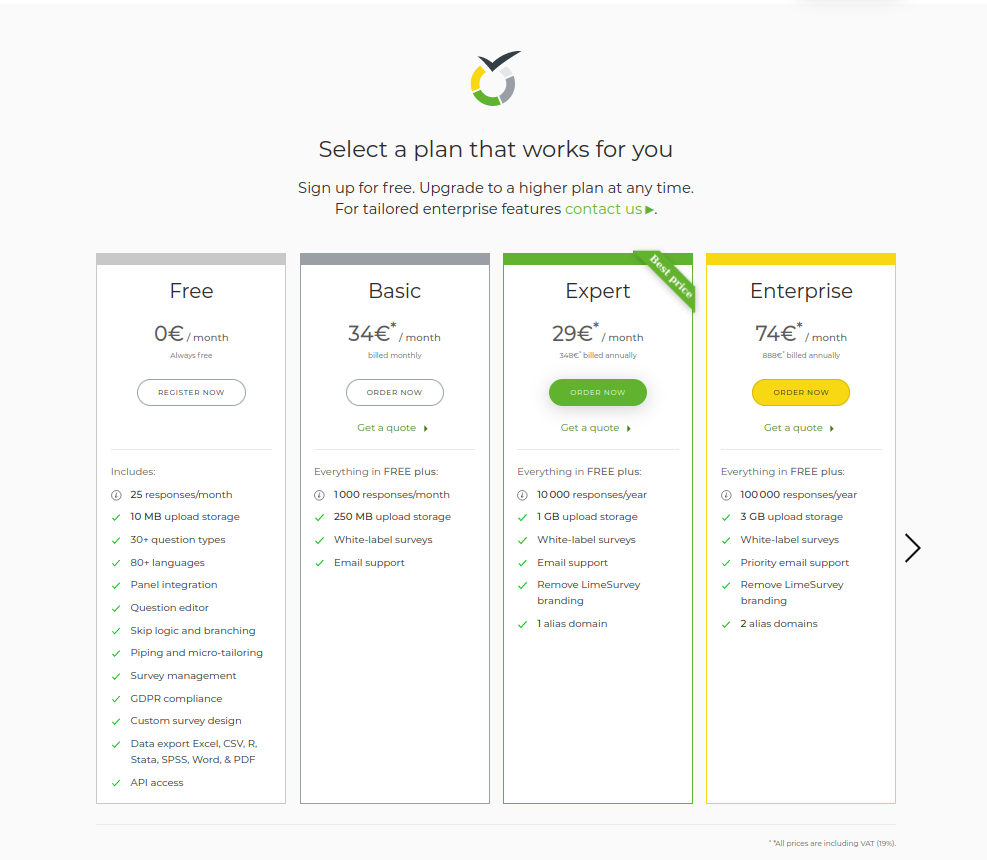
LimeSurveyでは、その特長とコア機能をテストするため、フリーのアカウントを作成することができます。トライするには、LimeSurveyウェブサイトのトップツールバーにあるEditions & Pricingにカーソルを合わせ、LimeSurvey ProタブにあるEditions & Pricingボタンをクリックします。

free、basic、expert、enterpriseの4つの選択肢が現れます。FREEオプションのボックスからRegister Nowボタンをクリックします。
次のステップでは、次のフィールドを入力します。
- Username: LimeSurveyのアクセスにも使用されるアカウントのユーザー名。
- Email: アクティベーションリンクが送信される電子メール。
- Password: アカウントのパスワードで、LimeSurveyのアクセスにも使用されます。
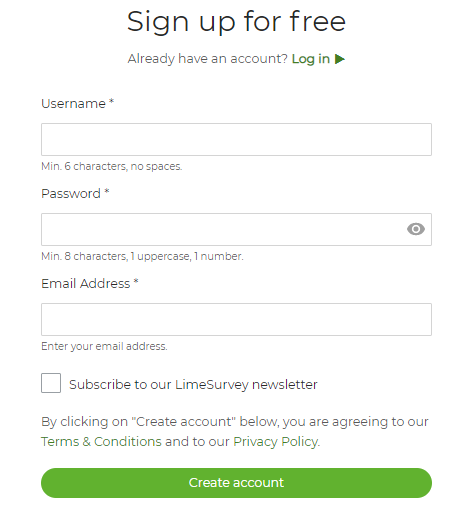
各フィールドの上にマウスを置くと、各フィールドの詳細がテキストボックスにポップアップ表示されます。必要に応じて、LimeSurveyのニュースレターに登録して、ヘルプ、ヒントとテクニック、サービスの割引、最新のニュースを入手することもできます。
手軽に登録できるよう、LimeSurveyではユーザーが自分のTwitter、Gmail、GitHubアカウントでサインアップすることもできます。LimeSurveyは、選択したソースから必要とされる基本情報を収集します。
SIGN UPボタンを クリックしてLimeSurveyアカウントを作成したら、Eメールが届きます。この電子メールには、新しく作成したアカウントにアクセスするためのアカウントアクティベーションリンクが含まれています。クリックすると、LimeSurveyのWebサイトにリダイレクトされ、LimeSurveyのアカウントに自動的にログインします。
アンケートリンクにアクセスするには、まずインストールする必要があります。メインツールバーからユーザー名をクリックし、YOUR LIMESURVEY PROFILEに移動します。

画面の左側にあるプロファイルメニューからInstallationsを選択し、インストールを作成します。
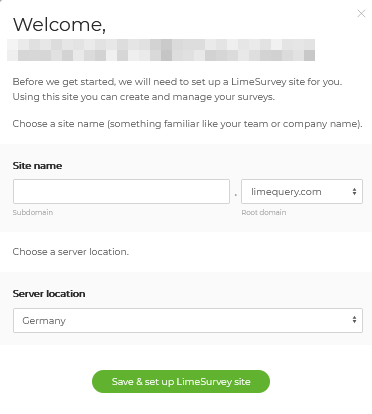
次のように求められます。
- ドメイン名(アンケートのURLリンク)を入力します。
- サーバーの場所を選択します。4つのサーバーの場所のうち、ニーズに適合する1つを選択できます。
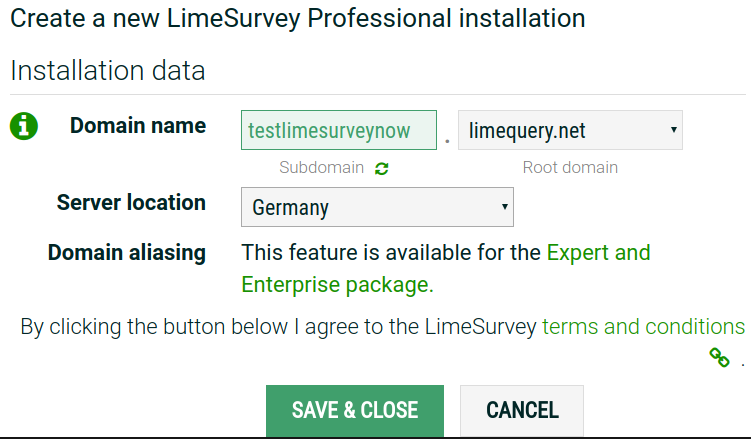
ドメイン関連のフィールドが完了して保存されると、インストールプロセスが開始されます。これには最大10秒かかります。インストール設定ページは次のようになります。
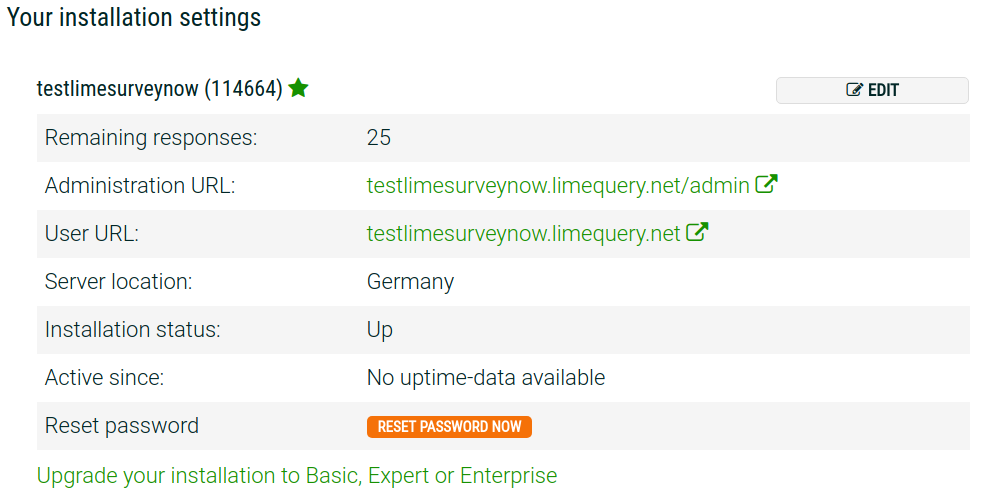
管理URLをクリックすると、サーバーにアクセスできます。LimeSurveyにサインインするには、LimeSurvey.orgの資格情報を使用してください。
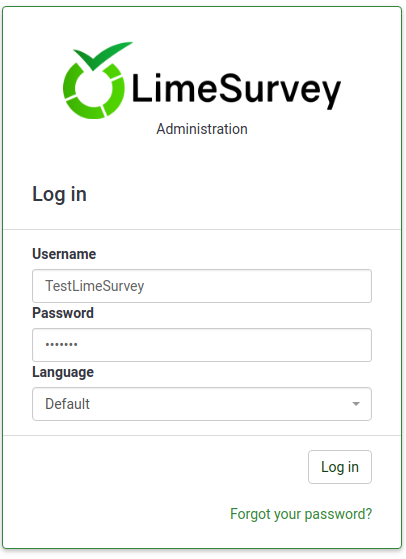
LimeSurveyの使用開始
ログインすると、LimeSurveyのホームページが表示されます。ウィンドウの右上部分にあるツールバーと、ホームページの中央にある6つのLimeSurvey機能のショートカットボックスが表示されています。
このツールバーには次の設定があります。
- チュートリアル: このオプションをクリックすると、LimeSurveyに同梱されたチュートリアルにアクセスできます。たとえば、LimeSurvey 3以上でアクセスできるチュートリアルは"初心者ツアー"です。
- 設定: 選択すると、LimeSurveyのインストールを管理できるダイアログが表示されます。
- 設定: このタブには、LimeSurveyのインストールをカスタマイズするためのオプションがあります。
- ホームページ設定: このオプションを使用して、必要に応じてホームページの設定を調整できます。
- 全体設定: ここで行われた変更は、LimeSurveyのインストール全体に影響を与え、すべてのユーザーのスーパー管理者以外のユーザーの設定にも影響します。
- プラグインマネージャー: LimeSurveyチームがサポートしているプラグインをアクティブにできます。新しいプラグインを追加することもできます。
- ユーザー: このタブでは、ユーザーおよびアンケート参加者の管理に関連する設定ができます。
- アンケート管理ユーザ: ここから新しい管理ユーザーを追加できます。
- ユーザーグループの作成/編集: この機能は、管理ユーザーを個々のグループにグループ化するためのものです。
- 中央参加者データベース: 各管理者は、参加者の情報を個々のアンケートの参加者テーブルから独立した中央テーブル/データベースに格納することができます。
- アドバンス: ここには、ユーザー設定またはアンケート設定以外のオプションが含まれます。これらは、LimeSurveyを強化するために使用できます。
- テンプレート: アンケートテーマ、管理テーマ、または質問テーマを追加/編集/削除するため、下記のオプションをクリックします。テーマでは、アンケートやLimeSurvey GUIのページの見た目を制御できます。
- ラベルセット管理: ラベルセットは基本的にリストテンプレートであり、各リストにはラベル付きのコードセットがあり、ほとんどの質問タイプで回答として、またはサブ質問として使用できます。
- データ整合性確認: データの一貫性と冗長性をチェックします。
- データベース全体のバックアップ: LimeSurveyの重要なアップグレードが公開されたとき、またはLimeSurveyを別のサーバーに移動するときに、LimeSurveyのデータをバックアップするために使用します。
- ComfortUpdate: 手動によるLimeSurveyの再インストールではなく、ウェブブラウザーからわずか数回のマウスクリックでLimeSurveyのインストールを簡単に更新するツールです。
- 設定: このタブには、LimeSurveyのインストールをカスタマイズするためのオプションがあります。
- アンケート: アンケートは、言語、質問グループ、質問、質問属性、回答、サブ質問、既定の回答、評価、クォータ、クォータメンバー、クォータ言語設定など、相互に接続されたたくさんのデータベースから構成されます。緑色の矢印をクリックすると、次のオプションのウィンドウが表示されます。
- 新規アンケート作成: 新しいアンケートを作成してアンケートリストに追加することができます。
- アンケートインポート: アンケートリストにアンケートをインポートする場合は、この機能を使用します。
- アンケートコピー: アンケートをすばやくコピーすることができます。これは、編集可能な場所からアンケートリストの中に表示されます。
- アンケートリスト: 既存のすべての調査の概要がわかります。
- 回答残数: サブスクリプションの中で残っている回答の数を表示します。無料のアカウントでは、毎月25件の回答しか利用できません。回答数が足りなくなったら、次のthe following リンクからさらに購入してください。
- ストレージ: アンケートと回答を保存するために使用できるMBの量を表します。無料のアカウントでは、10MBの記憶領域が得られます。追加のストレージ容量をご希望の場合は、以下の有料オプションのいずれかを選択してください。
- ユーザー名: クリックすると、ユーザーの設定にアクセスするか、アカウントからログアウトすることができます。
- 通知: これは緑色のベルで表示されます。LimeSurveyに関するさまざまな通知がここに表示されます。
LimeSurveyインストールのホームページには、6つの既定のボックスがあります。
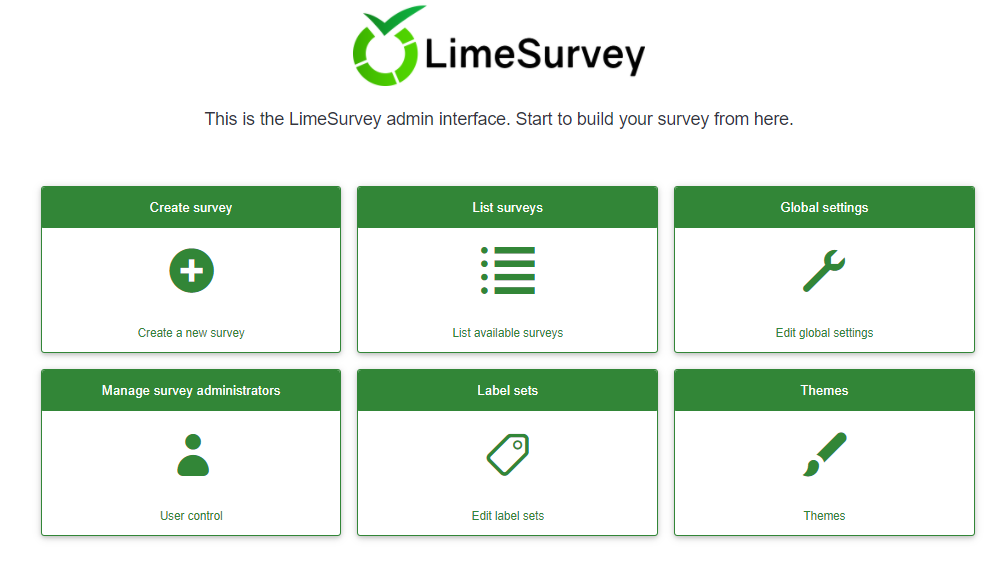
- アンケート作成
- アンケートリスト
- 全体設定
- ComfortUpdate
- ラベルセット
- テンプレート
アンケート作成
アンケートを作成するには、アンケート作成ボックスをクリックします。
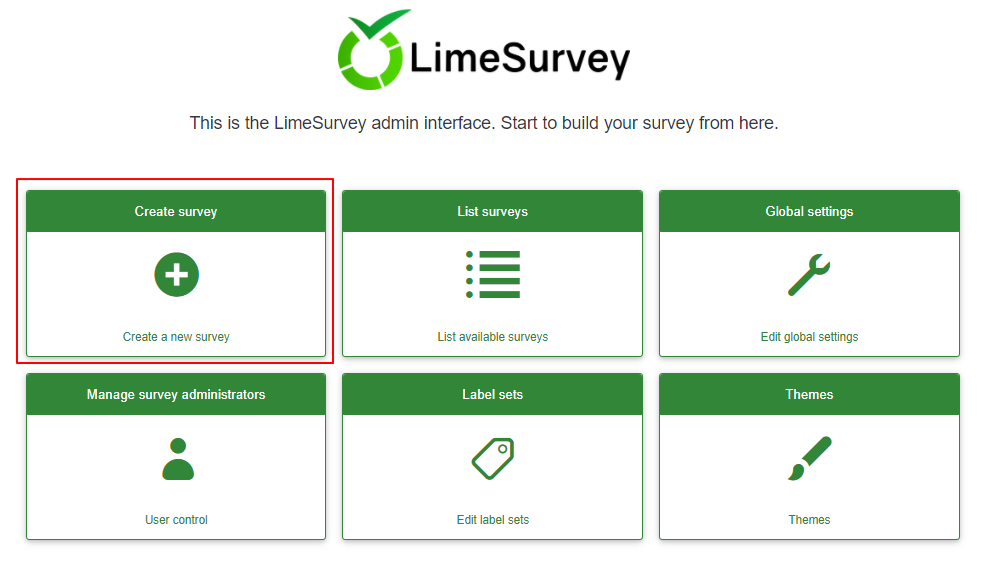
アンケート作成ページが表示されます。
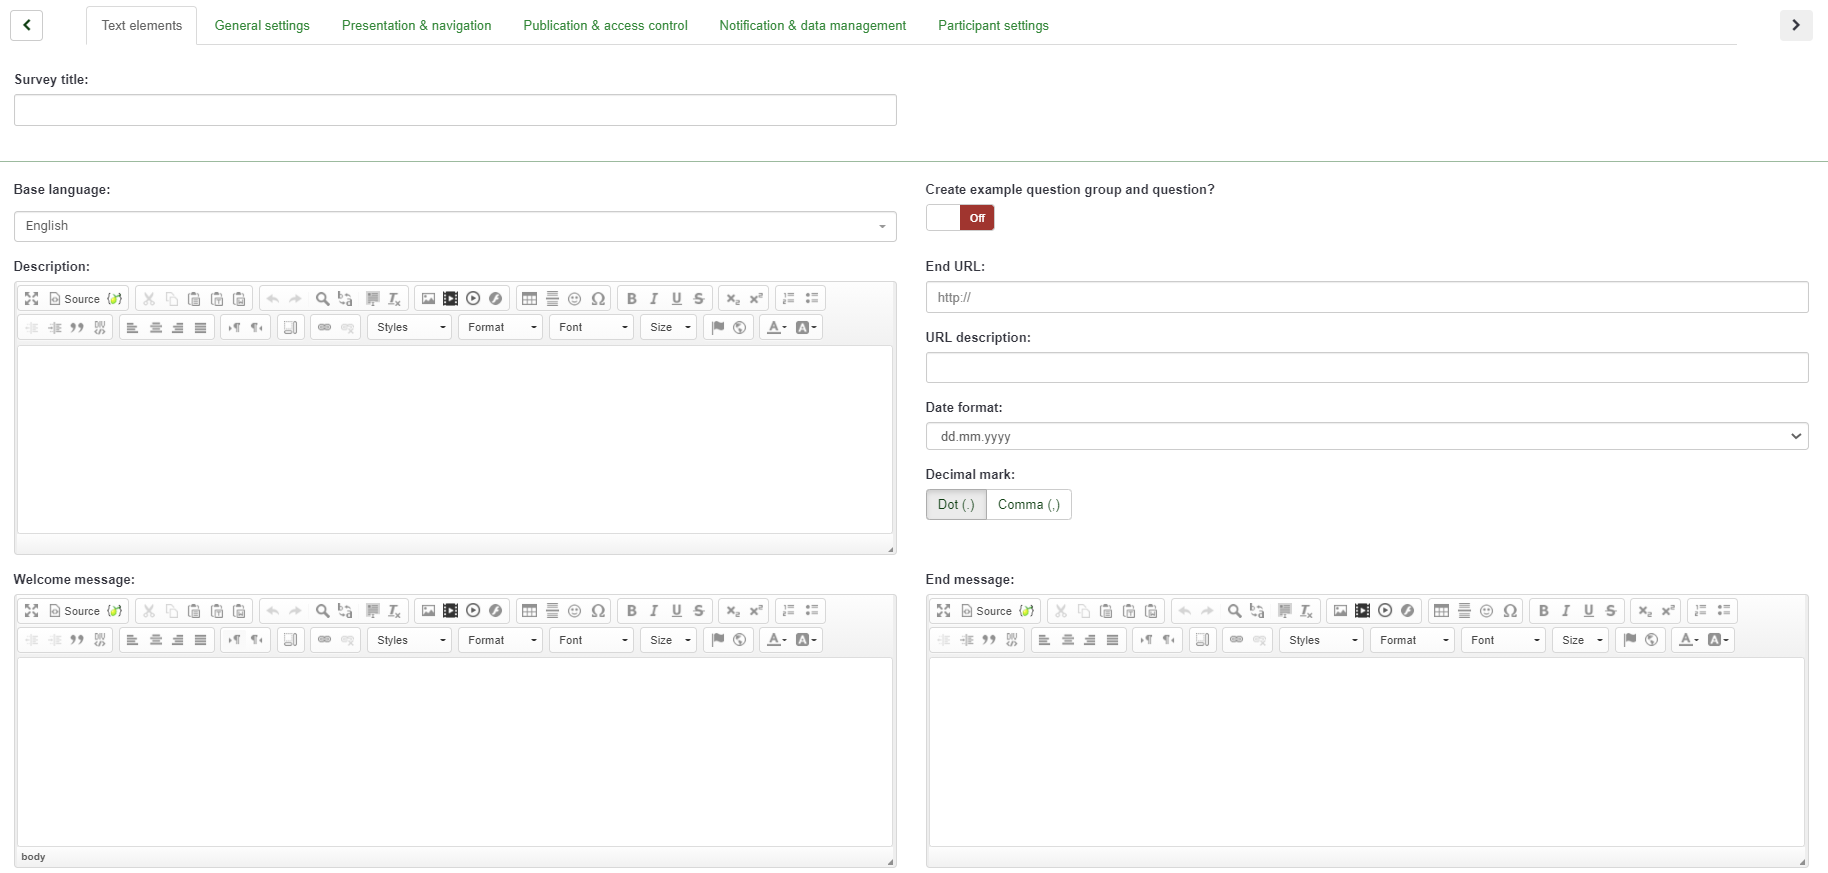
次のオプションが表示されます。
- アンケートのタイトル: アンケートのタイトルを入力します。アンケートに名前を設定しないと先に進むことはできません。その時点で思いついていなくても心配はありません。アンケートのタイトルは後で変更することができます。
- 基本言語: アンケートの主たる言語です。後で追加の言語をアンケート設定から追加することができます。
- 質問グループと質問の例を作成しますか?: 既定では無効になっています。これを有効にすると、質問グループと質問例がアンケートに追加されます。
- 終了URL: アンケートの記入が完了したら、別のページにユーザーをリダイレクトしたい場合があります。その場合は、URLを入力し、プレゼンテーションとナビゲーションタブにある「アンケート完了時自動読込URL」オプションを有効にします。
- URLの説明: アンケートに関連のないウェブページにリダイレクトする場合、終了URLに関する簡単な説明を追加できます。アンケート管理者は、URLの使用状況に応じてメモを追加することができます。
- 日付フォーマット: このオプションは、アンケート参加者の回答とともにタイムスタンプを記録する場合に重要です。クリックすると、ドロップダウンリストに多数の日付形式が表示されます。アンケート回答者に合ったものを選んでください(世界中で異なる日付形式が使用されている点に注意してください)。
- 小数点: ドット(.)とカンマ(,)の2つのオプションがあります。アンケートを行う場所に合ったものを選択してください(例えば、米国とドイツでは違う記号が使われます)。
- 説明: ここにアンケートの簡単な説明を追加できます。
- ようこそメッセージ: ここに入力した文面がようこそメッセージとしてアンケート参加者に表示されます。
- 終了メッセージ: アンケートへの回答を送信したときにアンケート参加者に表示されるメッセージを入力します。
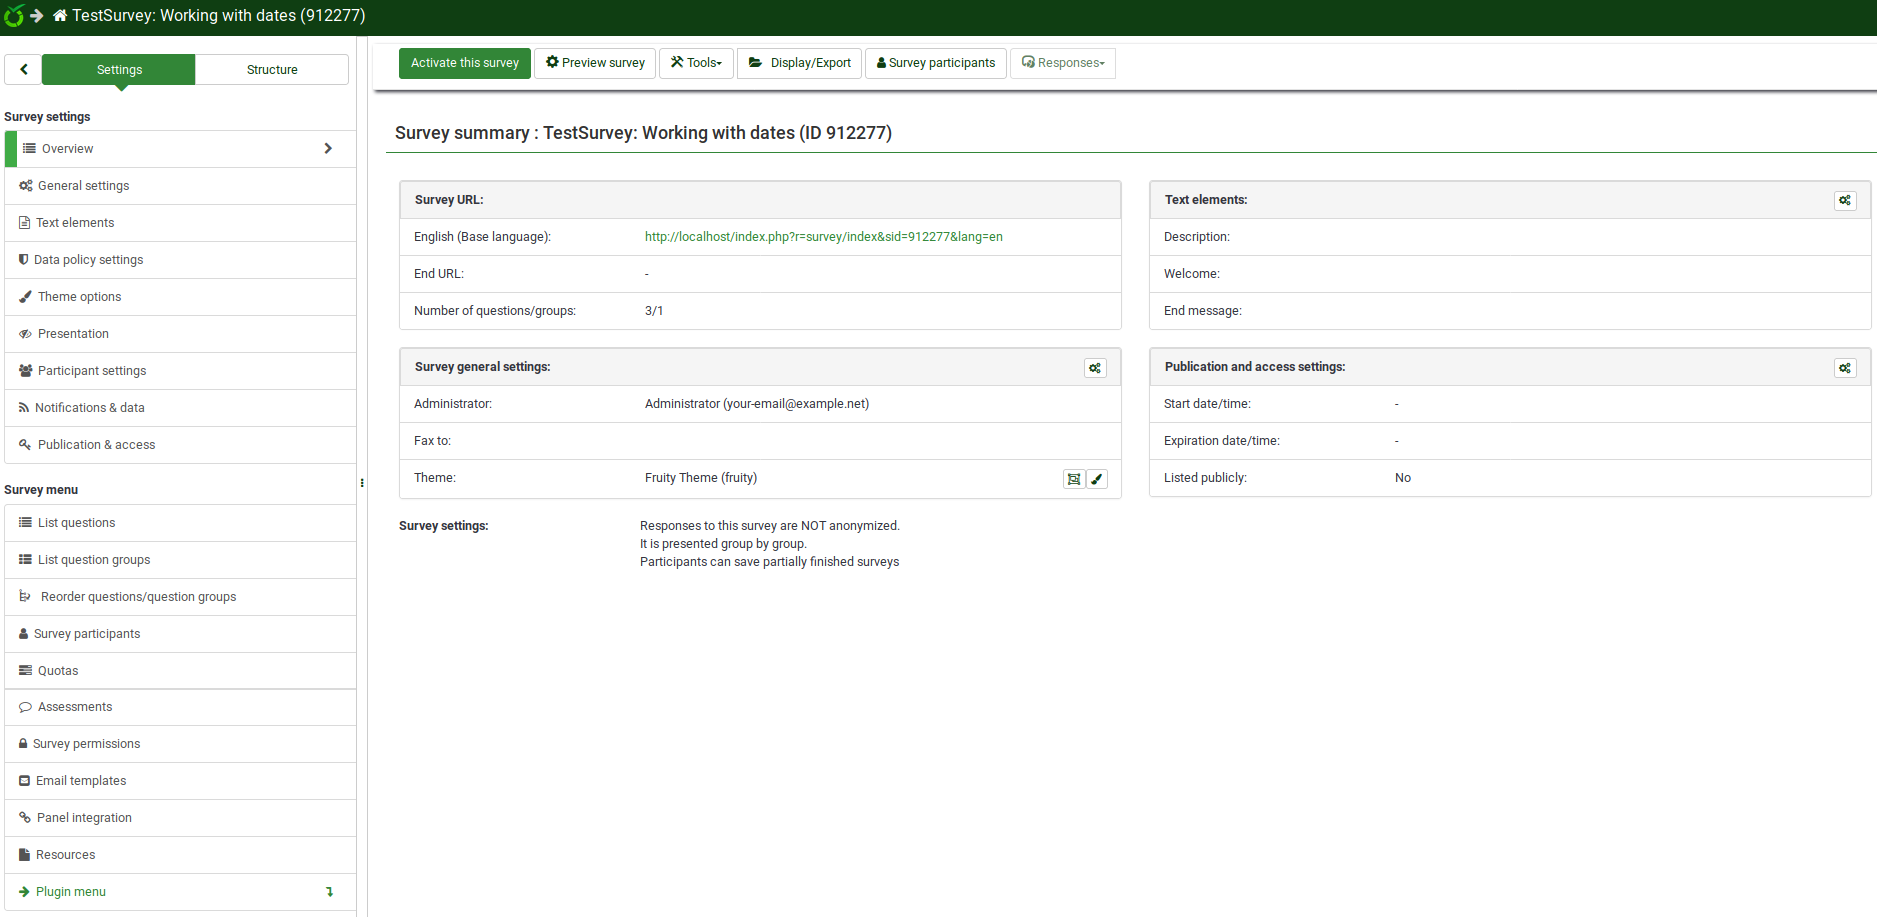
If you are done completing the fields, click on the Save and close button located in the upper-right part of the window. You will be redirected to the home page of your recently added survey:
Create a question group
A question group is used to group different elements of a survey like descriptions, questions, and answers.
To create a question group, you have to first access the survey to which you want to add the question group. To do that, click on the Surveys button located on the top toolbar from the LimeSurvey home page:
Click on the survey you wish to add the question group to - the survey page will show up. The left-side menu contains two tabs: settings and structure. To add questions and question groups, you have to work from the structure tab:
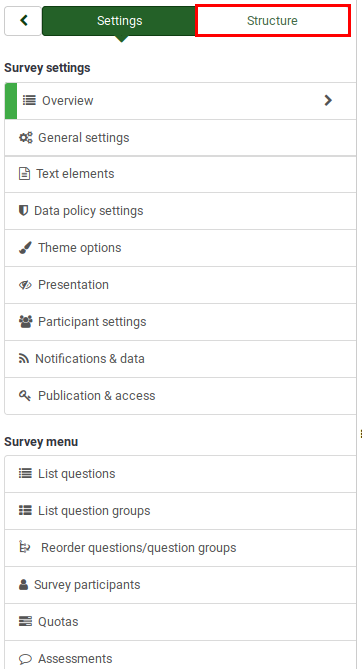
Once clicked on the Structure tab, the left-side menu will look like this:
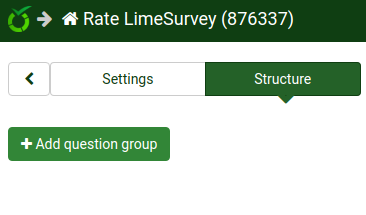
Now, click on the Add question group button. The following page will be displayed:
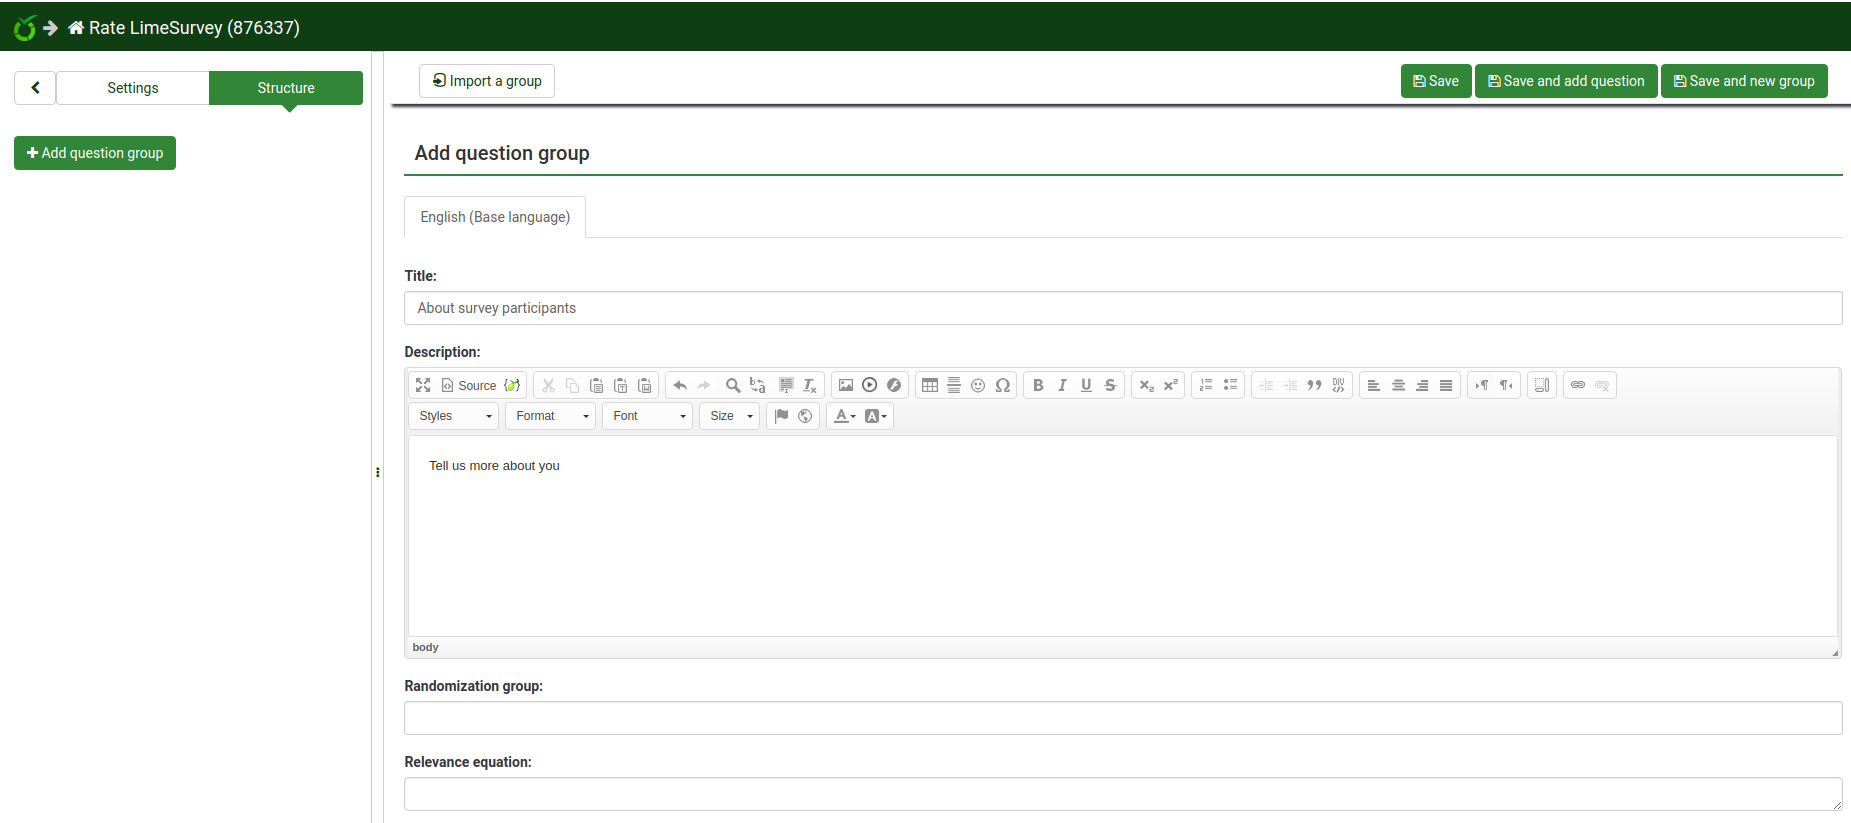
- Title: The name of the survey group;
- Description: A short description of the question group can be typed in. It can be displayed to the survey participants if the corresponding option is enabled from the settings of the survey;
- Randomization group: This function is used when you would like to randomize certain question groups (the same has to be allocated to the respective question groups);
- Relevance equation: It is used to make survey participants answer only to certain question groups, according to their prior answers.
Once done, click on the Save button located in the upper-right part of the window.
Create a question
To create a new question, always remember that you need first to create a question group. Please check the steps presented above to see how you can add a question group to a survey.
Once done creating the survey group, select again the structure tab and click on the add question button or select the question group from the left-side menu and click on the “add new question to group” button located under the Group quick actions:

Once clicked, the Create question page will load up. It contains the following options:
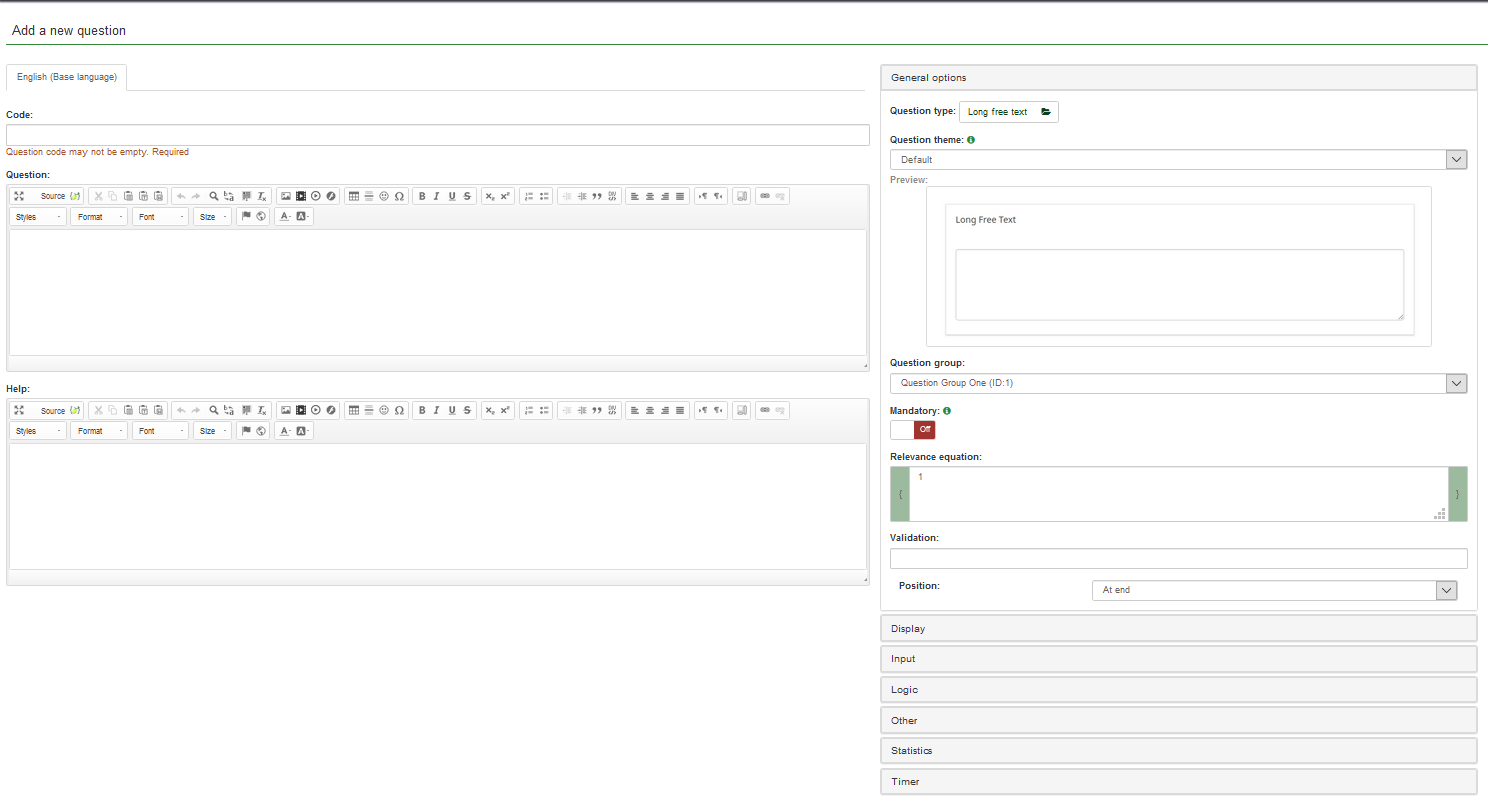
- Code: It represents the individual question name/code with which the survey is saved in the database and can be used further in more complex and advanced types of questions;
- Question: The name of the question that will actually appear in the survey for the survey participants;
- Help: A short text can be provided in order to help the survey participants better understand the question;
- General options: The functionalities located under this option allow you to modify the most important question-related settings. It includes four options:
- Question type: Many question types can be used in LimeSurvey. To better understand them, hover the mouse over each option or read our wiki on questions;
- Question group: You can choose here which question group you would like to add the question to;
- Validation: This feature is available on all free text type or numeric questions. It is used for response validation. If the response is not validated, the user will be prompted to try again before they can progress;
- Mandatory: It is available for all question types. This setting allows you to require users to answer the question before they can move on to the next question;
- Relevance equation: It is a setting for advanced users. It is recommended to use the default value of "1" (it means that the item will be always shown);
Please note that according to the selected question type, different tabs will be displayed below the General settings tab. To find out more on this, we suggest you to start reading first the following wiki section.
For example, if the Long free text question type is selected (the default option), then the following tabs will be displayed: General options, Display, Input, Logic, Other, Statistics, Timer. Click on the Save button. You will be redirected to a page that contains the summary of the recently added question:
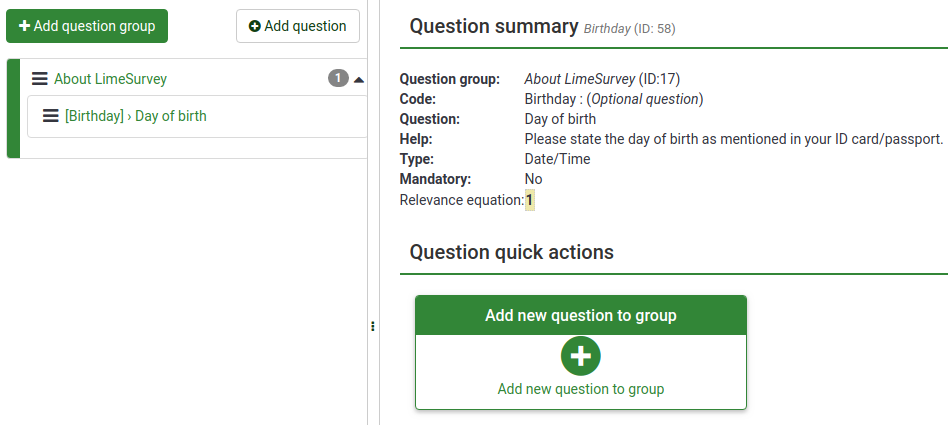
To add more questions, follow the same procedure described above.
Add subquestions and answers
Different types of questions require subquestions, predefined sets of answers, both or none. For example, a question that requires the age of a survey participant does not require any subquestion or predefined set of answers. On the other hand, a simple array question requires both subquestions and answers.
The next screenshot contains an array-type question:

Add subquestions
To add subquestions, go to the top toolbar and click on Edit subquestions. Type in the subquestions you wish the survey participants to answer to:

Add answers
To add a set of predefined answers, go to the top toolbar and click on Edit answer options. Type in the answers:

Save the set of answers and preview the question (look for the Preview question button located on the top toolbar).
Our question looks like this:

Congratulations! You have successfully created your first array-type question.
Organize questions
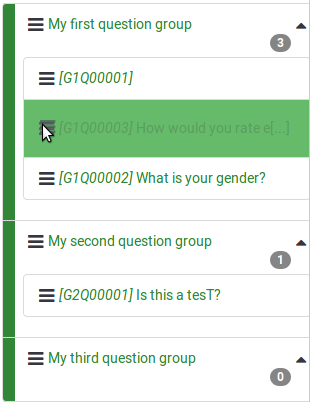
If your survey already contains dozens of questions, it is a time-consuming process to access each question and/or question group and edit the order one-by-one. Therefore, to quickly reorganize your questions and question groups, you can change the order of the questions and question groups from the Survey Structure menu. Once accessed, click on the three-lines symbol that is located in front of the question (group) name and start dragging it to the desired position.
Activate/Stop survey
Now that you have at least one question and question group added to your survey, you can activate it. Select the Settings tab from the left-side menu and click on the Overview option. The following page will load up:
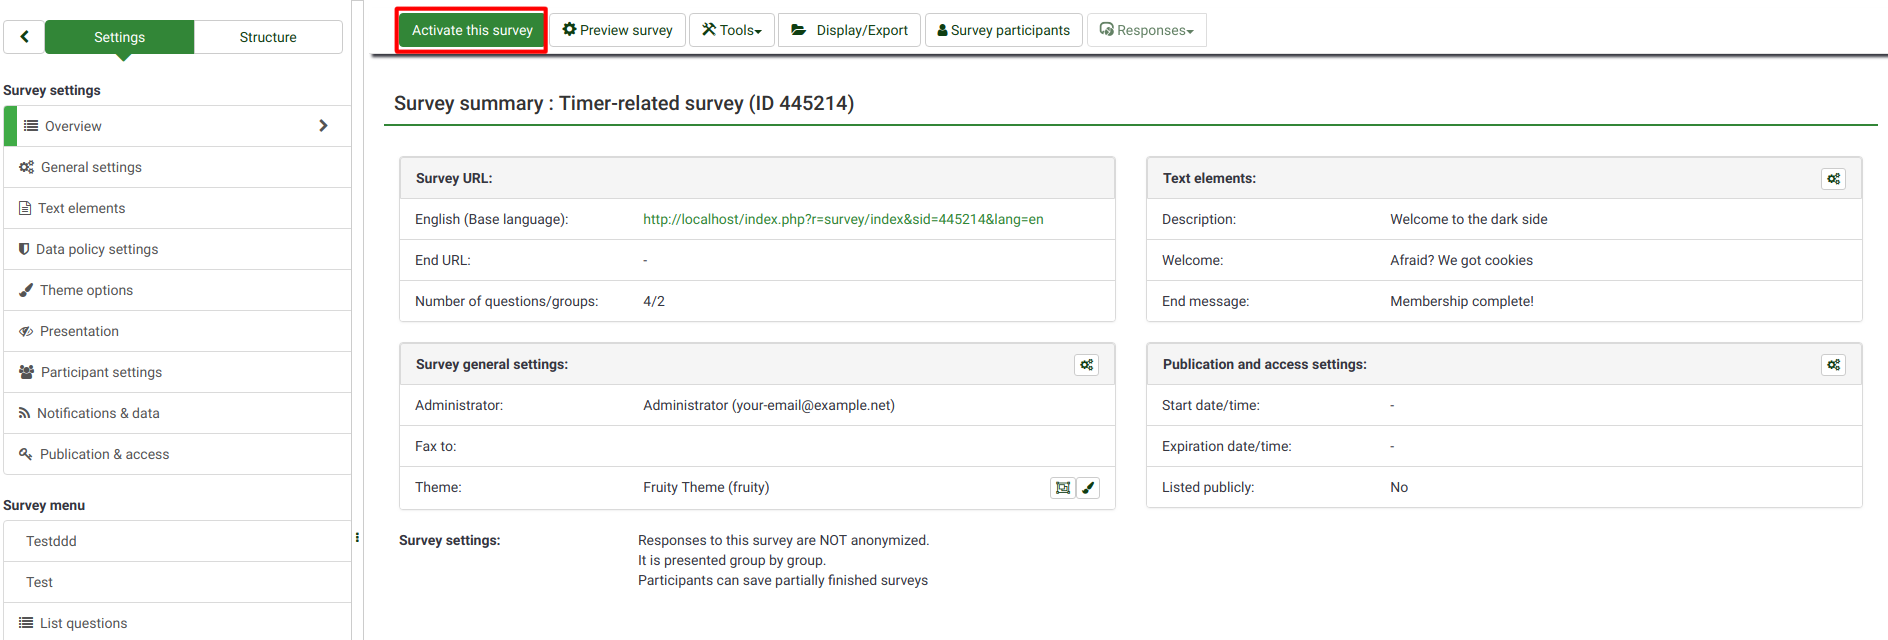
Check the toolbar and click on the Activate this survey button.
Before activation, a window will be displayed, asking you about some general survey settings:

- Anonymyzed responses: This option allows you to determine whether responses to your survey are matched up with information from your survey's token table, or kept "anonymous". If you decide to enable it, your survey is set to anonymize responses - there will be no way to connect answers and participants;
- Save IP address: If enabled, the IP address of the survey respondent will be stored together with his/her answers;
- Save timings: If enabled, the time spent on each page of the survey by each survey participant is recorded;
- Date stamp: Turn it on if you would like to see the date the answers were submitted;
- Save referrer URL: If enabled, the referrer URL will be stored together with the answers.
Once you are done enabling the desired functionalities, click on the Save & activate survey button. The following message should be displayed:

Select the option No, thanks to disable the closed-access mode! In this way, everyone will have access to your survey.
Congratulations! You have activated your first survey! If you want to start sharing the survey URL, go to the home page of your survey, and look for the survey URL in the Survey summary:
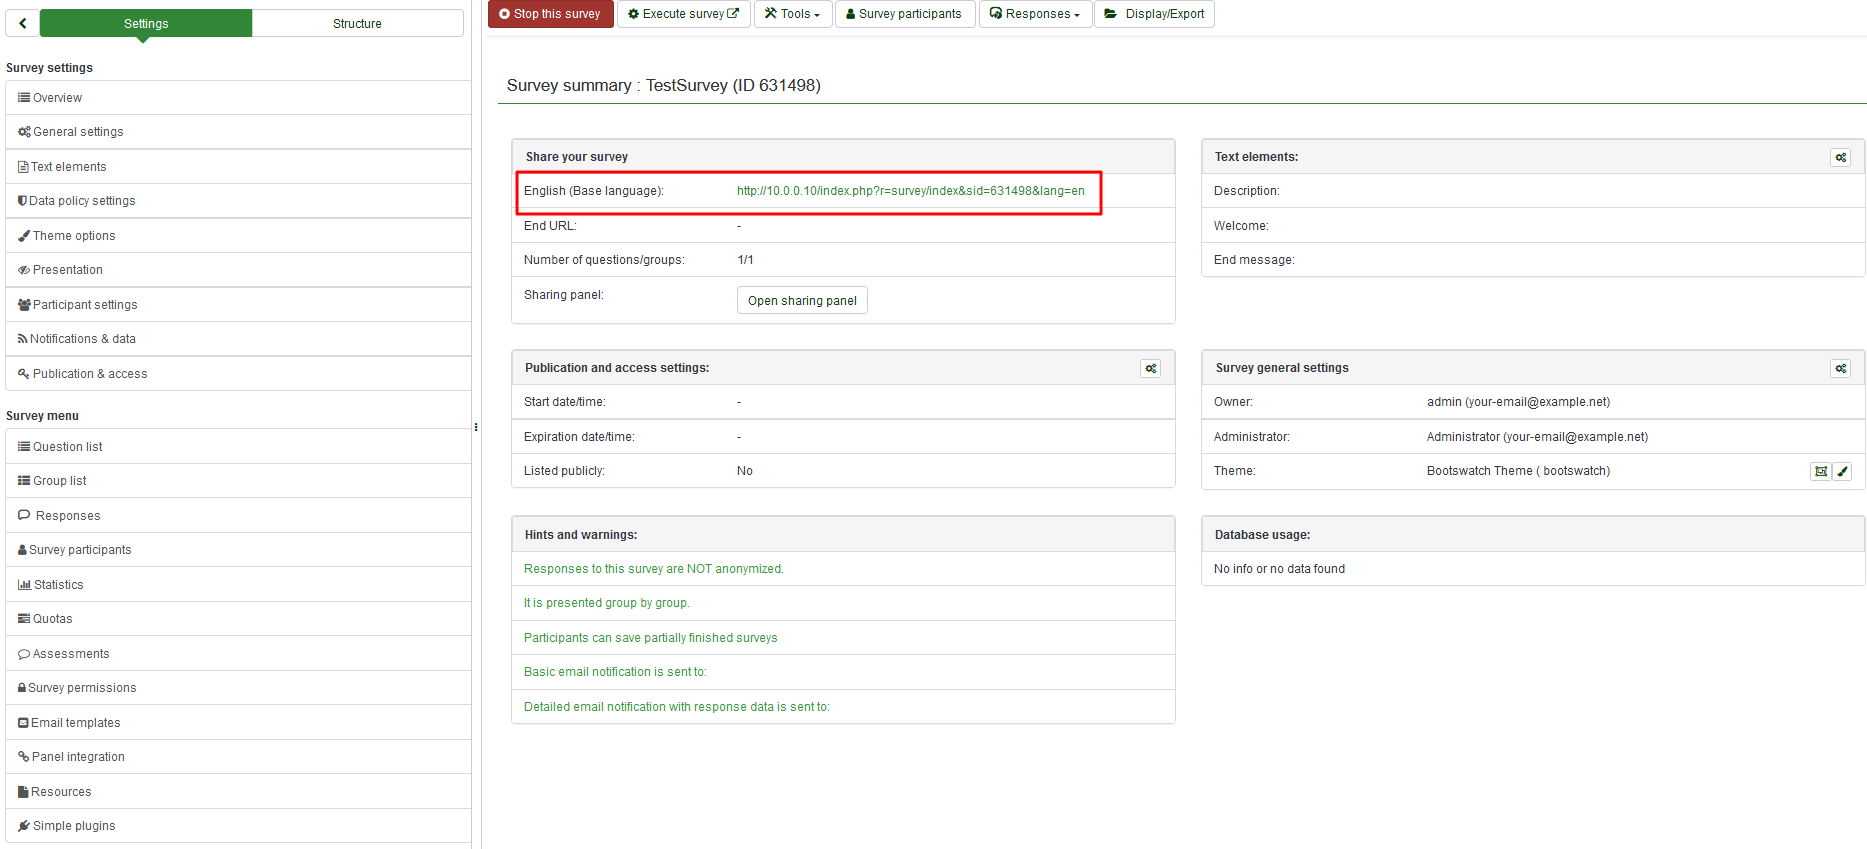
Copy the link and start sharing it.
If you want to stop the survey, click on the Overview tab from the left-side menu and look for the Stop this survey button located on the top toolbar:

統計
To quickly see your survey statistics, click on the Survey button located on the top toolbar of your LimeSurvey home page. A list with all the available surveys will be displayed. Now, go to the last column and click on the Statistics button (![]() ) that corresponds to the row of the survey you wish to analyse:
) that corresponds to the row of the survey you wish to analyse:

A new window with a set of graphs will be loaded up. If you want to use them in a report, scroll down and click on the Export images button located on the bottom-left part of the page. All the charts will be separately saved as .png files and archived in a .zip file.
On the upper-right part of the window, you can see the Expert mode button. Click on it in order to access more statistics-related filters.
Once you select the filters according to your desired analyses, click on the View Statistics button located on the upper-right part of the window.

According to the chosen output, the results are displayed in HTML, Excel or PDF.
Exporting the questions and responses
If you want to export the results in a different format in order to produce statistics and graphs using other apps such as SPSS, R, STATA, etc., access the survey you want to analyse. Click on the Responses button located on the top toolbar, and then on Responses & Statistics:

Now you are on the Browse responses page. Look at the top toolbar for the Export button and select the desired format you wish to export to. If you select the first option, all the availalbe formats in which you can export the data will be displayed:

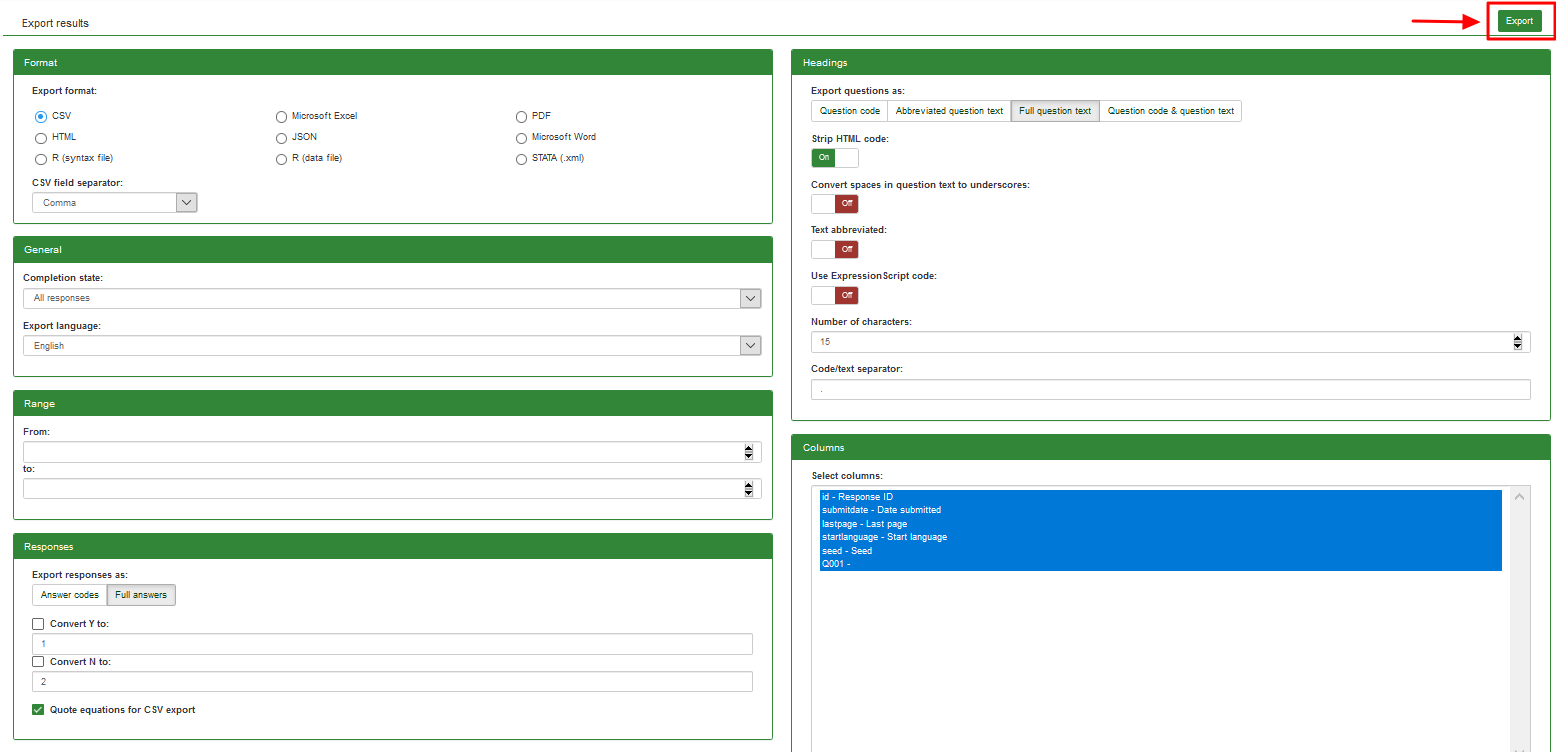
Once the filters are set, click on the Export button located in the upper-right side of the window.
Other LimeSurvey features - advanced users
Check the features of LimeSurvey Pro package by clicking on the following link: https://www.limesurvey.org/editions-and-prices/limesurvey-pro/professional-features.
If further questions arise, please post them on our forum or join the IRC channel.