Overview/ja: Difference between revisions
From LimeSurvey Manual
Bravehorse (talk | contribs) (Created page with "このツールバーには次の設定があります。") |
Bravehorse (talk | contribs) (Created page with "*'''アンケートの状態:''' アンケートの状態によって、ツールバーの左側に4種類のボタンのいずれかが表示されます。 **File:Button -...") |
||
| Line 19: | Line 19: | ||
*''' | *'''アンケートの状態:''' アンケートの状態によって、ツールバーの左側に4種類のボタンのいずれかが表示されます。 | ||
**[[File:Button - activate this survey.png]] : | **[[File:Button - activate this survey.png]] : アンケートが停止中の時に表示されます。アンケートを稼働させるにはこのボタンをクリックします。アンケートのURLは、[[Overview/ja#Survey summary|アンケート概要セクション]]にある''アンケートURL''ボックスを確認してください。 | ||
**[[File:Button - stop this survey.png]] : | **[[File:Button - stop this survey.png]] : アンケートが実行中の時に表示されます。アンケートを停止させたいときはこのボタンをクリックします(クリックすると回答できなくなります)。 | ||
**[[File:Button - execute survey.png]]: | **[[File:Button - execute survey.png]]: アンケートが実行中の時、アンケートを確認・実行するには'''アンケート実行'''ボタンをクリックします。このオプションと'''アンケートのプレビュー'''との違いは、前者は回答を保存し、後者は保存しない点です。 | ||
**[[File:Button - expired survey.png]] : | **[[File:Button - expired survey.png]] : アンケートが期限切れの時に表示されます。再稼働させるには、ボタンをクリックして[[Publication & access/ja|公開&アクセス設定]]にアクセスし、アンケートの開始・有効期限日時を変更します。 | ||
*''' | *'''アンケートプレビュー:''' アンケートをプレビューします。アンケートが多言語対応のとき、緑色の矢が表示されます。各言語のアンケートをチェックするにはそれぞれの言語をクリックします。 | ||
*''' | *'''ツール:''' '''ツール'''メニューから次の機能にアクセスできます。 | ||
**'' | **''アンケートを削除:'' アンケートを削除したいときに使います。 | ||
**'' | **''クイック翻訳:'' 翻訳メニューに移動します。アンケートが多言語対応の時だけアクセス可能です。 | ||
**'' | **''条件のリセット:'' アンケートのすべての条件が削除されます。 | ||
**'' | **''アンケートロジックファイル:'' アンケートのロジックをチェックします。アンケートで高度な機能を使うときに使用します。詳細は、[[Show_logic_file/ja|アンケートロジック]]を参照してください。 | ||
**'' | **''質問コード再生成:'' 質問を編集する権限を持つユーザーは、アンケートの質問にユニークなIDを付与することができます。ただし、IDが多くなりすぎた場合(番号付けが乱雑になるなど)、'''質問コード再作成'''機能により質問を自動的に番号付けします。次のような番号付けが可能です。 | ||
***'' | ***''一括:'' このオプションを使うと、[[Survey structure/ja|アンケート構成]]の順番に対応したコードが割り当てられます(例:Q00001、Q0002等)。 | ||
***'' | ***''質問グループで:'' このオプションを使うと、各々の質問が属する質問グループごとに、グループ内の順番に従って割り当てられます(G1Q00001、G1Q00002、G2Q00001など) | ||
*''' | *'''表示、出力:''' この機能の詳細は、[[Exporting_a_survey_structure/ja|LimeSurveyの出力機能]]を参照してください。 | ||
*''' | *'''アンケート参加者:''' アンケート参加者として特定の人だけ招待し、各々が1回だけ参加できるようにするときに使います。詳細は、[[Survey_participants/ja|アンケート参加者]]を参照してください。 | ||
*''' | *'''回答:''' 保存された回答を確認したり、新しいデータを入力したり、回答を出力・インポートしたり、不完全な回答を閲覧したりするためのメニューを提示します。矢印をクリックすると、3つのオプションが表示されます。 | ||
**'' | **''回答と統計:'' 保存されたすべての回答と回答者の概要を表示します。 | ||
**'' | **''データ入力画面:'' 回答テーブルに新しいデータを入力します。アンケート参加者からの回答をオフラインで受領しLimeSurveyで提供される機能により回答を分析したい場合に有効です。 | ||
**'' | **''不完全な回答:'' 一部だけ回答して保存された回答(未送信)を表示します。 | ||
=Survey summary= | =Survey summary= | ||
Revision as of 11:40, 26 May 2018
はじめに
概要パネルでは、メインのアンケートに関連した設定と機能にアクセスできます。このパネルは2つのパートに分かれています。
概要ツールバー
このツールバーには次の設定があります。
- アンケートの状態: アンケートの状態によって、ツールバーの左側に4種類のボタンのいずれかが表示されます。
 : アンケートが停止中の時に表示されます。アンケートを稼働させるにはこのボタンをクリックします。アンケートのURLは、アンケート概要セクションにあるアンケートURLボックスを確認してください。
 : アンケートが実行中の時に表示されます。アンケートを停止させたいときはこのボタンをクリックします(クリックすると回答できなくなります)。
 : アンケートが実行中の時、アンケートを確認・実行するにはアンケート実行ボタンをクリックします。このオプションとアンケートのプレビューとの違いは、前者は回答を保存し、後者は保存しない点です。
 : アンケートが期限切れの時に表示されます。再稼働させるには、ボタンをクリックして公開&アクセス設定にアクセスし、アンケートの開始・有効期限日時を変更します。
- アンケートプレビュー: アンケートをプレビューします。アンケートが多言語対応のとき、緑色の矢が表示されます。各言語のアンケートをチェックするにはそれぞれの言語をクリックします。
- ツール: ツールメニューから次の機能にアクセスできます。
- アンケートを削除: アンケートを削除したいときに使います。
- クイック翻訳: 翻訳メニューに移動します。アンケートが多言語対応の時だけアクセス可能です。
- 条件のリセット: アンケートのすべての条件が削除されます。
- アンケートロジックファイル: アンケートのロジックをチェックします。アンケートで高度な機能を使うときに使用します。詳細は、アンケートロジックを参照してください。
- 質問コード再生成: 質問を編集する権限を持つユーザーは、アンケートの質問にユニークなIDを付与することができます。ただし、IDが多くなりすぎた場合(番号付けが乱雑になるなど)、質問コード再作成機能により質問を自動的に番号付けします。次のような番号付けが可能です。
- 一括: このオプションを使うと、アンケート構成の順番に対応したコードが割り当てられます(例:Q00001、Q0002等)。
- 質問グループで: このオプションを使うと、各々の質問が属する質問グループごとに、グループ内の順番に従って割り当てられます(G1Q00001、G1Q00002、G2Q00001など)
- 表示、出力: この機能の詳細は、LimeSurveyの出力機能を参照してください。
- アンケート参加者: アンケート参加者として特定の人だけ招待し、各々が1回だけ参加できるようにするときに使います。詳細は、アンケート参加者を参照してください。
- 回答: 保存された回答を確認したり、新しいデータを入力したり、回答を出力・インポートしたり、不完全な回答を閲覧したりするためのメニューを提示します。矢印をクリックすると、3つのオプションが表示されます。
- 回答と統計: 保存されたすべての回答と回答者の概要を表示します。
- データ入力画面: 回答テーブルに新しいデータを入力します。アンケート参加者からの回答をオフラインで受領しLimeSurveyで提供される機能により回答を分析したい場合に有効です。
- 不完全な回答: 一部だけ回答して保存された回答(未送信)を表示します。
Survey summary
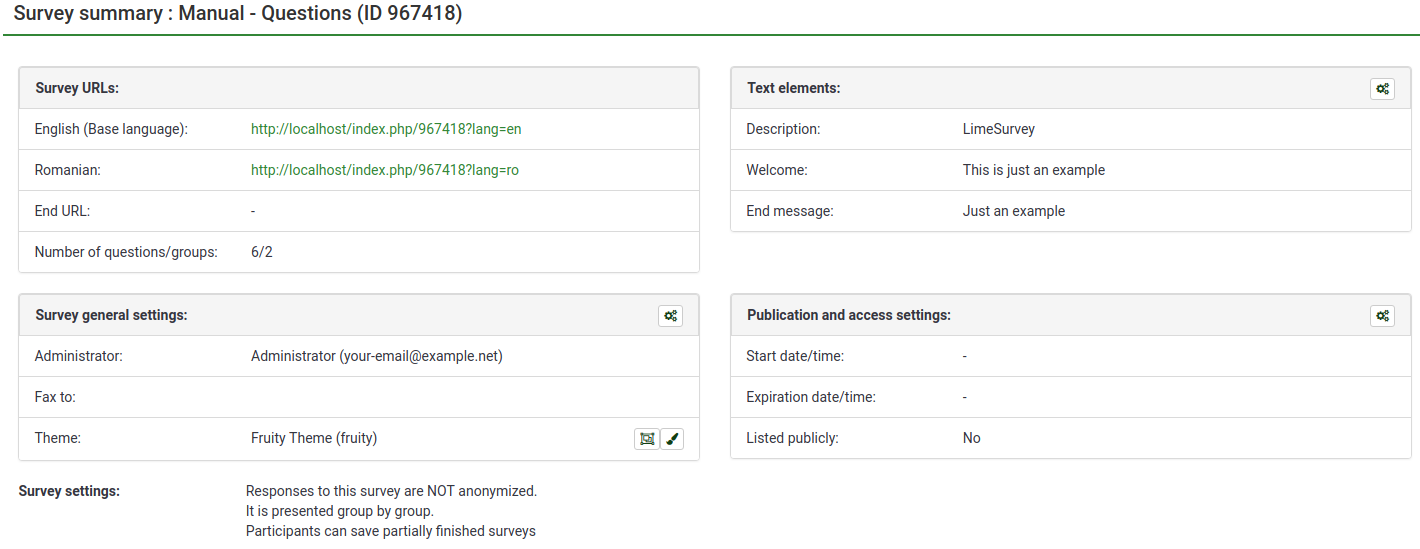
The bottom part of the Overview section offers some general information about your survey:

- Survey URLs: It displays the URLs used within your survey:
- English (Base language): The first survey URL is in your base language (English in our case). Therefore, if you share this link, the respondents will fill out the English version of the survey;
- Romanian: All the additional survey languages are listed below the base language. In our example, Romanian is the only selected additional language. Access the following wiki section for more information on additional languages.
- End URL: You have the possibility to redirect respondents to another page once they are done filling out the questionnaire. For more details, check the Survey text elements wiki.
- Survey general settings: The following settings can be revised from here:
- Administrator: It shows the user that is the administrator of the survey;
- Fax to: It is used when you want to give a fax number on the "printable survey". For more details, check our wiki page on general settings;
- Theme: It allows you to quickly edit the survey theme. Two shortcuts are located on the same row:
- Survey settings: A short description on which options (the most important ones) are enabled within the survey.
- Number of questions/groups: It displays the total number of questions and question groups within the survey. If you would like to add/edit/delete them, read first about the survey structure of a LimeSurvey questionnaire;
- Text elements: These options can be edited from the survey text elements panel:
- Description: A general survey description;
- Welcome: It displays the welcome message that is shown to the survey participants when they access the survey;
- End message: It displays the end message that is shown to the survey participants when they finish filling out the survey.
- Publication and access settings: The below options can be edited from the publication and access control settings panel:
- Start date/time: It shows the start date and time of your survey. Even if the survey participants have access to the URL, they will not be able to start completing it till the start date.
- Expiration date/time: It shows the expiration date and time of your survey. After the expiration date/time, no more responses are recorded.
- Listed publicly: If turned on, your survey will be listed in the "available surveys" portal from where it can be access by anyone;
All the options presented in the survey summary can be edited from the settings menu.