플러그인 - 고급
From LimeSurvey Manual
개요
LimeSurvey 2.05부터 LimeSurvey는 공식적으로 플러그인을 지원합니다. 일부 플러그인은 LimeSurvey 팀에서 지원되며 핵심으로 들어갈 것입니다. 일부는 LimeSurvey 팀 외부의 다른 사람들에 의해 지원됩니다. 이를 찾는 데 도움이 되도록 사용 가능한 타사 플러그인을 확인하고 여기에 자신만의 플러그인을 추가하세요!
플러그인을 사용하면 사용자는 정기적인 소프트웨어 업데이트의 혜택을 누리면서 설치 기능을 사용자 정의할 수 있습니다.
이 문서는 자신의 사용이나 클라이언트를 위해 LimeSurvey를 확장하는 개발자를 위한 것입니다. 최종 사용자에게는 이 문서가 도움이 되지 않습니다.
플러그인은 iPlugin 인터페이스를 구현해야 합니다. PluginBase 클래스에서 플러그인 클래스를 확장하는 것이 좋습니다.
플러그인은 이벤트 메커니즘을 중심으로 개발되었습니다.
플러그인 설정
확장하면 당사가 이미 구현한 플러그인에 필요한 공통 기능의 이점을 누릴 수 있습니다. 이러한 함수 중 하나는 getPluginSettings 함수의 구현입니다. 이 함수는 사용자의 구성 옵션을 설명하는 배열을 반환해야 합니다.
예제 플러그인은 단 하나의 구성 가능한 설정, 즉 표시될 메시지를 노출합니다.
protected $settings = array(
    'logo' => array(
          'type' => 'logo',
          'path' => 'assets/logo.png'
     ),

     'message' => array(
          'type' => 'string',
          'label' => 'Message'
     )
);
배열에는 각 설정의 이름이 키로 포함되어 있습니다. 값은 필수 메타데이터가 포함된 배열입니다.
지원되는 유형은 다음과 같습니다:
- logo
- int (정수)
- string (영숫자)
- text
- html
- relevance
- info
- password
- date
- select
유형 외에도 여러 가지 다른 키를 사용할 수 있습니다.
- label, 레이블 정의
- default, 값이 지정되지 않은 경우 표시할 값을 정의합니다(측량 설정이 아닌 전역 설정에만 해당)
- current, 현재 값을 정의합니다.
- readOnly : 설정은 readonly
- htmlOptions, 입력 부분의 htmlOptions( Yii 매뉴얼 [[1]])
- 플러그인 옵션 참조)로 표시됩니다. 일부 설정(html 또는 선택) : 위젯 옵션 설정
- labelOptions : 라벨의 htmlOptions
- controlOptions : 라벨 및 입력 래퍼의 htmlOptions
모든 실제 설정을 사용한 플러그인 예제는 exampleSettings에서 찾을 수 있습니다.
읽기 및 쓰기 플러그인 설정
플러그인 코드에서 직접 플러그인 설정을 읽고 쓸 수 있습니다.
예:
$mySetting = $this->get('mySetting');
$this->set('mySetting', $mySetting + 1);
설정이 null인 경우 기본값을 얻을 수 있습니다.
$mySetting = $this->get('mySetting', null, null, 10); // 기본값은 10입니다
설문조사별 플러그인 설정
설문조사별 플러그인 설정을 생성하는 데는 두 가지 이벤트가 사용됩니다.
- newSurveySettings
- beforeSurveySettings
특정 설문조사를 위해 플러그인을 비활성화하는 예:
    public function init()
    {
        $this->subscribe('beforeSurveySettings');
        $this->subscribe('newSurveySettings');
        // 기타 이벤트...
    }

    public function beforeSurveySettings()
    {
	    $event = $this->event;
	    $surveyId = intval($event->get('survey'));

        $event->set(
            "surveysettings.{$this->id}",
            [
                'name' => get_class($this),
                'settings' => [
                    'isActive' => [
                        'type' => 'boolean',
                        'label' => 'isActive',
                        'current' => $this->getIsActive($surveyId),
                        'help' => 'Activate plugin for this survey'
                    ],
                ]
            ]
        );
    }

    public function newSurveySettings()
    {
        $event = $this->event;
        foreach ($event->get('settings') as $name => $value)
        {
            $this->set($name, $value, 'Survey', $event->get('survey'), false);
        }
    }

    private function getIsActive(int $sid): bool
    {
        return (bool) $this->get('isActive', 'Survey', $sid, false);
    }
이벤트
플러그인은 이벤트를 구독하고 이벤트가 실행될 때 LimeSurvey와 상호 작용할 수 있습니다. 현재 사용 가능한 이벤트 목록을 보려면 플러그인 이벤트를 확인하세요.
API
플러그인은 "공개" API를 통해서만 LimeSurvey를 확장해야 합니다. 즉, 소스 코드에 있는 클래스를 직접 사용하는 것은 나쁜 습관입니다. 강제로 그렇게 하지 않도록 할 수는 없지만, 사소한 업데이트를 할 때마다 플러그인이 손상될 위험이 있습니다.
가능한 한 여기에 설명된 방법을 통해서만 LimeSurvey와 상호 작용하십시오. 이벤트와 동일합니다.
API 개체는 PluginBase에서 확장할 때 $this->api 통해 사용할 수 있습니다. 그렇지 않으면 플러그인 생성자에 전달되는 PluginManager 인스턴스에서 가져올 수 있습니다.
요청 시 API 객체에 새로운 기능을 추가할 수 있습니다.
<span id="Form_extension (New in 6 )">
양식 확장 (New in 6 )
소개
양식 확장 시스템은 각 양식에 대해 새 이벤트를 추가하지 않고 핵심 LimeSurvey에서 양식을 확장하는 보다 일반적인 방법입니다.
이는 다음 구성 요소로 구성됩니다:
- FormExtensionService라는 전역 모듈
- 플러그인이 위의 모듈 초기화에 추가할 수 있는 입력 클래스 라이브러리
- 위젯과 함께 LimeSurvey 보기 파일에 사용되는 사용자 정의 렌더러
각 형태는 위치 문자열로 식별됩니다.<form name><dot><tab name> . 예: globalsettings.general 또는 globalsettings.security .
HTML이 없는 클래스 기반 시스템의 핵심은 핵심 HTML이 변경될 때 플러그인 작성자가 HTML을 업데이트할 수 있도록 하는 것입니다. 그래도 작성자는 필요한 경우 RawHtmlInput 유형을 사용할 수 있습니다.
이 시스템에서 할 수 없는 한 가지는 '새 양식 탭'을 추가하는 것입니다.
예시
플러그인에서 양식에 새 입력을 추가하려면 init() 함수에서 다음 코드를 사용하십시오:
TODO: 전역 대신 플러그인 설정에 저장
// 파일 맨 위에
use LimeSurvey\Libraries\FormExtension\Inputs\TextInput;
use LimeSurvey\Libraries\FormExtension\SaveFailedException;

// Inside init()
Yii::app()->formExtensionService->add(
    'globalsettings.general',
    new TextInput([
        'name' => 'myinput',
        'label' => 'Label',
        'disabled' => true,
        'tooltip' => 'Moo moo moo',
        'help' => 'Some help text',
        'save' => function($request, $connection) {
            $value = $request->getPost('myinput');
            if ($value === 'some invalid value') {
                throw new SaveFailedException("Could not save custom input 'myinput'");
            } else {
                SettingGlobal::setSetting('myinput', $value);
            }
        },
        'load' => function () {
            return getGlobalSetting('myinput');
        }
    ])
);
유효성 검사
입력 유효성 검사는 save 기능에서 수행됩니다(위 예 참조). 게시된 값이 유효하지 않은 경우 SaveFailedException 발생하고 경고 플래시 메시지가 사용자에게 표시됩니다.
지원되는 양식
다음 양식을 확장할 수 있습니다.
- globalsettings.general (New in 6.0.0 )
다른 핵심 양식에 대한 지원을 추가하려면 pull-요청에 다음 변경 사항을 적용해야 합니다.
보기 파일에 다음을 추가합니다:
<?php
use LimeSurvey\Libraries\FormExtension\FormExtensionWidget;
use LimeSurvey\Libraries\FormExtension\Inputs\DefaultBaseRenderer;
?>
... more HTML
<?= FormExtensionWidget::render(
    App()->formExtensionService->getAll('globalsettings.security'),
    new DefaultBaseRenderer()
); ?>
양식 HTML이 다른 양식과 다른 경우 DefaultBaseRenderer 기반으로 새 렌더러(renderer) 클래스를 만들어야 할 수도 있습니다. 아직 추가되지 않은 입력 유형을 사용하여 기본 렌더러 클래스를 확장해야 할 수도 있습니다.
두 번째 변경 사항은 양식을 저장하는 컨트롤러 작업에서 양식 확장 서비스 클래스에 대한 호출을 추가하는 것입니다:
$request = App()->request;
Yii::app()->formExtensionService->applySave('globalsettings', $request);
그게 다입니다!
<span id="Localization_ (New in 3 )">
현지화 (New in 3 )
플러그인이 자신의 로케일 파일을 추가하는 것이 가능합니다. 사용되는 파일 형식은 핵심 번역과 동일하게 .mo입니다. 파일은 다음 위치에 저장되어야 합니다.
<plugin root folder>/locale/<language>/<language>.mo
"<language>"에는 "de" 또는 "ko"와 같은 두 글자 단어입니다.
특정 로케일 파일을 사용하려면 플러그인 함수 gT를 사용하십시오.
$this->gT("A plugin text that needs to be translated");
특정 문자열을 플러그인 특정 로케일 파일에서 찾을 수 없는 경우 함수는 핵심 로케일 파일을 찾습니다. 따라서 "취소"와 같은 문자열을 사용하는 것이 안전합니다.
$this->gT("Cancel"); // Will be translated even if "Cancel" is not in the plugin locale file
플러그인과 함께 뷰를 사용하는 경우 다음을 사용해야 합니다:
$plugin->gT("Translate me");
보기에서 플러그인별 번역을 수행합니다.
pot 파일의 모양에 대한 예로 [2] 파일을 사용할 수 있습니다. 이를 번역 도구로 가져옵니다.
Tools
One open-source tool to edit po- and mo-files is Poedit.
Logging (New in 3 )
If you want to log something from your plugin, just write
$this->log("Your message");
The default logging level is trace, but you can give another log level as an optional second argument:
$this->log("Something went wrong!", CLogger::LEVEL_ERROR);
The log file can be found in folder
<limesurvey root folder>/tmp/runtime/plugin.log
Your plugin name is automatically used as category. A nice way to see only the errors from your plugin is using grep (on Linux):
$ tail -f tmp/runtime/plugin.log | grep <your plugin name>
More info about configuring logging in Yii 1: Optional_settings#Logging_settings.
Extension updates (New in 4 )
Since LimeSurvey version 4.0.0, there's a system in place to deal with plugin and other extension updates. To use this system, your extension config.xml file needs to include updater configuration.
<updaters>
    <updater>
        <stable>1</stable>
        <type>rest</type>
        <source>https://comfortupdate.limesurvey.org/index.php?r=limestorerest</source>
        <manualUpdateUrl>https://somedownloadlink.com/maybegithub</manualUpdateUrl>
    </updater>
</updaters>
(The source tag above points to the LimeStore REST API, which will be used for all extensions available in our LimeStore.)
| Tag | Description |
|---|---|
| stable | "1" if this source only gives you stable version numbers; "0" if the source will also provide unstable versions, like 0.3.3-beta.
|
| type | For now, only type rest is supported. It's easy to add new updater types (version checkers), like git, wget, etc.
|
| source | The URL to fetch new versions from. |
| manualUpdateUrl | URL which the user can go to to update the latest version of the extension. |
| automaticUpdateUrl | TODO |
If you don't want to supply an updater, you should put the following text in your config XML file:
<updaters disabled="disabled">
</updaters>
This way, you tell the system that you purposefully disabled the update system, and didn't just forget to add it.
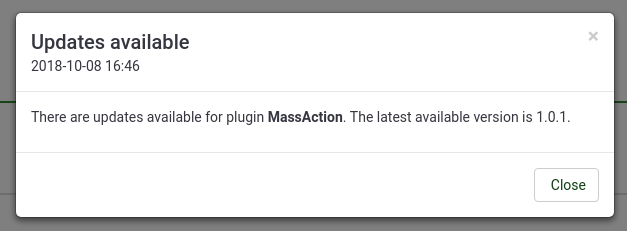
The new plugin UpdateCheck - installed and activated by default - checks for new updates for all installed extensions when a super admin logs in, asynchronously, max one time every 24 hours. If any new versions are found, a notification is pushed.
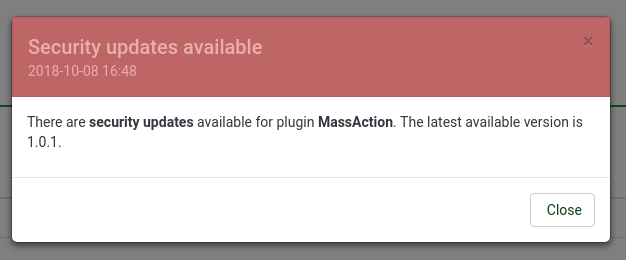
If a new security update is found, the notification will open automatically and be styled in "danger" class.
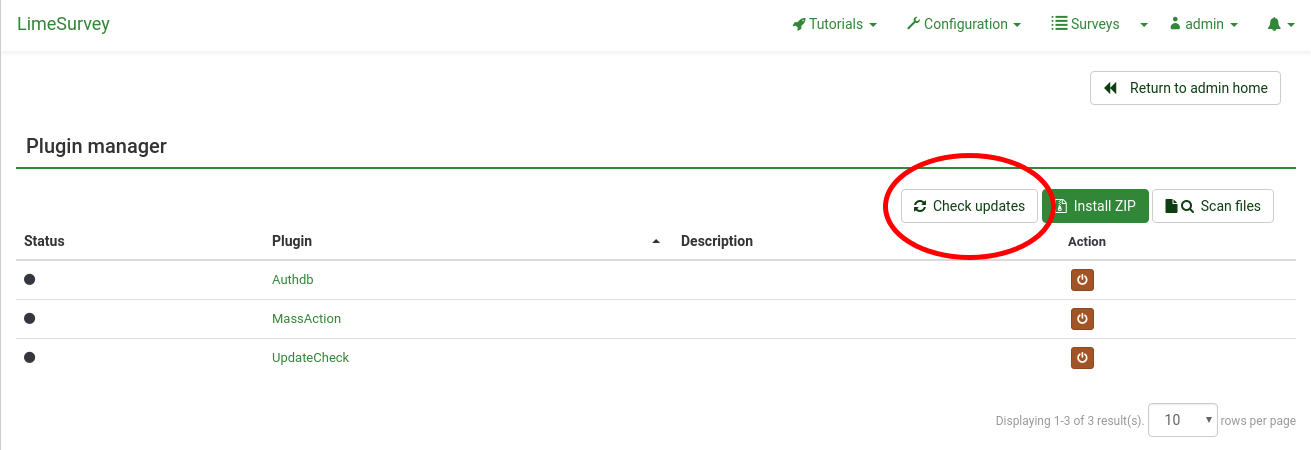
You can manually check for updates by going to the plugin manager view and click on "Check updates". Note that this button is only visible if the UpdateCheck plugin is activated.
Under the hood
This section provides a brief overview over the extension updater implementation.
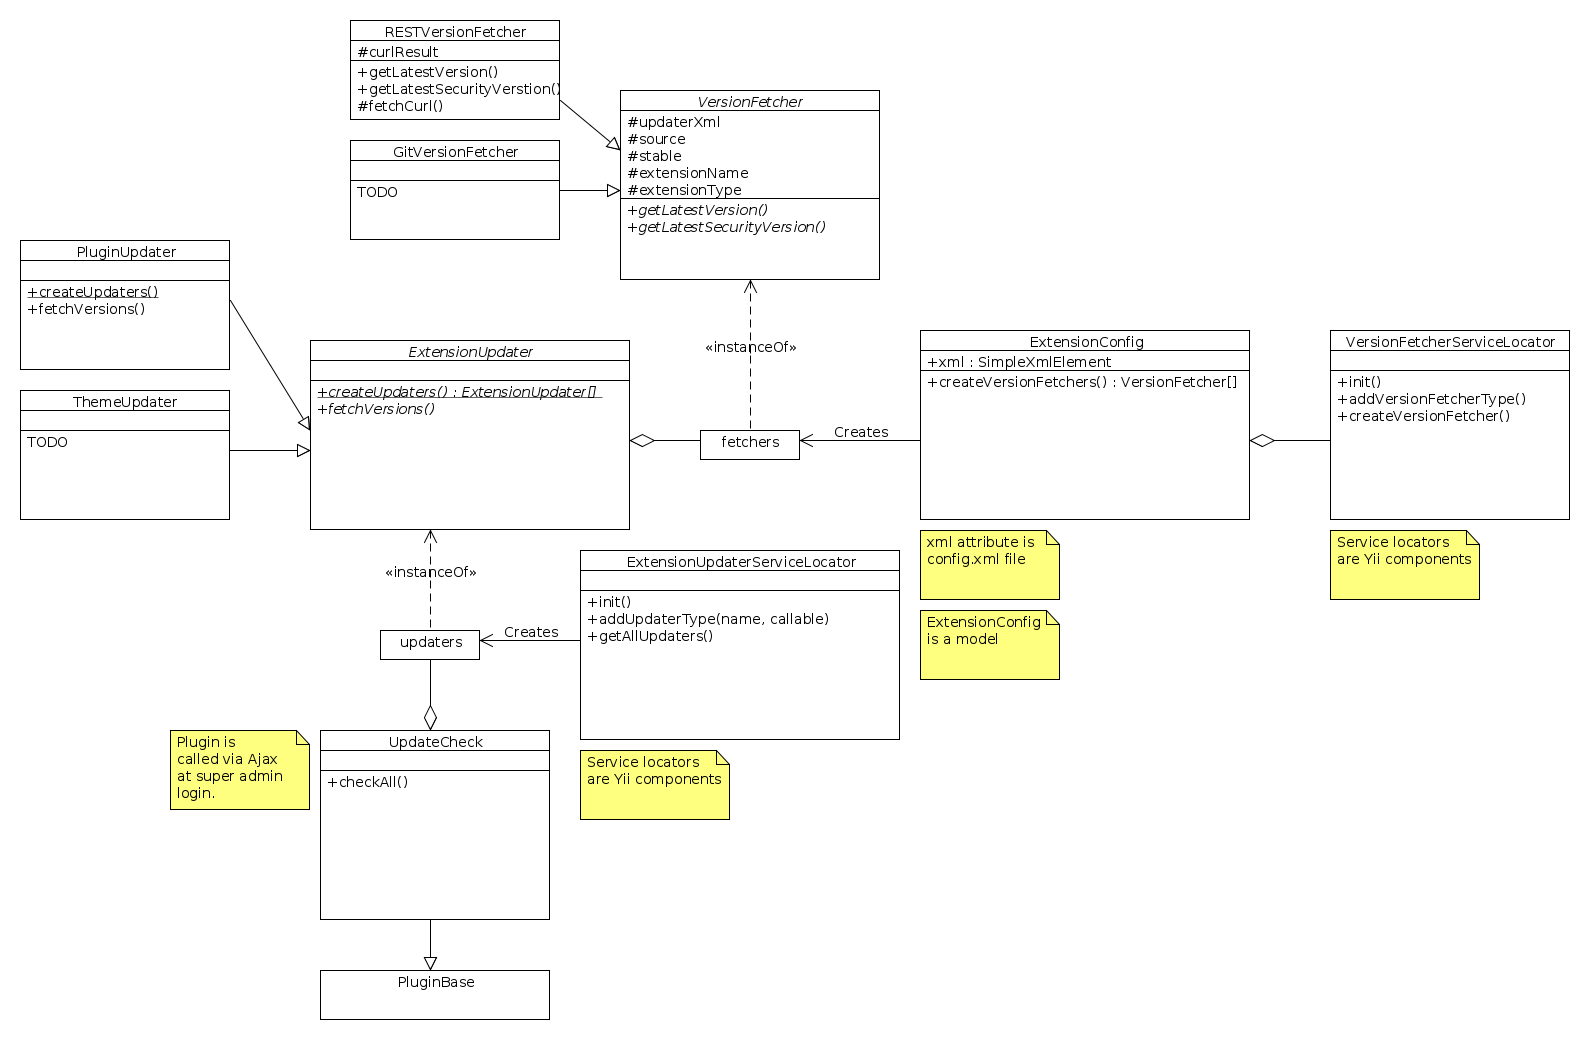
The extension updater is part of the ExtensionInstaller library. Below is a UML diagram for the classes related to the updater process.
Program flow when Yii starts:
 Yii init
   VersionFetcherServiceLocator->init()
     Add REST version fetcher
   ExtensionUpdaterServiceLocator->init()
     Add PluginUpdater
     TODO: Add an updater for each extension type (theme, question template, ...)
Program flow when running the UpdaterCheck plugin:
 Get all updaters from ExtensionUpdaterServiceLocator
 Loop each updater
   For each updater, loop through version fetchers configured by <updater> XML
     For each version fetcher, contact remote source and get version information
 Compose all versions into a notification
The checkAll method in the UpdateCheck plugin provides an example of how to query all extensions for new versions.
Adding new version fetchers
To add a new custom version fetcher, run this during Yii initialization:
$service = \Yii::app()->versionFetcherServiceLocator
$service->addVersionFetcherType(
  'myNewVersionFetcherType',
  function (\SimpleXMLElement $updaterXml) {
    return new MyNewVersionFetcher($updaterXml);
  }
);
Of course, the class MyNewVersionFetcher has to subclass VersionFetcher.
To use your new version fetcher, configure the type tag in the updater XML to use
myNewVersionFetcherType (instead of e.g. rest).
Adding new extension updaters
To add a new custom extension updater, run this during Yii initialization:
$service = \Yii::app()->extensionUpdaterServiceLocator;
$service->addUpdaterType(
  'myNewExtensionUpdater',
  function () {
    return MyNewExtensionUpdater::createUpdaters();
  }
);
Class MyNewExtensionUpdater has to subclass ExtensionUpdater.
The top type tag in config.xml ('plugin', 'theme', ...) will control which extension updater are used for this extension. The system is not fully customizable yet, since you also need to add a custom ExtensionInstaller, menu items, etc. But in theory, and maybe in the future, it should be possible to add a new type of extension this way.
확장 설치 프로그램
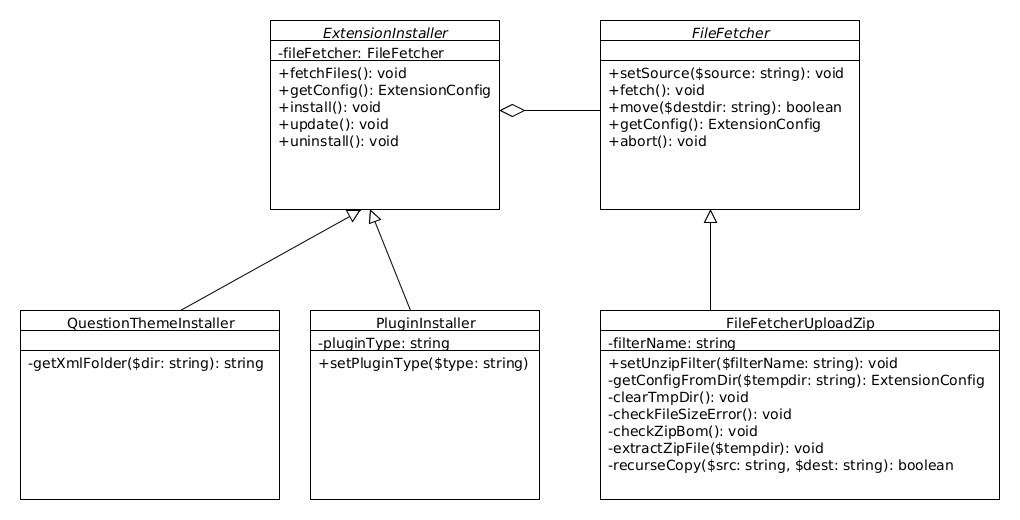
확장 설치 프로그램 라이브러리는 두 개의 추상 클래스로 구성됩니다.
- ExtensionInstaller
- FileFetcher
ExtensionInstaller는 PluginInstaller, QuestionThemeInstaller 등과 같은 각 확장 유형에 대해 하위 클래스로 분류됩니다.
FileFetcher는 파일을 가져오는 다양한 방법에 따라 하위 클래스로 분류됩니다. 현재는 업로드된 zip 파일만 지원되지만 앞으로는 Github 또는 LimeStore 가져오기 도구도 있을 수 있습니다.
특수 플러그인
사용 가능한 플러그인
튜토리얼
이 단계별 튜토리얼은 모든 설문조사 응답 제출에 대해 게시물 요청을 보내는 플러그인을 만드는 방법을 보여줍니다. 튜토리얼에서는 전역 및 설문조사별 설정을 생성하고 저장하는 방법, 이벤트를 등록하는 방법 등을 보여줍니다.
