Tip vprašanja - Seznam (izbirni gumbi)
From LimeSurvey Manual
Kratek opis
Ta vrsta vprašanja zbira vnose s seznama izbirnih gumbov.
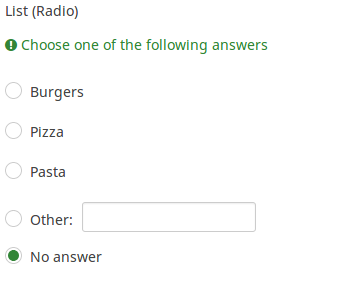
Primer: List_radio_example.zip
Splošne možnosti
Možnost 'Drugo' (drugo)
Opis
Ta možnost se uporablja pri tipu vprašanja, kjer anketiranec kot odgovor izbere več možnosti. Poleg seznama odgovorov ponuja polje poljubnega odgovora pod "Drugo".
'Razpoložljive možnosti
- Vklopljeno
- Izklopljeno (privzeto)
Obvezno
Opis
Ta možnost skrbnikom ankete omogoča, da od svojih anketirancev zahtevajo, da odgovorijo na določena anketna vprašanja. Če na obvezna vprašanja ne odgovorijo, anketiranci ne bodo mogli nadaljevati. Če imate vprašanje z več podvprašanji in zahtevate odgovor le na določena podvprašanja, uporabite atribut minimalni odgovor, ki se nahaja pod zavihkom Logika.
Razpoložljive možnosti
- Vklopljeno - na vprašanje je treba odgovoriti, preden lahko udeleženec nadaljuje na naslednjo stran - možnost odgovora 'Brez odgovora' ni nikoli prikazana.
- Soft - Če na vprašanje ni odgovorjeno, se ob poskusu nadaljevanja prikaže opozorilo naslednja stran - vendar se lahko udeleženec odloči, da opozorilo prezre in nadaljuje. Upoštevajte, da je možnost 'Brez odgovora' še vedno prikazana (če je aktivirana v nastavitvah predstavitve ankete)
- Izklopljeno (privzeto) - Vprašanje lahko ostane brez odgovora
Pogoj (prej "Enačba ustreznosti")
Opis
Če je rezultat pogoja »1« ali »true«, je vprašanje v kontekstu ankete »relevantno«, torej se prikaže anketirancu. Če ne, je vprašanje skrito. Vsako anketno vprašanje vam omogoča, da določite enačbo pomembnosti. Ta funkcija je naslednica pogojev in podpira veliko bolj zapleteno pogojno logiko.
Označevanje sintakse
Kadarkoli shranite pogoj, je ovrednoten in sintaktično poudarjen. Morebitne napake bodo označene z barvami, da jih boste lahko hitro odkrili in odpravili.

Veljavne vrednosti
- Kateri koli pogoj, ki uporablja sintakso ExpressionScript brez okoliških zavitih oklepajev.
Primeri
Tu so dobri primeri označevanja sintakse.
Zaslon
Answer order (answer_order)
Description
This attribute allows to set the order of answer options. (New in 5.5.0 build 221219)
Available options
- Normal (default)
- Alphabetically
- Random - Randomize when participant enters survey
Example
See this example (outside link) to better understand how to use different LimeSurvey randomization features.
Label for 'Other:' option (other_replace_text)
Description
Short text string to replace the text "Other" as label for the "other" option.
Example
Entering a value of "Alternative:" for this attribute would result in the word "Alternative:" being used instead of "Other".
Position for 'Other:' option (other_position)
Description
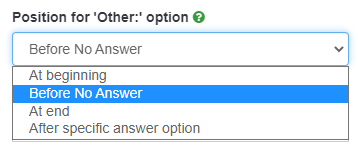
Indicates where the 'Other' option should be placed in the answer list, in relation to the answer options.
Options
- Before No Answer: The 'Other' option shall be placed in the answer list before the 'No Answer' answer option.
- At End: The 'Other' option shall be place at the end of the answer list.
- After specific answer option: The 'Other' option shall be placed in the answer list after a specific answer options which shall be set in the attribute Answer code for 'After specific answer option'.
Prikaži stolpce (display_columns)
Opis
Ta nastavitev vam omogoča prikaz možnosti odgovora v več kot enem stolpcu. Dodajte ta atribut in vrednost, ki označuje število stolpcev, ki jih želite uporabiti pri vprašanju. Priporočljivo je omejiti število stolpcev na število odgovorov.
'Veljavne vrednosti
- Katera koli vrednost pozitivnega celega števila, večja od 0
'Primeri
- Če imate 3 možnosti odgovora in jih želite prikazati vodoravno, nastavite to možnost na "3" namesto navpično.
- Če imate 6 možnosti odgovora in želite pokaži jih v dveh stolpcih (3 na stolpec), nato to možnost nastavi na '2'.
Skrij nasvet (hide_tip)
Opis
Večina vprašanj običajno vključuje namig, ki pravi: »Prosimo, izberite eno od naslednjih možnosti« ali besedilo z namigom, kako izpolniti vprašanje. Ta atribut vam omogoča, da izklopite ali vklopite te nasvete/namige.
Ti nasveti/namigi vključujejo sporočila o kriterijih za preverjanje (kot je najmanjše/največje število odgovorov, najmanjša/največja/enaka vrednost vsote). Če je hide_tip omogočen, bodo ta sporočila skrita. Vendar, če uporabnik vnese neveljavne podatke, se prikažejo namigi. Obarvana bodo rdeče in se bodo spremenila v zeleno, ko bodo izpolnjena merila za preverjanje veljavnosti.
'Razpoložljive možnosti
- Vklopljeno - nasveti/namigi so skriti;
- Izklopljeno (privzeto).
Vedno skrij to vprašanje (skrito)
Opis
Če je omogočeno, bo vprašanje vedno skrito – ne bo prikazano udeležencem ankete. To funkcijo je mogoče uporabiti v naslednjih scenarijih:
- Če želite vprašanje vnaprej izpolniti z URL-jem in ne želite, da se prikaže na zaslonu. To preglasi vse pogoje, uporabljene v anketi, ker zadevno vprašanje sploh ne bo vdelano na stran.
- Če želite sproti shraniti ali izračunati vrednost prek ExpressionScript - Presentation.
'Razpoložljive možnosti
- Vklopljeno
- Izklopljeno (privzeto)
QS:Pomoč glede ustreznosti ankete za tiskanje
Logika
Slog filtra polja (array_filter_style)
Opis
Ta funkcija vam omogoča, da izberete, kako so prikazana podvprašanja, filtrirana po nizu. Lahko so "skrite" ali "onemogočene".
Razpoložljive možnosti
- Skrito (privzeto) - če je ta možnost izbrana, prej izbrana podvprašanja ne bodo prikazana v drugem vprašanju.
- Onemogočeno - če je ta možnost izbrana, bodo prej izbrana podvprašanja zatemnjena in jih ni mogoče izbrati. .
Primer
Če želite uporabiti opcijo "onemogočeno", bodo prej izbrana podvprašanja prikazana takole:
Filter polja (array_filter)
Opis
Nastavitev Filter matrike vam omogoča, da uporabite katero koli vprašanje z več možnimi odgovori, da izberete ali nastavite, kateri odgovori bodo prikazani na naslednjem seznamu, nizu ali vprašanju z več možnimi odgovori.
- Večkratna izbira
- Večkratna izbira s komentarji
- Večkratno kratko besedilo
- Večštevilsko
- Matrika (5 točk, 10 točk, Da/Ne/Neznano, Povečanje/Enako/Zmanjšanje, Stolpec)
- Matrika (dvojna lestvica, besedilo, številke)
- Razvrstitev
Poleg tega je vsako od teh vrst vprašanj mogoče filtrirati.
Edina izjema je »Matrika (stolpec)«, ki lahko filtrira druga vprašanja, ne pa tudi sebe.Kako nastaviti filter
Če želite nastaviti filter, vnesite kodo vprašanja vprašanja z več možnostmi v polje filtra niza vprašanja, ki ga trenutno urejate. Ustrezno vprašanje bo uporabljeno kot vir informacij za trenutno vprašanje, izbrani odgovori iz prejšnjega vprašanja pa bodo pridobljeni in uporabljeni kot možnosti odgovora za trenutno vprašanje. Na primer, če je vaša izvorna koda vprašanja z več možnostmi "Q1", vnesite "Q1" v polje 'Array Filter', da začnete postopek filtriranja odgovorov. V vprašanju z array_filter-ed bodo vidne samo možnosti odgovora, ki so izbrane v vprašanju Q1.
Kaskadno
Izbrane možnosti so lahko prikazane v kaskadi. To pomeni, da lahko izberete vprašanje, ki filtrira drugo vprašanje, ki filtrira drugo vprašanje itd.
Primer matričnega filtra
Oglejmo si naslednji primer, da bomo bolje razumeli moč te nastavitve:
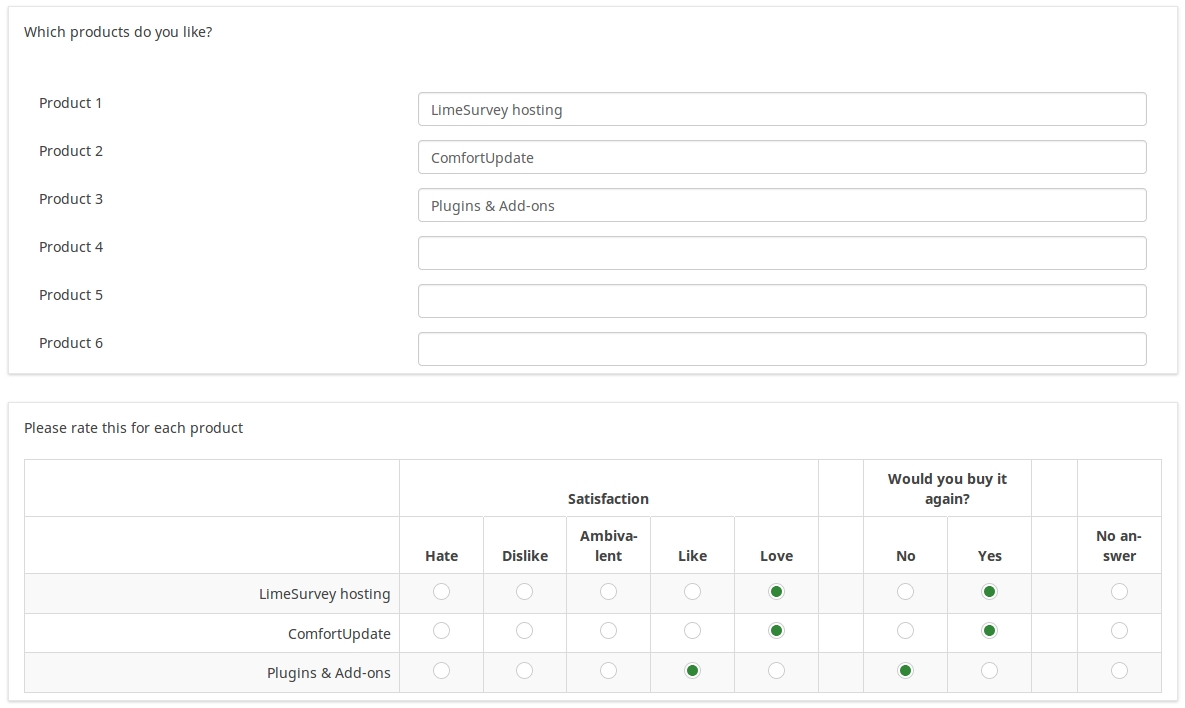
Na zgornjem posnetku zaslona imamo dve vprašanji. Prvi je tip vprašanja "več kratkih besedil", medtem ko je drugi tip vprašanja "matrična dvojna lestvica". Odgovori, ki jih navedete v prvem vprašanju, bodo navedeni v drugem. Tehnično gledano so odgovori, ki jih podate na podvprašanja iz prvega vprašanja, filtrirani in prikazani v drugem vprašanju.
Ta primer lahko prenesete s te povezave: limesurvey_group_32.lsg. Uvozite to skupino vprašanj v svojo namestitev LimeSurvey.
Filter za izključitev polja (array_filter_exclude)
Opis
Nastavitev Izključitev filtra matrike vam omogoča, da uporabite katero koli vprašanje z več možnimi odgovori, da izberete ali nastavite, kateri odgovori NIso' prikazani na naslednjem seznamu, nizu ali vprašanju z več izbirnimi odgovori.
- Večkratna izbira
- Večkratna izbira s komentarji
- Večkratno kratko besedilo
- Večštevilsko
- Matrika (5 točk, 10 točk, Da/Ne/Neznano, Povečanje/Enako/Zmanjšanje, Po stolpcu)
- Matrika (dvojno merilo, besedilo, številke)
- Razvrstitev
Poleg tega je vsako od teh vrst vprašanj mogoče filtrirati.
Edina izjema je »Array by column«, ki lahko filtrira druga vprašanja, vendar ga ni mogoče filtrirati.Kako to nastaviti
Vnesite kodo vprašanja vprašanja z več možnostmi v polje filter za izključitev niza vprašanja, ki ga trenutno urejate. Zadevno vprašanje bo uporabljeno kot vir informacij za trenutno vprašanje, neizbrani odgovori iz prejšnjega vprašanja pa bodo pridobljeni in uporabljeni kot možnosti odgovora za trenutno vprašanje. Na primer, če je vaša izvorna koda vprašanja z več možnostmi "Q1", vnesite "Q1" v polje "Filter za izključitev niza", da začnete postopek filtriranja odgovorov. V vašem vprašanju bodo vidne samo tiste možnosti odgovora, ki NISO izbrane v vprašanju Q1.
Kaskadno
Izbrane možnosti so lahko prikazane v kaskadi. To pomeni, da lahko izberete vprašanje, ki filtrira drugo vprašanje, ki filtrira drugo vprašanje itd.
Primer
Oglejmo si skupaj spodnji primer:
Na zgornjem posnetku zaslona imamo dve vprašanji. Prvo je vprašanje tipa večkratna izbira, medtem ko je drugo vprašanje tipa večkratna izbira s komentarji. Odgovori, ki jih navedete v prvem vprašanju, bodo izključeni iz drugega. Na primer, če izberete možnost ComfortUpdate (ki ima kodo podvprašanja 'SQ1') in možnost Plugin ('SQ4'), bosta korespondenca podvprašanja 'SQ1' in 'SQ4' iz drugega vprašanja izključena. Na našem posnetku zaslona lahko opazimo, da so samo neizbrane možnosti v prvem vprašanju in prikazane v drugem.
Ta primer lahko prenesete s te povezave: Limesurvey_group_array_filter_exclude.zip. Uvozite to skupino vprašanj v svojo namestitev LimeSurvey.
Številke samo za 'Drugo' (other_numbers_only)
Opis
Če je ta atribut omogočen skupaj z možnostjo "drugo" (ki se nahaja pod zavihkom Splošne možnosti), lahko anketiranci vnesejo samo številke v besedilno polje "drugo".
Razpoložljive možnosti:
- Vklopljeno
- Izklopljeno (privzeto)
'Drugo:' komentar obvezen (other_comment_mandatory)
Opis
Velja le za obvezna vprašanja, ki imajo možnost "drug odgovor", pri kateri lahko udeleženec odgovori s prostim besedilom ("drug komentar").
Ko je ta nastavitev aktivirana in udeleženec izbere drug odgovor ("drugo potrditveno polje" ali "drugi odgovor na seznamu"), bo moral podati komentar v vnosno polje "Drugi komentar", da lahko nadaljuje na Naslednja stran.
Upoštevajte, da ta možnost ni na voljo za Vprašanja z več možnostmi, ker stanje potrditvenega polja "Drugo" ni zabeleženo v bazi podatkov za to vrsto vprašanja, beleži se le vsebina. To pomeni, da je preverjanje potrditvenega polja »drugo« samo vizualni učinek, ki je smiseln samo, če je besedilno polje izpolnjeno: zato se za to vrsto vprašanja predvideva, da je »other_comment_mandatory« nastavljen.
'Razpoložljive možnosti
- Vklopljeno
- Izklopljeno (privzeto)
Primer
Če je aktivirano za vprašanje »Več možnosti s komentarji« in uporabnik vnese vrednost v levi del Drugega odgovora, vendar ne vnese besedila v Drugi komentar, bo prikazano opozorilno sporočilo, ko bo poskušal nadaljevati na Naslednja stran.
Ime naključne skupine (random_group)
Opis
Vprašanja postavi v določeno naključno skupino, pri čemer so vsa vprašanja, vključena v navedeno skupino, prikazana v naključnem vrstnem redu anketirancem.
V ExpressionScript sample survey lahko najdete vzorec ankete z imenom skupine za naključno izbiranje.
Veljavne vrednosti
Samo vnesite poljuben niz (na primer: 'group1'). Vsa vprašanja, ki so v polju 'ime skupine za naključno izbiro nastavili isti niz, bodo imela svoje mesto v anketi randomizirana (=naključno izmenjana med seboj).
Predogled
Za predogled vprašanj uporabite predogled ankete namesto funkcije predogled skupine vprašanj, saj so poročali, da druga ne prikazuje vprašanj v naključnem vrstnem redu.
Question validation equation (em_validation_q)
Description
This is an equation that is used to validate the entire question (e.g, all of its parts collectively for a multi-answer question). If the question fails the validation criteria, then em_validation_q_tip message will be displayed (it uses the CSS style .error). This tip uses the .em_q_fn_validation CSS style, which is hidden by default within template.css.
The main difference between this feature and the subquestion validation equations (em_validation_sq option) is that for this feature, if the question (or question parts) fail validation, then an error message could be shown. For the subquestion validation, each text entry cell (e.g., in an array question type, but it can also be applied to single entry question types) will be styled so that the background color is (light) red.
Valid values
- Any equation that makes use of the ExpressionScript syntax, without surrounding curly braces.
Example
- You want to collect demographic information from users via a multiple short text question, and you want to validate that the user has entered a valid email address and phone number.
This example shows how the question looks with invalid answers:

And here is what it looks like with one invalid answer:

Here is how you edit a question to enter that information:
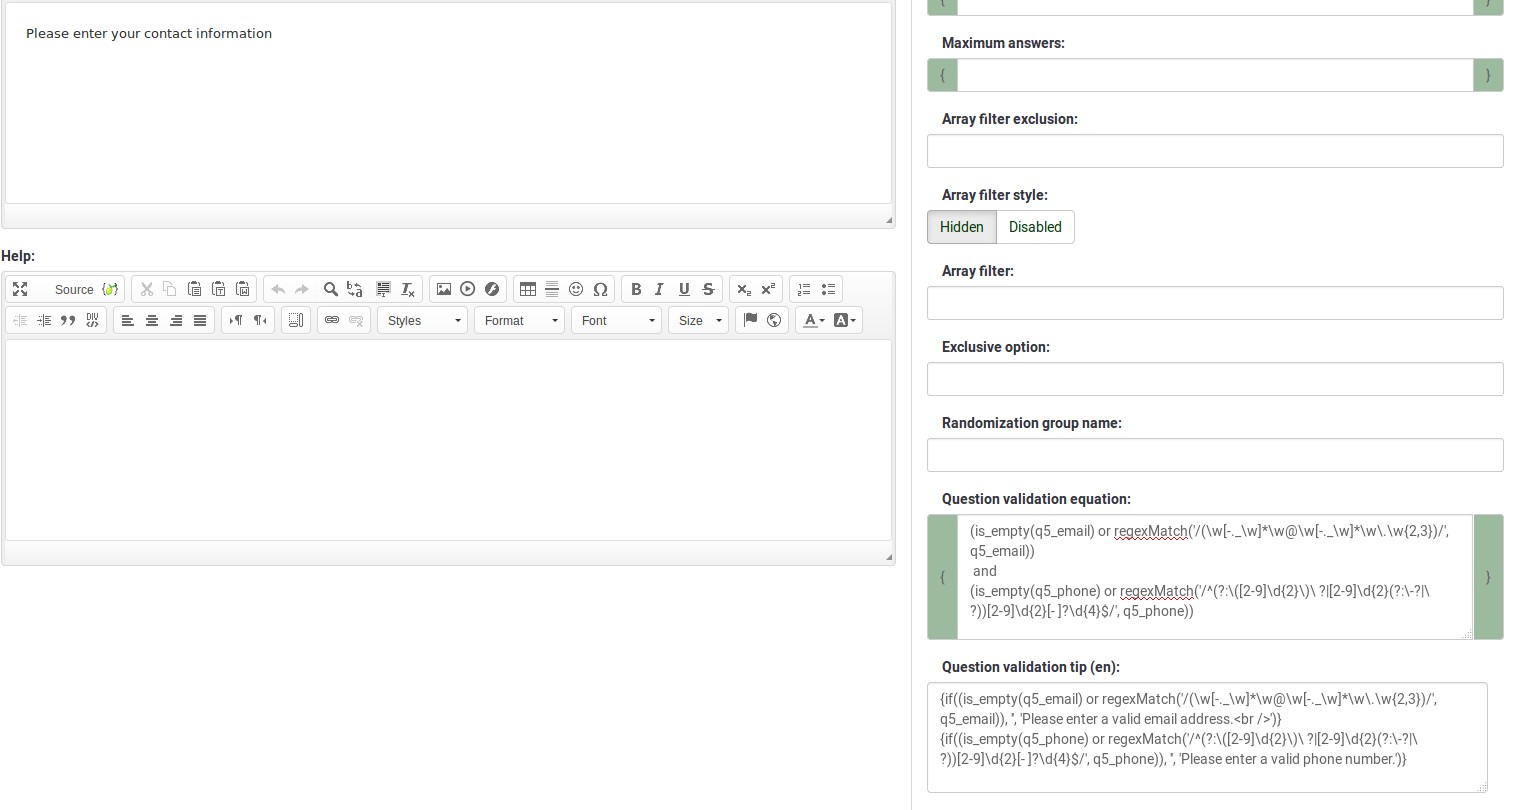
And here is part of the Show Logic File output that lets you check the accuracy of your expression and ensure that there are no syntax errors:
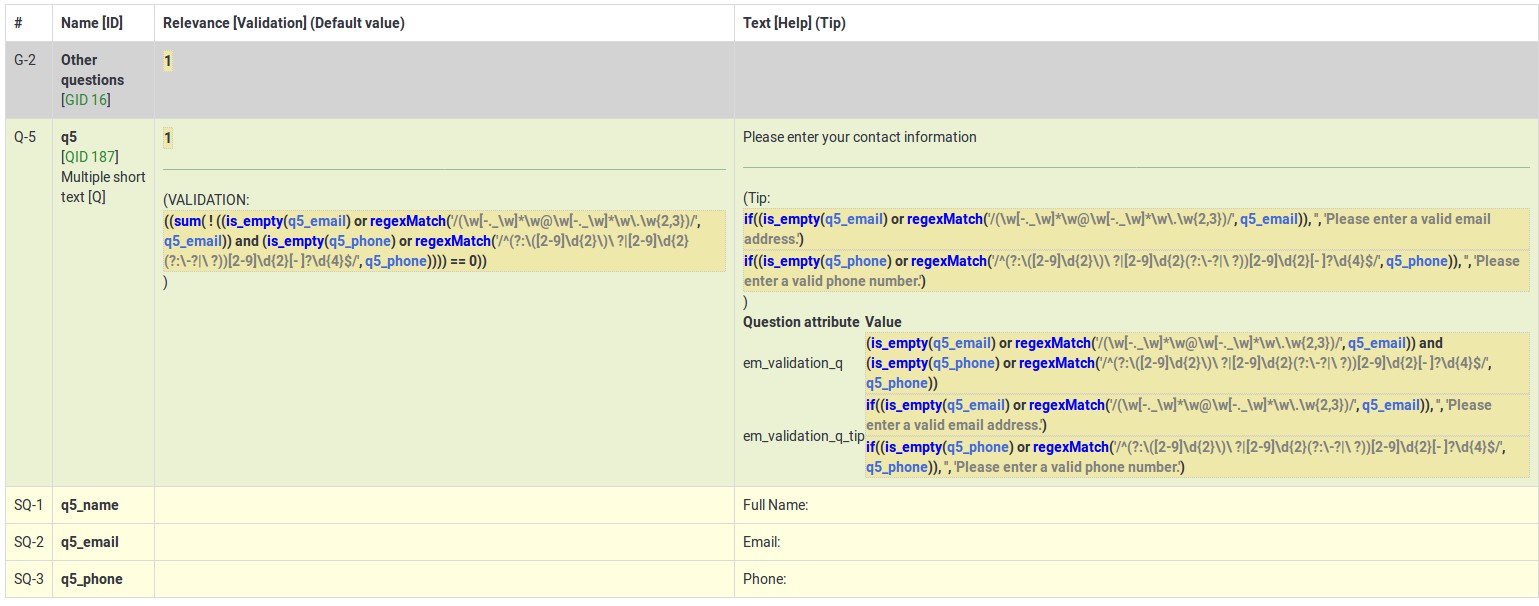
As you can see, the validation equation tests that both the email and phone number are either empty or match a regular expression filter.
The validation tip only shows the warning message if the phone or email appears invalid.

If you wish to import the example from above into your LimeSurvey installation, download the following .lsq file: Em_validation_q_example.zip.

Tip for whole question validation equation (em_validation_q_tip)
Description
If you are using the question validation equation, you can use this box in order to display an optional message as question tip on how the question has to be filled out.
Valid values
- Any string or equation that makes use of the ExpressionScript syntax.
Example
See the example from the question validation equation wiki section- it shows how the tip can be tailored to show which parts of a multiple short text question fail the validation criteria.
Drugo
Insert page break in printable view (page_break)
Description
This attribute is only active when you actually print a survey from the Printable View. It forces a page break before the question.
Available options
- On
- Off (default)
SPSS export scale type (scale_export)
Description
This is used for SPSS export only. This attribute overrides the default scale guessed by SPSS. To learn what the different measurement scales do, please read the related SPSS documentation.
Available options
- Default (default)
- Nominal
- Ordinal
- Scale
Statistika
Display chart (display_chart)
Description
This attribute allows the survey administrator to choose if a chart that contains the question results should be displayed to the survey participants after they filled out the survey.
- public statistics survey setting from the presentation & navigation settings
- show graphs survey setting from the presentation & navigation settings
- public statistics question attribute, and
- display chart question attribute.
Available options
- On
- Off (default)
Chart type (chart_type)
Description
This attribute allows the survey administrator to choose which type of chart will be displayed to the respondent once he/she finished filling out the survey.
Available options
- Bar chart
- Pie chart
- Radar
- Line
- PolarArea
- Doughnut
Časovnik
Naslednje vrste vprašanj podpirajo časovnike:
Atributi časovnika najbolje delujejo z anketami, ki uporabljajo obliko Vprašanje po vprašanju. Uporabljajo se lahko tudi v anketah, ki uporabljajo format Group by group. Toda vodenje skupine po obliki skupine lahko prekine obvezna vprašanja in implicitno anketo.
<translate>
<onlyinclude>
Time limit action (time_limit_action)
Description
Sets the action performed when a time_limit has expired. By default the action for a time limit is "Warn and move on", which means the system will give a short warning that the time limit has expired before saving the question and effectively automatically clicking "Next >>". The alternative choices are to:
- "Move on without warning", which automatically clicks the "Next >>" button after the timer is finished but without any warning message.
- "Disable only", which disables changes in the question so the participant can't change anything, but doesn't automatically click the "Next >>" button.
This setting is only applicable if the general time limit setting is activated.
Available options
- Warn and move on (default): will warn the participant that the time has expired, and then click the next button
- Move on without warning: will immediately click the next button after the time limit has expired
- Disable only: will disable the answer after the time limit has expired but not automatically click next
Additional information
Instead of relying on mandatory questions, you may use expressions (read more about question and subquestion validation equations) to make the user not leave empty the answer fields. To see how the validation equations work, check the following example.
In the case in which you want to apply a timer to a question group, activate the group-by-group survey mode, set up a question to use the time limit functionality, and choose the warn and move on (default) option as time limit action. Once the question timer expires, the survey will move to the next page.
</translate>
Time limit disable next (time_limit_disable_next)
Description
It allows disabling the "next" button while a time_limit countdown is occurring. Normally, even if the time limit countdown is active, if the participant wants to click "Next" and move on to the next question or question group, they can simply click on the "Next" button (thus cutting short the time spent on the question or question group). By activating this function, the next button will appear greyed out and will not be available until the countdown timer has finished.
This settings is only applicable if the general time limit setting is activated.
Available options
- On - The "Next" button will be disabled until the time limit countdown is complete.
- Off (default)
Time limit disable prev (time_limit_disable_prev)
Description
It allows disabling the "previous" button while a time_limit countdown is occurring. Normally, even if a time limit countdown is active, if the participant wants to click on "Previous" and move to the previous question or question group, they can simply click on the "Previous" button (thus cutting short the time spent on the question or question group). By activating this function, the previous button will appear greyed out and will not be available until the countdown timer has finished.
This settings is only applicable if the general time limit setting is activated.
Available options
- On - the "Previous" button will be disabled until the time limit countdown is complete.
- Off (default)
Time limit countdown message (time_limit_countdown_message)
Description
Write in this field the text message you wish to be displayed in the countdown timer during the countdown. This setting is applicable only if the general time limit setting is activated. If nothing is written, the the field will use the default value: "Time remaining".
Time limit timer CSS style (time_limit_timer_style)
Description
It allows (and overrides the default) css styling used to display the countdown timer. The default style value for this attribute will be used if it does not exist, which is: 'width: 150px; margin-left: auto; margin-right: auto; border: 1px solid #111; text-align: center; background-color: #EEE; margin-bottom: 5px; font-size: 8pt;'.
Any text entered into this attribute will overwrite the entire default css style, so you should ensure that care is taken when entering a value for this attribute. A simple way to hide this is to copy the default style into this attribute and add 'display: none;' to the end.
This settings is only applicable if the general time limit setting is activated.
Time limit expiry message display time (time_limit_message_delay)
Description
This attribute sets how many seconds the time_limit_message is displayed before the time_limit_action occurs. If this attribute is not set, it defaults to a value of 1 (1 second).
This settings is only applicable if the general time limit settings is activated.
Example
time_limit_message_delay: 5 = the message displays for 5 seconds
Time limit expiry message (time_limit_message)
Description
This is the text of the message that appears to the participant when the time_limit has expired. By default, this message is "Your time to answer this question has expired". If the time_limit_action attribute is set to "Move on without warning" this message is not displayed. You can set the CSS style for this text in the time_limit_message_style attribute (see below).
This settings is only applicable if the general time limit settings is activated.
Example
time_limit_message: The time limit on answering this question is now up.
Time limit message CSS style (time_limit_message_style)
Description
It allows (and overrides the default) css styling used to display the time limit message. The default style value for this attribute will be used if it does not exist, which is: 'top: 10px; left: 35%; width: 30%; height: 60px; padding: 16px; border: 8px solid #555; background-color: white; z-index: 1002; text-align: center; overflow: auto'.
Any text entered into this attribute will overwrite the entire default css style, so you should ensure that care is taken when entering a value for this attribute. It is strongly recommended that you re-use the z-index value, or that, at least, the z-index value is higher than that used for the time_limit_warning_message_style attribute (which defaults to 1001).
Example
Set to: top: 10px; left: 35%; width: 30%; height: 60px; padding: 16px; border: 8px solid #555; background-color: black; color: white; z-index: 1010; text-align: center; overflow: auto
Time limit warning message display time (time_limit_warning_display_time)
Description
It sets for how long the time_limit_warning_message is displayed before it is removed/hidden from the screen. By default, if the time_limit_warning_message appears, it will remain visible until the countdown timer has completed the countdown. If a value greater than zero is introduced in this field, the message will be hidden after that many seconds.
This setting is applicable only if the general time limit setting is activated. This setting also exists for a second warning message.
Example
time_limit_warning_display_time: 10 = The time limit warning message will disappear 10 seconds after its moment of appearance.
Time limit warning message (time_limit_warning_message)
Description
If set up, it displays the text of the warning message which is displayed for a fixed period of time before a time limit expires. The default text is "Your time to answer this question has nearly expired. You have {TIME} remaining." {TIME} is replaced by a formatted description which represents the amount of time left (i.e. "30 seconds", "1 minute or 5 seconds"). This message only appears if the time_limit_warning attribute exists. You can set from the time_limit_warning attribute when the message (time_limit_warning_message) appears.
This question attribute is only applicable if the time limit setting is activated and you set some text in the time limit warning message field. This setting also exists for a second warning message.
Example
Attention: In {TIME} the time limit to answer question will expire.
Time limit warning CSS style (time_limit_warning_style)
Description
It allows (and overrides the default) css styling used to display the time limit warning message. The default style value for this attribute will be used if it does not exist, which is: 'top: 10px; left: 35%; width: 30%; height: 60px; padding: 16px; border: 8px solid #555; background-color: white; z-index: 1001; text-align: center; overflow: auto'.
Any text entered into this attribute will overwrite the entire default css style for the warning message, so you should ensure that care is taken when entering a value for this attribute. It is strongly recommended that you re-use the z-index value, or that, at least, the z-index value be lower than that used for the time_limit_message_style attribute (which defaults to 1002).
This settings is only applicable if the general time limit setting is activated. This setting also exists for a second warning message.
Example
top: 10px; left: 35%; width: 30%; height: 60px; padding: 16px; border: 8px solid #555; background-color: gray; color: white; z-index: 1001; text-align: center; overflow: auto
