General FAQ/zh-cn: Difference between revisions
From LimeSurvey Manual
(Created page with "常规需求请参考安装说明.") |
(Created page with "== LimeSurvey 有哪些限制...==") |
||
| Line 297: | Line 297: | ||
== | == LimeSurvey 有哪些限制...== | ||
Revision as of 03:36, 8 September 2020
入门指南
如果你不想通过阅读 LimeSurvey 手册来学习怎么做, 我们推荐你可以通过 的视频教程来学习:
我想快速安装LimeSurvey
请从下面两个链接获得快速安装LimeSurvey的方法:
调查的设计和布局
我如何从 URL 路径里删掉index.php,从而得到一个短的 URL
如果你要用花式链接(每个链接里都没有/index.php), 请编辑文件 /application/config/config.php,修改下面的内容
'showScriptName' => true,
为
'showScriptName' => false,
要使这个设置正常工作,必须使用正确安装了 mod_rewrite 模块的Apache 服务器。
If you are using the Nginx http server (with php running via FastCGI) and want to use the 'urlFormat' => 'path' setting (see config.php), consider the following Nginx website configuration:
server {
    set $host_path "/PATH/TO/LIMESURVEY";
    server_name  YOUR.SERVER.FQDN;
    root /PATH/TO/LIMESURVEY;
    charset utf-8;
    try_files $uri $uri/ /index.php?r=$uri&$args;
    #Disallow reading inside php script directory, see issue with debug > 1 on note
    location ~ ^/(application|protected|framework|themes/\w+/views) {
        deny  all;
    }
    #Disallow direct read user upload files
    location ~ ^/upload/surveys/.*/fu_[a-z0-9]*$ {
        return 444;
    }
    #Disallow uploaded potential executable files in upload directory
    location ~* /upload/.*\.(pl|cgi|py|pyc|pyo|phtml|sh|lua|php|php3|php4|php5|php6|pcgi|pcgi3|pcgi4|pcgi5|pcgi6|icn)$ {
        return 444;
    }
    #avoid processing of calls to unexisting static files by yii
    location ~ \.(js|css|png|jpg|gif|swf|ico|pdf|mov|fla|zip|rar)$ {
        try_files $uri =404;
    }
    location ~ \.php$ {
        fastcgi_split_path_info  ^(.+\.php)(.*)$;
        try_files $uri index.php;
        fastcgi_pass   127.0.0.1:9000; # Change this to match your settings
        fastcgi_index index.php;
        include fastcgi_params;
        fastcgi_param  SCRIPT_FILENAME  $document_root$fastcgi_script_name;
        fastcgi_param  SCRIPT_NAME      $fastcgi_script_name;
    }
}
'use_asset_manager' => 1, in your config file (or remove application from the directory list).The end result should look like this:

我要如何处理 * 必答题的(红色星号)?
LimeSurvey 2 的使用说明
在 LimeSurvey 2.x 里,必答题的红星是在 template.css file 文件里设置的("asterisk" c类). 要想隐藏的话:
- 打开模板编辑器
- 创建你要编辑的模板的副本
- 选择 "template.css" 文件并找到 asterix 类
- 在 asterix 类的末尾加上".asterisk {display: none;}".
- 保持 template.css 文件
- 清除浏览器缓存,确保编辑后的 template.css 文件不是从缓存里载入。
LimeSurvey 3 的使用说明
这个说明和上面 LimeSurvey 2 的相似。
- 访问想要使用的主题。如果是默认的主题,通过点击 "扩展" 按钮创建一份副本。
- 从主题列表里选择新近创建的主题,并点击其对应的 主题编辑器 。
- 你可以可视化你主题对应的 左边的 CSS 文件。
- 点击 custom.css 并加入下列内容:
.asterisk {display: none;}
- 保存修改。通常在问题开始的位置显示的红星就被隐藏了。
如果嵌入 flash 文件?
首先,进入 全局设置 并停用 XSS-filter. 请一并阅读停用过滤器对你的实例的影响。下列步骤在过滤器启用的时候是 '没有用的 。
- 导航到调查里你要插入Flash 文件的位置。可能是你可以使用内置 HTML 编辑器的任何地方,比如在问题里,子问题里,答案里,调查的开始/结束文本等等。
- 打开 全屏编辑模式 工具栏上的 'LimeFitWin' 按钮。
- 在全屏编辑器的工具栏上有个带 Flash 符号的按钮,点击后会出现对话框。
- 在这个窗口你要么提供一个现有的 Flash 文件的路径,要么通过 '浏览服务器' 按钮选取文件。
- 点击了 '浏览服务器' 按钮之后,选取文件的窗口会呈现,下边有上传的按钮。选择要嵌入的文件。
就是这样!如果你发现此说明不完整,请更新对应的部分。
我如何创建一个所有人都可以用的调查问卷?
要创建一个所有人都可以填的调查,不要创建 调差参与者列表! 并共享预览面板 里调查的链接。
公开注册-必填字段
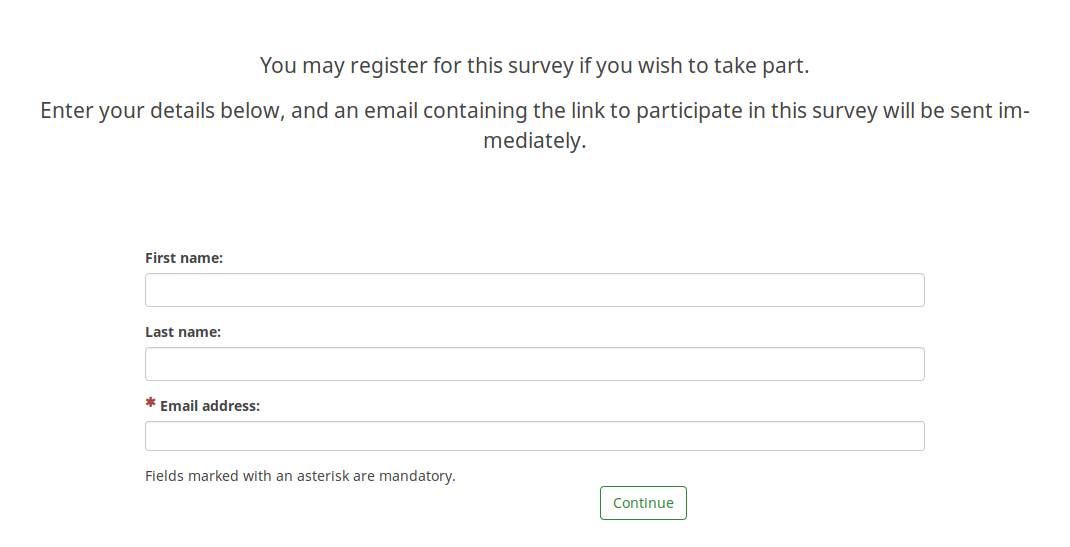
如果你使用调差参与者 ,并且你允许 公开注册, 用户会看到下面的提示信息:

就像上面看到那样,只有邮件地址字段是必填项。
如果想要三个字段都是必填项,需要在你的主题里做相应的设置。如果你选的主题是Fruity, 你可以去 注册 界面看看参与者的邮件字段是什么样的:
        {# Participants email #}
        <div class='{{ aSurveyInfo.class.registerformcolrowc }} form-group row' {{ aSurveyInfo.attr.registerformcolrowc }}>
            <label {{ aSurveyInfo.attr.registerformcolrowclabel }} class='{{ aSurveyInfo.class.registerformcolrowclabel }}  control-label'> {{ gT("Email address:") }} {{ include('./subviews/registration/required.twig') }}</label>
            <div {{ aSurveyInfo.attr.registerformcolrowcdiv }}  >
                {{ C.Html.textField('register_email', aSurveyInfo.sEmail, ({'id' : 'register_email','class' : 'form-control input-sm','required' : true})) }}
            </div>
        </div>
然后,确保通过添加的标签来编辑对应的名和姓的字段:
{{ include('./subviews/registration/required.twig') }}
下面的内容保证字段在填写时是必填项:
'required' : true
编辑过的文件应该看起来像这样:
        {# Participants first name #}
        <div class='{{ aSurveyInfo.class.registerformcolrow }} form-group row' {{ aSurveyInfo.attr.registerformcolrow }}>
            <label for='register_firstname' class='{{ aSurveyInfo.class.registerformcolrowlabel }} control-label '>{{ gT("First name:") }} {{ include('./subviews/registration/required.twig') }}</label> {# extra label #}
            <div class="">
                {{ C.Html.textField('register_firstname', aSurveyInfo.sFirstName, ({'id' : 'register_firstname','class' : 'form-control', 'required' : true})) }} {# mandatory field #}
            </div>
        </div>

        {# Participants last name #}
        <div class='{{ aSurveyInfo.class.registerformcolrowb }} form-group row' {{ aSurveyInfo.attr.registerformcolrowb }}>
            <label {{ aSurveyInfo.attr.registerformcolrowblabel }}  class='{{ aSurveyInfo.class.registerformcolrowblabel }} control-label '>{{ gT("Last name:") }} {{ include('./subviews/registration/required.twig') }}</label> {# extra label #}
            <div {{ aSurveyInfo.attr.registerformcolrowbdiv }} >
                {{ C.Html.textField('register_lastname', aSurveyInfo.sLastName, ({'id' : 'register_lastname', 'class' : 'form-control', 'required' : true})) }} {# mandatory field #}
            </div>
        </div>
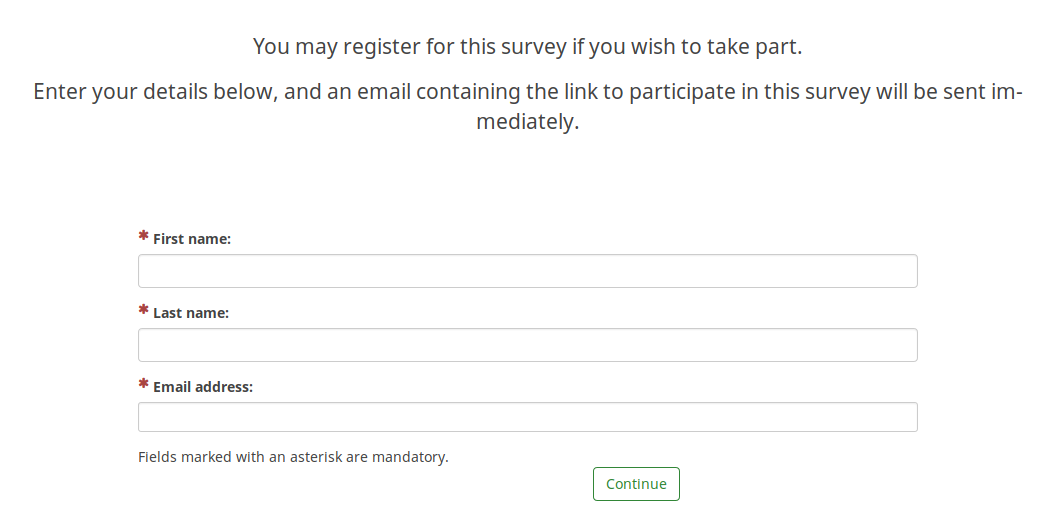
现在,公共注册页面样子变了 (所有的字段都是必填项了):

隐藏语言切换
隐藏语言切换的步骤在(接近调查的标题,页面的右上角) 多语言调查章节中有描述。
隐藏 退出并清空调查
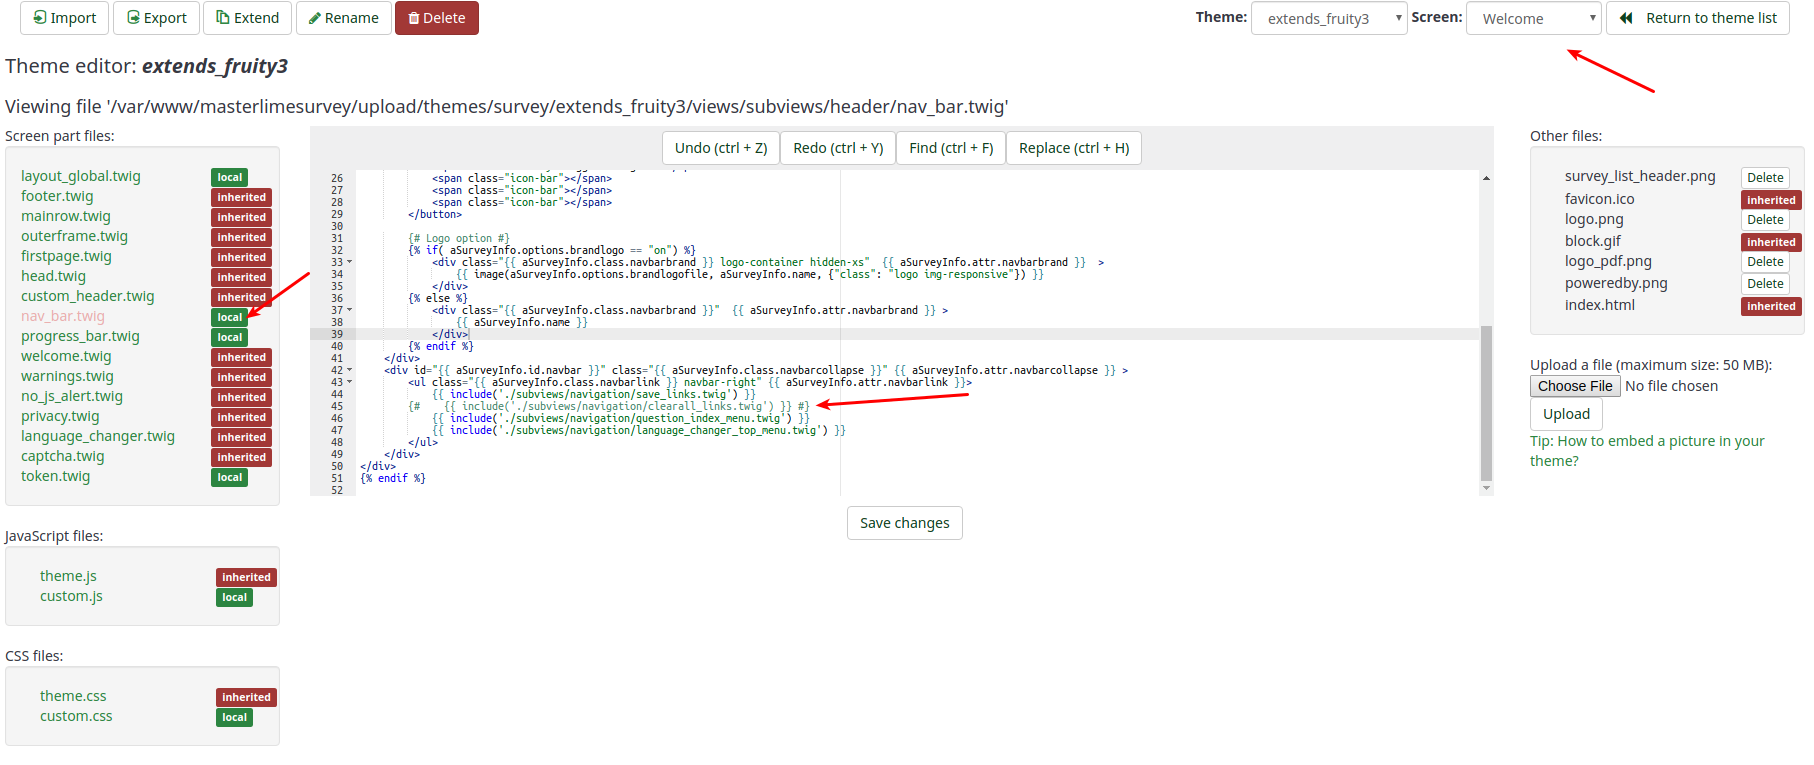
要隐藏 "退出并清空调查" 按钮,你需要编辑主题里的 nav_bar.twig 文件。

要删除掉的行 (或注释掉) 是:
{{ include('./subviews/navigation/clearall_links.twig') }}

现在,就没有退出并清空调查这个选项了。

救命,我不小心...
我忘了密码,怎么重置密码?
2.x 版本
- 用命令行访问你的调查 (比如用 ssh)
- 确保你有 php 命令行可用 ( 参看 http://php.net/features.commandline.php).
- 进入 LimeSurvey 的目录
- 运行命令
php application/commands/starter.php resetpassword NEW_ADMIN_NAME NEW_ADMIN_PASSorphp application/commands/console.php resetpassword NEW_ADMIN_NAME NEW_ADMIN_PASSPhp 要有目录的完全访问权限,比如 /usr/bin/php
用 FTP 访问 2.x.x 和以上版本
参考 重置密码控制器
直接在数据库中改密码
如果你能够直接访问If you have direct access to the Limesurvey 的数据库,你可以用 SHA256 哈希值格式上传新密码. 你可以创建你密码的 SHA256 哈希值.
比如你可以用下面的说明设置你的密码:
UPDATE lime_users SET password = 0x35653838343839386461323830343731353164306535366638646336323932373733363033643064366161626264643632613131656637323164313534326438 WHERE uid =1;
这个例子是以 lime_ 为前缀,并已经选择了数据库。
我怎么恢复一个停用的调查?
我们推荐用超时选项来代替停用一个调查。 如果你不小心关闭了你的调查,重要的是你没有修改调查的任何内容!
那么,只有下列步骤可以生效:
我删除了一个问题/问题组/调查!
如果你真的删掉了,那就是没了。只有备份能够帮助你恢复。
软硬件需求
常规需求请参考安装说明.
LimeSurvey 有哪些限制...
...regarding speed
There is no existing speed limit on LimeSurvey. Everything depends on how fast your server and your connection are. If you expect a large number of users within a short amount of time and you are not sure if your server can handle this, check our forum for similar topics! or contact an authorized LimeSurvey partner: https://limesurvey.com.
...regarding survey size
Note: 'Survey size' refers to the maximum number of questions (and answers) in your survey - don't confuse this with the number of replies on your survey (there is no limitation on that). Theoretically there would also be no limit on the maximum number of questions/answers in LimeSurvey. But the database engine you are using has several limits. The most important one is the limit on the number of fields(columns) in the result table.
- MySQL ISAM: The sum of the lengths of the VARCHAR and CHAR columns in a table may be up to 64KB.
- MySQL InnoDB: Maximum number of 1000 columns
- MS SQL Server 2000: Maximum number of 1024 columns
- Postgres: Maximum number of 250-1600 columns depending on column types. The maximum number of columns can be quadrupled by increasing the default block size to 32k. See Installation FAQ and PostgreSQL FAQ.
The mySQL ISAM engine is the most tricky one (see mysql documentation for more information). As it allows only up to 65,535 bytes per row and utf8 characters, it can require up to three bytes per character. The maximum may be only 21,844 characters (but this depends on your DB encoding).
You can roughly calculate the size of your survey like this:
- Every multiple numerical question: 20 chars for each answer
- Every multiple choice & array question answers: 5 chars for each answer
- Every other question type: 5 chars
- Add 10% for the usual overhead
How to increase the maximum number of columns in PostgreSQL
In case your survey contains too many questions, you can define a different block size in PostgreSQL to create more columns. This might be tricky because you have to recompile PostgreSQL and set BLCKSZ to a higher value, like 16kiB or 32kiB. Watch for the configuration option "--with-blocksize=BLOCKSIZE". For details see the archives of the PostgreSQL mailing list or ask there (pgsql-patches(at)postgresql(dot)org).
Instructions for Debian (thanks to Martin Pitt):
sudo apt-get build-dep postgresql-8.3
apt-get source postgresql-8.3
cd postgresql-8.3-*
debian/rules patch
sensible-editor build-tree/postgresql-8.3.5/src/include/pg_config_manual.h
dpkg-buildpackage -us -uc -b -nc
Note: the above could not be reproduced on Ubuntu 14.04 in August 2014. A patch is required (the configuration option is not enough). See (tested with PostgreSQL 9.3 on Linux): Instructions for increasing the maximum number of columns in PostgreSQL on Linux
Fatal error: Allowed memory size
Depending on your server configuration you might run into memory problems being reported by an error like "Fatal error: Allowed memory size of 8388608 bytes exhausted (tried to allocate 233472 bytes) in /path/to/htdocs/limesurvey/filename.php on line 7296".
You can try to raise the limit by adding an optional setting to LimeSurvey's config file.
Please bear in mind that changes in the default settings of an application can always be overruled by global server settings. To increase the memory limit of your sever to 128M:
- memory_limit = 128M to your server's main php.ini file (recommended, if you have access)
- memory_limit = 128M to a php.ini file in the LimeSurvey root
- php_value memory_limit 32M in a .htaccess file located in the LimeSurvey root folder
- " ini_set('memory_limit', '128M'); " in your config.php
Specific configuration
Under certain circumstances, you need to update the LimeSurvey configuration in application/config/config.php
IE 11 and Windows 7 / Windows 8
There is a known issue with the session with IE 11, that leads to users not being able to finish a survey.
It is solved by giving the session a unique name.
This is done by adding this to the config file.
       // Set the name of the session
        'session' => array (
            'sessionName' => "YOURUNIQUESESSIONNAME",
        ),
Two LimeSurvey instances on same domain
If you run 2 LimeSurvey instances on the same domain, but within different directories, you need to update the session configuration.
For example, if you have example.org/ls1 and example.org/ls2, update the ls1 config file:
        'session' => array (
            'cookieParams' => array(
                    'path' => '/ls1',
                ),
            ),
        'request' => array(
            'csrfCookie' => array( 'path' => '/ls1' )
        ),