Câu hỏi thường gặp chung
From LimeSurvey Manual
Bắt đầu
Nếu bạn không muốn đọc một nửa hướng dẫn để biết những gì có thể làm được với LimeSurvey, chúng tôi khuyên bạn nên xem một số video hướng dẫn trên YouTube:
- Cách thiết lập tài khoản và cài đặt khảo sát
- Loại câu hỏi - Array
- Đánh giá
- Các trường giữ chỗ
- Danh sách đài phát thanh
- Khảo sát sao chép/nhập
- Câu hỏi nhập
Tôi cần giới thiệu nhanh về LimeSurvey
Để có phần giới thiệu văn bản nhanh về LimeSurvey, hãy kiểm tra hai liên kết sau:
Thiết kế và bố trí khảo sát
Làm cách nào tôi có thể xóa index.php khỏi đường dẫn URL để có URL ngắn hơn
Nếu bạn muốn sử dụng các URL ưa thích (không có /index.php trong mọi URL), vui lòng chỉnh sửa /application/config/config.php và thay đổi
'showScriptName' => đúng,
ĐẾN
'showScriptName' => sai,
Để tính năng này hoạt động bình thường, bạn phải sử dụng máy chủ web Apache với mô-đun mod_rewrite được cài đặt đúng cách.
Với máy chủ web nginx
Nếu bạn đang sử dụng máy chủ http Nginx (với php chạy qua FastCGI) và muốn sử dụng cài đặt 'urlFormat' => 'path' (xem cấu hình .php), hãy xem xét cấu hình trang web Nginx sau:
máy chủ {
 đặt $host_path "/PATH/TO/LIMESURVEY";
 server_name YOUR.SERVER.FQDN;
 root /PATH/TO/LIMESURVEY;
 bộ ký tự utf-8;
 try_files $uri /index.php?$uri&$args;
 # Không cho phép đọc bên trong thư mục tập lệnh php, hãy xem vấn đề gỡ lỗi > 1 trên ghi chú
 location ~ ^/(application|docs|framework|locale|protected|tests|themes/\w+/views) {
 phủ nhận tất cả;
 }
 # Không cho phép đọc trong thư mục thời gian chạy
 vị trí ~ ^/tmp/runtime/ {
 phủ nhận tất cả;
 }

    # Cho phép truy cập vào thư mục nổi tiếng, cách sử dụng khác nhau, ví dụ Thử thách ACME cho Let's Encrypt
 vị trí ~ /\. nổi tiếng {
 cho phép tất cả;
 }
 # Từ chối mọi nỗ lực truy cập các tập tin ẩn
 # chẳng hạn như .htaccess, .htpasswd, .DS_Store (Mac).
 vị trí ~ /\. {
 phủ nhận tất cả;
 }
 #Không cho phép đọc trực tiếp tệp tải lên của người dùng
 vị trí ~ ^/upload/surveys/.*/fu_[a-z0-9]*$ {
 trả về 444;
 }
 #Không cho phép tải lên các tệp thực thi tiềm năng trong thư mục tải lên
 vị trí ~* /upload/.*\.(pl|cgi|py|pyc|pyo|phtml|sh|lua|php|php3|php4|php5|php6|pcgi|pcgi3|pcgi4|pcgi5|pcgi6|icn)$ {
 trả về 444;
 }
 #avoid xử lý lệnh gọi đến các tệp tĩnh không tồn tại bởi yii
 location ~ \.(js|css|png|jpg|gif|swf|ico|pdf|mov|fla|zip|rar)$ {
 try_files $uri =404;
 }
 vị trí ~ \.php$ {
 fastcgi_split_path_info ^(.+\.php)(.*)$;
 try_files $uri index.php;
 fastcgi_pass 127.0.0.1:9000; # Thay đổi điều này để phù hợp với cài đặt của bạn
 fastcgi_index index.php;
 bao gồm fastcgi_params;
 fastcgi_param SCRIPT_FILENAME $document_root$fastcgi_script_name;
 fastcgi_param SCRIPT_NAME $fastcgi_script_name;
 }
}
Kết quả cuối cùng sẽ trông như thế này:

Làm cách nào để loại bỏ dấu * (dấu hoa thị màu đỏ) trong các câu hỏi bắt buộc?
Hướng dẫn làm LimeSurvey 2
Trong LimeSurvey 2.x, dấu hoa thị màu đỏ của các câu hỏi bắt buộc được đặt trong tệp template.css (lớp "dấu hoa thị"). Để ẩn nó:
- Mở trình soạn thảo mẫu
- Tạo một bản sao của mẫu mà bạn muốn sửa đổi
- Chọn tệp "template.css" và tìm kiếm lớp dấu hoa thị
- Thêm dòng sau ở cuối lớp dấu hoa thị".asterisk {display: none;}".
- Save template.css
- Xóa bộ đệm trình duyệt của bạn để template.css đã chỉnh sửa được tải lại và không bị lấy khỏi bộ đệm.
Hướng dẫn LimeSurvey 3
Các hướng dẫn tương tự như hướng dẫn được trình bày ở trên đối với LimeSurvey 2.
- Truy cập chủ đề mong muốn. Nếu đó là chủ đề mặc định, hãy tạo một bản sao của nó bằng cách nhấp vào nút "mở rộng".
- Truy cập danh sách các chủ đề và nhấp vào trình chỉnh sửa chủ đề tương ứng với chủ đề mới được tạo.
- Ở phía bên trái, bạn có thể hình dung các tệp CSS tương ứng cho chủ đề của mình.
- Nhấp vào custom.css và thêm dòng sau:
.dấu hoa thị {hiển thị: không có;}
- Lưu các thay đổi. Dấu hoa thị màu đỏ thường hiển thị ở đầu câu hỏi đã bị ẩn.
Làm cách nào để nhúng tệp flash?
Trước tiên, hãy đi tới Cài đặt chung và tắt bộ lọc XSS. Ngoài ra, vui lòng đọc thêm ý nghĩa của việc tắt bộ lọc đó đối với phiên bản của bạn. Các bước sau sẽ không hoạt động nếu bộ lọc đang hoạt động.
- Điều hướng đến vị trí trong khảo sát mà bạn muốn chèn tệp Flash của mình. Đây có thể là bất kỳ nơi nào mà bạn có thể sử dụng trình soạn thảo HTML tích hợp, chẳng hạn như trong các câu hỏi, câu hỏi phụ, câu trả lời, văn bản chào mừng/kết thúc khảo sát và nhiều nội dung khác.
- Mở full- chế độ chỉnh sửa màn hình bằng cách nhấp vào nút 'LimeFitWin' trên thanh công cụ chỉnh sửa.
- Trên thanh công cụ chỉnh sửa toàn màn hình, bạn sẽ tìm thấy một nút nhỏ có biểu tượng Flash. Nhấn vào nó. Một hộp thoại sẽ mở ra.
- Trong hộp này, bạn có thể cung cấp đường dẫn đến tệp Flash hiện có ở đâu đó hoặc bạn nhấp vào nút 'Duyệt máy chủ'.
- Nếu bạn nhấp vào nút 'Duyệt máy chủ', bạn sẽ được trình bày với một trình duyệt tệp và ở dưới cùng là trường tải tệp lên. Chọn ngay một tệp hiện có hoặc tải tệp lên trước.
Đó là nó! Nếu bạn thấy mô tả này không đầy đủ, vui lòng cập nhật nó cho phù hợp.
Làm cách nào để tạo một cuộc khảo sát dành cho tất cả mọi người?
Để tạo một bản khảo sát mà bất kỳ ai cũng có thể điền vào, đừng tạo bảng người tham gia khảo sát! Chia sẻ liên kết khảo sát nằm trên bảng tổng quan.
Đăng ký công khai - các trường bắt buộc
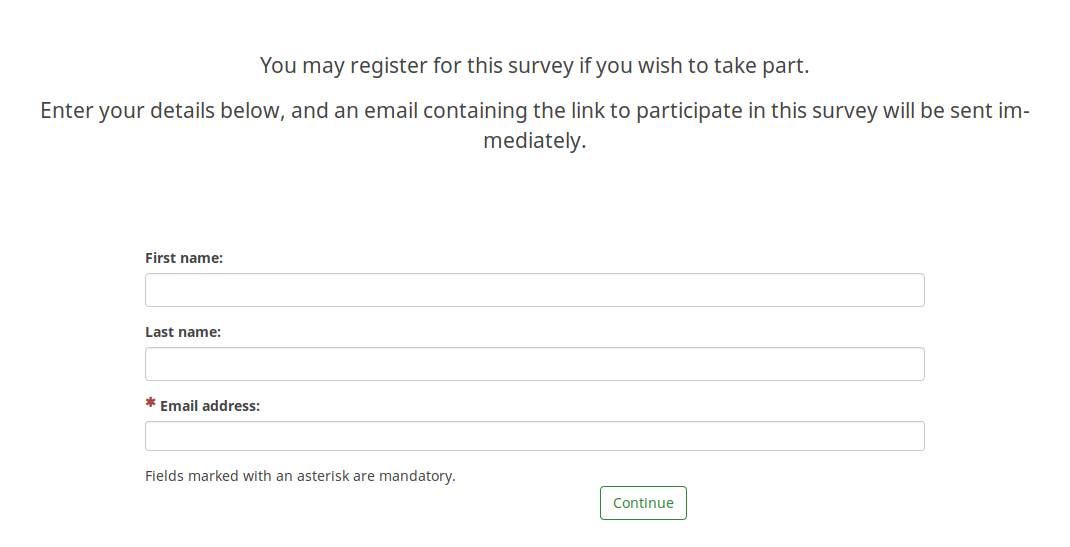
Nếu bạn sử dụng bảng người tham gia khảo sát và cũng cho phép đăng ký công khai thì người dùng sẽ được nhắc bằng thông báo sau:

Như có thể thấy ở trên, chỉ có trường email là bắt buộc.
Để đánh dấu cả ba trường là bắt buộc, vui lòng chỉnh sửa chủ đề khảo sát của bạn cho phù hợp. Nếu bạn sử dụng Fruity', bạn phải vào màn hình đăng ký và xem trường email của người tham gia trông như thế nào:
 {# Email người tham gia #}
 <div class='{{ aSurveyInfo.class.registerformcolrowc }} form-group row' {{ aSurveyInfo.attr.registerformcolrowc }}>
 <label {{ aSurveyInfo.attr.registerformcolrowclabel }} class='{{ aSurveyInfo.class.registerformcolrowclabel }}  control-label'>{{ gT("Địa chỉ email:") }} {{ include('./subviews/registration/required.twig') }} !</label>
<div {{ aSurveyInfo.attr.registerformcolrowcdiv }}  >
 {{ C.Html.textField('register_email', aSurveyInfo.sEmail, ({'id' : 'register_email','class' : 'form-control input-sm','required' : true})) }}
</div>
</div>
Sau đó, hãy đảm bảo chỉnh sửa trường họ và tên tương ứng bằng cách thêm nhãn:
{{ include('./subviews/registration/required.twig') }}
và dòng này bắt buộc phải điền vào trường này:
'bắt buộc': đúng
Tệp đã chỉnh sửa sẽ trông như thế này:
 {# Tên người tham gia #}
 <div class='{{ aSurveyInfo.class.registerformcolrow }} form-group row' {{ aSurveyInfo.attr.registerformcolrow }}>
 <label for='register_firstname' class='{{ aSurveyInfo.class.registerformcolrowlabel }} control-label '>{{ gT("First name:") }} {{ include('./subviews/registration/required.twig') }}</label> {# extra label #}
<div class="">
 {{ C.Html.textField('register_firstname', aSurveyInfo.sFirstName, ({'id' : 'register_firstname','class' : 'form-control', 'required' : true})) }} {# trường bắt buộc #}
</div>
</div>

        {# Họ của người tham gia #}
 <div class='{{ aSurveyInfo.class.registerformcolrowb }} form-group row' {{ aSurveyInfo.attr.registerformcolrowb }}>
 <label {{ aSurveyInfo.attr.registerformcolrowblabel }}  class='{{ aSurveyInfo.class.registerformcolrowblabel }} control-label '>{{ gT("Họ:") }} {{ include('./subviews/registration/required.twig') }}</label> {# nhãn phụ #}
<div {{ aSurveyInfo.attr.registerformcolrowbdiv }} >
 {{ C.Html.textField('register_lastname', aSurveyInfo.sLastName, ({'id' : 'register_lastname', 'class' : 'form-control', 'required' : true})) }} {# trường bắt buộc #}
</div>
</div>
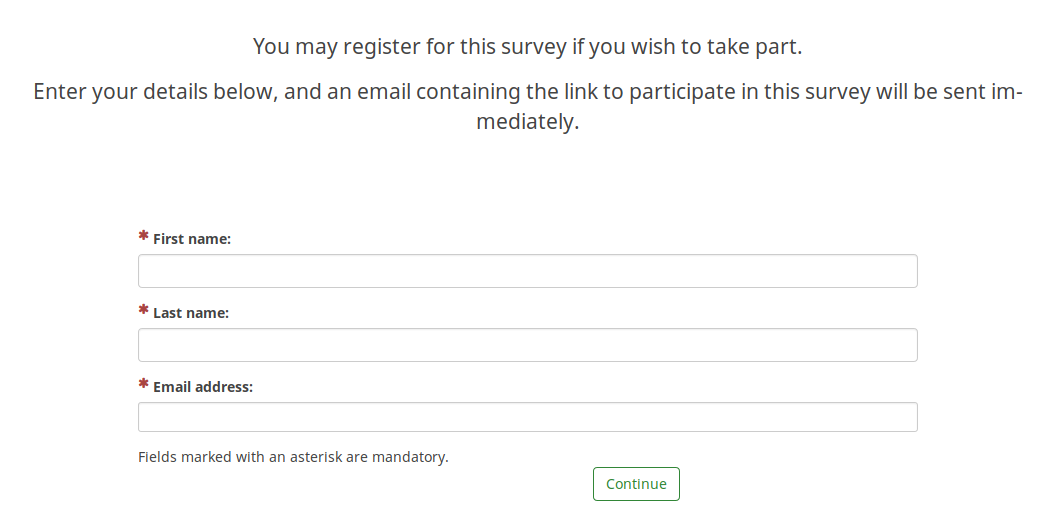
Bây giờ, trang đăng ký công khai sẽ trông như thế này (tất cả các trường đều là bắt buộc):

Ẩn trình chuyển đổi ngôn ngữ
Các bước để ẩn cả trình chuyển đổi ngôn ngữ (gần tiêu đề khảo sát và ở phía trên bên phải của trang) được mô tả trong phần wiki của chúng tôi dành riêng cho khảo sát đa ngôn ngữ.
Ẩn "Thoát và xóa khảo sát"
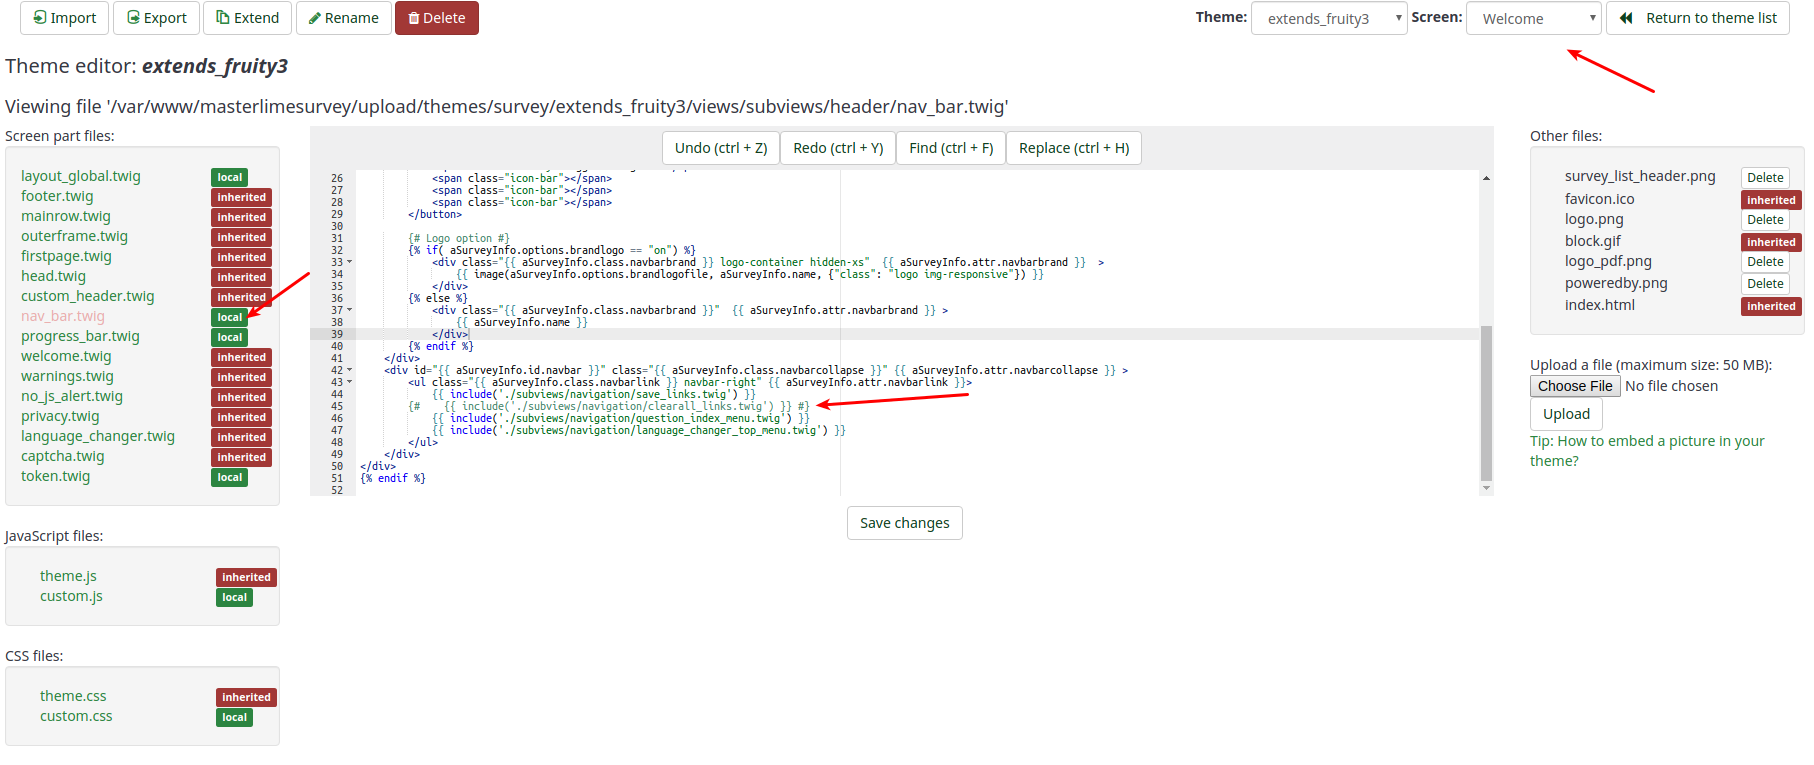
In case you wish to hide the button "Exit and clear survey", you have to edit the nav_bar.twig file located inside your survey theme.

The line that needs to be removed (or commented out) is:
{{ include('./subviews/navigation/clearall_links.twig') }}

Now, there is no option to exit and clear the survey.

Help, I accidentally...
I forgot my admin password. How do I reset it?
Version 2.x
- Access to your server with a command line (ssh for example)
- Ensure you have php command line access (see http://php.net/features.commandline.php).
- Go to your LimeSurvey directory
- Launch this command
php application/commands/starter.php resetpassword NEW_ADMIN_NAME NEW_ADMIN_PASSorphp application/commands/console.php resetpassword NEW_ADMIN_NAME NEW_ADMIN_PASSThe php can need complete directory access, example /usr/bin/php
Version 2.x.x and newer with only FTP access
Directly change the password in the database
If you have direct access to the Limesurvey database you can change the old password there by uploading the new password as SHA256 hash. You can create the SHA256 hash of your password here.
For example, you can use this instruction to set password to password:
UPDATE lime_users SET password = 0x35653838343839386461323830343731353164306535366638646336323932373733363033643064366161626264643632613131656637323164313534326438 WHERE uid =1;
Here with prefix to lime_ and database selected.
How can I restore data from a deactivated survey?
We recommend to always use the time-out option instead of deactivating a survey. If you closed your survey accidentally, it is important that you don't change anything in the survey!
Then, and only then the following steps will work:
- Activate your survey again
- Select Responses from the survey toolbar.
- Click on Import and select the "Import answers from a deactivated survey table" menu entry.
- Choose your source table.
- Click on the "Import" button located on the upper-right part of the screen.
I deleted a question/question group/survey!
If you delete it, it is gone. Only a backup could help you recover it.
Hard- and Software requirements
For general requirements please refer to our installation instructions.
What limitations does LimeSurvey have...
...regarding speed
There is no existing speed limit on LimeSurvey. Everything depends on how fast your server and your connection are. If you expect a large number of users within a short amount of time and you are not sure if your server can handle this, check our forum for similar topics! or contact an authorized LimeSurvey partner: https://limesurvey.com.
...regarding survey size
MySQL and MariaDB
Note: 'Survey size' refers to the maximum number of questions (and answers) in your survey - don't confuse this with the number of replies on your survey (there is no limitation on that). Theoretically there would also be no limit on the maximum number of questions/answers in LimeSurvey. But the database engine you are using has several limits. The most important one is the limit on the number of fields(columns) in the result table.
- MySQL ISAM: The sum of the lengths of the VARCHAR and CHAR columns in a table may be up to 64KB.
- MySQL InnoDB: Maximum number of 1000 columns
- MS SQL Server 2000: Maximum number of 1024 columns. There are a maximum of 8,060 bytes for size one row, then even is survey can be activated, if you have a lot of text data : participant can not submit…
- Postgres: Maximum number of 250-1600 columns depending on column types. The maximum number of columns can be quadrupled by increasing the default block size to 32k. See Installation FAQ and PostgreSQL FAQ.
The mySQL ISAM engine is the most tricky one (see mysql documentation for more information). As it allows only up to 65,535 bytes per row and utf8 characters, it can require up to three bytes per character. The maximum may be only 21,844 characters (but this depends on your DB encoding).
You can roughly calculate the size of your survey like this:
- Every multiple numerical question: 20 chars for each answer
- Every multiple choice & array question answers: 5 chars for each answer
- Every other question type: 5 chars
- Add 10% for the usual overhead
With Microsoft SQL
There are no fixed limit on MSSQL. Some information on microsoft website.
The 8,060 bytes per row can appear after activation when you want to browse response and data. You can export answer code and not answer text or try to export only some columns.
With PostgreSQL
When you try to export response : you can have SQLSTATE[54000] error. You can export some columns. See forum post.
How to increase the maximum number of columns in PostgreSQL
In case your survey contains too many questions, you can define a different block size in PostgreSQL to create more columns. This might be tricky because you have to recompile PostgreSQL and set BLCKSZ to a higher value, like 16kiB or 32kiB. Watch for the configuration option "--with-blocksize=BLOCKSIZE". For details see the archives of the PostgreSQL mailing list or ask there (pgsql-patches(at)postgresql(dot)org).
Instructions for Debian (thanks to Martin Pitt):
sudo apt-get build-dep postgresql-8.3
apt-get source postgresql-8.3
cd postgresql-8.3-*
debian/rules patch
sensible-editor build-tree/postgresql-8.3.5/src/include/pg_config_manual.h
dpkg-buildpackage -us -uc -b -nc
Note: the above could not be reproduced on Ubuntu 14.04 in August 2014. A patch is required (the configuration option is not enough). See (tested with PostgreSQL 9.3 on Linux): Instructions for increasing the maximum number of columns in PostgreSQL on Linux
Fatal error: Allowed memory size
Depending on your server configuration you might run into memory problems being reported by an error like "Fatal error: Allowed memory size of 8388608 bytes exhausted (tried to allocate 233472 bytes) in /path/to/htdocs/limesurvey/filename.php on line 7296".
You can try to raise the limit by adding an optional setting to LimeSurvey's config file.
Please bear in mind that changes in the default settings of an application can always be overruled by global server settings. To increase the memory limit of your sever to 128M:
- memory_limit = 128M to your server's main php.ini file (recommended, if you have access)
- memory_limit = 128M to a php.ini file in the LimeSurvey root
- php_value memory_limit 32M in a .htaccess file located in the LimeSurvey root folder
- " ini_set('memory_limit', '128M'); " in your config.php
Specific configuration
Under certain circumstances, you need to update the LimeSurvey configuration in application/config/config.php
IE 11 and Windows 7 / Windows 8
There is a known issue with the session with IE 11, that leads to users not being able to finish a survey.
It is solved by giving the session a unique name.
This is done by adding this to the config file.
       // Set the name of the session
        'session' => array (
            'sessionName' => "YOURUNIQUESESSIONNAME",
        ),
Two LimeSurvey instances on same domain
If you run 2 LimeSurvey instances on the same domain, but within different directories, you need to update the session configuration.
For example, if you have example.org/ls1 and example.org/ls2, update the ls1 config file:
        'session' => array (
            'cookieParams' => array(
                    'path' => '/ls1',
                ),
            ),
        'request' => array(
            'csrfCookie' => array( 'path' => '/ls1' )
        ),