Theme editor/it: Difference between revisions
From LimeSurvey Manual
m (Text replacement - "sub-question" to "subquestion") |
(Updating to match new version of source page) |
||
| Line 2: | Line 2: | ||
=Introduzione= | =Introduzione= | ||
<div class="mw-translate-fuzzy"> | |||
LimeSurvey dispone di un sistema di base per fornire modelli e stili di base, simile a quello che si trova in alcune applicazioni basate sul browser. Essi sono semplicemente chiamati '''Modelli''' o '''Template''' e permettono di controllare l'aspetto delle pagine durante un sondaggio. L'amministratore di un'indagine può selezionare il modello da utilizzare per ogni questionario in modo da personalizzarne la presentazione visiva. Le modifiche ai template possono essere molto semplici come l'aggiunta di un logo unico nella pagina di benvenuto, cambiare il coloro dello sfondo, aggiungere un nuovo colore per il testo di specifiche domande. | LimeSurvey dispone di un sistema di base per fornire modelli e stili di base, simile a quello che si trova in alcune applicazioni basate sul browser. Essi sono semplicemente chiamati '''Modelli''' o '''Template''' e permettono di controllare l'aspetto delle pagine durante un sondaggio. L'amministratore di un'indagine può selezionare il modello da utilizzare per ogni questionario in modo da personalizzarne la presentazione visiva. Le modifiche ai template possono essere molto semplici come l'aggiunta di un logo unico nella pagina di benvenuto, cambiare il coloro dello sfondo, aggiungere un nuovo colore per il testo di specifiche domande. | ||
</div> | |||
<div class="mw-translate-fuzzy"> | |||
LimeSurvey è predisposto con un set di modelli iniziali, i quali sono definiti nelle cartelle contenute nella cartella di installazione LimeSurvey chiamata 'templates'. Ogni modello ha una propria directory principale, nella quale ci sono numerosi file: '''templates (.pstpl)''', '''cascading style sheets (.css)''', '''images''' ('''.jpg'''. '''.png''') e molti altri. | LimeSurvey è predisposto con un set di modelli iniziali, i quali sono definiti nelle cartelle contenute nella cartella di installazione LimeSurvey chiamata 'templates'. Ogni modello ha una propria directory principale, nella quale ci sono numerosi file: '''templates (.pstpl)''', '''cascading style sheets (.css)''', '''images''' ('''.jpg'''. '''.png''') e molti altri. | ||
</div> | |||
<div class="mw-translate-fuzzy"> | |||
Come anche in altri sistemi che si basano sui temi, frammenti di codice HTML vengono memorizzati nel file dei modelli .pstpl. Questi frammenti vengono letti e utilizzati per costruire le pagine da visualizzare all'utente finale durante lo svolgimento dell'indagine. Spesso, si racchiudono nel file, delle parole chiave ('''keywords''') tra parentesi graffe che sono poi sostituite dal corrispondente testo. Ciò che segue è un esempio del contenuto di un file assieme alla corrispondente pagina risultante: | Come anche in altri sistemi che si basano sui temi, frammenti di codice HTML vengono memorizzati nel file dei modelli .pstpl. Questi frammenti vengono letti e utilizzati per costruire le pagine da visualizzare all'utente finale durante lo svolgimento dell'indagine. Spesso, si racchiudono nel file, delle parole chiave ('''keywords''') tra parentesi graffe che sono poi sostituite dal corrispondente testo. Ciò che segue è un esempio del contenuto di un file assieme alla corrispondente pagina risultante: | ||
</div> | |||
Since LimeSurvey 3, the theme engine uses [https://twig.symfony.com Twig], so the theme developers can change the logic of the survey rendering in a safe and easy way. Twig replace the old system of replacement keywords that was used in the previous versions. The logic that was used to generate the HTML of the keywords are now available inside the theme's views. | |||
Snippet from Vanilla Theme: | |||
<syntaxhighlight lang="html4strict" enclose="div"> | <syntaxhighlight lang="html4strict" enclose="div"> | ||
| Line 12: | Line 26: | ||
<div style='text-align: center;'><span style='color:red'>Quest'indagine è stata creata da me per scoprire che tipo di cioccolata piace alle persone.</span></div> | <div style='text-align: center;'><span style='color:red'>Quest'indagine è stata creata da me per scoprire che tipo di cioccolata piace alle persone.</span></div> | ||
</syntaxhighlight> | </syntaxhighlight> | ||
I modelli, essendo codice HTML, tendono a definire la posizione e il tipo di testo da visualizzare e altre simili funzionalità strutturali della pagina. Spesso fanno riferimento, od includono altri file. | I modelli, essendo codice HTML, tendono a definire la posizione e il tipo di testo da visualizzare e altre simili funzionalità strutturali della pagina. Spesso fanno riferimento, od includono altri file. | ||
| Line 24: | Line 33: | ||
Visita la nostra [https://www.limesurvey.org/index.php?option=com_sobipro&sid=55:Templates&Itemid=729 LimeSurvey template repository], dove puoi condividere i tuoi modelli. | Visita la nostra [https://www.limesurvey.org/index.php?option=com_sobipro&sid=55:Templates&Itemid=729 LimeSurvey template repository], dove puoi condividere i tuoi modelli. | ||
= | =Creazione di un nuovo template= | ||
Per creare un nuovo template (o modificarne uno esistente) è necessario possederne la relativa l'autorizzazione come utente in LimeSurvey, così come l'autorizzazione per la manipolazione dei file contenuti nel sistema operativo dell'hosting in cui è installato LimeSurvey. | Per creare un nuovo template (o modificarne uno esistente) è necessario possederne la relativa l'autorizzazione come utente in LimeSurvey, così come l'autorizzazione per la manipolazione dei file contenuti nel sistema operativo dell'hosting in cui è installato LimeSurvey. | ||
| Line 33: | Line 42: | ||
<div class="simplebox">'''Nota permessi:''' nei sistemi unix/linux i proprietari di questi file relativi ai modelli saranno del gruppo e dell'utente con cui si ha eseguito l'accesso al server web. Quindi assicurati di aver accesso alla modifica di questi file e quando li salvi, assicurati che non cambino proprietario, in modo che tu possa ancora utilizzare l'interfaccia web per l'editing dei modelli se necessario.</div><br /> | <div class="simplebox">'''Nota permessi:''' nei sistemi unix/linux i proprietari di questi file relativi ai modelli saranno del gruppo e dell'utente con cui si ha eseguito l'accesso al server web. Quindi assicurati di aver accesso alla modifica di questi file e quando li salvi, assicurati che non cambino proprietario, in modo che tu possa ancora utilizzare l'interfaccia web per l'editing dei modelli se necessario.</div><br /> | ||
Un certo numero di elementi 'pubblici' possono essere modificati da una serie di modelli. La prossima sezione fornisce una breve spiegazione di questi template. | |||
In un primo momento i file riguardanti i modelli potrebbero apparire complessi da comprendere. Devi imparare a capire il codice HTML e possibilmente anche CSS. | In un primo momento i file riguardanti i modelli potrebbero apparire complessi da comprendere. Devi imparare a capire il codice HTML e possibilmente anche CSS. | ||
=L'editori di modelli di LimeSurvey= | |||
Per alleggerire la comprensione e l'aggiornamento rapido di un modello, LimeSurvey fornisce un '''Editor di Modelli''' nella barra degli strumenti '''Amministrazione''' dell'applicazione. Questo editor è disponibile solo per gli utenti che ne hanno i privilegi, nelle 'impostazioni sulla sicurezza degli utenti', e ai superadministrator. Un template ha effetti su tutte le indagini e può rendere un sondaggio non operativo se non è costruito in maniera corretta. | |||
{{Alert|title=Attention|text=A theme that is not correctly constructed can make a survey (that uses the respective template) inoperable. }} | |||
L'editor di modelli di LimeSurvey ti contente di modificare online il contenuto dei tuoi modelli. Per aprire l'editor cliccare su '''Editor dei modelli''' nel menù '''Configurazioni'''. | L'editor di modelli di LimeSurvey ti contente di modificare online il contenuto dei tuoi modelli. Per aprire l'editor cliccare su '''Editor dei modelli''' nel menù '''Configurazioni'''. | ||
| Line 46: | Line 57: | ||
[[File:templates.png]] | [[File:templates.png]] | ||
La schermata principale è simile a quella di amministrazione di un'indagine. Essa permette di selezionare il modello da modificare/visualizzare. Dopo averlo selezionato, puoi scegliere una tra le differenti pagine delle indagini pubbliche. Comparirà una lista dei file del template che costituiscono quella particolare pagina. | La schermata principale è simile a quella di amministrazione di un'indagine. Essa permette di selezionare il modello da modificare/visualizzare. Dopo averlo selezionato, puoi scegliere una tra le differenti pagine delle indagini pubbliche. Comparirà una lista dei file del template che costituiscono quella particolare pagina. | ||
[[File:Template-editor-2013-7-10_11_38_16.png|center]] | [[File:Template-editor-2013-7-10_11_38_16.png|center]] | ||
The following options are available: | |||
*'''Creare''': ti permette di creare un nuovo modello. Per non dover cominciare da zero, viene copiato il template di default. | *'''Creare''': ti permette di creare un nuovo modello. Per non dover cominciare da zero, viene copiato il template di default. | ||
| Line 94: | Line 105: | ||
*'''{TEMPLATECSS}''': aggiunge linee per il fil css di default, template.css, e per il linguaggio rtl, template-rtl.css. | *'''{TEMPLATECSS}''': aggiunge linee per il fil css di default, template.css, e per il linguaggio rtl, template-rtl.css. | ||
*'''{TEMPLATEJS}''': aggiunge i file di default di javascript, template.js e tutti gli altri file js di cui LimeSurvey ha bisogno. | *'''{TEMPLATEJS}''': aggiunge i file di default di javascript, template.js e tutti gli altri file js di cui LimeSurvey ha bisogno. | ||
===Utilizzare Bootstrap=== | ===Utilizzare Bootstrap=== | ||
| Line 105: | Line 115: | ||
===Sostituire il css o javascript di default=== | ===Sostituire il css o javascript di default=== | ||
Some | Some questions use specific files for Javascript or CSS. If you need to replace a function, use a cascading system. For javascript function, the last function read is the function used. | ||
==Other Template Files== | ==Other Template Files== | ||
The '''privacy.pstpl''', '''invitationemail.pstpl''', '''reminderemail.pstpl''' and '''confirmationemail.pstpl''' are no longer used by LimeSurvey and defaults are instead set in the applicable language files. The email messages can now be edited on a survey by survey basis. | The '''privacy.pstpl''', '''invitationemail.pstpl''', '''reminderemail.pstpl''', and '''confirmationemail.pstpl''' are no longer used by LimeSurvey and defaults are instead set in the applicable language files. The email messages can now be edited on a survey by survey basis. | ||
==Standard Pages== | ==Standard Pages== | ||
There are ten standard pages that a survey participant may see in the course of taking or accessing the LimeSurvey application. Each is constructed from a number of common '''Template''' files from the '''Template''' specified in the survey | There are ten standard pages that a survey participant may see in the course of taking or accessing the LimeSurvey application. Each is constructed from a number of common '''Template''' files from the '''Template''' specified in the settings of the survey. The table below indicates which template files are used in constructing each of these pages. | ||
{| class="wikitable" | {| class="wikitable" | ||
! '''Survey Pages | ! '''Survey Pages/'''<br />'''Template Files'''!!Survey<br />List!!Welcome!!Question!!Completed!!Clear All!!Register!!Load!!Save!!Print<br />Answers!!Print<br />Survey | ||
|- | |- | ||
|SurveyList||align="center" | [[File:check.gif]]|| || || || || || || || || | |SurveyList||align="center" | [[File:check.gif]]|| || || || || || || || || | ||
| Line 159: | Line 169: | ||
|} | |} | ||
<span style='color:red'>'''*'''</span>NOTE: In | <span style='color:red'>'''*'''</span>NOTE: In version 1.90+, this replaces question.pstpl AND question_start.pstpl. If you are using an old custom template, you need to add the following line to the beginning of question.pstpl:<syntaxhighlight lang="php" enclose="div"><div {QUESTION_ESSENTIALS} class="{QUESTION_CLASS}{QUESTION_MAN_CLASS}{QUESTION_INPUT_ERROR_CLASS}"></syntaxhighlight>And then add the corresponding closing tag to the end of question.pstpl:<syntaxhighlight lang="php" enclose="div"></div></syntaxhighlight> | ||
<span style='color:red'>'''*'''</span>NOTE: In version 1.91 and earlier, LimeSurvey js files are not included | <span style='color:red'>'''*'''</span>NOTE: In version 1.91 and earlier, LimeSurvey js files are not included in the template. In version 2, '''you have to use {TEMPLATEJS} in one of your template file''' to add the link to the js file. You can add it in startpage.pstpl or in endpage.pstpl. You can remove the {TEMPLATEURL}/template.js line and you have to replace with {TEMPLATEJS} to update a personal template. | ||
==The File Control Section== | ==The File Control Section== | ||
In the "file control" window on the left, you can click on one of the template files that is used to compile the page. The HTML code for that file will then appear in the "Now editing" window in the center. If the template is editable (determined by directory permissions) you can then make any changes and save them. | In the "file control" window on the left, you can click on one of the template files that is used to compile the page. You can see the ''Screen part'', JavaScript, and CSS files. The HTML code for that file will then appear in the "Now editing" window in the center. If the template is editable (determined by directory permissions) you can then make any changes and save them. | ||
The "Other files" window shows a list of all other files | <center>[[File:File Control Section.png|center]]</center> | ||
The "Other files" window shows a list of all other files from the template directory. You can use the right side to '''upload and select image files (your pics, logos,...) or other files needed to create your template'''. | |||
Instead of using a link for each picture, utilize the field string {TEMPLATEURL}. So, instead of: | |||
<syntaxhighlight lang="html4strict" enclose="div">img src='/limesurvey/templates/yourtemplate/files/mypicture.jpg'</syntaxhighlight> | <syntaxhighlight lang="html4strict" enclose="div">img src='/limesurvey/templates/yourtemplate/files/mypicture.jpg'</syntaxhighlight> | ||
| Line 176: | Line 190: | ||
<syntaxhighlight lang="html4strict" enclose="div">img src='{TEMPLATEURL}mypicture.jpg'</syntaxhighlight> | <syntaxhighlight lang="html4strict" enclose="div">img src='{TEMPLATEURL}mypicture.jpg'</syntaxhighlight> | ||
A "sample" of the template page you are editing will be visible | A "sample" of the template page you are editing will be visible in the bottom of the screen. There is no way to delete a template from the template editor. This must be done by accessing the underlying directory and deleting manually the files from there. You also have the possibility to select different screen resolutions in order to better evaluate the feel and look of the template. | ||
= | <div class="simplebox">'''Note:''' The shipped templates cannot be edited using the template editor. If you want to modify them, create a copy first and edit the copy.</div> | ||
==Template files location== | |||
LimeSurvey stores each of the 'standard' templates in their own distinct sub-directory within the ''/templates'' directory that is kept in the public directory with the other LimeSurvey public files. Customized user templates are stored in the ''/upload/templates'' directory. | |||
There should ALWAYS be a "default" directory in the templates directory. This template is used by default and as a fall-back if a template folder doesn't exist, or can't be found. | There should '''ALWAYS''' be a "default" directory in the templates directory. This template is used by default and as a fall-back if a template folder doesn't exist, or can't be found. It comes installed by default. | ||
You can use any image files that you upload into the template management area with syntax | You can use any image files that you upload into the template management area with the help of this syntax: | ||
<syntaxhighlight lang="php" enclose="div">{TEMPLATEURL}filename.xyz</syntaxhighlight> | <syntaxhighlight lang="php" enclose="div">{TEMPLATEURL}filename.xyz</syntaxhighlight> | ||
| Line 194: | Line 206: | ||
=Styling questions with CSS= | =Styling questions with CSS= | ||
Styling of questions in CSS has become much easier. Each question type now | Styling of questions in CSS has become much easier. Each question type has now a unique class. The mandatory questions have an additional mandatory class. For example, for a non-mandatory question: | ||
<syntaxhighlight lang="html4strict" enclose="div"><div id="question5" class="gender"> | <syntaxhighlight lang="html4strict" enclose="div"><div id="question5" class="gender"> | ||
| Line 200: | Line 212: | ||
</div></syntaxhighlight> | </div></syntaxhighlight> | ||
and if the question is mandatory | and if the question is mandatory: | ||
<syntaxhighlight lang="html4strict" enclose="div"><div id="question5" class="gender mandatory"> | <syntaxhighlight lang="html4strict" enclose="div"><div id="question5" class="gender mandatory"> | ||
| Line 206: | Line 218: | ||
</div></syntaxhighlight> | </div></syntaxhighlight> | ||
and if the question is mandatory but the user didn't answer it or if there is validation on a question | and if the question is mandatory, but the user didn't answer it or if there is validation on a question: | ||
<syntaxhighlight lang="html4strict" enclose="div"><div id="question5" class="gender mandatory input-error"> | <syntaxhighlight lang="html4strict" enclose="div"><div id="question5" class="gender mandatory input-error"> | ||
| Line 212: | Line 224: | ||
</div></syntaxhighlight> | </div></syntaxhighlight> | ||
and if the question has validation applied but the user hasn't answered correctly | and if the question has validation applied, but the user hasn't answered correctly: | ||
<syntaxhighlight lang="html4strict" enclose="div"><div id="question6" class="text-short input-error"> | <syntaxhighlight lang="html4strict" enclose="div"><div id="question6" class="text-short input-error"> | ||
| Line 220: | Line 232: | ||
==Global classes for question part== | ==Global classes for question part== | ||
These classes are used for each question type. Some question types use only one or two | These classes are used for each question type. Some question types use only one or two classes, while others may use much more. | ||
{| class="wikitable alternance" | {| class="wikitable alternance" | ||
| Line 231: | Line 243: | ||
! scope="col" | Note | ! scope="col" | Note | ||
|- | |- | ||
! scope="row" | .question {{ObsoleteIn| | ! scope="row" | .question {{ObsoleteIn|3.0}} | ||
| All question block | | All question block | ||
| All question type | | All question type | ||
| Line 271: | Line 283: | ||
| Multi text question, array question type | | Multi text question, array question type | ||
| <li class="question-item">, <tr class="question-item"> | | <li class="question-item">, <tr class="question-item"> | ||
| Some | | Some answers are questions too. Then we have a lot of class="question-item answer-item" | ||
|- | |||
! scope="row" | .button-list | |||
| A list of button | |||
| Yes no and Gender question | |||
| <ul class="button-list"> | |||
| | |||
|- | |||
! scope="row" | .button-item | |||
| The answer part with a button | |||
| Yes no and Gender question | |||
| <li class="button-item"> | |||
| | |||
|- | |- | ||
! scope="row" | .checkbox-list | ! scope="row" | .checkbox-list | ||
| Line 277: | Line 301: | ||
| Multi choice question, array number (checkbox) question type | | Multi choice question, array number (checkbox) question type | ||
| <ul class="checkbox-list">, <tr class="checkbox-list"> | | <ul class="checkbox-list">, <tr class="checkbox-list"> | ||
| Some question | | Some question types use multi-list class, like checkbox with comment: class="checkbox-list text-list" | ||
|- | |- | ||
! scope="row" | .checkbox-array {{NewIn|3.0}} | ! scope="row" | .checkbox-array {{NewIn|3.0}} | ||
| Line 373: | Line 397: | ||
| Short text question | | Short text question | ||
| <label class="hide"> | | <label class="hide"> | ||
| Can be used for other | | Can be used for other purposes | ||
|- | |- | ||
! scope="row" | .ls-js-hidden {{NewIn|3.0}} | ! scope="row" | .ls-js-hidden {{NewIn|3.0}} | ||
| Line 379: | Line 403: | ||
| Button for example | | Button for example | ||
| <div class="ls-js-hidden"> | | <div class="ls-js-hidden"> | ||
| LimeSurvey core used it, but | | LimeSurvey core used it, but you can use it too in your template | ||
|- | |- | ||
! scope="row" | .ls-js-hidden-sr {{NewIn|3.0}} | ! scope="row" | .ls-js-hidden-sr {{NewIn|3.0}} | ||
| Line 409: | Line 433: | ||
| Question with checkbox | | Question with checkbox | ||
| <input type="checkbox" class="checkbox"> | | <input type="checkbox" class="checkbox"> | ||
| With modern browser: not needed but some old browser need this | | With modern browser: not needed, but some old browser need this | ||
|- | |- | ||
! scope="row" | .radio {{ObsoleteIn|3.0}} | ! scope="row" | .radio {{ObsoleteIn|3.0}} | ||
| Line 415: | Line 439: | ||
| Question with radio | | Question with radio | ||
| <input type="radio" class="radio"> | | <input type="radio" class="radio"> | ||
| With modern browser: not needed but some old browser need this | | With modern browser: not needed, but some old browser need this | ||
|- | |- | ||
! scope="row" | .text | ! scope="row" | .text | ||
| Line 456: | Line 480: | ||
=== Some example of question part with classes=== | === Some example of question part with classes=== | ||
''' | '''Text-short question type:'''<source lang="html4strict"> | ||
<p class="question answer-item text-item "> | <p class="question answer-item text-item "> | ||
<label class="hide label" for="answerSGQA">Answer</label><input type="text" value="" id="answerSGQA" name="SGQA" size="50" class="text empty"> | <label class="hide label" for="answerSGQA">Answer</label><input type="text" value="" id="answerSGQA" name="SGQA" size="50" class="text empty"> | ||
| Line 528: | Line 552: | ||
|- | |- | ||
|Date||.date||D | |Date||.date||D | ||
|- | |||
|Equation||.equation||* | |||
|- | |- | ||
|Gender||.gender||G | |Gender||.gender||G | ||
| Line 568: | Line 594: | ||
These apply to the help and/or validation tip messages so that each type can be individually styled. | These apply to the help and/or validation tip messages so that each type can be individually styled. | ||
The .hide-tip option and .input-error options | The .hide-tip option and .input-error options interact by default so that you can have validation tips hidden. However, they do appear when there are validation errors and disappear again when those errors are rectified. | ||
All of these are designed to eliminate the need for pop-up alert messages. | All of these are designed to eliminate the need for pop-up alert messages. Instead, tips can appear/disappear as needed and are color-coded to indicate whether the answers pass the validation criteria. | ||
Furthermore, when you first visit a page that has unmet validation criteria, you can color-code the tips in a pleasing color to show which validation criteria have not been | Furthermore, when you first visit a page that has unmet validation criteria, you can color-code the tips in a pleasing color to show which validation criteria have not been met yet; then re-display the page using a harsher color if the person submits the page with lingering validation errors. | ||
{| | {| | ||
| Line 582: | Line 608: | ||
|- | |- | ||
|Hide Tip||.hide-tip||added if you use the hide_tip option | |Hide Tip||.hide-tip||added if you use the hide_tip option | ||
|- | |||
|defrault type||.em_default||for default tip set ( numeric value etc …) | |||
|- | |- | ||
|Num answers||.em_num_answers||for for min_answers and max_answers | |Num answers||.em_num_answers||for for min_answers and max_answers | ||
| Line 604: | Line 632: | ||
The custom question styles are near the bottom of each template's CSS file and start with:<syntaxhighlight lang="php" enclose="div">/* --------------------------- START: Question styles ------------------------------ */</syntaxhighlight> | The custom question styles are near the bottom of each template's CSS file and start with:<syntaxhighlight lang="php" enclose="div">/* --------------------------- START: Question styles ------------------------------ */</syntaxhighlight> | ||
If you're styling your own custom template, you should be able to copy everything after the above from templates/default/template.css (for | If you're styling your own custom template, you should be able to copy everything after the above one from ''templates/default/template.css'' (for table-based layouts) or ''/templates/limespired/template.css'' (for CSS-based layouts) into your own style sheet without any impact on your other styles. | ||
==Internet Explorer conditional style sheets== | ==Internet Explorer conditional style sheets== | ||
Because of the marked discrepancies in rendering between IE6 | Because of the marked discrepancies in rendering between IE6 & IE7 and the other browsers, there are special IE conditional style sheets included for each template. | ||
<source lang="html4strict" enclose="div"> | <source lang="html4strict" enclose="div"> | ||
| Line 622: | Line 650: | ||
</source> | </source> | ||
You should include the above code within your '''startpage.pstpl''' and copies of both the IE style sheets from either /templates/default/ or /templates/limespired for Tables base layout and CSS based layout respectively. | You should include the above code within your '''startpage.pstpl''' and copies of both the IE style sheets from either ''/templates/default/'' or ''/templates/limespired'' for Tables base layout and CSS based layout respectively. | ||
<div class="simplebox">'''Note:''' If you copy the styles into your own style sheet you will almost certainly need to tweak them.</div> | <div class="simplebox">'''Note:''' If you copy the styles into your own style sheet you will almost certainly need to tweak them.</div> | ||
| Line 628: | Line 656: | ||
===Alternative solution for Internet explorer=== | ===Alternative solution for Internet explorer=== | ||
You can put conditional class for body in startpage.pstpl | You can put a conditional class for body in startpage.pstpl and use this class in your template.css. This method is used in the citronade template{{ObsoleteIn|2.06}}. Adding a js / no-js class to have javascript / no javascript system. | ||
<source lang="html4strict"><!--[if lt IE 7 ]> <body class="lang-{SURVEYLANGUAGE} {SURVEYFORMAT} ie ie6 ielt7 ielt8 ielt9 no-js"> <![endif]--> | <source lang="html4strict"><!--[if lt IE 7 ]> <body class="lang-{SURVEYLANGUAGE} {SURVEYFORMAT} ie ie6 ielt7 ielt8 ielt9 no-js"> <![endif]--> | ||
| Line 637: | Line 665: | ||
<script type='text/javascript'>/*<![CDATA[*/(function(H){ H.className=H.className.replace(/\bno-js\b/,'js') })(document.getElementsByTagName('body')[0]);/*]]>*/</script></source> | <script type='text/javascript'>/*<![CDATA[*/(function(H){ H.className=H.className.replace(/\bno-js\b/,'js') })(document.getElementsByTagName('body')[0]);/*]]>*/</script></source> | ||
And in template.css use | And in template.css use: | ||
<source lang="css">.ie6{/*specific for internet explorer 6*/} | <source lang="css">.ie6{/*specific for internet explorer 6*/} | ||
| Line 645: | Line 673: | ||
== Right-to-Left (RTL) Languages and justify== | == Right-to-Left (RTL) Languages and justify== | ||
The text editor within LimeSurvey is able to format RTL | The text editor within LimeSurvey is able to format RTL text. However, the editor itself shows the RTL language in a left to right format when justified. This is just an editor display issue. The RTL and justified question or text will display correctly from right to left, even when justified, in your survey or on preview. | ||
==Keywords== | ==Keywords== | ||
Keywords within a template file get replaced by the current survey information. They are surrounded by curly brackets, for example: {SURVEYNAME} | {{Deprecated|3.0}} | ||
Keywords within a template file get replaced by the current survey information. They are surrounded by curly brackets, for example: {SURVEYNAME}. | |||
The following strings will be replaced by LimeSurvey when parsing the template file and presenting it to survey users. These field strings will work on almost every template except for the 'Completed Page'. (Most of these strings can be found in the common.php file. If it's not there, look in the index.php file.) | The following strings will be replaced by LimeSurvey when parsing the template file and presenting it to survey users. These field strings will work on almost every template except for the 'Completed Page'. (Most of these strings can be found in the common.php file. If it's not there, look in the index.php file.) | ||
| Line 674: | Line 704: | ||
|{CHECKJAVASCRIPT}||All files (mainly for welcome.pstpl)||Warning message when end-user browser have javascript disabled | |{CHECKJAVASCRIPT}||All files (mainly for welcome.pstpl)||Warning message when end-user browser have javascript disabled | ||
|- | |- | ||
|{QUESTION}||Question.pstpl||('''Has been superseeded | |{QUESTION}||Question.pstpl||('''Has been superseeded as of LS1.87''') Displays the current question text (The format of {QUESTION} can customised by editing 'question_start.pstpl') Use the following: {QUESTION_TEXT}, {QUESTION_MANDATORY}, {QUESTION_HELP}, {QUESTION_MAN_MESSAGE}, {QUESTION_VALID_MESSAGE}, {QUESTION_INPUT_ERROR_CLASS}, and appropriate wrapping HTML instead of {QUESTION} | ||
|- | |- | ||
|{ANSWER}||question.pstpl, print_question.pstpl||presents the answer form for the current question | |{ANSWER}||question.pstpl, print_question.pstpl||presents the answer form for the current question | ||
|- | |- | ||
|{SGQ}||question.pstpl, question text||Can be used in the question text itself | |{SGQ}||question.pstpl, question text||Can be used in the question text itself to reference the input field of the question dynamically by displaying the Survey-Group-Question id for the current question. (as of svn build 9755) | ||
|- | |- | ||
|{QUESTIONHELP}||question.pstpl, print_question.pstpl||Displays help text (predefined tip for question type) for the current question | |{QUESTIONHELP}||question.pstpl, print_question.pstpl||Displays help text (predefined tip for question type) for the current question | ||
| Line 729: | Line 759: | ||
|- | |- | ||
|{SAVEDID}||All Files||Displays 'Response ID' of user | |{SAVEDID}||All Files||Displays 'Response ID' of user | ||
|- | |||
|- | |||
|{QUEXMLPDF}||All Files||Displays button to export the queXML PDF of questionnaire including answers entered up until the point that has been completed in the survey. | |||
|- | |- | ||
|{TOKEN:FIRSTNAME}||All Files||***If survey answers are NOT ANONYMOUS - gets replaced with the users first name from the tokens table | |{TOKEN:FIRSTNAME}||All Files||***If survey answers are NOT ANONYMOUS - gets replaced with the users first name from the tokens table | ||
| Line 759: | Line 792: | ||
==Input/Buttons== | ==Input/Buttons== | ||
Each "input" type in a survey has been given its own class name, so that you can add CSS to your "startpage.pstpl" file | Each "input" type in a survey has been given its own class name, so that you can add CSS to your "startpage.pstpl" file and have some control over the appearance of form buttons and inputs. These class names are as follows: | ||
*'''submit''' (Submit Buttons) | *'''submit''' (Submit Buttons) | ||
*'''text''' (Text Inputs - for short free text, date and numerical type) | *'''text''' (Text Inputs - for short free text, date, and numerical type) | ||
*'''answertext''' (Text of answers) | *'''answertext''' (Text of answers) | ||
*'''radio''' (Radio Buttons) | *'''radio''' (Radio Buttons) | ||
| Line 768: | Line 801: | ||
*'''textarea''' (Large text inputs - for long free text) | *'''textarea''' (Large text inputs - for long free text) | ||
*'''clearall''' (The "Exit and Clear Survey" link) | *'''clearall''' (The "Exit and Clear Survey" link) | ||
*'''rank''' (The rank style question. Doesn't set the colour of the select box or the text boxes | *'''rank''' (The rank style question. Doesn't set the colour of the select box or the text boxes, but it does allow the changing of background colour, text colour, size etc., for the rest of the ranking question) | ||
*'''graph''' (The "percentage completed" graph table) | *'''graph''' (The "percentage completed" graph table) | ||
*'''innergraph''' (The table inside the graph table - this contains the 0% and 100% text. Use this for changing the size of this text) | *'''innergraph''' (The table inside the graph table - this contains the 0% and 100% text. Use this for changing the size of this text) | ||
*'''question''' (General settings for any question that is displayed within a table. Generally you should use this to make sure that their font size and | *'''question''' (General settings for any question that is displayed within a table. Generally, you should use this to make sure that their font size and color is the same as you have used elsewhere as a default) | ||
*'''mandatory''' (Mandatory questions) | *'''mandatory''' (Mandatory questions) | ||
*'''input-error''' (User input error - for if a user has made a mistake with a mandatory question or question with validation) | *'''input-error''' (User input error - for if a user has made a mistake with a mandatory question or question with validation) | ||
*'''array1''' and '''array2''' (These two styles are cycled when presenting the range of answers for an array type question. This allows you to set an alternating background | *'''array1''' and '''array2''' (These two styles are cycled when presenting the range of answers for an array type question. This allows you to set an alternating background color for these question types. '''Array1''' is also used for the column headings in these question types) | ||
*'''errormandatory''' (Sets the | *'''errormandatory''' (Sets the color and style of the "This question is mandatory" error message) | ||
*'''warningjs''' (Sets the | *'''warningjs''' (Sets the color and style of the warning message displayed if the participant's browser has javascript disabled) | ||
There are also some elements that can be accessed using the ID of the element ('''#ID''' in CSS): | There are also some elements that can be accessed using the ID of the element ('''#ID''' in CSS): | ||
| Line 782: | Line 815: | ||
*'''tokenmessage''' (used for messages inside the survey, e.g. the session expired error message) | *'''tokenmessage''' (used for messages inside the survey, e.g. the session expired error message) | ||
Because you can edit all the HTML aspects, there's no reason to surround your templates with a | |||
<syntaxhighlight lang="php" enclose="div"><div class='new_name'></div></syntaxhighlight> | |||
Because you can edit all the HTML aspects, there's no reason to surround your templates with a <div class='new_name'> and then define a css for that new_name class. | and then define a css for that new_name class. | ||
==Styling the progress bar== | ==Styling the progress bar== | ||
The progress bar appearance can be modified with CSS. | The progress bar appearance can be modified with CSS. | ||
To change the background | To change the background color of the bar, add something like the following to the end of your template.css file: | ||
<syntaxhighlight lang="php" enclose="div">#progress-wrapper .ui-widget-header { | <syntaxhighlight lang="php" enclose="div">#progress-wrapper .ui-widget-header { | ||
| Line 802: | Line 829: | ||
}</syntaxhighlight> | }</syntaxhighlight> | ||
To change the border | To change the border color of the bar, add something like the following to the end of your template.css file: | ||
<syntaxhighlight lang="php" enclose="div">#progress-wrapper .ui-widget-content, | <syntaxhighlight lang="php" enclose="div">#progress-wrapper .ui-widget-content, | ||
| Line 811: | Line 838: | ||
==Advanced Features Available to Developers== | ==Advanced Features Available to Developers== | ||
LimeSurvey has integrated some user-made patches that permits some special changes. These very advanced features (generally) require changes to the underlying code base of LimeSurvey and should be done carefully in order not to introduce security holes. | |||
===Support for your own Javascript functions=== | ===Support for your own Javascript functions=== | ||
Some users may need to run Javascript on the survey pages, but calling '''checkconditions()''' in the BODY element made it impossible to do so. | Some users may need to run Javascript on the survey pages, but calling '''checkconditions()''' in the BODY element made it impossible to do so. This call has been replaced with a small JavaScript function in the HEAD that sniffs for the existence of '''checkconditions()''' and '''template_onload()''' before calling them. In this way, a template author can create his or her own '''template_onload()''' function in the HEAD that replaces the default one. | ||
*Disable XSS filter - in Global settings -> Security, set "Filter HTML for XSS" to No. | *Disable XSS filter - in Global settings -> Security, set "Filter HTML for XSS" to No. | ||
*Enter your script in the source of a question or group description. | *Enter your script in the source of a question or group description. | ||
{{Note|For further details, see the [[Workarounds: Manipulating a survey at runtime using Javascript#How to use Script (eg. JavaScript etc.) in LimeSurvey|workaround section]].}} | |||
=Videos on Templates= | =Videos on Templates= | ||
This video will demonstrate the basic and advanced template functions that are available to all LimeSurvey users. This includes changing the appearance of certain forms and inserting custom graphics. Additionally, it will thoroughly walk you through on how to edit and preview specific page templates, importing/exporting templates, modify appearance of questions in the CSS, customizing survey description | This video will demonstrate the basic and advanced template functions that are available to all LimeSurvey users. This includes changing the appearance of certain forms and inserting custom graphics. Additionally, it will thoroughly walk you through on how to edit and preview specific page templates, importing/exporting templates, modify appearance of questions in the CSS, and customizing survey description page. | ||
Video - needed | |||
=Tips & Tricks= | =Tips & Tricks= | ||
| Line 849: | Line 859: | ||
==Some language specific element== | ==Some language specific element== | ||
If you want to have some language specific sentence in a survey, for example a help at end of each page, you can add in a .pstl file a sentence and hidding it for other language. | If you want to have some language specific sentence in a survey, for example a help at the end of each page, you can add in a .pstl file a sentence and hidding it for other language. If we hide it in the template.css, we can use the pseudo selector :lang, but we use some class for better compatibility. | ||
Below, there are two help sentences, in French and English. Put this on endpage.pstpl: | |||
<syntaxhighlight lang="php" enclose="div"><div class="fr" lang="fr">Pour de l'aide en direct appelez le 000000</div> | <syntaxhighlight lang="php" enclose="div"><div class="fr" lang="fr">Pour de l'aide en direct appelez le 000000</div> | ||
<div class="en" lang="en">For some help, please call 000000</div></syntaxhighlight> | <div class="en" lang="en">For some help, please call 000000</div></syntaxhighlight> | ||
and in template.css | and in template.css: | ||
<syntaxhighlight lang="php" enclose="div">.lang-fr .en{display:none} | <syntaxhighlight lang="php" enclose="div">.lang-fr .en{display:none} | ||
.lang-en .fr{display:none}</syntaxhighlight> | .lang-en .fr{display:none}</syntaxhighlight> | ||
==Change the layout of the survey page== | ==Change the layout of the survey page== | ||
After editing and saving a template, it applies to a survey list page only if it is selected from the settings of the survey. To make it the default template, go under the '''General tab''' located in the '''Global settings''' of your LimeSurvey installation and choose the desired template. From now on, all the templates that use the "default" option as template plus the ones that are going to be newly created, will use the newly selected default template. | |||
To use your current template for this page you have change the according setting | To use your current template for this page, you have to change the according setting from '''Global settings'''. In older versions, this change can be done by editing the $defaulttemplate setting from the config file: copy this setting from config-defaults.php to config.php which overrides config-defaults.php and edit this setting to <code lang="html">$defaulttemplate = 'yourtemplatename';</code>. | ||
==Import/Export of templates: Mac users== | ==Import/Export of templates: Mac users== | ||
Mac users, please note | <u>Mac users</u>, please note that the Mac OSX default archive utility may have problems with zip folders "generated on the fly". | ||
A workaround is to unix'es unzip from the command line: | |||
$ unzip template.zip -d template | $ unzip template.zip -d template | ||
| Line 883: | Line 891: | ||
inflating: ... | inflating: ... | ||
Another workaround is to use scripts in their mac-compiled counterparts. | |||
==Replacing the help icon {{ObsoleteIn|2.50}} == | |||
When a question help text is shown, then an help.gif image is used from the default template folder. | |||
You can replace this image by uploading a new help.gif, help.png or help.jpg in your custom template folder. It will then be automatically used instead of the default help icon. | |||
2 | ==Replacing an existing logo {{NewIn|2.50}} {{ObsoleteIn|3.0}}== | ||
'''Note''': In the '''default''' Template of 2.50, there is no preembedded logo. Read further our [[#Adding_your_own_logo |wiki on how to add your own logo]]. | |||
1. To edit the logo go to the ''<u>template.css</u>'' file which you can find it here: | |||
<center>[[File:t1.PNG|200px]]</center> | |||
2. Click the search button to find occurrences of logo related styles and search for ''logo'' | |||
<center>[[File:2.png|200px]]</center> | |||
3. Edit the main style file. | |||
You will see something similar to: | You will see something similar to: | ||
[[File:t4.PNG|500px]] | <center>[[File:t4.PNG|500px]]</center> | ||
If you want to change the image, just replace logo.gif with another image link. Example: (<u>logo.png</u> or <u>logo.jpg</u>). | |||
If you want to | If you want to change the image size, adjust width and height (in pixels) like this: | ||
<syntaxhighlight lang="php" enclose="div">width:100px; height:100px;</syntaxhighlight> | <syntaxhighlight lang="php" enclose="div">width:100px; height:100px;</syntaxhighlight> | ||
==Adding your own logo== | ==Adding your own logo {{ObsoleteIn|3.0}} == | ||
1. Find and open the | 1. Find and open the '''startpage.pstpl''' template file. | ||
[[File:startpage.pstpl.png]] | <center>[[File:startpage.pstpl.png]]</center> | ||
2. After this | |||
2. After | <source lang="html4strict" ><div id="topContainer" class="jumbotron"></source> | ||
add this line to '''startpage.pstpl''': | |||
<source lang="html4strict"> | <source lang="html4strict"> | ||
<div class="container"><img id='page_logo' src='{TEMPLATEURL}/files/logo.png' class="clearfix pull-right" /></div> | <div class="container"><img id='page_logo' src='{TEMPLATEURL}/files/logo.png' class="clearfix pull-right" /></div> | ||
</source> | </source> | ||
3. To upload your own logo go to the template editor and upload your logo. | 3. To upload your own logo, go to the template editor and upload your logo. | ||
[[File:uploadyourlogo.png]] | <center>[[File:uploadyourlogo.png]]</center> | ||
To position your logo please use one of the following css classes: | To position your logo, please use one of the following css classes: | ||
'''If you want the logo to be placed | *'''If you want the logo to be placed on the left side:''' | ||
<source>clearfix pull-left</source> | <source lang="html">clearfix pull-left</source> | ||
'''If you want the logo to be placed | *'''If you want the logo to be placed on the right side:''' | ||
<source>clearfix pull-right</source> | <source lang="html">clearfix pull-right</source> | ||
'''If you want to center the logo''' | *'''If you want to center the logo''' | ||
<source>clearfix center-block</source> | <source lang="html">clearfix center-block</source> | ||
==Use the same template with different logos== | ==Use the same template with different logos== | ||
| Line 972: | Line 961: | ||
<syntaxhighlight lang="php" enclose="div"><img src="{TEMPLATEURL}files/logoImage-{SID}.png"></syntaxhighlight> | <syntaxhighlight lang="php" enclose="div"><img src="{TEMPLATEURL}files/logoImage-{SID}.png"></syntaxhighlight> | ||
== Display custom favicon== | == Display custom favicon== | ||
A favicon is the little icon you see in the browser's address bar, list of bookmarks or tab. You can display your own icon as follows: | A favicon is the little icon you see in the browser's address bar, list of bookmarks or tab. You can display your own icon as follows: | ||
#Create a favicon - google will find you lots of free favicon generators | #Create a favicon - google will find you lots of free favicon generators. | ||
#Name your new favicon "favicon.ico" and place it in your template /files directory | #Name your new favicon "favicon.ico" and place it in your template /files directory. | ||
#Add the following code to your '''startpage.pstpl''' before the </head> tag | #Add the following code to your '''startpage.pstpl''' before the </head> tag. | ||
<syntaxhighlight lang="html4strict" enclose="div"><link rel="shortcut icon" href="{TEMPLATEURL}files/favicon.ico" type="image/x-icon"> | <syntaxhighlight lang="html4strict" enclose="div"><link rel="shortcut icon" href="{TEMPLATEURL}files/favicon.ico" type="image/x-icon"> | ||
| Line 994: | Line 974: | ||
== Different appearance for survey-/question-pages== | == Different appearance for survey-/question-pages== | ||
If you want LimeSurvey to change the appearance of every second page (i.e. of even and odd survey pages), you can use '''.page-odd''' class in your CSS file to change the appearance of odd pages. | |||
If you want LimeSurvey to change the appearance of every second page (i.e. of even and odd survey pages) you can use '''.page-odd''' class in your | |||
example from default template of LimeSurvey 1.91+ | An example from default template of LimeSurvey 1.91+: | ||
<syntaxhighlight lang="php" enclose="div"> | <syntaxhighlight lang="php" enclose="div"> | ||
| Line 1,005: | Line 983: | ||
}</syntaxhighlight> | }</syntaxhighlight> | ||
If you do '''not''' want differentiate even and odd pages, find all instances of ''.page-odd'' in template.css and remove those styles. | |||
==Create a vertical separator border for dual scale array== | ==Create a vertical separator border for dual scale array== | ||
To create a vertical separator border for a dual scale array you can add the following lines to your '''template.css'''-file. | To create a vertical separator border for a dual scale array, you can add the following lines to your '''template.css'''-file. | ||
<syntaxhighlight lang="php" enclose="div"> | <syntaxhighlight lang="php" enclose="div"> | ||
| Line 1,019: | Line 997: | ||
</syntaxhighlight> | </syntaxhighlight> | ||
header_separator is used to adress the separator for the header "td" | ''header_separator'' is used to adress the separator for the header "td". The "dual_scale_separator" is used to address the separator column in the dual scale array. | ||
==Hide the survey contact message shown on the start page/survey list== | ==Hide the survey contact message shown on the start page/survey list {{ObsoleteIn|3.0}} == | ||
To hide the "Please contact ..." message on the start page (with the survey list) you can add the following to the '''$(document).ready''' function in the '''template.js''' of your used design template: | To hide the "Please contact ..." message on the start page (with the survey list), you can add the following to the '''$(document).ready''' function in the '''template.js''' of your used design template: | ||
<syntaxhighlight lang="php" enclose="div"> | <syntaxhighlight lang="php" enclose="div"> | ||
| Line 1,031: | Line 1,009: | ||
</syntaxhighlight> | </syntaxhighlight> | ||
==Remove the survey contact message shown on error messages== | ==Remove the survey contact message shown on error messages {{ObsoleteIn|3.0}}== | ||
If you want to remove the survey contact message from error messages it'll be trickier. You can add the | If you want to remove the survey contact message from error messages, it'll be trickier. You can add the function from below. It calls the '''$(document).ready''' function in the '''template.css''' of your used design template: | ||
<syntaxhighlight lang="php" enclose="div"> | <syntaxhighlight lang="php" enclose="div"> | ||
| Line 1,054: | Line 1,032: | ||
</syntaxhighlight> | </syntaxhighlight> | ||
It will probably not work for a survey in English language and has to be extended when used for multilingual surveys. But it's an idea/tip how to solve this. | It will probably not work for a survey in English language and has to be extended when used for multilingual surveys. But it's an idea/tip on how to solve this. | ||
==How to deal with multilingual question attributes | ==How to deal with multilingual question attributes {{ObsoleteIn|2.50}}== | ||
If you have a multilingual survey and e. g. want to use a different string for the "other" field, this could only be done for the base language (until this feature was added at LimeSurvey 2.0). To work around this, paste in the field to change the label for "other" | If you have a multilingual survey and e. g. want to use a different string for the "other" field, this could only be done for the base language (until this feature was added at LimeSurvey 2.0). To work around this, paste in the field to change the label for "other": | ||
<syntaxhighlight lang="php" enclose="div"><span class="en">New label</span><span class="fr">Nouveau label</span></syntaxhighlight> | <syntaxhighlight lang="php" enclose="div"><span class="en">New label</span><span class="fr">Nouveau label</span></syntaxhighlight> | ||
Add in the template.css of your template (at ''/limesurvey/upload/templates/<yourtemplatename>/template.css''): | |||
<syntaxhighlight lang="php" enclose="div">html:lang(en) .fr{display:none} | <syntaxhighlight lang="php" enclose="div">html:lang(en) .fr{display:none} | ||
html:lang(fr) .en{display:none}</syntaxhighlight> | html:lang(fr) .en{display:none}</syntaxhighlight> | ||
=Custom Question Views | ==Adding your own logo to the survey list {{ NewIn|3.0}} == | ||
# First please open the theme editor for the theme you like to use. [[File:OpenThemeEditor.jpg]] | |||
# We recommend to use fruity, it is our best theme currently. | |||
# Then extend the theme and give it a name you will recognize. [[File:ExtendTheme.jpg]] | |||
# In the following view you may upload the logo you want to use. [[File:UploadFileTheme.jpg]] | |||
# Select the editor screen `Survey List´ in the Screen dropdown in the top right corner. [[File:OpenScreenSurveyList.jpg]] | |||
# Then select `layout_survey_list.twig´ in the left side menu. [[File:EditLayoutSurveyListTwig.jpg]] | |||
# In the editor scroll to line 126 and change the marked part to the filename of the image you uploaded to the theme before. [[File:ChangeSurveyListHeaderImageEditor.jpg]] | |||
# Save your file. [[File:ThemeEditorSaveChanges.jpg]] | |||
# Change default theme to your extended theme. [[File:ChangeDefaultTheme.jpg]] | |||
=Custom Question Views {{NewIn|3.0}}= | |||
<div class="simplebox">'''Note:''' This is a temporary feature to be replaced in the future by question object (it will be very easy to move custom views to question object). It is disabled by default.</div> | <div class="simplebox">'''Note:''' This is a temporary feature to be replaced in the future by question object (it will be very easy to move custom views to question object). It is disabled by default.</div> | ||
| Line 1,078: | Line 1,068: | ||
*Note that you only need to copy the files that you intend to modify but the file structure must remain the same as in application/views/survey/ | *Note that you only need to copy the files that you intend to modify but the file structure must remain the same as in application/views/survey/ | ||
=Insert Custom CSS or JavaScript files for template {{NewIn|2.50}}= | |||
As of version 2.50, you can use the config.xml file to automatically load plugin files. | |||
As of version 2. | |||
*Upload your files to the template /css or /scripts folder | *Upload your files to the template /css or /scripts folder | ||
| Line 1,102: | Line 1,091: | ||
</js> | </js> | ||
</syntaxhighlight> | </syntaxhighlight> | ||
[[Category:Theme]] | |||
[[Category:Twig]] | |||
Revision as of 12:04, 4 May 2021
Introduzione
LimeSurvey dispone di un sistema di base per fornire modelli e stili di base, simile a quello che si trova in alcune applicazioni basate sul browser. Essi sono semplicemente chiamati Modelli o Template e permettono di controllare l'aspetto delle pagine durante un sondaggio. L'amministratore di un'indagine può selezionare il modello da utilizzare per ogni questionario in modo da personalizzarne la presentazione visiva. Le modifiche ai template possono essere molto semplici come l'aggiunta di un logo unico nella pagina di benvenuto, cambiare il coloro dello sfondo, aggiungere un nuovo colore per il testo di specifiche domande.
LimeSurvey è predisposto con un set di modelli iniziali, i quali sono definiti nelle cartelle contenute nella cartella di installazione LimeSurvey chiamata 'templates'. Ogni modello ha una propria directory principale, nella quale ci sono numerosi file: templates (.pstpl), cascading style sheets (.css), images (.jpg. .png) e molti altri.
Come anche in altri sistemi che si basano sui temi, frammenti di codice HTML vengono memorizzati nel file dei modelli .pstpl. Questi frammenti vengono letti e utilizzati per costruire le pagine da visualizzare all'utente finale durante lo svolgimento dell'indagine. Spesso, si racchiudono nel file, delle parole chiave (keywords) tra parentesi graffe che sono poi sostituite dal corrispondente testo. Ciò che segue è un esempio del contenuto di un file assieme alla corrispondente pagina risultante:
Since LimeSurvey 3, the theme engine uses Twig, so the theme developers can change the logic of the survey rendering in a safe and easy way. Twig replace the old system of replacement keywords that was used in the previous versions. The logic that was used to generate the HTML of the keywords are now available inside the theme's views.
Snippet from Vanilla Theme:
<div style='text-align: center;'><span style='color:red'>La mia nuova indagine</span></div>
<div style='text-align: center;'><span style='color:red'>Quest'indagine è stata creata da me per scoprire che tipo di cioccolata piace alle persone.</span></div>
I modelli, essendo codice HTML, tendono a definire la posizione e il tipo di testo da visualizzare e altre simili funzionalità strutturali della pagina. Spesso fanno riferimento, od includono altri file. La maggior parte fa riferimento a fogli di stile (.CSS) che definiscono lo stile del carattere, il colore, la dimensione, lo sfondo e i parametri simili comuni a tutte le pagine del sondaggio. I fogli di stile fanno riferimento a parametri delle classi HTML che sono associati ai vari tipi di oggetti inclusi nel codice HTML. Questo permette ai fogli di stile di descrivere una volta sola come visualizzare ognuna delle diverse tipologie di testo o di altri oggetti che possono apparire in più parti. In LimeSurvey ci sono classi uniche per ogni tipo di domanda, dando così un controllo dettagliato sull'aspetto di ognuna di esse. File di immagini, come loghi o barre di progresso speciali, possono essere contenuti nel file del template. Infine, speciali parole chiave (keywords), all'interno di parentesi graffe, sono rimpiazzate, con il testo definito nell'indagine, con la propria traduzione nelle corrispondenti lingue associate al sondaggio (per esempio, questo avviene per il titolo dell'indagine per ogni lingua definita).
Se crei un nuovo modello personalizzato, ti preghiamo di pensare a contribuire aggiungendolo alla community LimeSurvey rendendolo disponibile anche agli altri. Con il tuo aiuto, possiamo far crescere la nostra collezione di template, indagini ed altri componendi aggiuntivi, per rendere LimeSurvey sempre migliore! Visita la nostra LimeSurvey template repository, dove puoi condividere i tuoi modelli.
Creazione di un nuovo template
Per creare un nuovo template (o modificarne uno esistente) è necessario possederne la relativa l'autorizzazione come utente in LimeSurvey, così come l'autorizzazione per la manipolazione dei file contenuti nel sistema operativo dell'hosting in cui è installato LimeSurvey.
La modalità preferibile per creare un nuovo template è di utilizzare i "Templete Editor" all'interno del menù di amministrazione. Alcuni preferiscono lavorare direttamente all'interno dei files template, utilizzando così il proprio editor di testo preferito invece dell'interfaccia web. In questo caso, utilizza comunque prima l'editore di modelli per creare tuo template. Questo creerà un nuovo modello di base con tutti i file di cui hai bisogno nella cartella LimeSurvey_web_root/upload/templates/your_new_template. Da qui puoi usare il tuo editor di testo per aggiustare manualmente i file del modello.
Un certo numero di elementi 'pubblici' possono essere modificati da una serie di modelli. La prossima sezione fornisce una breve spiegazione di questi template.
In un primo momento i file riguardanti i modelli potrebbero apparire complessi da comprendere. Devi imparare a capire il codice HTML e possibilmente anche CSS.
L'editori di modelli di LimeSurvey
Per alleggerire la comprensione e l'aggiornamento rapido di un modello, LimeSurvey fornisce un Editor di Modelli nella barra degli strumenti Amministrazione dell'applicazione. Questo editor è disponibile solo per gli utenti che ne hanno i privilegi, nelle 'impostazioni sulla sicurezza degli utenti', e ai superadministrator. Un template ha effetti su tutte le indagini e può rendere un sondaggio non operativo se non è costruito in maniera corretta.
L'editor di modelli di LimeSurvey ti contente di modificare online il contenuto dei tuoi modelli. Per aprire l'editor cliccare su Editor dei modelli nel menù Configurazioni.

La schermata principale è simile a quella di amministrazione di un'indagine. Essa permette di selezionare il modello da modificare/visualizzare. Dopo averlo selezionato, puoi scegliere una tra le differenti pagine delle indagini pubbliche. Comparirà una lista dei file del template che costituiscono quella particolare pagina.

The following options are available:
- Creare: ti permette di creare un nuovo modello. Per non dover cominciare da zero, viene copiato il template di default.
- Importare: ti permette di importare un modello da un file zip.
- Esportare: ti permette di esportare il modello corrente in un file zip.
- Copiare: ti permette di creare un nuovo template copiando quello corrente.
- Rinominare: ti permette di cambiare il nome del modello. Generalmente è utilizzato dopo aver copiato od importato un template.
Il menù a tendina Finestra sulla destra ti permette di scegliere in quale particolare pagina del sondaggio inserire il template che stai visualizzando in quel momento.
Importare/Esportare/Copiare un modello
Quando tu Esporti un modello, viene creato un archivio ZIP contenente tutti i file che costituiscono il template (.pstpl, image, .css, etc.). Puoi semplicemente Importare il file zip esportato in un altro sistema LimeSurvey utilizzando la funzione di importazione, oppure puoi manualmente copiare l'archivio all'interno di un'altra istanza LimeSurvey ed estrarlo nella corrispondente cartella del modello del nuovo sistema.
Tuttavia è preferibile utilizzare le funzioni di importazione/esportazione/copia dei modelli LimeSurvey all'interno dell'editor di template.
Struttura della pagine / Utilizzo dei modelli
- Pagina di benvenuto: startpage.pstpl, welcome.pstpl, privacy.pstpl, navigator.pstpl, endpage.pstpl
- Pagine delle domande: startpage.pstpl, survey.pstpl, startgroup.pstpl, groupdescrption.pstpl, question.pstpl, endgroup.pstpl, endpage.pstpl
- Pagina completata: startpage.pstpl, assessment.pstpl, completed.pstpl, endpage.pstpl
File dei modelli
I seguenti file dei template sono utilizzati per produrre le tue indagini pubbliche e devono esistere nella cartella di ogni nuovo modello creato:
- startpage.pstpl: produce l'inizio di ogni pagina html. Comincia con il tag "<head> e non dovrebbe contenere il tag "<html>", poiché questo 'vero inizio' di ogni standard pagina html è scritto dallo script. Assicurati che il tuo file startpage.pstpl contenga un tag "<body>" perché, anche se alcuni browser non richiedono una stretta aderenza agli standard W3 HTML, lo script LimeSurvey ha bisogno di trovare un tag "<body>" per eseguire alcuni elementi JavaScript. Non è richiesto che vengano utilizzate particolari parole chiave nel file startpage.pstpl, però potresti desiderare di inserire il {SURVEYNAME} nel titolo. Il file startpage.pstpl può contenere del codice che terminerà nel corrispondente file endpage.pstpl. I due file appena citati racchiudono qualsiasi altra pagina utilizzata da LimeSurvey.
- survey.pstpl: questo modello è il secondo utilizzato nella maggior parte delle pagine e fornisce uno spazio in cui inserire il nome e la descrizione dell'indagine. A differenza del file startpage.pstpl, questo non ha un corrispondente file di chiusura; di conseguenza tutti i tag devono essere aperti e chiusi all'interno del file (per esempio: non lasciare una tabella aperta qui perché non verrebbe chiusa in nessun altro file).
- welcome.pstpl: questo modello è utilizzato solo nella 'Pagina di benvenuto' (la quale è anche la pagina principale nelle indagini 'all in one'). Puoi usarlo per mostrare il testo di benvenuto e altre informazione che dovrebbero essere fornite come introduzione. Così come il file 'survey.pstpl', non c'è un corrispondente template di chiusura, quindi tutti i tag aperti vanno chiusi all'interno di questo stesso file.
- startgroup.pstpl: questo modello consente di ottenere un riassunto sulle domande contenute in un gruppo. Ha un corrispondente modello di chiusura, 'endgroup.pstpl', che può essere utilizzato per chiudere qualsiasi tag aperto in questo file.
- groupdescrption.pstpl: questo modello è utilizzato per visualizzare la descrizione di un gruppo. Si noti che nelle impostazioni dell'indagine si può decidere se la descrizione deve comparire o meno. Nel caso in cui si decida di non visualizzarla, questso modello non è incluso.
- question.pstpl: questo file contiene le sezioni dedicate alle domande, risposte e ai testi di aiuto del sondaggio. Nelle indagini "group by group" e "all in one" questo modello è ciclicamente ripetuto per ogni domanda. Non c'è un corrispondente modello di chiusura quindi tutti i tag devono essere chiusi.
- question_start.pstpl: contiene i singoli elementi che si trovano all'inizio di una domanda. è incluso nel file 'question.pstpl' tramite la keyword {QUESTION}. Viene inserito per permettere ai designer dei modelli un maggior controllo sul layout di una domanda. Questo template si colloca all'esterno del normale sistema di modellazione ed è stato sostituito (a partire da LS 1.87). Tutte le keyword di questo modello ora sono disponibili direttamente in 'question.pstpl'. NOTA: i template che usano 'question_start.pstpl' funzioneranno ancora per un paio di versioni di LS 1.X.
- completed.pstpl: questo modello compare nella pagina finale, quando le risposte sono salvate e il questionario è concluso. Può essere utilizzato per visualizzare un "forwarding link" come settato nelle impostazioni dell'indagine.
- endgroup.pstpl: questo file chiude i gruppi, e può essere utsato per chiudere i tag ancora aperti del modello 'startgroup.pstpl'.
- navigator.pstpl: questo file contiene i pulsanti per navigare attraverso l'indagine: "Avanti", "Indietro", "Invia", "Ultimo", "Pulisci tutto". Viene richiamato in tutte le pagine, ad eccezione di 'completed.pstpl'.
- printanswers.pstpl: contiene il wrapper HTML per la versione stampabile del questionario.
- print_group.pstpl: questo file corrisponde alla versione stampabile di 'startgroup.pstpl' e 'endgroup.pstpl'.
- print_questions.pstpl: questo file corrisponde alla versione stampabile di 'question.pstpl'.
- print_survey.pstpl: questo file corrisponde alla versione stampabile di 'survey.pstpl'.
CSS e JavaScript
Due sono i file che sono sempre utilizzati nei modelli: template.css per CSS e template.js per JavaScript.
- {TEMPLATECSS}: aggiunge linee per il fil css di default, template.css, e per il linguaggio rtl, template-rtl.css.
- {TEMPLATEJS}: aggiunge i file di default di javascript, template.js e tutti gli altri file js di cui LimeSurvey ha bisogno.
Utilizzare Bootstrap
LimeSurvey integra Bootstrap 3, quindi poi creare tutti i tuoi modelli con le ben documentate classi Bootstrap. Per maggiori informazioni si faccia riferimento alla documentazione Bootstrap.
Un altro plugin incluso è Awesome-Bootstrap-Checkbox. Con questo puoi utilizzare le color-classes di Bootstrap (info, warning, danger, etc.) anche con il suffisso "-checkbox" o "-radio", definendo come preferisci checkbox e radio.
Sostituire il css o javascript di default
Some questions use specific files for Javascript or CSS. If you need to replace a function, use a cascading system. For javascript function, the last function read is the function used.
Other Template Files
The privacy.pstpl, invitationemail.pstpl, reminderemail.pstpl, and confirmationemail.pstpl are no longer used by LimeSurvey and defaults are instead set in the applicable language files. The email messages can now be edited on a survey by survey basis.
Standard Pages
There are ten standard pages that a survey participant may see in the course of taking or accessing the LimeSurvey application. Each is constructed from a number of common Template files from the Template specified in the settings of the survey. The table below indicates which template files are used in constructing each of these pages.
| Survey Pages/ Template Files |
Survey List |
Welcome | Question | Completed | Clear All | Register | Load | Save | Print Answers |
Print Survey |
|---|---|---|---|---|---|---|---|---|---|---|
| SurveyList | ||||||||||
| Welcome | ||||||||||
| Privacy | ||||||||||
| Navigator | ||||||||||
| Survey | ||||||||||
| StartGroup | ||||||||||
| GroupDescription | ||||||||||
| Question* | ||||||||||
| EndGroup | ||||||||||
| Assessment | ||||||||||
| Completed | ||||||||||
| ClearAll | ||||||||||
| Register | ||||||||||
| Load | ||||||||||
| Save | ||||||||||
| PrintAnswers | ||||||||||
| Print Survey | ||||||||||
| Print Group | ||||||||||
| Print Question | ||||||||||
| StartPage EndPage Template.css |
*NOTE: In version 1.90+, this replaces question.pstpl AND question_start.pstpl. If you are using an old custom template, you need to add the following line to the beginning of question.pstpl:
<div {QUESTION_ESSENTIALS} class="{QUESTION_CLASS}{QUESTION_MAN_CLASS}{QUESTION_INPUT_ERROR_CLASS}">
And then add the corresponding closing tag to the end of question.pstpl:
</div>
*NOTE: In version 1.91 and earlier, LimeSurvey js files are not included in the template. In version 2, you have to use {TEMPLATEJS} in one of your template file to add the link to the js file. You can add it in startpage.pstpl or in endpage.pstpl. You can remove the {TEMPLATEURL}/template.js line and you have to replace with {TEMPLATEJS} to update a personal template.
The File Control Section
In the "file control" window on the left, you can click on one of the template files that is used to compile the page. You can see the Screen part, JavaScript, and CSS files. The HTML code for that file will then appear in the "Now editing" window in the center. If the template is editable (determined by directory permissions) you can then make any changes and save them.

The "Other files" window shows a list of all other files from the template directory. You can use the right side to upload and select image files (your pics, logos,...) or other files needed to create your template.
Instead of using a link for each picture, utilize the field string {TEMPLATEURL}. So, instead of:
img src='/limesurvey/templates/yourtemplate/files/mypicture.jpg'You can use (New in 2.50 ):
img src='{TEMPLATEURL}files/mypicture.jpg'In LimeSurvey versions before 2.50 use:
img src='{TEMPLATEURL}mypicture.jpg'A "sample" of the template page you are editing will be visible in the bottom of the screen. There is no way to delete a template from the template editor. This must be done by accessing the underlying directory and deleting manually the files from there. You also have the possibility to select different screen resolutions in order to better evaluate the feel and look of the template.
Template files location
LimeSurvey stores each of the 'standard' templates in their own distinct sub-directory within the /templates directory that is kept in the public directory with the other LimeSurvey public files. Customized user templates are stored in the /upload/templates directory.
There should ALWAYS be a "default" directory in the templates directory. This template is used by default and as a fall-back if a template folder doesn't exist, or can't be found. It comes installed by default.
You can use any image files that you upload into the template management area with the help of this syntax:
{TEMPLATEURL}filename.xyz
Styling questions with CSS
Styling of questions in CSS has become much easier. Each question type has now a unique class. The mandatory questions have an additional mandatory class. For example, for a non-mandatory question:
<div id="question5" class="gender">
...
</div>
and if the question is mandatory:
<div id="question5" class="gender mandatory">
...
</div>
and if the question is mandatory, but the user didn't answer it or if there is validation on a question:
<div id="question5" class="gender mandatory input-error">
...
</div>
and if the question has validation applied, but the user hasn't answered correctly:
<div id="question6" class="text-short input-error">
...
</div>
Global classes for question part
These classes are used for each question type. Some question types use only one or two classes, while others may use much more.
| Class name | Part | Question type | Examples | Note | |
|---|---|---|---|---|---|
| .question (Obsolete since 3.0) | All question block | All question type | <p class="question">, <ul class="question">, <table class="question"> | ||
| .ls-answers (New in 3.0 ) | All question block | All question type | <div class="ls-answers ">, <ul class="ls-answers ">, <table class="ls-answers"> | ||
| .subquestions-list | List of subquestion | Multi choice question, array question type | <ul class="subquestions-list">, <table class="subquestions-list"> | .questions-list is used too | |
| .answers-list | List of answers | Single choice question, array question type, Multi input text question | <ul class="answers-list">, <table class="answers-list"> | ||
| .answer-item | The answer part: one answer | Single choice question, array question type, Multi input text question | <li class="answer-item">, <td class="answer-item"> | ||
| .noanswer-item | The answer part for no answer | Single choice question, array question type | <li class="noanswer-item">, <td class="noanswer-item"> | No answer is an answer too, then have double class noanswer-item and answer-item | |
| .question-item | The question part: one question | Multi text question, array question type | <li class="question-item">, <tr class="question-item"> | Some answers are questions too. Then we have a lot of class="question-item answer-item" | |
| .button-list | A list of button | Yes no and Gender question | <ul class="button-list"> | ||
| .button-item | The answer part with a button | Yes no and Gender question | <li class="button-item"> | ||
| .checkbox-list | A list of checkbox | Multi choice question, array number (checkbox) question type | <ul class="checkbox-list">, <tr class="checkbox-list"> | Some question types use multi-list class, like checkbox with comment: class="checkbox-list text-list" | |
| .checkbox-array (New in 3.0 ) | A array of checkbox | Array (numbers) with checkbox option | <table class="checkbox-list"> | ||
| .checkbox-item | The answer part with a checkbox | Multi choice question, array number (checkbox) question type | <li class="checkbox-item">, <td class="checkbox-item"> | ||
| .radio-list | A list of radio item | Single choice question, array question type (each row) | <ul class="radio-list">, <tr class="radio-list"> | ||
| .radio-array (New in 3.0 ) | A array of radio item | Array question type | <table class="radio-array"> | ||
| .radio-item | The answer part with a radio | Single choice question, array question type | <li class="radio-item">, | ||
| .text-list | A list of text input | Multi text question type, array of text | <ul class="text-list">, <tr class="text-list"> | ||
| .text-item | The answer part of a text input | Multi text question type, array of text | <li class="text-item">, | ||
| .numeric-list | A list of text input with numeric only answer | Multi numeric question type, array of number | <ul class="text-list numeric-list">, <tr class="text-list numeric-list"> | ||
| .number-list | A list of text input with numeric only answer (each row) | Multi numeric question type, array of number | <ul class="text-list numeric-list">, <tr class="text-list numeric-list"> | ||
| .number-array (New in 3.0 ) | The answer part of a numeric input | Array of number | <table class="number-array"> | ||
| .select-list (Obsolete since 2.50) | A list of select | Array numbers, Dual scale array (select) | <table class="select-list"> | ||
| .dropdown-list (New in 2.50 ) | A list of select | Array numbers, Dual scale array (select) (each row) | <table class="dropdown-list"> | ||
| .dropdown-array (New in 3.0 ) | A array of dropdown | Array numbers, Dual scale array (select) | <table class="dropdown-array"> | ||
| .select-item (Obsolete since 2.50) | The answer part of a select | Array numbers, Dual scale array (select), single choice with select | <p class="select-item">, <td class="select-item"> | ||
| .dropdown-item (New in 2.50 ) | The answer part of a select | Array numbers, Dual scale array (select), single choice with select | <p class="dropdown-item">, <td class="dropdown-item"> | ||
| .hide (Obsolete since 3.0) | Used for accessibility: hidden with css but read by screenreader, since 2.50 : you can use sr-only from bootstrap | Short text question | <label class="hide"> | Can be used for other purposes | |
| .ls-js-hidden (New in 3.0 ) | Used for part to be hidden if javascript is activated | Button for example | <div class="ls-js-hidden"> | LimeSurvey core used it, but you can use it too in your template | |
| .ls-js-hidden-sr (New in 3.0 ) | Used for accessibility: hide it if js is activated, but always show if user use a screenreader | Button for example | <a class="ls-js-hidden-sr"> | Button | |
| .ls-no-js-hidden (New in 3.0 ) | Used for part to be hidden if javascript is not activated | Link | <a class="ls-no-js-hidden"> | LimeSurvey core used it for inactive link if javascript is not activated | |
| .ls-label-xs-visibility (New in 3.0 ) | Label to be hidden in big screen, but show with little screen (with no more table) and to screenreader | label | <label class="ls-no-js-hidden"> | Used for label inside table cell of array question type | |
| .ls-input-group-extra (New in 3.0 ) | Same usage of boostrap input-group-addon, but without the border and the background. | right suffix | <div class="ls-input-group-extra"> | Used for right and left suffix (global) | |
| .checkbox (Obsolete since 3.0) | input[type=checkbox] | Question with checkbox | <input type="checkbox" class="checkbox"> | With modern browser: not needed, but some old browser need this | |
| .radio (Obsolete since 3.0) | input[type=radio] | Question with radio | <input type="radio" class="radio"> | With modern browser: not needed, but some old browser need this | |
| .text | input[type=text] | Question with input text, or textarea | <textarea class="text"> | ||
| .answertext | Array question type | Answer part of array question type | <th class="answertext"> | ||
| .col-answers | Array question type | Column of answers | <col class="col-answers"> | ||
| .odd .even (Obsolete since 2.50) | Array question type | Alternation for column | <col class="odd"> | ||
| .array1 .array2 (Obsolete since 3.0) | Array question type | Alternation for line | <tr class="array1"> | ||
| .ls-odd .ls-even (New in 3.0 ) | Array question type | Alternation for subquestion and Y axis | <tr class="ls-odd"> |
Some example of question part with classes
Text-short question type:
<p class="question answer-item text-item ">
<label class="hide label" for="answerSGQA">Answer</label><input type="text" value="" id="answerSGQA" name="SGQA" size="50" class="text  empty">
</p>
Multiple short text
<ul class="subquestions-list questions-list text-list">
  <li class="question-item answer-item text-item" id="javatbdSGQA">
    <label for="answerSGQA">Some example subquestion</label>
     <span><input type="text" value="" id="answerSGQA" name="SGQA" size="20" class="text empty"></span>
  </li>
</ul>
Array question type
<table class="question subquestion-list questions-list ">
<caption class="hide read">Some explanation for accessibility.</caption>
<colgroup class="col-responses">
<col width="50%" class="col-answers">
<col width="25%" class="odd">
<col width="13.3%" class="col-no-answer even">
</colgroup>
<thead>
<tr class="array1 dontread">
<td> </td>
<th>1</th>
<th>No answer</th>
</tr>
</thead>
<tbody>
<tr class="array2 answers-list radio-list" id="javatbdSGQ">
<th width="20%" class="answertext">Some example subquestion
</th>
<td class="answer_cell_001 answer-item radio-item">
<label for="answerSGQA" class="hide read">1</label>
<input type="radio" value="1" id="answerSGQA" name="SGQA" class="radio">
</td>
<td class="answer-item radio-item noanswer-item">
<label for="answerSGQA" class="hide read">No answer</label>
<input type="radio" value="" id="answerSGQA" name="SGQA" class="radio">
</td>
</tr>
</tbody>
</table>The full list of question classes
| Question Type | Question Class | Question ID |
| 5 point choice | .choice-5-pt-radio | 5 |
| Array (10 point choice) | .array-10-pt | B |
| Array (5 point choice) | .array-5-pt | A |
| Array (Flexible Labels) dual scale | .array-flexible-duel-scale | 1 |
| Array (Increase, Same, Decrease) | .array-increase-same-decrease | E |
| Array (Multi Flexible) (Numbers) | .array-multi-flexi | : |
| Array (Multi Flexible) (Text) | .array-multi-flexi-text | ; |
| Array (Yes/No/Uncertain) | .array-yes-uncertain-no | C |
| Array (flexible labels) | .array-flexible-row | F |
| Array (flexible labels) by column | .array-flexible-column | H |
| Boilerplate question | .boilerplate | X |
| Date | .date | D |
| Equation | .equation | * |
| Gender | .gender | G |
| Huge free text | .text-huge | U |
| Language switch | .language | I |
| List (dropdown) | .list-dropdown | ! |
| List (radio) | .list-radio | L |
| List with comment | .list-with-comment | O |
| Long free text | .text-long | T |
| Multiple numerical input | .numeric-multi | K |
| Multiple options | .multiple-opt | M |
| Multiple options with comments | .multiple-opt-comments | P |
| Multiple short text | .multiple-short-txt | Q |
| Numerical input | .numeric | N |
| Ranking | .ranking | R |
| Short free text | .text-short | S |
| Yes/No | .yes-no | Y |
The full list of validation classes
These apply to the help and/or validation tip messages so that each type can be individually styled.
The .hide-tip option and .input-error options interact by default so that you can have validation tips hidden. However, they do appear when there are validation errors and disappear again when those errors are rectified.
All of these are designed to eliminate the need for pop-up alert messages. Instead, tips can appear/disappear as needed and are color-coded to indicate whether the answers pass the validation criteria.
Furthermore, when you first visit a page that has unmet validation criteria, you can color-code the tips in a pleasing color to show which validation criteria have not been met yet; then re-display the page using a harsher color if the person submits the page with lingering validation errors.
| Purpose | CSS Class | Description |
| Mandatory | .mandatory | the question is mandatory |
| User input error | .input-error | the question had at least one validation error |
| Hide Tip | .hide-tip | added if you use the hide_tip option |
| defrault type | .em_default | for default tip set ( numeric value etc …) |
| Num answers | .em_num_answers | for for min_answers and max_answers |
| Value range | .em_value_range | for min/max_num_value_n and multiflexible_min/max |
| Sum range | .em_sum_range | for min/max/equals_num_value |
| Regex validation | .em_regex_validation | for regular-expression validation of the question |
| Question-level validation function | .em_q_fn_validation | for the em_validation_q option |
| Subquestion-level validation function | .em_sq_fn_validation | for the em_validation_sq option |
| Other comment mandatory | .em_other_comment_mandatory | for other_comment_mandatory option - shows when "other" is selected but associated comment is missing. |
Importing styles into your custom template
The custom question styles are near the bottom of each template's CSS file and start with:
/* --------------------------- START: Question styles ------------------------------ */
If you're styling your own custom template, you should be able to copy everything after the above one from templates/default/template.css (for table-based layouts) or /templates/limespired/template.css (for CSS-based layouts) into your own style sheet without any impact on your other styles.
Internet Explorer conditional style sheets
Because of the marked discrepancies in rendering between IE6 & IE7 and the other browsers, there are special IE conditional style sheets included for each template.
<!--[if IE]>
  <link rel="stylesheet" type="text/css" href="{TEMPLATEURL}IE_fix_all-versions.css" />
<![endif]-->
<!--[if lt IE 7]>
  <link rel="stylesheet" type="text/css" href="{TEMPLATEURL}IE_fix_older-than-7.css" />
<![endif]-->
<!--[if IE 8]>
		<link rel="stylesheet" type="text/css" href="{TEMPLATEURL}ie_fix_8.css" />
<![endif]-->
You should include the above code within your startpage.pstpl and copies of both the IE style sheets from either /templates/default/ or /templates/limespired for Tables base layout and CSS based layout respectively.
Alternative solution for Internet explorer
You can put a conditional class for body in startpage.pstpl and use this class in your template.css. This method is used in the citronade template (Obsolete since 2.06). Adding a js / no-js class to have javascript / no javascript system.
<!--[if lt IE 7 ]> <body class="lang-{SURVEYLANGUAGE} {SURVEYFORMAT} ie ie6 ielt7 ielt8 ielt9 no-js"> <![endif]-->
<!--[if IE 7 ]> <body class="lang-{SURVEYLANGUAGE} {SURVEYFORMAT} ie ie7 ielt8 ielt9 no-js"> <![endif]-->
<!--[if IE 8 ]> <body class="lang-{SURVEYLANGUAGE} {SURVEYFORMAT} ie ie8 ielt9  no-js"> <![endif]-->
<!--[if IE 9 ]> <body class="lang-{SURVEYLANGUAGE} {SURVEYFORMAT} ie ie9 no-js"> <![endif]-->
<!--[if gt IE 9]><!--><body id="body" class="lang-{SURVEYLANGUAGE} {SURVEYFORMAT} no-js"><!--<![endif]-->
<script type='text/javascript'>/*<![CDATA[*/(function(H){ H.className=H.className.replace(/\bno-js\b/,'js') })(document.getElementsByTagName('body')[0]);/*]]>*/</script>
And in template.css use:
.ie6{/*specific for internet explorer 6*/}
.ielt8{/*specific for internet explorer 6 and 7*/}
.ie{/*specific for all internet explorer */}
Right-to-Left (RTL) Languages and justify
The text editor within LimeSurvey is able to format RTL text. However, the editor itself shows the RTL language in a left to right format when justified. This is just an editor display issue. The RTL and justified question or text will display correctly from right to left, even when justified, in your survey or on preview.
Keywords
Keywords within a template file get replaced by the current survey information. They are surrounded by curly brackets, for example: {SURVEYNAME}.
The following strings will be replaced by LimeSurvey when parsing the template file and presenting it to survey users. These field strings will work on almost every template except for the 'Completed Page'. (Most of these strings can be found in the common.php file. If it's not there, look in the index.php file.)
| Keyword | Template files | Description |
|---|---|---|
| {SURVEYNAME} | All Files | The survey title |
| {SURVEYDESCRIPTION} | All Files | The survey description |
| {WELCOME} | All files (mainly for welcome.pstpl) | The survey 'welcome' text |
| {PERCENTCOMPLETE} | survey.pstpl | A small graph showing the percentage of the survey completed |
| {GROUPNAME} | startgroup.pstpl, groupdescription.pstpl, endgroup.pstpl | Displays the current group name |
| {GROUPDESCRIPTION} | startgroup.pstpl, groupdescription.pstpl, endgroup.pstpl | Displays the current group description |
| {NUMBEROFQUESTIONS} | welcome.pstpl | Displays the total number of questions in the survey (just the number) |
| {THEREAREXQUESTIONS} | welcome.pstpl | Displays the sentence "There are X questions in this survey" - from the relevant language file. The X is replaced with the number of questions. Note that this will also work appropriately for singular or plural. If there is only 1 question, it will print "There is 1 question in this survey". |
| {CHECKJAVASCRIPT} | All files (mainly for welcome.pstpl) | Warning message when end-user browser have javascript disabled |
| {QUESTION} | Question.pstpl | (Has been superseeded as of LS1.87) Displays the current question text (The format of {QUESTION} can customised by editing 'question_start.pstpl') Use the following: {QUESTION_TEXT}, {QUESTION_MANDATORY}, {QUESTION_HELP}, {QUESTION_MAN_MESSAGE}, {QUESTION_VALID_MESSAGE}, {QUESTION_INPUT_ERROR_CLASS}, and appropriate wrapping HTML instead of {QUESTION} |
| {ANSWER} | question.pstpl, print_question.pstpl | presents the answer form for the current question |
| {SGQ} | question.pstpl, question text | Can be used in the question text itself to reference the input field of the question dynamically by displaying the Survey-Group-Question id for the current question. (as of svn build 9755) |
| {QUESTIONHELP} | question.pstpl, print_question.pstpl | Displays help text (predefined tip for question type) for the current question |
| {QUESTION_CLASS} | question.pstpl, print_question.pstpl | unique class for each question type. (To be included in the question's wrapping tag.) |
| {QUESTION_CODE} | question.pstpl, print_question.pstpl | Displays the current question code |
| {QUESTION_ESSENTIALS} | question.pstpl | the question ID and (if a question is conditional), 'style="display:none;"'. (To be included in the question's wrapping tag.) |
| {QUESTION_HELP} | question.pstp, question_start.pstpl | Displays the user defined help text for the current question |
| {QUESTION_TYPE_HELP} | print_question.pstp | Displays the user defined help text for the current question |
| {QUESTION_INPUT_ERROR_CLASS} | question.pstp, question_start.pstpl | Provides a class if there was user input error |
| {QUESTION_ID} | print_question.pstp | Provides a unique ID for each question to allow styling for specific questions |
| {QUESTION_TEXT} | question.pstp, print_question.pstp, question_start.pstpl | Displays the text for the current question |
| {QUESTION_MANDATORY} | question.pstp, print_question.pstp, question_start.pstpl | Displays the translated 'Mandatory' text for the current question |
| {QUESTION_MAN_CLASS} | question.pstpl, print_question.pstpl | class if a question is mandatory. (To be included in the question's wrapping tag.) |
| {QUESTION_MAN_MESSAGE} | question.pstp, print_question.pstp, question_start.pstpl | Displays the translated 'Mandatory' help message text for the current question |
| {QUESTION_NUMBER} | print_question.pstpl | Incremental count of questions. |
| {QUESTION_VALID_MESSAGE} | question.pstp, print_question.pstp, question_start.pstpl | Displays the translated valid help message text for the current question |
| {QUESTION_SCENARIO} | print_question.pstp | Prints out the 'scenario' text for conditional questions. |
| {NAVIGATOR} | navigator.pstpl | Displays navigation buttons (next, prev, last) |
| {CLEARALL} | All files (but intended for navigator.pstpl) | Displays the "Exit and Clear Results" link |
| {COMPLETED} | completed.pstpl | Displays the 'completed' message for registering, will change depending on whether the attribute_1 and attribute_2 fields are set. |
| {URL} | completed.pstpl | Displays the survey 'url' and 'url text' |
| {PRIVACYMESSAGE} | privacy.pstpl | The privacy message is shown if you set your survey to be anonymous. The text can be edited/translated in the language files. This can also be changed manually by editing the privacy.pstpl template you wish to use. |
| {TEMPLATEURL} | All Files | The URL to the current template location (useful for referencing image files in your template) |
| {SURVEYRESOURCESURL} | All Files | The URL to the current uploaded files for this survey location (useful for referencing image files in your question, group, ....) |
| {SUBMITCOMPLETE} | endpage.pstpl | The statement (from the language files) that tells the user they have completed the survey, and to press the "Submit" button |
| {SUBMITREVIEW} | survey.pstpl | The statement (from the language files) that tells the user they can review/change the answers they have made by clicking "<< prev" |
| {SAVEDID} | All Files | Displays 'Response ID' of user |
| {QUEXMLPDF} | All Files | Displays button to export the queXML PDF of questionnaire including answers entered up until the point that has been completed in the survey. |
| {TOKEN:FIRSTNAME} | All Files | ***If survey answers are NOT ANONYMOUS - gets replaced with the users first name from the tokens table |
| {TOKEN:LASTNAME} | All Files | ***If survey answers are NOT ANONYMOUS - gets replaced with the users last name from the tokens table*** |
| {TOKEN:EMAIL} | All Files | ***If survey answers are NOT ANONYMOUS - gets replaced with the users email from the tokens table*** |
| {TOKEN:ATTRIBUTE_1} | All Files | ***If survey answers are NOT ANONYMOUS - gets replaced with the users attribute_1 from the tokens table*** |
| {TOKEN:ATTRIBUTE_2} | All Files | ***If survey answers are NOT ANONYMOUS - gets replaced with the users attribute_2 from the tokens table*** |
| {ANSWERSCLEARED} | Preferably in navigator.pstpl | The "Answers Cleared" statement from the language files |
| {RESTART} | clearall.pstpl | URL to restart the survey |
| {REGISTERERROR} | register.pstpl | Shows any error messages in the register page (ie: "You must include an email address") |
| {REGISTERMESSAGE1} | register.pstpl | The statement "You must be registered to complete this survey" from the language files |
| {REGISTERMESSAGE2} | register.pstpl | Details about registering from the language files |
| {REGISTERFORM} | register.pstpl | The actual form for registering, will change depending on whether the attribute_1 and attribute_2 fields are set. |
| {SAVE} | Works suitable on navigator.pstpl | Displays the 'Save your responses so far' button to offer the user to save and come back later to continue the survey. If the Save option is deactivated in the survey properties the tag will not be shown and ignored. |
| {LANGUAGECHANGER} | survey.pstpl | Displays a switch in multilingual surveys to change the question. |
Input/Buttons
Each "input" type in a survey has been given its own class name, so that you can add CSS to your "startpage.pstpl" file and have some control over the appearance of form buttons and inputs. These class names are as follows:
- submit (Submit Buttons)
- text (Text Inputs - for short free text, date, and numerical type)
- answertext (Text of answers)
- radio (Radio Buttons)
- checkbox (Check Boxes)
- select (Select / List Boxes)
- textarea (Large text inputs - for long free text)
- clearall (The "Exit and Clear Survey" link)
- rank (The rank style question. Doesn't set the colour of the select box or the text boxes, but it does allow the changing of background colour, text colour, size etc., for the rest of the ranking question)
- graph (The "percentage completed" graph table)
- innergraph (The table inside the graph table - this contains the 0% and 100% text. Use this for changing the size of this text)
- question (General settings for any question that is displayed within a table. Generally, you should use this to make sure that their font size and color is the same as you have used elsewhere as a default)
- mandatory (Mandatory questions)
- input-error (User input error - for if a user has made a mistake with a mandatory question or question with validation)
- array1 and array2 (These two styles are cycled when presenting the range of answers for an array type question. This allows you to set an alternating background color for these question types. Array1 is also used for the column headings in these question types)
- errormandatory (Sets the color and style of the "This question is mandatory" error message)
- warningjs (Sets the color and style of the warning message displayed if the participant's browser has javascript disabled)
There are also some elements that can be accessed using the ID of the element (#ID in CSS):
- surveycontact (The contact message shown on the start page)
- tokenmessage (used for messages inside the survey, e.g. the session expired error message)
Because you can edit all the HTML aspects, there's no reason to surround your templates with a
<div class='new_name'></div>
and then define a css for that new_name class.
Styling the progress bar
The progress bar appearance can be modified with CSS.
To change the background color of the bar, add something like the following to the end of your template.css file:
#progress-wrapper .ui-widget-header {
 background-color: #3300FF;
}
To change the border color of the bar, add something like the following to the end of your template.css file:
#progress-wrapper .ui-widget-content,
#progress-wrapper .ui-widget-header {
 border: 1px solid #FF0000;
}
Advanced Features Available to Developers
LimeSurvey has integrated some user-made patches that permits some special changes. These very advanced features (generally) require changes to the underlying code base of LimeSurvey and should be done carefully in order not to introduce security holes.
Support for your own Javascript functions
Some users may need to run Javascript on the survey pages, but calling checkconditions() in the BODY element made it impossible to do so. This call has been replaced with a small JavaScript function in the HEAD that sniffs for the existence of checkconditions() and template_onload() before calling them. In this way, a template author can create his or her own template_onload() function in the HEAD that replaces the default one.
- Disable XSS filter - in Global settings -> Security, set "Filter HTML for XSS" to No.
- Enter your script in the source of a question or group description.
Videos on Templates
This video will demonstrate the basic and advanced template functions that are available to all LimeSurvey users. This includes changing the appearance of certain forms and inserting custom graphics. Additionally, it will thoroughly walk you through on how to edit and preview specific page templates, importing/exporting templates, modify appearance of questions in the CSS, and customizing survey description page.
Video - needed
Tips & Tricks
Some language specific element
If you want to have some language specific sentence in a survey, for example a help at the end of each page, you can add in a .pstl file a sentence and hidding it for other language. If we hide it in the template.css, we can use the pseudo selector :lang, but we use some class for better compatibility.
Below, there are two help sentences, in French and English. Put this on endpage.pstpl:
<div class="fr" lang="fr">Pour de l'aide en direct appelez le 000000</div>
<div class="en" lang="en">For some help, please call 000000</div>
and in template.css:
.lang-fr .en{display:none}
.lang-en .fr{display:none}
Change the layout of the survey page
After editing and saving a template, it applies to a survey list page only if it is selected from the settings of the survey. To make it the default template, go under the General tab located in the Global settings of your LimeSurvey installation and choose the desired template. From now on, all the templates that use the "default" option as template plus the ones that are going to be newly created, will use the newly selected default template.
To use your current template for this page, you have to change the according setting from Global settings. In older versions, this change can be done by editing the $defaulttemplate setting from the config file: copy this setting from config-defaults.php to config.php which overrides config-defaults.php and edit this setting to $defaulttemplate = 'yourtemplatename';.
Import/Export of templates: Mac users
Mac users, please note that the Mac OSX default archive utility may have problems with zip folders "generated on the fly".
A workaround is to unix'es unzip from the command line:
$ unzip template.zip -d template
Archive: template.zip
inflating: template/startpage
inflating: ...
Another workaround is to use scripts in their mac-compiled counterparts.
Replacing the help icon (Obsolete since 2.50)
When a question help text is shown, then an help.gif image is used from the default template folder.
You can replace this image by uploading a new help.gif, help.png or help.jpg in your custom template folder. It will then be automatically used instead of the default help icon.
Replacing an existing logo (New in 2.50 ) (Obsolete since 3.0)
Note: In the default Template of 2.50, there is no preembedded logo. Read further our wiki on how to add your own logo.
1. To edit the logo go to the template.css file which you can find it here:

2. Click the search button to find occurrences of logo related styles and search for logo
3. Edit the main style file.
You will see something similar to:

If you want to change the image, just replace logo.gif with another image link. Example: (logo.png or logo.jpg).
If you want to change the image size, adjust width and height (in pixels) like this:
width:100px; height:100px;
Adding your own logo (Obsolete since 3.0)
1. Find and open the startpage.pstpl template file.

2. After this
<div id="topContainer" class="jumbotron">add this line to startpage.pstpl:
<div class="container"><img id='page_logo' src='{TEMPLATEURL}/files/logo.png' class="clearfix pull-right" /></div>3. To upload your own logo, go to the template editor and upload your logo.

To position your logo, please use one of the following css classes:
- If you want the logo to be placed on the left side:
clearfix pull-left
- If you want the logo to be placed on the right side:
clearfix pull-right
- If you want to center the logo
clearfix center-block
Use the same template with different logos
If you want to use the same template for all surveys and just want to change the logo for each survey, you can use the {SID} placeholder in the template .pstpl file and thereby refer to different images:
<img src="{TEMPLATEURL}files/logoImage-{SID}.png">
Display custom favicon
A favicon is the little icon you see in the browser's address bar, list of bookmarks or tab. You can display your own icon as follows:
- Create a favicon - google will find you lots of free favicon generators.
- Name your new favicon "favicon.ico" and place it in your template /files directory.
- Add the following code to your startpage.pstpl before the </head> tag.
<link rel="shortcut icon" href="{TEMPLATEURL}files/favicon.ico" type="image/x-icon">
<link rel="icon" href="{TEMPLATEURL}files/favicon.ico" type="image/x-icon">
Different appearance for survey-/question-pages
If you want LimeSurvey to change the appearance of every second page (i.e. of even and odd survey pages), you can use .page-odd class in your CSS file to change the appearance of odd pages.
An example from default template of LimeSurvey 1.91+:
.page-odd table.question-group {
 background-color: #D2F2D3;
}
If you do not want differentiate even and odd pages, find all instances of .page-odd in template.css and remove those styles.
Create a vertical separator border for dual scale array
To create a vertical separator border for a dual scale array, you can add the following lines to your template.css-file.
table.question thead td.header_separator,
table.question tbody td.dual_scale_separator
{
   border-right:solid 1px #00A8E1;
}
header_separator is used to adress the separator for the header "td". The "dual_scale_separator" is used to address the separator column in the dual scale array.
Hide the survey contact message shown on the start page/survey list (Obsolete since 3.0)
To hide the "Please contact ..." message on the start page (with the survey list), you can add the following to the $(document).ready function in the template.js of your used design template:
$('#surveycontact').hide(); //Hides the survey contact message
Remove the survey contact message shown on error messages (Obsolete since 3.0)
If you want to remove the survey contact message from error messages, it'll be trickier. You can add the function from below. It calls the $(document).ready function in the template.css of your used design template:
removeContactAdressFromMessage(); //Removes the survey contact message from error messages
and add the following function to your *template.js* file
function removeContactAdressFromMessage()
{
if ($('#tokenmessage').length > 0)
   {
   var oldMessage = $('#tokenmessage').html();
   var indexContact = oldMessage.indexOf('Bitte kontaktieren');
   var newMessage = oldMessage.substr(0, indexContact);
   $('#tokenmessage').html(newMessage);
   }
}
It will probably not work for a survey in English language and has to be extended when used for multilingual surveys. But it's an idea/tip on how to solve this.
How to deal with multilingual question attributes (Obsolete since 2.50)
If you have a multilingual survey and e. g. want to use a different string for the "other" field, this could only be done for the base language (until this feature was added at LimeSurvey 2.0). To work around this, paste in the field to change the label for "other":
<span class="en">New label</span><span class="fr">Nouveau label</span>
Add in the template.css of your template (at /limesurvey/upload/templates/<yourtemplatename>/template.css):
html:lang(en) .fr{display:none}
html:lang(fr) .en{display:none}
Adding your own logo to the survey list (New in 3.0 )
- First please open the theme editor for the theme you like to use.
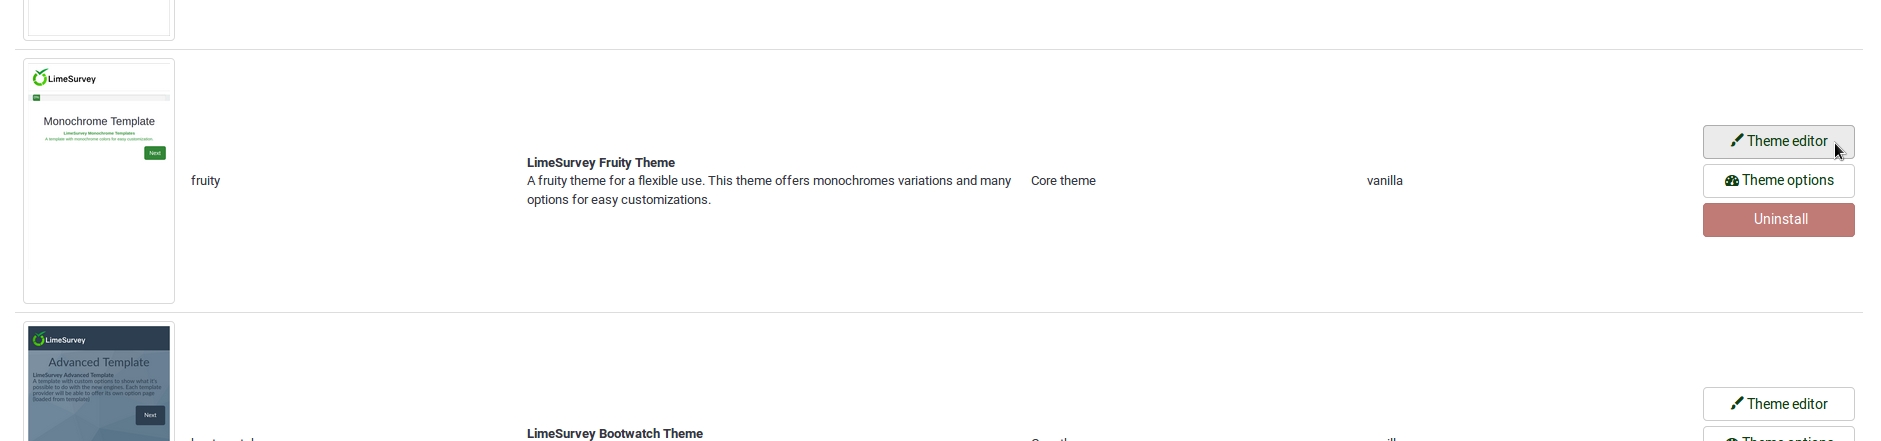
- We recommend to use fruity, it is our best theme currently.
- Then extend the theme and give it a name you will recognize.
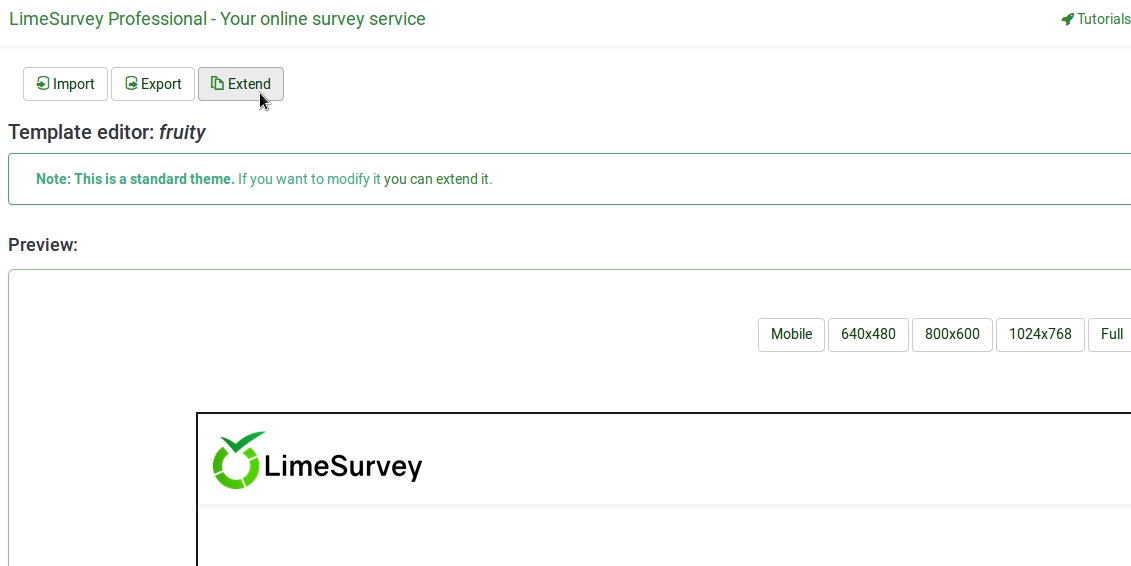
- In the following view you may upload the logo you want to use.
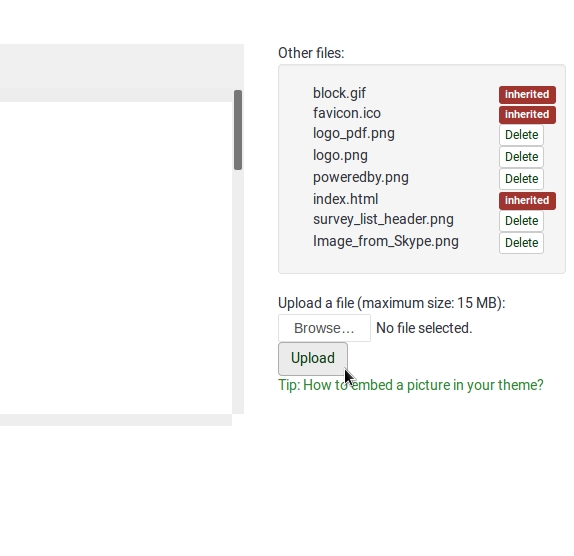
- Select the editor screen `Survey List´ in the Screen dropdown in the top right corner.
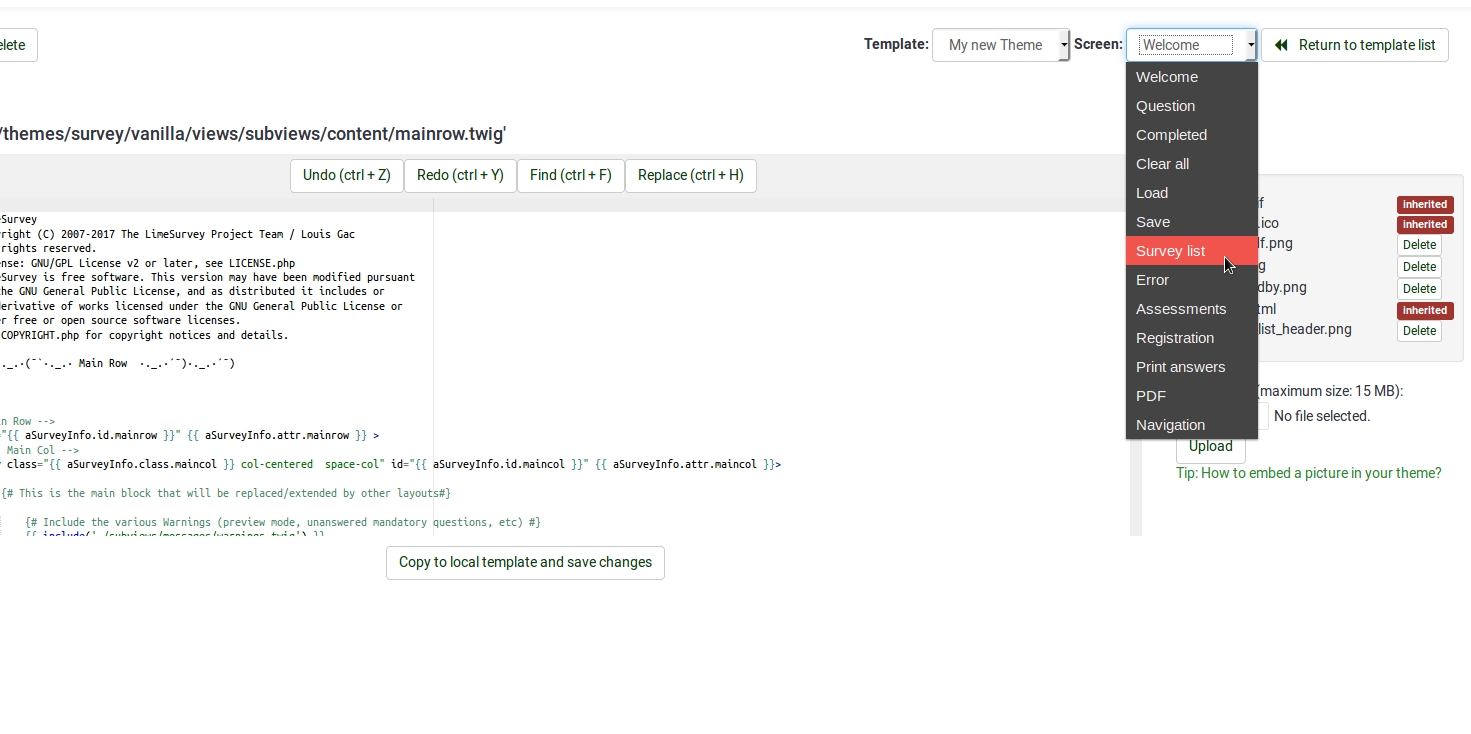
- Then select `layout_survey_list.twig´ in the left side menu.
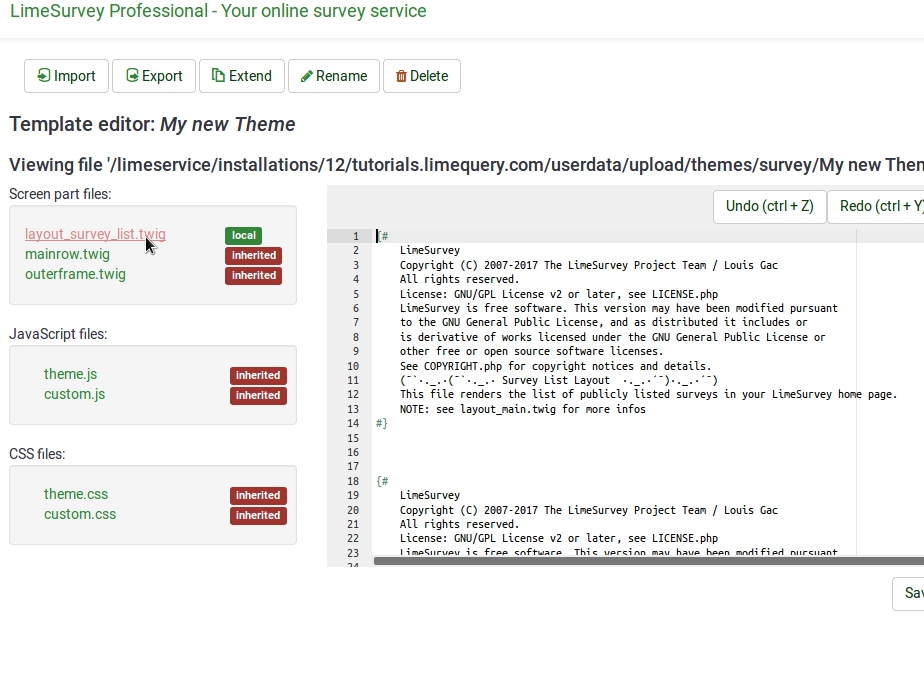
- In the editor scroll to line 126 and change the marked part to the filename of the image you uploaded to the theme before.
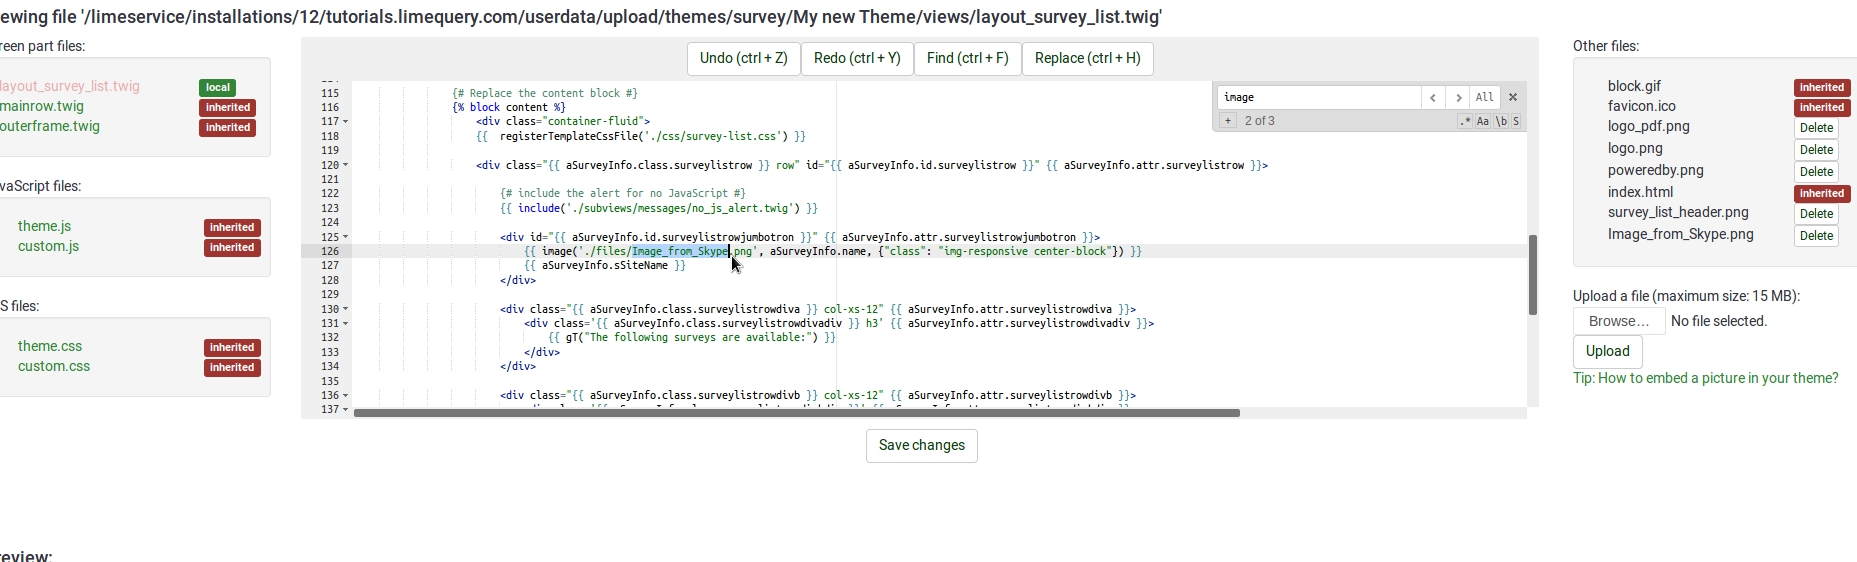
- Save your file.
- Change default theme to your extended theme.
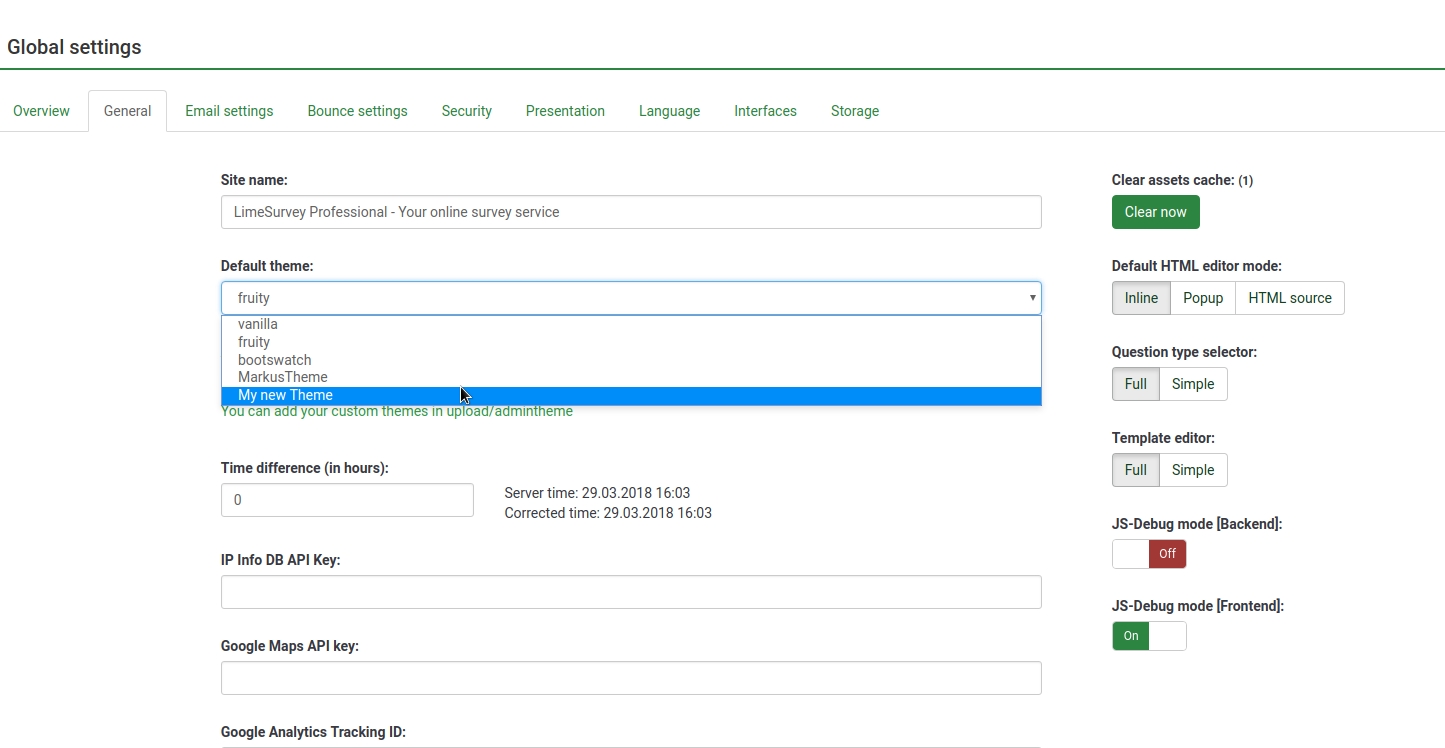


Custom Question Views (New in 3.0 )
As of version 2.5, you can create template-specific custom views for questions and some of their incorporated elements. This is useful if you want to modify the HTML layout of a particular question type for one or more surveys.
- In application/config/config.php, find 'config'=>array and add this line to the array : 'allow_templates_to_overwrite_views'=>1
- In /{your_template}/config.xml, set "overwrite_question_views" to true
- Copy application/views/survey/* to template/{your_view_directory}/survey/
- Note that you only need to copy the files that you intend to modify but the file structure must remain the same as in application/views/survey/
Insert Custom CSS or JavaScript files for template (New in 2.50 )
As of version 2.50, you can use the config.xml file to automatically load plugin files.
- Upload your files to the template /css or /scripts folder
- In /{your_template}/config.xml, add the file paths to the <css> or <js> blocks, something like this:
<css>
	<filename>css/jquery-ui-custom.css</filename>
	<filename>css/bootstrap-slider.css</filename>

	<filename>css/awesome-bootstrap-checkbox/awesome-bootstrap-checkbox.css</filename>
	<filename>css/flat_and_modern.css</filename>

	<filename>css/template.css</filename>

	<filename>css/myCustomPlugin.css</filename>
</css>
<js>
	<filename>scripts/template.js</filename>
	<filename>scripts/bootstrap-slider.js</filename>

	<filename>scripts/myCustomPlugin.js</filename>
</js>