Uczestnicy ankiety
From LimeSurvey Manual
Wprowadzenie
Jest wiele powodów, dla których możesz chcieć zaprosić do wzięcia udziału w twoim badaniu określoną grupę ludzi, śledzić kto ukończył badanie i upewnić się, że każda osoba wzięła udział w badaniu tylko jeden raz. Tokeny mogą zostać utworzone w momencie, gdy badanie zostało aktywowane. Dział tokenów pozwala na:
- Import listy nazw i adresów email uczestników badania (z pliku CSV lub kwerendy LDAP) albo dodawanie/usuwanie pojedynczych uczestników
- Wygenerowanie unikalnych numerów token dla każdego uczestnika
- Wysłanie emaila zapraszającego do wzięcia udziału w badaniu do każdej osoby z twojej listy, grupowo lub indywidualnie
- Wysłanie emaila z przypomnieniem o badaniu do każdej osoby z twojej listy, która jeszcze nie wzięła udziału w badaniu, grupowo lub indywidualnie
- Śledzenie kto z twojej listy uczestników wziął udział w badaniu
- Ograniczenie dostępu osobom, które nie posiadają tokenu, i tym, których token został już wykorzystany
- Edytowanie/zmienianie jakichkolwiek szczegółów w twojej liście uczestników
Kiedy aktywujesz tokeny dla danego badania, jedynymi osobami, które będą miały do niego dostęp będą Ci, którzy otrzymali numer token.
Tokenów można używać tylko w badaniach, które zostały zaprojektowane jako nieanonimowe. Takiego ustawienia dokonuje się podczas tworzenia badania. Jeśli badanie nie jest anonimowe (lub 'śledzone') lista tokenów może zostać użyta do wyszukania odpowiedzi udzielonych w badaniu przez poszczególne osoby. Jeśli badanie jest anonimowe, wówczas nie istnieje żadne połączenie między tabelą tokenów i odpowiedziami.

Can a survey using tokens ensure anonymous responses?
The answer to this question is Yes. Tokens can be used both for anonymous and non-anonymous surveys. This is determined when creating a survey. If a survey is not anonymous (or 'tracked') then the token list can be used to find the responses that an individual has made to the survey. If the survey is anonymous, then no link (technically: foreign key relationship) is available between the tokens table and the responses.
How to activate tokens?
There are two ways to activate tokens:
- After survey activation you will be asked if you want to activate tokens:

- OR you can click on the tokens symbol
 - even before the survey is activated.
The token management tools
Poniżej znajduje się krótkie podsumowanie opcji menu ekranu tokenów:
- Powrót do ustawień głównych: Powrót do głównego ekranu administracyjnego
- Informacje o tokenach: Wyświetla krótkie podsumowanie o tokenach w tabeli (liczba tokenów, ilu tokenom przesłano zaproszenie i ile udzieliło odpowiedzi). Pozwala również na dostęp do funkcji administratora bazy danych (zobacz poniżej). To jest domyślny ekran.
- Wyświetl tokeny: Wyświetla pełną listę uczestników w postaci tabeli tokenów. Z poziomu tego ekranu można edytować, kasować pojedyncze wpisy w tabeli jak również wykonywać wiele innych przydatnych funkcji (zobacz poniżej sekcję wyświetl tokeny)
- Dodaj nowy wpis tokenu: Pozwala na dodanie nowego wpisu (uczestnika badania) w tabeli tokenów
- Importuj tokeny z pliku CSV: Pozwala na zaimportowanie danych z pliku CSV
- Plik powinien być standardowym plikiem CSV (ograniczony przecinkami) z wartościami umieszczonymi pomiędzy podwójnymi znakami cytatu (domyślnie dla Open Office i Excela). Pierwsza linia powinna zawierać nagłówek z informacjami (zostanie usunięty). Dane powinny mieć następującą kolejność:
Pierwsze trzy pola (imię, nazwisko, email) są obowiązkowe! i muszą zawierać wartości (znak "" nie jest wystarczający).
- Duplikaty są identyfikowane po imieniu, nazwisku i adresie email. Jeśli duplikat zostanie znaleziony podczas importowania danych odpowiednia linia jest pomijana, chyba że odznaczono pole Filtruj powielone rekordy.
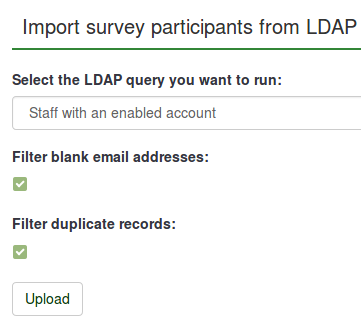
- Importuj tokeny z kwerendy LDAP: Pozwala na import danych z kwerendy LDAP (przetestowano na openLdap ale powinno działać na jakichkolwiek kwerendach LDAP włączając ActiveDirectory)
- Eksportuj tokeny do pliku CSV: Tworzy standardowy (ograniczony przecinkami) plik CSV, zawierający kompletną listę uczestników twojej aktualnej tabeli tokenów w postaci:
- Generuj tokeny: Tworzy unikalne numery token dla wszystkich uczestników w tabeli tokenów, którzy jeszcze nie posiadają swojego numeru
- Wyślij zaproszenie: Wysyła masowe emaile z zaproszeniami do wszystkich uczestników w tabeli tokenów, którym jeszcze nie wysłano zaproszenia.
- Wyślij przypomnienie: Wysyła masowe emaile z przypomnieniem o badaniu do wszystkich uczestników w tabeli tokenów, którzy jeszcze nie ukończyli badania, ale którzy otrzymali już swoje pierwsze zaproszenie.
Editing/adding a token
A typical token entry contains the following fields:
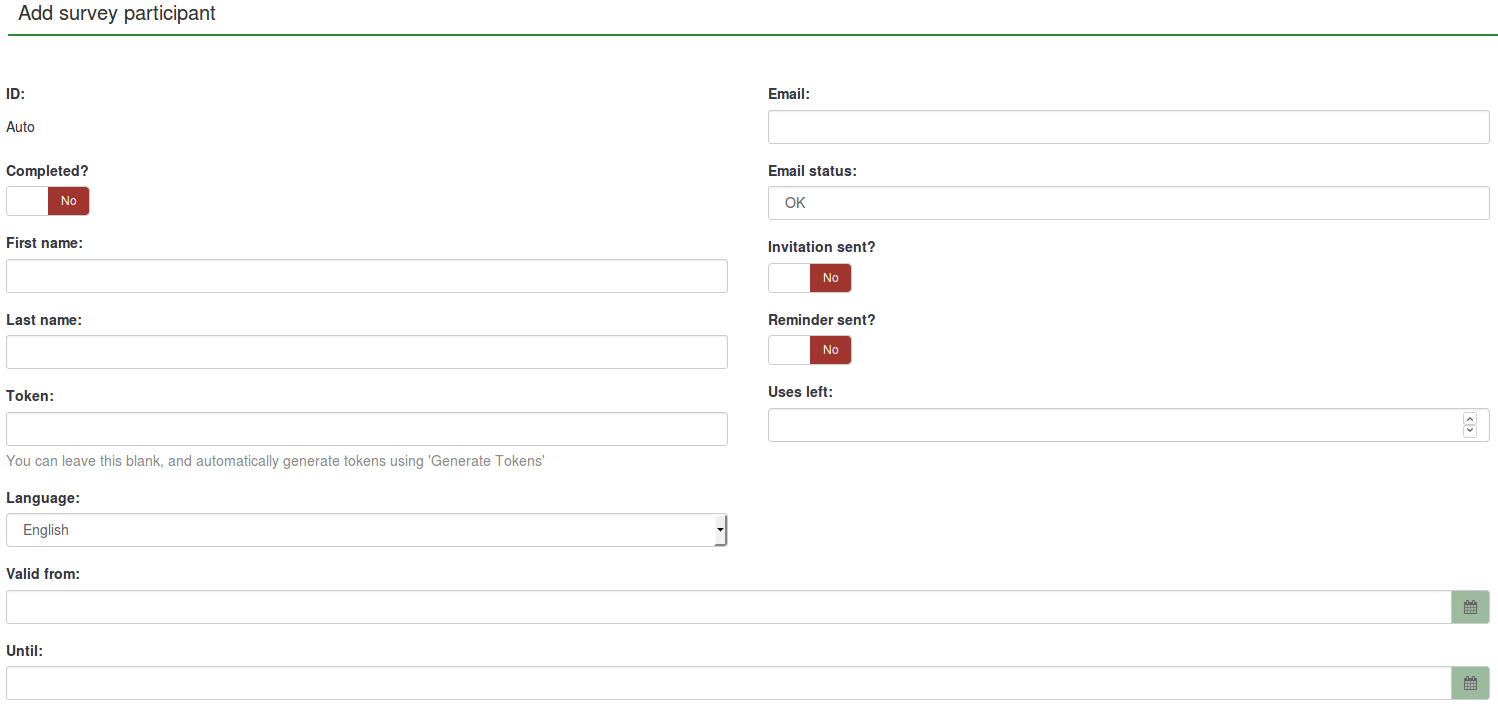
- First and last name: .. of the participant (can be used in the emails & survey)
- Email: the participant's email address
- Email status: a field to keep track of bad emails. For instance, if the survey administrator received email error notifications from this email, the he can set this field to anything other than 'OK' (for instance 'user unknown', or 'mailbox quota exceeded'). Marking this token with an email status other than 'OK', will help skip this entry when sending invitation or reminder emails. Note that this is completely manual, unless you decide to implement a script which does update this field automatically.
- Token: this is the invitation code. It is usually automatically generated by the 'Generate tokens' button
- Language: if you want to set the default language for this participant
- Invite sent: defaults to 'N', otherwise would contain the date when the invitation email was sent
- Reminder sent: defaults to 'N', otherwise would contain the date when the reminder email was sent
- Completed: defaults to 'N', otherwise would contain the date when the survey was submitted for not anonymous survey, or 'Y' for anonymous survey
- Uses left: A counter of number of times the token can be used. Note: When increasing this value (default = 1) for a user who has already filled out the survey (which sets uses left to 0), you have to add "N" at the "completed" field.
- Valid from & Valid until : You can set a date/time range where this token would be allowed to use. You can leave these empty if you don't want to limit participation time frame for certain users. Note: If the user is answering the survey and the participation time ends then the user is locked out immediately and won't be able to finish the survey.
- Attribute1 to Attribute x: These are user-definable attribute fields - see the next paragraph.
Dummy Tokens
Dummy Tokens were added in 1.91. Here is a typical screen:
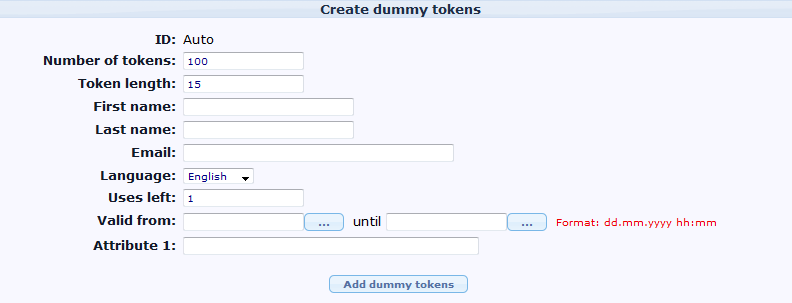
- Number of tokens: Number of tokens to be added. Default is 100.
- Token length: Number of characters or length of token. Default 15
- First and last name: .. of the participant.
- Email: the participant's email address
- Language: If you want to set the default language for this participant
- Uses left: A counter of number of times the token can be used.
- Valid from & Valid until : You can set a date/time range where this token would be allowed to use. You can leave these empty if you don't want to limit participation time frame for certain users. Note: If the user is answering the survey and the participation time ends then the user is locked out immediately and won't be able to finish the survey.
- Attribute1 to Attribute x: These are user-definable attribute fields - see the next paragraph.
Note that Name, email, language will be set to the same value for all dummy Tokens
Bounce Settings (New in 1.91 )
Please also check out the Email bounce tracking system page for more information how to correctly configure this feature.
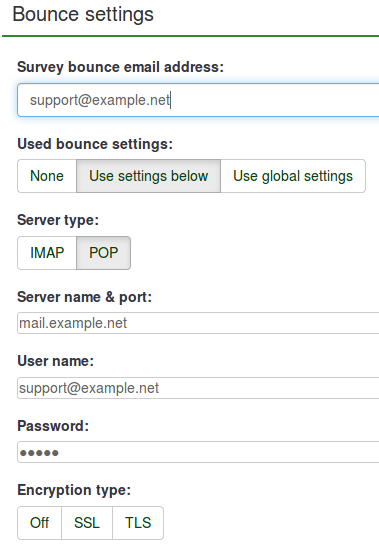
- Survey bounce email: A valid email address for return mail. For faster bounce back processing, this email box should be limited to bounce back only.
- Bounce settings to be used: There are three options: 1- None (default) - no bounce back processing, 2- Use settings below - Will set bounce back processing at the survey level, or 3- Use global settings -- Settings based on the system level.
- Server type: Three options: 1- Off, 2- IMAP or 3- POP
- Server name & port: Host name and port number. Port number isn't typically needed unless the email host uses a non-standard port. Example: mail.example.net:25 or imap.gmail.com:995
- User name: User Name or User ID of the email account
- Password: password of the email account
- Encryption type: Three options: 1- None (default), 2- SSL, or 3- TLS
User-defined attribute fields
It is possible to add a number of additional fields to the tokens table to save additional data for a participant. By clicking on the 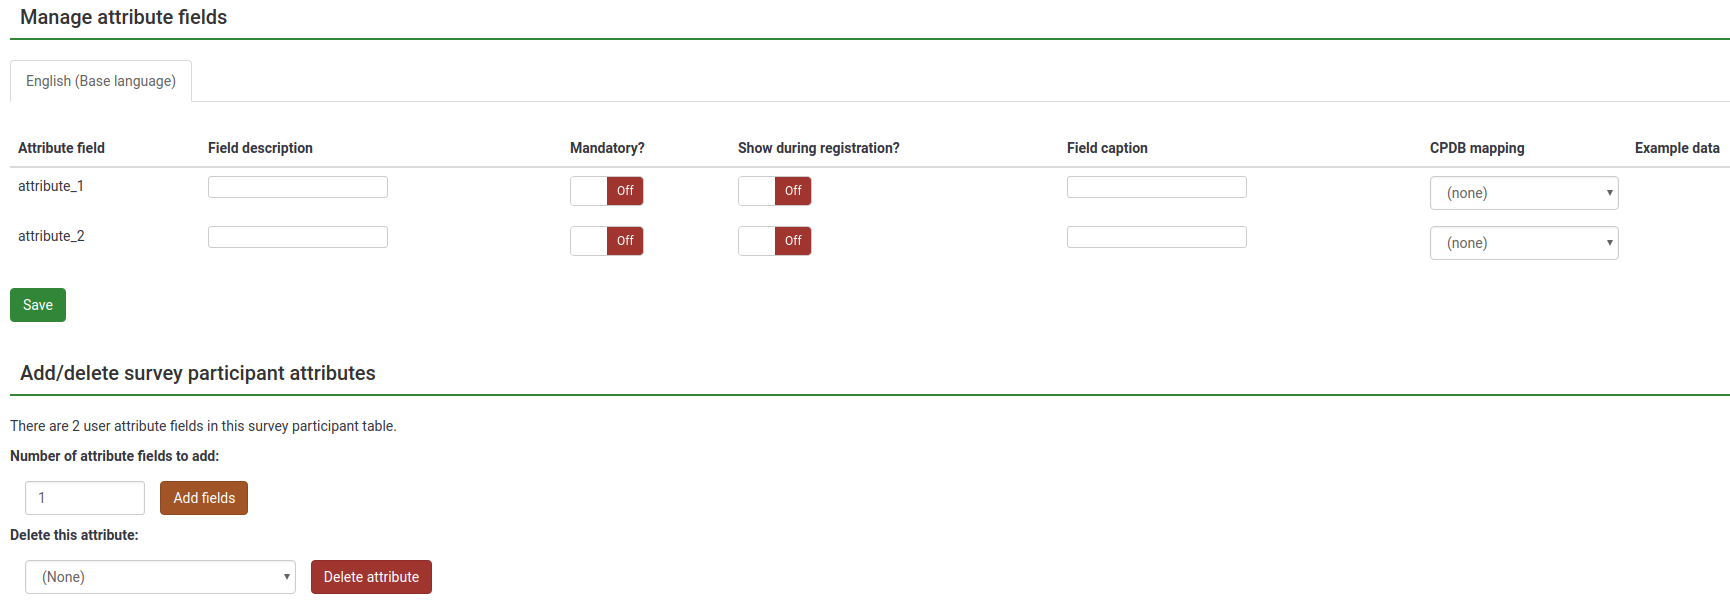 icon you can manage these fields. You can add more attribute fields (by default they have a a length of 255 chars) and also set descriptions for each field - so they look nicer in the administration, when you browse tokens, when creating conditions based on attribute fields or even when you export results for non-anonymous surveys.
Detailed instructions on how to add additional attribute fields and use conditions based on these values can be found at this blog post: "Conditions based on token attributes"
Using the browse screen and editing tokens
The browse screen will show you a list of all entries in the tokens table, as well as giving you some 'action' buttons that can perform specific tasks for that individual entry.
The top row of the table has three columns: The dialogue on the right gives options for displaying a number of records, and a starting point. In the middle is a search bar and the symbols on the left let you move backwards or forwards through your list.
The second row of the table (see image below) includes various criteria to sort the entries and for each a green arrow that - if clicked - will refresh the screen showing the tokens ordered by that criterion.
The "Actions" column gives a list of specific tasks that can be performed on that individual entry:
- Do the survey using the unique token of this entry
- Edit this entry
- Delete this entry
- Send a invitation/reminder to this individual entry
- If the survey is a 'tracked' (ie: not anonymous) survey, another button will appear, allowing you to view the response from this individual entry.
Database Admin
While the summary screen shows a brief summary of tokens in the table, it also provides access to the "Database Admin" features which include:
- Clear invites: Sets all records that an invitation has been sent out to 'N'. Obviously shouldn't normally be used.
- Clear tokens: Clears all tokens. Similarly shouldn't normally be used.
- Drop tokens: Allows you to remove the tokens feature from your script. Deletes the entire table and all records, and allows the survey to be accessed by anybody who knows the URL.
Importing/exporting tokens
CSV import
When you click the icon to import tokens you will be presented with the following screen:
Your CSV file must be a standard CSV (Comma Separated Value) file. The first line of text is always the header information and will be used to identify the field data. Possible data fields are:
firstname,lastname,email,emailstatus,token,language code,tid,attribute_1,attribute_2, attribute_...
To obtain a full list of token field names, export an existing token table.
The fields can be in any order but firstname, lastname and email are mandatory, and they must contain at least one character. Empty data (such as "") is not sufficient. If you would like to import data for attribute fields, you must add the desired attribute fields to the token table prior to importing token data.
A bare minimum CSV file could look like this:
   firstname,lastname,email
   John,Doe,john@doe.net
Date format for token import
The date format for the "validfrom" and "validuntil" fields in the CSV token inport file is "YYYY-MM-DD HH:MM", e.g.:
2012-01-01 00:00
--would correspond to 1st January, 2012, at 12:00 AM.
Filtering duplicates
If you activate the option to filter for duplicates you can set which fields are used to identify duplicates. By default First name, Last name & Email-address are pre-selected. If a duplicate is found while importing the related line is omitted.
Troubleshooting the token import
A common error when users try to import tokens is an invalid CSV file. This is often caused by Microsoft Excel. Many users have a list of e-mail addresses saved as an XLS document. A file can be saved as CSV in Excel, however, Microsoft uses semi-colon (;) as the comma separator, while a standard CSV file uses comma (,) as the separator. If you try to import an Excel saved CSV file you will get an error message. A simple solution is to save your XLS document as a CSV file in Excel and then open the file in a raw text editor and replace all semi-colon characters with commas. In version 2.00 can you select the used separator.
Recommended free raw text editors are: PSPad, NotePad2 or Notepad++ for Windows, and TextWrangler for Macintosh.
You can use LibreOffice Calc to export import your xls file and export your csv file.
Add additional attributes at import It is also possible to add new custom attributes when import a CSV file. It is still needed to define what attributes will be added. The way to do this is:
   firstname,lastname,email
   attribute_1 <Casenr>; token; attribute_2 <Title>; attribute_3 <destination>; lastname; firstname; attribute_4 <Sender>;
Creating CSV file with Excel on the Mac
When you create a CSV file with Excel 2011 on the MAC and use the standard "save as" option, you loose special characters such as ü, ë, é etc. when importing into LimeSurvey Token Table.
To make this work properly choose to save the file as a Windows text CSV file (tested on the Dutch version of Excel, saved as "Door lijstscheidingstekens gescheiden Windows tekst (.CSV)").
Then when importing the file in the LimeSurvey token table, under "character set of file" choose "Mac West European". The special characters will be imported correctly.
Tested on LimeSurvey 2.0 only.
CSV export
When you export your tokens the following fieldorder is exported:
tid,firstname,lastname,email,emailstatus,token,language code,attribute_1,attribute_2,...
LDAP import
- Queries are manually defined by the system administrator in the config-ldap.php file
- Duplicates are identified by First Name, Last Name & Email-Address. If a duplicate is found while importing the related line is omitted, unless you have unchecked the Filter Duplicates checkbox.
A tip for generating a large number of fake e-mail addresses
Sometimes you may need a large number of fake e-mail addresses and tokens. You can use functions in a spreadsheet (e.g. OpenOffice Calc) to generate them. Let's assume you want thousands addresses in a form: 1@test.com, 2@test.com, 3@test.com... Put consecutive numbers in column A: 1 in the A1, then insert function =A1+1 in A2, then copy A2 down as many times as you need. In B1 use concatenation function to join A1 and "@test.com", which is =CONCATENATE(A1;"@test.com"). Then copy B1 down for each copied A. You may generate fake names in a similar way. Finally, save the file as CSV for import in LS.
With the 1.91, you can use "Generate dummy token" functionnality
A tip for generating a large number of individual links which include the token already
The structure of the survey link is the following:
Limesurvey 1.x: http://url-to-your-limesurvey-installation/index.php?sid=XXXX&lang=en&token={TOKEN}
Limesurvey 2.x: http://url-to-your-limesurvey-installation/index.php/survey/index/sid/xxxx/newtest/Y/lang/EN/token/{TOKEN}
So you proceed similar to the example above for generating email adresses.
- First column: http://url-to-your-limesurvey-installation/index.php?sid=XXXX&lang=en&token= (for version 1.x) OR http://url-to-your-limesurvey-installation/index.php/survey/index/sid/xxxx/newtest/Y/lang/EN/token/ (for version 2.x) (same URL for all, as long as the language is the same!)
- Second column: {TOKEN} (put your tokens here, of course they must be individual)
- Third column: use the CONCATENATE function to join the first column with the second column.
Emailing
Email placeholders
Następujące nazwy pól są dozwolone w szablonach emaili z zaproszeniem/przypomnieniem. Pola te muszą być wypełnione we właściwościach badania. Podczas wysyłania emaili te nazwy pól są odpowiednio zastępowane w podglądzie twoich zapraszających/przypominających emaili.
| {ADMINEMAIL} | Adres Email Administratora badania |
| {ADMINNAME} | Nazwisko Administratora Badania |
| {SURVEYNAME} | Tytuł badania |
| {SURVEYDESCRIPTION} | Opis twojego badania |
Następujące nazwy pól są dozwolone w zapraszających/przypominających emailach (w temacie i/lub treści) i są zastępowane podczas wysyłania emaili:
| {EMAIL} | Adres Email odbiorcy |
| {FIRSTNAME} | Imię |
| {LASTNAME} | Nazwisko |
| {SURVEYURL} | Twój publiczny URL wskazujący na początkową stronę badania |
| {TOKEN} | Token dostępu do badania |
| {ATTRIBUTE_1} | Atrybut 1 |
| {ATTRIBUTE_2} | Atrybut 2 |
If your survey is NOT anonymous, the following field names are available to insert token data in survey text and javascript. You can use these fields in confirmation and notification email template, too.
| {TOKEN:EMAIL} | Adres Email odbiorcy |
| {TOKEN:FIRSTNAME} | Imię |
| {TOKEN:LASTNAME} | Nazwisko |
| {TOKEN} | Token dostępu do badania |
| {TOKEN:ATTRIBUTE_1} | Atrybut 1 |
| {TOKEN:ATTRIBUTE_2} | Atrybut 2 |
Additional hints
- If your survey is using anonymized responses then token-related placeholders will not work in notification email templates.
- You can use Expression Manager to use expressions for tailoring an email (New in 1.92 ). Please have a look at the Expression Manager HowTos for an example.
Also have a look at the examples on using information from tokens table.
Ustawienia Emaili
- Temat emaila zaproszenia: Linia tematu emaila zapraszającego, która jest wysyłana kiedy wykorzystujesz tokeny w swoim badaniu.
- Email zaproszenia: To jest tekst emaila zapraszającego, który jest wysyłany kiedy wykorzystujesz tokeny w swoim badaniu.
Wstępnie pola te są wypełnione domyślną treścią wiadomości (z plików językowych) ale możesz je dostosować do własnych potrzeb.
Jeśli używasz angielskiego jako języka podstawowego, tekst domyślnego zaproszenia i przypomnienia może zostać znaleziony w pliku limesurvey/tokens.php. Oczywiście, jeśli nie zamierzasz skorzystać z tokenów w swoim badaniu to co znajduje się w tym polu nie ma znaczenia. Możesz użyć następujących "nazw pól" aby zindywidualizować informacje w poszczególnych emailach:
- {FIRSTNAME} - jest zastępowany przez wartość pola "imię" z tabeli tokenów
- {LASTNAME} - jest zastępowany przez wartość pola "nazwisko" z tabeli tokenów
- {SURVEYNAME} - jest zastępowany przez nazwę twojego badania
- {SURVEYDESCRIPTION} - jest zastępowany przez opis twojego badania
- {ATTRIBUTE_1} - jest zastępowany przez wartość pola "atrybut 1" z tabeli tokenów
- {ATTRIBUTE_2} - jest zastępowany przez wartość pola "atrybut 2" z tabeli tokenów
- {SURVEYURL} - jest zastępowany przez pełny adres URL do tego konkretnego badania
Zwróć uwagę, że te "pola nazw" odnoszą się do następujących pól emaili.
- Temat emaila przypomnienia: Linia tematu emaila przypominającego o badaniu, który jest wysyłany za pomocą funkcji ekranu tokenów.
- Email przypomnienia: To jest tekst emaila przypomnienia, który jest wysyłany,kiedy wykorzystujesz tokeny w swoim badaniu. Aby uzyskać szczegółowe informacje odnośnie możliwości wykorzystania tego pola zobacz fragment instrukcji o "emailu zaproszenia".
- Temat email potwierdzenia: Kiedy używasz tokenów, to jest linia tematu emaila, który jest automatycznie wysyłany do uczestników badania po ukończeniu przez nich badania.
- Email potwierdzenia: To jest tekst emaila, który jest wysłany do uczestnika po ukończeniu badania.
- Temat emaila publicznej rejestracji: To jest linia tematu dla emaila z zaproszeniem wysyłanego do nowego uczestnika badania, który sam zarejestrował się do wzięcia udziału w badaniu.
- Email publicznej rejestracji: To jest tekst emaila z zaproszeniem wysyłanego do nowego uczestnika badania, który sam zarejestrował się do wzięcia udziału w badaniu. W tym mailu można również stosować "nazwy pól", tak jak w ww. przypadkach.
Baza danych Administratora
Ekran "informacje o tokenach" prezentuje krótkie podsumowanie informacji o tokenach w tabeli, ale umożliwia również dostęp do następujących funkcji "Bazy danych Administratora":
- "Zmień status wszystkich pozycji na "Nie wysłano zaproszenia" - oczywiście nie powinno się standardowo korzystać z tej funkcji.
- Usuń wszystkie unikalne numery tokenów
- Usuń wszystkie wpisy tokenów - używanie tej funkcji nie powinno być standardem
- Usuń tabele tokenów - Pozwala na usunięcie wszystkich cech tokenów z twojego skryptu. Kasuje całą tabelę i wszystkie rekordy, i pozwala na otwarty dostęp do badania dla wszystkich, którzy będą znali jego adres URL.
Używanie ekranu "wyświetl tokeny"
Ekran "wyświetl tokeny" przedstawia listę wszystkich wpisów tabeli tokenów jak również udostępnia parę przycisków "akcji", które pozwalają na wykonanie określonych zadań dla poszczególnych wpisów.
Górny wiersz tabeli pozwala na określenie liczby elementów wyświetlanych na stronie oraz pierwszego wyświetlanego rekordu tabeli. W wierszu tym znajduje się również pasek umożliwiający nawigację między stronami tabeli. Drugi wiersz tabeli zawiera nazwę pola oraz zieloną strzałkę, która - jeśli zostanie kliknięta - odświeży ekran pokazując tokeny uporządkowane wg tego pola.
Kolumna "Akcje" zawiera listę określonych zadań, które mogą zostać wykonane dla poszczególnego wpisu.
- E: Edytuj wpis tokenu
- D: Usuń wpis tokenu
- S: Wypełnij ankietę (korzystając z unikalnego tokenu tego wpisu)
- R: Wyślij przypomnienie do tego wpisu (dostępne tylko jeśli zostało już wysłane zaproszenie)
- I: Wyślij zaproszenie do tego wpisu (dostępne tylko jeśli nie zaproszenie nie zostało już wysłane)
- V: Przycisk dostępny jeśli badanie jest "śledzone" (np. nieanonimowe). Pozwala na przeglądanie odpowiedzi udzielonych przez danego uczestnika.
Sending emails
Send invitations
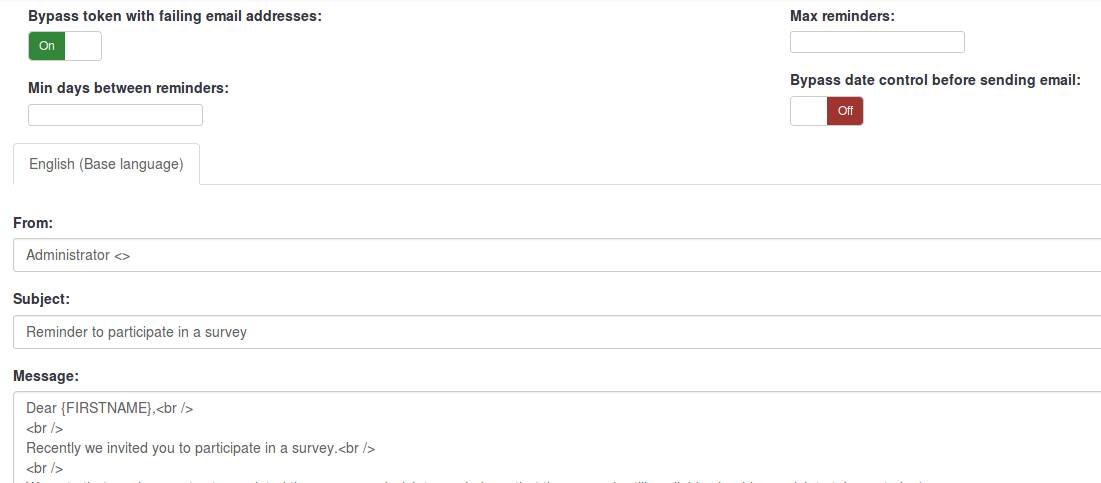
You can skip tokens for which the email status field is different from 'OK', by choosing the 'Bypass token with failing email addresses' option.
Resending invitations
Sometimes you might want to send invitations again to certain token entries / persons. When you use the send invitations-function only e-mail addresses that has not previously received an invitation will get one. This means that if you add new addresses to the token list after the first time you sent invitations, only these new addresses will receive an invitation the second time you send invitations.
This means that you can also edit/change an e-mail in a particular token entry that you got a bounce from and then send to only this edited address. Just substitute the date Invite sent? for a capital N (no) and click send invitations again.
Participant opt-out
When you use the {OPTOUTURL} tag in your invitation/reminder email, your participants have the possibility to opt out of this particular survey by just clicking on the related URL in the email - so you don't harrass them with reminder emails. A participant that opted out of your survey will have the email status 'OptOut' set in the token.
Send reminders
When sending reminders you can:
- bypass tokens with failing email addresses
- skip tokens for which an email has been 'recently' sent
- skip tokens for which a given number of emails have already been sent
Note: A reminder will only be send to tokens where the "completed" field is not "N" (this means the respondent has either not taken or has not completed the survey).
Sending emails by batch
When you have to send a lot of emails at the same time, LimeSurvey will only send a first batch of N emails (this threshold is set by the administrator in the Global Settings).
You'll then need to click "Next" to send the next batch, and so on untill all emails have been sent.
Confirmation email
If you are using tokens and a participant fills out the survey, a confirmation email is sent to his/her email address.
If you don't want this message to be sent, just deactivate this in the General survey settings.
Spam problems
Often users complain not having received an invitation/reminder email because the user’s spam filter treated the email as spam.
If an email is treated as spam mostly depends on the spam filter being used and its settings. A spam filter usually checks the sender address and the email subject and content, so there are ways and means to influence how they treat your LimeSurvey invitation and reminder emails.
At this blog post on limesurvey-consulting.com a lot of possible issues and solutions are listed.
Wrong domain in invitation/reminder email link
LimeSurvey automatically tries to determine the URL for the invitation link by looking at the URL by which you logged in to the LimeSurvey administration. However with some server (mis-)configurations this might not work properly and you will have to set this manually.
You can edit application/config/config.php to change the default base URL value. Add hostInfo property like this to the existing 'components' array.
    'components' => array(
       ...
       'request' => array(
           'hostInfo' => 'http://www.example.com',
       ),
   )
Regarding the source of the problem: LimeSurvey tried to determine the domain from the server PHP variable $_SERVER['HTTP_HOST'] or $_SERVER['SERVER_NAME'].
Some web server software do not properly seem to provide this information or are mis-configured.
Public registration
Zezwolenie na publiczną rejestrację
Możesz ustawić swoje badanie jako ogólnodostępne i jednocześnie stosować pewien rodzaj kontroli uczestników używając tokenów. To jest możliwe: jeśli zainicjujesz swoją tabelę tokenów i wybierzesz, w głównych ustawieniach badania, opcję "Zezwól na publiczną rejestrację", osoby, które odwiedzą twoje badanie (adres URL) i nie będą miały swojego tokenu, będą miały możliwość zarejestrowania się. Jeśli podadzą adres email, który nie występuje już w tabeli tokenów badania, zostanie stworzony nowy wpis w tabeli. Osoby te otrzymają natomiast email z zaproszeniem zawierający ich unikatowy token. Wszystkie tokeny udostępniane samodzielnie się rejestrującym uczestnikom będą zaczynały się od litery "R".
Zabezpieczenie Captcha w publicznej rejestracji
Dla zabezpieczenia twojego badania przed rejestracją robotów internetowych, we wszystkich formularzach zapisu i wczytywania wykorzystywany jest filtr captcha. (począwszy od wersji 1.48)
Ta funkcja jest dostępna tylko w przypadku, gdy masz włączoną opcję "GD-support" w konfiguracji PHP. (Zobacz wymagania instalacyjne)
