Setting conditions/fr: Difference between revisions
From LimeSurvey Manual
Maren.fritz (talk | contribs) (Created page with "===Définition des conditions élémentaires===") |
Maren.fritz (talk | contribs) (Created page with "Une condition élémentaire est simplement une condition unique '''sans aucun opérateur logique OU ou ET'''.") |
||
| Line 213: | Line 213: | ||
Une condition élémentaire est simplement une condition unique '''sans aucun opérateur logique OU ou ET'''. | |||
It is composed by: | It is composed by: | ||
Revision as of 08:26, 28 September 2023
Ce contenu n'est pas à jour, pour avoir un contenu à jour, veuillez vous rendre sur la page anglaise:
{TRANSLATED(lang="en")}Setting conditions{TRANSLATED}
Conditions existantes
LimeSurvey possède une fonctionnalité de branchement logique très puissante. Il est accessible en cliquant sur le bouton Définir les conditions - ![]() - situé sur chaque barre des questions.
- situé sur chaque barre des questions.
Dans ce chapitre, nous décrirons :
- quelles conditions vous pouvez trouver dans LimeSurvey
- ce que vous pouvez et ne pouvez pas faire avec les conditions
- quelles étapes vous devez apprendre pour configurer des conditions simples ou plus complexes
Pour obtenir des instructions vidéo étape par étape, consultez ce didacticiel ou téléchargez l'échantillon d'enquête sur les conditions : [[Media:LimeSurvey_Survey_Setting_Conditions.zip|LimeSurvey_Survey_Setting_Conditions.zip] ].

Masquer/Afficher les branchements par rapport aux branchements sautés
Vous pouvez concevoir des branchements logiques avec LimeSurvey, ce qui signifie que vous pouvez décider que certaines questions ne seront affichées que si certaines conditions sont remplies, comme "Afficher la question X si la réponse à la question Y était Z".
Notre approche consiste à mettre en œuvre une Masquer/Afficher une logique de branchement :
- vous pouvez définir une condition ou un ensemble de conditions sur chaque question de votre enquête - si la condition est remplie, la question sera alors affiché :

- une question sans condition définie sera toujours affichée;
- une question avec une condition définie ne sera affichée que si la condition est remplie .
Cette approche est différente de la Jump Branching Logic qui est parfois implémentée par d'autres logiciels. Dans la Jump Branching Logic, l'action résultant d'une condition remplie serait de passer à une autre question (c'est-à-dire de masquer toutes les questions intermédiaires). LimeSurvey n'implémente pas cette méthode Jump Branching Logic. Au lieu de cela, si vous souhaitez sauter une série de questions, vous devez simplement définir la même condition pour toutes les questions que vous ne souhaitez pas afficher. Par exemple, si la condition de saut que vous souhaitez définir sur la question 2 est "Sauter à la question 5 si la réponse à la question 1 est 'Oui'", vous pouvez simplement :
- définir une condition sur les questions 2, 3 et 4 pour afficher uniquement "si la réponse à la question 1 était NON 'Oui'"
LimeSurvey facilite la définition de la même condition sur plusieurs questions (et donc la mise en œuvre de Jump Branching Logic) en vous permettant de "copier" une condition d'une question à une série d'autres. Dans l'exemple ci-dessus, vous commenceriez par définir la condition sur la question 2, puis, à partir du même écran, vous copieriez cette condition sur la question 3 et la question 4.
Types de conditions pris en charge
Fondamentalement, une condition peut comparer des valeurs et renvoyer vrai ou faux.
Les valeurs pouvant être comparées sont les réponses aux questions précédentes. Par exemple, si vous répondez « Oui » à la question 1, la question 2 sera alors présentée au répondant :

À ce stade, il est important de comprendre ce qui est considéré comme une entrée de question éligible pour l’éditeur de conditions.
Une question-saisie est soit :
- une question simple (pour tous les types de questions sauf les questions Array)
- par exemple : des questions textuelles, des listes radio ou déroulantes, et même des choix multiples questions
- ou une ligne dans les questions Array (sauf pour les questions Array dual scale et Array multiple flexible)
- par exemple : tableau avec 5 boutons radio ou tableau avec questions d'étiquette
- ou soit la partie gauche ou la partie droite d'une question Array à double échelle
- ou chaque cellule d'une question Array flexible
- valeurs constantes
- par exemple : "Si vous avez répondu plus de 18 ans à la question ci-dessous"

- Données de profil des participants : Pour utiliser les données du tableau des participants à l'enquête, les « Réponses anonymisées » doivent être définies sur NON. Cette option se trouve dans le panneau Paramètres des participants de l'enquête.

Plusieurs opérateurs de comparaison sont pris en charge - du simple « égal » à l'« expression régulière » avancée :
- Les opérateurs de base font référence aux opérations « égal » et « différent de »
- Le « plus grand/moins La famille d'opérateurs than est également disponible et est généralement utilisée lors de l'utilisation d'entrées de questions numériques
- Veuillez noter que les comparaisons sur les champs numériques utilisent l'ordre numérique. Par exemple, 2 < 10
- Si vous utilisez une entrée de question dont le type est texte, la condition peut être évaluée comme "2" > "10" (ordre des chaînes) !
- Questions numériques, ainsi que les questions textuelles (lorsqu'elles ont l'attribut 'numbers_only' défini), utiliseront l'ordre numérique pour les comparaisons !N !* Un opérateur de comparaison avancé utilisant des expressions régulières est également disponible (pas de panique ! Si vous ne savez pas ce que cela signifie, alors vous n'en avez pas besoin)
- le motif ne doit pas être entouré de caractères '/'
- par exemple : [a-zA -Z]$
Comment puis-je combiner les conditions ?
Vous pouvez construire des conditions complexes' en combinant des conditions simples avec les opérateurs logiques ET et OU .

Cependant, il est important de comprendre que LimeSurvey détermine automatiquement quel opérateur logique appliquer. Cela signifie que l'utilisation des opérateurs OU ou ET est déterminée selon le contexte de la condition. Dans l'exemple ci-dessus, il n'y a qu'un seul scénario. Cela signifie que LimeSurvey utilise l'Algèbre booléenne, ce qui signifie que l'opérateur ou est « calculé » en premier.
Nous parlerons davantage des conditions complexes plus tard. Attardons-nous d'abord ensemble sur les élémentaires.
Le concepteur des conditions
Tout d'abord, vous devez accéder aux Concepteur de conditions. Pour cela, cliquez sur la question à laquelle vous souhaitez appliquer la condition :
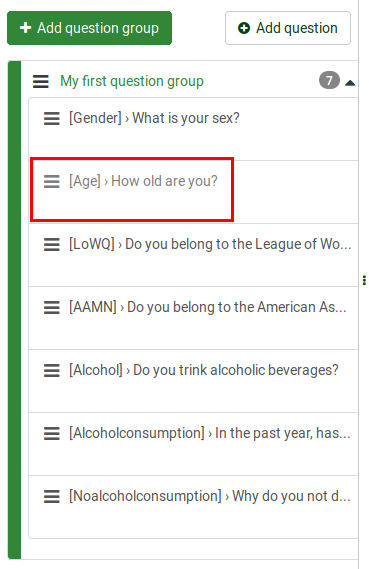
Maintenant, recherchez le bouton « Définir les conditions » situé dans la barre de questions supérieure :
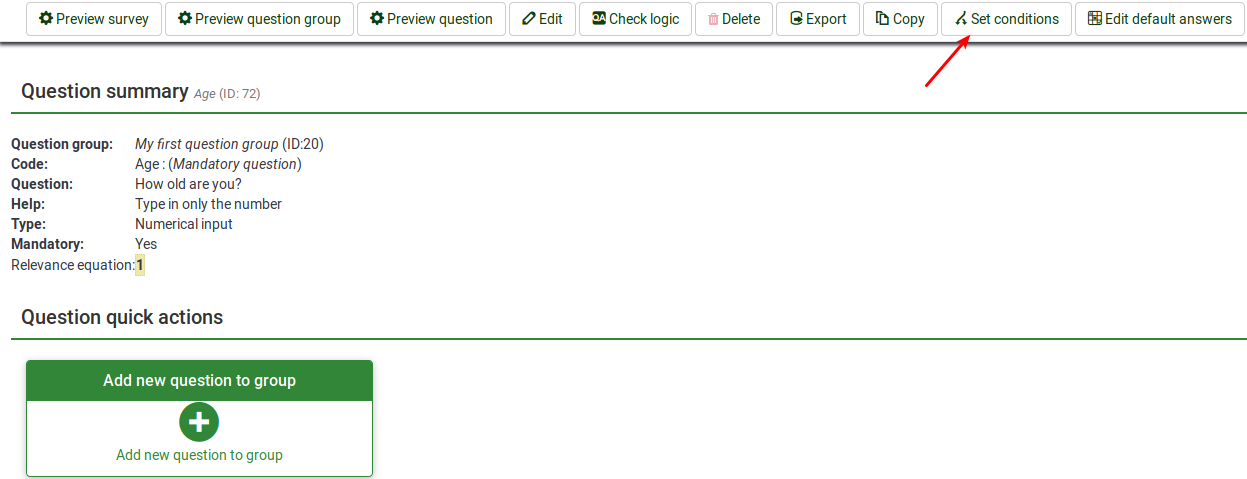
Une fois accédée, la page suivante s'affichera :
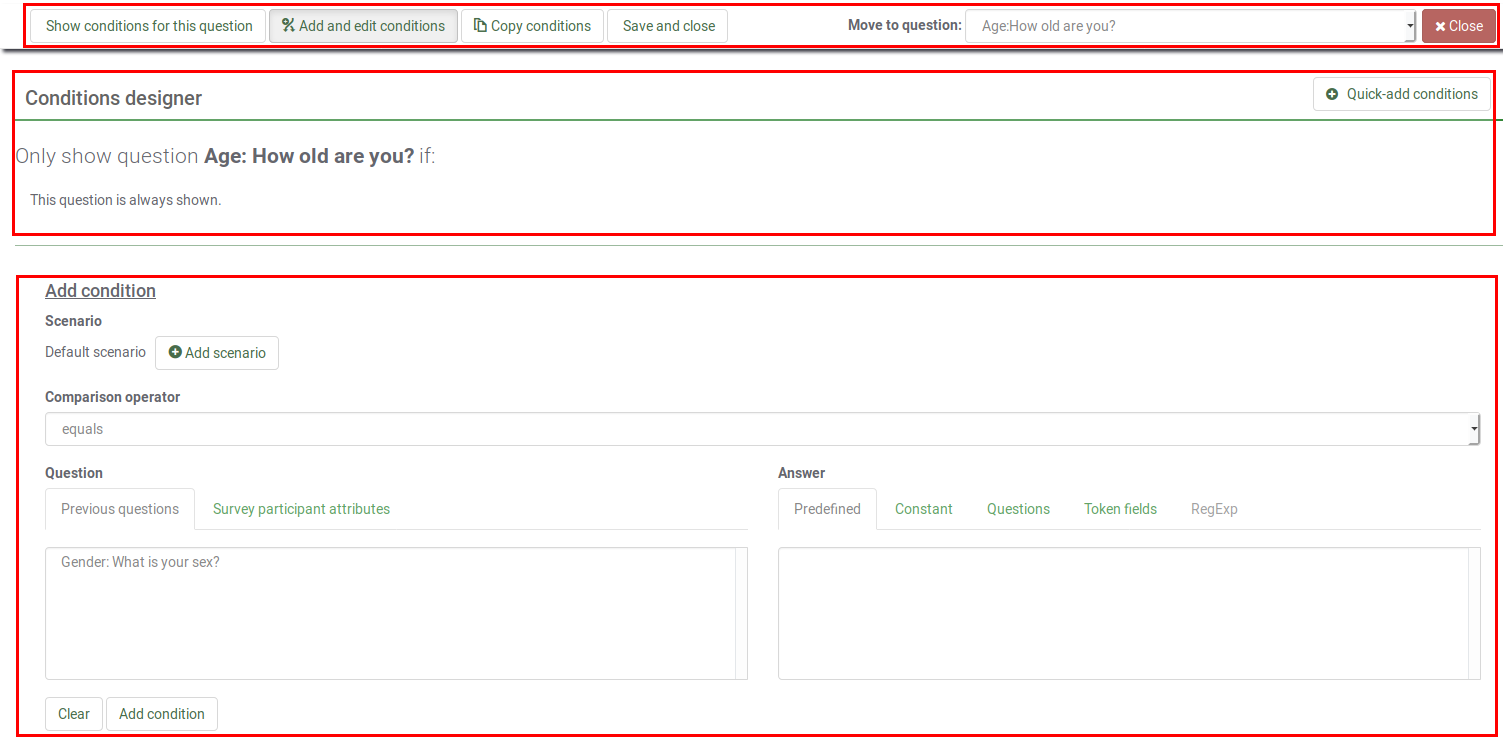
Le panneau du concepteur de conditions peut être divisé en trois sections :
- La barre d'outils du concepteur de conditions
- La question existante actuelle conditions
- Ajouter/modifier le menu de conditions
La barre d'outils du concepteur de conditions
Vous pouvez trouver sur la barre d'outils les options suivantes :

- Afficher les conditions pour cette question : Cliquez sur ce bouton pour obtenir un aperçu rapide des conditions existantes actuelles qui sont appliquées à votre question.
- Ajouter et modifier des conditions : Il représente la page par défaut qui s'ouvre automatiquement une fois que vous cliquez sur le bouton Définir les conditions. Il est divisé en deux parties : (1) un tableau affichant toutes les conditions et scénarios existants, et (2) le menu ajouter/modifier les conditions.
- Copier les conditions : Parfois, vous souhaitez appliquer la même condition à X questions afin d'afficher la question Y à la fin. Pour cela, cliquez sur Copier les conditions. Une nouvelle fenêtre s'ouvrira affichant les conditions existantes actuelles ajoutées à votre question (appelons-la question3). Pour les ajouter à la question5, cochez les conditions que vous souhaitez copier, sélectionnez la question5, et cliquez sur le bouton Copier les conditions situé en bas à gauche du panneau. Pour plus d'informations, veuillez continuer à lire la section wiki.
- Enregistrer et fermer : Une fois que vous avez terminé les modifications, cliquez sur Enregistrer et fermer pour enregistrer vos conditions.
- Déplacer vers la question : Afin de ne pas quitter le panneau de conception de conditions en passant à une autre question, utilisez l'option suivante pour sélectionner dans la liste déroulante la question suivante à laquelle vous souhaitez appliquer des conditions. Veuillez noter que la liste déroulante affiche les questions affichées dans l'enquête avant et après la question actuelle.
- Fermer : Si vous souhaitez quitter le panneau sans effectuer de modifications, vous pouvez soit aller directement à l'onglet paramètres/structure et sélectionner l'option souhaitée, soit cliquer sur Fermer, qui se trouve en haut à droite de l'écran.
Aperçu des conditions existantes
Cette section affiche un tableau qui contient tous les scénarios et conditions existants d'une question. Certaines actions peuvent être effectuées à partir d'ici :
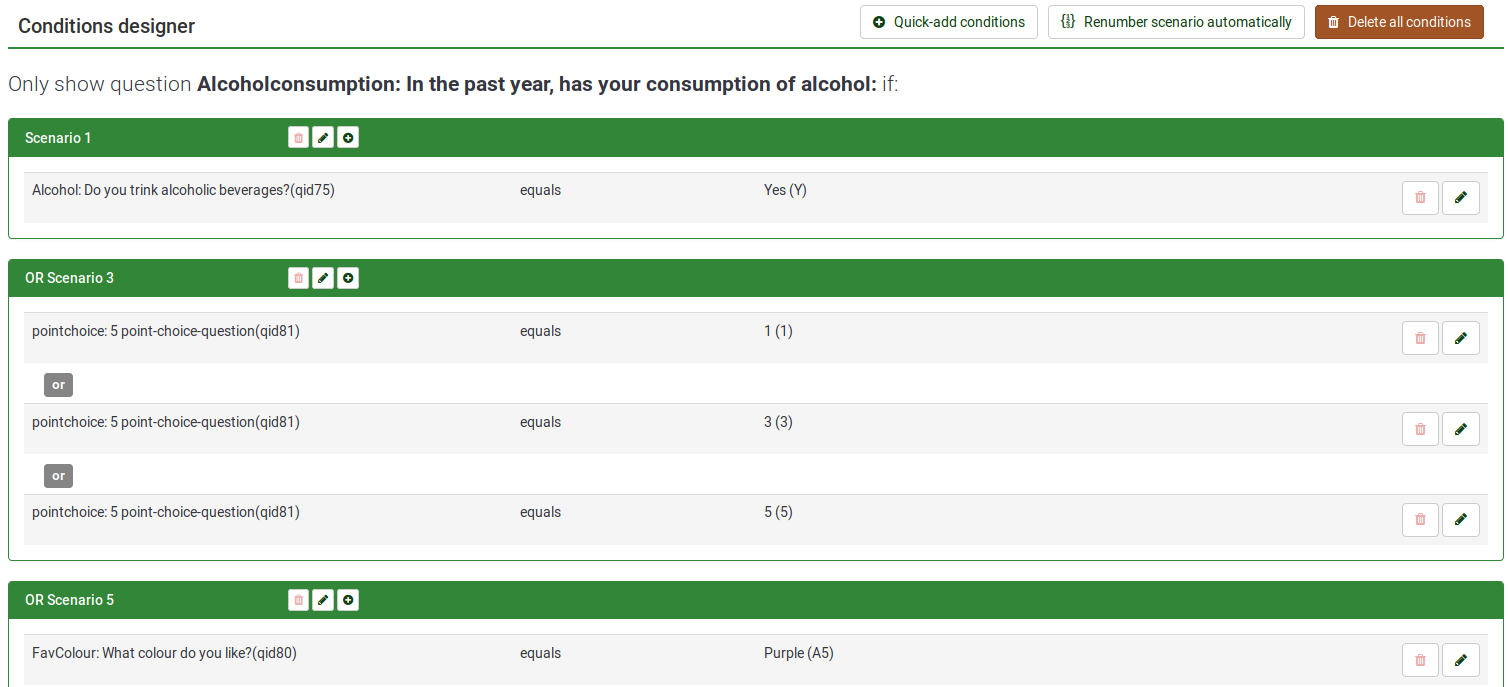
- Dans la partie supérieure droite, trois actions sont disponibles :
- Ajout rapide de conditions - cela accélère le processus d'ajout de conditions (lisez below pour en savoir plus sur toutes les options )
- Renuméroter les scénarios - si vous cliquez dessus, les scénarios seront renumérotés avec des numéros incrémentiels commençant à un. Veuillez noter que cette option ne s'affiche que si deux scénarios ou plus sont appliqués à votre question.
- Supprimer toutes les conditions - vous pouvez supprimer via cette action toutes les conditions et scénarios existants actuellement appliqués à votre question.

- En plus du numéro d'identification de chaque scénario, il y a trois boutons qui vous permettent d'effectuer les actions suivantes :
- Supprimer le scénario
- Changer le numéro du scénario
- Ajouter une condition à ce scénario - cliquez dessus bouton pour ajouter une autre condition au scénario souhaité

- Deux actions peuvent être effectuées sur chaque condition :
- Supprimer la condition
- Modifier la condition - si vous cliquez dessus, vous pourrez modifier la condition à partir du menu conditions

Ajouter/Modifier des conditions
La partie inférieure de l'écran est affectée au menu Ajouter/Modifier des conditions :

Pour comprendre le fonctionnement de la fonctionnalité conditions dans LimeSurvey, nous présenterons dans un premier temps les conditions élémentaires.
Définition des conditions élémentaires
Une condition élémentaire est simplement une condition unique sans aucun opérateur logique OU ou ET.
It is composed by:
- a left operand: the tested value. You can choose the tested value type by selecting the appropriate tab in the condition editor. It can either be a previous question or a survey participant attribute.

If you select a question-entry (from the Previous questions tab) and if this question uses predefined answers, then the corresponding predefined answers are displayed under the Predefined tab of the comparison value selection.
- not use anonymous answers
- use a survey participants table and closed access.
- a comparison operator. Choose the comparison operator you want to apply from the dropdown list (less than, less than or equal to, equals, not equal to, greater than or equal to, greater than, regular expression).
- a right operand: the comparison value. You can choose the comparison value type by selecting the appropriate tab in the condition editor. When you create a condition, you can select as the comparison value a predefined value (answer), a constant, a question, a survey participant attribute, or a regular expression:

Example of elementary conditions and how to create them
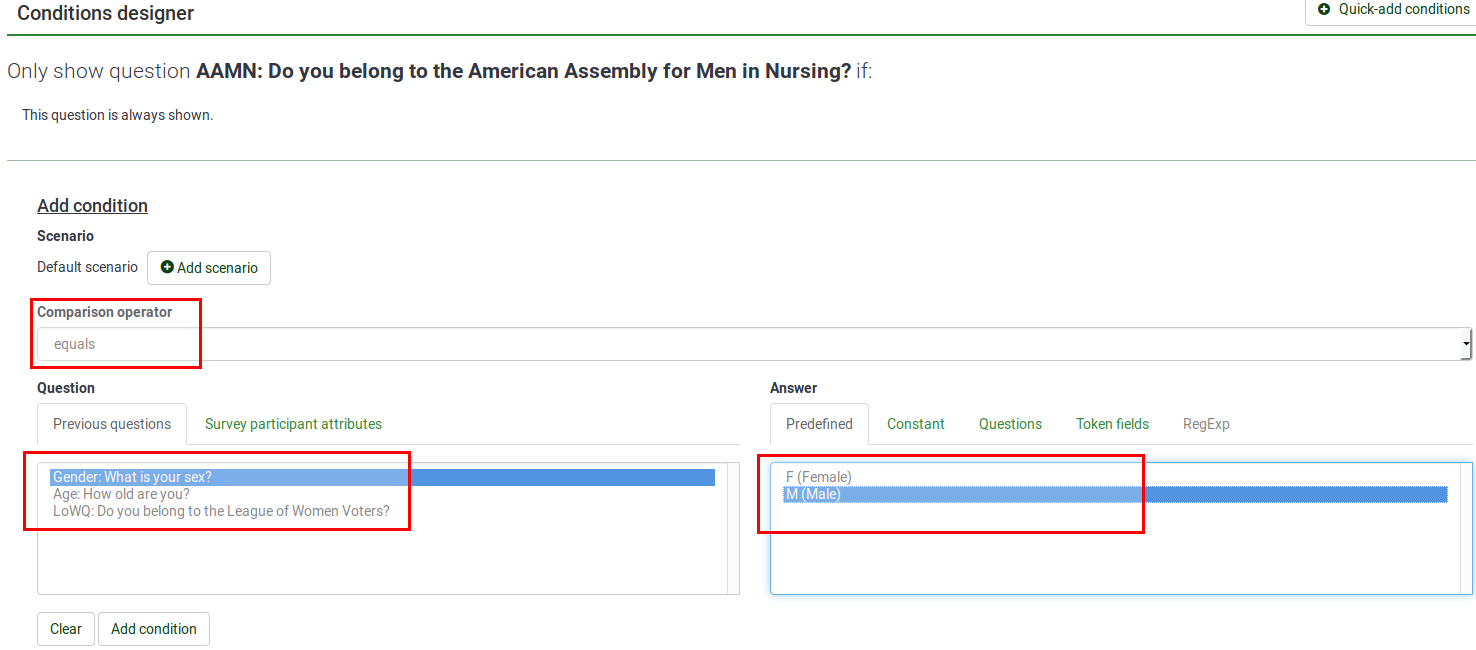
- Show Question 'AAMN' if "the answer to Question 'Gender' is the predefined answer 'Male'"
- tested value = answer to Question 'Gender'
- comparison operator = equals
- comparison value = predefined answer code (the 'Male' answer in this case)
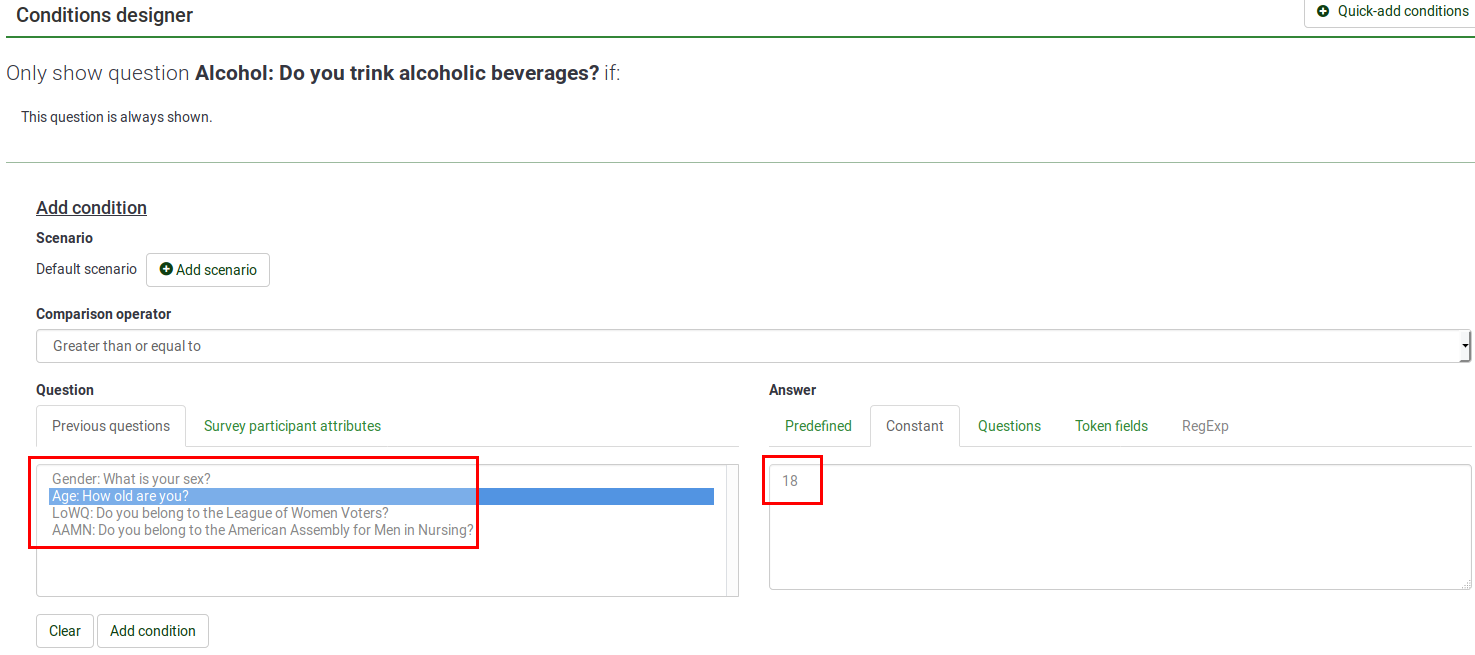
- Show Question 'Alcohol' if "the answer to Question 'Age' is greater or equal than the numerical value '18'"
- tested value = answer to Question 'Age'
- comparison operator = greater than or equal to
- comparison value = the constant value '18'
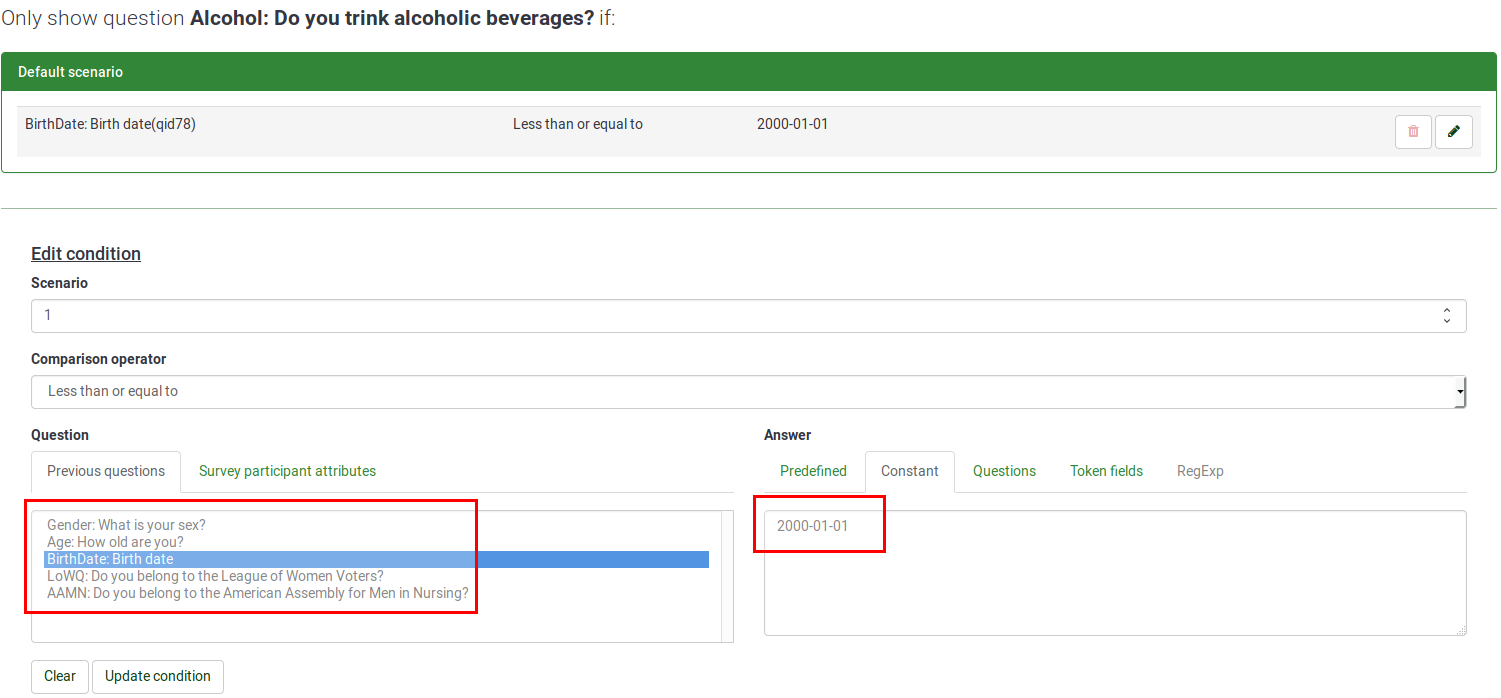
- Show Question 'Alcohol' if "the answer to Question 'BirthDate' is greater than 2000-01-01"
- tested value = answer to Question 'BirthDate'
- comparison operator = Greater than or equal to
- comparison value = '2000-01-01' (the format in the constant field: 2000-01-01)
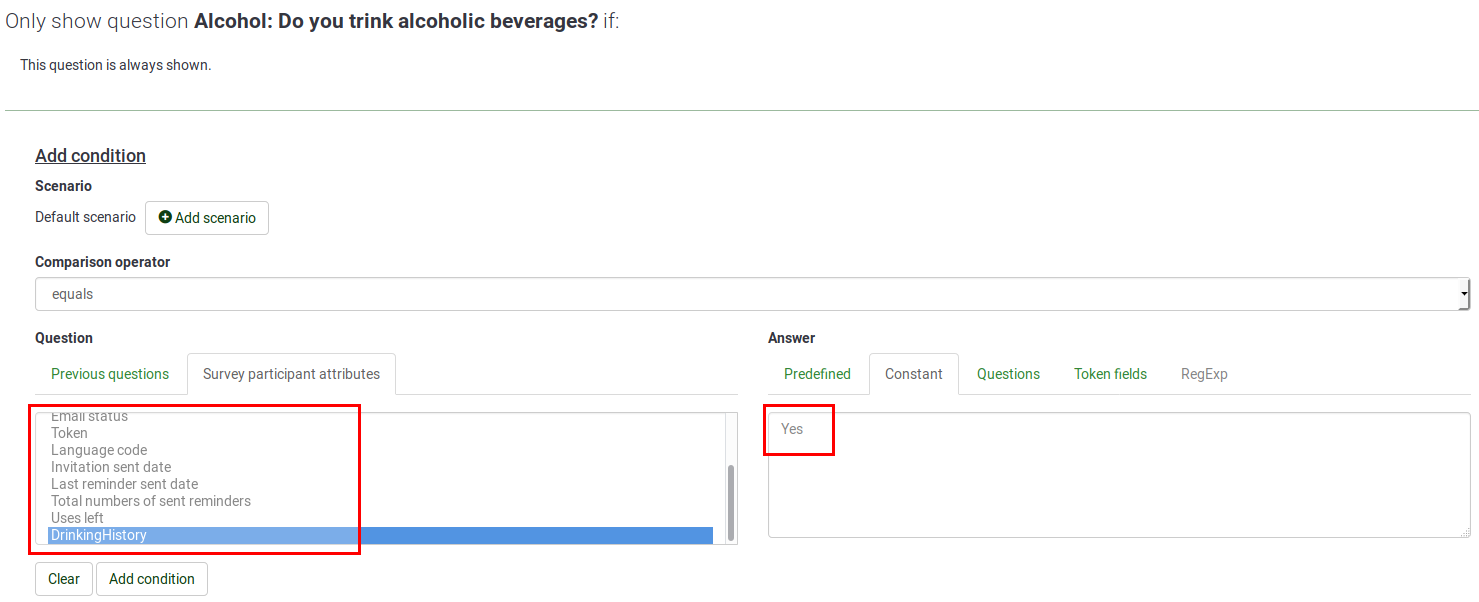
- Show Question 'Alcohol' if "the the 'DrinkingHistory' participant's attribute" matches the 'Yes' string.
- tested value= the 'DrinkingHistory' value taken from the survey participants table
- comparison operator = equals
- comparison value = the constant value 'Yes'
Conditions and scenarios in LimeSurvey
Default condition combinations
As said earlier, LimeSurvey automatically decides which logical operator (AND or OR) should be applied between conditions depending on the 'context'.
Note also that the order in which you define your elementary conditions is not relevant as LimeSurvey will automatically reorder them according to its own logic.
Let's study this in detail. Two rules should be always remembered:
- First rule: conditions having the same tested value are ORed together
- Second rule: conditions having different tested value are ANDed together
First rule: conditions having the same tested value are ORed together
When you have several conditions, they are ORed together if they share the same tested value. This is the case if the condition applies to several answers belonging to one single question. For example, a condition was applied below to three answers belonging to the same question - if answer to Question 'FavColour' equals 'green' OR answer to Question 'FavColour' equals 'red' OR answer to Question 'FavColour' equals 'blue', then Question 'BirthDate' will be displayed to the survey respondent:


Second rule: conditions having different tested value are ANDed together
When you have several conditions, they are ANDed together if they don't share the same tested values. For example, you may see below the case for several conditions based on different previous questions - "If answer to Question 'Alcohol' equals 'Y' answer AND answer to Question 'Gender' equals 'F'", then Question 'Alcoholconsumption' will be displayed to the survey respondent:


The multiple options questions
The Multiple choice and Multiple choice with comments question types will be displayed in two flavors:
- a Group of checkboxes flavor which let you set conditions on all possible answers of the respective question;
- a set of Single checkbox entries which lets you set conditions on each checkbox individually.

The group of checkboxes flavour
Now, let's focus on an example to better understand the difference between the two flavours. Let's imagine that we wish to display the 'Pointchoice' Question only if the respondent checks at least one of the tested answers listed under the 'MultipleOrganizations' Question.
As mentioned above, the group of checkboxes flavor allows you to set conditions on all possible answers of the respective question. Therefore, only the options that refer to responsibilities are selected as comparison values below:
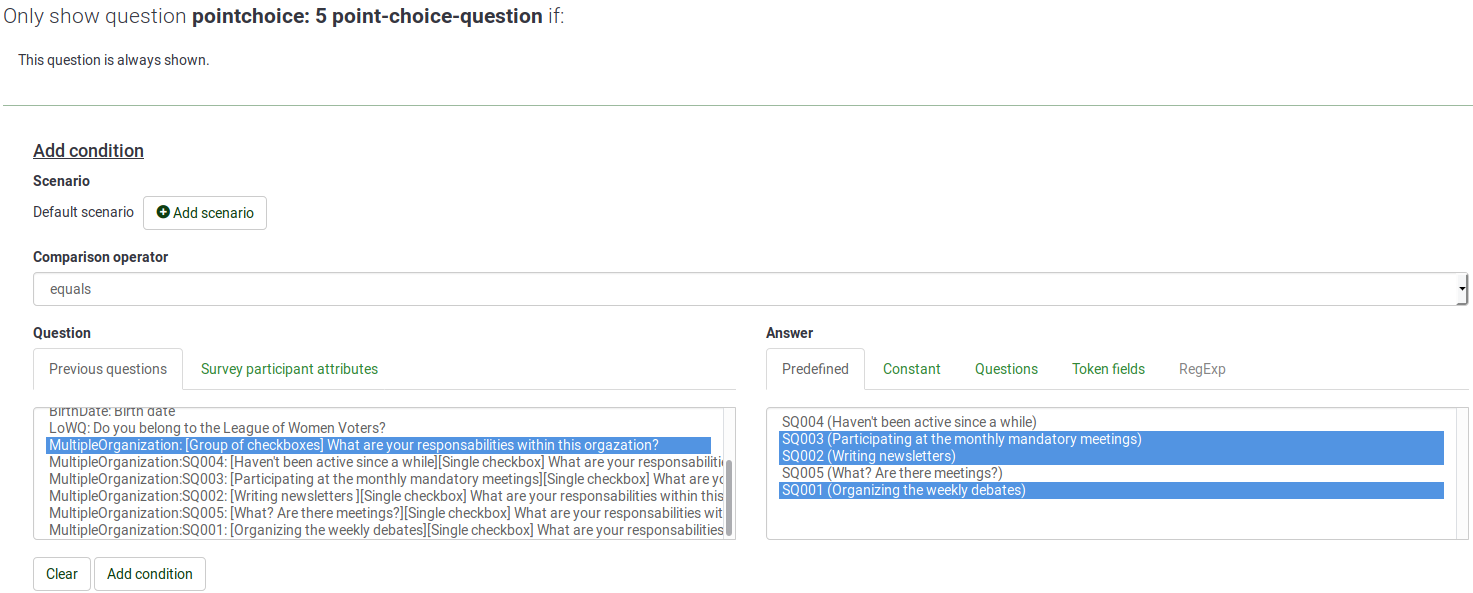
As we can observe, the conditions get ORed due to the Group of checkboxes flavour selected in the beginning.:

ANDing conditions in multiple choice questions
Now, let's focus on a similar example. However, we are looking this time only for the most active members to ask them further questions. To do this, we make use of the Single checkbox flavour which allows you to set conditions based on each checkbox individually.
In this example, question X will be displayed if A and B are checked:
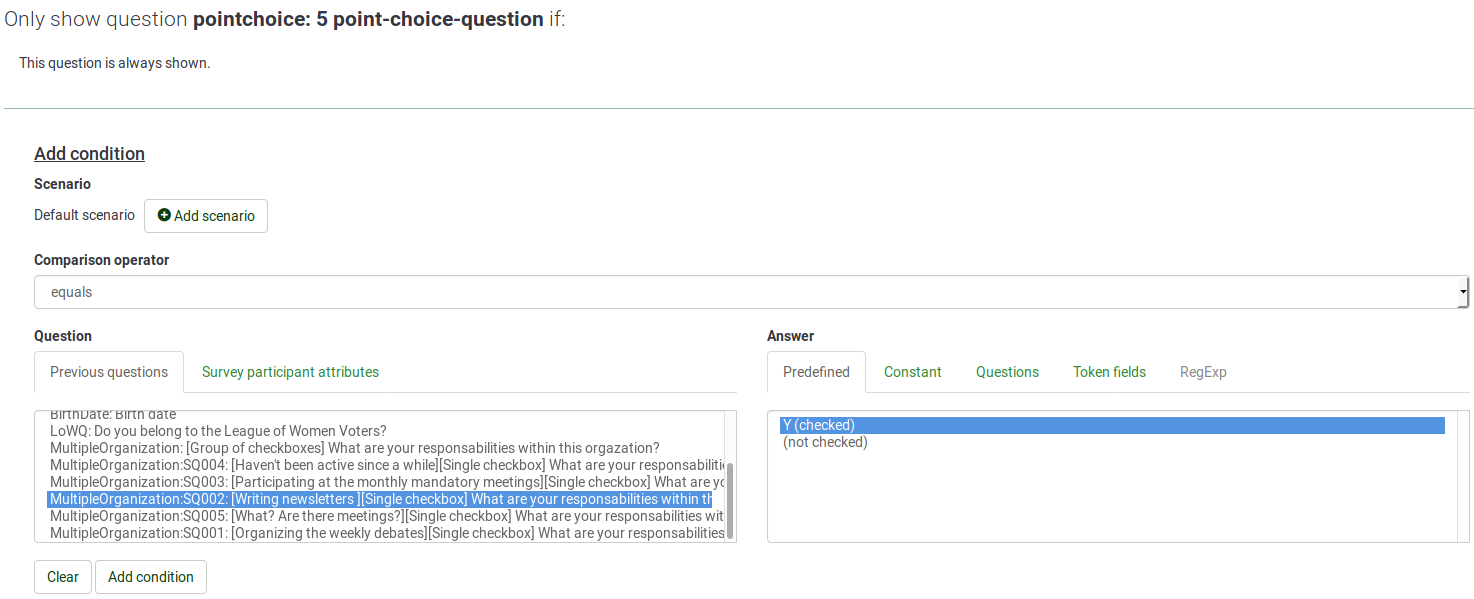
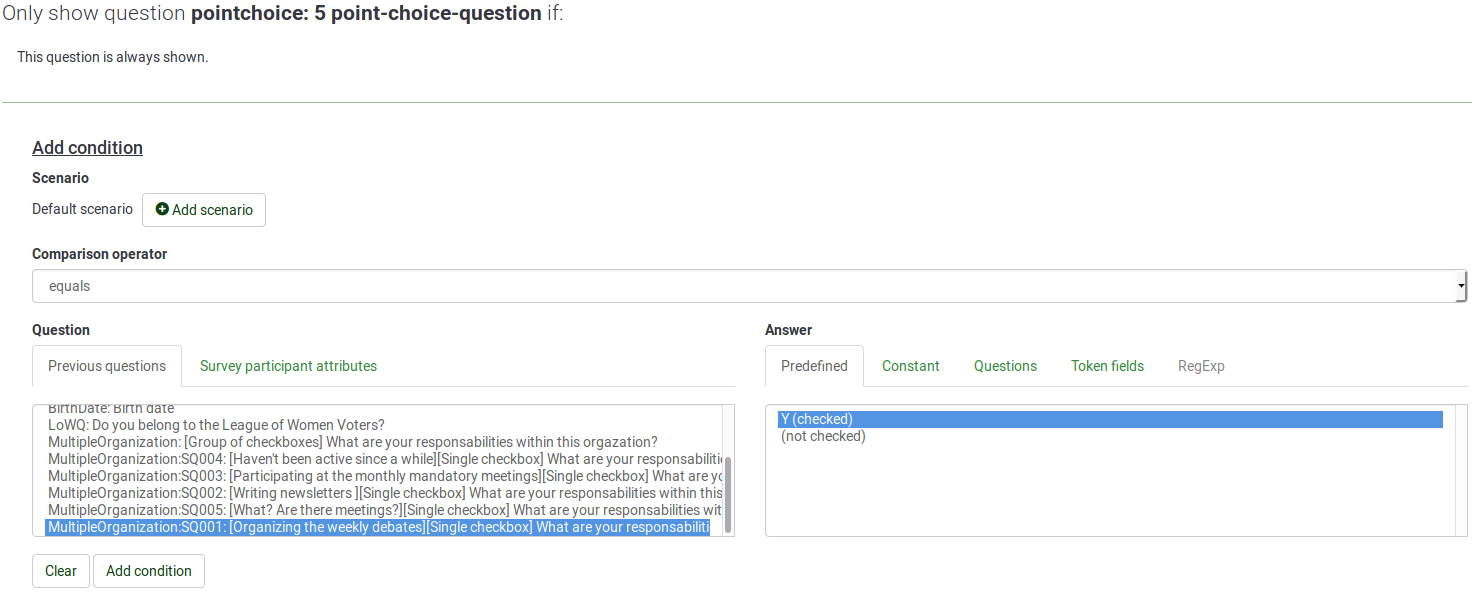
Once done, you can observe that the two conditions are ANDed now.

This means that your question will not be displayed unless both tested values (the selected subquestions) are met.
The usage of scenarios - Using ORed conditions between different questions
Now, you may argue that sometimes you need to have ORed conditions even when they are set on different questions (that is to say on different tested values). This is why we got scenarios!
Definition of a scenario
A scenario is simply a manual grouping of conditions in which some conditions are evaluated independently of other conditions from other scenarios. The complex condition resulting in this association of several scenarios will be met only if one scenario is met. In other words, scenarios are logical grouping of conditions, respecting the above rules, and which are ORed together to build complex conditions.
Everything described above applies to the conditions located in every scenario. By default, all the new conditions are created inside the Default Scenario, which uses number '1' as its identifier. When you create new conditions, you can choose whether they are added to the default scenario or not. To change the scenario, just use another identifier.
Adding a question to another scenario
When you create (or edit) a condition, you can modify the scenario in which the condition is stored by simply clicking on the add scenario button:
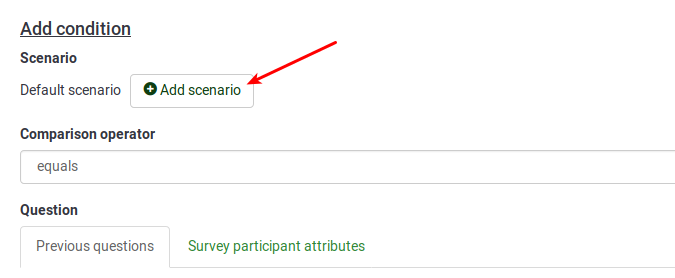
As you can observe, the default scenario uses as identifier '1'. To add conditions to different scenarios, change the identifier by typing a different number in the box.
The number id of a scenario has no importance and different scenarios can have non-continuous ids.

You can change the number assigned to a scenario by clicking this Icon ![]() and assigning the new id to the scenario.
and assigning the new id to the scenario.

- decide in which order the scenarios are displayed when using the printable version of a survey
- merge conditions from two scenarios (in order to merge scenario 10 with scenario 1, just renumber scenario 10, so that it is scenario 1).
Example: creating three scenarios
To create three scenarios, you need at least three conditions and to add to each of them a different scenario id. Once done, the scenarios are going to be connected among themselves via the 'OR' operator. For example, it could look like this:
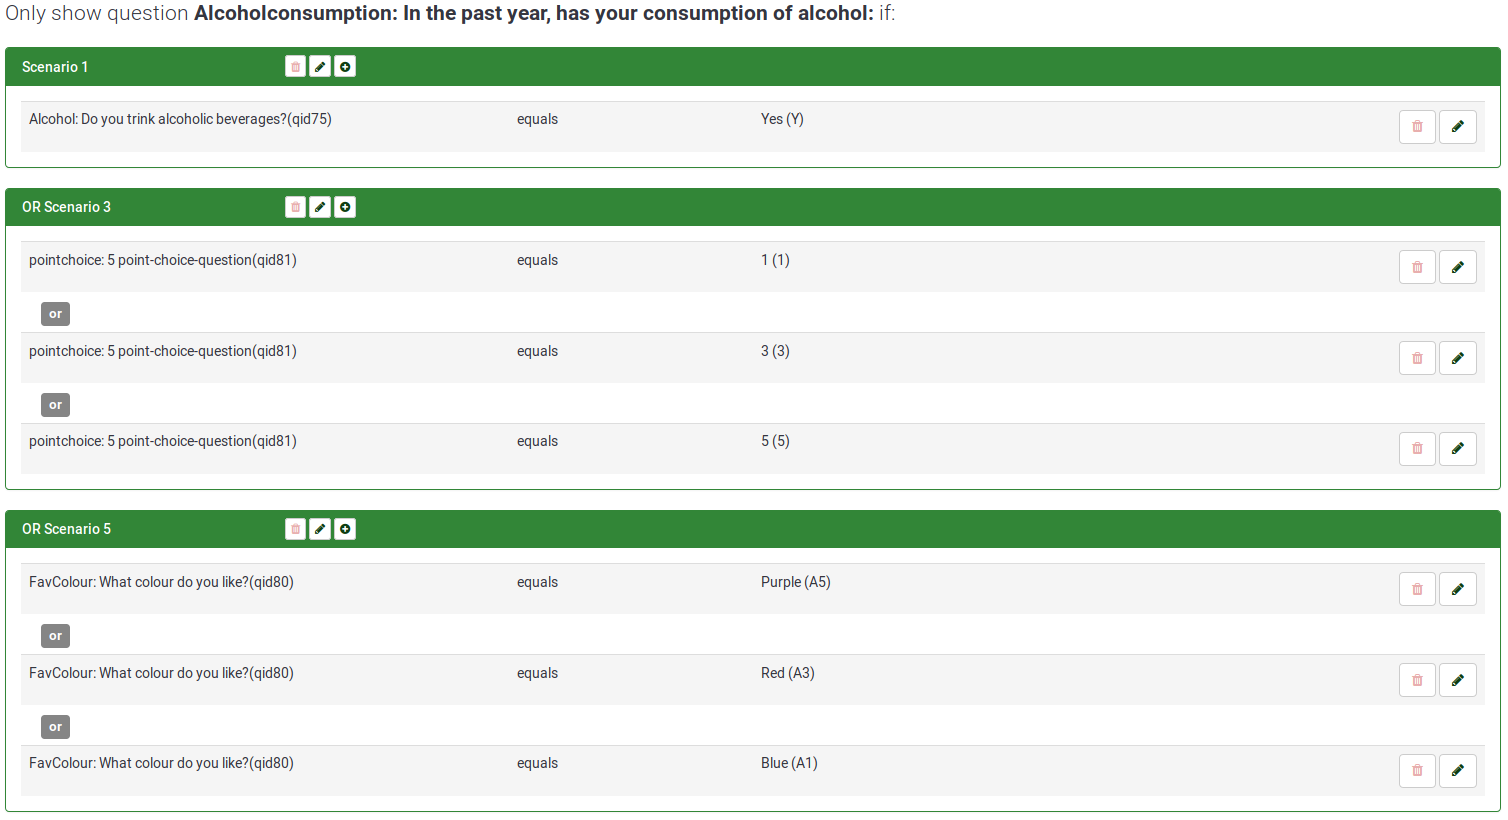
AND vs OR in the same scenario
You may end up in certain cases with AND and OR logical operators in the same scenario:
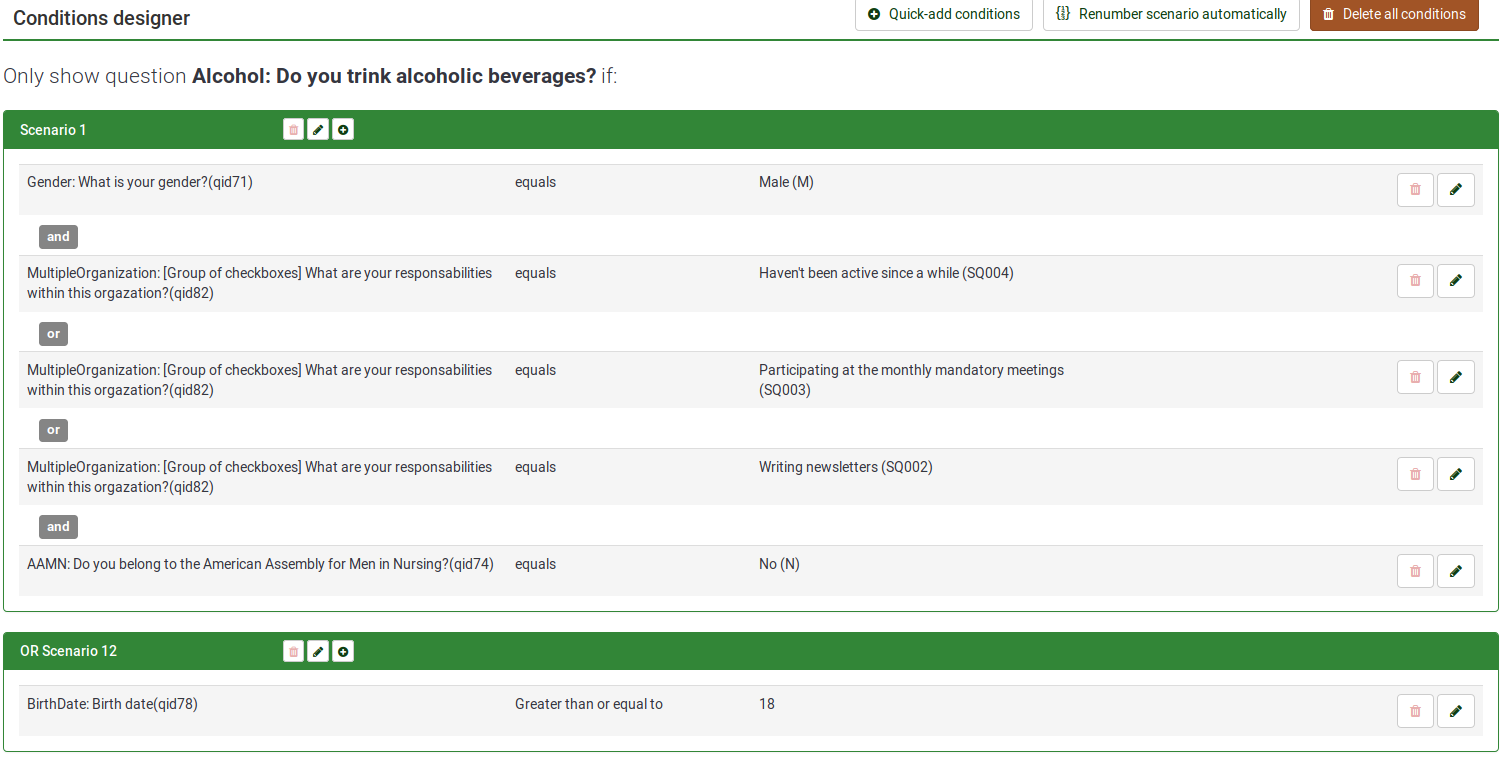
LimeSurvey will always apply first OR. For further details on this, you may check the following Wikipedia article on Boolean algebra.
However. the order of operations can also be observed in the Relevance equation field. For the above example, the relevance equation is highlighted below:

As it can be observed, a set of extra parentheses is added for the OR logical operations in order to let the software know that it must be "computed" first.
How to copy conditions
The copy conditions functionality can be used when you wish to apply the same set of conditions you applied to Question5 to Question10. In this way, you will not have to manually recreate the conditions you applied to the previous question(s).
To start copying conditions, you first have to select the question the condition(s) is/are applied to (Question 'LowQ' in our case). Then, select the conditions you wish to be copied and select the question you wish to have the conditions added to (Question 'Alcohol' in our case).
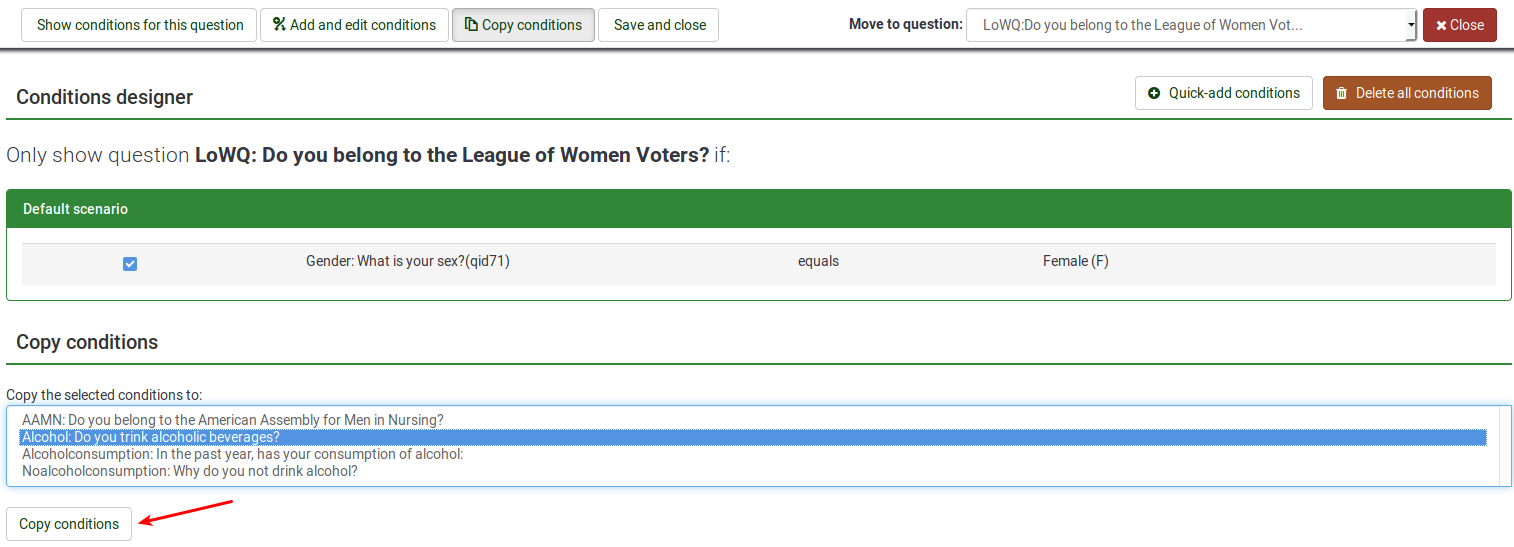
Please pay attention to how the copy conditions functions work when you wish to copy and apply a set of conditions located under different scenarios to another question which uses the same or different scenario id numbers. To summarise the possible cases you might have, check the following example:
- you wish to copy Scenario 1 - Condition A, Scenario 1- Condition B, Scenario 7 - Condition C, and Scenario 7 - Condition D from QuestionX into QuestionY
- QuestionY already contains Scenario 1 - Condition A, Scenario - Condition C, Scenario 6 - Condition E, Scenario 8- Condition F.
- Once copied, the following conditions will be applied to QuestionY:
- Scenario 1: Condition A, Condition B, Condition C -> Condition A is not copied anymore as it already exists in QuestionY, only condition B being copied.
- Scenario 6: Condition E -> not affected
- Scenario 7: Condition C, Condition D -> a new scenario is created where the two conditions are added to it
- Scenario 8: Condition F -> not affected
Reset conditions
To quickly reset all the survey conditions, click on one survey-related setting, look for Tools on the top toolbar, and click Reset conditions:
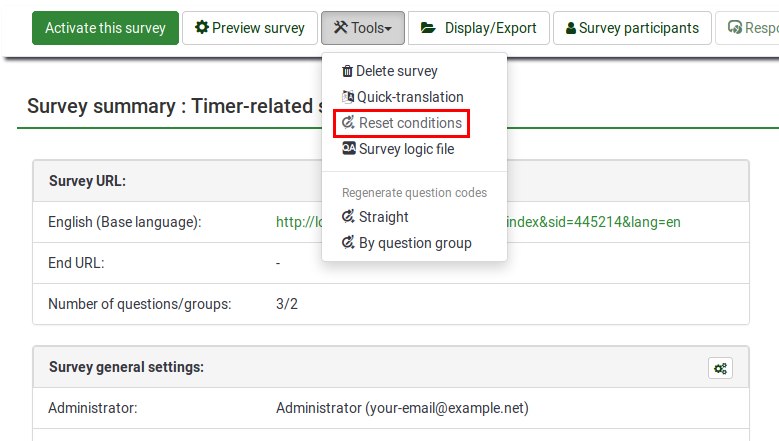
Next, confirm on the next page that you want to proceed and all the conditions will be deleted.
Things to watch out for
General considerations
There are a few basic rules you should keep in mind before setting conditions on a question:
- Once a single condition has been set for a question, that question will not be displayed unless that condition is met.
- Conditions can only be set based on questions that appear before the question on which the condition is set.
- If you change the order of questions in your survey after you create conditions, LimeSurvey does not warn you if the changed order will break any of your conditions. You should always put aside the creation of conditions until you are satisfied with the order of questions and groups in your survey.
- You can modify conditions even after a survey has been activated. This should be done with caution, as there is no "consistency checking" applied here.
Conditions using the 'no answer' predefined answer

Setting the following condition "Show question 'FavColour' if the answer to the question 'Gender' is 'no answer'" really means "show question 'FavColour' if question 'Gender' was displayed to the survey participant who did not submit answer".

Chained conditions
If you set conditions on a question that, itself, has conditions, you could end up with your survey behaving in ways you might not have predicted. For example, a typical side-effect is that if you hide all questions in a group with chained conditions, the group header will still be shown unless you correct these conditions as explained below.


In the above example, the 'Alcohol' question is displayed if the respondent has previously answered to the 'AAMN' question 'No (N)'. However, the 'AAMN' question might not be displayed at the end if the respondent did not select to the previous question ('Gender') answer 'Male (M)'. In this scenario, no 'Alcohol' question will be displayed if 'Male (M)' was chosen previously.
To have the 'Alcohol' question displayed, you have to copy the conditions from the earlier question(s) to the one you're editing. To have the 'Alcohol' question displayed, you need to set up the following set of conditions:
- Show 'AAMN' if the answer to 'Gender' is 'Male (M)'
- Show 'Alcohol' if answer to 'Gender' is 'Male (M)' and if answer to 'AAMN' is No (N)'.
After correction, the correct set of conditions for 'Alcohol' should look like this:

So if you are designing a complicated survey with a large number of conditions, make sure you test the survey for as many different combinations of results as you can think of.
Limitations and workarounds
Progress-bar
If you create a survey where many questions get skipped because of conditions, the progress bar either jumps over a set of questions or the survey ends at 50%.
To avoid such behavior, the questions that could be skipped should be arranged between the shown questions. In this way, only one or two questions get skipped per answer.
For example, based on Question1 (yes or no question), 14 questions (2A to 15A) will be displayed if the answer to Question1 is 'Yes', or 2B to 15B if the answer to Question1 was 'No'.
If you arrange the questions in one group and arrange them like 2A, 2B, 3A, 3B, and so on, you will get a nearly correct progress bar, while arranging the questions like 2A, 3A, 4A, [...], 2B, 3B, 4B, ... you will get a progress bar from 0 to 50% or from 50% to 100%, depending on the answer to the first question.
Setting a constant comparison value for a "Date" Question Type
You have to use the internal representation of Date values (which is YYYY-MM-DD) to define your constant comparison value.
Setting conditions for "Other" Options in the Multiple Options Question Type
In the multiple options question type, you can use the "Other" provided in the question type as a valid choice but you cannot set conditions on it. For example, Question No 1 says "Which color do you prefer to use?" Answer checkbox choices are Blue, Black and Other. If the participant chooses Blue, you can set a condition. If the participant chooses Black, you can set a different condition. However, if the participant chooses "Other" and types in something in the text box, there is NO way a condition can be set. LimeSurvey does not recognize if the participant chose the "Other" condition. This is NOT a bug but a limitation.
There is no real field recorded for the 'other' checkbox for this question type. Thus, the only way to know if the user has answered the 'other' part of the question or not would be to check if the value of the text written in the other input field is empty or not.
However, due to the specific way Multiple choice questions are handled, testing the 'other' text input field has never been implemented.
As a workaround, add an explicit answer option called 'Other' and do not use the built-in 'other' option of these question types. Then add an additional short text question which will be displayed if this 'Other' checkbox was clicked.
How to use parenthesis for the boolean expressions?
You can't!
If you want to design something like:
(condition1 OR condition2) AND (condition3 OR condition4),
you'll have to set up:
(condition1 AND condition3) OR
(condition1 AND condition4) OR
(condition2 AND condition3) OR
(condition2 AND condition4)