Quick start guide - LimeSurvey 3.0+/ja: Difference between revisions
From LimeSurvey Manual
Bravehorse (talk | contribs) (Created page with "このスタートガイドは、[https://www.limesurvey.org/editions-and-prices/limesurvey-pro/editions-and-prices-professional LimeSurvey Pro]の利用を前提にしたも...") |
Bravehorse (talk | contribs) No edit summary |
||
| (267 intermediate revisions by 2 users not shown) | |||
| Line 3: | Line 3: | ||
__TOC__ | __TOC__ | ||
<div class="simplebox">[[File:help.png]] '''注意''': | <div class="simplebox">[[File:help.png]] '''注意''': 本記事は、基本的なクイックスタートガイドです。[https://www.limesurvey.org LimeSurvey]の主な機能と特長を知ることを目的としています。LimeSurveyの概要と機能については、[https://manual.limesurvey.org マニュアル]を読んでください。疑問が生じたら、[https://forums.limesurvey.org/forum フォーラム]に投稿するか、Discordの[https://discord.gg/DEjguXn LimeSurveyコミュニティチャット]に参加してください。あなたの声を待っています。</div> | ||
=はじめに - LimeSurveとは何か?= | =はじめに - LimeSurveとは何か?= | ||
LimeSurveyは、[https://secure.php.net/manual/en/intro-whatis.php PHP]で書かれ、[https://www.gnu.org/licenses/gpl-2.0.html GNU General Public License 2] | LimeSurveyは、[https://secure.php.net/manual/en/intro-whatis.php PHP]で書かれ、[https://www.gnu.org/licenses/gpl-2.0.html GNU General Public License 2]でライセンスされている、フリーなオープンソースのオンラインアンケートアプリケーションです。このソフトウェアは、オンラインアンケートの作成・公開し、回答収集、統計、他のアプリケーション向けに回答結果の出力ができます。LimeSurveyは自前のサーバー([https://community.limesurvey.org LimeSurvey Community Edition])にインストールするか、ホスティングサービス([https://www.limesurvey.org LimeSurvey Cloud])を利用します。 | ||
このクイックスタートガイドは、[https://www.limesurvey.org LimeSurvey Cloud]ユーザー向けに作成しています。[https://community.limesurvey.org LimeSurvey Community Edition]を使用する場合は、LimeSurveyを自前のサーバーにインストールする方法については、LimeSurveyマニュアルの[[Installation/ja|インストール]]を参照してください。 | |||
= | =フリーのLimeSurveyアカウントを作成する= | ||
[https://www.limesurvey.org LimeSurvey] | 今すぐお試しください。フリーの[https://www.limesurvey.org LimeSurvey]アカウントを作成し、その特長とコア機能をテストしてください。[https://www.limesurvey.org LimeSurveyウェブサイト]のホームページで'''Sign Up For Free'''ボタンをクリックするか、'''Pricing'''を選択し、登録します。 | ||
<center>[[File:Editions and Pricing - LimeSurvey Pro.png]]</center> | <center>[[File:Editions and Pricing - LimeSurvey Pro.png]]</center> | ||
<hr width="50%" style="margin:auto"> | |||
'''Sign Up For Free'''を選択すると自動的に登録ページが開きます。 | |||
'''Pricing'''を選択すると'''Free'''、'''Basic'''、'''Expert'''、'''Enterprise'''の4つの選択肢が表示されます。 '''FREE'''オプションボックス内の'''Register Now'''ボタンをクリックします。登録ページが表示されます。 | |||
| Line 34: | Line 31: | ||
次に、以下のフィールドを入力します。 | |||
*'''Username:''' | *'''Username:''' ユーザー名を入力します。ユーザー名はLimeSurveyサイトのアクセスにも使用されます。 | ||
*'''Email:''' | *'''Email:''' アクティベーションリンクがここで登録した電子メールアドレスに送信されます。 | ||
*'''Password:''' | *'''Password:''' LimeSurveyサイトのアクセスにも使用されるパスワードを設定します。 | ||
| Line 43: | Line 40: | ||
テキストボックスをクリックすると、各フィールドに必要な情報の詳細が表示されます。LimeSurveyのニュースレターに登録すれば、ヘルプ、ヒント、アップデート、サービスの割引、最新のニュースを入手することができます。 | |||
<div class="simplebox">[[File:help.png]] '''注意''': ニュースレターの末尾にあるリンクをクリックすればいつでも退会することができます。</div> | |||
<hr width="50%" style="margin:auto"> | <hr width="50%" style="margin:auto"> | ||
LimeSurveyアカウントを作成したら、電子メールが届きます。この電子メールには、アカウントアクティベーションリンクが含まれています。新しく作成したアカウントにアクセスするため、リンクをクリックします。[https://www.limesurvey.org/ LimeSurveyのWebサイト]のアカウントが表示されます。 | |||
=アンケートサイトを構築する= | |||
オンラインアンケートの作成と管理を始める前に、アンケートサイトを作成する必要があります。アカウントにログインし、'''''アンケートサイトの作成'''''ボタンをクリックします。 | |||
| Line 66: | Line 58: | ||
'''LimeSurveyのサイトを作成する手順''': | |||
*サイト名を入力します。 | |||
*ドロップダウンメニューからドメイン名を選択します。 | |||
*サーバーの所在地を選択します。 | |||
*''LimeSurveyサイトを保存して構築する''ボタンをクリックします。 | |||
このプロセスには最大20秒かかります。プロセスが完了すると、ウィンドウが閉じ、アカウントページに戻ります。 | |||
<center>[[File:view survey site.png]]</center> | |||
ページの上段にある'''''アンケートサイトを見る'''''ボタンをクリックすると、アンケートサイトにアクセスできます。[https://www.limesurvey.org LimeSurvey.org]の資格情報を使用してアカウントにサインインします。 | |||
| Line 95: | Line 79: | ||
<hr width="50%" style="margin:auto"> | <hr width="50%" style="margin:auto"> | ||
=LimeSurveyの使用開始= | |||
ページ右上にツールバーがあります。ページの中央には6つのボックスがあり、それぞれがよく使われるLimeSurveyの機能へのショートカットになっています。 | |||
このツールバーには次の設定があります。 | |||
| Line 105: | Line 88: | ||
*''' | *'''チュートリアル''': ここには(LimeSurvey 3+のアプリケーションでは)、LimeSurveyの基本的事項と最も重要な機能を理解するための''"初心者ツアー"''チュートリアルがあります。 | ||
*''' | *'''設定''': ''設定''、''ユーザー''、''詳細設定''をクリックすると、LimeSurveyアプリケーションをカスタマイズしたり、ユーザーやアンケート参加者を管理したり、アンケートをカスタマイズしたりするためのオプションがあります。 | ||
**''' | **''設定'': LimeSurveyアプリケーションをカスタマイズするためのオプションです。 | ||
***'' | ***''ホームページ設定:'' ホームページをカスタマイズするための設定です。 | ||
***'' | ***''全体設定:'' ここで行われた変更は、スーパー管理者以外のすべてのユーザーの設定など、LimeSurveyアプリケーション全体に適用されます。 | ||
***'' | ***''プラグインマネージャー:'' ここからLimeSurveyチームがサポートするすべてのLimeSurveyプラグインを有効にし管理するオプションです。新しいプラグインを追加することもできます。 | ||
**''' | ***''メニュー設定:'' 新しいメニューを作成したり、既存のメニューにエントリーを追加したりするオプションです。 | ||
***'' | ***''メニュー項目設定:'' メニュー項目の作成、編集、削除をするためのオプションです。 | ||
***'' | **''ユーザー'': ユーザーおよびアンケート参加者の管理に関連するオプションです。 | ||
***'' | ***''アンケート管理ユーザ:'' ここから新しいアンケート管理者を追加できます。 | ||
**'' | ***''ユーザーグループの作成/編集:'' この機能は、管理ユーザーを別々のグループにグループ化するためのものです。 | ||
***'' | ***''中央参加者データベース:'' 各管理者は、参加者の情報を個々のアンケートの参加者テーブルから独立した中央テーブル/データベースに格納することができます。 | ||
**''アドバンス'': ユーザー設定またはアンケート設定以外のLimeSurveyアプリケーションを強化するためのオプションです。 | |||
***'' | ***''テーマエディター:'' アンケートテーマ、管理テーマ、または質問テーマを追加/編集/削除するためのオプションです。アンケートやLimeSurveyのインターフェースをカスタマイズするテーマを選択できます。 | ||
***'' | ***''ラベルセット管理:'' ラベルセットはラベル付きのコードのリストであり、ほとんどの質問タイプで回答またはサブ質問として使用できます。 | ||
***'' | ***''データ整合性確認:'' データの一貫性と冗長性をチェックします。 | ||
*''' | ***''データベース全体のバックアップ:'' 重要なアップグレードが公開されたとき、またはLimeSurveyアプリケーションを別のサーバーに移動するときに、LimeSurveyのデータをバックアップするためのオプションです。 | ||
**''' | *'''アンケート:''' アンケートは、言語、質問グループ、質問、質問属性、回答、サブ質問、既定の回答、評価、クォータ、クォータメンバー、クォータ言語設定などから構成されます。緑色の矢印をクリックすると、次のオプションのウィンドウが表示されます。 | ||
**''' | **'''新規アンケート作成:''' 新しいアンケートを作成することができます。 | ||
**''' | **'''アンケートインポート:''' アンケートをインポートすることができます。 | ||
**''' | **'''アンケートコピー:''' アンケートリストにあるアンケートを簡単にコピーすることができます。コピー後に編集することができます。 | ||
*''' | **'''アンケートリスト:''' 既存のアンケートの一覧を表示します。 | ||
*''' | *'''回答残数:''' サブスクリプションの中で残っている回答の数を表示します。無料のアカウントでは、毎月25件の回答しか利用できません。回答数が足りなくなったら、[https://www.limesurvey.org/en/pricing こちら]から購入してください。 | ||
*''' | *'''ストレージ:''' アンケートと回答を保存するために使用できるMBの量を表します。無料のアカウントでは、10MBの記憶領域が得られます。ストレージ容量を増やしたい場合は、[https://www.limesurvey.org/en/pricing 以下の有料オプションのいずれか]を選択してください。 | ||
*''' | *'''ユーザー名:''' ここからユーザーの設定を見たり、アカウントからログアウトしたりできます。 | ||
*'''ベルアイコン:''' 緑色のベルをクリックすると、LimeSurveyに関するさまざまな通知を見ることができます。 | |||
| Line 135: | Line 119: | ||
LimeSurveyアプリケーションのホームページには、6つのボックスがあります。 | |||
| Line 141: | Line 125: | ||
* ''' | * '''アンケート作成''' | ||
* ''' | * '''アンケートリスト''' | ||
* ''' | * '''全体設定''' | ||
* ''' | * '''アンケート管理者の管理''' | ||
* ''' | * '''ラベルセット''' | ||
* ''' | * '''テンプレート''' | ||
<div class="simplebox">[[File:help.png]] | <div class="simplebox">[[File:help.png]] このボックスは、さまざまなLimeSurvey機能へのショートカットです。ボックスとその番号は、'''設定 -> ホームページ設定'''から変更することができます。</div> | ||
| Line 155: | Line 139: | ||
== | ==アンケート作成== | ||
アンケートを作成するには、'''アンケート作成'''ボックスをクリックします。 | |||
| Line 163: | Line 147: | ||
'''アンケート作成'''ページが表示されます。 | |||
| Line 169: | Line 153: | ||
'''アンケート作成'''ページに以下の項目があります。 | |||
*''' | *'''アンケートのタイトル:''' アンケートのタイトルを入力します。必須項目です。その時点で思いついていなくても心配はありません。アンケートのタイトルは後で変更することができます。 | ||
*''' | *'''基本言語:''' アンケートで使用する言語です。後からアンケート設定を変更して言語を追加することができます。 | ||
*''' | *'''サンプル質問:''' 既定では無効になっています。これを有効にすると、質問グループと質問例がアンケートに追加されます。 | ||
*''' | *'''終了URL:''' ユーザーがアンケートの記入を完了した後に、別のページにリダイレクトさせることができます。その場合は、URLを入力し、[[Surveys_-_introduction/ja#.E3.83.97.E3.83.AC.E3.82.BC.E3.83.B3.E3.83.86.E3.83.BC.E3.82.B7.E3.83.A7.E3.83.B3.E3.81.A8.E3.83.8A.E3.83.93.E3.82.B2.E3.83.BC.E3.82.B7.E3.83.A7.E3.83.B3|プレゼンテーションとナビゲーションタブ]]にある"''アンケート完了時自動読込URL''"オプションを有効にします。 | ||
*''' | *'''URLの説明:''' アンケートに関連のないウェブページにリダイレクトする場合、"終了URL"に関する簡単な説明を追加できます。アンケート管理者は、(それぞれのURLにリダイレクトする目的を記した)メモを追加することができます。 | ||
*''' | *'''日付フォーマット:''' このオプションは、アンケート参加者の回答とともに[[Notifications_%26_data/ja|タイムスタンプ]]を記録する場合に重要です。クリックすると、ドロップダウンリストに日付形式がリストで表示されます。アンケート回答者が認識できるものを選んでください(世界中で異なる日付形式が使用されている点に注意してください)。 | ||
*''' | *'''小数点:''' ドット(.)とカンマ(,)の2つのオプションがあります。アンケートを行う地域で最も使われるものを選択してください(例えば、米国とドイツでは違う記号が使われます)。 | ||
*''' | *'''説明:''' ここにアンケートの簡単な説明を追加できます。 | ||
*''' | *'''ようこそメッセージ:''' ここに入力したようこそメッセージが、アンケート参加者に提示されます。 | ||
*''' | *'''終了メッセージ:''' アンケートへの回答を送信したとき(アンケートが完了したとき)にアンケート参加者に提示するメッセージを入力します。 | ||
{{Box|上部のツールバーには6つのオプションがあります。上記で触れたのは[[Text elements/ja|テキスト要素]]です。その他の5つは、[[General settings/ja|一般設定]]、[[Presentation/ja|プレゼンテーションとナビゲーション]]、[[Publication_%26_access/ja|公開とアクセス制御]]、[[Notifications_%26_data/ja|通知とデータ管理]]、[[Participant_settings|参加者設定]](トークン)です。それぞれをクリックすると、より高度なメニューが表示されます。これらはアンケートを強化するために使用します。アンケートを作成した後からでもアンケート設定から編集できるので、ここで選択する必要はありません。}} | |||
'''テキスト要素'''の必要なフィールドへの入力が完了したら、ウィンドウの右上にある''保存''ボタンをクリックします。新たに作成したアンケートのホームページにリダイレクトされます。新たなアンケートのホームページから質問グループや質問を追加することができます。 | |||
<center>[[File:QSG LS3 General view.png]]</center> | <center>[[File:QSG LS3 General view.png]]</center> | ||
== | ==質問グループ追加== | ||
質問グループによって、質問をグループ化することができます。'''質問を追加する前に質問グループを追加する必要があります。''' | |||
質問グループを作成するには、まず質問グループを追加するアンケートを選択します。このオプションは、LimeSurveyホームページの上部のツールバーにあります。 | |||
| Line 198: | Line 183: | ||
質問グループを追加するアンケートをクリックすると、アンケートページが表示されます。左側のメニューには、[[Survey settings/ja|設定]]と[[Survey structure/ja|構成]]という 2つのタブがあります。質問と質問グループを追加するには、'''構成'''タブから作業します。 | |||
<center>[[File:QSG LS3 Visualise settings tab.png]]</center> | <center>[[File:QSG LS3 Visualise settings tab.png]]</center> | ||
'''構成'''タブを選択すると、メニューは次のようになります。 | |||
| Line 209: | Line 194: | ||
次に、'''質問グループの追加'''ボタンをクリックします。次のページが表示されます。 | |||
| Line 215: | Line 200: | ||
*''' | *'''題名:''' 質問グループの名前 | ||
*''' | *'''説明:''' 質問グループの簡単な説明を追加できます。アンケートの設定で対応するオプションが有効になっている場合、アンケート参加者に表示されます。 | ||
*''' | *'''グループの表示順序を不規則にする:''' この機能により、質問グループの表示順序をランダム化します(ランダム化する対象の質問グループのそれぞれに同じ文字列の割り当てが必要です)。 | ||
*'''Relevance | *'''Relevance Equation(出現条件式):''' この機能は、先行する質問への回答によって特定の質問グループにしか回答できないようにするために使用します。 | ||
完了したら、画面の右上にある''保存''ボタンをクリックします。 | |||
{{Box| | {{Box|スクリーンショットでは、最後の2つのフィールド(ランダム化されたグループ、出現条件式)はLimeSurveyの式マネージャーに関する知識が必要なため、空のままになっています。これらについてもっと知りたい場合は、[https://manual.limesurvey.org/Question_groups_-_introduction/ja 質問グループに関するウィキ]を参照してください。}} | ||
== | ==質問追加== | ||
新しい質問を作成する前に質問グループを作成する必要があります。[[Quick_start_guide_-_LimeSurvey_3.0%2B/ja#Create_a_question_group|質問グループを追加する方法]]については、上記の手順を確認してください。 | |||
アンケートを作成して質問グループを追加したら、'''構成'''タブをもう一度選択し、左側のメニューバーから'''''質問追加'''''ボタンをクリックするか、''グループクイックアクション''の下にある'''''新しい質問をグループに追加'''''をクリックします。 | |||
| Line 235: | Line 219: | ||
'''新規質問を追加'''ページが表示されます。以下の項目があります。 | |||
| Line 241: | Line 225: | ||
*''' | *'''コード:''' アンケートがデータベースに保存されるときに使われる個々の質問名/コード。 | ||
*''' | *'''質問:''' アンケートで参加者に実際に表示される質問。 | ||
*''' | *'''ヘルプ:''' アンケートの参加者が質問をよりよく理解できるようにするために短いテキストを提供できます。 | ||
*''' | *'''全般オプション:''' このオプションにある機能により、最も重要な質問関連の設定を変更できます。7つのオプションがあります。 | ||
**'' | **''質問タイプ:'' LimeSurveyでは、多くの質問タイプが使用できます。理解を深めるため、各オプションの上にマウスを置くか、[https://manual.limesurvey.org/Questions_-_introduction/ja 質問に関するウィキ]を読んでください。 | ||
**'' | **''質問テンプレート:'' 既定のものではなく、カスタマイズされた質問テンプレートを選択できます。 | ||
**'' | **''質問グループ:'' ここから質問の所属先となる質問グループを選択できます。 | ||
**'' | **''回答必須:'' このオプションはすべての質問タイプで利用可能です。この設定では、次の質問に進む前にユーザーが質問に回答するよう要求することができます。 | ||
**'' | **''検証:'' この機能は、すべてのフリーテキストタイプまたは数値質問で利用できます。回答の検証に使用されます。回答が検証条件に適合しない場合、ユーザーは先に進める前にやり直すよう求められます。 | ||
**''出現条件:'' 上級ユーザー向けの設定です。既定値の"1"を使用することをお勧めします(アイテムが常に表示されることを意味します)。 | |||
**''位置:'' 質問をグループ内のどこに配置するかを選択します。 | |||
選択した質問タイプに応じて、'''一般設定'''タブの下に異なるタブが表示されます。これについてもっと知るには、まず以下の[[Question types/ja|ウィキセクション]]を読むことをお勧めします。 | |||
たとえば、'''自由回答(長い)'''の質問タイプが選択されている場合(既定のオプション)、'''全般オプション'''、'''表示'''、'''入力'''、'''ロジック'''、'''その他'''、'''統計'''、'''タイマー'''のタブが表示されます。 | |||
必要なフィールドに入力し、'''保存'''ボタンをクリックします。追加された質問の要約が表示されたページにリダイレクトされます。 | |||
| Line 260: | Line 247: | ||
さらに質問を追加するには、上記と同じ手順を実行します。 | |||
== | ==サブ質問と回答の追加== | ||
質問の種類によって、サブ質問やあらかじめ定義した回答のセットが必要な場合があります。たとえば、アンケート参加者の年齢を尋ねる質問では、サブ質問またはあらかじめ定義した回答のセットは必要ありません。一方、単純な配列質問には、サブ質問と回答の両方が必要です。 | |||
<div class="simplebox">[[File:help.png]] | <div class="simplebox">[[File:help.png]] どちらか一方または両方を必要とする質問で、サブ質問と回答が欠けている場合は、質問の概要で強調表示されます。</div> | ||
次のスクリーンショットには配列タイプの質問が含まれています。 | |||
| Line 274: | Line 261: | ||
=== | ===サブ質問の追加=== | ||
サブ質問を追加するには、上部のツールバーに移動し、'''サブ質問編集'''をクリックします。アンケート参加者に答えてほしいサブ質問を入力してください。 | |||
| Line 282: | Line 269: | ||
<div class="simplebox">[[File:help.png]] | <div class="simplebox">[[File:help.png]] さらにサブ質問を追加するには、'''操作'''列の下にある''緑色のプラス記号''をクリックします。</div> | ||
=== | ===回答の追加=== | ||
定義済みの回答を追加するには、上部のツールバーに移動し、'''回答オプション編集'''をクリックし、回答を入力してください。 | |||
| Line 293: | Line 280: | ||
<div class="simplebox">[[File:help.png]] | <div class="simplebox">[[File:help.png]] 回答の選択肢を追加するには、'''操作'''列の下にある''緑色のプラス記号''をクリックします。</div> | ||
回答のセットを保存して質問をプレビューします(上部のツールバーにある'''質問プレビュー'''ボタンをクリックします)。 | |||
| Line 301: | Line 288: | ||
質問は次のようになります。 | |||
| Line 307: | Line 294: | ||
おめでとう!最初の配列型の質問が正常に作成されました。 | |||
== | ==質問の整理== | ||
アンケートにすでに数十の質問が含まれている場合、それぞれの質問や質問グループにアクセスして順番を1つずつ編集するのは時間がかかります。質問や質問グループをすばやく再編成するには、'''アンケート構成'''メニューから質問と質問グループの順序を変更します。左側のメニューから'''アンケート構成'''タブを選択し、質問(グループ)名の前にある3本線の記号をクリックし、移動させたい位置までドラッグします。 | |||
<center>[[File:Reorder-question.png]]</center> | <center>[[File:Reorder-question.png]]</center> | ||
== | ==アンケートの実行/停止== | ||
アンケートに最低限必要な1つの質問と1つの質問グループが追加されたので、アンケートを実行することができます。左側のメニューから'''設定'''タブを選択し、'''概要'''をクリックします。次のページが表示されます。 | |||
| Line 324: | Line 311: | ||
ツールバーにある'''このアンケートを実行'''をクリックします。 | |||
| Line 330: | Line 317: | ||
実行する前に、一般的なアンケート設定について質問するウィンドウが表示されます。 | |||
| Line 336: | Line 323: | ||
{{Alert|title= | {{Alert|title=注意|text=アンケートを実行すると、グループ、質問、サブ質問、およびこれらのコードを編集することはできなくなります。}} | ||
*''' | *'''回答を匿名にしますか?:''' このオプションでは、アンケートへの回答がアンケートのトークンテーブルの情報と一致するかどうかを判断するか、あるいは匿名のままとするかを決めることができます。有効にすると、アンケートは回答が匿名になるように設定されます。回答と参加者を結びつける方法はありません。 | ||
*''' | *'''IPアドレスを保存しますか?:''' 有効にすると、アンケート回答者のIPアドレスが回答と共に保存されます。 | ||
*''' | *'''回答タイミングを保存しますか?:''' 有効にすると、アンケート参加者がアンケートの各ページに費やした時間が記録されます。 | ||
*''' | *'''回答に日付をスタンプしますか?:''' 回答が提出された日付を残したい場合は有効にします。 | ||
*''' | *'''リンク元URLを保存しますか?:''' 有効にすると、リファラーURLが回答と共に保存されます。 | ||
必要な機能を有効にしたら、'''アンケートを保存し、実行'''をクリックします。次のメッセージが表示されます。 | |||
| Line 350: | Line 337: | ||
クローズドアクセスモードを無効にするには、"'''いいえ、オープンアンケートで実行します。'''"オプションを選択してください。これにより、アンケートリンクから誰でもアンケートにアクセスできるようになります。 | |||
おめでとう!あなたは最初のアンケートを開始しました!アンケートURLは、アンケートのホームページに移動し、 | |||
''アンケートを共有''の下にある'''アンケート概要'''セクションに掲載されています。 | |||
| Line 359: | Line 347: | ||
リンクをコピーして共有してください。 | |||
アンケートを停止するには、左側のメニューから'''概要'''タブをクリックし、上部のツールバーにある'''このアンケートを止める'''をクリックします。 | |||
<center>[[File:Quick start guide - Stop this survey.png]]</center> | <center>[[File:Quick start guide - Stop this survey.png]]</center> | ||
== | ==統計== | ||
アンケートの統計をすばやく表示するには、LimeSurveyのホームページの上部ツールバーにある'''アンケート'''をクリックします。利用可能なすべてのアンケートのリストが表示されます。次に、最後の列に移動し、分析するアンケートの行にある'''統計'''ボタン([[File:Quick start guide - see Statistics survey.png]])をクリックします。 | |||
| Line 374: | Line 362: | ||
いくつかのグラフを含む新しいウィンドウが表示されます。レポートで使用する場合は、下にスクロールして、'''画像出力'''をクリックします。それぞれのグラフは.pngファイルとして個別に保存され、.zipファイルとしてアーカイブされます。 | |||
より多くの統計関連のフィルタにアクセスすには、ウィンドウの右上にある'''エキスパートモード'''クリックしてください。 | |||
フィルタを選択したら、ウィンドウの右上にある'''統計を表示'''をクリックします。 | |||
| Line 384: | Line 372: | ||
選択に応じて、HTML、Excel、PDFの形式で結果が表示されます。 | |||
== | ==質問と回答のエクスポート== | ||
SPSS、R、STATAなどの他のアプリを使用して統計やグラフを作成するため、アンケート結果を別の形式でエクスポートすることができます。分析する対象のアンケートにアクセスし、上部のツールバーにある'''回答'''をクリックし、'''回答と統計'''を選択します。 | |||
| Line 394: | Line 384: | ||
'''回答概要'''ページが表示されます。上部のツールバーにある'''エクスポート'''をクリックし、エクスポートするフォーマットを選択します。最初のオプションを選択すると、データのエクスポートで利用できるすべての形式が表示されます。 | |||
| Line 403: | Line 393: | ||
フィルタを設定したら、ウィンドウの右上にある'''エクスポート '''をクリックします。 | |||
= | =LimeSurveyのその他の機能 - 上級者向け= | ||
[https://www.limesurvey.org LimeSurvey Cloud]パッケージの[https://www.limesurvey.org/en/pricing#features 特徴]を確認してください。 | |||
さらに質問がある場合は、Discordの[https://forums.limesurvey.org LimeSurveyコミュニティチャット]に参加してください。 | |||
Latest revision as of 15:08, 1 November 2021
はじめに - LimeSurveとは何か?
LimeSurveyは、PHPで書かれ、GNU General Public License 2でライセンスされている、フリーなオープンソースのオンラインアンケートアプリケーションです。このソフトウェアは、オンラインアンケートの作成・公開し、回答収集、統計、他のアプリケーション向けに回答結果の出力ができます。LimeSurveyは自前のサーバー(LimeSurvey Community Edition)にインストールするか、ホスティングサービス(LimeSurvey Cloud)を利用します。
このクイックスタートガイドは、LimeSurvey Cloudユーザー向けに作成しています。LimeSurvey Community Editionを使用する場合は、LimeSurveyを自前のサーバーにインストールする方法については、LimeSurveyマニュアルのインストールを参照してください。
フリーのLimeSurveyアカウントを作成する
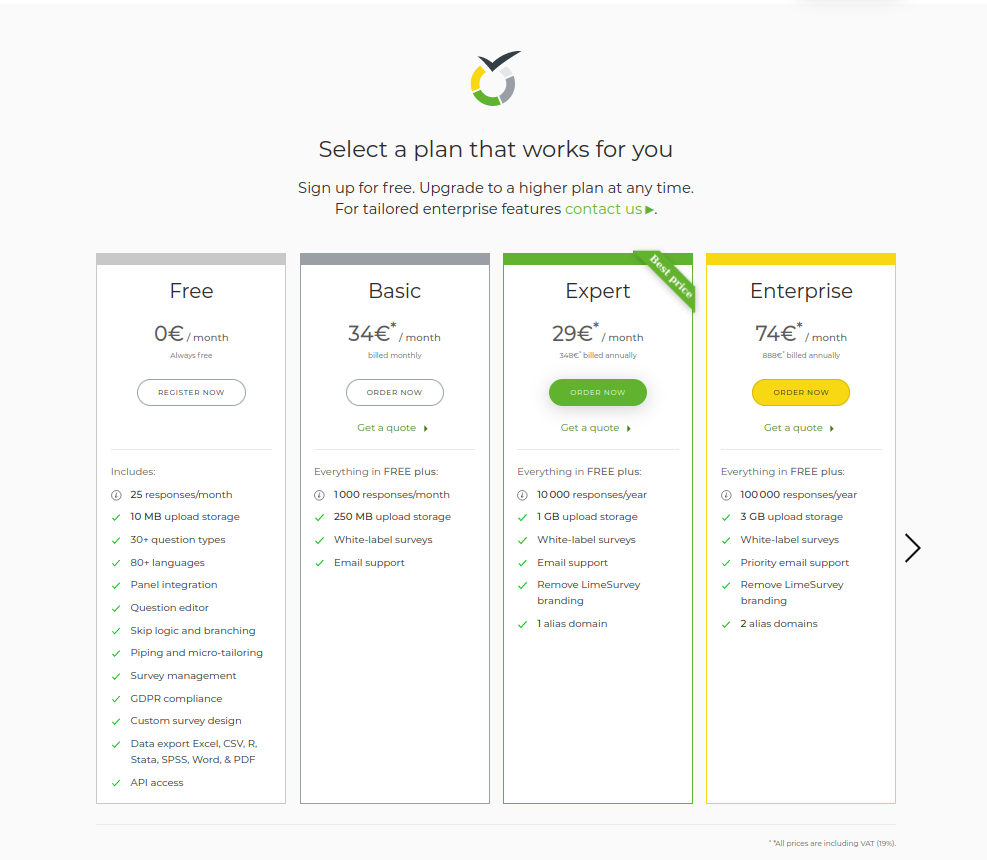
今すぐお試しください。フリーのLimeSurveyアカウントを作成し、その特長とコア機能をテストしてください。LimeSurveyウェブサイトのホームページでSign Up For Freeボタンをクリックするか、Pricingを選択し、登録します。

Sign Up For Freeを選択すると自動的に登録ページが開きます。
Pricingを選択するとFree、Basic、Expert、Enterpriseの4つの選択肢が表示されます。 FREEオプションボックス内のRegister Nowボタンをクリックします。登録ページが表示されます。
次に、以下のフィールドを入力します。
- Username: ユーザー名を入力します。ユーザー名はLimeSurveyサイトのアクセスにも使用されます。
- Email: アクティベーションリンクがここで登録した電子メールアドレスに送信されます。
- Password: LimeSurveyサイトのアクセスにも使用されるパスワードを設定します。
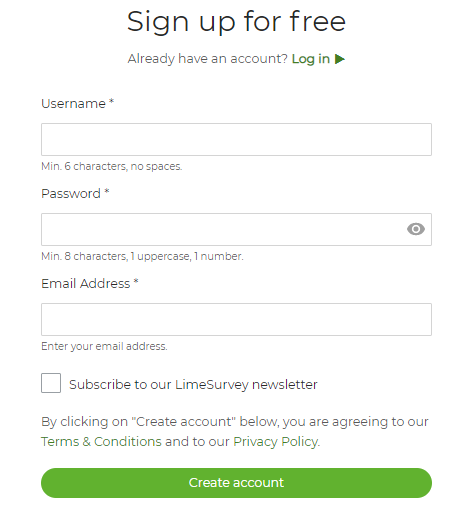
テキストボックスをクリックすると、各フィールドに必要な情報の詳細が表示されます。LimeSurveyのニュースレターに登録すれば、ヘルプ、ヒント、アップデート、サービスの割引、最新のニュースを入手することができます。
LimeSurveyアカウントを作成したら、電子メールが届きます。この電子メールには、アカウントアクティベーションリンクが含まれています。新しく作成したアカウントにアクセスするため、リンクをクリックします。LimeSurveyのWebサイトのアカウントが表示されます。
アンケートサイトを構築する
オンラインアンケートの作成と管理を始める前に、アンケートサイトを作成する必要があります。アカウントにログインし、アンケートサイトの作成ボタンをクリックします。

LimeSurveyのサイトを作成する手順:
- サイト名を入力します。
- ドロップダウンメニューからドメイン名を選択します。
- サーバーの所在地を選択します。
- LimeSurveyサイトを保存して構築するボタンをクリックします。
このプロセスには最大20秒かかります。プロセスが完了すると、ウィンドウが閉じ、アカウントページに戻ります。

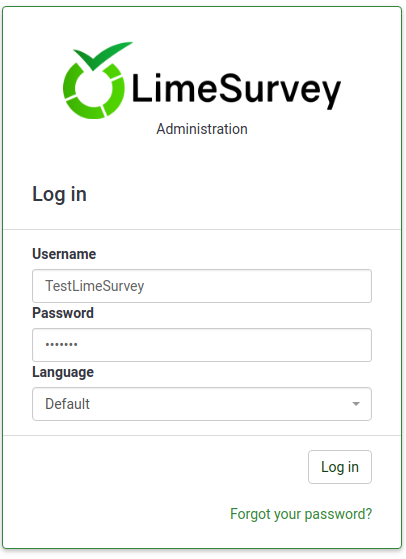
ページの上段にあるアンケートサイトを見るボタンをクリックすると、アンケートサイトにアクセスできます。LimeSurvey.orgの資格情報を使用してアカウントにサインインします。
LimeSurveyの使用開始
ページ右上にツールバーがあります。ページの中央には6つのボックスがあり、それぞれがよく使われるLimeSurveyの機能へのショートカットになっています。
このツールバーには次の設定があります。
- チュートリアル: ここには(LimeSurvey 3+のアプリケーションでは)、LimeSurveyの基本的事項と最も重要な機能を理解するための"初心者ツアー"チュートリアルがあります。
- 設定: 設定、ユーザー、詳細設定をクリックすると、LimeSurveyアプリケーションをカスタマイズしたり、ユーザーやアンケート参加者を管理したり、アンケートをカスタマイズしたりするためのオプションがあります。
- 設定: LimeSurveyアプリケーションをカスタマイズするためのオプションです。
- ホームページ設定: ホームページをカスタマイズするための設定です。
- 全体設定: ここで行われた変更は、スーパー管理者以外のすべてのユーザーの設定など、LimeSurveyアプリケーション全体に適用されます。
- プラグインマネージャー: ここからLimeSurveyチームがサポートするすべてのLimeSurveyプラグインを有効にし管理するオプションです。新しいプラグインを追加することもできます。
- メニュー設定: 新しいメニューを作成したり、既存のメニューにエントリーを追加したりするオプションです。
- メニュー項目設定: メニュー項目の作成、編集、削除をするためのオプションです。
- ユーザー: ユーザーおよびアンケート参加者の管理に関連するオプションです。
- アンケート管理ユーザ: ここから新しいアンケート管理者を追加できます。
- ユーザーグループの作成/編集: この機能は、管理ユーザーを別々のグループにグループ化するためのものです。
- 中央参加者データベース: 各管理者は、参加者の情報を個々のアンケートの参加者テーブルから独立した中央テーブル/データベースに格納することができます。
- アドバンス: ユーザー設定またはアンケート設定以外のLimeSurveyアプリケーションを強化するためのオプションです。
- テーマエディター: アンケートテーマ、管理テーマ、または質問テーマを追加/編集/削除するためのオプションです。アンケートやLimeSurveyのインターフェースをカスタマイズするテーマを選択できます。
- ラベルセット管理: ラベルセットはラベル付きのコードのリストであり、ほとんどの質問タイプで回答またはサブ質問として使用できます。
- データ整合性確認: データの一貫性と冗長性をチェックします。
- データベース全体のバックアップ: 重要なアップグレードが公開されたとき、またはLimeSurveyアプリケーションを別のサーバーに移動するときに、LimeSurveyのデータをバックアップするためのオプションです。
- 設定: LimeSurveyアプリケーションをカスタマイズするためのオプションです。
- アンケート: アンケートは、言語、質問グループ、質問、質問属性、回答、サブ質問、既定の回答、評価、クォータ、クォータメンバー、クォータ言語設定などから構成されます。緑色の矢印をクリックすると、次のオプションのウィンドウが表示されます。
- 新規アンケート作成: 新しいアンケートを作成することができます。
- アンケートインポート: アンケートをインポートすることができます。
- アンケートコピー: アンケートリストにあるアンケートを簡単にコピーすることができます。コピー後に編集することができます。
- アンケートリスト: 既存のアンケートの一覧を表示します。
- 回答残数: サブスクリプションの中で残っている回答の数を表示します。無料のアカウントでは、毎月25件の回答しか利用できません。回答数が足りなくなったら、こちらから購入してください。
- ストレージ: アンケートと回答を保存するために使用できるMBの量を表します。無料のアカウントでは、10MBの記憶領域が得られます。ストレージ容量を増やしたい場合は、以下の有料オプションのいずれかを選択してください。
- ユーザー名: ここからユーザーの設定を見たり、アカウントからログアウトしたりできます。
- ベルアイコン: 緑色のベルをクリックすると、LimeSurveyに関するさまざまな通知を見ることができます。
LimeSurveyアプリケーションのホームページには、6つのボックスがあります。
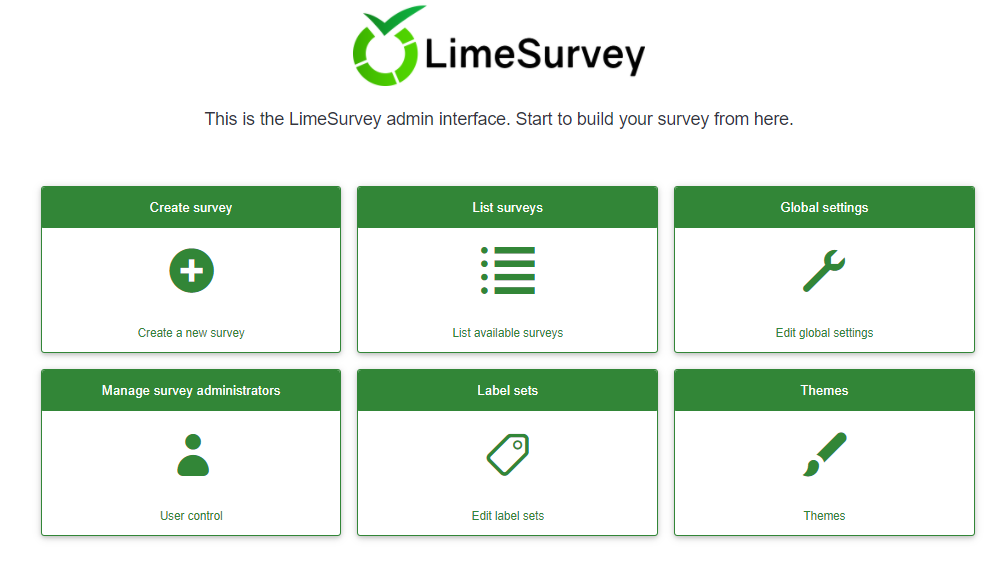
- アンケート作成
- アンケートリスト
- 全体設定
- アンケート管理者の管理
- ラベルセット
- テンプレート
アンケート作成
アンケートを作成するには、アンケート作成ボックスをクリックします。
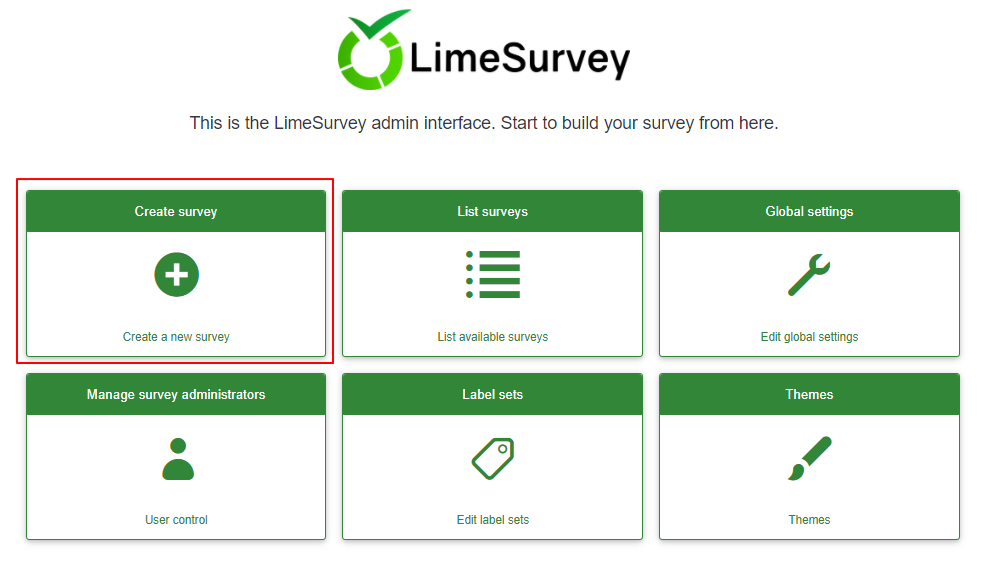
アンケート作成ページが表示されます。
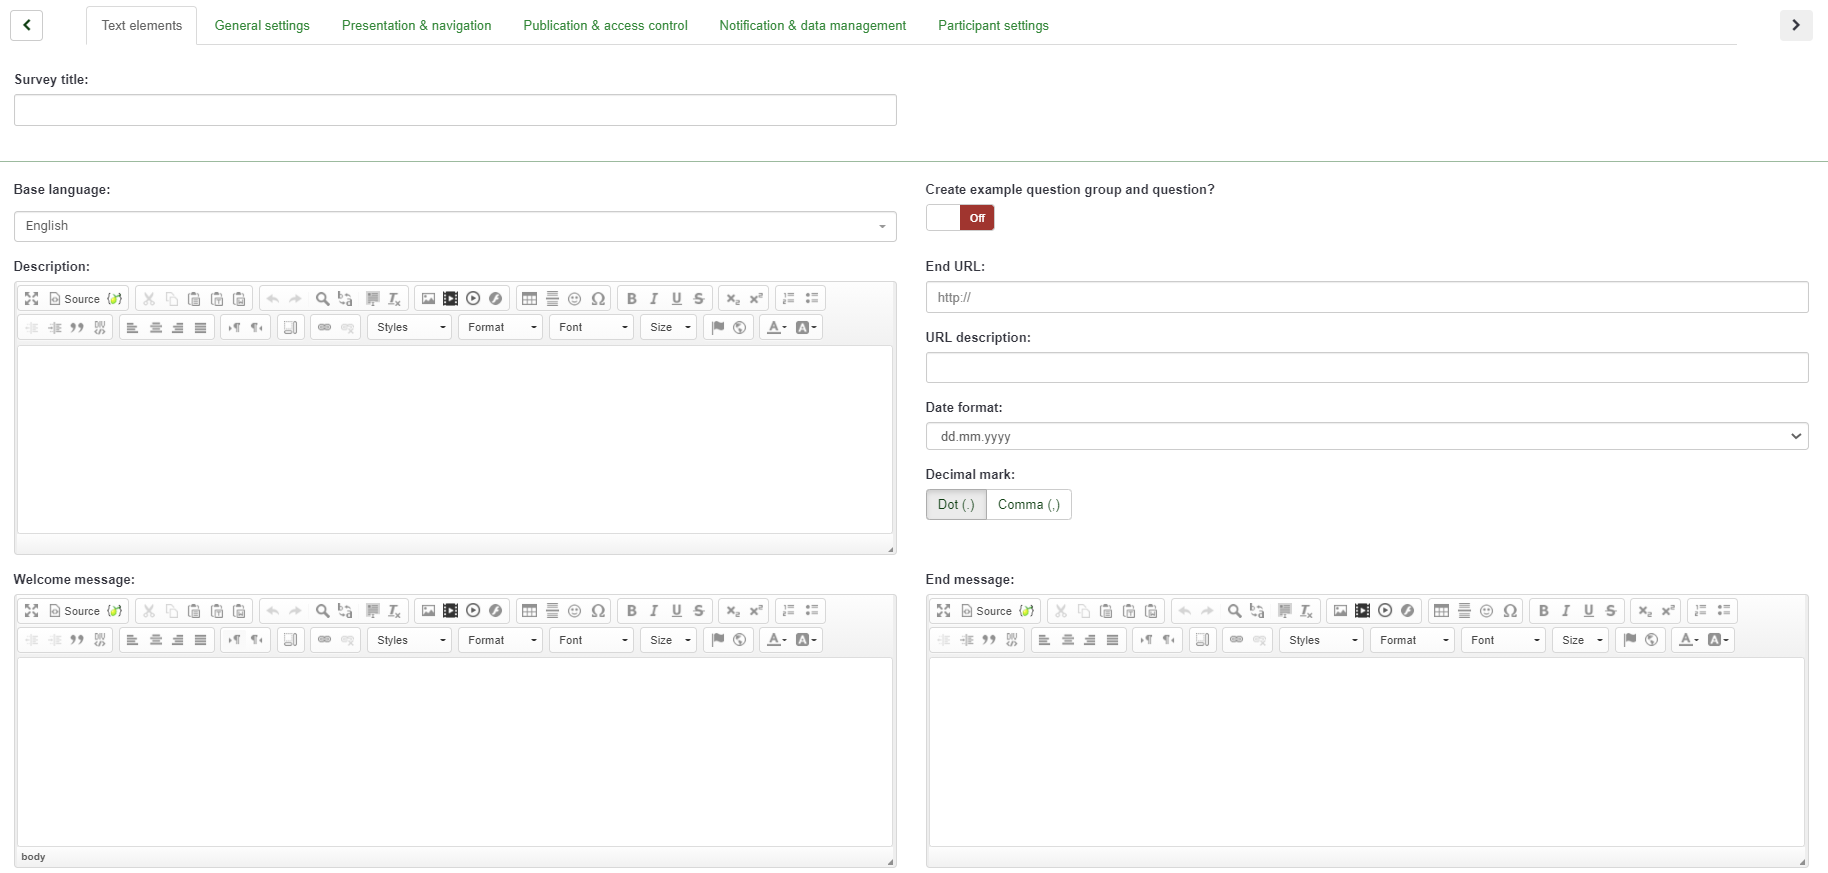
アンケート作成ページに以下の項目があります。
- アンケートのタイトル: アンケートのタイトルを入力します。必須項目です。その時点で思いついていなくても心配はありません。アンケートのタイトルは後で変更することができます。
- 基本言語: アンケートで使用する言語です。後からアンケート設定を変更して言語を追加することができます。
- サンプル質問: 既定では無効になっています。これを有効にすると、質問グループと質問例がアンケートに追加されます。
- 終了URL: ユーザーがアンケートの記入を完了した後に、別のページにリダイレクトさせることができます。その場合は、URLを入力し、プレゼンテーションとナビゲーションタブにある"アンケート完了時自動読込URL"オプションを有効にします。
- URLの説明: アンケートに関連のないウェブページにリダイレクトする場合、"終了URL"に関する簡単な説明を追加できます。アンケート管理者は、(それぞれのURLにリダイレクトする目的を記した)メモを追加することができます。
- 日付フォーマット: このオプションは、アンケート参加者の回答とともにタイムスタンプを記録する場合に重要です。クリックすると、ドロップダウンリストに日付形式がリストで表示されます。アンケート回答者が認識できるものを選んでください(世界中で異なる日付形式が使用されている点に注意してください)。
- 小数点: ドット(.)とカンマ(,)の2つのオプションがあります。アンケートを行う地域で最も使われるものを選択してください(例えば、米国とドイツでは違う記号が使われます)。
- 説明: ここにアンケートの簡単な説明を追加できます。
- ようこそメッセージ: ここに入力したようこそメッセージが、アンケート参加者に提示されます。
- 終了メッセージ: アンケートへの回答を送信したとき(アンケートが完了したとき)にアンケート参加者に提示するメッセージを入力します。
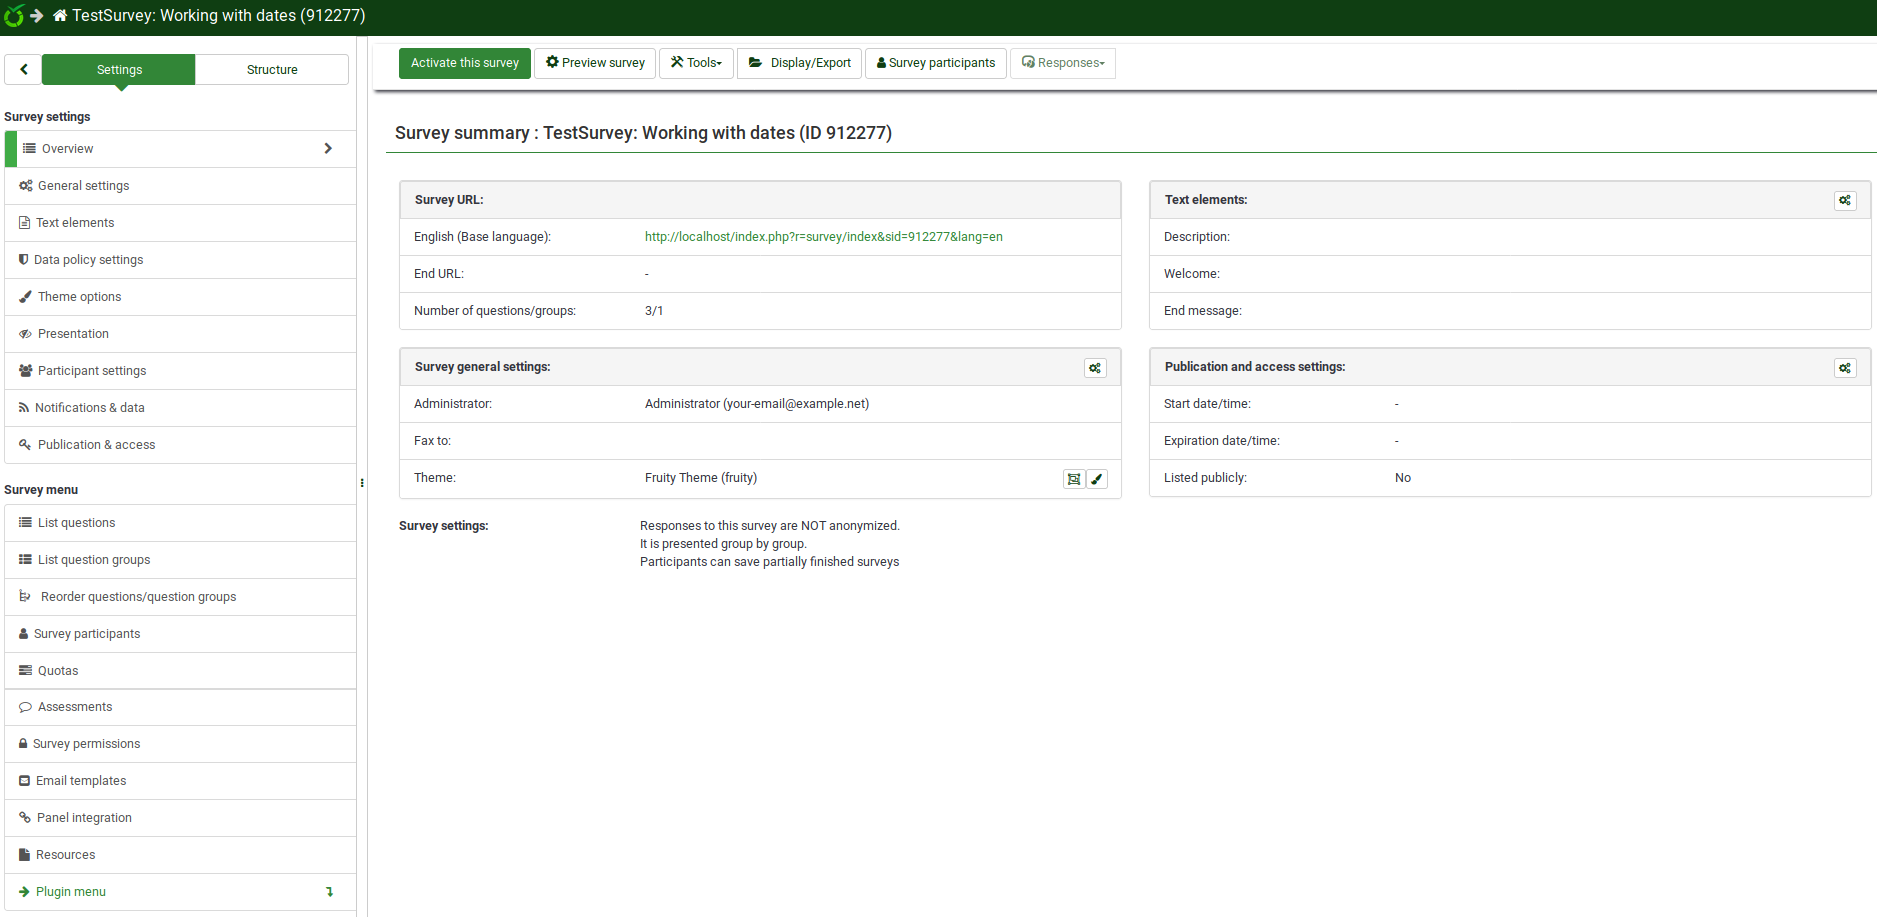
テキスト要素の必要なフィールドへの入力が完了したら、ウィンドウの右上にある保存ボタンをクリックします。新たに作成したアンケートのホームページにリダイレクトされます。新たなアンケートのホームページから質問グループや質問を追加することができます。
質問グループ追加
質問グループによって、質問をグループ化することができます。質問を追加する前に質問グループを追加する必要があります。
質問グループを作成するには、まず質問グループを追加するアンケートを選択します。このオプションは、LimeSurveyホームページの上部のツールバーにあります。
質問グループを追加するアンケートをクリックすると、アンケートページが表示されます。左側のメニューには、設定と構成という 2つのタブがあります。質問と質問グループを追加するには、構成タブから作業します。
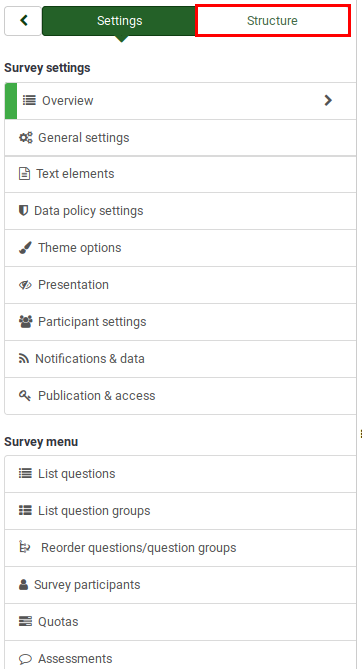
構成タブを選択すると、メニューは次のようになります。
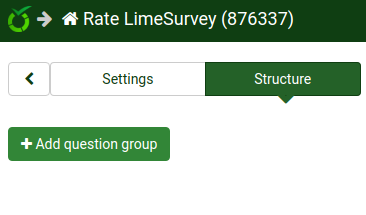
次に、質問グループの追加ボタンをクリックします。次のページが表示されます。
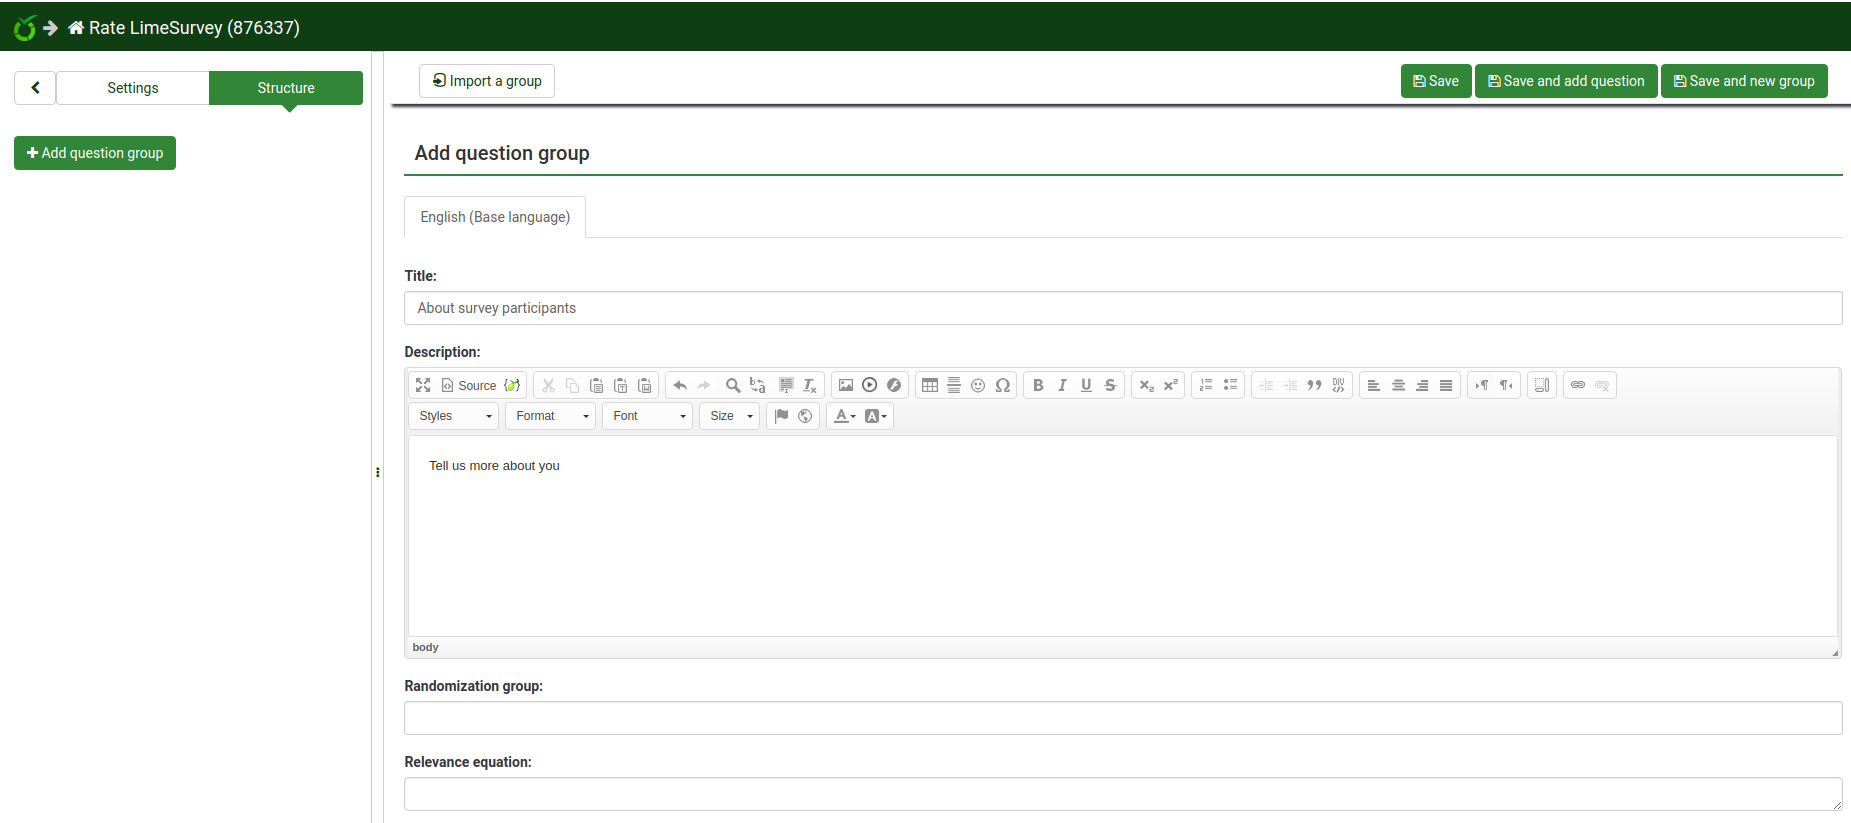
- 題名: 質問グループの名前
- 説明: 質問グループの簡単な説明を追加できます。アンケートの設定で対応するオプションが有効になっている場合、アンケート参加者に表示されます。
- グループの表示順序を不規則にする: この機能により、質問グループの表示順序をランダム化します(ランダム化する対象の質問グループのそれぞれに同じ文字列の割り当てが必要です)。
- Relevance Equation(出現条件式): この機能は、先行する質問への回答によって特定の質問グループにしか回答できないようにするために使用します。
完了したら、画面の右上にある保存ボタンをクリックします。
質問追加
新しい質問を作成する前に質問グループを作成する必要があります。質問グループを追加する方法については、上記の手順を確認してください。
アンケートを作成して質問グループを追加したら、構成タブをもう一度選択し、左側のメニューバーから質問追加ボタンをクリックするか、グループクイックアクションの下にある新しい質問をグループに追加をクリックします。

新規質問を追加ページが表示されます。以下の項目があります。
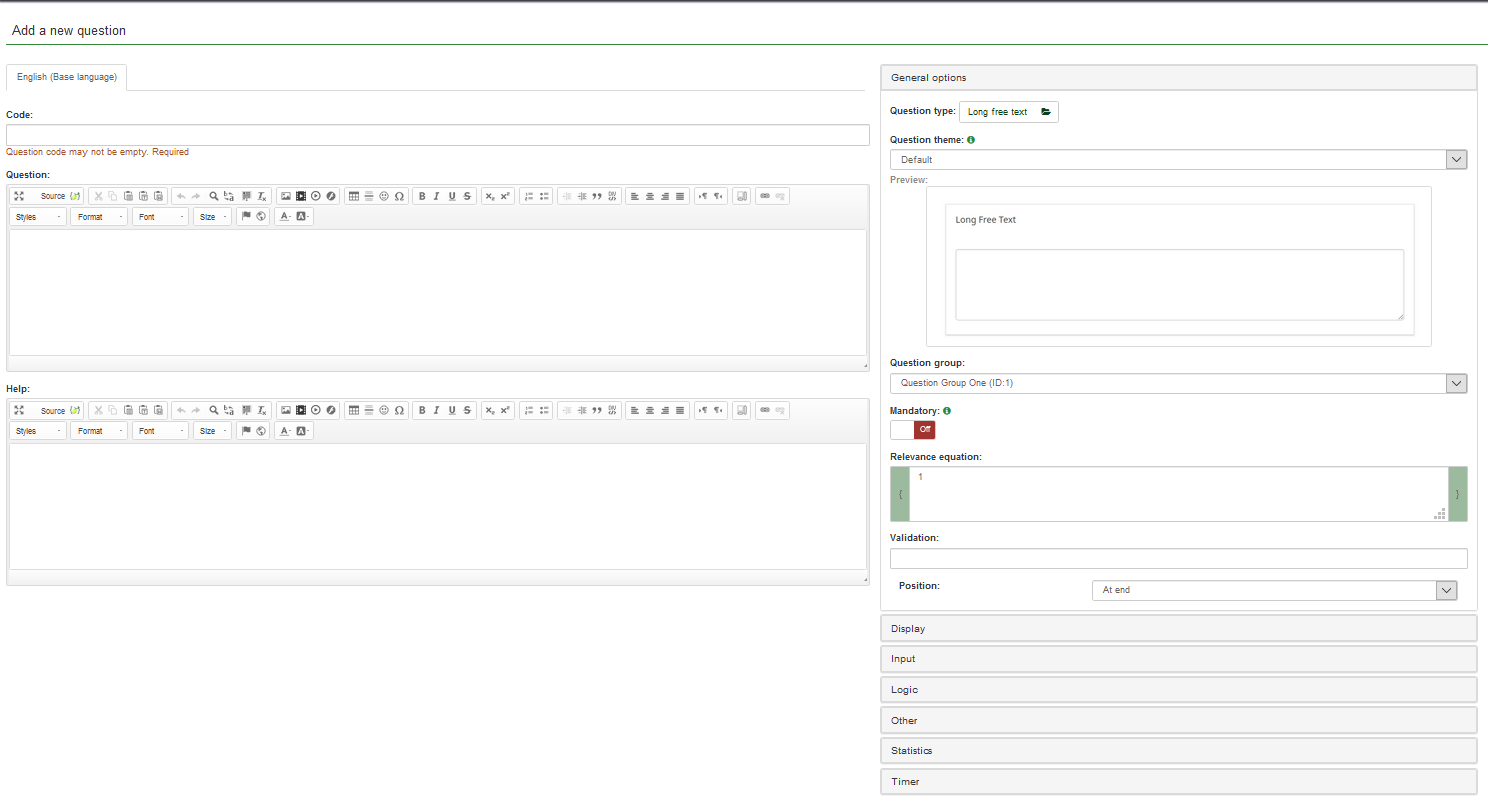
- コード: アンケートがデータベースに保存されるときに使われる個々の質問名/コード。
- 質問: アンケートで参加者に実際に表示される質問。
- ヘルプ: アンケートの参加者が質問をよりよく理解できるようにするために短いテキストを提供できます。
- 全般オプション: このオプションにある機能により、最も重要な質問関連の設定を変更できます。7つのオプションがあります。
- 質問タイプ: LimeSurveyでは、多くの質問タイプが使用できます。理解を深めるため、各オプションの上にマウスを置くか、質問に関するウィキを読んでください。
- 質問テンプレート: 既定のものではなく、カスタマイズされた質問テンプレートを選択できます。
- 質問グループ: ここから質問の所属先となる質問グループを選択できます。
- 回答必須: このオプションはすべての質問タイプで利用可能です。この設定では、次の質問に進む前にユーザーが質問に回答するよう要求することができます。
- 検証: この機能は、すべてのフリーテキストタイプまたは数値質問で利用できます。回答の検証に使用されます。回答が検証条件に適合しない場合、ユーザーは先に進める前にやり直すよう求められます。
- 出現条件: 上級ユーザー向けの設定です。既定値の"1"を使用することをお勧めします(アイテムが常に表示されることを意味します)。
- 位置: 質問をグループ内のどこに配置するかを選択します。
選択した質問タイプに応じて、一般設定タブの下に異なるタブが表示されます。これについてもっと知るには、まず以下のウィキセクションを読むことをお勧めします。
たとえば、自由回答(長い)の質問タイプが選択されている場合(既定のオプション)、全般オプション、表示、入力、ロジック、その他、統計、タイマーのタブが表示されます。
必要なフィールドに入力し、保存ボタンをクリックします。追加された質問の要約が表示されたページにリダイレクトされます。
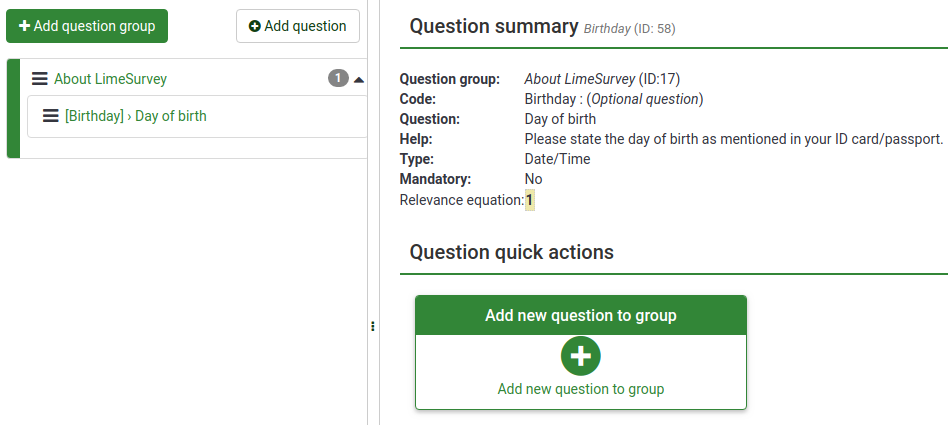
さらに質問を追加するには、上記と同じ手順を実行します。
サブ質問と回答の追加
質問の種類によって、サブ質問やあらかじめ定義した回答のセットが必要な場合があります。たとえば、アンケート参加者の年齢を尋ねる質問では、サブ質問またはあらかじめ定義した回答のセットは必要ありません。一方、単純な配列質問には、サブ質問と回答の両方が必要です。
次のスクリーンショットには配列タイプの質問が含まれています。

サブ質問の追加
サブ質問を追加するには、上部のツールバーに移動し、サブ質問編集をクリックします。アンケート参加者に答えてほしいサブ質問を入力してください。

回答の追加
定義済みの回答を追加するには、上部のツールバーに移動し、回答オプション編集をクリックし、回答を入力してください。

回答のセットを保存して質問をプレビューします(上部のツールバーにある質問プレビューボタンをクリックします)。
質問は次のようになります。

おめでとう!最初の配列型の質問が正常に作成されました。
質問の整理
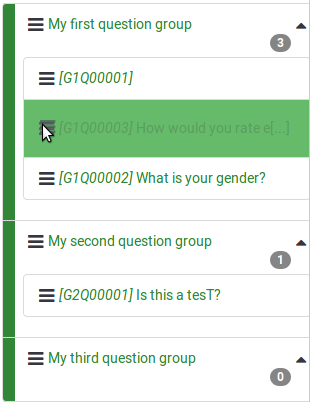
アンケートにすでに数十の質問が含まれている場合、それぞれの質問や質問グループにアクセスして順番を1つずつ編集するのは時間がかかります。質問や質問グループをすばやく再編成するには、アンケート構成メニューから質問と質問グループの順序を変更します。左側のメニューからアンケート構成タブを選択し、質問(グループ)名の前にある3本線の記号をクリックし、移動させたい位置までドラッグします。
アンケートの実行/停止
アンケートに最低限必要な1つの質問と1つの質問グループが追加されたので、アンケートを実行することができます。左側のメニューから設定タブを選択し、概要をクリックします。次のページが表示されます。
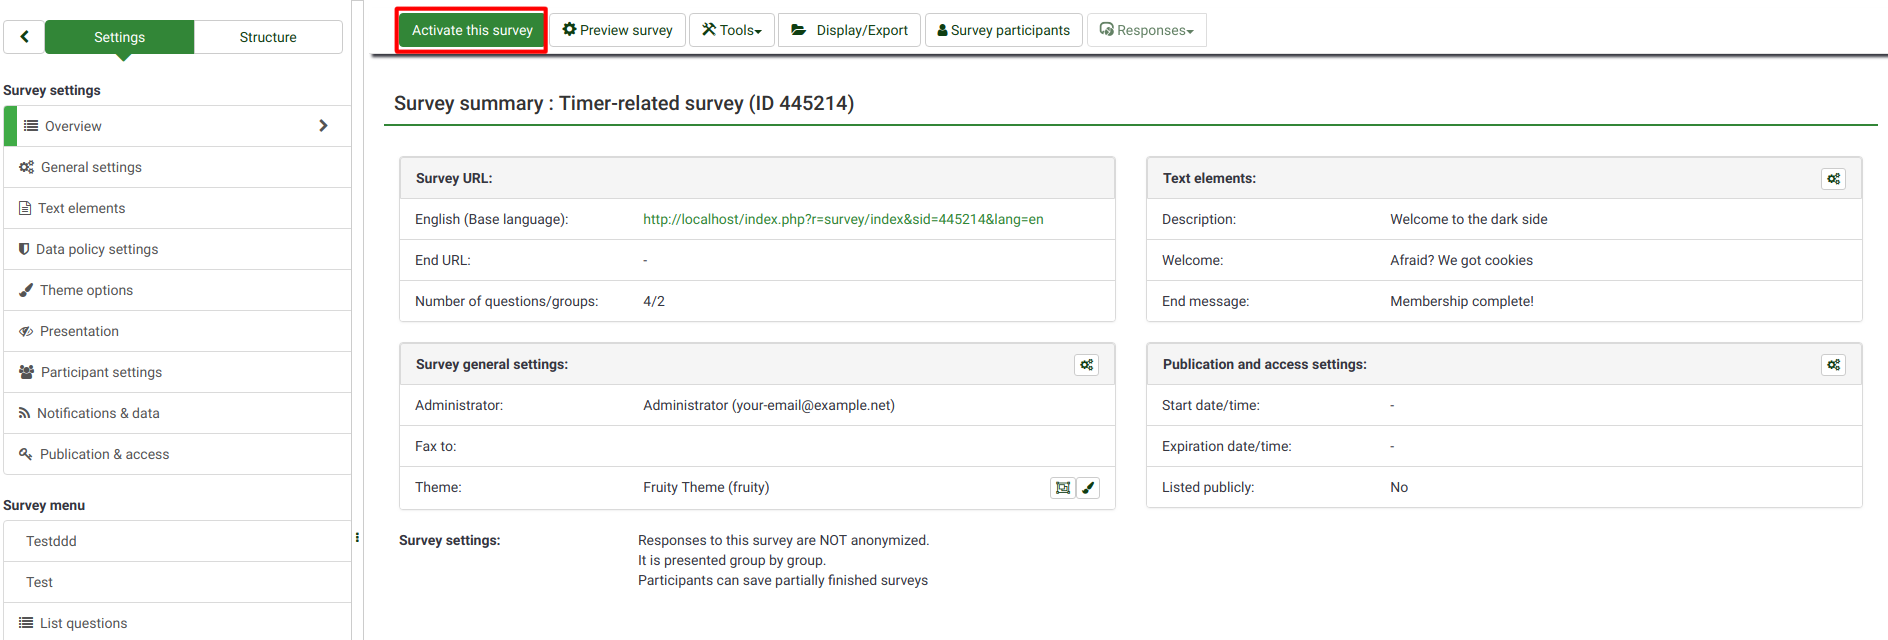
ツールバーにあるこのアンケートを実行をクリックします。
実行する前に、一般的なアンケート設定について質問するウィンドウが表示されます。

- 回答を匿名にしますか?: このオプションでは、アンケートへの回答がアンケートのトークンテーブルの情報と一致するかどうかを判断するか、あるいは匿名のままとするかを決めることができます。有効にすると、アンケートは回答が匿名になるように設定されます。回答と参加者を結びつける方法はありません。
- IPアドレスを保存しますか?: 有効にすると、アンケート回答者のIPアドレスが回答と共に保存されます。
- 回答タイミングを保存しますか?: 有効にすると、アンケート参加者がアンケートの各ページに費やした時間が記録されます。
- 回答に日付をスタンプしますか?: 回答が提出された日付を残したい場合は有効にします。
- リンク元URLを保存しますか?: 有効にすると、リファラーURLが回答と共に保存されます。
必要な機能を有効にしたら、アンケートを保存し、実行をクリックします。次のメッセージが表示されます。

クローズドアクセスモードを無効にするには、"いいえ、オープンアンケートで実行します。"オプションを選択してください。これにより、アンケートリンクから誰でもアンケートにアクセスできるようになります。
おめでとう!あなたは最初のアンケートを開始しました!アンケートURLは、アンケートのホームページに移動し、
アンケートを共有の下にあるアンケート概要セクションに掲載されています。
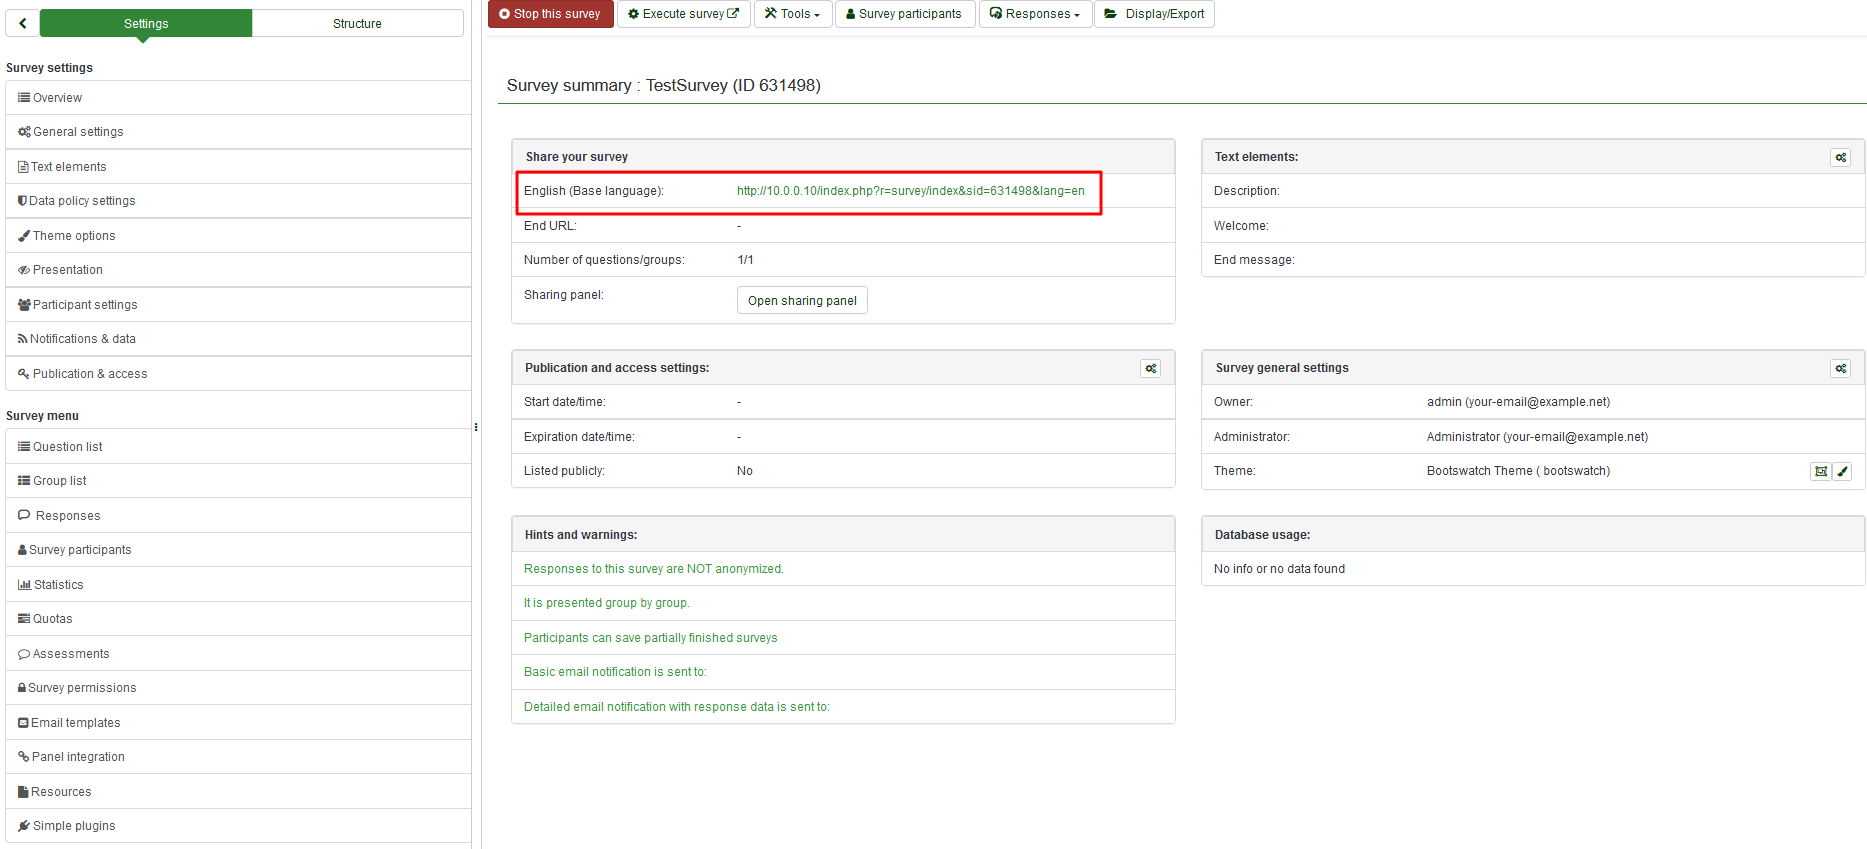
リンクをコピーして共有してください。
アンケートを停止するには、左側のメニューから概要タブをクリックし、上部のツールバーにあるこのアンケートを止めるをクリックします。

統計
アンケートの統計をすばやく表示するには、LimeSurveyのホームページの上部ツールバーにあるアンケートをクリックします。利用可能なすべてのアンケートのリストが表示されます。次に、最後の列に移動し、分析するアンケートの行にある統計ボタン(![]() )をクリックします。
)をクリックします。

いくつかのグラフを含む新しいウィンドウが表示されます。レポートで使用する場合は、下にスクロールして、画像出力をクリックします。それぞれのグラフは.pngファイルとして個別に保存され、.zipファイルとしてアーカイブされます。
より多くの統計関連のフィルタにアクセスすには、ウィンドウの右上にあるエキスパートモードクリックしてください。
フィルタを選択したら、ウィンドウの右上にある統計を表示をクリックします。

選択に応じて、HTML、Excel、PDFの形式で結果が表示されます。
質問と回答のエクスポート
SPSS、R、STATAなどの他のアプリを使用して統計やグラフを作成するため、アンケート結果を別の形式でエクスポートすることができます。分析する対象のアンケートにアクセスし、上部のツールバーにある回答をクリックし、回答と統計を選択します。

回答概要ページが表示されます。上部のツールバーにあるエクスポートをクリックし、エクスポートするフォーマットを選択します。最初のオプションを選択すると、データのエクスポートで利用できるすべての形式が表示されます。

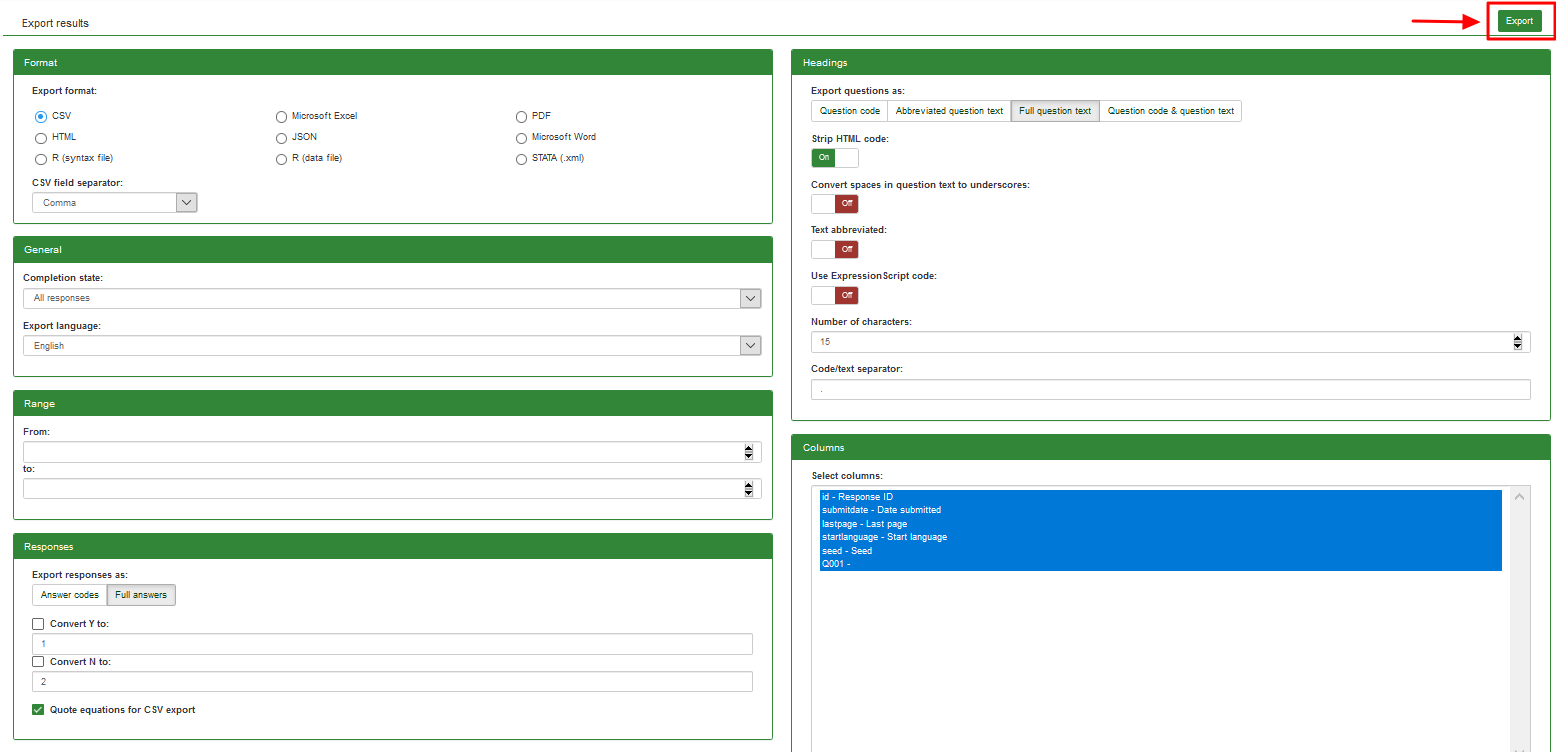
フィルタを設定したら、ウィンドウの右上にあるエクスポート をクリックします。
LimeSurveyのその他の機能 - 上級者向け
LimeSurvey Cloudパッケージの特徴を確認してください。
さらに質問がある場合は、DiscordのLimeSurveyコミュニティチャットに参加してください。