Manage user groups/sl: Difference between revisions
From LimeSurvey Manual
Maren.fritz (talk | contribs) (Created page with "==Izbriši skupino uporabnikov==") |
Maren.fritz (talk | contribs) (Created page with "Če želite izbrisati uporabniško skupino, kliknite rdeči gumb za smeti, ki se nahaja v vrstici z uporabniško skupino, ki jo želite izbrisati, in pritisnite OK.") |
||
| Line 60: | Line 60: | ||
==Izbriši skupino uporabnikov== | ==Izbriši skupino uporabnikov== | ||
Če želite izbrisati uporabniško skupino, kliknite rdeči gumb za smeti, ki se nahaja v vrstici z uporabniško skupino, ki jo želite izbrisati, in pritisnite OK. | |||
<div class="mw-translate-fuzzy"> | <div class="mw-translate-fuzzy"> | ||
Revision as of 10:51, 14 December 2023
Splošno
Funkcionalnost Uporabniške skupine je bila dodana tako, da je uporabnike za upravljanje skupin mogoče uvrstiti v posamezne skupine. Vendar je ta možnost trenutno omejena glede funkcionalnosti'. Na skupino ni vezanih nobenih pravih dovoljenj. Skupine služijo bolj kot makro ali besedilna priročnost za delo s skupinami skrbniških uporabnikov.
Upravljanje skupin uporabnikov
Če kliknete gumb Ustvari/uredi skupine uporabnikov v pogovornem oknu Konfiguracija, boste preusmerjeni na stran za upravljanje uporabniške skupine'.

Ustvarite skupine uporabnikov
Če želite dodati skupino uporabnikov, kliknite gumb Dodaj novo skupino uporabnikov' v zgornjem levem kotu okna. Vnesite ime in opis uporabniške skupine in kliknite Shrani:

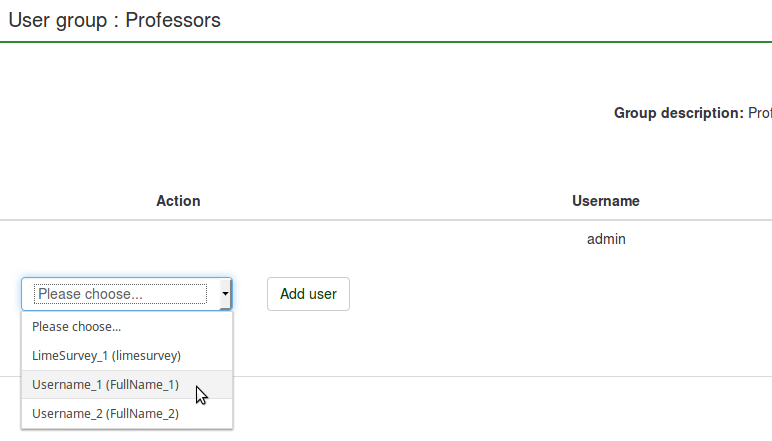
Sedaj lahko dodate uporabnike v novo ustvarjeno uporabniško skupino tako, da izberete želenega uporabnika iz spustnega seznama in kliknete gumb Dodaj uporabnika.


Kliknite Zapri (zgornji desni del okna), da se vrnete na seznam skupin uporabnikov. Na seznamu lahko opazujete novo dodano skupino. V tabeli so navedeni naslednji podatki:

- ID uporabniške skupine : Prikazuje edinstven ID, ki je samodejno dodeljen vsaki uporabniški skupini.
- Ime : Ime uporabniške skupine.
- Opis : Opis uporabniške skupine.
- Lastnik : lastnik/ustvarjalec uporabniške skupine. Lastnika ni mogoče spremeniti. Če je to potrebno, morate skupino izbrisati in ustvariti novo.
- Members : prikazuje število članov uporabniške skupine;
- Action : zadnji prikazuje nabor dejanj, ki so na voljo za vsako skupino uporabnikov s seznama skupin uporabnikov. Spodaj so predstavljena naslednja dejanja uporabniške skupine: ogled uporabnikov, urejanje uporabniške skupine, e-pošta uporabniške skupine in izbris uporabniške skupine.
Ogled članov uporabniške skupine
Če kliknete zeleno tabelo, se prikaže podrobnejši prikaz članov uporabniške skupine.
Urejanje skupine uporabnikov
S klikom na zeleno pero lahko uredite ime in opis zadevne skupine uporabnikov.
E-poštno sporočilo skupini uporabnikov
Zeleni simbol pošte omogoča skrbniku skupine množično pošiljanje e-pošte članom te uporabniške skupine. Njegova funkcionalnost vključuje:
- 'Pošlji mi kopijo': če je označeno, bo e-poštno sporočilo poslano lastniku uporabniške skupine/tistemu, ki je ustvaril uporabniško skupino.
- ' Zadeva: Vnesite želeno zadevo vašega e-poštnega sporočila.
- Sporočilo: Vnesite želeno sporočilo, ki ga želite poslati članom uporabniške skupine.
Nato kliknite gumb Pošlji pod besedilnim poljem Sporočilo.
Izbriši skupino uporabnikov
Če želite izbrisati uporabniško skupino, kliknite rdeči gumb za smeti, ki se nahaja v vrstici z uporabniško skupino, ki jo želite izbrisati, in pritisnite OK.
Skupina uporabnikov je lahko ciljna skupina za varnostne nastavitve ankete, kadar delate z anketo. Ko imate izbrano anketo, kliknite na ikono Dovoljenja ankete v meniju Lastnosti ankete. V oknu, ki se prikaže, lahko izbirate posamezne uporabnike ali skupine uporabnikov. Z izbiro skupine uporabnikov se na trenutni seznam za urejanje pravic ankete dodajo vsi člani izbrane skupine. Ko imate izbrane uporabnike, jim lahko dodelite posebne pravice nad izbrano anketo.
A user group can be used to offer specific survey permissions, like editing the questions, activating the survey, and/or viewing the responses among others. Adding a user group behaves like a macro function that simply adds all the current members of the user group with the same privileges at that same time to the Survey.
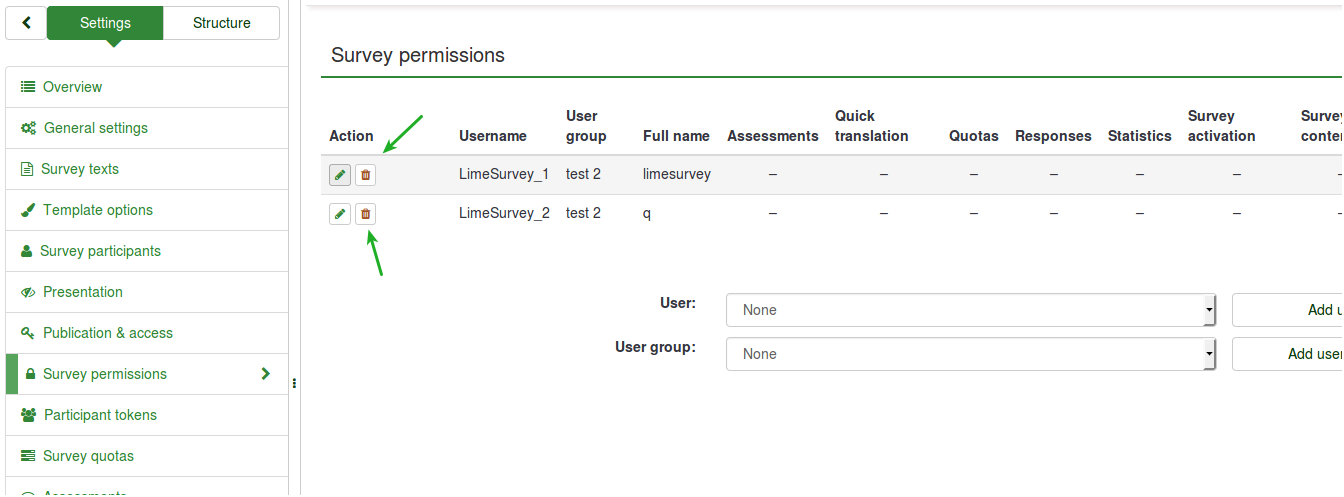
To change the survey permissions, go to the Settings menu of your survey. Click on Survey permissions and choose the user group that should be granted survey permissions:


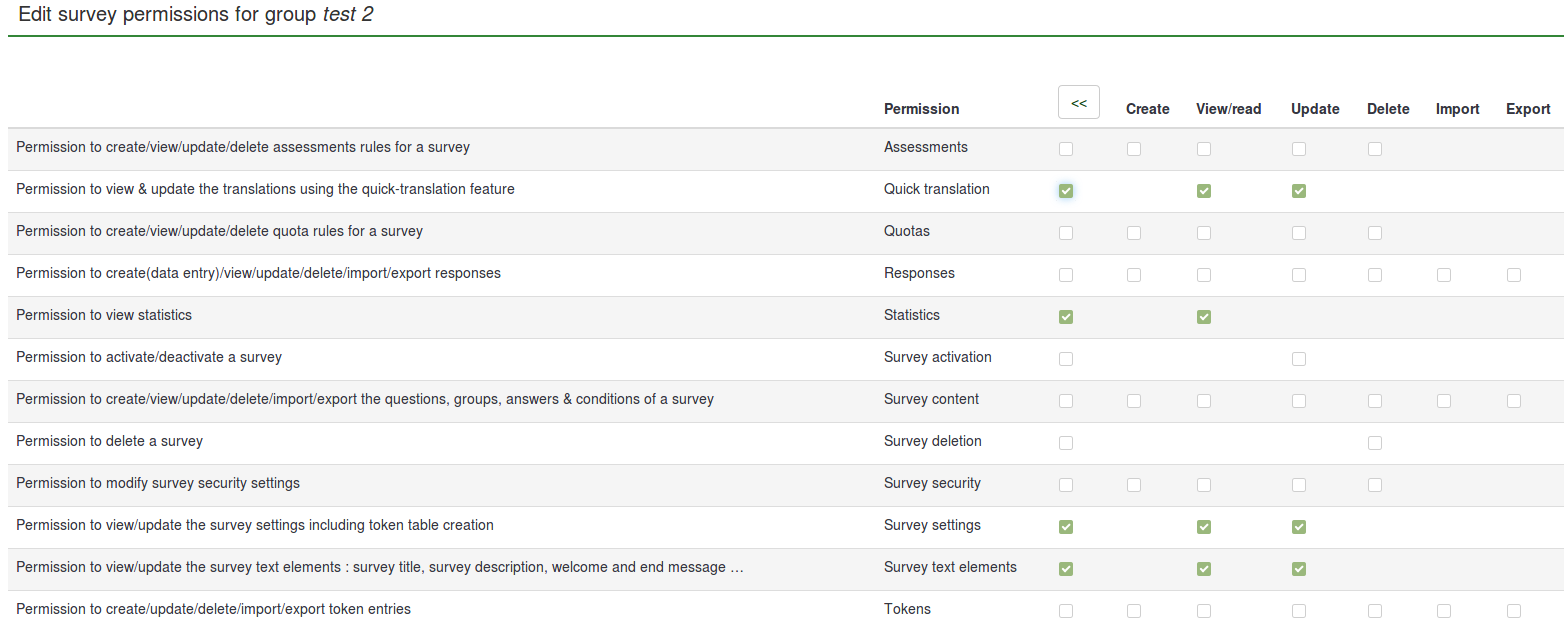
Select in the next step the permissions that you allocate to the members of that user group. Do not forget to click the double-right arrowhead to get an extended view of the permissions matrix.

After you have finished editing the survey permissions, click the Save button, which is located in the upper right part of the screen. Some examples are provided below in order to help you get a better understanding of the Limesurvey's survey permissions system.
Things to watch out for
Some limitations of the user group functionality are presented below:
Kasnejše spremembe v skupini uporabnikov po urejanju pravic nad anketo ne bodo vplivale na že dodeljene pravice. Člani izbrane skupine uporabnikov so povezani samo pri trenutnem nastavljanju pravic ankete.
Because the user group functions are still experimental, we kindly ask you to pay attention to any inconsistencies you may find while using LimeSurvey and report them via the bugs tracker (recommended) or the ticket system.

Examples
Some examples are provided below to help you better understand how a LimeSurvey user group works:
Informing members of a user group that they have received certain survey permissions
- Log in.
- Go to the user groups list and click the green mail sign (located on the last column of the table).
- Type the subject and the text body of the email.
- Send it.
Granting certain permissions to a user group
- Log in as admin (or as a user that has the 'Survey security' and 'Survey content' permission).
- Create a user group.
- Add users to the user group.
- Go to the Survey permissions page of the survey.
- Add the user group and offer its members the survey permissions you wish them to have.
Adding a user to a user group
As mentioned above, adding a user group behaves like a macro function that simply adds all the current members of the user group, easing the process of granting survey permissions. However, if a new member is added to that user group, that member will not automatically receive the rights that were previously granted to the other members of the user group. Therefore, you will have to repeat the steps shown in the example from above in order to grant him or her the same rights or you just add him or her separately, using the Add user function (from the 'Survey permission' panel).
Removing permissions of a user no longer in a user group
Removing him from the group should leave him without any user group permissions. However, this is not happening due to the limitations of the user group functionalities! If you delete the user from the user group, he or she still remains with the user group survey permissions. Therefore, a workaround is to manually delete the account from the 'Survey permissions' table.
- Log in as administrator (or as a user with 'Survey security' permission).
- Go to the Survey permissions page, which can be accessed from the Settings of the survey.
- Delete the respective user from the 'Survey permissions' table.

Removing all user group members with access to a survey
As mentioned above, deleting a user from a group won't retrieve his survey permissions. The same goes for 'user groups'. Deleting a user group won't retrieve the survey permissions that were previously granted to the members of the respective user group. At the moment, the only viable solution is to have them manually removed from the 'Survey permissions' table.