Benutzergruppen verwalten
From LimeSurvey Manual
Allgemein
Die Funktionalität „Benutzergruppen“ wurde hinzugefügt, damit Gruppenverwaltungsbenutzer in einzelne Gruppen eingeteilt werden können. „Diese Option ist derzeit jedoch in ihrer Funktionalität eingeschränkt.“ Es gibt keine wirklichen Berechtigungen, die an eine Gruppe gebunden sind. Gruppen dienen eher als Makro- oder Texthilfe für die Arbeit mit Gruppen von Verwaltungsbenutzern.
Benutzergruppenverwaltung
Wenn Sie im Dialogfeld „Konfiguration“ auf die Schaltfläche „Benutzergruppen erstellen/bearbeiten“ klicken, gelangen Sie zur Verwaltungsseite „Benutzergruppen“.


Benutzergruppen erstellen
Um eine Benutzergruppe hinzuzufügen, klicken Sie auf die Schaltfläche „Neue Benutzergruppe hinzufügen“ in der oberen linken Ecke des Fensters. Geben Sie den Namen und die Beschreibung der Benutzergruppe ein und klicken Sie auf „Speichern“:

Jetzt können Sie Benutzer zur neu erstellten Benutzergruppe hinzufügen, indem Sie den gewünschten Benutzer aus der Dropdown-Liste auswählen und auf die Schaltfläche „Benutzer hinzufügen“ klicken.


Klicken Sie auf „Schließen“ (oben rechts im Fenster), um zur Benutzergruppenliste zurückzukehren. Sie können die neu hinzugefügte Gruppe in der Liste beobachten. Die folgenden Details sind in der Tabelle aufgeführt:

- Benutzergruppen-ID: Zeigt eine eindeutige ID an, die jeder Benutzergruppe automatisch zugewiesen wird.
- Name: Der Name der Benutzergruppe.
- Beschreibung: Die Beschreibung der Benutzergruppe.
- Owner : Der Besitzer/Ersteller der Benutzergruppe. Der Eigentümer kann nicht geändert werden. Wenn dies erforderlich ist, müssen Sie die Gruppe löschen und eine neue erstellen.
- Members : Zeigt die Anzahl der Mitglieder der Benutzergruppe an;
- Action : Die letzte Die Spalte zeigt eine Reihe von Aktionen an, die für jede Benutzergruppe in der Benutzergruppenliste verfügbar sind. Im Folgenden werden die folgenden Benutzergruppenaktionen vorgestellt: „Benutzer anzeigen“, „Benutzergruppe bearbeiten“, „Benutzergruppe per E-Mail senden“ und „Benutzergruppe löschen“.
Benutzergruppenmitglieder anzeigen
If you click the green table, a more detailed view of the members of the user group will be shown.
Edit user group
Clicking the green pen allows you to edit the name and the description of the respective user group.
Email user group
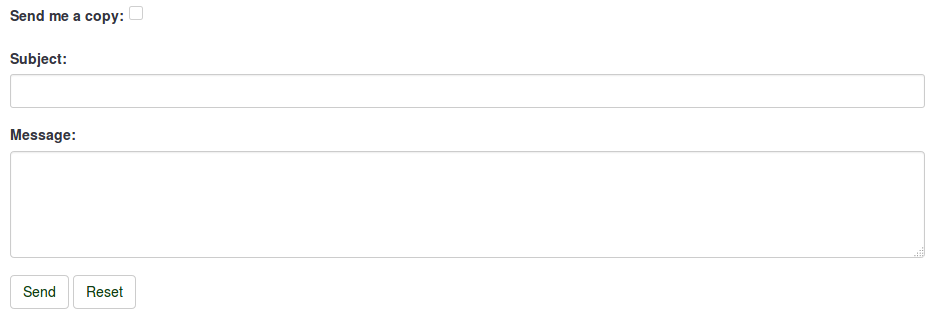
The green mail symbol allows the group administrator to send mass emails to the members of that user group. Its functionality includes:
- Send me a copy: If ticked, an email will be sent to the owner of the user group/the one who created the user group.
- Subject: Type in the desired subject of your email.
- Message: Type in the desired message you wish to send to the members of the user group.

Then, click the Send button located under the Message text box.
Delete user group
To delete a user group, click the red wastebin button that is located on the line with the user group that you wish to delete and hit OK.
Berechtigungen für eine einzelne Umfrage an eine Benutzergruppe vergeben
Eine „Benutzergruppe“ kann verwendet werden, um spezifische Umfrageberechtigungen festlegen anzubieten, z. B. das Bearbeiten der Fragen, das Aktivieren der Umfrage und/oder das Anzeigen der Antworten. Das Hinzufügen einer „Benutzergruppe“ verhält sich wie eine Makrofunktion, die einfach alle aktuellen Mitglieder der „Benutzergruppe“ mit denselben Berechtigungen gleichzeitig zur „Umfrage“ hinzufügt.
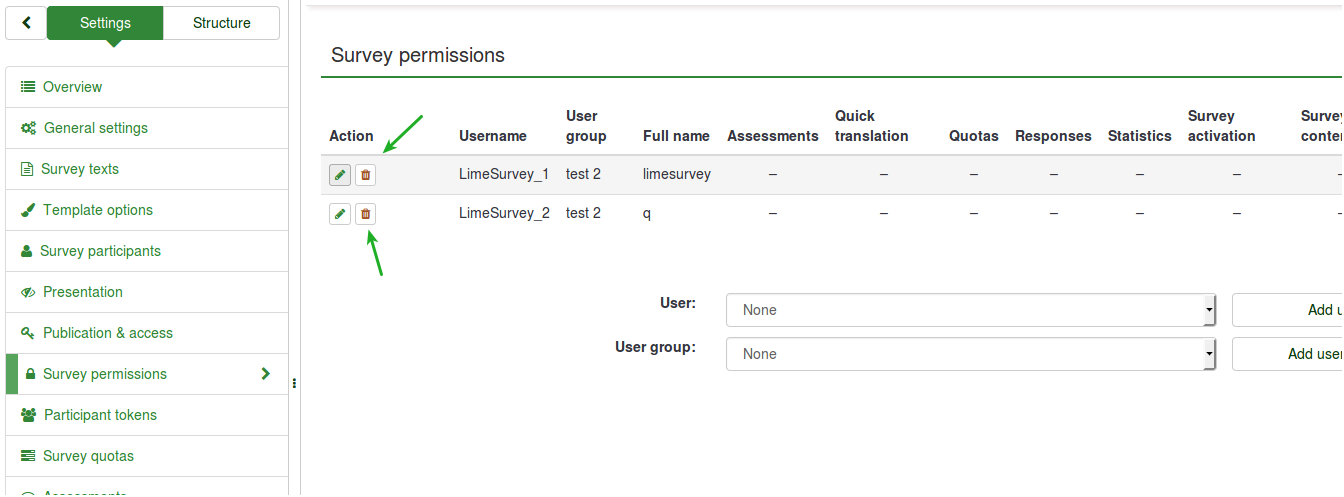
To change the survey permissions, go to the Settings menu of your survey. Click on Survey permissions and choose the user group that should be granted survey permissions:


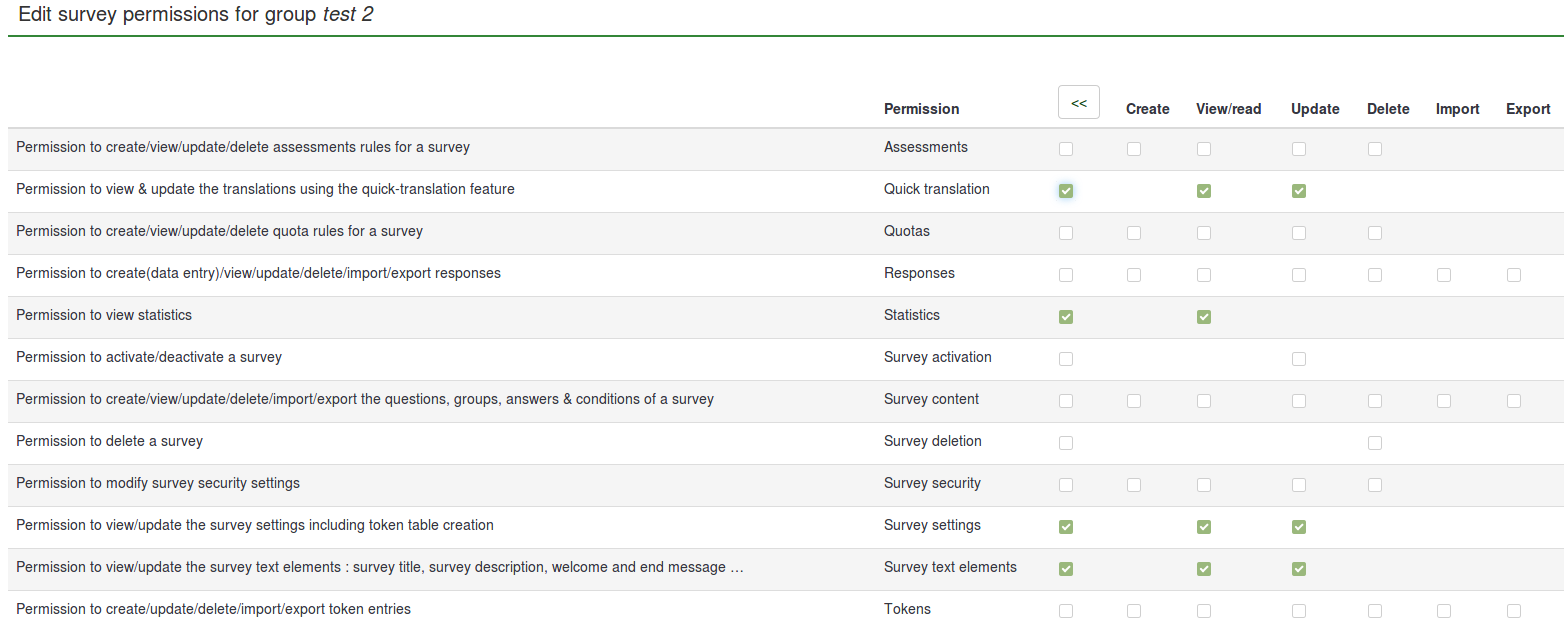
Select in the next step the permissions that you allocate to the members of that user group. Do not forget to click the double-right arrowhead to get an extended view of the permissions matrix.

After you have finished editing the survey permissions, click the Save button, which is located in the upper right part of the screen. Some examples are provided below in order to help you get a better understanding of the Limesurvey's survey permissions system.
Things to watch out for
Some limitations of the user group functionality are presented below:
- Changes to a user group (after it was added in the survey) will not cause changes to the survey permissions. For example, if new users are added to a user group that has been already granted survey permissions, the respective new users won't have the same survey permissions as the rest of the user group members. For this to happen, the updated user group has to be granted survey permissions again so that the new user group members can receive the same permissions as the rest of the user group members.
- If you delete a user from a user group with survey permissions, the respective user will not lose the user group survey permissions. To remove his or her permission rights, delete the account from the survey permissions table.
Because the user group functions are still experimental, we kindly ask you to pay attention to any inconsistencies you may find while using LimeSurvey and report them via the bugs tracker (recommended) or the ticket system.

Examples
Some examples are provided below to help you better understand how a LimeSurvey user group works:
Informing members of a user group that they have received certain survey permissions
- Log in.
- Go to the user groups list and click the green mail sign (located on the last column of the table).
- Type the subject and the text body of the email.
- Send it.
Granting certain permissions to a user group
- Log in as admin (or as a user that has the 'Survey security' and 'Survey content' permission).
- Create a user group.
- Add users to the user group.
- Go to the Survey permissions page of the survey.
- Add the user group and offer its members the survey permissions you wish them to have.
Adding a user to a user group
As mentioned above, adding a user group behaves like a macro function that simply adds all the current members of the user group, easing the process of granting survey permissions. However, if a new member is added to that user group, that member will not automatically receive the rights that were previously granted to the other members of the user group. Therefore, you will have to repeat the steps shown in the example from above in order to grant him or her the same rights or you just add him or her separately, using the Add user function (from the 'Survey permission' panel).
Removing permissions of a user no longer in a user group
Removing him from the group should leave him without any user group permissions. However, this is not happening due to the limitations of the user group functionalities! If you delete the user from the user group, he or she still remains with the user group survey permissions. Therefore, a workaround is to manually delete the account from the 'Survey permissions' table.
- Log in as administrator (or as a user with 'Survey security' permission).
- Go to the Survey permissions page, which can be accessed from the Settings of the survey.
- Delete the respective user from the 'Survey permissions' table.

Removing all user group members with access to a survey
As mentioned above, deleting a user from a group won't retrieve his survey permissions. The same goes for 'user groups'. Deleting a user group won't retrieve the survey permissions that were previously granted to the members of the respective user group. At the moment, the only viable solution is to have them manually removed from the 'Survey permissions' table.