Central Participant Database/nl: Difference between revisions
From LimeSurvey Manual
m (FuzzyBot moved page Central participants database/nl to Central Participant Database/nl without leaving a redirect: Part of translatable page "Central participants database".) |
(Updating to match new version of source page) |
||
| Line 2: | Line 2: | ||
__TOC__ | __TOC__ | ||
=Introductie= | |||
To access this option: '''Configuration''' -> '''Central Participant Database''': | |||
<center>[[File:Central participants database.png]]</center> | <center>[[File:Central participants database.png]]</center> | ||
In | This feature allows the administrator to store the participant information into a central table that is independent of any survey participants table. Its major advantages are: | ||
* The central table acts as a backup. In the case in which a user creates a new survey, he does not have to go through the trouble of exporting its participants to a CSV file and then importing them back into a new survey. | |||
* Users need only to add the participants to the central table. Then, the same participants can be added to as many surveys as the user wants. | |||
* In case multiple users have access to a LimeSurvey installation, its owner(s) can choose to share his participants with other users and also set access rights for the shared users. | |||
You may also find in your LimeSurvey installation an advanced [[Central Participant Database#Attributes|attribute control]] and several other features. | |||
=Deelnemersdatabase= | =Deelnemersdatabase= | ||
De volgende opties zijn beschikbaar: | De volgende opties zijn beschikbaar: | ||
<center>[[File:The participants panel management tools.png]]</center> | <center>[[File:The participants panel management tools.png]]</center> | ||
*[[Central participants | |||
*[[Central | *[[Central Participant Database#Display CPDB participants|Display CPDB (Central Participant Database) participants]] | ||
*[[Central | *[[Central Participant Database#Info|Info]] | ||
*[[Central participants | *[[Central Participant Database#Import|Import]] | ||
*[[Central | *[[Central Participant Database#Export participants|Export participants]] | ||
*[[Central | *[[Central Participant Database#Blacklist settings|Blacklist settings]] | ||
*[[ | *[[Central Participant Database#Attributes|Attributes]] | ||
*[[Central Participant Database#Share panel|Share panel]] | |||
*[[Central_Participant_Database#Export_all_participants|Export all participants]] | |||
==Tonen deelnemers in deelnemersdatabase== | ==Tonen deelnemers in deelnemersdatabase== | ||
This is the main component of this panel. The great majority of options can be accessed from here, such as adding, deleting, exporting, adding participants to surveys, and so on. | |||
Er zijn 5 opties voor elke deelnemer beschikbaar in de kolom ''Actie'': | Er zijn 5 opties voor elke deelnemer beschikbaar in de kolom ''Actie'': | ||
<center>[[File:displayParticipant.png]]</center> | <center>[[File:displayParticipant.png]]</center> | ||
{{Box| | *[[Central Participant Database#Edit participant|Edit this participant]] | ||
*[[Central Participant Database#Delete participant|Delete this participant]] | |||
*[[Central Participant Database#Share participant|Share this participant]] | |||
*[[Central Participant Database#List active surveys|List active surveys]] | |||
*[[Central Participant Database#Add participant to survey|Add participant to survey]] | |||
{{Box|Before getting access to the options mentioned above, you need to have users listed in your database. To create them, click on the '''[[Central Participant Database#Add participant|Add new participant]]''' button, located in the upper-right part of the window.}} | |||
===Deelnemer toevoegen=== | ===Deelnemer toevoegen=== | ||
| Line 51: | Line 57: | ||
Je krijgt een dialoogscherm te zien met de volgende attributen: | Je krijgt een dialoogscherm te zien met de volgende attributen: | ||
<center>[[File:addParticipant.png]]</center> | <center>[[File:addParticipant.png]]</center> | ||
*'''Voornaam''' | *'''Voornaam''' | ||
| Line 60: | Line 68: | ||
*'''Eigenaar''': Elke gebruiker van LimeSurvey gedefinieerd in [[Manage_users/nl#Gebruikersbeheer|gebruikersbeheer]] kan de eigenaar zijn. | *'''Eigenaar''': Elke gebruiker van LimeSurvey gedefinieerd in [[Manage_users/nl#Gebruikersbeheer|gebruikersbeheer]] kan de eigenaar zijn. | ||
{{Box|''' | {{Box|'''Custom attributes''' can be added. For further details, see the [[Central Participant Database#Attributes|attributes]] and [[Central Participant Database#Examples|examples]] sections.}} | ||
=== | ===Edit participant=== | ||
To edit the basic and/or custom attributes of a participant, click on the first button (from left to right) located in the '''Action''' column ([[File:Edit participant CPDB.png]]). A window with all the available attributes will be displayed. | |||
===Deelnemer verwijderen=== | ===Deelnemer verwijderen=== | ||
You can easily delete one or multiple participants: | |||
* | * If you want to delete one participant, go to the row where the respective participant is located and click on the red bin button: [[File:Delete participant CPDB.png]]. | ||
* | * If you want to delete two or more participants, click on the '''Selected participant(s)...''' button (under the last row, below the '''Action''' column) after you selected the corresponding entries: [[File:Select participants CPDB.png]]. Then, click on the delete option. | ||
Als je deelnemer(s) wilt verwijderen heb je drie opties beschikbaar: | Als je deelnemer(s) wilt verwijderen heb je drie opties beschikbaar: | ||
<center>[[File:deleteParticipant.png]]</center> | <center>[[File:deleteParticipant.png]]</center> | ||
1) ''' | |||
1) '''Delete only from the central panel''': The first option deletes the participant from the central participant database only. If the participant is in any token table, he/she will not be removed. | |||
2) '''Verwijder deelnemer(s) uit de tabel en eventuele tokentabellen'''. Het antwoord wordt niet verwijderd. | 2) '''Verwijder deelnemer(s) uit de tabel en eventuele tokentabellen'''. Het antwoord wordt niet verwijderd. | ||
| Line 82: | Line 92: | ||
3) '''Verwijder deelnemer(s) uit de tabel, tokentabellen en antwoorden'''. Alles van de deelnemer wordt verwijderd. | 3) '''Verwijder deelnemer(s) uit de tabel, tokentabellen en antwoorden'''. Alles van de deelnemer wordt verwijderd. | ||
{{Alert|title=Attention|text=Please note that in all the three scenarios, the links created for the purpose of maintaining a participant's history are also deleted.}} | |||
=== | ===Share participant=== | ||
This is another important feature of the '''Central Participant Database'''. You can share your participants with other users. You just have to select the participant(s) you want to share and click either on the green right-arrow icon ([[File:Share participate CPDB.png]]) or on the '''Selected participant(s)...''' button situated in the bottom left part of the participants table. A modal box will open up which will allow you to select the user with whom you want to share the respective participant(s). You can also set whether the user who shares your participant can edit those participants. If you set it to ''No'', they will get an access denied error when trying to edit the entries of the shared participant. | |||
<center>[[File:shareParticipant.png]]</center> | <center>[[File:shareParticipant.png]]</center> | ||
===Actieve enquêtes tonen=== | ===Actieve enquêtes tonen=== | ||
If you click on the next icon ([[File:List active surveys CPDB.png]]), all the active surveys where the respective participant has been added to will be listed. | |||
===Deelnemer toewijzen aan enquête=== | ===Deelnemer toewijzen aan enquête=== | ||
Adding a participant to a survey can be done by clicking on the last icon ([[File:Add participant to survey CPDB.png]]) from the '''Action''' column. If you wish to add more than one participant to a survey, mark them and select the '''Share''' option from the '''Selected participant(s)...''' dialog box (located in the bottom-left part of the central table). | |||
<center>[[File:addtoSurvey.png]]</center> | <center>[[File:addtoSurvey.png]]</center> | ||
<div class='simplebox'> [[File:help.png]] Please note that if you wish to add participants from the central database to a survey, the respective survey needs to contain a '''survey participants table'''! For further details, please continue reading the following [[Survey participants|wiki section]].</div> | |||
The title of the dialog box will show you the number of participants that are going to be added to the respective survey. Besides that, there is also a checkbox, that if checked, it will take you to the survey participants/tokens table of the survey to which you are adding the participants to. | |||
Na het klikken op "volgende" kom je op de attribuutpagina. | Na het klikken op "volgende" kom je op de attribuutpagina. | ||
The attribute map page contains four tables and uses an advanced drag-and-drop functionality: | |||
<center>[[File:attributemap.png]]</center> | <center>[[File:attributemap.png]]</center> | ||
* The first table, ''Unmapped participant attributes'', shows all the attributes that are present in the central participant database. They are currently unmapped - not present in the survey participants table. These unmapped attributes can either be moved into the ''Token attributes to create'' table which creates new attributes in the survey participants table or they can be merged with the existing token attributes by dragging the unmapped attributes into the ''Existing token attributes'' table, besides the existing token attribute you wish to be merged with. | |||
* The second table, ''Token attributes to create'', helps you copy unmapped participant attributes into the survey participants table, creating new columns. Drag the attribute(s) you wish to add to the survey participants table and drop them into the second table. In this way, new columns/attributes will be added to the survey participants table. | |||
* The third table, ''Existing token attributes'', displays the current attributes existing in the survey participants table. Drop the unmapped attributes here if you wish to copy the data from the unmapped attributes into the one of the existing token attributes (see screenshot below) | |||
* The fourth table, the ''Standard token fields'', displays the standard token fields that can be merged with unmapped participant attributes. The only standard token field from a survey participants table that can be edited is the '''Token''' one. This is important when you wish, for example, to easily copy token codes across different LimeSurvey installations. | |||
<center>[[File:Attributemaps test.png]]</center> | |||
<div class='simplebox'> [[File:help.png]] You can also overwrite the existing token attribute values from the survey participants table if a participant already exists. Use this option cautiously in order not to lose any important data on survey respondents.</div> | |||
After you have mapped all the attributes, you can click on the '''Continue''' button. After processing the participants, a summary page will show up, telling you how many participants were successfully copied. If you have previously asked for redirection, you will be redirected to the survey participants table, otherwise you will be redirected to the CPDB main page. | |||
<center>[[File:addtosurveysummary.png]]</center> | <center>[[File:addtosurveysummary.png]]</center> | ||
| Line 114: | Line 148: | ||
==Informatie== | ==Informatie== | ||
It displays some '''CPDB''' stats: | |||
<center>[[File:ParticipantPanel.png]]</center> | <center>[[File:ParticipantPanel.png]]</center> | ||
2) '' | 1) ''Total participants in central table'' : The total number of participants located in the central participant database. | ||
2) ''Participants owned by you'' : It shows the total number of participants that have you as a owner. By default, <u>the new participants</u> entered into the central participant database <u>have as owner the user that firstly added them to it</u>. | |||
3) ''Deelnemers die met jou gedeeld zijn'' | 3) ''Deelnemers die met jou gedeeld zijn'' | ||
| Line 134: | Line 171: | ||
De beschikbare opties: | De beschikbare opties: | ||
[[File:Import CSV CPDB.png]] | [[File:Import CSV CPDB.png]] | ||
Let op de tekst in het veld '''CSV-invoerformaat''': | Let op de tekst in het veld '''CSV-invoerformaat''': | ||
| Line 144: | Line 183: | ||
===Stappen=== | ===Stappen=== | ||
1) | 1) Select a file to import and specify the settings associated to it. | ||
2) Map the attributes from the CSV file. Import the attribute data either into an existing attribute from the central participant database or into a new column by creating a new attribute. The newly created attribute will be of text box type - the format can be changed later. | |||
<center>[[File:attributeMapCSV.png]]</center> | <center>[[File:attributeMapCSV.png]]</center> | ||
In the screenshot from above, a new attribute called "New Age" will be created. The data from attribute "Sex" was mapped and copied into the existent "Sex" attribute from the central participant database. | |||
3) Click continue, and wait for the process to be done. At the end of it, a short summary will be displayed. | |||
<center>[[File:CSVsummary.png]]</center> | |||
Clicking ok will redirect you to the participants screen, showing you the newly imported participants. | |||
==Blacklist settings== | |||
The '''Blacklist settings''' button is available on the main toolbar of the '''Central participant database''' page. Once you click on it, the following page will be loaded: | |||
<center>[[File:CPDB Blacklist settings panel.png]]</center> | |||
The following Yes/No options are available: | |||
*'''Blacklist all current surveys for participant once the global field is set''': If set to ''Yes'', the blacklisted participant(s) cannot be added to any survey. | |||
*'''Blacklist participant for any new added survey once the global field is set''': If new surveys are created, the respective participant(s) cannot be added to them (if ''Yes'' is picked up). However, he can still be added to those surveys created earlier. | |||
*'''Allow blacklisted participants to be added to a survey''': Even if a participant is blacklisted, he can still be added to a survey. | |||
*'''Hide blacklisted participants''': Useful function when you would like to hide participant for a specific amount of time and then make them available for the rest of users with whom those blacklisted participants have been shared with. | |||
*'''Delete globally blacklisted participants from the database''': If ''Yes'', the blacklisted participants will be deleted from the database. | |||
*'''Allow participant to un-blacklist himself/herself''': If ''Yes'', a participant can un-blacklist himself without the help of a LimeSurvey user. | |||
==Attributen== | ==Attributen== | ||
Om naar het scherm '''Attributenbeheer''' te gaan, klik op de knop '''Attributen''' in de taakbalk: [[File:Attributes management icon.png]] | Om naar het scherm '''Attributenbeheer''' te gaan, klik op de knop '''Attributen''' in de taakbalk: [[File:Attributes management icon.png]] | ||
<center>[[File:Add new attribute CPDB.png]]</center> | <center>[[File:Add new attribute CPDB.png]]</center> | ||
Het attribuutbeheer ondersteunt het toevoegen van drie typen attributen : '''tekst-type, datum en dropdownlijst'''. Om een attribuut toe te voegen klik je op '''Voeg attribuut toe''', dat staat rechtsboven in het scherm: | Het attribuutbeheer ondersteunt het toevoegen van drie typen attributen : '''tekst-type, datum en dropdownlijst'''. Om een attribuut toe te voegen klik je op '''Voeg attribuut toe''', dat staat rechtsboven in het scherm: | ||
<center>[[File:addingattribute.png]]</center> | <center>[[File:addingattribute.png]]</center> | ||
*''' | When adding a new attribute, the following options are available: | ||
*''' | *'''Defaultname''': It will be used by LimeSurvey to name the attribute in case no other English name is provided. | ||
*''' | *'''Attribute type''': You can choose either of the attribute types and the associated user interface will be presented to you while editing. | ||
*''' | *'''Should this attribute be visible on the panel?''': It can be ''Yes'' or ''No''. This function determines whether the attribute is visible in the CPDB table or not. This can be later edited from the '''Visible''' column that is located in the main attributes table. | ||
*'''Languages''': If you would like LimeSurvey not to use the defaultname as the name of the attribute, type here the desired name. Please note that the attribute management has multilingual support. Click on the plus sign after you have selected the language. A new field will appear below the English/default language. | |||
Klik na het wijzigen op de knop '''Bewaar'''. | Klik na het wijzigen op de knop '''Bewaar'''. | ||
<div class='simplebox'>[[File:help.png]] We recommend you to write the name of the attribute in the corresponding language box even if you use only one language (the base language). The reason for this is that when you map attributes and you wish to add them to different survey participants table, the '''defaultname''' of the attribute is not displayed in the respective panel - only the name you give in the corresponding language box is shown.</div> | |||
In de attributentabel staan twee beschikbare acties (in de kolom ''Actie''): | In de attributentabel staan twee beschikbare acties (in de kolom ''Actie''): | ||
| Line 216: | Line 251: | ||
==Deel bestand== | ==Deel bestand== | ||
The share panel shows all the information related to the shared participants. Please note that this panel shows only the shared participants owned by that particular user. | |||
<center>[[File:sharepanel.png]]</center> | <center>[[File:sharepanel.png]]</center> | ||
Het laat de volgende waardes zien: | Het laat de volgende waardes zien: | ||
| Line 236: | Line 273: | ||
7) ''Mag bewerken?'' | 7) ''Mag bewerken?'' | ||
All this information is for viewing/sorting purposes. Only the '''Can Edit''' field is editable for the user. The '''Can edit''' field determines whether to allow the respective participant to be editable by the user with whom that participant was shared with or not. Just clicking on the check box will make an AJAX call and save the changes on the server. | |||
==Export participants== | |||
The export function is located on the main toolbar of the '''Central participant database''' page: [[File:Export CPDB.png]] | |||
When exporting to CSV, you are presented with a dialog box that asks you to mark the attributes you wish to export. | |||
You can export: | |||
*'' '''None''' of the additional attributes'' | |||
*'' '''All''' the additional attributes'' | |||
*'' '''Certain''' additional attributes'' | |||
<center>[[File:exporttoCSV.png]]</center> | |||
The format of the exported file will be CSV. | |||
===Export filtered participants=== | |||
To export filtered participants, use first the [[Central Participant Database#Search filters|search filters]]. Then. click on the checkbox located on the left side of the '''Action''' column (to select all the filtered participants). Then, click on the '''Selected participant(s)...''' button located at the bottom-right side of the table and select the export function. In this way, only the '''filtered participants''' will be exported. | |||
==Search filters== | |||
If you wish to filter the users from your database, use the search/dropdown boxes located below each column title: | |||
<center>[[File:CPDB Filtered search.png]]</center> | |||
You may type a string of characters according to which you wish to filter our the participants or select from the dropdown lists (when possible) the participants you wish to be listed after the filtering process. | |||
=Aanvullende informatie= | =Aanvullende informatie= | ||
Aanvullende (technische) informatie is [[Central participants database (User panel) Development|hier]] beschikbaar. | Aanvullende (technische) informatie is [[Central participants database (User panel) Development|hier]] beschikbaar. | ||
Revision as of 16:05, 14 May 2018
Introductie
To access this option: Configuration -> Central Participant Database:

This feature allows the administrator to store the participant information into a central table that is independent of any survey participants table. Its major advantages are:
- The central table acts as a backup. In the case in which a user creates a new survey, he does not have to go through the trouble of exporting its participants to a CSV file and then importing them back into a new survey.
- Users need only to add the participants to the central table. Then, the same participants can be added to as many surveys as the user wants.
- In case multiple users have access to a LimeSurvey installation, its owner(s) can choose to share his participants with other users and also set access rights for the shared users.
You may also find in your LimeSurvey installation an advanced attribute control and several other features.
Deelnemersdatabase
De volgende opties zijn beschikbaar:
- Display CPDB (Central Participant Database) participants
- Info
- Import
- Export participants
- Blacklist settings
- Attributes
- Share panel
- Export all participants
Tonen deelnemers in deelnemersdatabase
This is the main component of this panel. The great majority of options can be accessed from here, such as adding, deleting, exporting, adding participants to surveys, and so on.
Er zijn 5 opties voor elke deelnemer beschikbaar in de kolom Actie:

- Edit this participant
- Delete this participant
- Share this participant
- List active surveys
- Add participant to survey
Deelnemer toevoegen
Klik op de knop Voeg deelnemer toe die rechtsboven staat: ![]() .
.
Je krijgt een dialoogscherm te zien met de volgende attributen:
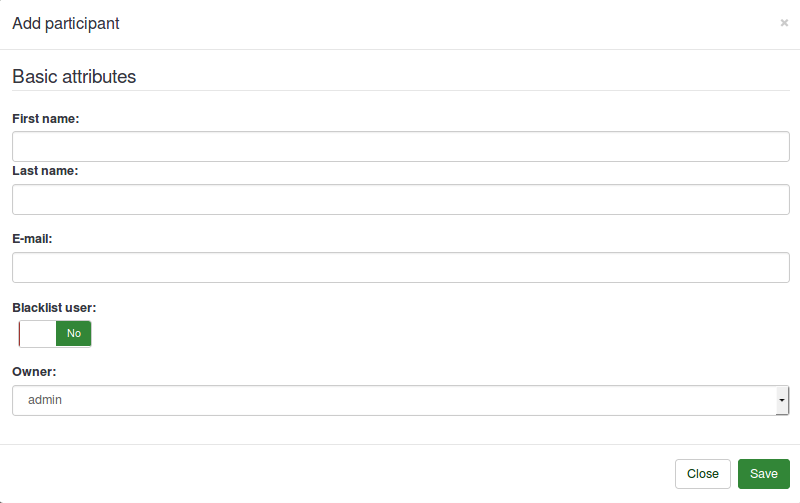
- Voornaam
- Achternaam
- E-mailadres
- Uitgesloten gebruiker
- Eigenaar: Elke gebruiker van LimeSurvey gedefinieerd in gebruikersbeheer kan de eigenaar zijn.
Edit participant
To edit the basic and/or custom attributes of a participant, click on the first button (from left to right) located in the Action column (![]() ). A window with all the available attributes will be displayed.
). A window with all the available attributes will be displayed.
Deelnemer verwijderen
You can easily delete one or multiple participants:
- If you want to delete one participant, go to the row where the respective participant is located and click on the red bin button:
 .
. - If you want to delete two or more participants, click on the Selected participant(s)... button (under the last row, below the Action column) after you selected the corresponding entries:
 . Then, click on the delete option.
Als je deelnemer(s) wilt verwijderen heb je drie opties beschikbaar:

1) Delete only from the central panel: The first option deletes the participant from the central participant database only. If the participant is in any token table, he/she will not be removed.
2) Verwijder deelnemer(s) uit de tabel en eventuele tokentabellen. Het antwoord wordt niet verwijderd.
3) Verwijder deelnemer(s) uit de tabel, tokentabellen en antwoorden. Alles van de deelnemer wordt verwijderd.
This is another important feature of the Central Participant Database. You can share your participants with other users. You just have to select the participant(s) you want to share and click either on the green right-arrow icon (![]() ) or on the Selected participant(s)... button situated in the bottom left part of the participants table. A modal box will open up which will allow you to select the user with whom you want to share the respective participant(s). You can also set whether the user who shares your participant can edit those participants. If you set it to No, they will get an access denied error when trying to edit the entries of the shared participant.
) or on the Selected participant(s)... button situated in the bottom left part of the participants table. A modal box will open up which will allow you to select the user with whom you want to share the respective participant(s). You can also set whether the user who shares your participant can edit those participants. If you set it to No, they will get an access denied error when trying to edit the entries of the shared participant.

Actieve enquêtes tonen
If you click on the next icon (![]() ), all the active surveys where the respective participant has been added to will be listed.
), all the active surveys where the respective participant has been added to will be listed.
Deelnemer toewijzen aan enquête
Adding a participant to a survey can be done by clicking on the last icon (![]() ) from the Action column. If you wish to add more than one participant to a survey, mark them and select the Share option from the Selected participant(s)... dialog box (located in the bottom-left part of the central table).
) from the Action column. If you wish to add more than one participant to a survey, mark them and select the Share option from the Selected participant(s)... dialog box (located in the bottom-left part of the central table).

The title of the dialog box will show you the number of participants that are going to be added to the respective survey. Besides that, there is also a checkbox, that if checked, it will take you to the survey participants/tokens table of the survey to which you are adding the participants to.
Na het klikken op "volgende" kom je op de attribuutpagina.
The attribute map page contains four tables and uses an advanced drag-and-drop functionality:
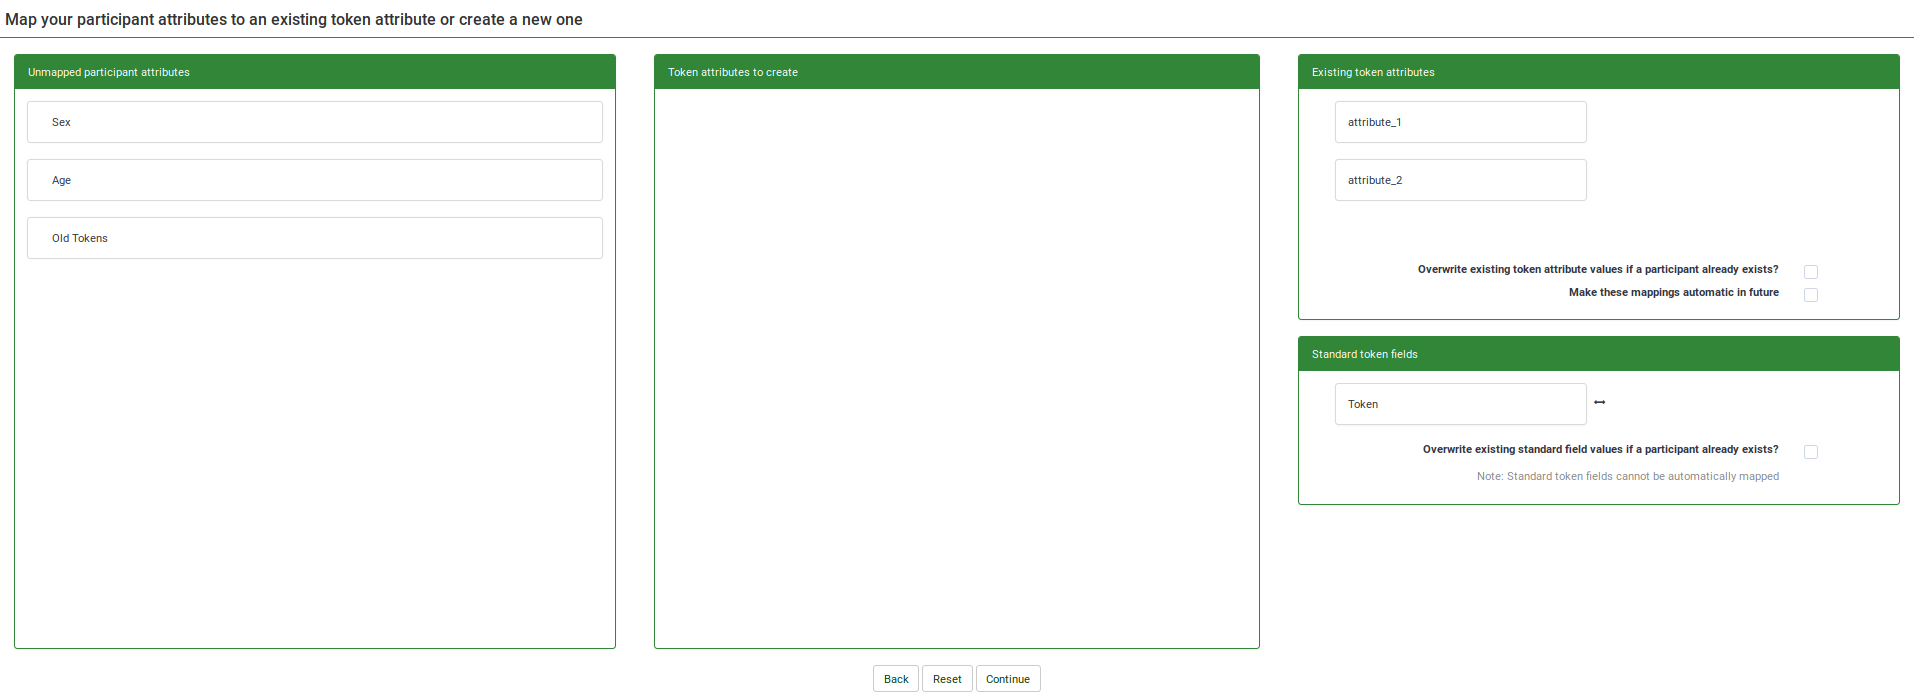
- The first table, Unmapped participant attributes, shows all the attributes that are present in the central participant database. They are currently unmapped - not present in the survey participants table. These unmapped attributes can either be moved into the Token attributes to create table which creates new attributes in the survey participants table or they can be merged with the existing token attributes by dragging the unmapped attributes into the Existing token attributes table, besides the existing token attribute you wish to be merged with.
- The second table, Token attributes to create, helps you copy unmapped participant attributes into the survey participants table, creating new columns. Drag the attribute(s) you wish to add to the survey participants table and drop them into the second table. In this way, new columns/attributes will be added to the survey participants table.
- The third table, Existing token attributes, displays the current attributes existing in the survey participants table. Drop the unmapped attributes here if you wish to copy the data from the unmapped attributes into the one of the existing token attributes (see screenshot below)
- The fourth table, the Standard token fields, displays the standard token fields that can be merged with unmapped participant attributes. The only standard token field from a survey participants table that can be edited is the Token one. This is important when you wish, for example, to easily copy token codes across different LimeSurvey installations.
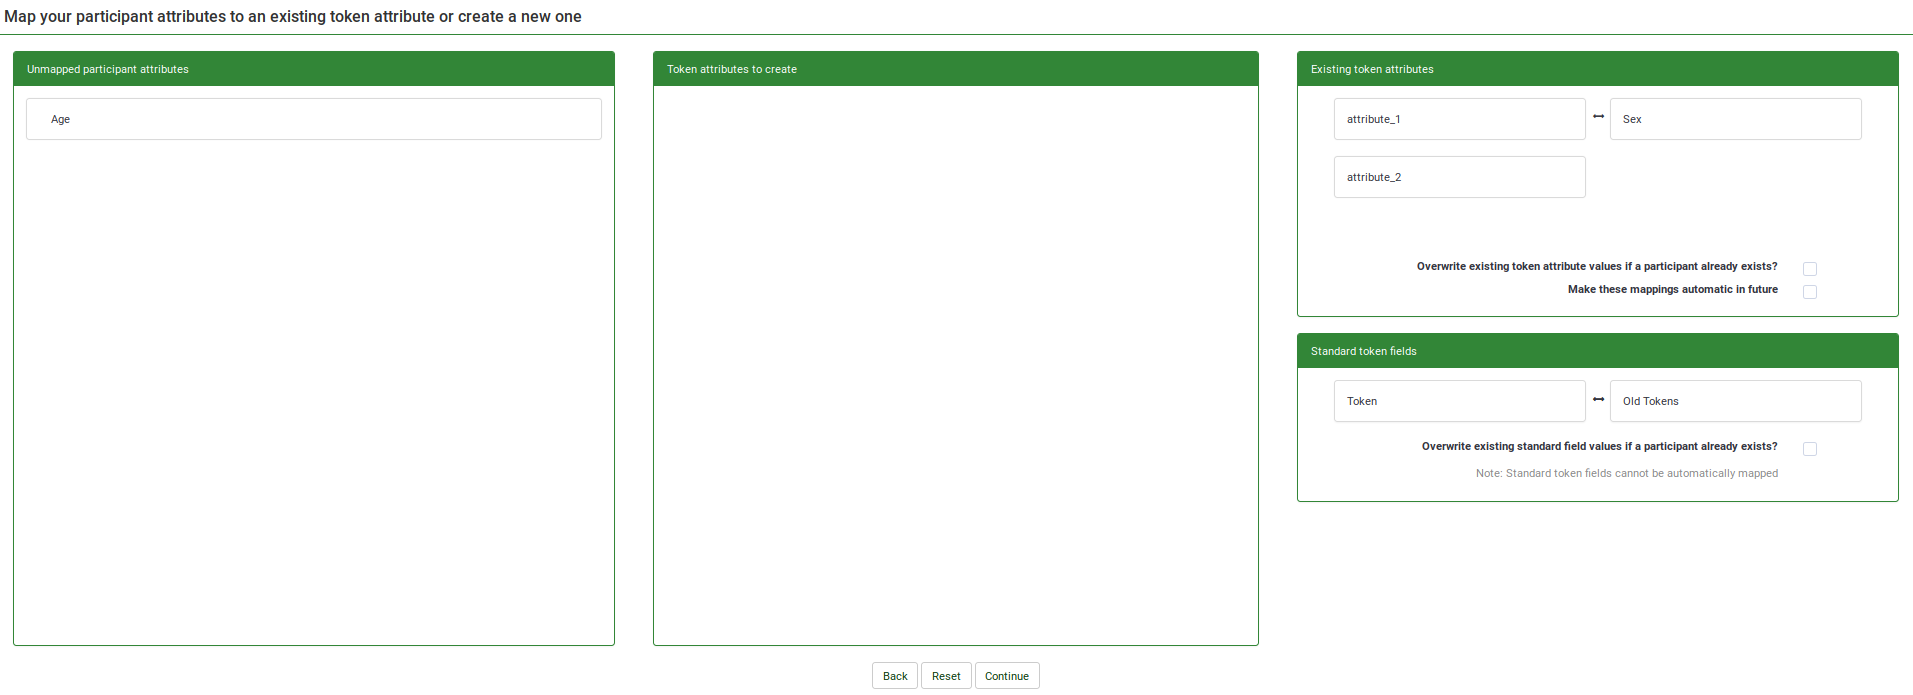
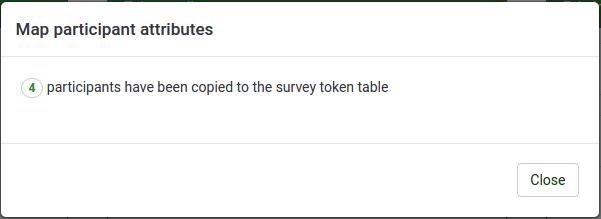
After you have mapped all the attributes, you can click on the Continue button. After processing the participants, a summary page will show up, telling you how many participants were successfully copied. If you have previously asked for redirection, you will be redirected to the survey participants table, otherwise you will be redirected to the CPDB main page.
Informatie
It displays some CPDB stats:

1) Total participants in central table : The total number of participants located in the central participant database.
2) Participants owned by you : It shows the total number of participants that have you as a owner. By default, the new participants entered into the central participant database have as owner the user that firstly added them to it.
3) Deelnemers die met jou gedeeld zijn
4) Deelnemers die jij gedeeld hebt
5) Uitgesloten deelnemers (zwarte lijst)
6) Totaal aantal attributen in de database
Importeren
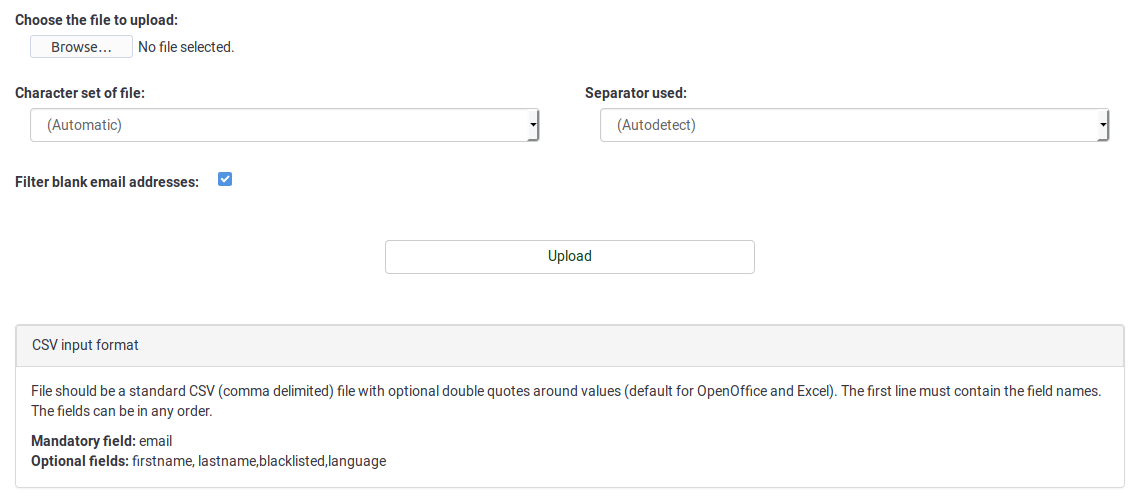
Je kunt deelnemers toevoegen door ze te importeren, klik op de knop Importeer gegevens: ![]()
De beschikbare opties:
Let op de tekst in het veld CSV-invoerformaat:
Verplicht veld: e-mailadres
Optionele velden: voornaam, achternaam, uitgesloten, taal
Stappen
1) Select a file to import and specify the settings associated to it.
2) Map the attributes from the CSV file. Import the attribute data either into an existing attribute from the central participant database or into a new column by creating a new attribute. The newly created attribute will be of text box type - the format can be changed later.

In the screenshot from above, a new attribute called "New Age" will be created. The data from attribute "Sex" was mapped and copied into the existent "Sex" attribute from the central participant database.
3) Click continue, and wait for the process to be done. At the end of it, a short summary will be displayed.
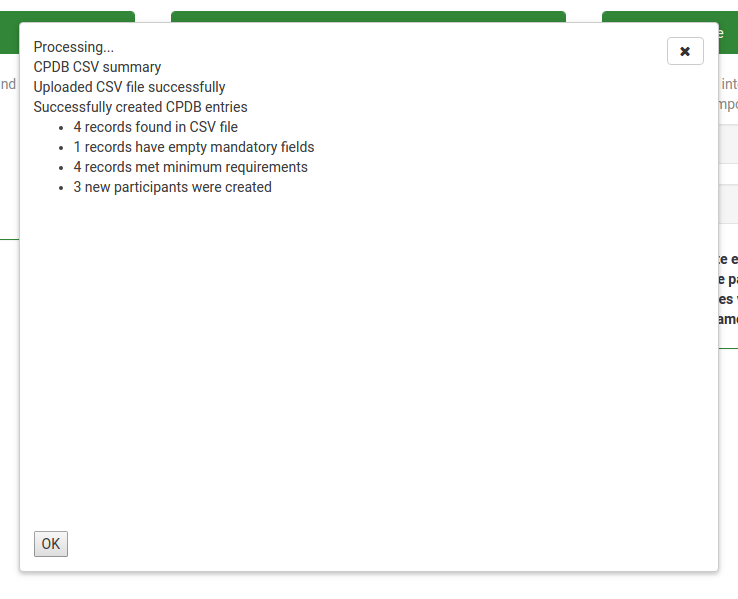
Clicking ok will redirect you to the participants screen, showing you the newly imported participants.
Blacklist settings
The Blacklist settings button is available on the main toolbar of the Central participant database page. Once you click on it, the following page will be loaded:
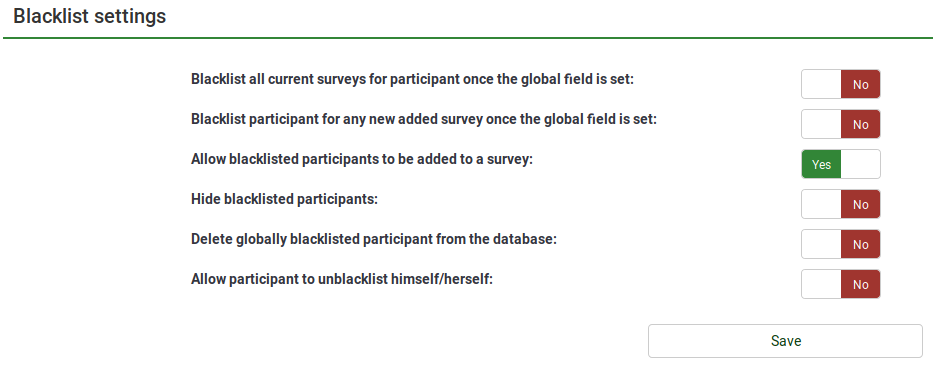
The following Yes/No options are available:
- Blacklist all current surveys for participant once the global field is set: If set to Yes, the blacklisted participant(s) cannot be added to any survey.
- Blacklist participant for any new added survey once the global field is set: If new surveys are created, the respective participant(s) cannot be added to them (if Yes is picked up). However, he can still be added to those surveys created earlier.
- Allow blacklisted participants to be added to a survey: Even if a participant is blacklisted, he can still be added to a survey.
- Hide blacklisted participants: Useful function when you would like to hide participant for a specific amount of time and then make them available for the rest of users with whom those blacklisted participants have been shared with.
- Delete globally blacklisted participants from the database: If Yes, the blacklisted participants will be deleted from the database.
- Allow participant to un-blacklist himself/herself: If Yes, a participant can un-blacklist himself without the help of a LimeSurvey user.
Attributen
Om naar het scherm Attributenbeheer te gaan, klik op de knop Attributen in de taakbalk: ![]()

Het attribuutbeheer ondersteunt het toevoegen van drie typen attributen : tekst-type, datum en dropdownlijst. Om een attribuut toe te voegen klik je op Voeg attribuut toe, dat staat rechtsboven in het scherm:
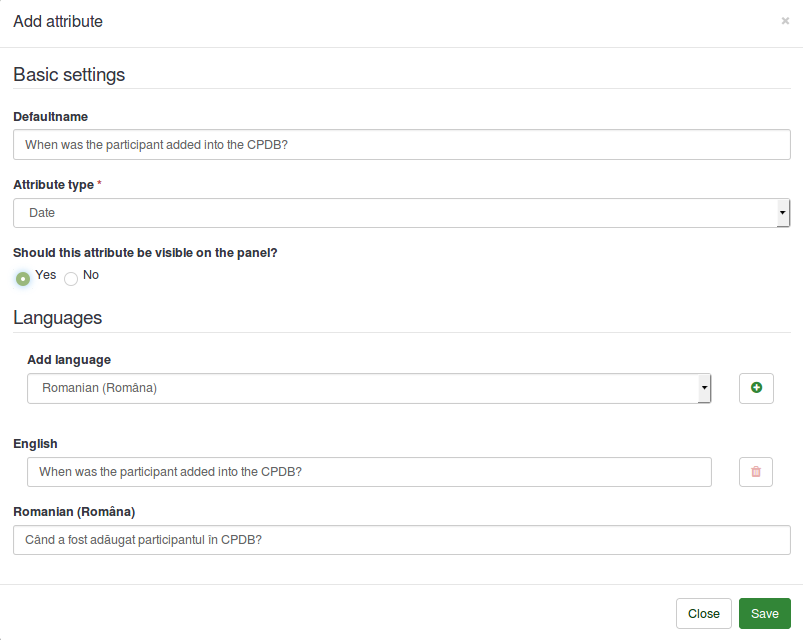
When adding a new attribute, the following options are available:
- Defaultname: It will be used by LimeSurvey to name the attribute in case no other English name is provided.
- Attribute type: You can choose either of the attribute types and the associated user interface will be presented to you while editing.
- Should this attribute be visible on the panel?: It can be Yes or No. This function determines whether the attribute is visible in the CPDB table or not. This can be later edited from the Visible column that is located in the main attributes table.
- Languages: If you would like LimeSurvey not to use the defaultname as the name of the attribute, type here the desired name. Please note that the attribute management has multilingual support. Click on the plus sign after you have selected the language. A new field will appear below the English/default language.
Klik na het wijzigen op de knop Bewaar.
In de attributentabel staan twee beschikbare acties (in de kolom Actie):

Als je op het eerste icoon klikt, dan krijg een dialoog met de basisinstellingen van het geselecteerde attribuut Je kunt deze instellingen wijzigen.
Klik op de rode afvalbak (naast de knop wijzig) om een attribuut te verwijderen. Daarbij worden ook de bijbehorende waarden verwijderd uit de deelnemersdatabase!
Deel bestand
The share panel shows all the information related to the shared participants. Please note that this panel shows only the shared participants owned by that particular user.

Het laat de volgende waardes zien:
1) Achternaam
2) Voornaam
3) E-mailadres
4) Gedeeld met
5) Eigenaar
6) Datum toegevoegd
7) Mag bewerken?
All this information is for viewing/sorting purposes. Only the Can Edit field is editable for the user. The Can edit field determines whether to allow the respective participant to be editable by the user with whom that participant was shared with or not. Just clicking on the check box will make an AJAX call and save the changes on the server.
Export participants
The export function is located on the main toolbar of the Central participant database page: ![]()
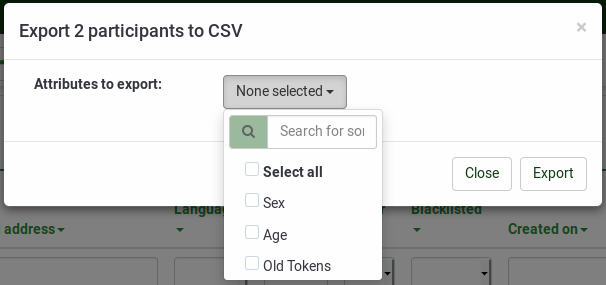
When exporting to CSV, you are presented with a dialog box that asks you to mark the attributes you wish to export.
You can export:
- None of the additional attributes
- All the additional attributes
- Certain additional attributes
The format of the exported file will be CSV.
Export filtered participants
To export filtered participants, use first the search filters. Then. click on the checkbox located on the left side of the Action column (to select all the filtered participants). Then, click on the Selected participant(s)... button located at the bottom-right side of the table and select the export function. In this way, only the filtered participants will be exported.
Search filters
If you wish to filter the users from your database, use the search/dropdown boxes located below each column title:

You may type a string of characters according to which you wish to filter our the participants or select from the dropdown lists (when possible) the participants you wish to be listed after the filtering process.
Aanvullende informatie
Aanvullende (technische) informatie is hier beschikbaar.
