Zentrale Teilnehmerdatenbank
From LimeSurvey Manual
Einführung
So greifen Sie auf diese Option zu: Konfiguration -> Zentrale Teilnehmerdatenbank:

Dieses Feature erlaubt es dem Administrator, die Teilnehmerinformationen in einer zentralen Datenbank zu speichern, die unabhängig der Umfrageteilnehmertabelle ist. Die Hauptvorteile dieses Features sind:
- Die zentrale Datenbank kann als Backup dienen. Wenn zum Beispiel ein Benutzer eine neue Umfrage erstellt, muss er sich nicht damit herumschlagen, die Teilnehmer als CSV Datei exportieren, und diese wieder in einer anderen Umfrage zu importieren.
- Der Benutzer muss die Teilnehmer nur einmal zur zentralen Datenbank hinzufügen und dann kann er diesen Daten in so vielen Umfragen verwenden, wie er will.
- Falls mehrere Benutzer dieselben Daten nutzen wollen, kann der Besitzer Teilnehmer teilen/sharen. Außerdem kann er Zugriffsrechte auf geteilte Teilnehmer setzen.
Es gibt in Ihrer LimeSurvey-Installation auch eine erweiterte Attributsteuerung und weitere andere Funktionen.
Die Teilnehmerpanel Management Werkzeuge
Folgende Optionen stehen zur Verfügung:

- CPDB-Teilnehmer (Zentrale Teilnehmerdatenbank) anzeigen
- Info
- [[Zentrale Teilnehmerdatenbank#Import|Import] ]
- Blacklist-Einstellungen
- Attribute
- Teilenpanel
- Alle Teilnehmer exportieren
Zeige die Teilnehmertabelle
Dies ist der Hauptbestandteil dieses Panels. Von hier aus kann auf die meisten Optionen zugegriffen werden, z. B. Hinzufügen, Löschen, Exportieren, Hinzufügen von Teilnehmern zu Umfragen usw.
Die Erklärung des Bildschirmfotos:

- Diesen Teilnehmer bearbeiten
- Diesen Teilnehmer löschen
- [[Zentrale Teilnehmerdatenbank#Teilnehmer teilen|Diesen Teilnehmer teilen] ]
- Aktive Umfragen auflisten
- Teilnehmer zur Umfrage hinzufügen
Teilnehmer hinzufügen
Mit Hilfe des Pluszeichens kann man neue Teilnehmer hinzufügen. Um den hinzugefügten Teilnehmer zu bearbeiten,
muss man auf den Teilnehmer doppelklicken und nach dem Bearbeiten Enter drücken. Wenn Veränderungen vorgenommen wurden, werden diese auf dem Server gespeichert.
A dialog box with the following basic attributes will then appear:
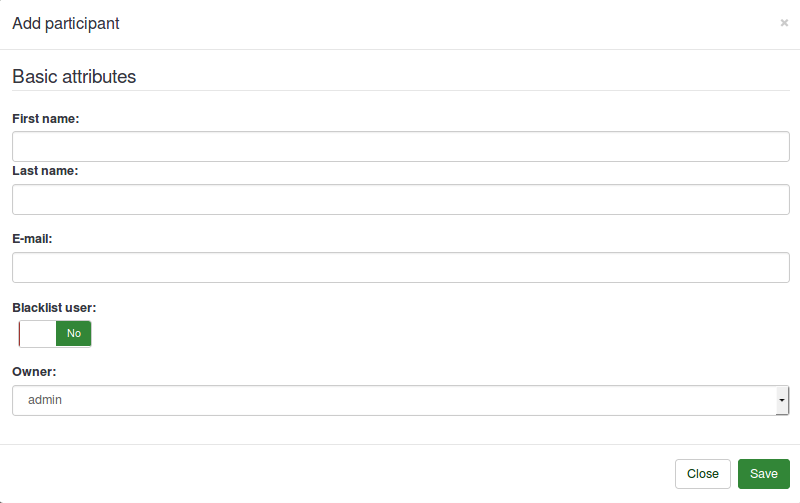
- First name
- Last name
- Blacklist user
- Owner: Any user of LimeSurvey defined in the user control management page can be an owner.
Edit participant
To edit the basic and/or custom attributes of a participant, click the first button (from left to right) located in the Action column (![]() ). A window with all the available attributes will be displayed.
). A window with all the available attributes will be displayed.

Sie können ganz einfach einen oder mehrere Teilnehmer löschen:
- Wenn Sie einen Teilnehmer löschen möchten, gehen Sie in die Zeile, in der sich der jeweilige Teilnehmer befindet, und klicken Sie auf den roten Mülleimer-Button: Datei:Teilnehmer löschen CPDB.png.
- Wenn Sie zwei oder mehr Teilnehmer löschen möchten, klicken Sie nach Ihnen auf die Schaltfläche „Ausgewählte Teilnehmer...“ (unter der letzten Zeile, unterhalb der Spalte „Aktion“) die entsprechenden Einträge ausgewählt: Datei:Teilnehmer auswählen CPDB.png. Klicken Sie dann auf die Option „Löschen“.
When you delete the participant(s), three options are available to you:

1) „Nur aus dem zentralen Panel löschen“: Die erste Option löscht den Teilnehmer nur aus der zentralen Teilnehmerdatenbank. Befindet sich der Teilnehmer in einer Umfrageteilnehmertabelle, wird er nicht entfernt.
2 Lösche die Teilnehmer aus dem zentralen Panel und aus den Tokentabellen
3 Lösche die Teilnehmer aus dem zentralen Panel, aus den Tokentabellen und alle Antworten des Benutzers
Teilnehmer teilen
Dies ist ein weiteres wichtiges Merkmal der „Zentralen Teilnehmerdatenbank“. Sie können Ihre Teilnehmer mit anderen Benutzern teilen. Sie müssen nur die Teilnehmer auswählen, die Sie teilen möchten, und entweder auf das grüne Pfeilsymbol nach rechts (Datei:Partizipieren CPDB.png teilen) oder auf „Ausgewählte Teilnehmer...“ klicken. -Schaltfläche unten links in der Teilnehmertabelle. Es öffnet sich eine modale Box, in der Sie den Benutzer auswählen können, mit dem Sie den/die jeweiligen Teilnehmer teilen möchten. Sie können auch festlegen, ob der Benutzer, der Ihren Teilnehmer teilt, diese Teilnehmer bearbeiten kann. Wenn Sie die Einstellung auf „Nein“ setzen, wird beim Versuch, die Einträge des freigegebenen Teilnehmers zu bearbeiten, die Fehlermeldung „Zugriff verweigert“ angezeigt.

Dies lädt die Tabellen neu vom Server herunter.
If you click the next icon (![]() ), all the active surveys where the respective participant has been added to will be listed.
), all the active surveys where the respective participant has been added to will be listed.
Nach CSV exportieren
Das Hinzufügen eines Teilnehmers zu einer Umfrage kann durch Klicken auf das letzte Symbol (Datei:Teilnehmer zur Umfrage hinzufügen CPDB.png) in der Spalte „Aktion“ erfolgen. Wenn Sie mehr als einen Teilnehmer zu einer Umfrage hinzufügen möchten, markieren Sie diese und wählen Sie im Dialogfeld „Ausgewählte(r) Teilnehmer...“ (im unten und linken Teil der zentralen Tabelle) die Option „Teilen“.

Der Titel des Dialogfensters zeigt Ihnen die Anzahl der Teilnehmer an, die zur jeweiligen Umfrage hinzugefügt werden. Darüber hinaus gibt es auch ein Kontrollkästchen, das Sie, wenn es aktiviert ist, zur Umfrageteilnehmertabelle der Umfrage führt, zu der Sie die Teilnehmer hinzufügen.
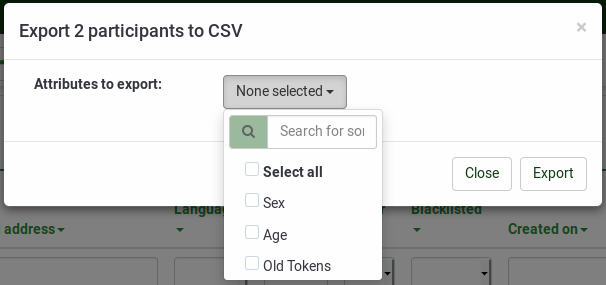
Der Titel der Dialogbox zeigt an, wie viele Teilnehmer exportiert werden.
Die Attributkartenseite enthält vier Tabellen und verwendet eine erweiterte Drag-and-Drop-Funktionalität:
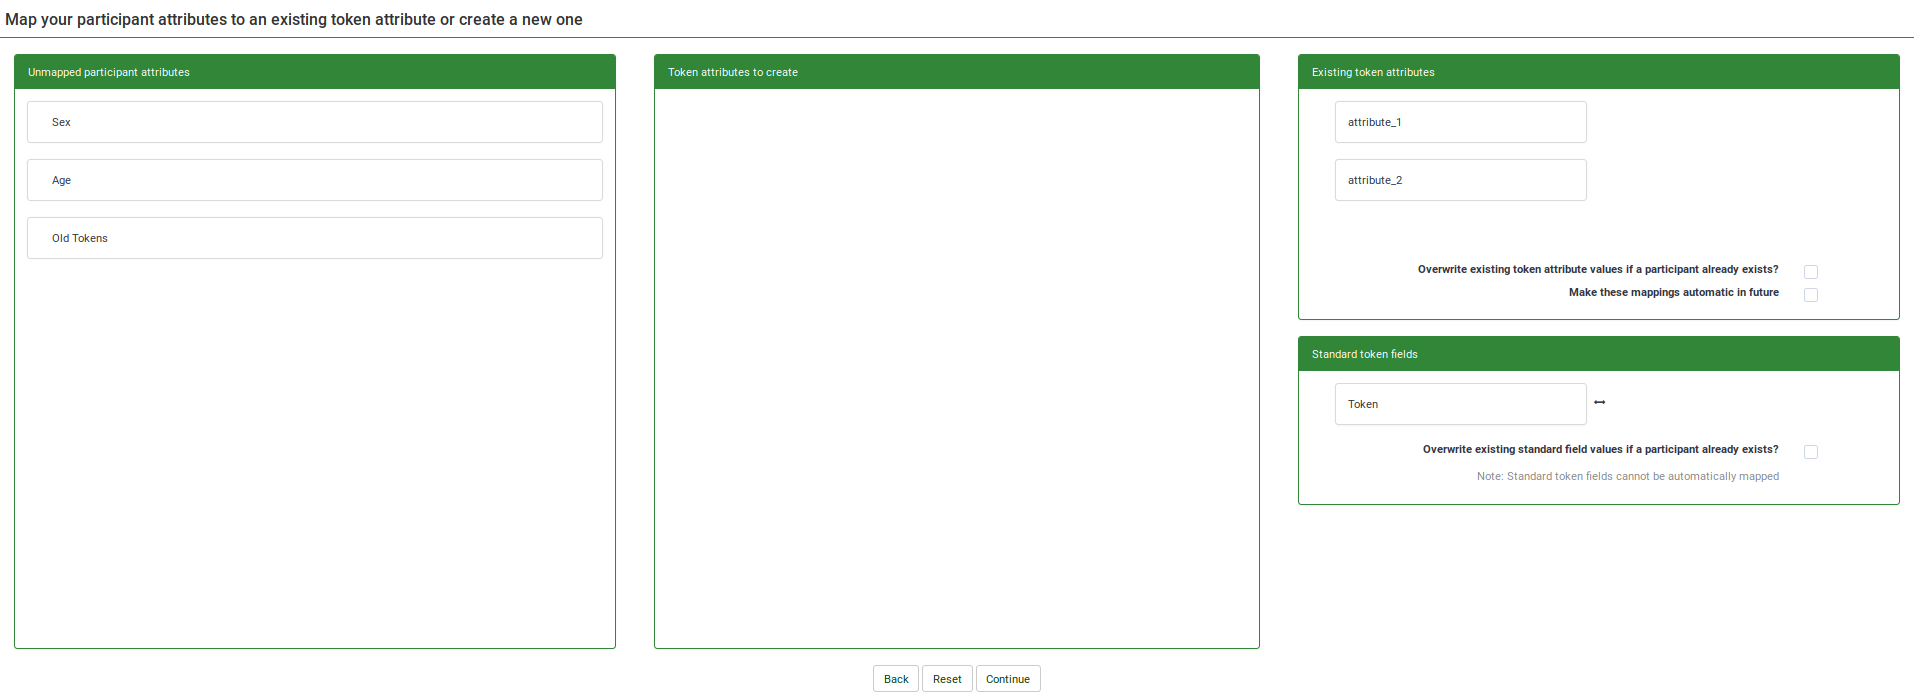
- The first table, Unmapped participant attributes, shows all the attributes that are present in the central participant database. They are currently unmapped - not present in the survey participants table. These unmapped attributes can either be moved into the Token attributes to create table which creates new attributes in the survey participants table or they can be merged with the existing token attributes by dragging the unmapped attributes into the Existing token attributes table, besides the existing token attribute you wish to be merged with.
- The second table, Token attributes to create, helps you copy unmapped participant attributes into the survey participants table, creating new columns. Drag the attribute(s) you wish to add to the survey participants table and drop them into the second table. In this way, new columns/attributes will be added to the survey participants table.
- The third table, Existing token attributes, displays the current attributes existing in the survey participants table. Drop the unmapped attributes here if you wish to copy the data from the unmapped attributes into the one of the existing token attributes (see screenshot below)
- The fourth table, the Standard token fields, displays the standard token fields that can be merged with unmapped participant attributes. The only standard token field from a survey participants table that can be edited is the Token one. This is important when you wish, for example, to easily copy token codes across different LimeSurvey installations.
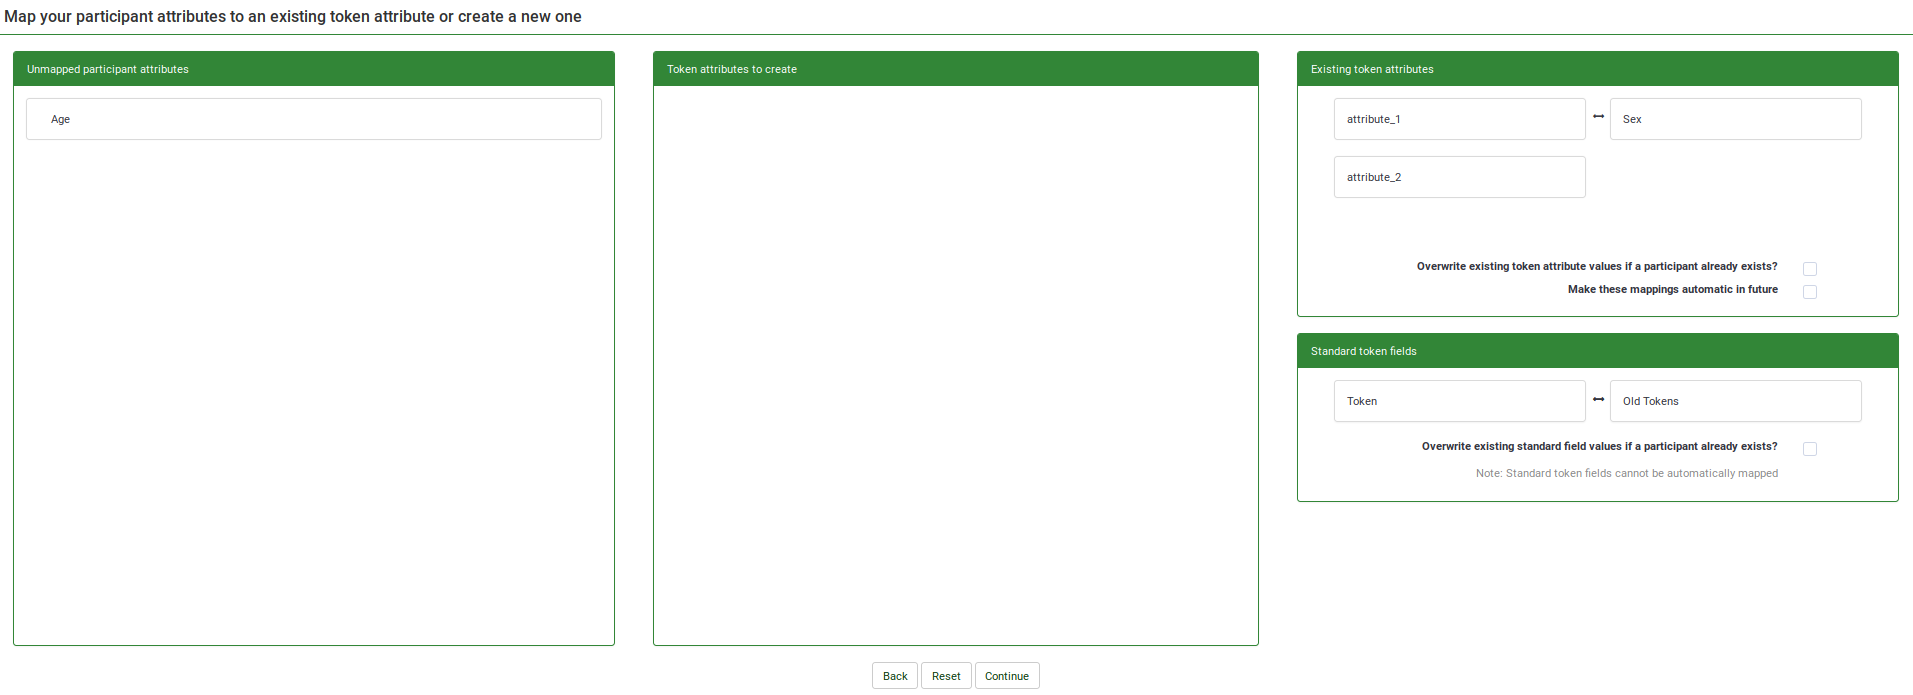
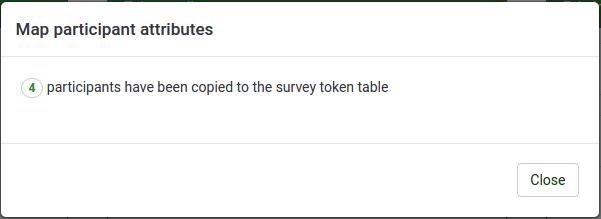
Nachdem Sie alle Attribute zugeordnet haben, können Sie auf „Weiter“ klicken. Nach der Bearbeitung der Teilnehmer wird eine Übersichtsseite angezeigt, die Ihnen mitteilt, wie viele Teilnehmer erfolgreich kopiert wurden. Wenn Sie zuvor um eine Weiterleitung gebeten haben, werden Sie zur Tabelle der Umfrageteilnehmer weitergeleitet, andernfalls werden Sie zur CPDB-Hauptseite weitergeleitet.
Information
Zeigt CPDB-Statistiken an:

1) „Gesamtzahl der Teilnehmer in der zentralen Tabelle“: Die Gesamtzahl der Teilnehmer in der zentralen Teilnehmerdatenbank.
2) „Teilnehmer, deren Eigentümer Sie sind“: Zeigt die Gesamtzahl der Teilnehmer an, deren Eigentümer Sie sind. Standardmäßig haben die neuen Teilnehmer, die in die zentrale Teilnehmerdatenbank eingetragen werden , als Eigentümer den Benutzer, der sie zuerst hinzugefügt hat .
3 Teilnehmer, die mit Ihnen geteilt wurden.
4 Teilnehmer, die Sie geteilt haben
5 Teilnehmer auf der Blacklist
6 Alle Eigenschaften der zentralen Datenbank
Im Drop Down Menü kann man die Anzahl der zu ladenden Einträge auswählen, und mit den Navigationstasten kann man durch die Seiten blättern. Man kann natürlich auch das Textfeld benutzen, um auf eine bestimmte Seite zu springen. Bitte beachten Sie, dass die Anzahl Seiten sich verkleinern wird, wenn Sie die Anzahl pro Seite sichtbarer Einträge erhöhen. Auch ist das Suchen und das Sortieren unabhängig davon, wie viele Einträge in der Tabelle angezeigt werden, aber in der ganzen zentralen Datenbank gesucht, beziehungsweise sortiert werden.
If you wish to add participants via the import function, click the Import button that is located on the main toolbar of the Central participant database page: ![]()
The following options are available:
Teilnehmer teilen
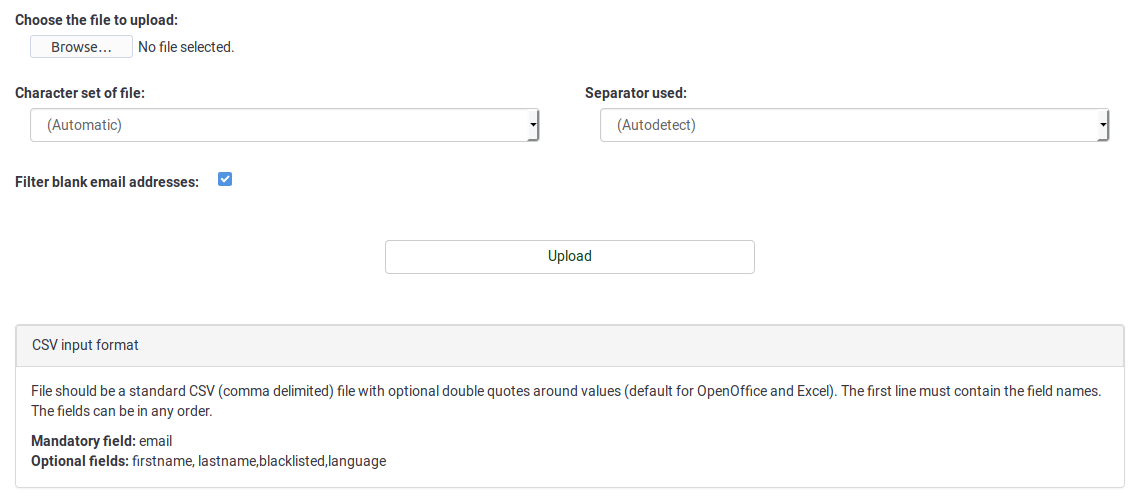
Schritte zum Import
1) Wählen Sie eine Datei zum Importieren aus und legen Sie die damit verbundenen Einstellungen fest.
2) Ordnen Sie die Attribute aus der CSV-Datei zu. Importieren Sie die Attributdaten entweder in ein vorhandenes Attribut aus der zentralen Teilnehmerdatenbank oder in eine neue Spalte, indem Sie ein neues Attribut erstellen. Das neu erstellte Attribut wird vom Typ Textfeld sein – das Format kann später geändert werden.

Im Screenshot von oben wird ein neues Attribut namens „New Age“ erstellt. Die Daten des Attributs „Geschlecht“ wurden gemappt und in das vorhandene Attribut „Geschlecht“ aus der zentralen Teilnehmerdatenbank kopiert.
3) Klicken Sie auf „Weiter“ und warten Sie, bis der Vorgang abgeschlossen ist. Am Ende wird eine kurze Zusammenfassung angezeigt.
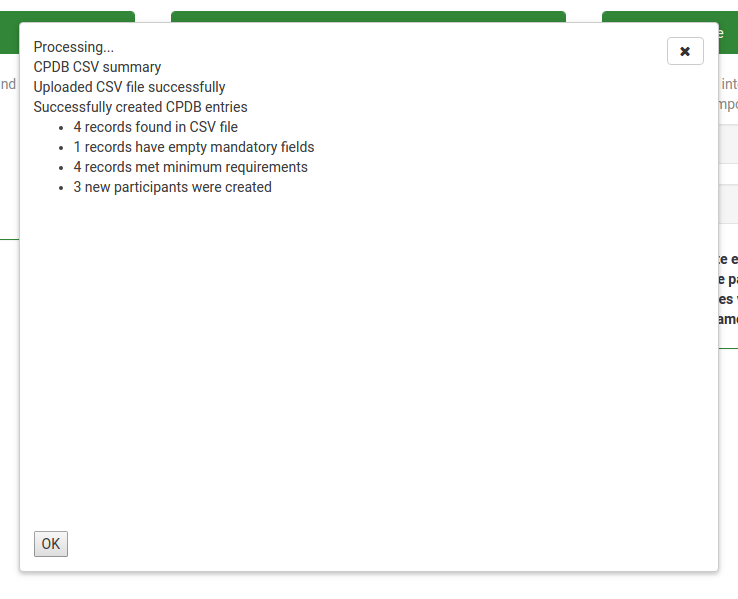
Wenn Sie auf „OK“ klicken, werden Sie zum Teilnehmerbildschirm weitergeleitet, auf dem Ihnen die neu importierten Teilnehmer angezeigt werden.
Blacklist-Einstellungen
The Blacklist settings button is available on the main toolbar of the Central participant database page. Once you click it, the following page will be displayed.
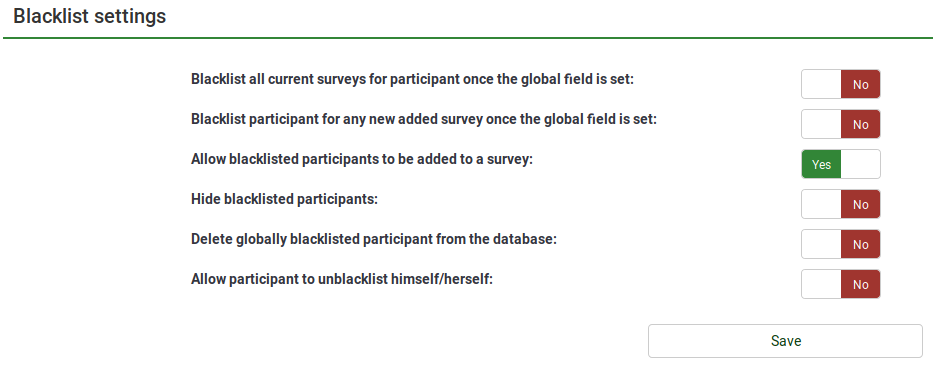
The following Yes/No options are available:
- Blacklist all current surveys for participant once the global field is set: If set to Yes, the blacklisted participant(s) cannot be added to any survey.
- Blacklist participant for any new added survey once the global field is set: If new surveys are created, the respective participant(s) cannot be added to them (if Yes is picked up). However, they can still be added to those surveys created earlier.
- Allow blacklisted participants to be added to a survey: Even if a participant is blacklisted, they can still be added to a survey.
- Hide blacklisted participants: Useful function when you would like to hide participant for a specific amount of time and then make them available for the rest of users with whom those blacklisted participants have been shared with.
- Delete globally blacklisted participants from the database: If Yes, the blacklisted participants will be deleted from the database.
- Allow participant to un-blacklist himself/herself: If Yes, participants can un-blacklist themselves without the help of a LimeSurvey user.
Spaltenkontrolle
To access the Attributes management panel, click the Attributes button located on the main toolbar of CPDB main page: ![]()
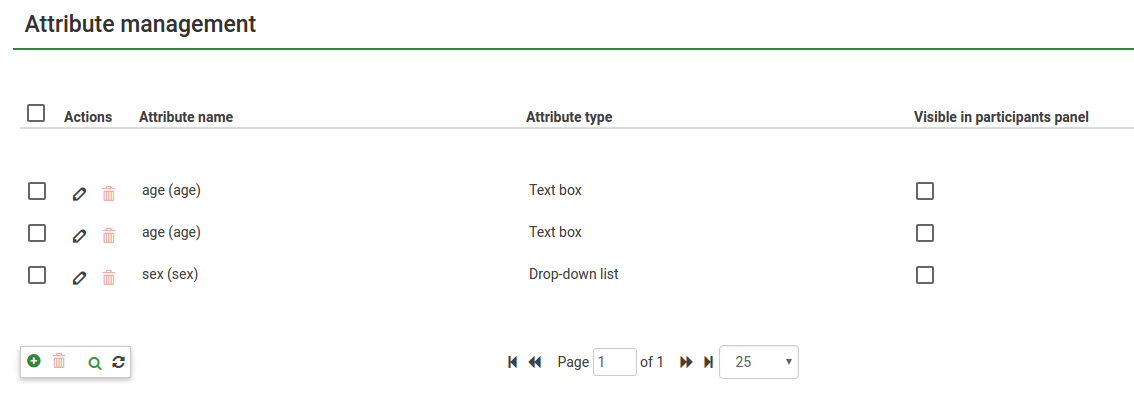
Die Spaltenkontrolle im Tokensystem erlaubt es Ihnen nur, Spalten des Typs "Text" hinzuzufügen, was die Komplexität reduziert. Wenn aber eine grosse Anzahl von Spaltenwerten hinzugefügt werden muss, wird es mühsam, immer dieselben Werte zu schreiben. (Zum Beispiel immer wieder "männlich") Um dieses Problem zu überdecken, haben wir drei unterschiedliche Spaltentypen eingeführt:
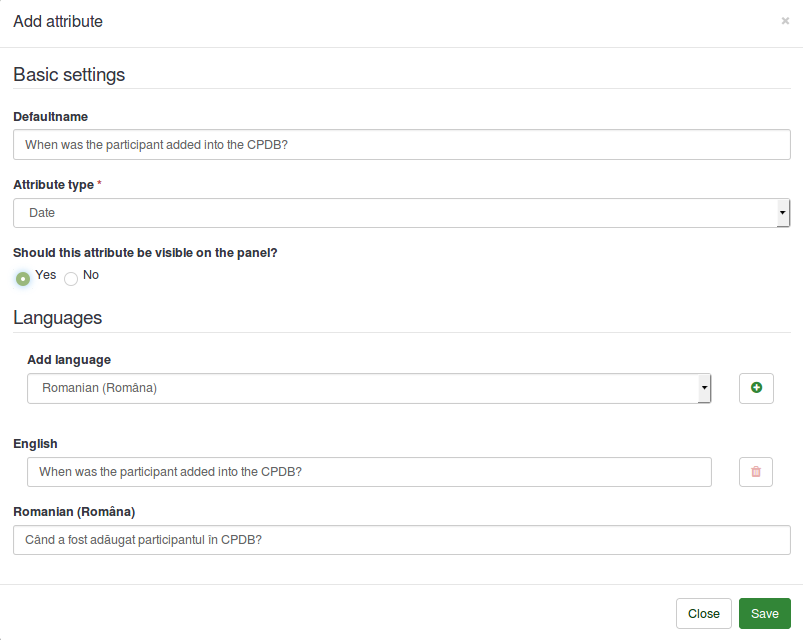
When adding a new attribute, the following options are available:
- Defaultname: It will be used by LimeSurvey to name the attribute in case no other English name is provided.
- Attribute type: You can choose either of the attribute types and the associated user interface will be presented to you while editing.
- Should this attribute be visible on the panel?: It can be Yes or No. This function determines whether the attribute is visible in the CPDB table or not. This can be later edited from the Visible column that is located in the main attributes table.
- Languages: If you would like LimeSurvey not to use the defaultname as the name of the attribute, type here the desired name. Please note that the attribute management has multilingual support. Click on the plus sign after you have selected the language. A new field will appear below the English/default language.
Once the changes are done, click Save.
In the attributes table, two actions are available (see the Action column):

If you click the first icon, a dialog box will be displayed. It includes the basic settings of the selected attribute that can be edited according to your needs.
Um die Werte zu löschen, klickt man auf den Löschbutton, der sich neben dem Editierbutton befindet. Der Löschbutton löscht nicht nur die Spalten, sondern auch die mit den Spalten verbundenen Werte.
Das "Teilen"-Panel
Im Freigabebereich werden alle Informationen zu den freigegebenen Teilnehmern angezeigt. Bitte beachten Sie, dass in diesem Bereich nur die freigegebenen Teilnehmer angezeigt werden, die diesem bestimmten Benutzer gehören.

Dieses Panel zeigt Werte wie:
2 Nachname
1 Vorname
3 E-Mail
4 Geteilt mit
5 Besitzer
6 Das Datum, als der Benutzer hinzugefügt wurde
7 Darf bearbeitet werden
Diese Informationen dienen der Ansicht/Sortierung. Nur das Feld „Kann bearbeiten“ ist für den Benutzer editierbar. Im Feld „Darf bearbeiten“ können Sie festlegen, ob der jeweilige Teilnehmer von dem Benutzer, mit dem dieser Teilnehmer geteilt wurde, bearbeitet werden kann oder nicht. Durch Klicken auf das Kontrollkästchen wird ein AJAX-Aufruf durchgeführt und die Änderungen auf dem Server gespeichert.
Export participants
Die Exportfunktion befindet sich in der Hauptsymbolleiste der Seite „Zentrale Teilnehmerdatenbank“: Datei:Export CPDB.png
When exporting to CSV, you are presented with a dialog box that asks you to mark the attributes you wish to export.
Sie können exportieren:
- None of the additional attributes
- All the additional attributes
- Certain additional attributes
Das Format der exportierten Datei ist CSV.
Export filtered participants
To export filtered participants, use first the search filters. Then. click the checkbox located on the left side of the Action column (to select all the filtered participants). Then, click the Selected participant(s)... button located at the bottom-right side of the table and select the export function. In this way, only the filtered participants will be exported.
Suchfilter
If you wish to filter the users from your database, use the search/dropdown boxes located below each column title:

Enter information in the search fields or select from the dropdown lists (when possible) the participants you want to be listed after the filtering process.
Zusätzliche Informationen
Additional (technical) information is available in the Central participants database (User panel) Development wiki.
