Zentrale Teilnehmerdatenbank
From LimeSurvey Manual
Einführung
Dieses neue Feature erlaubt es dem Administrator, die Teilnehmerinformationen in einer zentralen Datenbank zu speichern, die unabhängig der Tokentabelle ist. Die Hauptvorteile dieses Features sind:
- Die zentrale Datenbank kann als Backup dienen. Wenn zum Beispiel ein Benutzer eine neue Umfrage erstellt, muss er sich nicht damit herumschlagen, die Teilnehmer als CSV Datei abzuspeichern, und diese wieder in einer anderen Umfrage zu importieren.
- Der Benutzer muss die Teilnehmer nur einmal zur zentralen Datenbank hinzufügen und dann kann er mit diesen Daten soviele Umfragen erstellen, wie er will.
- Falls mehrere Benutzer dieselben Daten nutzen wollen, kann der Besitzer Benutzer teilen. Ausserdem kann er Zugriffsrechte auf geteilte Benutzer setzen.
Dazu kommen die erweiterte Attributkontrolle und einige weitere Features.
Die Teilnehmerpanel Management Werkzeuge

1 Start
2 Informationen ( Zusammenfassung der ZTD )
3 Zeige die Teilnehmertabelle
4 CSV Import
5 Alle Teilnehmer nach CSV exportieren
6 Blacklist Kontrolle
7 Globale Teilnehmereinstellungen
8 Attribut Kontrolle
9 Das "Teilen"-Panel
10 Das Übersichtspanel
Start
Das Teilnehmer-Panel ist ein seperates Panel in der LimeSurvey Administrator Werkzeugleiste, es führt also zurück zum Administrator Panel.
Information
Diese Anzeige zeigt die Statistiken der zentralen Teilnehmer Datenbank. Das gibt einen Überblick auf
1 Anzahl Teilnehmer in der zentralen Datenbank
2 Teilnehmer, die Sie hinzugefügt haben
3 Teilnehmer, die mit Ihnen geteilt wurden.
4 Teilnehmer, die Sie geteilt haben
5 Teilnehmer auf der Blacklist
6 Alle Eigenschaften der zentralen Datenbank
Zeige die Teilnehmertabelle
Hier kann man die Mehrheit aller Aktionen der zentralen Datenbank ausführen. Zum Beispiel: Teilnehmer hinzufügen, Teilnehmer löschen, Teilnehmer exportieren, zur Umfrage hinzufügen etc.
Hier ist ein Bildschirmfoto davon:

Die Erklärung des Bildschirmfotos:
1) jqGrid header
2 Teilnehmer hinzufügen
3 Teilnehmer löschen
4 Tabelle aktualisieren
5 Nach CSV exportieren ( Erweitert )
6 Erweiterte Suche
7 Navigationsleiste
8 Teilnehmer teilen
9 Zur Umfrage hinzufügen
10 Totale Anzahl Teilnehmer
11 Verstecke/Zeige Tabelle
12 Untertabelle
Teilnehmer hinzufügen
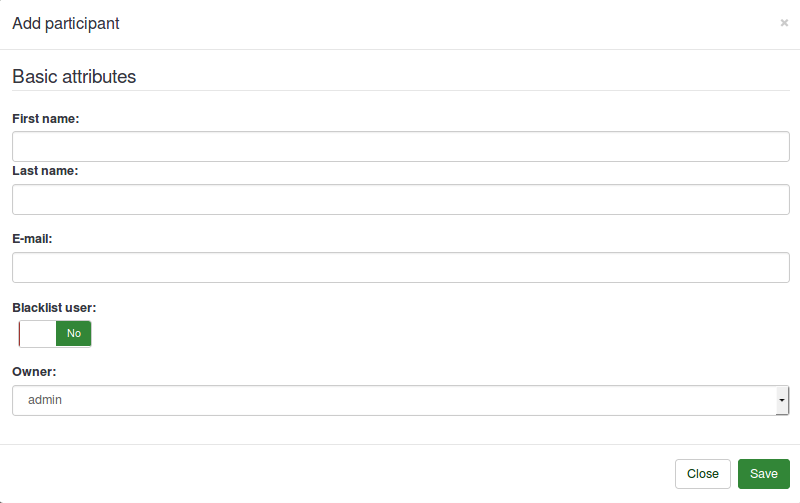
Mit Hilfe des Pluszeichens kann man neue Teilnehmer hinzufügen. Um den hinzugefügten Teilnehmer zu bearbeiten,
muss man auf den Teilnehmer doppelklicken und nach dem Bearbeiten Enter drücken. Wenn Veränderungen vorgenommen wurden, werden diese auf dem Server gespeichert.
Teilnehmer löschen
Man kann einen Teilnehmer markieren, um ihn zu löschen oder einfach auswählen, dass alle Teilnehmer in der Tabelle gelöscht werden sollen. Es gibt drei verschiedene Bedingungen um Teilnehmer zu löschen.

Diese drei Bedingungen sind:
1 Teilnehmer nur aus dem zentralen Panel löschen
2 Lösche die Teilnehmer aus dem zentralen Panel und aus den Tokentabellen
3 Lösche die Teilnehmer aus dem zentralen Panel, aus den Tokentabellen und alle Antworten des Benutzers
Die erste Option löscht den Teilnehmer nur aus dem zentralen Panel, wenn der Teilnehmer in einer Tokentabelle ist, wird er nicht entfernt.
Die zweite Option löscht den Teilnehmer aus der zentralen und auch aus der Tokentabelle, aber seine Antworten bleiben erhalten.
Die dritte Option löscht alle Spuren des Teilnehmers, inklusive seinen Antworten. his responses.
In all the three options the links created for the purpose of maintaining history related to a particular participant are also deleted.
Aktualisiere Tabelle
Dies lädt die Tabellen neu vom Server herunter.
Nach CSV exportieren
Wenn man nach CSV exportieren will, öffnet sich eine Dialogbox, in der man die Spalten, die man exportieren will, markieren muss. Es gibt auch eine Option, um die Spalten zu filtern. Diese zeigt alle Spalten der zentralen Datenbank an. (sichtbar/nicht sichtbar)
Der CSV-Export kann unter zwei Umständen erfolgen:
1 Die Gefilterten exportieren
2 Alle exportieren
Es werden entweder alle oder nur die ausgewählten Teilnehmer exportiert, je nach ihrem Filterkriterium.
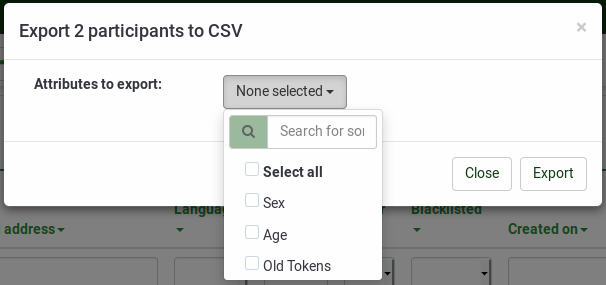
Die Datei wird unter dem Namen central_' das aktuelle Datum und die aktuelle Zeit'.csv gespeichert.
Erweiterte Suche
Das ist noch ein anderes Hauptfeatures des zentralen Panels. Es ist ein leistungsfähiges Feature, das nicht nur die Teilnehmerspalten durchsucht, sondern auch noch zusätzliche Spalten. (sichtbare und nicht sichtbare) Dieses Feature ist auch mit der Tabelle eingebaut.
Es gibt zwei Suchstufen, die man nutzen kann.
1 Einzelsuche
2 Kombinierte Suche
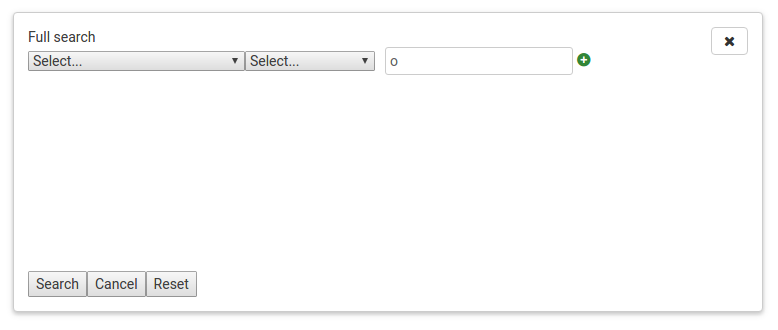
Es kann auch eine komplexe Bedingung benutzt werden, indem man ein Pluszeichen nach der vorherigen Bedingung setzt, oder man kann eine Bedingung entfernen, indem man vor die Bedingung ein Minuszeichen setzt.
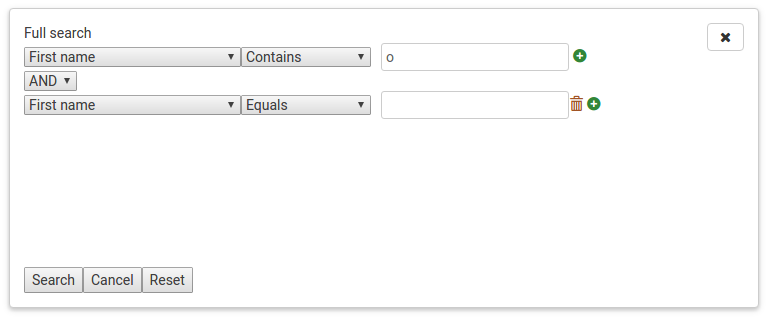
Dies filtert nicht nur die Teilnehmer in der Tabelle, sondern auch die in der Datenbank, die bis jetzt noch nicht geladen wurden. Es ist also eine umfangreiche Suche.
Um die Ladezeit der Tabelle zu verkürzen, werden die Einträge auf mehreren Seiten angezeigt, was es erlaubt, die ersten X Einträge zu sehen (von Ihnen ausgewählt), und um später mehr Einträge nachzuladen. Die Kontrolle zum Seitenwechsel befindet sich in der Navigationsleiste.
Im Drop Down Menü kann man die Anzahl der zu ladenden Einträge auswählen, und mit den Navigationstasten kann man durch die Seiten blättern. Man kann natürlich auch das Textfeld benutzen, um auf eine bestimmte Seite zu springen. Bitte beachten Sie, dass die Anzahl Seiten sich verkleinern wird, wenn Sie die Anzahl pro Seite sichtbarer Einträge erhöhen. Auch ist das Suchen und das Sortieren unabhängig davon, wie viele Einträge in der Tabelle angezeigt werden, aber in der ganzen zentralen Datenbank gesucht, beziehungsweise sortiert werden.
Teilnehmer teilen
Es ist möglich Teilnehmer mit anderen Benutzern teilen. Dazu muss man nur die Teilnehmer, die man teilen will auswählen und auf "Teilen" klicken. Eine kleine Box öffnet sich, in der man den Benutzer auswählt, mit dem man die Teilnehmer teilen will. Man kann auch auswählen, ob die Benutzer, mit denen man die Teilnehmer teilen will, die geteilten Benutzer bearbeiten dürfen oder nicht. Wenn dies mit einem "Nein" beantwortet wird, werden alle Bearbeitungsversuche mit einem "Access Denied"- (Zugriff Verweigert) Fehler abgewiesen.

Zur Umfrage hinzufügen
Auch dies kann mit drei Möglichkeiten erfolgen:
1 Alle Teilnehmer der aktuellen Suche
2 Alle Teilnehmer
3 Nur ausgewählte Teilnehmer
Wie wir wissen, lädt die Tabelle nur die angefragten Teilnehmer, um die minimale Ladezeit für den Benutzer zu ermöglichen. Wenn man also auf einer Seite alle Benutzer ausgewählt hat, heisst das nicht, dass alle gefilterten Teilnehmer aus der Datenbank ausgewählt wurden.

Wenn die Einträge nun exportiert werden, werden nur diese, die auf der angezeigten Seite sind, exportiert.
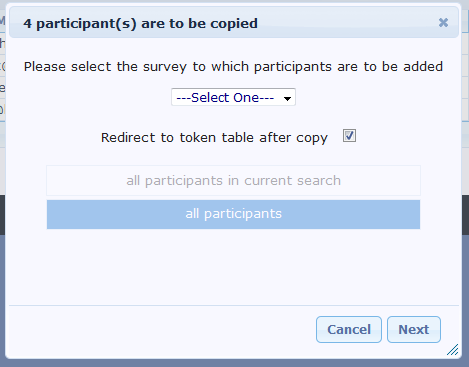
Wenn keine Zeile markiert wurde, und nicht gesucht wurde, werden keine Optionen angezeigt. Folglich ist es Ihnen nur möglich, alle Teilnehmer der Tabelle hinzuzufügen.
Der Titel der Dialogbox zeigt an, wie viele Teilnehmer exportiert werden.
Im Dialog ist auch eine Checkbox, die, wenn aktiv, zur Tokentabelle der Umfrage führt, zu welcher man die Teilnehmer hinzufügen will.
Nachdem man auf "Weiter" geklickt hat, wird man zur Spaltenanzeige weitergeleitet.
Die Spaltenanzeige hat drei Spalten und nutzt Drag and Drop. Die erste Spalte zeit alle Spalten, die in der zentralen Datenbank vorhanden sind. Die zweite Spalte gibt dem Benutzer Platz, neue Spalten zu erstellen. Die dritte Spalte zeigt die Spalten, die in der Tokentabelle der Umfrage vorhanden sind, zu der man die Benutzer hinzufügen will, um so neue Werte zu kopieren, oder um diese in der zentralen Datenbank anzuzeigen.
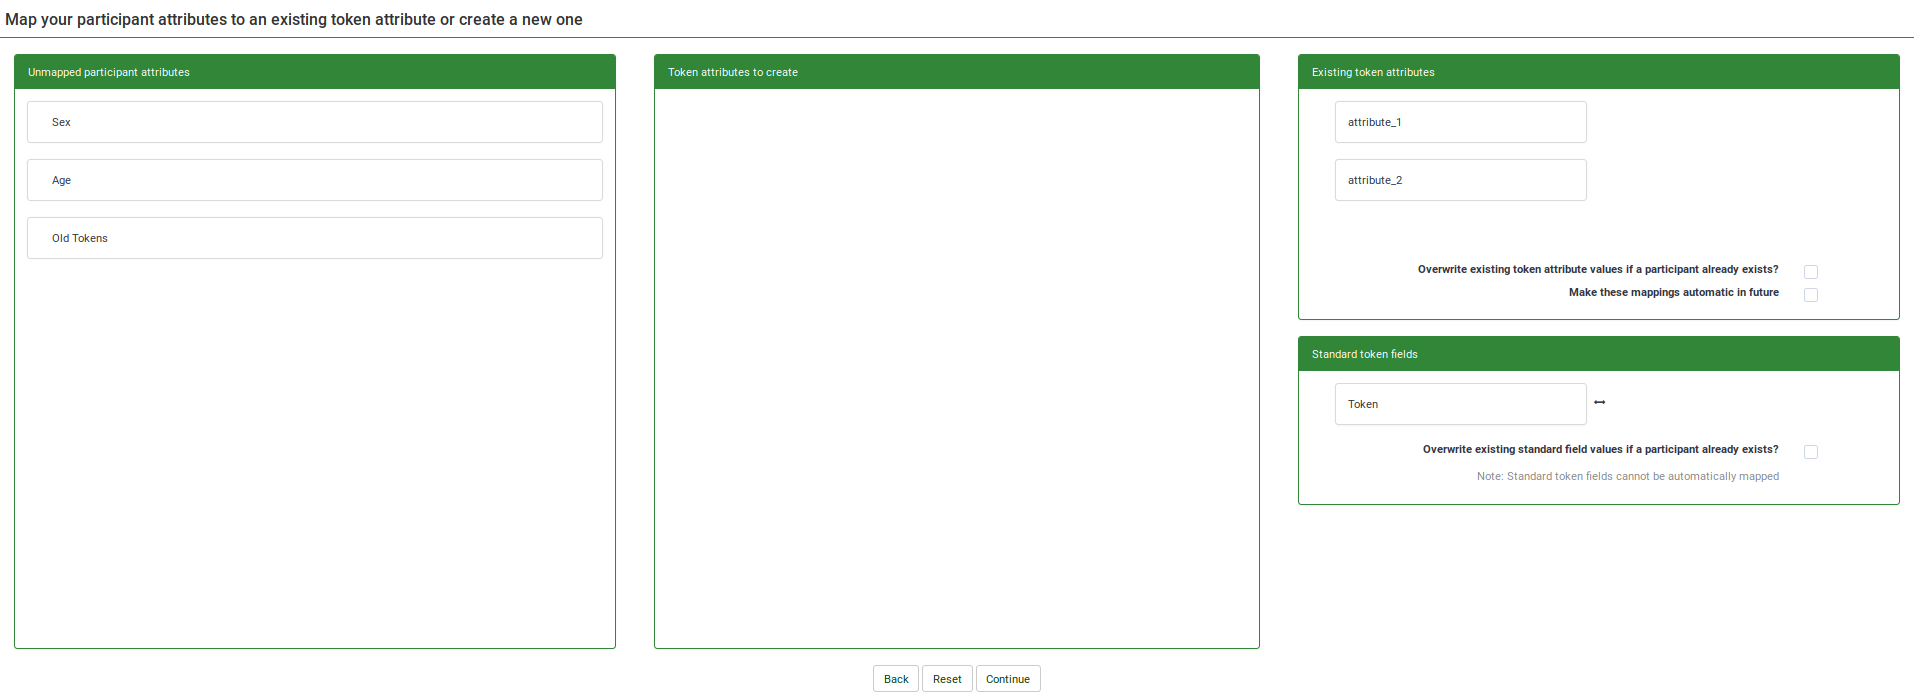
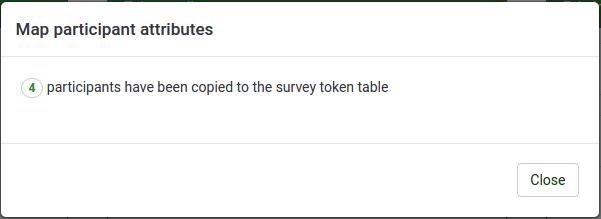
Wenn alle Spalten zugewiesen sind, kann man auf weiter klicken, und nach dem Verarbeiten der Teilnehmer, wird eine Übersichtsnachricht angezeigt, die Ihnen sagt, wie viele Teilnehmer erfolgreich kopiert worden sind und bei wie vielen man nach einer Weiterleitung gefragt wurde. Wenn man nach einer Weiterleitung gefragt wurde, so wird man zur Tokentabelle der Umfrage weitergeleitet. Ansonsten gelangt man zur zentralen Datenbank.
Totale Anzahl
Wie viele Teilnehmer von wie vielen angezeigt werden, steht rechts des Navigators.
Verstecke/Zeige Tabelle
Simply hide or show the grid.
Subgrid
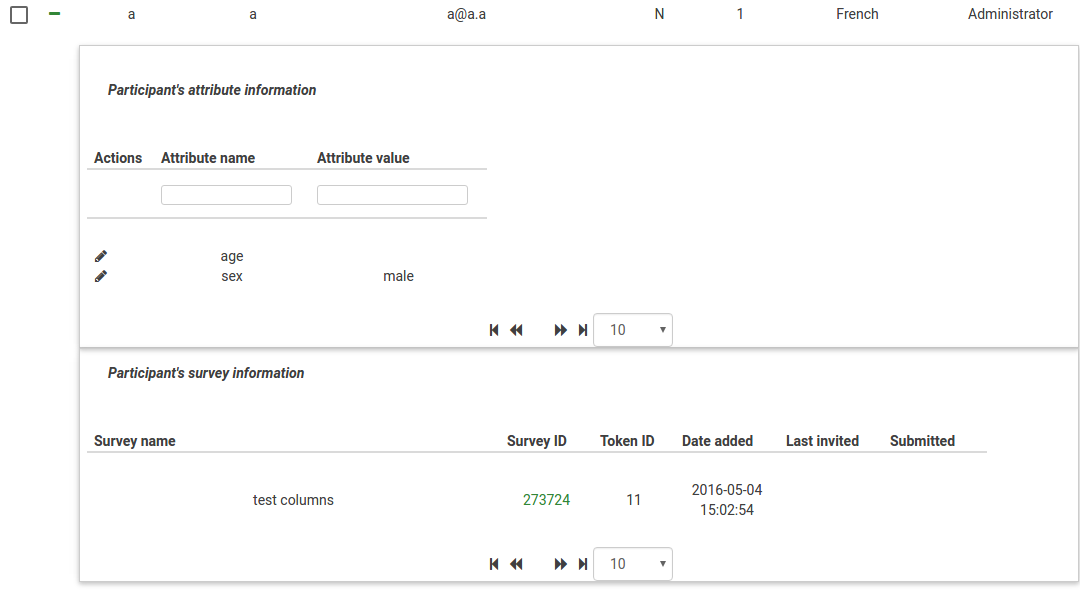
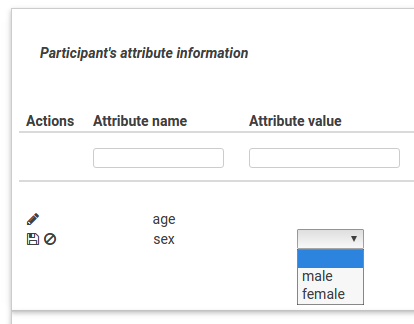
For editing of attributes in the system we have implemented the concept subgrid in the main grid that shows all the attributes in the system and also allows you to edit them. The main grid shows only the visible attributes, the rest of the attributes are available here and only fetched when required. The subgrid as the main grid allows inline editing of attributes and also sorting. It also shows the links to the surveys to which the participant is added to. In case the participant is not added to atleast one survey, this subgrid is not diplayed. When you expand the subgrid, all of the attributes in the system show up, but that doesn't means all the attribute values for that participant are saved in the database. Only when you add some value, that attribute value is saved for that particular participant.
Import from CSV
This supports files with only *.csv extension. The rest of the settings are similar with what we have for "import CSV" under tokens. As in "add to survey" option we also have a drag and drop control over the attribute here. This feature scans all the headings in the CSV and shows them . You can map the attribute to an already existing central attribute or choose to create a new one.
Steps to import
1) Select a file to import and specify associated settings.
2) Map the attributes in the CSV to those in the central table or create a new attribute. New attributes created will be of text box type but can be changed later.

In the example screenshot I have created a new attribute age and mapped sex with the attribute in the central table.
3) Wait for it to process and show the summary.
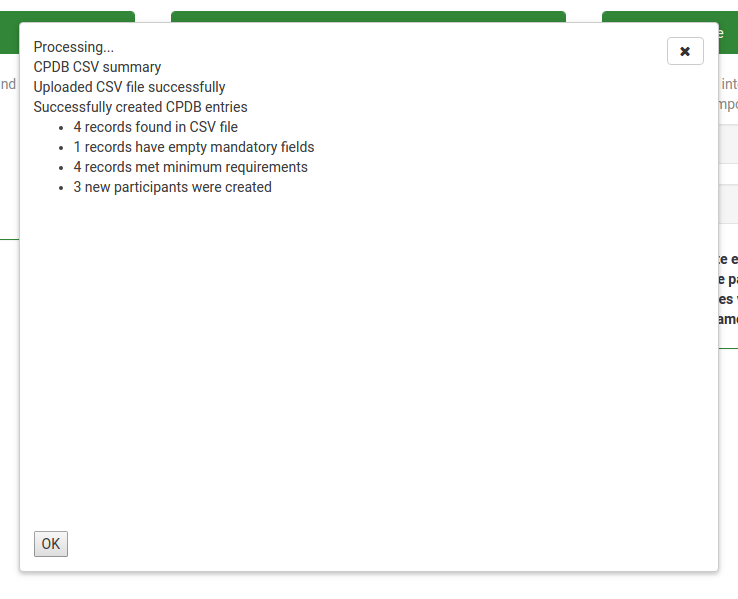
Clicking ok will redirect you to the display participants screen showing the newly imported participants.
Export all
This feature is for simplicity of the user. The user can click on it and can download all the participants that he has access to.
Global participant’s settings
For security purposes the editing of user id is restricted, as it's the user id associated with the participant which decides the ownership of the participant. For this there setting in the main CPDB panel which can be changed only by the super administrator. If the setting is set to yes, you can edit the user name field in the display grid.

When you double click on the row, you can see a drop down in the owner name field where the list of all users in the system are listed and you choose which one to give participant rights to.

Attribute control
This is yet another advance feature of the Central Participants Database. The attribute control in the token system allows to add only the attribute of text type, which reduces complexity, but when you have to add a large number of attribute values, it becomes very tiring to type the exact same value, for example 'male', repeatedly. To overcome this problem we have introduced three different attribute types :
1) Drop down
2) Text box
3) Date picker
You can choose either of the attribute types and associated UI will be presented to you while editing. For drop down , you will need to add possible values. Also, the attribute control has multilingual support.
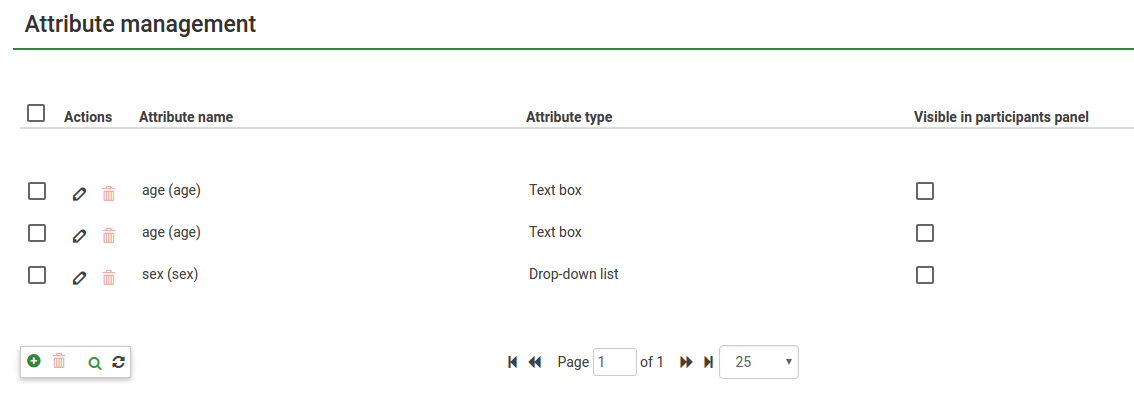
As you can see there are already two existing attributes in the system. You can set their visibility right here by using the check box. The visibility will determine as to whether the attributes should be visible in the main grid or not.
For adding a new attribute you just have to click on the plus sign and another row will pop up allowing you to put in basic details and saving the attribute.
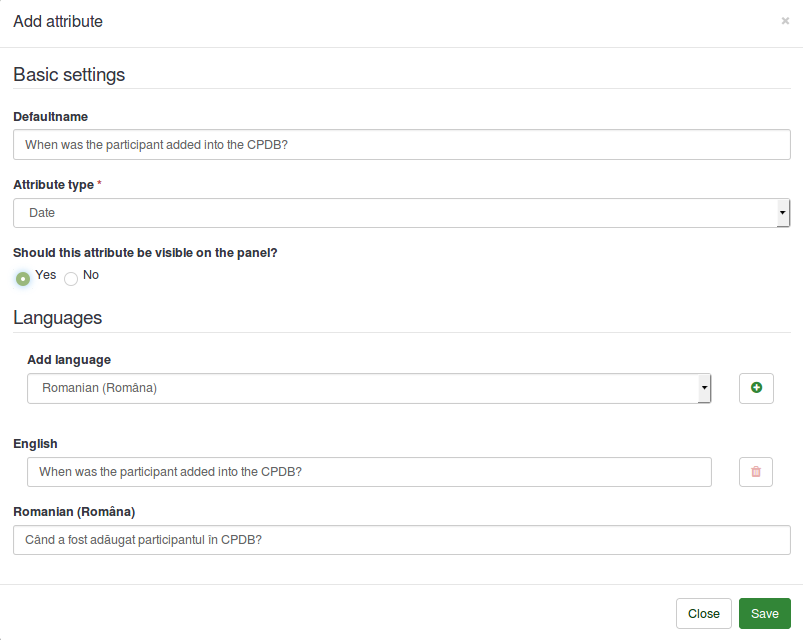
You can save the attribute by using the save button or by pressing enter after entering the attribute name.
For deleting an attribute in the system just click on the delete button next to the edit button. Clicking the delete button will not only delete the attribute but also the associated values.
For advanced editing, such as adding of drop down values and adding multilingual languages, you need to click on the edit button. On clicking the edit button you will see something like this.
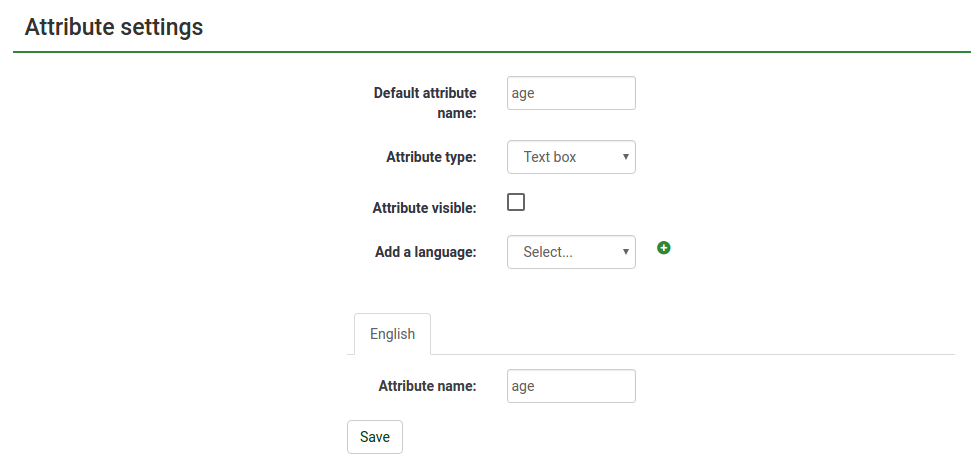
For adding a new language you can click on the plus sign and a new tab will pop up and you can add the attribute name in that language there.
You can also add drop down values by selecting the drop down attribute type.

You can edit the possible values of the drop down by clicking on the edit button or clicking on the value itself as it supports inline edit similar to what we have in the grid. Delete button is for deleting the specific value.
As you can see in the screenshots, the entire attribute properties can be edited here.
The share panel shows all the information related to the shared participant. Please note that this panel shows only the shared participants owned by that particular user.

This panel shows values like
1) First Name
2) Last Name
3) E-Mail
4) Shared With
5) Owner
6) Date Added
7) Can Edit
All this information is for viewing/sorting purposes only and only the "Can Edit" field is editable for the user. The can edit field as explained earlier determines whether to allow the shared participant to be editable by the sharer or not.Just clicking on the check box will make an AJAX call and save the changes on the server.
Panel summary
Panel summary is same as information, only it is loaded when the CPDB panel is opened and it can be accessed again by using the information icon in the toolbar.
Additional information
Additional (technical) information is available at Central participants database (User panel)