Questionários - introdução
From LimeSurvey Manual
Geral
Um questionário inclui diferentes bancos de dados interconectados: idiomas, grupos de perguntas, perguntas, atributos de perguntas, respostas, subquestões, respostas padrão, avaliações, cotas, membros de cotas e configurações de idioma de cotas. Para facilitar o gerenciamento dos questionários, a funcionalidade grupo de questionários (New in 3.0 ) foi adicionada recentemente.
Questionários
Existem duas maneiras pelas quais você pode acessar a página Criar um questionário:
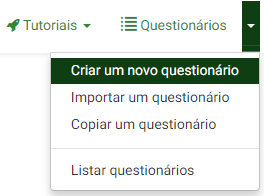
1. A primeira é clicar na seta, ao lado do botão Questionários, localizado na barra de ferramentas principal da página inicial da instalação do LimeSurvey. Uma lista suspensa aparecerá, por onde você pode escolher a opção Criar um novo questionário:
2. A segunda é clicar no botão Questionários, localizado na barra de ferramentas principal da página inicial da instalação do LimeSurvey:

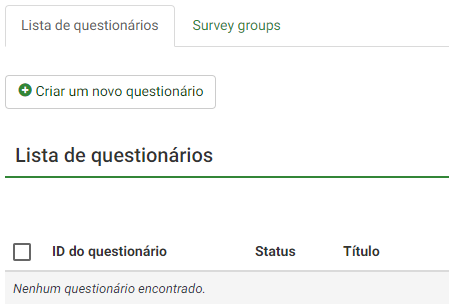
Uma lista de questionários será exibida. Para criar um novo, clique no botão Criar um novo questionário, localizado na parte superior esquerda da janela, acima da Lista de questionários:
Criar um questionário
Depois que você pressionar Criar um novo questionário, a página a seguir será carregada:
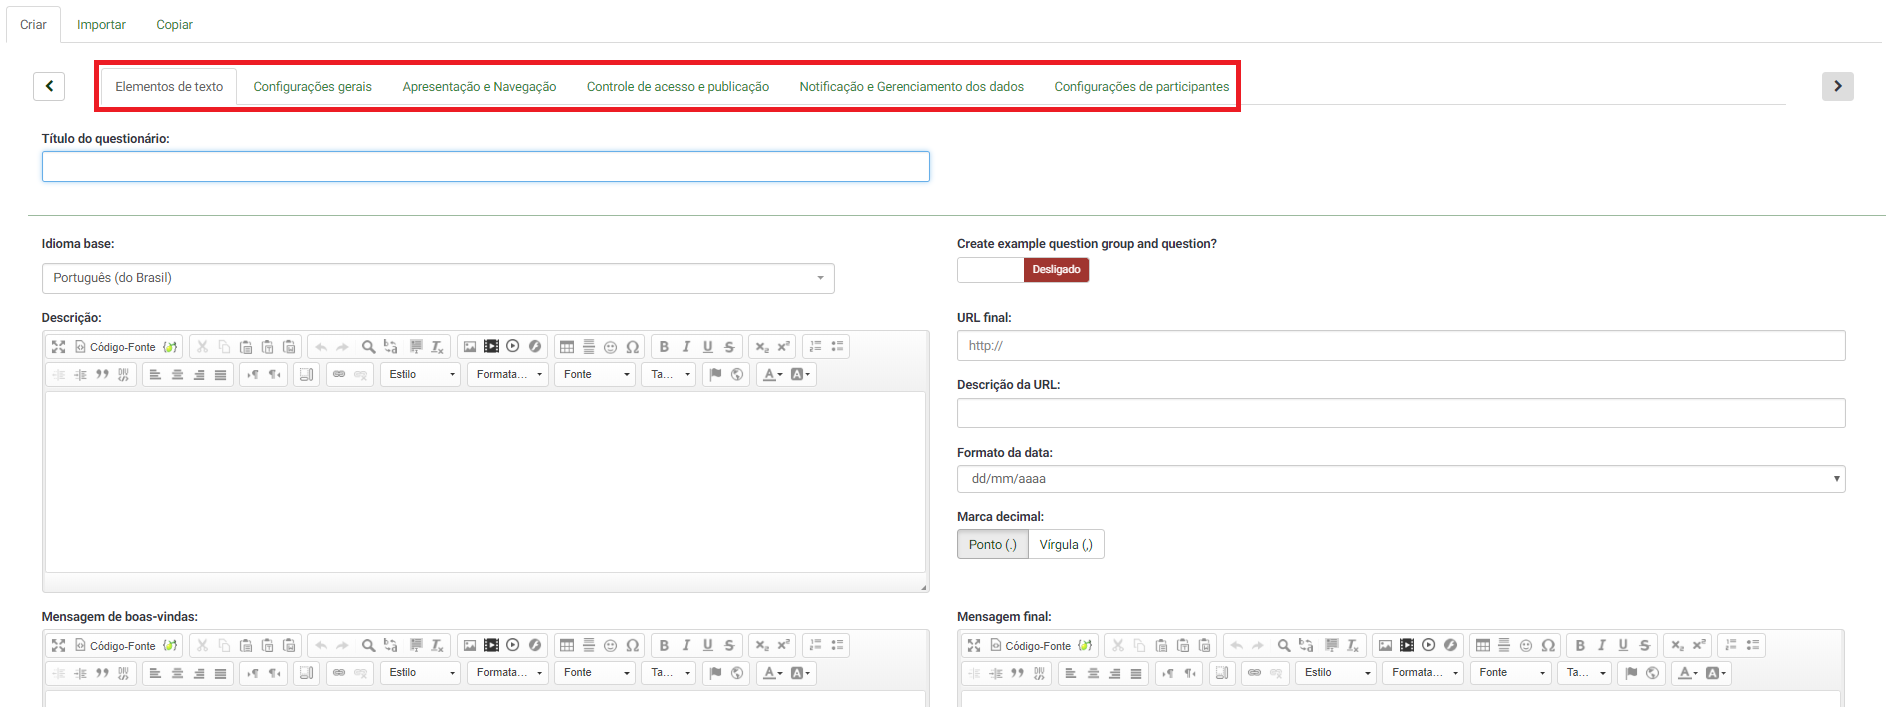
Para otimizar seu questionário, verifique as opções disponíveis em cada guia localizada na barra de ferramentas Criar um novo questionário:
- Elementos de texto
- Configurações gerais
- Apresentação & Navegação
- Controle de acesso e publicação
- Notificação & Gerenciamento dos dados
- Configurações de participantes
Elementos de texto
As seguintes opções estão localizadas nesta guia:
- Título do questionário: O título do questionário pode ser alterado neste campo;
- Criar um exemplo de questão e grupo de questões? (New in 3.0 ): Se ativado, uma questão e um grupo de Questões serão adicionados ao seu questionário por padrão quando você criar um questionário;
- Idioma base: Representa a língua principal do questionário. Se você deseja adicionar outros idiomas, crie primeiro um questionário, acesse as configurações gerais do questionário recém-criado e adicione idiomas adicionais;
- Descrição: Você pode digitar uma descrição do questionário. Se habilitado a partir de configurações globais, use o editor de HTML para personalizar melhor o campo de descrição;
- URL final: Você tem a possibilidade de redirecionar os usuários para outra página quando eles terminarem de preencher o questionário. Se você quiser redirecioná-los, digite o URL e ative a opção carregar automaticamente o URL localizada na guia Apresentação & navegação;
- Descrição da URL: Uma descrição curta do URL final pode ser adicionada no caso em que o usuário é redirecionado para uma página da Web de pesquisa não relacionada. Pode ajudar o administrador do questionário a adicionar notas em relação ao uso do respectivo URL;
- Formato de data: Esta opção é importante quando você quiser gravar os registros de data e hora juntamente com as respostas dos participantes do questionário. Se você clicar nela, uma lista suspensa será exibida com vários formatos de data. Escolha aquele que se adéqua aos participantes do seu questionário. Não se esqueça de que diferentes formatos de data são usados em todo o mundo. Por exemplo, recomenda-se usar um formato de data diferente se o seu questionário se concentrar no mercado dos EUA (mm-dd-aaaa) e não no mercado britânico (dd-mm-aa);
- Marca decimal: Duas opções estão disponíveis: ponto (.) e vírgula (,). Escolha aquela que se encaixa no lugar onde você conduz seu estudo (por exemplo, EUA vs Alemanha);
- Mensagem de boas-vindas: Digite uma mensagem que dará as boas-vindas aos participantes da pesquisa quando acessarem o link do questionário;
- Mensagem final: Digite uma mensagem que será exibida aos participantes da pesquisa assim que terminarem o questionário. Se o campo URL final é carregado automaticamente, a mensagem final não será mais exibida.
Configurações gerais
As seguintes opções podem ser encontradas nesta guia:

- Idioma base: Representa a principal língua do questionário. O idioma base corresponde ao idioma do site padrão. O último pode ser alterado a partir das configurações globais do LimeSurvey por um superadministrador;
- Idiomas adicionais: Mais idiomas podem ser adicionados ao seu questionário. Esta opção é importante quando você quiser criar questionários multilíngue. Por exemplo, se você quiser utilizar inglês, alemão e romeno para a sua pesquisa, adicione romeno e alemão como idiomas adicionais (se o inglês já for o idioma padrão/base). A lista de idiomas disponíveis pode ser menor se o administrador do LimeSurvey diminuir o número de idiomas disponíveis nas configurações globais do LimeSurvey;
- Proprietário do questionário: Digite o nome real do proprietário do questionário;
- Administrador: O nome do administrador;
- Email do administrador: Digite o endereço de e-mail do administrador do questionário;
- E-mail de retorno (bounce): Este é o endereço de e-mail para o qual os e-mails de notificação de erro de entrega (e-mails devolvidos ) serão enviados.
- Fax para: Este campo é usado para imprimir um número de fax no "versão para impressão do questionário" - por exemplo, quando você deseja enviar uma cópia impressa para alguém porque ele não pode usar o questionário on-line;
- Grupo (New in 3.0 ): Selecione o grupo de questionários no qual o questionário recém-criado deve ser adicionado;
- Formato: Permite que você escolha a forma na qual as questões serão apresentadas aos respondentes do questionário. Três opções são disponíveis:
- Pergunta por pergunta : As questões serão apresentadas uma por uma (uma questão por página). Se esta opção for selecionada, uma página de "boas-vindas" e uma de "mensagem final" separadas serão exibidas ao responder o questionário;
- Grupo por grupo : Cada página do questionário exibirá um grupo de questões. Além disso, uma página de "boas-vindas" e uma de "mensagem final" separadas serão exibidas ao responder o questionário, como nos questionários configurados como "Pergunta por pergunta";
- Todas em uma página : Se escolhido, todas as perguntas serão exibidas em uma única página. Se você selecionar esta opção, não serão exibidas páginas separadas para as telas de "boas-vindas" e de "mensagem final": elas aparecerão todas na mesma página, juntas com as questões.
- Modelo: O modelo padrão é bastante simples, mas funcional. Mais informações sobre como criar os seus próprios modelos estão disponíveis aqui.
As seguintes opções podem ser encontradas nesta guia:
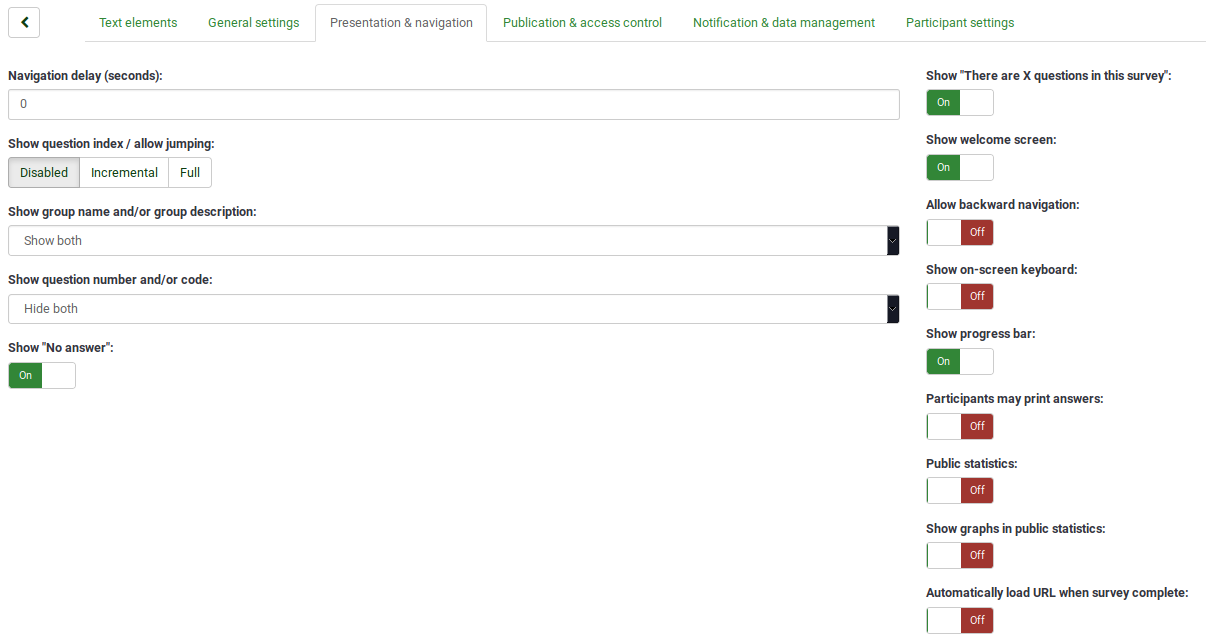
- Atraso na navegação (segundos): Mostra o número de segundos antes que os botões anterior, próximo e enviar sejam ativados. Se nenhum valor é especificado, a opção utilizará o valor padrão, que é "0" (segundos);
- Exibir índice de perguntas / permitir saltar perguntas: Um índice de perguntas pode ser exibido no questionário se esta função for ativada, permitindo ao usuário saltar de um grupo de questões para outro. Você pode escolher os seguintes:
- Desabilitado: Se esta opção for marcada, nenhum índice é mostrado no questionário;
- Incremental: Se essa opção for selecionada, os grupos de perguntas serão mostrados de forma incremental em um menu de índice localizado na página do questionário. Você pode "pular" apenas para os grupos de perguntas que foram visitados / acessados anteriormente;
- completo: Saltar de grupo de perguntas para grupo de perguntas é possível via menu de índice.
- Show "There are X questions in this survey: It shows the total number of questions in your survey;
- Show group name and/or group description: Your survey will show to the survey participants question groups names and/or group descriptions;
- Show question number and/or code: What to be shown to the survey participants - the question number and/or the question code, both or none. The number of the questions is shown in the moment in which someone wishes to start the survey, while the question code is shown next to each survey question;
- Show "No answer": When a radio button or select type question that contains editable answers (e.g.: List & array questions) has the Show "No answer" enabled and it is also not mandatory, an additional entry "No answer" is displayed for each question/subquestion. In this way, the respondents may choose not to answer the respective question/subquestion. As a survey administrator, the following two options are available:
- On : If this option is picked up, the respondents can choose the "no answer" option when it comes to selecting an answer for a non-mandatory question;
- Off : If selected, the "no answer" option will not be displayed as a possible answer for any non-mandatory question;
- Show welcome screen: If turned off, the welcome text message will not be displayed anymore at the beginning of the questionnaire;
- Allow backward navigation: If enabled, it will allow the users to navigate backwards and change his or her previous answers;
- Show on-screen keyboard: If turned on, an on-screen keyboard will show up when answering questions that require typing in information;
- Show progress bar: It shows to the survey participant a progress bar that emphasizes how much of the survey is filled out and how much is left to be completed;
- Participants may print answers: If turned on, the survey participants may choose at the end of the survey to print their answers;
- Public statistics: A link to a set of statistics will be shown at the end of the survey if this option is enabled;
- Show graphs in public statistics: If enabled, graphs will also be shown in the public statistics from the end of the survey. Please note that the "Public statistics option" has to be enabled to allow the survey participants see the graphs in the public statistics;
- Automatically load URL when survey complete: The end URL becomes a redirect link once the survey is completed, if this option is turned on.
Publication & access control
The following set of options is available under this tab:
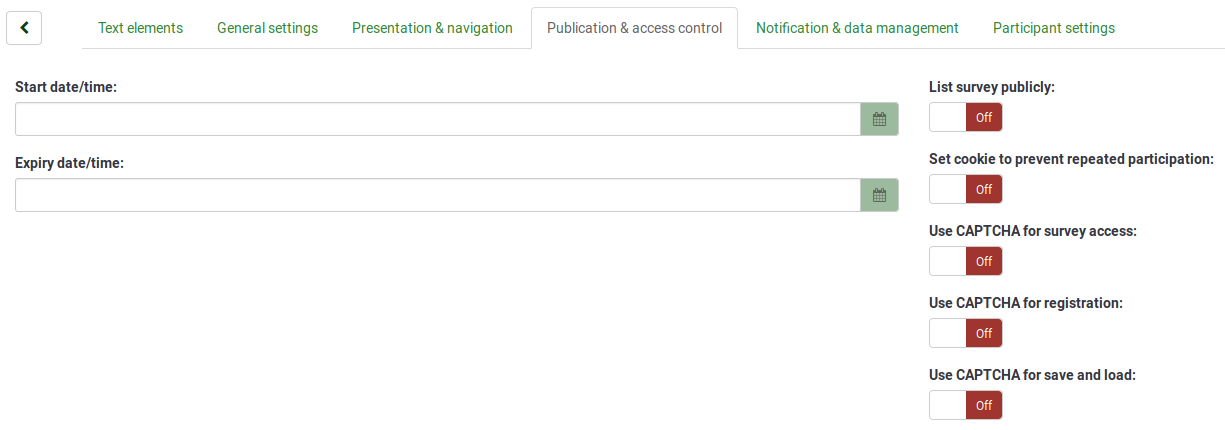
- Start date/time: The date/time the survey starts;
- Expiry date/time: Set this to some date if you want your survey to expire on a special date. This is the last date on which the public survey script will let people participate. (Example: If you set it for the 31st of December, then people will no longer be able to fill out the survey on the 1st of January). To disable this, just clear the date from the input field;
- List survey publicly: The default value is "No". When it is set to "Yes", your survey will be listed in the "available surveys" portal where it can be seen by all LimeSurvey users;
- Set cookie to prevent repeated participation: If this is turned on, a survey participant will be blocked from completing a survey for the second time;
- Use CAPTCHA for survey access: In order to access the survey, a CAPTCHA code has be typed in by the survey participant;
- Use CAPTCHA for registration: In order to register for the survey, a CAPTCHA code has be typed in by the survey participant;
- Use CAPTCHA for save and load: Enable it if you wish a survey participant to type in a CAPTCHA code when he or she loads again the survey after only a part of it was completed.
Notification & data management
The following options are available:
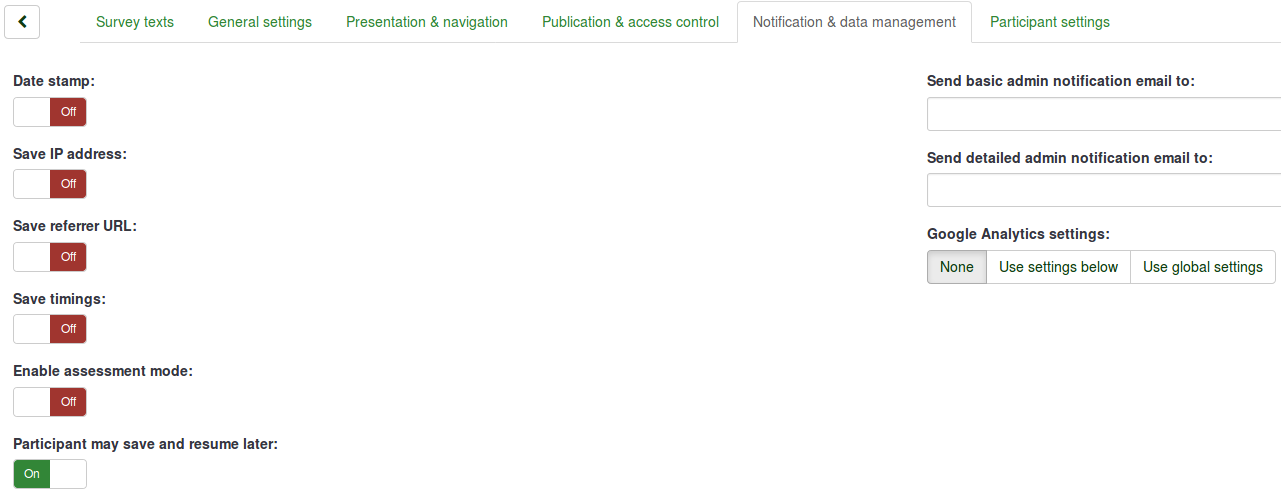
- Date stamp: Turn it on if you would like to see the time when the answers were submitted;
- Save IP address: If turned yes, the IP address of the survey respondent will be stored together with his or her answers;
- Save referrer URL: If turned yes, the referrer URL will be stored together with the answers;
- Save timings: If enabled, the time spent on each page of the survey by each survey participant is recorded;
- Enable assessment mode: You can enable/disable assessments for this survey with this setting;
- Participant may save and resume later: This setting allows a participant to save his responses and resume to answer the survey questions at a later time. Please note that this makes most sense with open surveys or surveys with anonymized answer. If you are using tokens and the survey is not anonymous, in most cases it is better to activate token-based response persistence from the Participant settings panel.
- Send basic admin notification email to and Send detailed admin notification email to: These two fields allow you to send notifications or survey responses to any email addresses once the survey is submitted. You can edit the templates for these emails from the Email templates menu. Multiple recipients can be set by separating the entries with a semicolon (;) (e.g "yourname@test.com; myname@test.com;hisname@test.com" or (if using placeholders) "yourname@test.com;{INSERTANS:82733X12X73};{TOKEN:EMAIL}").
There are different ways for entering an address:
- Enter a specific email address (ie: yourname@test.com);
- Enter a SGQA code and the response will be sent to an email address entered as an answer to that particular question (use the format {INSERTANS:9999X88X12} in the same way you would reuse information from previous answers);
- Enter a Token code (only possible if your survey is not anonymous) and the response will be sent to an email address retrieved from a token field (use the format {TOKEN:EMAIL} or {TOKEN:ATTRIBUTE_1} in the same way you would re-use Information from the Survey participants table).
- Google Analytics settings: If you would like to get further details about the survey web traffic, use Google Analytics. Three options are available:
- None : Google Analytics will not be used;
- Use settings below : If chosen, the survey owner can type in his or her Google Analytics Tracking ID to be stored only with the respective survey. You also have the possibility to choose one of the three Google Analytics styles:
- Do not use Google Analytics - so {GOOGLE_ANALYTICS_JAVASCRIPT} is an empty string;
- Default Google Analytics - {GOOGLE_ANALYTICS_JAVASCRIPT} uses the standard Google Analytics code, inserting the proper Google Analytics Key;
- SurveyName-[SID]/GroupName - {GOOGLE_ANALYTICS_JAVASCRIPT} contains customized Google Analytics code to log the URL as {SURVEYNAME}-[{SID}]/{GROUPNAME}. This can be helpful if you want to analyze navigation paths through your survey, time spent per page, and drop-off rates per page.
- Use global settings : If picked up, the survey will use the same Google Analytics Tracking ID as the one saved in the global settings and then you choose the desired Google Analytics style.
Participant settings
The following options are available:
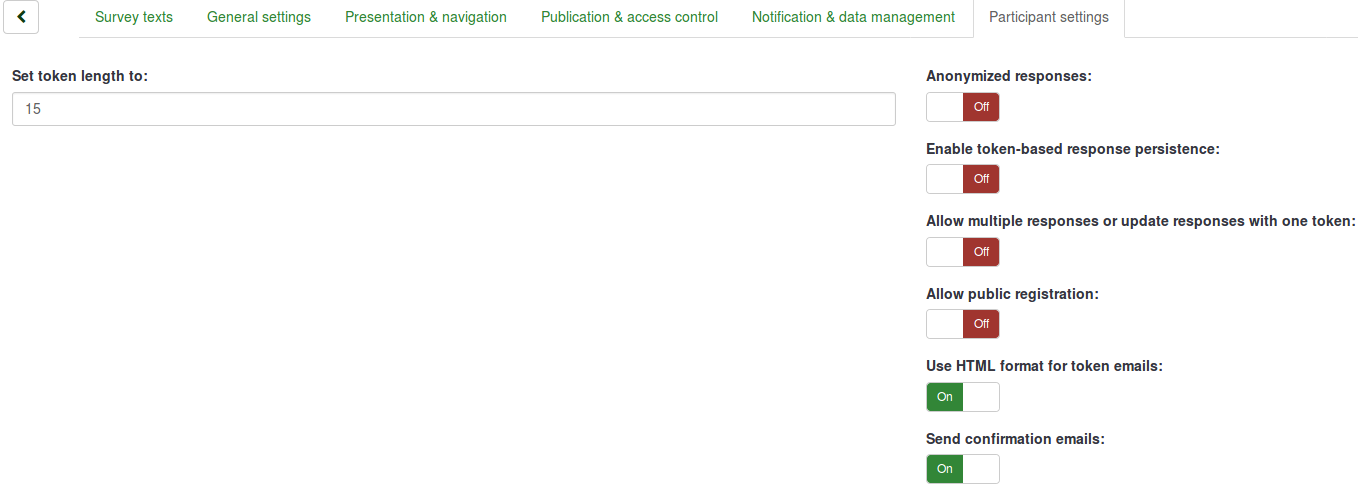
- Set token length to: Usually, the default value of 15 (max. supported value: 35) digits does not need to be changed. However, if you wish to change this setting, please enter a number (X) which is greater than 5. If the number entered is smaller than 5, it will be converted to the default value of 15. When generating tokens, all tokens will use a length of X digits;
- Anonymized responses: It allows you to determine whether responses to your survey are matched up with information from the Survey participants table (utilized in the respective survey) or are kept "anonymous". The default is "No". If you choose "Yes", then your survey is set to anonymize responses - there will be no way to connect answers and participants. Even the survey administrator will not be able to link response data and participant/token data. However, you will always be able to specifically view each response entered by your participants in the survey. Thus individual and anonymous analyses can still be done;
- Enable token-based response persistence: If your survey uses tokens and your responses are not anonymized, you may want to enable this feature. If you turn this on, your participants will be able to leave the survey and resume later at any time without using the Resume later function - for example, when they get distracted or their browser crashes. Upon clicking the invitation link again, they will find their survey answers still in place when they return to the survey and will even find themselves on the same page where they were before leaving;
- Allow multiple responses or update responses with one token: If this option is activated, participants will be able to return to their survey by clicking the invitation link, even if they have already submitted the survey. If the survey is anonymous or "Enable token-based response persistence" is set to "No", this will add a new response. If the survey is not anonymous and "Enable token-based response persistence" is enabled, the user will update the existing responses;
- Allow public registration: If you use tokens to control access to your survey, the only people who can use the survey are those who have an entry and a unique token code allocated in the Survey participants table. If you would like to use tokens, but also allow public registration, set this to "Yes". The "Yes" setting will allow visitors to register his or her name and email address. The script will create a new entry in your Survey participants table for this person, then send them an invitation email. The script will ensure that only one person per email address can complete your survey;
- Use HTML format for token emails: When enabled, all emails sent by the token management interface (invite, reminder, confirmation) will be formatted as HTML. You'll then be able to use rich formatting for these emails. The default value is "Yes";
- Send confirmation emails: If enabled, the participant will receive a confirmation email that the survey was submitted.
Import a survey
If you wish to import a survey, you can do that from the "Create, import, or copy survey" screen. To get there, click the Create, import, or copy a survey button and then on the Import tab. Next, click on browse to choose the file you wish to import, and then on the Import survey button.

The import process reads the following formats:
- .LSS files (XML-format created by LimeSurvey 1.90 or later);
- .LSA files (Survey archive which may include also token, responses and timings - available since LimeSurvey 2.0);
- .TXT files (Text-format created by Excel - available since LimeSurvey 2.0);
- .CSV files (Created by early LimeSurvey versions from 1.50 to 1.90).
The import function "intelligently" re-numbers the survey, groups, questions, answers, and condition IDs so that they all match each other. No existing survey is going to be overwritten during the import process.
By default, the resource links and expression fields are also imported. Basically, the more advanced type of questions are going to be also imported along questions that include complex branching, assessments, validation, and tailoring.
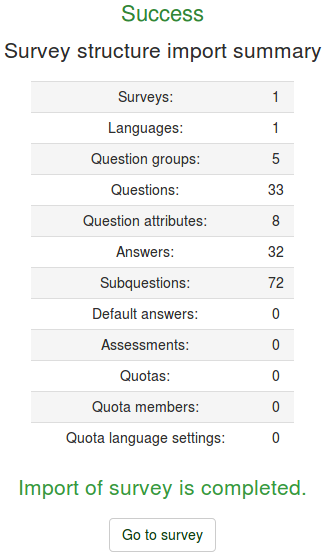
Once the import process is completed, a survey structure import summary will be displayed, showing whether it was successful or not:
Copy a survey
The last tab contains the copy survey functionality and its options:
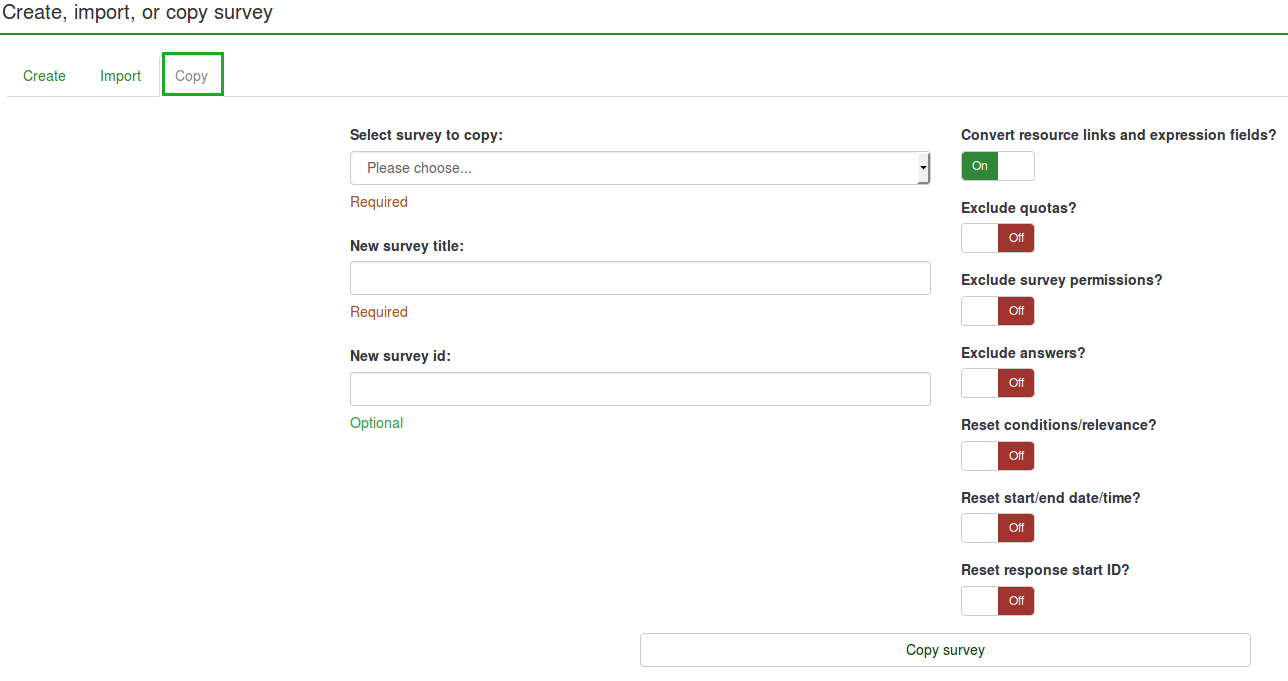
- Select survey to copy: Select from the drop-down list the survey you want to copy;
- New survey title: Type in the title you wish the copied survey to have;
- New survey id: You can complete it or let the field empty as it gets automatically assigned a survey id during the process;
- Convert resource links and expression fields: If you disable it, the more advanced question types that use the expression manager will not be copied;
- Exclude quotas: The quotas are going to be excluded if this option is disabled;
- Exclude survey permissions: If enabled, no survey permissions will be copied into the new survey.
- Exclude answers: Exclude the already-stored answers;
- Reset conditions/relevance: Reset the conditions set in the original survey;
- Reset start/end date/time?: Reset the set start/end date/time;
- Reset response start ID?: Each response has a corresponding ID. If enabled, the ID of the responses will be reset. However, bear in mind that it is better not to have an id with two matching responses because it might influence the output of your survey.
Once you are done with the options, click on the Copy survey button located on the bottom of the page. A survey copy summary will be displayed:
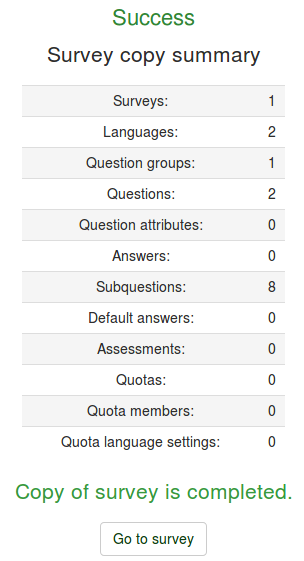
To access the copied survey, click Go to survey to be redirected to the settings of the newly added survey.
List surveys
To get an overview of all your surveys, click on the Surveys button located on the toolbar of LimeSurvey home page:

- Survey ID: When created, the survey receives a unique id that is used to make the connection between different LimeSurvey tables;
- Status: It can be:
- Title: The title of the survey;
- Group: The survey group to which the survey belongs to;
- Created: The date when the survey was created;
- Owner: The name of the user that owns the survey;
- Anonymized responses: It shows whether the responses are anonymized when stored into the database or not;
- Partial: The number of surveys that were partially completed;
- Full: The number of surveys that were fully completed by the survey participants;
- Total: The number of partially and fully completed surveys;
- Closed group: It can be either "Yes" (if a Survey participants table is used) or "No";
- Actions: The last column presents the actions that are available for each survey:

If you want to look for a specific survey, use the search bar and filter the results via the survey status field ("active", "active and running inactive", "inactive", "active but expired", and "active but not yet started").
Delete a survey
In order to delete a survey, you have to first access the survey list page. Then, select the survey(s) you wish to delete and click on the Selected survey(s)... button located on the bottom-left side of the page:
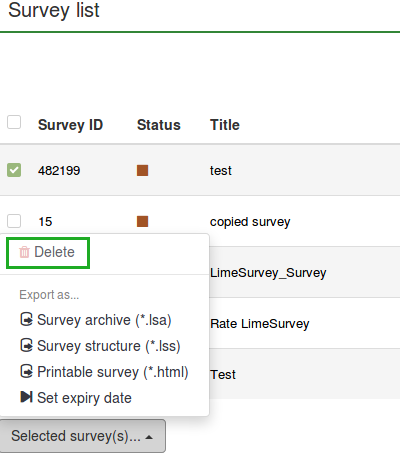
When you click Delete, a confirmation window will pop up in order to confirm your action.
Export a survey
If you want to export a survey, you have to access the survey list table and select the survey(s) you wish to export:
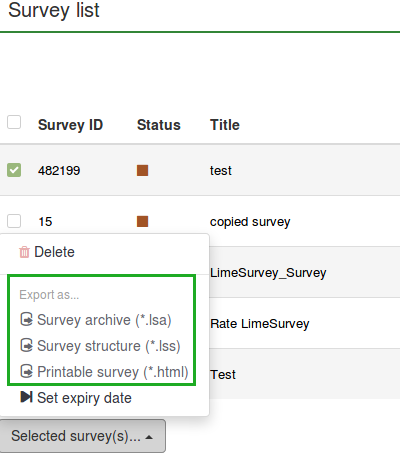
The following options are available:
- Survey archive (*.lsa);
- Survey structure (*.lss);
- Printable survey (*.html): if you would like to export the survey in a printable format in order to be filled out "offline".
For more details, check our wiki section on how to export a survey structure.
Survey groups
In order to access the survey group functionalities, click on the Surveys button located on the main toolbar of the LimeSurvey home page. Then, access Survey groups:

A survey groups list will be displayed.
On this page you can:
- Create a survey group - located above the survey groups table;
- Edit a survey group - located on the last column (the green pencil icon);
- Delete a survey group - located on the last column (the red trash icon).
Create a survey group
To add a new survey group, click on the Create a new survey group button located above the survey groups list. The following columns have to be filled in:
- Name: Type in the name of the survey group;
- Title: Type in the title of the survey group;
- Description: Type in a short description of the survey group;
- Order: Helps you organize the order of the survey groups within a parent group;
- Parent: Choose the survey group that will be the parent survey group. The parent group option is used to ease the edit of template-related options of a high number of survey groups via a few clicks.
Edit survey group
The following options of a survey group can be edited:
- Surveys in this group;
- Settings for this survey group;
- Template options for this survey group (New in 3.0 ).
Surveys in this group
If you click on the first tab, all the surveys from the respective group will be displayed.

This works as a filtering function, filtering out all the surveys not listed in the chosen survey group. You can now select the desired survey and start editing it. To see which survey-editing functionalities are available, check the list surveys section.
Settings for this survey group
The following fields can be edited from the Settings for this Surveygroup tab:
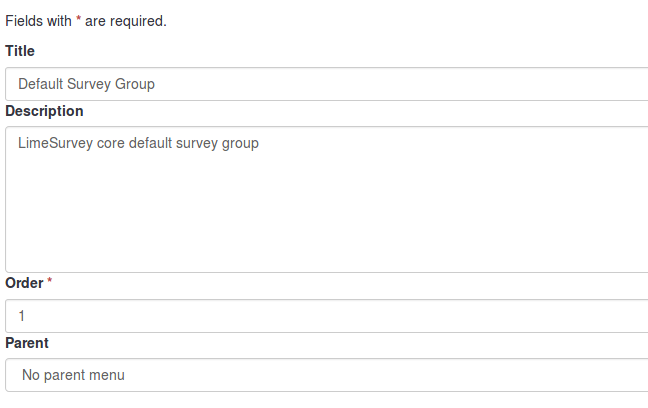
- Title: Type in the title of the survey group;
- Description: Type in a short description of the survey group;
- Order: Helps you organize the order of the survey groups within a parent group;
- Parent: Choose the survey group that will be the parent survey group. The parent group option is used to ease the edit of template-related options to a higher number of survey groups via a few clicks.
Template options for this survey group
The template options functionalities are present in LimeSurvey 3.0+. It offers a set of various options that allows you to quickly and easily change the templates-related settings of the surveys that belong to the same survey group:
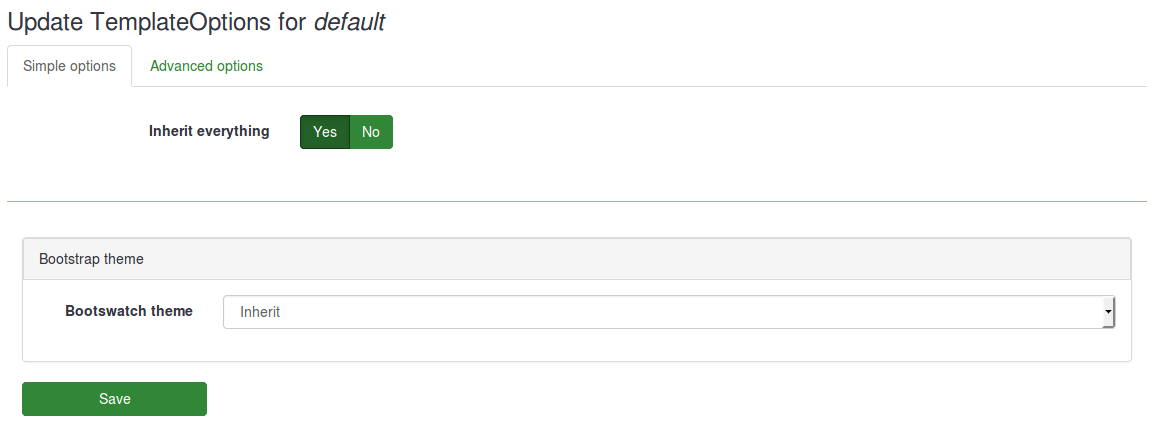
The Inherit everything functionality lets you decide whether you want the survey group to inherit everything or not from the parent survey group theme.
If you do not want this to happen, select "No". The following options will show up which will allow you to choose what should be inherited from the parent survey group theme:
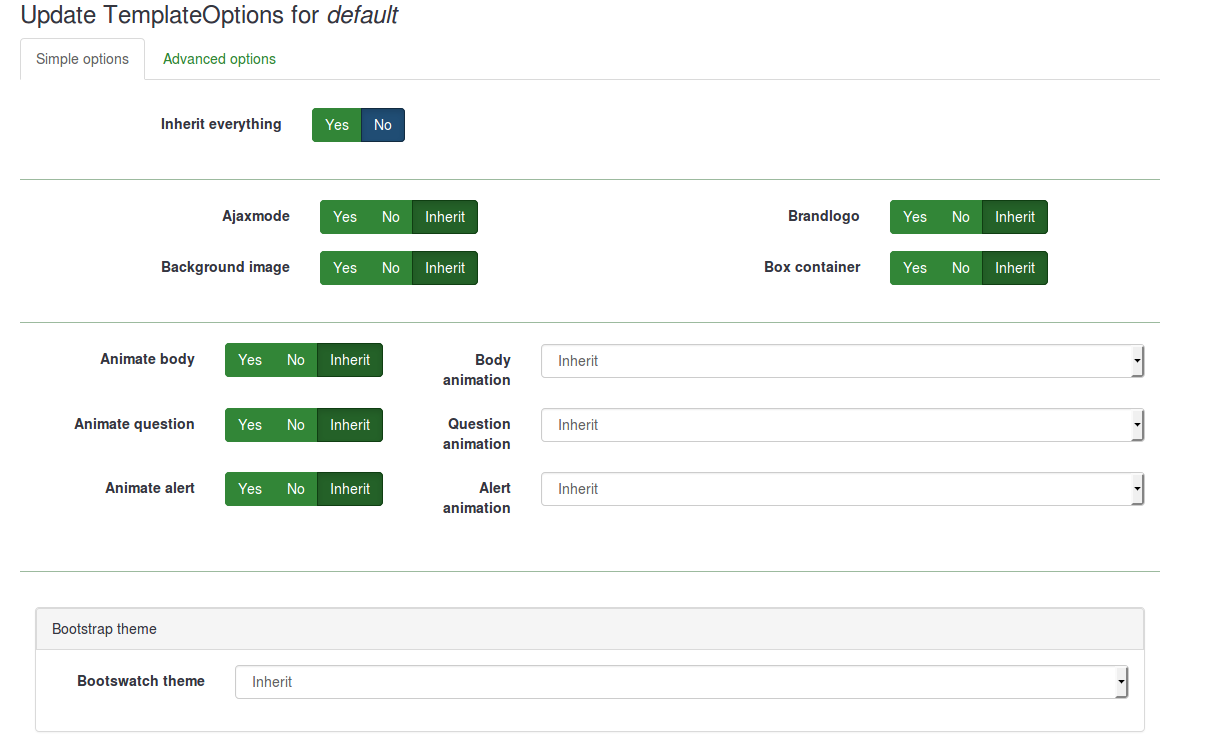
Below, you will see that you can choose a bootswatch theme for your survey group. Bootswatch themes can be used to quickly edit your templates. Basically, bootswatch is a collection of themed swatches which can be freely downloaded and dropped into your Bootstrap site. Some of these themes are already included into your LimeSurvey installation and they can be selected from the Bootswatch theme drop-down list.
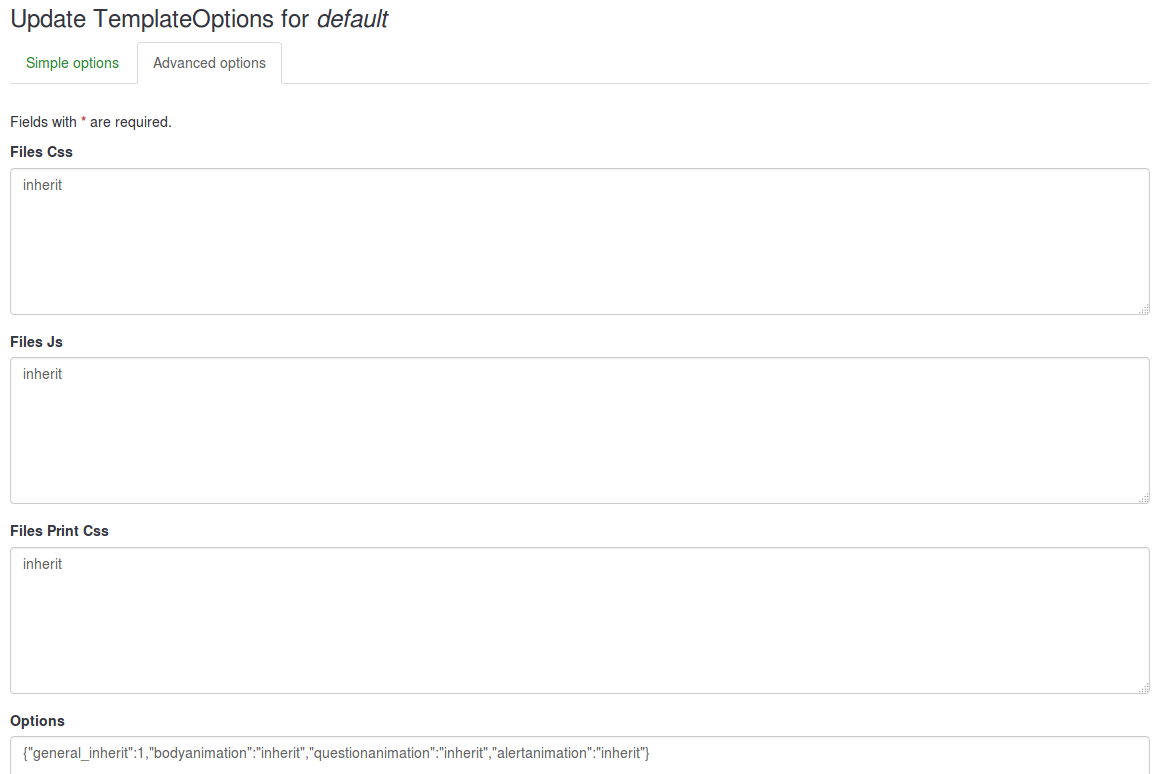
If you want to tweak more a survey group template options, click on the advanced option tab (recommended for advanced users):
Delete a survey group
To delete a survey group, select the survey group you wish to remove and click on the red trash button located in the last column. Then, confirm the deletion.