Survey quotas
From LimeSurvey Manual
Introduction
A quota is used to set a limit on responses from defined groups of people on an active survey. Some common attributes used in defining quotas are things like gender, age, race, province/state. To access the survey quotas panel, access the survey menu and select the Survey quotas tab:
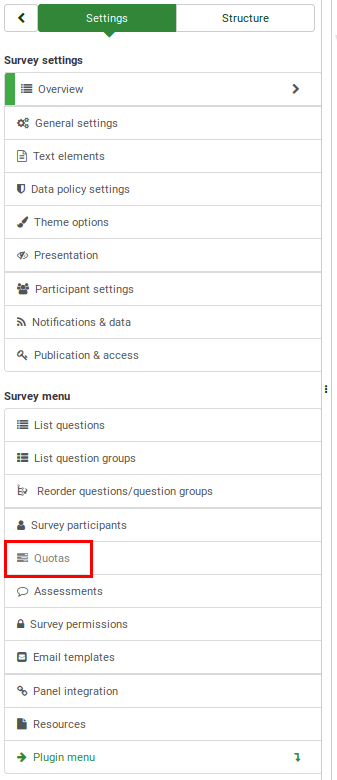
A survey example that can help you demonstrate the usage of quotas is available for download from the following link: LimeSurvey_sample_survey_Quotas.lss. If you do not know about the LimeSurvey import function, read first the following wiki section: import a survey in LimeSurvey.
How do quotas work
Quotas do not automatically exclude respondents based on their answers. Think of a survey that contains only a "Yes or No" question. You set a quota on this survey that contains a restriction of 20 users who have answered "Yes" to this question. The quota will be checked every time somebody answers "Yes" to that question and completes the whole survey. If the person answers the quota question but doesn't complete the survey, that answer-id is not going to be counted towards the quota. Once 20 people have filled out all the survey questions, the quota action will be triggered by anyone else choosing "Yes".
If "No" is chosen, the quota system is never triggered. Therefore, the survey won't restrict anyone from responding the rest of the questions, unless otherwise specified.
To set a limit on the number of "No" responses, you need to add an additional quota, restricting the number of participants who choose "No".
Example of a quota
You might have to conduct a survey where you want to limit it to 25 male and 30 female respondents. You could then define a quota with a limit of 25 for the answer "Male" from your gender question in the survey. Another quota for the answer "Female" with a limit of 30 could be added as well. This will give you a maximum of 25 males who will be able to complete the survey, and a maximum of 30 females who can complete the survey.
Supported question types
The quota system can be applied only to the following types of questions at the moment:
- Gender
- Multiple Choice
- Array - 5 Point Choice
- Array - 10 Point Choice
- Language Switch
- Yes/No
- List (Radio)
- List (Dropdown)
- List with comments
Survey quotas panel
Once you click on the Survey quotas tab from the survey menu, the following page will load up:

To see the full set of options available in this panel, add one survey quota. Then, the survey quota page will look like this:

The following options are available:
- Add new quota: Located on the bottom right part of the survey quotas table, it allows users to add new quotas. Once quotas are displayed on the table, you can start implementing them to certain questions/subquestions answers;
- Add an answer: Before adding an answer, you need to add a quota within which the answer(s) will be stored in. The quota limit will be applied only to those answers displayed in the quota box.
- Edit quota: Click on the green pencil located under the Action column of the survey quotas table to edit the fields of a quota;
- Delete quota: Click on the red trash button located under the Action column of the survey quotas table to delete the respective quota entry;
- Quota validation:Click on the last button located under the Action column of the survey quotas table to quickly check the quota message displayed to the respondents, the URL (and/or a short description of it) where they will be redirected;
- Quick CSV report: It exports the quotas under the form of a table where the main details about the usage of different quotas are emphasized;
- Selected quota(s)...: It works like an aggregator. If you wish to apply one of the actions specified below to more than one quota, use this button to fasten the process.
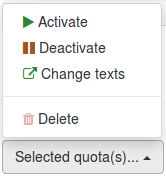
- Activate: Use this button to activate a quota. The active ones have the quota name and action written in white font on a green background.

- Deactivate: Use this button to deactivate a quota. The deactivated ones have the quota name and action written in black fond on a grey background.

- Change texts: Use this button to quickly change the quota message, URL, and URL description of a group of a quotas. You may use this function to redirect respondents to a certain link once the different quota conditions have been met.
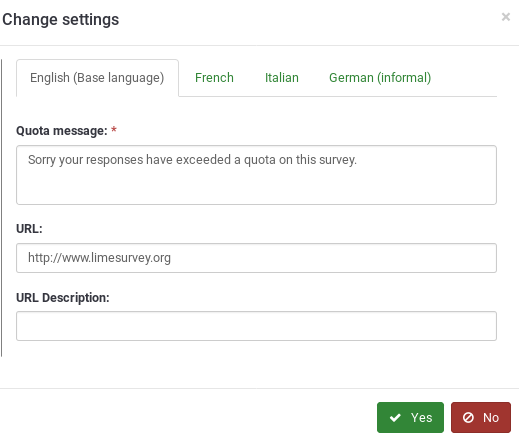
- Delete: If you wish to delete several quotas in the same time, tick the ones you wish to delete, click on the selected quota(s) button and select the Delete option.
Add new quota
For a fully working quota you must firstly "Add a quota", and then "Add Answers" to that quota.
Once you click on the Add new quota button, the following page will be displayed:
The fields marked with a star have to be filled in.
The following options are available:
- Quota Name: This represents the name of the quota that will be displayed on the survey quotas table. It should describe the quota it will represent;
- Quota Limit: It represents the maximum number of completed surveys that will be stored in the responses table. The limit will be checked everytime a survey the certain answer is selected and the whole survey is completed;
- Quota Action: This is an action to perform when a participant is filling out a survey and lands up being part of a quota that has become full.
- Terminate survey: This immediately terminates the survey, and closes the interview.
- Allow user to modify his last answers before terminate survey:" Useful action when you want a respondent not to sign up/choose anymore a certain category. For example, when goodies are offered, you can use a quota on each goodie option in order not to have more users selecting the same good.
- Autoload URL: This tells LimeSurvey to automatically redirect the participant to the URL when the quota action occurs.
- Quota Message: Write the text you wish to be displayed to your respondents if the quota action is triggered.
- URL: The URL displayed to survey participants after the quota action was triggered. The users can also be automatically redirected to this URL if "Autoload URL" is enabled. You can use URL fields in this section.
- URL Description: The text displayed for the URL. (Only in Version 1.85RC)
Add an answer
Once the quota was created, you can start adding answers under it. To do that, access the Survey quotas panel. Look into the survey quotas table and select the Add answer option from the quota box where you wish to add the respective answer to:
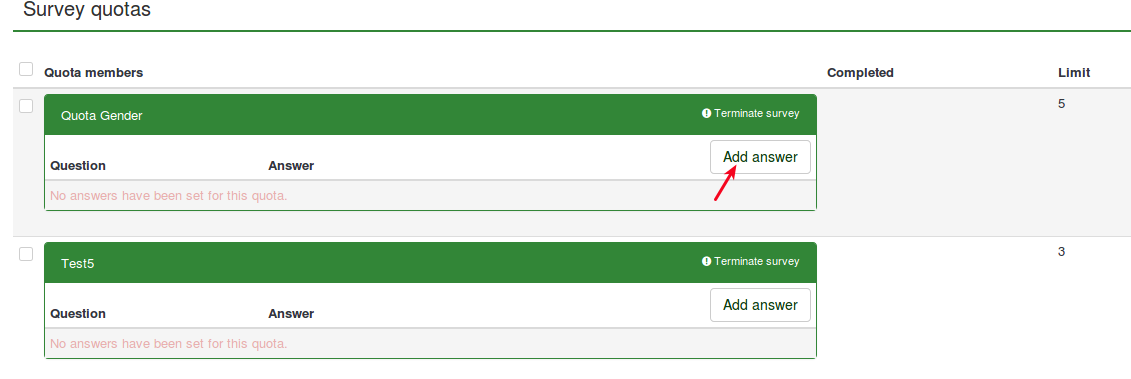
After you clicked it, a new page will load up which will ask you to select the question to which the quota will be applied to:
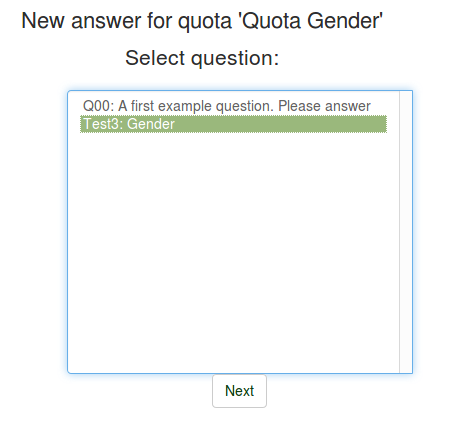
Once you click next, the answers of the question you selected one step before will be displayed. Now, you have to choose to which answer you wish the quota to be applied to:
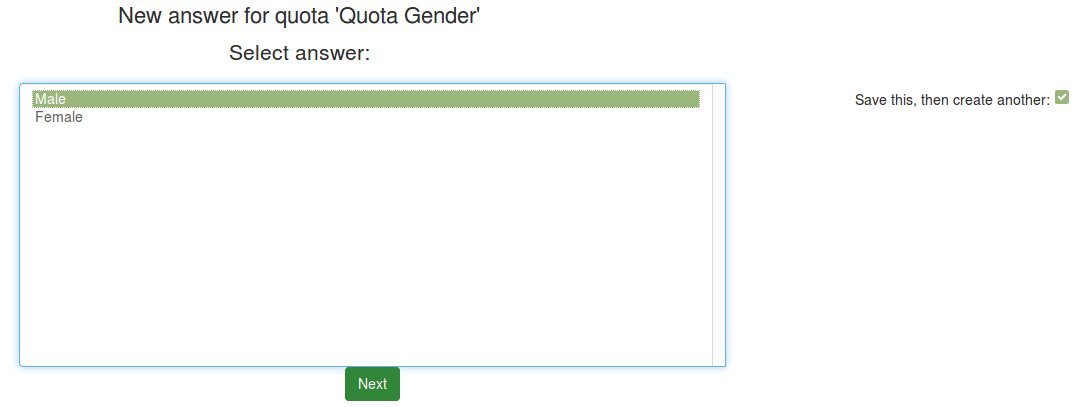
In this example. the "Male" answer will have the quota applied to it whenever respondents choose it (+they finish completing the survey).
Adding multiple quotas for the same question and subquestion
Adding N (a random number) quotas for the same question is possible. However, keep in mind that quotas are checked with a logical "AND" operator. Therefore, to meet the quota, all the N quota limits applied to that certain question/subquestion have to be reached.
Edit quota
Delete quota
Quick CSV report
Quota and response data
All data is saved when the participant clicks the "Next" button. Even if the quota is full, the data submitted until the survey is terminated will be recorded. Nevertheless, such id is marked as "No Completed".
Quota and tokens
When tokens are used in a survey and the user is screened out due to a quota, then the according token entry is marked with the letter "Q" in the Completed column. That way the token is invalidated and the survey participant can't re-start the survey.