Sistem de urmărire a respingerii e-mailului
From LimeSurvey Manual
Introducere
Sistemul de urmărire a respingerii e-mailurilor este capabil să urmărească și să marcheze e-mailurile care nu au fost livrate destinatarilor (participanții la sondaj). Sistemul se bazează pe „raportul de eșec al notificării de livrare prin e-mail”. Prin urmare, are nevoie de o adresă de e-mail la care să poată fi trimise e-mailurile pentru a urmări respingurile. Alături de adresa contului, sunt necesare și acreditările contului, precum și detaliile de conectare.
Cerințe
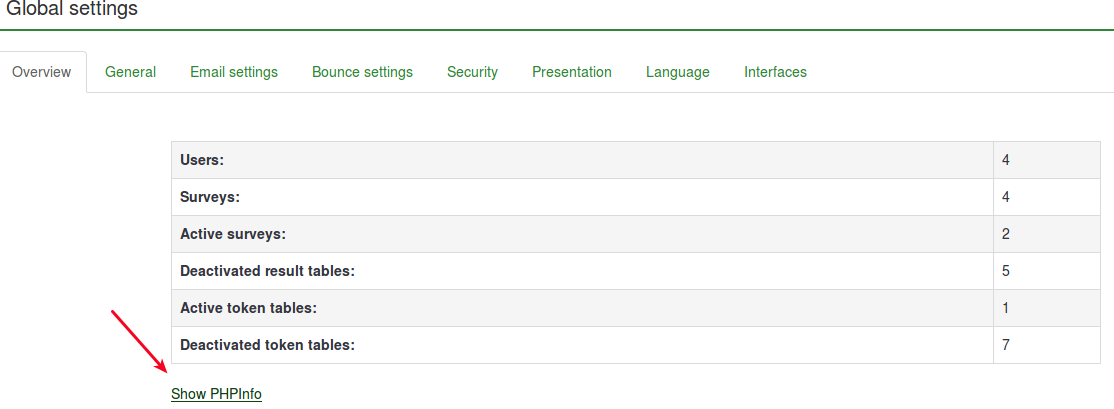
Modulul php5-imap trebuie instalat pe serverul dumneavoastră. Puteți verifica dacă acesta este cazul uitându-vă la butonul „Afișați informațiile PHP”, aflat în pagina global settings a instalării dvs. LimeSurvey, sub Prezentare generală fila :
Apoi, căutați o secțiune imap (utilizați control+F pentru o căutare rapidă). Dacă se afișează o secțiune imap, sunteți gata să mergeți:

Dacă nu ai instalat php5-imap și ai acces root la server, îl poți instala urmând procedura specifică distribuției tale. De exemplu, verificați this link dacă utilizați Debian. Nu uitați să reporniți serverul dvs. web odată ce este instalat (de exemplu, rulați „apache/usr/sbin/apache2ctl restart” în terminal).
Cum funcționează
Ideea de bază din spatele dezvoltării sistemului a fost de a reduce munca manuală și de a reduce posibilele erori umane care ar putea apărea din editarea manuală a fiecărui câmp.
Ideea de bază din spatele acestui sistem este că, atunci când trimite e-mailul, sistemul de urmărire a respingerii e-mailului adaugă automat un ID de sondaj și un ID de simbol la antetul e-mailului fără notificarea administratorului.

Aceste anteturi (cunoscute și ca anteturi personalizate) sunt adăugate la fiecare e-mail de invitație trimis prin LimeSurvey participanților la sondaj.
When the email is bounced back, the original header along with the delivery notification header is received. The system then checks for new emails and parses the emails that have these custom headers. It changes the font color of the wrong email addresses from the survey participants table in red.
Setting up the system
The system is capable of working globally (for all the surveys) or locally (only for a specific survey), thus the settings can be saved accordingly. The bounce global settings can be saved under Global Settings -> Bounce Settings. The following options will be displayed:
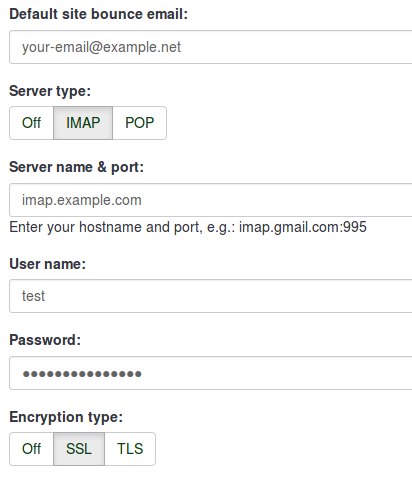
- Default site bounce email: This is the email address where bounced emails will be sent to. For a faster processing of the bounced emails, we recommend the usage of an email address that is used only for the LimeSurvey email bounce tracking system.
- Server type: If set to "Off", no bounce processing functions will be available. Choose either "POP" or "IMAP" to make use of LimeSurvey email bounce tracking system.
- Server name & port: Name of the server and (if needed) the port separated by a colon. The port number isn't typically needed unless the email host uses a non-standard port.
- User name: The user name for the POP/IMAP account.
- Password: The password for the POP/IMAP account.
- Encryption type: If encryption is used, please set the right one here (SSL or TLS).
If you want to apply bounce settings only to a single survey, access the desired survey -> go to the survey menu and click on the Survey participants tab -> check the main toolbar of the page and click on Invitations & reminders option -> click on Bounce settings. The following page will be loaded:
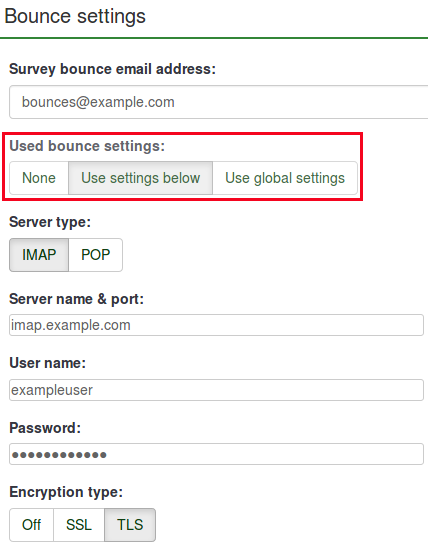
The additional option is represented by the Used bounce settings. Here, you can choose whether you use:
- no bounce settings;
- the local bounce settings. If picked up, you will have to fill out the rest of the local bounce settings fields;
- the global bounce settings. In this case, the bounce settings of your LimeSurvey installation will be used.
Using LimeSurvey Cloud email server
If you are using the LimeSurvey Cloud email server, all your emails will have the sender address "noreply@limesurvey.org". However, these emails will have a Reply-to header with your email address. So, in case someone tries to reply, they can write to you directly.
Bounces are automatically processed if you are using the LimeSurvey Cloud server. You don't need to set up anything, and you don't need to start the bounce processing at all, just leave the default settings untouched. It all happens magically in the background. Please note that it might take 10-15 minutes until a bounced email is processed, and the related entry is marked.
Starting Bounce Processing
Before starting the bounce processing, do not forget to first send the email invitations to your survey participants.
In version 3.0+, once the email bounce tracking system has been set up, you can start bounce processing by accessing the survey home page -> click on the Survey participants tab from the survey menu -> click on Invitations & reminders (located on the toolbar) -> Start bounce processing.

After selecting this option, a progress indicator will be displayed during the process, followed by a final processing status summary.
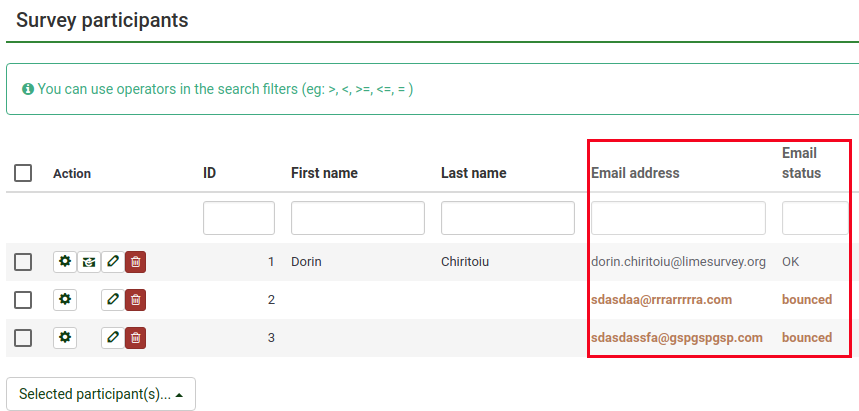
The sent email invitations will start to be examined. The scan results will be shown on the Survey participants table (you may have to manually refresh the page to actualize it). All the entries whose invitations were bounced will have their email addresses marked in red font. Also, their Email status is changed from "OK" to "bounced".

Starting Bounce Processing in v2.5
In version 2.50+, once the bounce processing system has been set up, you can start bounce processing. from the survey home page: Invitations & reminders -> Start bounce processing.

After selecting this option, a progress indicator will be displayed during the process, followed by a final processing status summary.
The sent email invitations will start to be examined. The scan results will be shown on the Survey participants table (you may have to manually refresh the page to actualize it). All the entries whose invitations were bounced will have their email addresses marked in red font. Also, their Email status is changed from "OK" to "bounced".
Example
To better understand how the LimeSurvey email bounce tracking system is working, check the below example:
1. Introduce your respondents to the survey participants table. Make sure that each of them has an assigned token and email address.
2. Select the respondents to whom you wish to send the survey invitation:

Click on the Selected participant(s)... button, and choose the send email invitations option.
3. Wait for some moments in order to make sure that the emails were sent to the survey respondents.
4. Now, you can make use of LimeSurvey email bounce tracking system. Click on Invitations & reminders and fill in the bounce email settings fields with the connection and account details of your personal email account:

You could also leave the fields empty. The bounce processing will still work, only that you will not get any bounce-processing-related email. However, the email status of the entries from the survey participants table will get updated.
As you may observe below, we use the email bounce tracking system with the help of a free Gmail account. To find out about the Gmail-related connection settings, access the following link. Also, do not forget to enable IMAP/POP from the settings of your Gmail account.
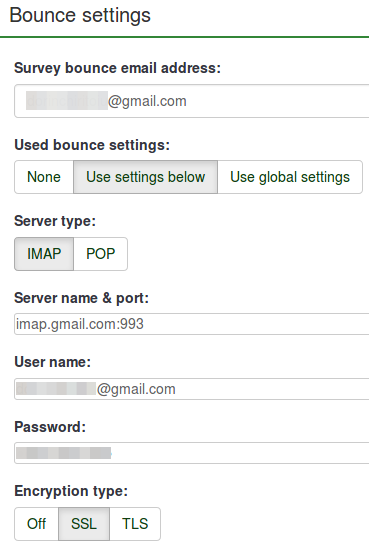
Fill in the fields. Select the desired server and encryption settings. Once done, click on the Save button located on the upper-right part of the screen.
5. Now, you can click on start bounce processing button:

The email bounce tracking system will start to look for the survey-id, token-id, and delivery notification which are attached to the email header of each bounced email. If these custom headers exist, the system will change the font color of the wrong email addresses from the survey participants table in red. Also, the email status of the respective entries will be switched from OK to bounced.
