Email bounce tracking system/it: Difference between revisions
From LimeSurvey Manual
Maren.fritz (talk | contribs) (Created page with "L'idea di base alla base di questo sistema è che quando si invia l'e-mail, il sistema di tracciamento del mancato recapito dell'e-mail aggiunge automaticamente un ID sondaggi...") |
Maren.fritz (talk | contribs) (Created page with "Queste intestazioni (note anche come intestazioni personalizzate) vengono aggiunte a ogni email di invito inviata tramite LimeSurvey ai partecipanti al sondaggio.") |
||
| Line 40: | Line 40: | ||
Queste intestazioni (note anche come intestazioni personalizzate) vengono aggiunte a ogni email di invito inviata tramite LimeSurvey ai partecipanti al sondaggio. | |||
When the email is bounced back, the original header along with the ''delivery notification header'' is received. The system then checks for new emails and parses the emails that have these custom headers. It changes the font color of the wrong email addresses from the [[Survey_participants|survey participants table]] in red. | When the email is bounced back, the original header along with the ''delivery notification header'' is received. The system then checks for new emails and parses the emails that have these custom headers. It changes the font color of the wrong email addresses from the [[Survey_participants|survey participants table]] in red. | ||
Revision as of 07:27, 3 August 2023
Introduzione
Il sistema di monitoraggio del mancato recapito delle e-mail è in grado di rintracciare e contrassegnare le e-mail che non sono state consegnate ai destinatari (partecipanti al sondaggio). Il sistema si basa sul "rapporto di errore di notifica di consegna e-mail". Pertanto, ha bisogno di un indirizzo e-mail a cui inviare le e-mail per tenere traccia dei rimbalzi. Oltre all'indirizzo dell'account, sono richieste anche le credenziali dell'account e i dettagli di connessione.
Requisiti
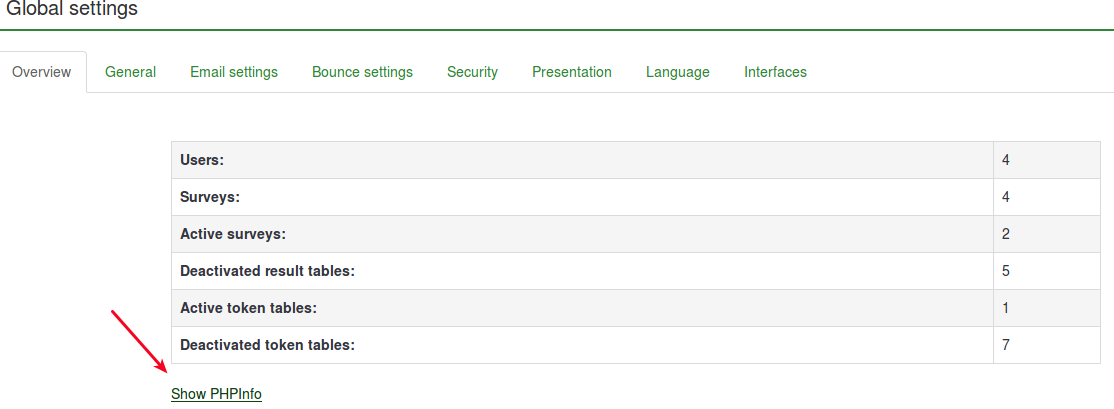
Il modulo php5-imap deve essere installato sul tuo server. Puoi controllare se questo è il caso guardando il pulsante Mostra informazioni PHP, che si trova nella pagina impostazioni globali della tua installazione di LimeSurvey, sotto Panoramica scheda:
Successivamente, cerca una sezione imap (usa control+F per una ricerca rapida). Se viene mostrata una sezione imap, sei a posto:

Se non hai php5-imap installato e hai accesso root al server, puoi installarlo seguendo la procedura specifica per la tua distribuzione. Ad esempio, controlla questo link se usi Debian. Ricorda solo di riavviare il tuo server web una volta installato (ad esempio, esegui "apache/usr/sbin/apache2ctl restart" nel terminale).
Come funziona
L'idea di base alla base dello sviluppo del sistema era quella di ridurre il lavoro manuale e ridurre i possibili errori umani che potrebbero derivare dalla modifica manuale di ogni campo.
L'idea di base alla base di questo sistema è che quando si invia l'e-mail, il sistema di tracciamento del mancato recapito dell'e-mail aggiunge automaticamente un ID sondaggio e un ID token all'intestazione dell'e-mail senza preavviso da parte dell'amministratore.

Queste intestazioni (note anche come intestazioni personalizzate) vengono aggiunte a ogni email di invito inviata tramite LimeSurvey ai partecipanti al sondaggio.
When the email is bounced back, the original header along with the delivery notification header is received. The system then checks for new emails and parses the emails that have these custom headers. It changes the font color of the wrong email addresses from the survey participants table in red.
Setting up the system
The system is capable of working globally (for all the surveys) or locally (only for a specific survey), thus the settings can be saved accordingly. The bounce global settings can be saved under Global Settings -> Bounce Settings. The following options will be displayed:
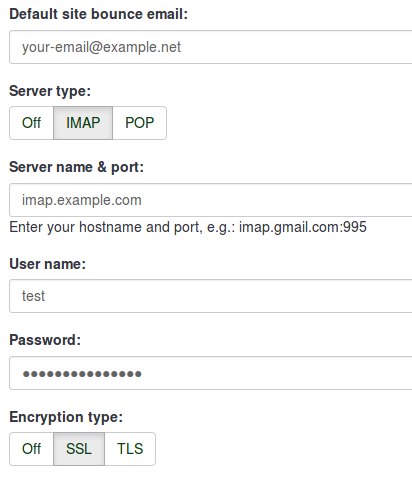
- Default site bounce email: This is the email address where bounced emails will be sent to. For a faster processing of the bounced emails, we recommend the usage of an email address that is used only for the LimeSurvey email bounce tracking system.
- Server type: If set to "Off", no bounce processing functions will be available. Choose either "POP" or "IMAP" to make use of LimeSurvey email bounce tracking system.
- Server name & port: Name of the server and (if needed) the port separated by a colon. The port number isn't typically needed unless the email host uses a non-standard port.
- User name: The user name for the POP/IMAP account.
- Password: The password for the POP/IMAP account.
- Encryption type: If encryption is used, please set the right one here (SSL or TLS).
If you want to apply bounce settings only to a single survey, access the desired survey -> go to the survey menu and click on the Survey participants tab -> check the main toolbar of the page and click on Invitations & reminders option -> click on Bounce settings. The following page will be loaded:
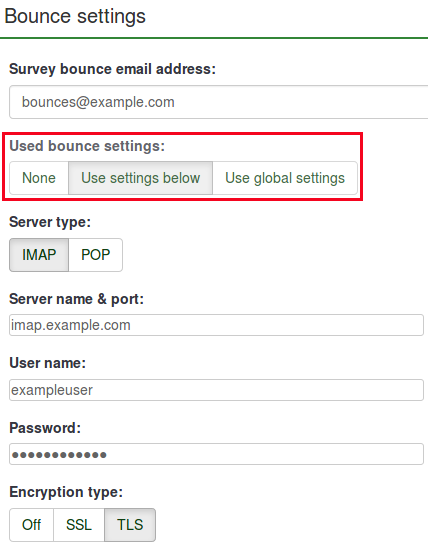
The additional option is represented by the Used bounce settings. Here, you can choose whether you use:
- no bounce settings;
- the local bounce settings. If picked up, you will have to fill out the rest of the local bounce settings fields;
- the global bounce settings. In this case, the bounce settings of your LimeSurvey installation will be used.
Using LimeSurvey Cloud email server
If you are using the LimeSurvey Cloud email server, all your emails will have the sender address "noreply@limesurvey.org". However, these emails will have a Reply-to header with your email address. So, in case someone tries to reply, they can write to you directly.
Bounces are automatically processed if you are using the LimeSurvey Cloud server. There is no need to set up anything and you should leave the default settings untouched.
Starting Bounce Processing in v3.0
Before starting the bounce processing, do not forget to first send the email invitations to your survey participants.
In version 3.0+, once the email bounce tracking system has been set up, you can start bounce processing by accessing the survey home page -> click on the Survey participants tab from the survey menu -> click on Invitations & reminders (located on the toolbar) -> Start bounce processing.

After selecting this option, a progress indicator will be displayed during the process, followed by a final processing status summary.
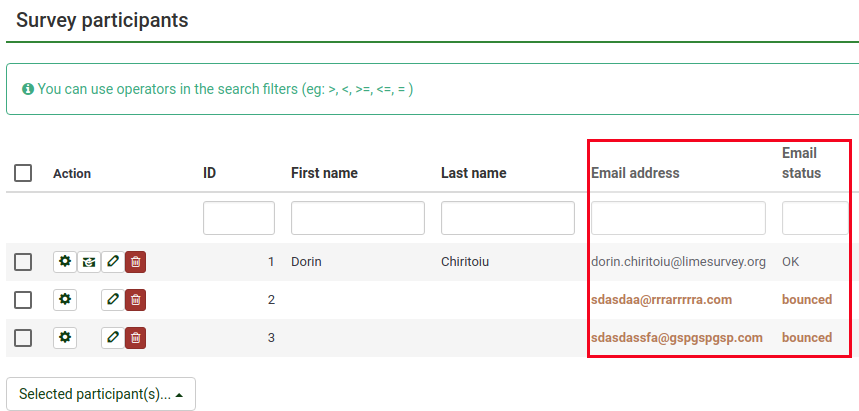
The sent email invitations will start to be examined. The scan results will be shown on the Survey participants table (you may have to manually refresh the page to actualize it). All the entries whose invitations were bounced will have their email addresses marked in red font. Also, their Email status is changed from "OK" to "bounced".

Starting Bounce Processing in v2.5
In version 2.50+, once the bounce processing system has been set up, you can start bounce processing. from the survey home page: Invitations & reminders -> Start bounce processing.

After selecting this option, a progress indicator will be displayed during the process, followed by a final processing status summary.
The sent email invitations will start to be examined. The scan results will be shown on the Survey participants table (you may have to manually refresh the page to actualize it). All the entries whose invitations were bounced will have their email addresses marked in red font. Also, their Email status is changed from "OK" to "bounced".
Example
To better understand how the LimeSurvey email bounce tracking system is working, check the below example:
1. Introduce your respondents to the survey participants table. Make sure that each of them has an assigned token and email address.
2. Select the respondents to whom you wish to send the survey invitation:

Click on the Selected participant(s)... button, and choose the send email invitations option.
3. Wait for some moments in order to make sure that the emails were sent to the survey respondents.
4. Now, you can make use of LimeSurvey email bounce tracking system. Click on Invitations & reminders and fill in the bounce email settings fields with the connection and account details of your personal email account:

You could also leave the fields empty. The bounce processing will still work, only that you will not get any bounce-processing-related email. However, the email status of the entries from the survey participants table will get updated.
As you may observe below, we use the email bounce tracking system with the help of a free Gmail account. To find out about the Gmail-related connection settings, access the following link. Also, do not forget to enable IMAP/POP from the settings of your Gmail account.
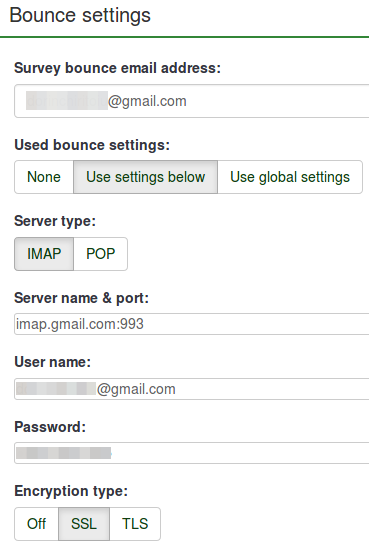
Fill in the fields. Select the desired server and encryption settings. Once done, click on the Save button located on the upper-right part of the screen.
5. Now, you can click on start bounce processing button:

The email bounce tracking system will start to look for the survey-id, token-id, and delivery notification which are attached to the email header of each bounced email. If these custom headers exist, the system will change the font color of the wrong email addresses from the survey participants table in red. Also, the email status of the respective entries will be switched from OK to bounced.
