Email bounce tracking system/hu: Difference between revisions
From LimeSurvey Manual
Maren.fritz (talk | contribs) (Created page with "Ha csak egyetlen felmérésre szeretné alkalmazni a visszafordulási beállításokat, nyissa meg a kívánt felmérést -> lépjen a felmérés menüjébe, és kattintson a...") |
Maren.fritz (talk | contribs) (Created page with "A további opciót a '''Használt visszafordulási beállítások''' jelentik. Itt választhatja ki, hogy használja-e a következőt: *no bounce settings; *a helyi visszaford...") |
||
| Line 76: | Line 76: | ||
A további opciót a '''Használt visszafordulási beállítások''' jelentik. Itt választhatja ki, hogy használja-e a következőt: | |||
*no bounce settings; | *no bounce settings; | ||
* | *a helyi visszafordulási beállításokat. Ha felveszi, ki kell töltenie a többi helyi visszapattanási beállítási mezőt; | ||
* | *a globális visszapattanási beállítások. Ebben az esetben a LimeSurvey telepítésének visszafordulási beállításait fogja használni. | ||
<div class="simplebox">[[File:help.png]] '''Note:''' LimeSurvey will initialize the SMTP connection from the IP address of your LimeSurvey installation. Just ping the URL of the LimeSurvey installation to find out which one it is. In case you have your SMTP server locked down you will need to add this IP address as an exception to your SMTP configuration/firewall.</div> | <div class="simplebox">[[File:help.png]] '''Note:''' LimeSurvey will initialize the SMTP connection from the IP address of your LimeSurvey installation. Just ping the URL of the LimeSurvey installation to find out which one it is. In case you have your SMTP server locked down you will need to add this IP address as an exception to your SMTP configuration/firewall.</div> | ||
Revision as of 18:49, 9 October 2023
Bevezetés
Az e-mailek visszafordulását követő rendszer képes a címzettekhez (felmérés résztvevőihez) nem kézbesített levelek nyomon követésére és megjelölésére. A rendszer az "e-mail kézbesítési értesítés hibajelentésére" támaszkodik. Ezért szüksége van egy e-mail címre, ahová az e-maileket el lehet küldeni, hogy nyomon tudja követni a visszapattanásokat. A számla címe mellett a fiók hitelesítő adataira, valamint a csatlakozási adatokra is szükség van.
Követelmények
A php5-imap modult telepíteni kell a szerverére. Ellenőrizheti, hogy ez a helyzet, ha megnézi a PHPinfo megjelenítése gombot, amely a LimeSurvey telepítés globális beállítások oldalán található, a Overview alatt. lap:
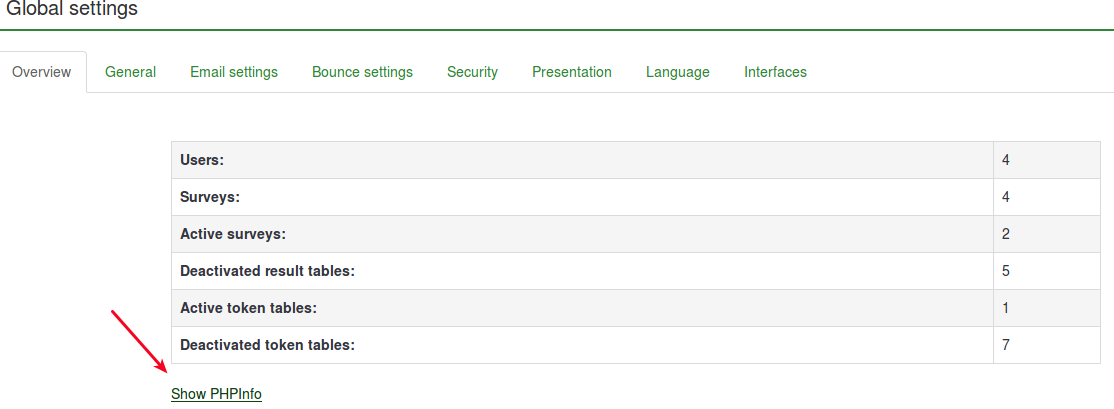
Ezután keressen egy imap részt (a gyors kereséshez használja a Ctrl+F billentyűket). Ha megjelenik egy imap-szakasz, akkor készen áll:

Ha nincs telepítve a php5-imap, és root hozzáféréssel rendelkezik a kiszolgálóhoz, akkor a disztribúciójára jellemző eljárást követve telepítheti. Például ellenőrizze a this link címet, ha Debiant használ. Ne felejtse el újraindítani a webszervert a telepítés után (pl. futtassa az "apache/usr/sbin/apache2ctl restart" parancsot a terminálon).
Hogyan működik
A rendszer fejlesztésének alapötlete az volt, hogy csökkentsék a kézi munkát, és csökkentsék az esetleges emberi hibákat, amelyek minden mező manuális szerkesztéséből adódhatnak.
Ennek a rendszernek az az alapötlete, hogy az e-mail elküldésekor az e-mail visszafordulást követő rendszer automatikusan hozzáad egy felmérés-azonosítót és egy token-id-t az e-mail fejlécéhez, a rendszergazda értesítése nélkül.

Ezeket a fejléceket (más néven egyéni fejléceket) a LimeSurvey-n keresztül a felmérésben résztvevőknek küldött meghívó e-mailekhez adjuk.
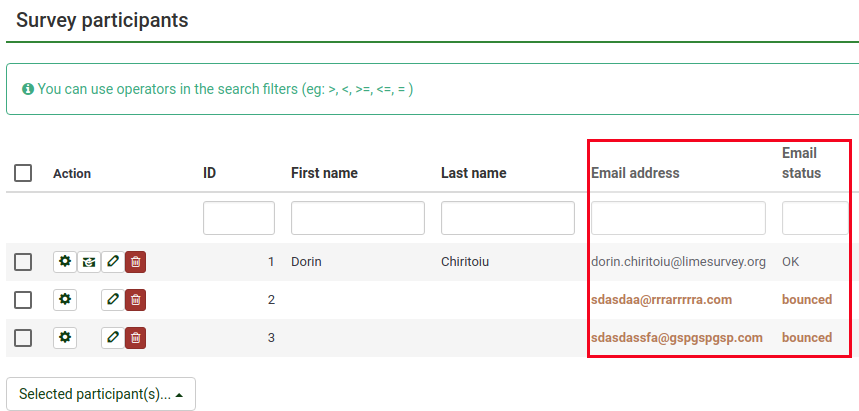
Amikor az e-mailt visszaküldik, az eredeti fejléc a „kézbesítési értesítés fejlécével” együtt érkezik. A rendszer ezután ellenőrzi az új e-maileket, és elemzi azokat az e-maileket, amelyek rendelkeznek ezekkel az egyéni fejlécekkel. Vörösre változtatja a felmérés résztvevői táblázat helytelen e-mail címeinek betűszínét.
A rendszer beállítása
A rendszer képes globálisan (minden felmérésnél) vagy lokálisan (csak egy adott felmérésnél) működni, így a beállítások ennek megfelelően menthetők. A visszapattanási globális beállításokat a Globális beállítások -> Visszafordulási beállítások menüpont alatt mentheti el. A következő opciók jelennek meg:
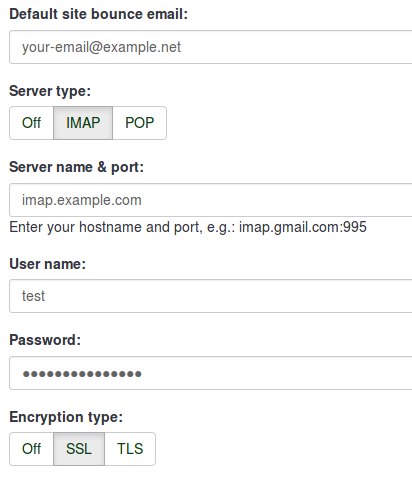
- Alapértelmezett webhely visszaküldési e-mail: Ez az az e-mail cím, amelyre a visszapattanó e-maileket küldik. A visszapattanó e-mailek gyorsabb feldolgozása érdekében olyan e-mail cím használatát javasoljuk, amelyet csak a LimeSurvey e-mail visszafordulás-követő rendszer használ.
- Szerver típusa: Ha "Off"-ra van állítva, nem lesz elérhető visszafordulási feldolgozási funkció. Válassza a "POP" vagy az "IMAP" lehetőséget a LimeSurvey e-mail visszafordulás-követő rendszerének használatához.
- Szerver neve és portja: A szerver neve és (ha szükséges) a port kettősponttal elválasztva. A portszámra általában nincs szükség, hacsak az e-mail gazdagép nem szabványos portot használ.
- Felhasználónév: A POP/IMAP fiók felhasználóneve.
- Password: A POP/IMAP fiók jelszava.
- Titkosítás típusa : Ha titkosítást használ, itt állítsa be a megfelelőt (SSL vagy TLS).
Ha csak egyetlen felmérésre szeretné alkalmazni a visszafordulási beállításokat, nyissa meg a kívánt felmérést -> lépjen a felmérés menüjébe, és kattintson a Felmérés résztvevői fülre -> ellenőrizze az oldal fő eszköztárát, és kattintson a Meghívók és emlékeztetők lehetőség -> kattintson a Visszafordulási beállítások lehetőségre. A következő oldal töltődik be:
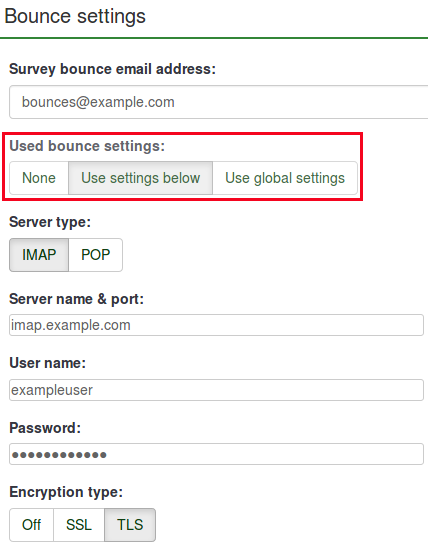
A további opciót a Használt visszafordulási beállítások jelentik. Itt választhatja ki, hogy használja-e a következőt:
- no bounce settings;
- a helyi visszafordulási beállításokat. Ha felveszi, ki kell töltenie a többi helyi visszapattanási beállítási mezőt;
- a globális visszapattanási beállítások. Ebben az esetben a LimeSurvey telepítésének visszafordulási beállításait fogja használni.
Using LimeSurvey Cloud email server
If you are using the LimeSurvey Cloud email server, all your emails will have the sender address "noreply@limesurvey.org". However, these emails will have a Reply-to header with your email address. So, in case someone tries to reply, they can write to you directly.
Bounces are automatically processed if you are using the LimeSurvey Cloud server. You don't need to set up anything, and you don't need to start the bounce processing at all, just leave the default settings untouched. It all happens magically in the background. Please note that it might take 10-15 minutes until a bounced email is processed, and the related entry is marked.
Starting Bounce Processing
Before starting the bounce processing, do not forget to first send the email invitations to your survey participants.
In version 3.0+, once the email bounce tracking system has been set up, you can start bounce processing by accessing the survey home page -> click on the Survey participants tab from the survey menu -> click on Invitations & reminders (located on the toolbar) -> Start bounce processing.

After selecting this option, a progress indicator will be displayed during the process, followed by a final processing status summary.
The sent email invitations will start to be examined. The scan results will be shown on the Survey participants table (you may have to manually refresh the page to actualize it). All the entries whose invitations were bounced will have their email addresses marked in red font. Also, their Email status is changed from "OK" to "bounced".

Starting Bounce Processing in v2.5
In version 2.50+, once the bounce processing system has been set up, you can start bounce processing. from the survey home page: Invitations & reminders -> Start bounce processing.

After selecting this option, a progress indicator will be displayed during the process, followed by a final processing status summary.
The sent email invitations will start to be examined. The scan results will be shown on the Survey participants table (you may have to manually refresh the page to actualize it). All the entries whose invitations were bounced will have their email addresses marked in red font. Also, their Email status is changed from "OK" to "bounced".
Example
To better understand how the LimeSurvey email bounce tracking system is working, check the below example:
1. Introduce your respondents to the survey participants table. Make sure that each of them has an assigned token and email address.
2. Select the respondents to whom you wish to send the survey invitation:

Click on the Selected participant(s)... button, and choose the send email invitations option.
3. Wait for some moments in order to make sure that the emails were sent to the survey respondents.
4. Now, you can make use of LimeSurvey email bounce tracking system. Click on Invitations & reminders and fill in the bounce email settings fields with the connection and account details of your personal email account:

You could also leave the fields empty. The bounce processing will still work, only that you will not get any bounce-processing-related email. However, the email status of the entries from the survey participants table will get updated.
As you may observe below, we use the email bounce tracking system with the help of a free Gmail account. To find out about the Gmail-related connection settings, access the following link. Also, do not forget to enable IMAP/POP from the settings of your Gmail account.
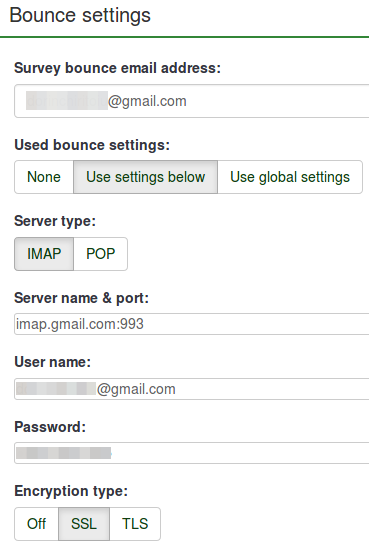
Fill in the fields. Select the desired server and encryption settings. Once done, click on the Save button located on the upper-right part of the screen.
5. Now, you can click on start bounce processing button:

The email bounce tracking system will start to look for the survey-id, token-id, and delivery notification which are attached to the email header of each bounced email. If these custom headers exist, the system will change the font color of the wrong email addresses from the survey participants table in red. Also, the email status of the respective entries will be switched from OK to bounced.
