Workarounds
From LimeSurvey Manual
Therefore we can't give support for any solution on this page.
Please contact the users that, thankfully, shared their solutions with the community if you have any questions.
If you have successfully tested a workaround please update the "tested with:..." entry. Thanks!
Contents:
Question Design, Layout, Templating
Getting rid of the question mark symbol (help.gif)
Tested with: 1.80+ (6536)
To get rid of the question mark symbol that LimeSurvey displays at the end of a question, you can either upload an empty help.gif into the template folder (as discussed in the forum) - or - you can use the Template editor: Open the template.css of your template and search for div.questionhelp img, then add a visibility:hidden;
It will look something like this:
div.questionhelp img

{

  margin:5px;

  visibility:hidden;

}
Use komma/virgule (komma: German data format) (virgule: french format) instead of dot when entering numbers
Tested with: LS1.53, LS1.70
To use kommas instead of dots when entering numbers make the following changes:
Search the "qanda.php" for the function "function do_numerical" which should look like this
inhibited_keypress=\"return goodchars(event,'0123456789.')\"
and replace the dot with a comma.
Require users to check a box agreeing to privacy statement before registering for a survey
If you need to have users positively acknowledge a privacy statement before submitting a registration form, the following will help you do this.
It involves a minor modification to common.php in versions up to 1.85. Later versions may not require this.
Edit common.php and look for the line (at approximately line 3014)
$registerform .= "<tr><td></td><td>

<input class='submit' type='submit' value='".$clang->gT("Continue")."' />"
and change it to:
$registerform .= "<tr><td></td><td>

<input id='registercontinue' class='submit' type='submit' value='".$clang->gT("Continue")."' />"
Then save common.php. This gives you DOM access to the "continue" button on the register form, but will have no other practical effect or change to LimeSurvey's operations.
Next, you need to edit the template you are using (see the documentation on the Template editor if you don't know how to do this).
In the template editor, open the screen "Register page" and select the file "register.pstpl"
There are two modifications you need to make to this file. The first is to add the following code after the line that says {REGISTERFORM}.
<script type='text/javascript'>


</script>
This code disables the "Continue" button so that nobody can process the registration form until they've clicked the checkbox.
The second modification to make is to be done between the lines {REGISTERMESSAGE2} and {REGISTERFORM}. Add:
<center>

 <label> Accept

   <input type='radio'

          name="privacy"

          value="YES"

          onChange="if(this.checked) {

                      document.getElementById('registercontinue').disabled=false;

                    }" />

 </label>

 <label>I don't accept

   <input type='radio'

          name="privacy"

          value="NO"

          CHECKED

          onChange="if(this.checked) {

                      document.getElementById('registercontinue').disabled=true;

                    }" />

 </label>

</center>
Then the users will have to agree to whatever text you replace "Do you agree to privacy stuff?" before they continue on and register.
(Thanks to Pippo_Jedi for helping work this out)
Different progress indicator
Tested with:
User Ypse implemented a new kind of progress indicator. Instead of showing the progress in percent his solution marks the progress like this:
3/6 (3 step of 6) Progress 14 %
The code and a short tutorial on how to integrate this solution can be found in the bug and feature tracker.
Delete unwanted gaps in question title
Tested with:
When copying data (questions, answers, ...) from MS Word or other applications into the editor there might occur some gaps in the question title.
There are two solutions to this:
- Use popup mode and manually delete unwanting extra html tags (requires html knowledge).
- Disable paste word feature: Tweak your limesurvey-config.js file in limesurvey/admin/scripts/fckeditor.26 and set the following option to true:
FCKConfig.ForcePasteAsPlainText = true ;
After that clear you browser cache and try again.
Removing the * (asterisk) from mandatory questions
Tested with:
Mandatory questions are always preceded with a * to indicate that they are mandatory. You can modify the colour of this, or hide it completely by editing the css style in the template you are using.
The default template uses the following, in the "startpage.pstpl" file:
    .asterisk

       {

       color: #FF0000;

       font-size: 9pt;

       font-family: verdana;

       }
To hide the asterisk completely, add a line
display: none;
To change the colour, change the colour code.
Some templates don't have a style defined for .asterisk, and in this case you'll need to add one in the style sheet.
How to change the <font-size> tags using CSS
This workaround was deleted because it is outdated. Such changes can be done by adjusting template.css of your template.
Question type variation: Scale with bars (one and two sided)
Tested with:
Some methodogical issues to think about: Very often a common scale as 1 to 5 or -2 to +2 fits all needs, as the shown subject is clearly defined as positive or negative. As soon as you would reduce the influence from the question and scale on the respondent, you will need something neutral to determine tendences, emphases and so on.
So I put up a new variation of the one and two sided array question:
ttp://www.limesurvey.org/images/fbfiles/images/example_bar_scale.jpg
In my example the left side reads "strategical planning" and the right side "operative business". None of these are purely negative or positive, so the bars only show in which direction the balancing point moves.
To realize a question as shown above just do as follows:
Set up as many bars as you will need (in my example there are four different bars in total) with a graphic program like PAINT .NET, GIMP or similar ones (yes, you may also use commercial software like Photoshop). To prevent the bars from looking twitchy, designate the size in advance. I did one bar 60x15 px, one 45x15px, one 30x15px and at last 15x15px. Save them as PNG, JPG or GIF.
- Create a new label set within Lime. Call it whatever you like.
- Enter a code number at first, then press the pencil symbol to enter the editor.
- Press the "Insert / edit image" button and upload the bar you want to insert with the FCK upload tool. Then choose the uploaded picture, save and leave the FCK editor.
- The row in the lable editor now shows an <img>-tag which refers to your bar picture.
- Repeat the above described steps as often as needed to build up your bar scale.
Doing a Likert Scale
Tested with:
A Likert Scale is a special type of the Semantic Differential question where several item shall be rated on different scales, each marked at the beginning and at the end with opposite statements. See example:
ttp://www.limesurvey.org/images/fbfiles/images/lickert.jpg
To do this in LimeSurvey just follow these steps:
- Create a label set with values from 0 to 7 (for the classic Likert Scale - feel free to choose other ranges).
- Create a new question and choose Array (Flexible Labels) as question type.
- Assign the Likert Scale label set to this question.
- Enter your answers as follows:
<DIV style="white-space: nowrap;">ITEM statement1|statement2</div>
The white-space style is to avoid line breaks which would ruin the whole scale. feel free to insert non-breakable spaces between the ITEM and statement1 to define the margin between these to strings.
Alternate background colour of questions
Tested with: 1.85+ (7191)
To alternate the background colour of questions, open the template.css of your template with the Template Editor or a text editor and modify the Question styles section to include the following style.
div#question2 td.questiontext,

div#question4 td.questiontext,

div#question6 td.questiontext {

   background-color: #E0EBF8;

}
Be sure to apply the style to all of the questions you would like modified using their question IDs (question2, question4, question6 in this case). Question IDs are displayed when creating or editing questions - see below:

Here are links to a couple of screenshots - before the styles change and after. The darker blue (#E0EBF8 in the "after" shot) is kinda subtle but could be more pronounced with something like #BACFEB.
Embedding audio in questions
Tested with: 1.85+ (7191), IE 7, FireFox 3
Audio clips can be embedded in most question text or answer text. In this example, using the default template, I've embedded clips into the answers of an Array (Yes/No/Uncertain) question to ask respondents how they feel about some sounds. The resulting question will look like this.

It's accomplished by placing the following code in each of the answers.
<embed height="20" width="128" autostart="false" controls="console"

loop="true" volume="50" src="{TEMPLATEURL}audio_1.mp3"></embed>
Some notes about the code:
- The audio_1.mp3 part will be different for each answer (it's the audio file name).
- In this case the audio files are residing in the template folder being used for this survey (that's where {TEMPLATEURL} points to) but they can be placed anywhere if you use an absolute URL in the src parameter - something like src="http://mysite.com/audio/audio_1.mp3"
- If the audio file doesn't exist where the src parameter indicates, the player will not appear.
- You'll need to insert the code into the answers using the source screen - click on "Edit answers", click the pencil beside the text box, click "Source" in the pop-up, enter the code and save it with the little diskette icon.
- You may need to turn off the XSS filter - see the documentation for Configuration Optional Settings / Security.
Although the above example places the audio in the answer text of the question, the same principles can be used to place it in the question text itself. Something like this perhaps.

Hiding inputs of a "Multiple options with comments" question
Tested with: 1.85+ (7253), IE 6/7, FireFox 3.0, Safari 3.2, Chrome 2.0
There may be times when you want to hide some of the input boxes of a Multiple options with comments question as in the image below.
![]()
This can be accomplished with CSS (see Styling questions in LimeSurvey 1.8). For each input that you want to hide, add the following style to your template.css file:
#answer11111X22X33Acomment {

   display: none;

}
Where 11111 is your survey ID, 22 is your group ID, 33 is your question ID and A is the answer code.
Note that you will still see columns for the hidden inputs in your data but they will be empty.
Multiple question types in array
Tested with: 1.85+ (7557), IE 6/7, Firefox 3.0, Safari 3.2 (Yes/No question styles need tweaking in Safari)
This workaround allows you to present multiple question types in what appears to be an array - as depicted in the image below and demonstrated here. This example uses the default template shipped with 7557 but should be adaptable to any template using divisions for question containers.

Basically what we do is take groups of questions (5 in this case), wrap them in a division and make them line up nicely horizontally and vertically. The width of the survey is also fixed to prevent wrapping issues. We do this with an onload function that inserts the necessary wrappers and then modifies styles so everything behaves properly. The top row is 5 boilerplate questions with the "column headers" as question text (the first just has a blank space). The following rows are a boilerplate with the "row headers" followed by 4 assorted questions.
Implementation is as follows:
- Turn off $filterxsshtml to allow insertion of JavaScript in the questions (see documentation here).
- Set up the template to use custom onload functions (see the workaround here).
- Create your questions keeping in mind how they will lay out when grouped into rows (in this example - boilerplate, yes/no, short text, numeric, dropdown, and repeat).
- In the source of the first boilerplate question add the following onload function (see How to use script here).
- Modify the question IDs in the first section of the code to match your survey.
The code may look intimidating at first but it's actually fairly simple. I've layed it out as sequentially as possible and purposely used few shortcuts and many comments to make it easier to follow.
Some brief notes about the code:
- The first section just assigns attributes to questions so we can handle them as rows or columns later - in this case 190-194 are row 1 (the top boilerplates), 195-199 are row 2, etc.
- The second section fixes the width of the survey (not necessary with fixed-width templates), inserts wrapper elements around each group of questions (rows) and forces each group to display horizontally.
- The next section adjusts column widths.
- The final section applies styles to the different question types to hide unnecessary elements and ensure that vertical alignment, question height, etc are consistent.
Onload code:
<script type="text/javascript" charset="utf-8">

function Custom_On_Load(){

 $(document).ready(function() {

   /***********

   Display multiple questions side by side

   ***********/

   //////// Define question attributes for later use ////////

   // Give questions row specific attributes so we can easily manipulate them by row

   $('#question190, #question191, #question192, #question193, #question194').attr('name', 'qRow1');

   $('#question195, #question196, #question197, #question198, #question199').attr('name', 'qRow2');

   $('#question200, #question201, #question202, #question203, #question204').attr('name', 'qRow3');

   $('#question205, #question206, #question207, #question208, #question209').attr('name', 'qRow4');

   // Give questions column specific attributes so we can easily manipulate them by column

   // I know, not the correct use of "rel" attribute but...too bad!

   $('#question190, #question195, #question200, #question205').attr('rel', 'qCol1');

   $('#question191, #question196, #question201, #question206').attr('rel', 'qCol2');

   $('#question192, #question197, #question202, #question207').attr('rel', 'qCol3');

   $('#question193, #question198, #question203, #question208').attr('rel', 'qCol4');

   $('#question194, #question199, #question204, #question209').attr('rel', 'qCol5');

   //////// Survey layout manipulation ////////

   // Fix the width of the survey

   $( 'table.outerframe' ).css({

     'width': '900px'

   });

   // Wrap each row in a div

   // This is kinda verbose but IE won't let me use jQuery shortcuts

   var el = document.createElement('div');

   el.setAttribute('id','inlineWrapper1');

   document.body.appendChild(el);

   $('div[name="qRow1"]').wrapAll($('#inlineWrapper1'));

   el.setAttribute('id','inlineWrapper2');

   document.body.appendChild(el);

   $('div[name="qRow2"]').wrapAll($('#inlineWrapper2'));

   el.setAttribute('id','inlineWrapper3');

   document.body.appendChild(el);

   $('div[name="qRow3"]').wrapAll($('#inlineWrapper3'));

   el .setAttribute('id','inlineWrapper4');

   document.body.appendChild(el );

   $('div[name="qRow4"]').wrapAll($('#inlineWrapper4'));

   // Style the wrapper divs

   $( '#inlineWrapper1, #inlineWrapper2, #inlineWrapper3, #inlineWrapper4' ).css({

     'width': '850px',

     'margin': '0 auto 0 auto',

     'clear': 'both'

   });

   // Get all the questions to sit politely side by side

   $( 'div[name="qRow1"], div[name="qRow2"], div[name="qRow3"], div[name="qRow4"]' ).css({

     'float': 'left',

     'display': 'inline'

   });

   //////// Column manipulation ////////

   // Set the column widths - can be set individually if necessary

   // Must add up to less than 100%

   $( 'div[rel="qCol1"]' ).css({

     'width': '12%'

   });

   $( 'div[rel="qCol2"], div[rel="qCol3"], div[rel="qCol4"], div[rel="qCol5"]' ).css({

     'width': '22%'

   });

   //////// Question manipulation ////////

   // Hide the answer element in boilerplate questions

   $( 'div.boilerplate td.answer' ).parent().hide();

   // Hide the question text elements in non-boilerplate questions

   $('div.text-short td.questiontext, div.list-dropdown td.questiontext,

  // CAUTION: Manually introduced line break, should be "...td.questiontext, div.yes-no td.questiontext, ...

  div.yes-no td.questiontext, div.numeric td.questiontext').parent().hide();

   // Push the question tables to 100%

   $( 'div[name="qRow1"] table, div[name="qRow2"] table, div[name="qRow3"] table, div[name="qRow4"] table' ).css({

     'width': '100%'

   });

   // Get everything to line up nicely vertically

   $( 'td.questiontext, td.answer p' ).css({

     'text-align': 'center'

   });

   // Adjust cell heights so everything lines up nicely horizontally

   $( 'td.answer, td.questiontext' ).css({

     'height':'35px'

   });

   // Yes-no question styles

   $( 'div.yes-no ul' ).css({

     'text-align': 'center',

     'font-size': '90%',

     'margin': '0',

     'padding-bottom': '5px'

   });

   $( 'div.yes-no td.answer' ).css({

     'padding-bottom': '0'

   });

   // Short-text question styles

   $( 'div.text-short input' ).css({

     'width': '125px',

     'margin-left': '0'

   });

   // Numeric question styles

   $( 'div.numeric input' ).css({

     'width': '125px',

     'margin-left': '0'

   });

   $( 'div.numeric p.tip' ).css({

     'display': 'none'

   });

   // Get rid of the margins around select boxes

   $( 'p.question' ).css({'margin':'0'});

   // Reduce the space caused by the question help table

   $( 'div[name="qRow1"], div[name="qRow2"], div[name="qRow3"]' ).css({

     'margin-bottom': '-8px'

   });

 });

}

</script>
Star Rating System
Tested with: 1.85+ (7557), IE 6/7, FireFox 3.0, Safari 3.2,
This workaround uses the jQuery Star Rating Plugin to display a series of stars that are used to generate a rating value. This value is then passed to either a hidden numeric input question or a hidden list radio question. Both methods are outlined below - use one or both depending on whether you want to use assessments.
The plugin uses a series of radio inputs to generate the stars (more about these below). It allows the use of whole or partial stars as shown in this demo and the image below.

Star Rating System Using Numeric Input Question
Use this method if you would like your rating data to be collected as a numeric value and don't want to use assessments - it's a little easier to implement. There is a demo here (first question).
Implementation is as follows:
1. Turn off $filterxsshtml to allow insertion of JavaScript in the questions. (See documentation here)
2. Set up the template to use custom onload functions. (See the workaround here)
3. Download the plugin and place the following included files in your template folder:
- jquery.MetaData.js
- jquery.rating.css
- jquery.rating.js
- delete.gif
- star.gif
4. In the <head> section of your startpage.pstpl, add the following code to link to the files.
<script type="text/javascript" src="{TEMPLATEURL}jquery.rating.js" charset="utf-8"></script>


<script type="text/javascript" src="{TEMPLATEURL}jquery.MetaData.js" charset="utf-8"></script>


<link rel="stylesheet" type="text/css" href="{TEMPLATEURL}jquery.rating.css" />
5. Create a numeric input question and then in the source of the question add as many radio inputs as star segments. For example, if you would like 5 stars, each with half-segments (as in the demo Q1), you would need 10 radio inputs and that would give rating values from 1-10.
Don't confuse these inputs with the actual question, they are just for the plugin's use.
At this point your question source code should look something like below. Make sure that all inputs have the same name. Each input must have the same title as value and these must be sequential. Don't worry about how all of this looks in the WSYSWYG editor - the plugin is going to hide these inputs and replace them with stars.
Q1 - Some question text here.<br /><br />

<div id="starContainer">

   <input type="radio" class="star {split:2}" title="1" value="1" name="q1Rate" />

   <input type="radio" class="star {split:2}" title="2" value="2" name="q1Rate" />

   <input type="radio" class="star {split:2}" title="3" value="3" name="q1Rate" />

   <input type="radio" class="star {split:2}" title="4" value="4" name="q1Rate" />

   <input type="radio" class="star {split:2}" title="5" value="5" name="q1Rate" />

   <input type="radio" class="star {split:2}" title="6" value="6" name="q1Rate" />

   <input type="radio" class="star {split:2}" title="7" value="7" name="q1Rate" />

   <input type="radio" class="star {split:2}" title="8" value="8" name="q1Rate" />

   <input type="radio" class="star {split:2}" title="9" value="9" name="q1Rate" />

   <input type="radio" class="star {split:2}" title="10" value="10" name="q1Rate" />

</div>
6. A note on split stars. The stars in the above example are split in half by the {split:2} metadata. So if you don't want split stars, your inputs would look like:
<input type="radio" class="star" title="1" value="1" name="q1Rate" />
And stars split into third-segments would look like:
<input type="radio" class="star {split:3}" title="1" value="1" name="q1Rate" />
7. Finally, in the source of the question add the following onload function after your inputs. (See How to use script here)
Some notes on the code:
- Replace "SSSSS", "GG", "QQ" in the function call at the end with the survey ID, group ID and question ID respectively.
- The code will hide the numeric input and pass the rating values into it as they are changed. If the rating is canceled the numeric input is nullified. If a respondent navigates away from the page then returns the code "remembers" the previous rating and displays the stars accordingly.
- If you want to apply it to more numeric questions on the same page simply add more calls with the appropriate IDs. (eg. handleRatingNumeric(11111, 22, 1); handleRatingNumeric(11111, 22, 2); ...) .
Onload code:
<script type="text/javascript" charset="utf-8">

function Custom_On_Load(){

$(document).ready(function() {

function handleRatingNumeric (sID, gID, qID) {

   // Hide the numeric input

   $('#question' + qID + ' td.answer').parent().hide();

   // Get a previous rating (if any) and use it to initialize the star display

   var rating = $('#answer' + sID + 'X' + gID + 'X' + qID + '').val();

   if ( rating != '' ) {

       $('#question' + qID + ' input.star').rating('select', rating);

   }

   // Listener on the star rating cancel element

   $('#question' + qID + ' div.rating-cancel').click(function(event) {

       // Nullify the rating if the Cancel element is clicked

       rating = '';

       $('#answer' + sID + 'X' + gID + 'X' + qID + '').val(rating);

   });

   // Listener on the star rating elements

   $('#question' + qID + ' div.star-rating').click(function(event) {

       // Find the value of the highest clicked star and pass it into the text input

       $('#question' + qID + ' div.star-rating-on').each(function(i) {

           rating = $(this).children('a').html( );

       });

       $('#answer' + sID + 'X' + gID + 'X' + qID + '').val(rating);

   });

}

// Call the function for the numeric question

handleRatingNumeric (SSSSS, GG, QQ);

});

}

</script>
Star Rating System Using List (Radio) Question
Use this method if you would like to use assessments. There is a demo here (second question).
Implementation is as follows:
1. Turn off $filterxsshtml to allow insertion of JavaScript in the questions. (See documentation here)
2. Set up the template to use custom onload functions. (See the workaround here)
3. Download the plugin and place the following included files in your template folder:
- jquery.MetaData.js
- jquery.rating.css
- jquery.rating.js
- delete.gif
- star.gif
4. In the <head> section of your startpage.pstpl, add the following code to link to the files.
<script type="text/javascript" src="{TEMPLATEURL}jquery.rating.js" charset="utf-8"></script>


<script type="text/javascript" src="{TEMPLATEURL}jquery.MetaData.js" charset="utf-8"></script>


<link rel="stylesheet" type="text/css" href="{TEMPLATEURL}jquery.rating.css" />
5. Create a list (radio) question with the same amount of sequentially numbered answers as star ratings. For example, if you want 5 whole-stars, you would create 5 answers, as in the image below, and this would give you ratings from 1-5. Note that the "Codes" and "Answers" must be sequential numbers.

6. In the list (radio) question, set the hide_tip question attribute to 1
7. In the source of the question add as many radio inputs as star segments. So 5 whole-stars (as in the demo Q2), would need 5 radio inputs.
Don't confuse these inputs with the actual question, they are just for the plugin's use.
At this point your question source code should look something like below. Make sure that all inputs have the same name. Each input must have the same title as value and these must be sequential. Don't worry about how all of this looks in the WSYSWYG editor - the plugin is going to hide these inputs and replace them with stars.
Q2 - Some question text here.<br /><br />

<div id="starContainer">

   <input type="radio" class="star" title="1" value="1" name="q2Rate" />

   <input type="radio" class="star" title="2" value="2" name="q2Rate" />

   <input type="radio" class="star" title="3" value="3" name="q2Rate" />

   <input type="radio" class="star" title="4" value="4" name="q2Rate" />

   <input type="radio" class="star" title="5" value="5" name="q2Rate" />

</div>
8. A note on split stars. The stars in the above example are whole-stars. If you want them split you need to add metadata to the class - something like {split:2}. So if you want half-stars your inputs would look like:
<input type="radio" class="star {split:2}" title="1" value="1" name="q1Rate" />
And stars split into third-segments would look like:
<input type="radio" class="star {split:3}" title="1" value="1" name="q1Rate" />
9. Finally, in the source of the question add the following onload function after your inputs. (See How to use script here)
Some notes on the code:
- Replace "SSSSS", "GG", "QQ" in the function call at the end with the survey ID, group ID and question ID respectively.
- The code will hide the question radio buttons and toggle them as the rating values are changed. If the rating is canceled all question inputs are unchecked. If a respondent navigates away from the page then returns the code "remembers" the previous rating and displays the stars accordingly.
- If you want to apply it to more numeric questions on the same page simply add more calls with the appropriate IDs. (eg. handleRatingRadio(11111, 22, 1); handleRatingRadio(11111, 22, 2); ...) .
Onload code:
<script type="text/javascript" charset="utf-8">

function Custom_On_Load(){

$(document).ready(function() {

function handleRatingRadio (sID, gID, qID) {

   // Hide the radio input

   $('#question' + qID + ' td.answer').parent().hide();

   // Get a previous rating (if any) and use it to initialize the star display

   var rating = $('#question' + qID + ' input.radio[checked=true]').attr('value');

   //if ( rating != '' ) {

   if ( rating ) {

       $('#question' + qID + ' input.star').rating('select', rating);

   }

   // Listener on the star rating cancel element

   $('#question' + qID + ' div.rating-cancel').click(function(event) {

       // Nullify the rating if the Cancel element is clicked

       rating = '';

       $('#question' + qID + ' input.radio').attr('checked', false);

   });

   // Listener on the star rating elements

   $('#question' + qID + ' div.star-rating').click(function(event) {

       // Find the value of the highest clicked star and pass it into the text input

       $('#question' + qID + ' div.star-rating-on').each(function(i) {

           rating = $(this).children('a').html( );

       });

       $('#question' + qID + ' input.radio[value=' + rating + ']').attr('checked', true);

   });

}

// Call the function for the radio question

handleRatingRadio (SSSSS, GG, QQ);

});

}

</script>
Variable column widths in array
Tested with: 1.85+ (7557), IE 6/7, Firefox 3.0, Safari 3.2
This workaround allows you to define all column widths of an array question - as shown in the image below and demonstrated here. This example uses the default template shipped with 7557 but should be adaptable to any template.

We use a custom onload function to remove all of the widths imposed by the core code and then insert our own.
Implementation is as follows:
- Turn off $filterxsshtml to allow insertion of JavaScript in the questions (see documentation here).
- Set up the template to use custom onload functions (see the workaround here).
- Create the array question.
- In the source of the array question add the following onload function (see How to use script here).
- Replace all instances of QQ with the question ID.
- In the third section of code, adjust the widths and add/remove columns as necessary. This example is for an array with a question text column followed by 3 answer columns as shown above.
- In the final section adjust the question text alignment to your liking
Onload code
<script type="text/javascript" charset="utf-8">

function Custom_On_Load(){

$(document).ready(function() {

   // Get rid of all the widths that the API imposes

   $( 'div#questionQQ table.question col' ).attr('width', '');

   $( 'div#questionQQ table.question thead td' ).attr('width', '');

   // Define a width for the question table so we can do so for its children

   // NOTE: Keep this to 95% or less so IE will behave

   $( 'div#questionQQ table.question' ).attr('width', '95%');

   // Define the column widths

   // Add or remove columns and adjust widths as necessary but widths should add up to 100%

   // NOTE: Columns must be sequentially numbered starting at 0 - eg, td:eq(0), td:eq(1), td:eq(2).....

   $( 'div#questionQQ table.question tbody th:eq(0)' ).css({'width':'10%'}); // Answer text column

   $( 'div#questionQQ table.question tbody td:eq(0)' ).css({'width':'50%'}); // First answer column

   $( 'div#questionQQ table.question tbody td:eq(1)' ).css({'width':'20%'}); // Second answer column

   $( 'div#questionQQ table.question tbody td:eq(2)' ).css({'width':'20%'}); // Third answer column

   // Push the text input widths to 95% of their parent containers

   $( 'div#questionQQ table.question input[type="text"]' ).css({'width':'95%'});

   // Align the answer text - feel free to experiment

   $( 'div#questionQQ table.question tbody th' ).css({'text-align':'center'});

});

}

</script>
Changing radio buttons and checkboxes
Tested with: 1.85 (7116), Googlechrome 3.0, IE 7, FireFox 3.0
This workaround uses the jQuery imagetick.js to change the default radio buttons and checkboxes. Example:

Implementation is as follows:
1. Turn off $filterxsshtml to allow insertion of JavaScript in the questions.
2. Set up the template to [http://docs.limesurvey.org/tiki-index.php?page=Workarounds&structure;=English+Instructions+for+LimeSurvey#Custom_onload_function
|use custom onload functions].
3. Download the plugin [here|http://boedesign.com/download.php?file=imagetick] and place the following files in your template folder:
- imagetick.js
- check.gif
- no_check.gif
- no_radio.gif
- radio.gif
4. In the head section of your startpage.pstpl, add the following code to link to the files.
<head>

<script type="text/javascript" src="{TEMPLATEURL}imagetick.js"></script>

</head>
5. In the source of the question [http://docs.limesurvey.org/tiki-index.php?page=Workarounds&structure;=English+Instructions+for+LimeSurvey#How_to_use_Script_eg._JavaScript_etc._
|add the following onload function] after your inputs:
<script type="text/javascript" charset="utf-8">

function Custom_On_Load(){

$(document).ready(function(){

   // the selector can be a class as well, target your radios or checkboxes

   $("input.radio").imageTick({

       // the image you want to use as a selected state of the radio/checkbox

       tick_image_path: "{TEMPLATEURL}radio.gif",

       // image you want to use as a non selected state

       // the class you want to apply to all images that are dynamically created

       no_tick_image_path: "{TEMPLATEURL}no_radio.gif", image_tick_class: "radios"});

});

       $("input.checkbox").imageTick({ // the selector can be a class as well

           tick_image_path: "{TEMPLATEURL}check.gif",

           no_tick_image_path: "{TEMPLATEURL}no_check.gif",

           image_tick_class: "checkboxes"

       });

}

</script>
If you want to apply it to only one question on a page use selector
$("#questionQQ input.radio")
where QQ is the question ID
If you want to apply it to a single radio button in a question (to maybe have different images for each option) use selector
$("input#answerSSSSSXGGXQQAA")
where SSSSS is the survey ID, GG is the group ID, QQ is the question ID, AA is the answer code.
Javascript
How to add javascript workarounds
Well, this is pretty easy. Click the edit icon and create your own headline within the javascript section starting with "!!". Then add a short note about the version you have used when creating your workaround, you can copy/paste this code snippet ''Tested with: (enter Limesurvey version and maybe browser)''.
Finally it's imported to mark all your code with code tags, other wise you might break this page.
- Start tag: <syntaxhighlight lang="php" enclose="div">
- End tag: </syntaxhighlight>.
How to use Script (eg. JavaScript etc.)
If you want to use javascript within Limesurvey you previously have to disable a security filter before you can add your javascript in source code mode:
FIRST, some info from config-default.php:
//$filterxsshtml'''

// Enables filtering of suspicious html tags in survey, group, questions'''

// and answer texts in the administration interface'''

// Only set this to false if you absolutely trust the users'''

// you created for the administration of  LimeSurvey and if you want to'''

// allow these users to be able to use Javascript etc. .'''

$filterxsshtml = true;
Follow these steps:
- In config.php add $filterxsshtml = false; (maybe as a last line before ?>).
- Add a new question
- In the question field, expande the tool bar by clicking the upper grey bar to get to the source code editor:

- Click on the button LimeFitWin to get full screen mode with even more buttons in the tool bar:

- Click on the button Source
Now you can add your code. A simple test to see if javascript is enabled is to echo an alert. Use this code:
<script type="text/javascript" charset="utf-8">

alert("Test!");

</script>
Sum up input values using Javascript
Tested with:
This is from a survey that is a invitation to a longer party, when the user clicks to the next page, the calculated results will be shown.
If you wonder what the {INSERTANS:1X6X12} stuff is, look at SGQA identifier and Using information from previous answers.
<div style="text-align: left">These are your answers:<br />
<u></u><u></u><u></u><u></u><u>=
<p><script LANGUAGE="JavaScript">
partyprice = 3;
beadclothprice = 3;
breakfastprice = 7;
lunchprice = 8;
dinnerprice = 10;
foodtotal = 0;
var isreallytrue = "Yes";
var noanswer = "No answer";
document.write( "Can you come? = {INSERTANS:45251X1X1}<BR>" );
if ("{INSERTANS:45251X1X1}" == isreallytrue )
{
if ("{INSERTANS:45251X1X3}"== noanswer) {answer = 0;}
else {answer = "{INSERTANS:45251X1X3}";}
partypeople = parseInt(answer);
partytotal = partyprice * partypeople;
document.write( "It's {INSERTANS:45251X1X3} persons who will come = " + partytotal + "€<BR>" );
if ("{INSERTANS:45251X1X4}"== noanswer) {answer = 0;}
else {answer = "{INSERTANS:45251X1X4}";}
beadcloths = parseInt(answer);
beadclothtotal = beadclothprice * beadcloths;
document.write( "You want to borrow {INSERTANS:45251X1X4} beadcloths = " + beadclothtotal + "€<BR>" );
document.write( "Will you be there thursday? = {INSERTANS:45251X1X5}<BR>" );
document.write( "On friday you will have these meals: <BR>" );
if ("{INSERTANS:45251X1X71}"== noanswer) {answer = 0;}
else {answer = "{INSERTANS:45251X1X71}";}
breakfastfriday = parseInt(answer) * breakfastprice;
document.write( "'''_ " + answer + " breakfeasts = " + breakfastfriday + "€<BR>" );
if ("{INSERTANS:45251X1X72}"== noanswer) {answer = 0;}
else {answer = "{INSERTANS:45251X1X72}";}
lunchfriday = parseInt(answer) * lunchprice ;
document.write( "'''_ " + answer + " lunches = " + lunchfriday + "€<BR>" );
if ("{INSERTANS:45251X1X73}"== noanswer) {answer = 0;}
else {answer = "{INSERTANS:45251X1X73}";}
dinnerfriday = parseInt(answer)* dinnerprice ;
document.write( "'''_ " + answer + " dinners = " + dinnerfriday + "€<BR>" );
foodtotal = breakfastfriday + lunchfriday + dinnerfriday;
document.write( "Will you be there saturday? = {INSERTANS:45251X1X8}<BR>" );
if ("{INSERTANS:45251X1X8}" == isreallytrue )
{
document.write( "On saturday you will have these meals: <BR>" );
if ("{INSERTANS:45251X1X91}"== noanswer) {answer = 0;}
else {answer = "{INSERTANS:45251X1X91}";}
breakfastsaturday = parseInt(answer) * breakfastprice ;
document.write("'''_ " + answer + " breakfeasts = " + breakfastsaturday + "€<BR>" );
if ("{INSERTANS:45251X1X92}"== noanswer) {answer = 0;}
else {answer = "{INSERTANS:45251X1X92}";}
lunchsaturday = parseInt(answer) * lunchprice ;
document.write( "'''_ " + answer + " lunches = " + lunchsaturday + "€<BR>" );
if ("{INSERTANS:45251X1X93}"== noanswer) {answer = 0;}
else {answer = "{INSERTANS:45251X1X93}";}
dinnersaturday = parseInt(answer) * dinnerprice ;
document.write( "'''_ " + answer + " dinners = " + dinnersaturday + "€<BR>" );
foodtotal = foodtotal + breakfastsaturday + lunchsaturday + dinnersaturday;
}
document.write( "Will you be there sunday? = {INSERTANS:45251X1X10}<BR>" );
if ("{INSERTANS:45251X1X10}" == isreallytrue )
{
document.write( "On sunday you will have these meals: <br>" );
if ("{INSERTANS:45251X1X111}"== noanswer) {answer = 0;}
else {answer = "{INSERTANS:45251X1X111}";}
breakfastsunday = parseInt(answer) * breakfastprice ;
document.write( "'''_ " + answer + " breakfeasts = " + breakfastsunday + "€<BR>" );
if ("{INSERTANS:45251X1X112}"== noanswer) {answer = 0;}
else {answer = "{INSERTANS:45251X1X112}";}
lunchsunday = parseInt(answer) * lunchprice ;
document.write( "'''_ " + answer + " lunches = " + lunchsunday + "€<BR>" );
if ("{INSERTANS:45251X1X113}"== noanswer) {answer = 0;}
else {answer = "{INSERTANS:45251X1X113}";}
dinnersunday = parseInt(answer) * dinnerprice ;
document.write( "'''_ " + answer + " dinners = " + dinnersunday + "€<p>" );
foodtotal = foodtotal + breakfastsunday + lunchsunday + dinnersunday;
}
total = partytotal + beadclothtotal + foodtotal;
document.write( "<h3>In total it will cost you " + total + "€</h3><BR>
Put that sum in this bank account 1234 5678 9012" );
}
</SCRIPT></p>
</div>
Multiple Question Validation
Tested with:
This workaround is in case you need to do some validation involving more than one question, it implies a very little JavaScript programming and the use of SQGA Identifiers; this should work on almost any version of LimeSurvey.
Is easy to explain with an example, we need to do a survey of the percentage of males and females and we want to be sure that the sum is 100, to do this follow this steps (the necessary data that is not indicated in these instructions are not important i.e. question codes, etc.):
- Create a new survey of type “group by group”, set the “Show |<< Prev| button” to yes and note the SID.
- Add a new group called “Group 1” and note the GID.
- Add a new question “Percent of males” of type “numeric”, make it mandatory and note the QID (we will refer to this as QID1).
- Add a new question “Percent of females” of type “numeric”, make it mandatory and note the QID (we will refer to this as QID2).
- Add a new group called “Group 2”
- Add a new non mandatory question, here is the trick the question text has to be (be sure to replace the SID, GID, QID1 and QID2
<script>

function validation()

{

   if [[{INSERTANS:SIDXGIDXQID1}+{INSERTANS:SIDXGIDXQID2}) != 100)

   {

     alert("Your responses don't sum 100! Check them");

     document.limesurvey.move.value = 'moveprev';

     document.limesurvey.submit();

   }

   else

   {

     document.limesurvey.move.value = 'movelast';

     document.limesurvey.submit();

   }

 }

 setTimeout("validation()",250);

 </script>
But this will show shortly the question and will jump to the end page, a little weird for the survey taker but works.
This is a proof of concept, and may have some problems, please if you notice something or improve it send me an e-mail to leochaton-limesurvey at yahoo dot com.
This will work for 2 questions that you want to be the same. Works well for email and confirm email questions
  function validation() {

  if ("{INSERTANS:SIDXGIDXQID}" != "{INSERTANS:SIDXGIDXQID}") {

     alert("Your responses don't match Check them"); document.limesurvey.move.value = 'moveprev';

     document.limesurvey.submit();

    }

  }

  setTimeout("validation()",250);
==Alternate exit==
Tested with:
Using the same idea of the previous post, you can implement an alternate exit of your survey.
This script should be in the first question to be displayed in a next page after the question that should trigger the alternate exit. In this example the question that trigger the alternate exit is a Yes/No question, if the user chooses no, he is redirected to another page.
 <script>

 if ("{INSERTANS:SIDXGIDXQID}" == "No")

 {

   window.location="http://www.limesurvey.org";

 }

 </script>
==Custom onload function==
Tested with:
This simple workaround describes how to add a custom onload function triggering when the page is being loaded. It may have numerous applications, especially when you deal with a custom JS/HTML code. It may be used to hide form elements (<input> tags), make them read-only, display alert messages, etc.
1. First, the template's of your choice "end page" code needs to be tweaked (it's in endpage.pstpl file). This is the only permanent change we'll be making here. Please note, that this change is harmless. Even if you are not gonna use any custom onload functions, it may stay there and it will not affect other surveys/questions in any way.
The modified content of your endpage.pstpl file should be as follows (~060~script~062~ section has been inserted):
 </td>

             </tr>

           </table>

           <script>

           // only call if it's defined

           if(typeof Custom_On_Load == 'function'){

              Custom_On_Load();

           }

           </script>

           </body>
2. Now, if you define a function called "Custom_On_Load" anywhere in your code, it will be executed when the page is being loaded. For example when you add the following code to one of your question definitions:
 <script>

 function Custom_On_Load(){

  alert('onload alert!');

 }

 </script>
It will display a pop-up message immediately after the page has been loaded.
Some of the applications of this trick I've explored are:
a) Hiding the form elements by calling in your Custom_On_Load:
document.getElementById("answer73166X16X54").style.display='none';
b) Making the elements read only:
document.getElementById("answer73166X16X54").readOnly=true;
where the "answer73166X16X54" structure has been described in one of other workarounds above.
c) For Hiding by a lot of elements by calling in your Customer_On_Load
jQuery searchs in html document for input-fields with radio type, if his answer text empty then do the display css set to none.
 jQuery(document).ready(

            function() {

              jQuery('input:radio').each(

                function() {

                  var s = jQuery(this);

                  var c = s.parent().children('.answertext');

                  for(var i=0; i < c.length; i++) {

                    var a = jQuery(c[i]]);

                    if(this.id </u> a.attr('for') && a.text() == '') {

                      s.css({'display' : 'none'});

                      a.css({'display' : 'none'});

                      break;

                    }

                  }

                }

              )

            }

          );
==Custom onload function in multi-language survey==
Tested with: 1.85+ (7253), IE 6/7, FireFox 3.0, Safari 3.2,
To use custom onload functions, as above, in multi-language surveys you must define the functions in the question source for all languages.
While this initially seems to be a bit tedious, it actually can be useful - you can alter your onload functions depending on the language in use. For example, you can dynamically display alerts or element contents in the current language.
==Advanced way for (global) custom onload function:==
This way, you can get one or more global onload functions, which will load on every page of your survey.
Define a function in startpage.pstpl before the closing head tag, or in template.js.
For example the focusFirst workaround function:
 function focusFirst(Event)

 {

    var i=0;

    while(document.forms[0].elements[i].type == "hidden")

    {

        i++;

    }

    document.forms[0].elements[i].focus();

    return;

 }
Note that the "Event" Parameter is mandatory for functions added to an Event.
After defining the function which should be loaded, add this into the head tag of startpage.pstpl (or in template.js) :
 if(ie)

 {window.attachEvent("onload", functionName);}

 else

 {document.addEventListener("load", functionName, true);}
var ie is set in startpage.pstpl to true (Internet Explorer) or false (other Browser than IE) with conditional comments. IE needs his own attachEvent.
EventListeners are supported from gecko and webkit Browsers (Firefox, Iceweasel, Safari, Chrome etc.)
==Global custom onload function in multi-language surveys==
Tested with: 1.85+ (7253), IE 6/7, FireFox 3.0, Safari 3.2,
Global custom onload functions can dynamically react to mid-survey language changes in multi-language surveys. This can be accomplished by using the value of the "languagechanger" element to control behavior of the onload function. It would be useful if you wanted to insert a language specific element or alerts on every question page of the survey. There is a small demo of this [1].
In the demo we placed the following code at the very end of endpage.pstpl. The function will be called whenever a page loads and then checks to see if the language switcher exists (indicating that this is a question page and not the intro or thanks pages) and, if so, inserts an element with language specific text. The code could be easily modified to handle images or alerts.
Onload code
<script type="text/javascript" charset="utf-8">
function Custom_On_Load(){
// Don't do anything unless the document is fully loaded
$(document).ready(function() {
// Only continue if the language switcher is present on this page
if ( $('select.languagechanger').length > 0 ) {
// Check the value of the language switcher element to find the current language
var langChange = $('select.languagechanger').val();
var langArray = langChange.split('lang=');
var lang = langArray[1];
// Create some language specific text for the element that we'll insert below
var newElementText = '';
switch(lang) {
case 'en' :
newElementText = 'This element was inserted with a global onload function.';
break;
case 'fr' :
newElementText = "Cet élément ...<br />";
break;
case 'de-informal' :
newElementText = 'Dieses Element ...<br />';
break;
default :
break;
}
// Insert a div element and fill it with the text above
var el = document.createElement('div');
el.setAttribute('id','newElement');
document.body.appendChild(el);
$( '#newElement' ).css({
'border':'1px solid #333333',
'width':'50%',
'padding':'5px',
'color':'red',
'margin-bottom':'10px'
});
$('#newElement').html(newElementText);
$('.boilerplate').after($('#newElement']];
}
});
}
// Call the function
Custom_On_Load();
</script>
Skipping the welcome page
Tested with: 1.85 (second code snippet)
Solution 1: Include this Javascript in your welcome template, file welcome.pstpl:
<script>

function custom_on_load(){

  document.limesurvey.move.value = 'movenext';

  document.limesurvey.submit();

}

window.onload = custom_on_load();

</script>
It will reproduce the onclick event of the submit button and submit the form.
To assure that the function is called only after the whole page got loaded,
the window.onload event is used.
Drawback of course is that users will see the page flashing up.
Therefore, you may want to announce "... loading survey ..." as a description of your welcome page (in the admin interface when creating the survey), to pretend loading something big.
Solution 2:
<script>

function custom_on_load(){

  document.limesurvey.move.value = 'movenext';

  document.limesurvey.submit();

}

window.setTimeout( 'custom_on_load()',1);

</script>
Extend the use of Attribute1/Attribute2 to an unlimited number of attributes
Officially taken into the core at 1.85 (Tested with: 1.70)
Note: This workaround is obsolute. Handling of additional tokens has been implemented in version 1.85. More information is available in the manual.
User Schalburg created a javascript solution (based on release 1.70) to use more than the two standard attributes (Thanks for that!). The workaround is posted in thebug and feature tracker. You'll find a detailled description there.
Filter answers of a question with the answer of another
Tested with: 1.70 - 1.72
If you want to filter the answer of a question with another answer, you can use this workaround.
First, use answer code like that: XX for the first question, and XXYYY for the second one.
Answer of the second question filter if the 2 first letters are the answer of the first question.
We use 1000X1X1 and 1000X1X2 for the example, question had to be on separate page (question by question for example).The second question had to be a dropdown list (we can do similar workaround, but droplis is the best)
Use the Custom_onload function:
function Custom_On_Load(){

var answerFilter='{INSERTANS:1000X1X1}' ;

var tblQuestionToFilter=document.getElementById('answer1000X1X2').options ;

var maxAnswer = tblQuestionToFilter.length;

var counter=1;

while (counter<=maxAnswer) {


if (![[(tblQuestionToFilter[counter].value).substr(0,answerFilter.length)==answerFilter)||

 (tblQuestionToFilter[counter].value=="-oth-"]])

{

  tblQuestionToFilter[counter]=null ;

  maxAnswer--;

  counter--;

}

counter++;

}

}
Use an answer to prefill another answer (default value)
Tested with: 1.72
This workaround give you the ablility to use an answer to fill the default value for another answer. It's explai for free text question type but can be adapted for another question type.
We use SGQA identifier. For the exemple , we use SGQA 1000X10X20 and 1000X10X21 to prefill 1000X11X30 and 1000X11X31. For working, the question had to be on different page.
<script>


</script>
Dynamic Sum
This script is used with a "Multiple Options" type question calculate a total price based on how which checkboxes are selected. The prices are listed as part of the answer. The answers are set up like this: "USB Mouse ($20)". The script uses the number between the "($" and the ")" as the price for that item. You can adapt the script to if you need to change the currency or need to sum something other than money.
This script works when used in a question-by-question format. It does not work when there are more than one question on a page. I think it can be adapted to work, but I haven't done the coding yet.
Put the following code into body of your question:
<script language=Javascript>

// General definitions

// Define a regular expression to match the labels containing information about an answer

// In LimeSurvey, these labels start with "answer..."

var answerRegex = /^answer/;

// Find all answer checkboxes in the document and set their

// onchange events to updatePrice

function Custom_On_Load()

{

   // Find all input elements

   var inputList=document.getElementsByTagName("input");

   // Loop through each, looking for checkboxes

   var i;

   for( i=0; i< inputList.length;i++ )

   {

       // If input item does not have an ID, skip

       if (! (inputList[i].id)) {continue;}

       // Skip to next if ID doesn't start with "answer"

       if (!answerRegex.test(inputList[i].id)) {continue;}

       // Skip to next if not a checkbox

       if (inputList[i].type.toUpperCase()!='CHECKBOX')  {continue;}

       // This is an answer checkbox!

       // Setup onchange event

       inputList[i].onclick = updatePrice;

   }

       // Load initial sum

   updatePrice();

}

function updatePrice()

{

var labels=document.getElementsByTagName("LABEL");

// Define a regular expression to match a price inside parenthesis

// For example: ($29) or ($29.54).

// Set up

priceRegex = /\(\$(\d*\.{0,1}\d+)\)/;

// Loop through all the labels, looking for labels corresponding to

// answers that have a price in them.

var i;

var total = 0;

for( i=0; i<labels.length;i++ )

{

   var myArray;    // Define array used for regex matching

   var inputID;    // Define field element

   // Get the ID of the field corresponding to the label using the

   // "htmlFor" attribute

   // (FYI, there are some labels that will have to be screened out

   // because they don't correspond to an answer)

   // Does the label start with "answer"?

   // If not: exit.

   if (!answerRegex.test(labels[i].htmlFor)) {continue;}

   // First make sure this element exists

   // If it doesn't, go to the next element

   // If it does, it will be defined in inputID

   if (! (inputID = document.getElementById(labels[i].htmlFor)) ) {continue;}

   // See if the corresponding answer is a checkbox that is checked.

   // If not, go to next label

   if (inputID.type.toUpperCase()!='CHECKBOX')  {continue;}

   if (!inputID.checked) {continue;}

   // This is label for an answer.

   // The innerHTML will give us the text of the label

   // The price information will be in the form ($XX.XX)

   // which in contained in the label text.

   // Find a match for a decimal number inside the pattern "($" and ")"

   if [[myArray = priceRegex.exec(labels[i].innerHTML]] != null)

   {

       // Keep a running tally

       total += parseFloat(myArray[1]);

   }

}

  // Update total price on form

  document.getElementById("totalPrice").value = "$" + formatCurrency(total);

}

function formatCurrency(num) {

  num = isNaN(num) || num <u> '' || num </u> null ? 0.00 : num;

  return parseFloat(num).toFixed(2);

}

</script>
Put the following code in the help section (or wherever you want the sum to appear):
Total Cost for selected accessories: <input type="readonly" value="" id="totalPrice" />
Focus on the first Input field
(Tested with: Limesurvey 1.80 / IE6/7, Firefox 3, Safari, Opera, chrome)
Again an onload Function is needed for this tasks. I have done it the DOM way with compatibility to IE6/7.
Put the following code into the startpage.pstpl of your template, right before the </head> closing tag:
<script type="text/javascript">

   function focusFirst(Event)

   {

       var i=0;

       while(document.forms[0].elements[i].type == "hidden")

       {

           i++;

       }

       document.forms[0].elements[i].focus();

       return;

   }

   if(ie)

   {window.attachEvent("onload", focusFirst);}

   else

   {document.addEventListener("load", focusFirst, true);}

</script>
Note: I am using this with version 1.80. As changes happened to the templates in the last release, you might need to add the following before the code, if your template is older than 1.80 stable and does not include this:
<script type="text/javascript">

   var ie = false;

</script>
You will need this for the var ie to be set. Without this var, the function will not work with ie.
Answer questions by keypress
(Tested with: IE7, Firefox 3)
This workaround allow to answer the question on key 0-9 (0 is for the 10 answer).
Follow issues are supported at the moment:
- Yes-No Questions
- List Questions (radio)
- other radio questions
In lists the answer limit is ten.
You supply the template "endpage" of your template with the following script.
<script type="text/javascript">

jQuery(document).ready(function() {

   jQuery(document).bind('keypress', function(e){

       if (48 <= e.which && e.which <= 57) {

           jQuery('input:radio').each(function() {

               var v = jQuery(this).val();

               var c = (e.which <u> 48) ? 10 : e.which - 48;

               if(v </u> 'Y' || v <u> 'N') {

                   v = (v </u> 'Y') ? 1 : 2;

               }

               if(v == c) {

                   jQuery(this).click();

                   jQuery('#limesurvey input:submit').click();

               }

           });

       }

   })

});

</script>
Math notation in LimeSurvey
- download the js file from AsciiMath script
- copy it in the /scripts/ folder in your installation
- modify the startpage.psptl of the template you want to use adding the reference to the script (if you use an older version make sure that you copy the template folder first!) for example:
<script type="text/javascript" src="ASCIIMathML.js">
Use the notation where you need it!
Note: If you use internet explorer or safari you will need to download the plugin as well, but firefox does the lot for you.
Finally, if you are confident with the limesurvey structure you could add the editor which support math notation and change the reference to the editor you want to use in the configuration file. here is the link for a TinyMCE with math support.
Reverse array_filter
Tested with: 1.85+ (7253), IE 6/7, FireFox 3.0, Safari 3.2, Chrome 2.0
This can be used to filter the answers of an array question to be displayed based on the answers of a multi option question that were NOT selected. A possible application would be to have a multi-option question asking which products were purchased, followed by 2 array questions - one asking to rate the purchased products and another asking why the remaining products were not purchased. Another would be to ask about sessions attended at a conference as in this forum thread and pictured below. There is a live demo here

We'll use the above example to explain the process as follows:
- In group 1 - Create a SessionsAttended multi-options question
- In group 1 - Create a SessionsNotAttended multi-options question with identical answers as SessionsAttended and hide it with styles or conditions
- In group 2 - Create a RateSessionsAttended array question with an array_filter based on SessionsAttended
- In group 2 - Create a ReasonNotAttended array question with an array_filter based on SessionsNotAttended
- In group 1 - Place JavaScript/jQeury listeners on each of the checkboxes in SessionsAttended that would toggle the corresponding checkbox in SessionsNotAttended to the opposite state
The JavaScript/jQuery code used would be:
       // The toggle function

   function toggle(q1, q2) {

       if ($(q1).attr('checked') == false ) {

           $(q2).attr('checked', true);

       }

       else {

           $(q2).attr('checked', false);

       }

   }

   // Initialize the SessionNotAttended checkboxes to "checked"

   toggle ('#answer11111X22X331', '#answer11111X22X441');

   toggle ('#answer11111X22X332', '#answer11111X22X442');

   toggle ('#answer11111X22X333', '#answer11111X22X443');

   toggle ('#answer11111X22X334', '#answer11111X22X444');

   // The jQuery listeners on the SessionAttended checkboxes

   // that toggle the SessionNotAttended checkboxes

   $('#answer11111X22X331').change(function() {

       toggle ('#answer11111X22X331', '#answer11111X22X441');

   });

   $('#answer11111X22X332').change(function() {

       toggle ('#answer11111X22X332', '#answer11111X22X442');

   });

   $('#answer11111X22X333').change(function() {

       toggle ('#answer11111X22X333', '#answer11111X22X443');

   });

   $('#answer11111X22X334').change(function() {

       toggle ('#answer11111X22X334', '#answer11111X22X444');

   });
Some notes about the code:
- The code is in an onload function defined in the first question of group 1 - see workarounds here
- Both SessionsAttended and SessionsNotAttended must be in the same group for the toggling to work
- This case only uses 4 checkboxes but could be expanded as required
- In this case the survey ID is 11111, the group ID is 22, SessionsAttended ID is 33 and SessionsNotAttended ID is 44 - these would need to be modified for your survey
- The toggle function looks for the state of a checkbox in SessionsAttended and sets the corresponding checkbox in SessionsNotAttended to the opposite state
- The "Initialize" section sets the state of SessionsNotAttended checkboxes whenever we navigate to the group
- The "Listener" section uses jQuery listeners to detect any change in the SessionsAttended checkboxes and then toggle the corresponding SessionsNotAttended checkbox
Some general notes about the questions:
- CSS can be used to hide SessionsNotAttended (div#question44 {display: none;}) if you don't want to use conditions (because maybe you've got $deletenonvalues set to 1)
- RateSessionsAttended and ReasonNotAttended are another group to avoid things popping in and out of existence as SessionsAttended is answered
- Conditions are used to ensure that RateSessionsAttended only appears if some sessions are selected and ReasonNotAttended only appears if no sessions are selected
Auto-tabbing between text input fields
Tested with: 1.85+ (7253), IE 6/7, FireFox 3.0, Safari 3.2, Chrome 2.0
This is a workaround to facilitate auto-tabbing between text input questions in a single group using a jQuery plugin by Mathachew and the Maximum characters attribute of questions.
The behaviour will be: When the maximum number of characters has been entered into an input field, the focus (cursor) will be automatically moved to the next input field. When the backspace key is used to remove all characters from a field, the focus will be moved to the previous field. It's very useful in surveys having many text input questions to avoid having to manually tab or click between fields.
You can view a small demo survey here.
Implementation is as follows:
- Visit http://plugins.jquery.com/node/4046, download the plugin script and save it as jquery.autotab-1.1b.js in the template folder.
- Link to the script by placing <script type="text/javascript" src="{TEMPLATEURL}jquery.autotab-1.1b.js"></script> within the <head> tag of startpage.pstpl.
- Turn off $filterxsshtml to allow insertion of JavaScript in the questions. (See documentation here)
- Set up the template to use custom onload functions. (See the workaround here)
- Create the text based questions that auto-tabbing is to be applied to. (All must be in the same group if you're using group by group presentation)
- Define a Maximum characters attribute for all questions that the autotab is applied to. (See documentation here)
- In the first question of the group that contains the auto-tabbed questions, add the following code. (See How to use script here) Note: I prefer to use a boilerplate question for this and hide it with CSS - this prevents the JavaScript from appearing in error alerts etc.
Onload code:
<script>

function Custom_On_Load(){

$(document).ready(function() {

   $('#answerSSSSSXGGXAA').focus(); //initially focus on the first input

   $('#answerSSSSSXGGXAA').autotab({ target: 'answerSSSSSXGGXBB' });

   $('#answerSSSSSXGGXBB').autotab({ previous: 'answerSSSSSXGGXAA', target: 'answerSSSSSXGGXCC' });

   $('#answerSSSSSXGGXCC').autotab({ previous: 'answerSSSSSXGGXBB', target: 'answerSSSSSXGGXDD' });

   $('#answerSSSSSXGGXDD').autotab({ previous: 'answerSSSSSXGGXCC' });

});

}

</script>
This example has 4 fields to be auto-tabbed between - all instances of the following must be replaced to be compatible with your survey (See image below):
- SSSSS -> Survey ID
- GG -> Group ID
- AA -> First question
- BB -> Second question
- CC -> Third question
- DD -> Last question

The target parameter defines where the next input is and the previous parameter defines (you guessed it) the previous input.
This plugin also has limited capability of formatting the input text - see comments in the plugin script.
Custom response listeners
Tested with: 1.85+ (7253), IE 6/7, FireFox 3.0, Safari 3.2, Chrome 2.0
Listeners can be used to perform functions when a change in an input is detected. There are many uses such as the Reverse array_filter but a simple one would be to warn a respondent if they enter a value that may be too high.
We can use the jQuery change( ) event to fire a function whenever there is a change to the input. The function will look for an input value higher than 10 and, if found, will warn the respondent.
Place the following code in your Custom onload function:
Onload code:
$('#answer11111X22X33').change(function() {

   if ( $('#answer11111X22X33').val() > 10 ) {

       alert ("That's an awful lot. Are you sure?");

   }

});
Where:
- 11111 is the survey ID
- 22 is the group ID
- 33 is the question ID
Text input masks
Tested with: 1.85+ (7253), IE 7, FireFox 3.0, Safari 3.2, Chrome 2.0
There may be instances where you would like to place a mask on a text input - for example only allowing respondents to enter the correct characters for a North American phone number [[###) ###-####) or a Canadian postal code (A1A 1A1) The meioMask plugin by fabiomcosta can be used to do this.
The plugin has several pre-defined masks and supports custom masks. It also allows for pasting of input, allows default values and can auto-focus the next form element when the current input is completely filled. See [2] for more details on features and options.
You can view a small demo survey of masks in use [3].
Implementation for this demo was as follows:
#Visit [4], download the latest plugin script and save it as jquery.meiomask.js in the template folder.
#Link to the script by placing <script type="text/javascript" src="{TEMPLATEURL}jquery.meiomask.js" charset="utf-8"></script> within the <head> tag of startpage.pstpl.
#Turn off $filterxsshtml to allow insertion of JavaScript in the questions. (See here)
#Set up the template to use custom onload functions. (See the here)
#Create the text input questions that the masks are to be applied to
#In the first question of the group that contains the masked inputs, add the following code. (See to use script here) Note: I prefer to use a boilerplate question for this and hide it with CSS - this prevents the JavaScript from appearing in error alerts etc.
Onload code:
 <script>

 function Custom_On_Load(){

 $(document).ready(function() {

    // Define custom masks

    $.mask.masks = $.extend($.mask.masks,{

        customMask1:{ mask: 'a9a 9a9' }, // Canadian postal code

        // Maximum input of 9,999.99, reverse input, default value of 0.00

        customMask2:{mask: '99.999,9', type : 'reverse', defaultValue : '000'}

    });

    // Set the 'alt' attributes of the inputs

    $('#answer111111X22XAA').attr('alt', 'phone-us'); // a pre-defined mask

    $('#answer111111X22XBB').attr('alt', 'customMask1'); // a custom mask

    $('#answer111111X22XCC').attr('alt', 'customMask2'); // a custom mask

    $('#answer111111X22XDD').attr('alt', 'cc'); // a pre-defined mask for credit card

    // Tell the plugin to apply masks to these inputs

    $('input:answer111111X22XAA').setMask();

    $('input:answer111111X22XBB').setMask();

    $('input:answer111111X22XCC').setMask();

    $('input:answer111111X22XDD').setMask();

 });

 }

 </script>
The first section defines two custom masks to be used - one for Canadian postal code with a format of A#A #A# and a second for a maximum amount of 9999.99 with reverse input (useful for cost inputs) and a default value of 0.00.
The next section sets the "alt" attributes for the text inputs. This will tell meioMask which mask we will be applying to each input. By default meioMask looks at the alt attribute to find which mask to apply however this can be changed using the options.
In the final section we apply the masks to the inputs.
This example has 4 inputs with masks on them - all instances of the following must be replaced to be compatible with your survey (See image below):
*11111 -> Survey ID
*22 -> Group ID
*AA -> First question
*BB -> Second question
*CC -> Third question
*DD -> Fourth question
Oops, found a possible bug in IE6: You may need to paste the contents of jquery.meiomask.js into the very beginning of your custom onload function (before the document.ready function).
==Select a random response to a "Multiple options" question for later use==
Tested with: 1.85+ (7253), IE 6/7, FireFox 3.0, Safari 3.2, Chrome 2.0
This workaround allows you to randomly select one of the checked boxes in a "Multiple options" question and store it's label for later use in the survey. A possible use would be to have a question asking what products were purchased and then randomly selecting one of the products to ask further questions about.
There is a small demo of the above example [5].
Basically what we've done here is to put listeners on all of the checkboxes. If a change of state is detected in any of them the "randomResponse" function is called which loops through all of the checkboxes and if it finds a checked state, that box's label is added to an array. Then a random item is pulled from the array and used to populate the hidden question. This hidden question can then be drawn upon later in the survey using [6] or [7].
Implementation for this demo is as follows:
#Turn off $filterxsshtml to allow insertion of JavaScript in the questions. (See here)
#Set up the template to use custom onload functions. (See the here)
#Create a "Multiple options" question that we're going to randomly pick a checked box from
#Create a text input question to store the label of the checked box in (we're going to hide this with JavaScript)
#In the first question of the group that contains the "Multiple options" question, add the following code. (See to use script here) Note: I prefer to use a boilerplate question for this and hide it with CSS - this prevents the JavaScript from appearing in error alerts etc.
Onload code:
 <script>

 function Custom_On_Load(){

 $(document).ready(function() {

    //// Identify the hidden question input

    //// EDIT HERE (1) - replace with your hidden question input ID

    var hiddenInput = '#answer11111X22X44';

    //// Make the "hidden" question disappear

    //// EDIT HERE (2) - replace with your hidden question ID

    $('#question44').hide();

    //// Identify the checkboxes to be randomized

    //// EDIT HERE (3) - add or remove as required,

    //// replace with your checkbox IDs

    var CB1 = '#answer11111X22X33A';

    var CB2 = '#answer11111X22X33B';

    var CB3 = '#answer11111X22X33C';

    var CB4 = '#answer11111X22X33D';

    var CB5 = '#answer11111X22X33E';

    var CB6 = '#answer11111X22X33F';

    //// Create an array of all checkboxes to be randomized

    //// EDIT HERE (4) - add or remove CBs as required

    checkBoxes = new Array( CB1, CB2, CB3, CB4, CB5, CB6 );

    var checkBoxesLength = checkBoxes.length;

    //// The randomizing function - no editing required

    function randomResponse () {

        var boxLabels = new Array();

        // loop through all of the checkboxes and if they are checked,

        // add their label to the boxLabels array

        for( var i=0; i<checkBoxesLength; i++ ) {

            if ( $(checkBoxes[i]).attr('checked') == true ) {

                var cbid = checkBoxes[i].replace('#','');

                boxLabels.push( $( 'label[for=' + cbid + ']' ).html() );

            }

        }

        // find a random index of the responses array

        var randomNum = Math.floor(Math.random() * boxLabels.length);

        // populate the hidden question input with the

        // random input value

        $(hiddenInput).val( boxLabels[randomNum] );

    }

    //// The listeners that will fire the randomize function if a

    //// change occurs in the checkboxes

    //// EDIT HERE (5) - add or remove CBs as required

    $(CB1).change(function() {

        randomResponse ();

    });

    $(CB2).change(function() {

        randomResponse ();

    });

    $(CB3).change(function() {

        randomResponse ();

    });

    $(CB4).change(function() {

        randomResponse ();

    });

    $(CB5).change(function() {

        randomResponse ();

    });

    $(CB6).change(function() {

        randomResponse ();

    });

 });

 }

 </script>
The following edits are required to implement this in your survey:
*EDIT HERE (1) - 11111 -> Survey ID, 22 -> Group ID, 44 -> hidden question ID.
*EDIT HERE (2) - 44 -> hidden question ID.
*EDIT HERE (3) - 11111 -> Survey ID, 22 -> Group ID, 33 -> multiple option question ID, A/B/C/D/E/F -> multiple option answer codes. Also add or remove CBs for more or less checkboxes.
*EDIT HERE (4) - add or remove CBs for more or less checkboxes.
*EDIT HERE (5) - add or remove CBs for more or less checkboxes.
For more info on these IDs see identifier.
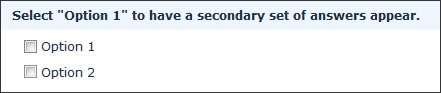
==Display secondary options in a "Multiple options" question==
Tested with: 1.85+ (7253), IE 6/7, FireFox 3.0, Safari 3.2
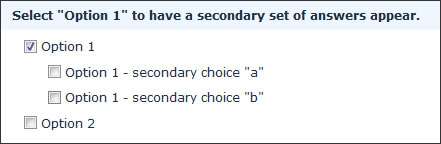
This workaround allows you to display secondary options in a "Multiple options" question if a primary option is checked as in the images below.
Primary option not selected:

Primary option selected:

)
There is a small demo of the above example [8].
We've put a listener on the primary answer ("Option 1" in the demo) that shows or hides the secondary answers depending on the state of the primary.
Implementation for this demo is as follows:
#Turn off $filterxsshtml to allow insertion of JavaScript in the questions. (See here)
#Set up the template to use custom onload functions. (See the here)
#Create a "Multiple options" question including both the primary and secondary answers (in the order that you would like them displayed if all shown)
#Add the following JavaScript to the onload function for that group (page). (See to use script here)
Onload code:
 <script type="text/javascript">

 function Custom_On_Load(){

    $(document).ready(function() {

        /****

        The following code puts a listener on an answer in a multiple options

        question (the primary answer) and if that answer is checked, a secondary

        level of answers is displayed.

        ****/

        // <strike>- 1 </strike>- Indent the secondary answers a bit

        $( '#questionQQ li:eq(1)' ).css({'margin-left':'2.5em'});

        $( '#questionQQ li:eq(2)' ).css({'margin-left':'2.5em'});

        // <strike>- 2 </strike>- When the page loads, see if the primary answer is checked and if not,

                //hide and un-check all secondary answers

        if ($( '#answerSSSSSXGGXQQAA' ).attr('checked') == false ) {

            $( '#questionQQ li:eq(1)' ).hide();

            $( '#questionQQ li:eq(2)' ).hide();

            $( '#answerSSSSSXGGXQQBB' ).attr('checked', false);

            $( '#answerSSSSSXGGXQQCC' ).attr('checked', false);

        }

        // <strike>- 3 </strike>- Now put a listener on the primary answer to show or hide secondary answers

        // We need to use .click instead of .change cause IE won't cooperate

        $('#answerSSSSSXGGXQQAA').click(function (event) {

            // Have a look at the primary answer and hide/show the secondary answers accordingly

            if ($( '#answerSSSSSXGGXQQAA' ).attr('checked') == false ) {

                $( '#questionQQ li:eq(1)' ).hide();

                $( '#questionQQ li:eq(2)' ).hide();

                $( '#answerSSSSSXGGXQQBB' ).attr('checked', false);

                $( '#answerSSSSSXGGXQQCC' ).attr('checked', false);

            }

            else {

                $( '#questionQQ li:eq(1)' ).show();

                $( '#questionQQ li:eq(2)' ).show();

            }

            // The original functions of the click event

            cancelBubbleThis(event);

            checkconditions(this.value, this.name, this.type);

          }

        );

    });

 }

 </script>
The following edits are required to implement this in your survey:
Section 1:
*This section indents the secondary answers to give the look of a list in a list when they're shown
*QQ is your question ID
*eq(1) and eq(2) are the index positions of your secondary options. Modify or add as necessary for the number and placement of secondary options in your question. Note that the index starts at 0 so eq(1) actually affects the second option in the full list and eq(2) affects the third.
Section 2:
*This section checks the state of the primary question when the page is loaded and if necessary hides the secondary questions. We need this in case users navigate away from and then back to the page.
*Modify eq(1) and eq(2) as above.
*SSSSS is your survey ID.
*GG is your group ID.
*QQ is your question ID.
*AA is your primary answer code.
*BB and CC are your secondary answer codes (add as necessary).
Section 3:
*This is the section that "listens" to the primary answer and reacts accordingly.
*Edit as in section 2.
For more info on these IDs see identifier.
This code could be tidied up and shortened a bit but I left it this way to make it easier to follow.
== Generate random number to control survey behaviour==
Tested with: 1.85+ (7253), IE 6/7, FireFox 3.0, Safari 3.2
This workaround allows you to generate a random number and then populate a hidden question with that number. You can then use this question to control the display of subsequent questions with [9]. It's useful if you have several sets of questions that you would like to randomly present to participants - see this post.
There is a small demo [10].
In the demo, in the first group, we generate a random number between 1 and 4 and populate a hidden question with it. Then in the second group we have 4 questions, each showing conditional on the answer of the first question.
Implementation for this demo is as follows:
#Turn off $filterxsshtml to allow insertion of JavaScript in the questions. (See here)
#Set up the template to use custom onload functions. (See the here)
#In the first group add a "Short free text" question (We're going to hide this with JavaScript)
#In the source of that question add the following onload function. (See to use script here)
#In the following groups add the questions that are conditional on the answer of the first question.
Onload code:
 <script type="text/javascript">

 function Custom_On_Load(){

    $(document).ready(function() {

        // Find a random number between 1 and 4

        var randNumber = Math.floor(Math.random()*4 + 1);

        // Populate and hide the hidden question

        $('input#answerSSSSSXGGXQQ').val(randNumber);

        $('#questionQQ').hide();

        /***********************************************************/

        // This just tells the user which number has been selected

        // You can remove this from your onload function

        $('input#setNumber').val(randNumber);

        $('input#setNumber').css({

            'margin-left':'0.5em',

            'width':'1.5em',

            'text-align':'center',

            'font-weight':'bold'

        });

        $('input#setNumber').attr('disabled', true);

        /***********************************************************/

    });

 }

 </script>
Where SSSSS is the survey ID, GG is the group ID and QQ is the hidden question ID.
Increase or decrease the maximum value of the random number by modifying the first section. For example to get a number between 1 and 10 you would use this:
var randNumber = Math.floor(Math.random()*10 + 1);
The third section of code just populates a placeholder element that I use to tell the participant what's going on. You can remove it from your code.
== Minimum number of required answers in an array==
Tested with: 1.85+ (7253), IE 6/7, FireFox 3.0, Safari 3.2,
This workaround allows you to specify a minimum number of answers required in an array question. It is an alternative to the "Mandatory" parameter which specifies that all answers are required. It could also be easily modified to specify a maximum number of answers.
We accomplish this by placing an onload function in the source of the array question. This function hides the Next/Submit button and displays a warning element until it detects a minimum number of responses. It then hides the warning and shows the Next/Submit button.
There is a demo [11].
Implementation is as follows:
#Turn off $filterxsshtml to allow insertion of JavaScript in the questions. (See here)
#Set up the template to use custom onload functions. (See the here)
#In the source of the array question add the following onload function. (See to use script here)
#Modify the SETTINGS section of the code as required.
Onload code:
 <script type="text/javascript" charset="utf-8">

    function Custom_On_Load(){

        // Wait until the document is fully loaded

        $(document).ready(function() {

            /********************** SETTINGS **********************/

            // The text to appear in the warning element

            var warningText = 'Please answer at least 4 to continue';

            // The question ID

            var questionId = 137;

            // The minimum number of answers required

            var minNumber = 4;

            /******************************************************/

            // Create the warning element and place it after the submit button

            var el = document.createElement('div');

            el.setAttribute('id','warning');

            document.body.appendChild(el);

            $( '#warning' ).css({

                'border':'1px solid #333333',

                'width':'200px',

                'padding':'3px',

                'color':'red'

            });

            $('#warning').html(warningText);

            $('input[type="submit"]').after($('#warning']];

           // Detect the initial number of checked answers & display Next/Submit button accordingly

           var inputInitCount = 0;

           $('#question' + questionId + ' input').each(function(i) {

               if ($( this ).attr('checked') == true ) {

                   inputInitCount++;

               }

           });

           if (inputInitCount > (minNumber - 1)) {

               $('input[type="submit"]').show();

               $('#warning').hide();

           }

           else {

               $('#warning').show();

               $('input[type="submit"]').hide();

           }

           // Listener to detect number of checked answers & display Next/Submit button accordingly

           $('#question' + questionId + ' input').click(function() {

               var inputCount = 0;

               $('#question' + questionId + ' input').each(function(i) {

                   if ($( this ).attr('checked') == true ) {

                       inputCount++;

                   }

               });

               if (inputCount > (minNumber - 1)) {

                   $('input[type="submit"]').show();

                   $('#warning').hide();

               }

               else {

                   $('#warning').show();

                   $('input[type="submit"]').hide();

               }

               // The original functions of the click event

               checkconditions(this.value, this.name, this.type);

           });

       });

   }

</script>
Variable Length Array (Multi Flexible Text) question
Tested with: 1.85+ (7557), IE 6/7, FireFox 3.0, Safari 3.2
This workaround allows a respondent to add or remove rows of an Array (Multi Flexible Text) question. It's useful to avoid the page being cluttered with unnecessary array rows.
An onload function is placed in the source of the array question. This function hides all of the array rows except the first and inserts two elements that when clicked show or hide rows accordingly.
There is a demo here.
It must be noted that you can not make this question Mandatory as the respondent will have no way to complete hidden fields. If you want the displayed fields to be mandatory you will need to validate them in another function or modify this function to only allow the addition of rows if all fields in the last row are completed and then disable those fields - that, however, is a little over the top for this example.
Implementation is as follows:
- Turn off $filterxsshtml to allow insertion of JavaScript in the questions. (See documentation here)
- Set up the template to use custom onload functions. (See the workaround here)
- Create one or more Array (Multi Flexible Text) questions
- In the source of the first array question add the following onload function. (See How to use script here)
- Replace "QQ" in the function call at the end with the question ID.
- If you want to apply it to more arrays on the same page simply add more calls with the appropriate question IDs. (eg. varLengthArray(1); varLengthArray(2);...)
Onload code:
<script type="text/javascript" charset="utf-8">

function Custom_On_Load(){

$(document).ready(function() {

// A function to add or remove rows of an Array (Multi Flexible)(Text) question

function varLengthArray(qID) {

   // The HTML content of the Add/Remove elements - modify as you wish

   var addContent = '[+]';

   var removeContent = '[-]';

   // Just some initialization stuff

   var arrayRow = '#question' + qID + ' table.question tbody tr';

   var rowCount = '';

   // Initially hide all except first row

   $( arrayRow ).each(function(i) {

       if ( i > 0 ) {

           // We also need to give the hidden rows a name cause IE doesn't

           // recognize jQuery :visible selector consistently

           $( this ).attr('name', 'hidden').hide();

           rowCount = i;

       }

   });

   // Create the Add and Remove elements & insert them

   var el1 = document.createElement('div');

   el1.setAttribute('id','addButton');

   document.body.appendChild(el1);

   var el2 = document.createElement('div');

   el2.setAttribute('id','removeButton');

   document.body.appendChild(el2);

   // Move them to after the array

   $( 'div#addButton' ).appendTo($( '#question' + qID + ' td.answer' ));

   $( 'div#removeButton' ).appendTo($( '#question' + qID + ' td.answer' ));

   // Insert their HTML

   $( 'div#addButton' ).html( addContent );

   $( 'div#removeButton' ).html( removeContent );

   // Style the elements - you can modify here if you wish

   $( 'div#addButton' ).css({

       'margin':'-10px 0 0 10px',

       'padding':'1px',

       'text-align':'center',

       'font-weight':'bold',

       'width':'auto',

       'cursor':'pointer',

       'float':'left'

   });

   $( 'div#removeButton' ).css({

       'margin':'-10px 0 0 10px',

       'padding':'1px',

       'text-align':'center',

       'font-weight':'bold',

       'width':'auto',

       'cursor':'pointer',

       'float':'left'

   });

   // Initially hide the Remove element

   $( 'div#removeButton' ).hide();

   // Call the functions below when clicked

   $( 'div#addButton' ).click(function (event) {

       addRow();

   });

   $( 'div#removeButton' ).click(function (event) {

       removeRow();

   });

   // Function to add a row, also shows the Remove element and hides the

   //Add element if all rows are shown

   function addRow() {

       $( arrayRow + '[name="hidden"]:first' ).attr('name', 'visible').show();

       $( 'div#removeButton' ).show();

       if ( $( arrayRow + ':eq(' + rowCount + ')' ).attr('name') == 'visible' )  {

           $( 'div#addButton' ).hide();

       }

   }

   // Function to remove a row, also clears the contents of the removed row,

   // shows the Add element if the last row is hidden and hides the Remove

   // element if only the first row is shown

   function removeRow() {

       $( arrayRow + '[name="visible"]:last input[type="text"]' ).val('');

       $( arrayRow + '[name="visible"]:last' ).attr('name', 'hidden').hide();

       $( 'div#addButton' ).show();

       if ( $( arrayRow + ':eq(1)' ).attr('name') == 'hidden' )  {

           $( 'div#removeButton' ).hide();

       }

   }

}

// Call the function with a question ID

varLengthArray(QQ);

});

}

</script>
Partially Randomized Answers - Multiple Options & List (radio) questions
Tested with: 1.85+ (7557), IE 6/7, FireFox 3.0, Safari 3.2
This workaround allows the answers of Multiple Options & List (radio) questions to be randomized while always keeping one answer at the end of the list. It's useful if you want to randomize, say, the first 4 of your answers but always have the fifth displayed last as in the image below:

An onload function is placed in the source of a question. After the randomizing has occurred this function moves the answer with the highest answer code to the end of the list.
There is a demo here.
Some conditions on the use of this are:
- For Select/radio type questions it will only work if the $shownoanswer option is set to 0 in config.php. ("No answer" is removed from the end of questions)
- You must use sequential numbers, starting at 1 as response codes. (See image below)

Implementation is as follows:
- Turn off $filterxsshtml to allow insertion of JavaScript in the questions. (See documentation here)
- Set up the template to use custom onload functions. (See the workaround here)
- Create one or more Multiple Options or List (radio) questions with sequential response codes. Set the random_order question attribute to 1.
- In the source of the first question add the following onload function. (See How to use script here)
- Replace "SSSSS", "GG", "QQ" in the function call at the end with the survey ID, group ID and question ID respectively.
- If you want to apply it to more questions on the same page simply add more calls with the appropriate IDs. (eg. partRand(11111, 22, 1); partRand(11111, 22, 2); ...)
Onload code:
<script type="text/javascript" charset="utf-8">

function Custom_On_Load(){

$(document).ready(function() {

   // Function to allow randomization of all answers

   //except the last one in Multiple options and List/radio questions

   function partRand(sID, gID, qID) {

       // Find the number of answers

       var ansCount = ''

       $( 'div#question' + qID + ' td.answer li' ).each(function(i) {

           ansCount = (i + 1);

       });

       // Place the last answer created at the end of the list

       $( 'input#answer' + sID + 'X' + gID + 'X' + qID + ansCount + '' ).

       //CAUTION: manually inserted line break.

       //Append the line below at the end of the above one

       parent().appendTo($( '#question' + qID + ' td.answer ul' ));

   }

   // Call the function with the SID, GID and QID

   partRand(SSSSS, GG, QQ);

});

}

</script>
Partially Randomized Answers - List (dropdown) questions
Tested with: 1.85+ (7557), IE 6/7, FireFox 3.0, Safari 3.2
This workaround, similar to the one above, allows the answers of List (dropdown) questions to be randomized while always keeping one answer at the end of the list. It's useful if you want to randomize, say, the first 4 of your answers but always have the fifth displayed last.
An onload function is placed in the source of a question. After the randomizing has occurred this function moves the answer with the highest answer code to the end of the list.
There is a demo here.
A condition is that you must use sequential numbers, starting at 1 as response codes. (See image below)
Implementation is as follows:
- Turn off $filterxsshtml to allow insertion of JavaScript in the questions. (See documentation here)
- Set up the template to use custom onload functions. (See the workaround here)
- Create one or more List (dropdown) questions with sequential response codes. Set the random_order question attribute to 1.
- In the source of the first question add the following onload function. (See How to use script here)
- Replace "SSSSS", "GG", "QQ" in the function call at the end with the survey ID, group ID and question ID respectively.
- If you want to apply it to more questions on the same page simply add more calls with the appropriate IDs. (eg. partRandDD(11111, 22, 1); partRandDD(11111, 22, 2); ...)
Onload code:
<script type="text/javascript" charset="utf-8">

function Custom_On_Load(){

$(document).ready(function() {

   // Function to allow randomization of all answers

   //except the last one in List/dropdown questions

   function partRandDD(sID, gID, qID) {

       // Find the number of answers

       var ansCount = ''

       $( 'div#question' + qID + ' select option' ).each(function(i) {

           ansCount = i;

       });

       // Place the last answer created at the end of the list

$( 'option[value="' + ansCount + '"]' ).appendTo($( 'div#question' + qID + ' select' ));

   }

   // Call the function with the SID, GID and QID

   partRandDD(89344, 72, 244);

});

}

</script>
Making one (or more) rows of an array mandatory
Tested with: 1.85+ (7557), IE 6/7, Firefox 3.0, Safari 3.2
This workaround allows you to define one or more rows of an array question as mandatory (instead of all of them which the "Mandatory" question setting does). It is demonstrated here.
We use a custom onload function to interrupt the submit function and check if the inputs in the mandatory row(s) are populated. If not, an alert is popped up, the offending inputs are turned pink and the submit is aborted. Otherwise the submit goes ahead.
Implementation is as follows:
- Turn off $filterxsshtml to allow insertion of JavaScript in the questions (see documentation here).
- Set up the template to use custom onload functions (see the workaround here).
- Create the array question.
- In the source of the array question add the following onload function (see How to use script here).
- Modify the alertText as required.
- Replace "QQ" with the question ID.
- Modify "tr:eq(0)" for whatever row you want mandatory. The row indexes start at 0, so "tr:eq(0)" would be row 1, "tr:eq(1)" would be row 2, "tr:eq(2)" would be row 3, etc. This example is for a single mandatory row - see below for multiple rows.
Onload code:
<script type="text/javascript" charset="utf-8">

function Custom_On_Load(){

$(document).ready(function() {

   // Interrupt the submit function

   $('form#limesurvey').submit(function(){

       // The alert to be displayed - modify as required

       var alertText = 'You must complete all fields for Option 1.';

       var empty = 0;

       // Loop through all inputs of the mandatory row

       // Modify "tr:eq(0)" for the row to be mandatory (indexes start at 0)

       // - eg, tr:eq(0) = row 1 mandatory, tr:eq(1) = row 2 mandatory,...

$( 'div#questionQQ table.question tbody tr:eq(0) input[type="text"]' ).each(function(i) {

           if ( $( this ).val() == '' ) {

               $( this ).css('background-color', 'pink');

               empty = 1;

           }

           else {

               $( this ).css('background-color', '#FFFFFF');

           }

       });

       if ( empty == 1 ) {

           alert ( alertText );

           return false;

       }

       else {

           return true;

       }

   });

});

}

</script>
If you would like multiple mandatory rows, simply repeat the loop with the other row number(s) as below. This example would make rows 1 and 2 mandatory:
<script type="text/javascript" charset="utf-8">

function Custom_On_Load(){

<<strike>-</strike>---

// Loop through all inputs of the mandatory row

// Modify "tr:eq(0)" for the row to be mandatory (indexes start at 0)

// - eg, tr:eq(0) = row 1 mandatory, tr:eq(1) = row 2 mandatory,...

$( 'div#questionQQ table.question tbody tr:eq(0) input[type="text"]' ).each(function(i) {

   if ( $( this ).val() == '' ) {

       $( this ).css('background-color', 'pink');

       empty = 1;

   }

   else {

       $( this ).css('background-color', '#FFFFFF');

   }

$( 'div#questionQQ table.question tbody tr:eq(1) input[type="text"]' ).each(function(i) {

   if ( $( this ).val() == '' ) {

       $( this ).css('background-color', 'pink');

       empty = 1;

   }

   else {

       $( this ).css('background-color', '#FFFFFF');

   }

});

-->

}

</script>
Randomly displaying one of a few YouTube videos, and recording which was displayed
Tested in 1.85+
Jason Cleeland has created and documented a method to randomly display one of a number of youtube videos in a single question, and save which one was displayed.
http://www.aptigence.com.au/home/archives/23-Random-display-of-videos-in-a-question-2-YouTube.html
Multiple numerical input with max_num_value defined in token (personalized limit)
Tested in 1.85+
To make personalized survey with multiple numerical input when max_num_value (Maximum sum value) is different for each user and is loaded from the token use following tricks:
- Create 1st group with numerical input field (1000X10X11). "Limit"
- Add java script into this question:
<script>

function Custom_On_Load(){

document.getElementById('answer1000X10X11').value='{TOKEN:ATTRIBUTE_1}';

document.getElementById('answer1000X10X11').readOnly=1;

}

</script>
where:
TOKEN:ATTRIBUTE_1 is individual limit defined in token.
readOnly=1 // user shouldn't change it.
- Create 2nd group with multiple numerical input and add "Max value from SGQA" with 1000X10X11 as argument.
Note: If you don't want to show first field with numerical input (and show definied limit in different way) you can add 2 lines to above script to hide whole question:
document.getElementById('question85').style.display='none';

document.getElementById('display85').value='';
where:
question85 and display85 are field names.
Note: It's no possible to create it into one group, because all SGQA references can only refer to data on a previous page because when clicking next the answer is stored at the DB and the SGQA is replaced by querying the database.
Survey Behavior
Respond multiple times using the same computer
Tested with:
With this workaround it will be possible to respond multiple times to the same survey. Normally there will be a message saying that the computer already received the answers. To prevent this you have to add the following code to the URL that leads to the survey "&newtest;=Y".
Example of the "new" url:
http://www.yourdomain.org/limesurvey/index.php?sid=12345&newtest;=Y
Allow Multiple Survey Invitations to the same Email Address to be completed in the Same Browser Session
Tested with:
Problem: When Multiple Surveys Invitations are activated during the same browser session, the second and subsequent survey activation results in a system message stating that the survey has already been completed. A user would have to close the browser and reopen in order to complete the next survey inviation.
Workaround: Edit the Survey Invitation Email (also the reminder) Template. Append "&newtest;=Y" to the {SURVEYURL} line so it looks like this {SURVEYURL}&newtest;=Y
Save the edited templates.
Note: The save of this template edit does not seem to work when using HTML invitations, only text based invitations.
Add a data field to manually add data
Tested with:
If you want to add some additional data after a user has finished a survey you can use the dataentry screen of the admin panel. You have to set up the survey as follows:
- Create a question that can store the needed data at the end of the survey.
- Use conditions on the previous question so that whatever is answered at the previous question the following question doesn't appear.
- To enter several questions repeat steps 1-2. Don't forget to adapt the conditions.
- Go to the admin panel, chose the survey from the list and go to Dataentry screen for survey.
- Enter the additional data
Totally random survey order
Tested with:
If you want to use random order globally for all questions in your survey, you can do it like this, depending on what type of question routine you use.
- If you use Group by Group add "shuffle($_SESSION['grouplist']);" at the end of UpdateSessionGroupList($language) function in index.php
- If you use Question by Question or All-in-one put "shuffle($_SESSION['fieldarray'])" at the end of buildsurveysession() function in index.php
Important: This modifications affect all surveys in application, you may want to use an if statement with surveyid to make this work with specific surveys e.g.
if ($surveyid==12345)

{

  do_some_shuffling()

}
- Saving survey is not possible because this workaround doesn't save random order for specyfic tokens.
- Solution doesn't care about language changes so if you have on in your survey this will not work.
- Using conditions is not possible because conditions rely on a fixed and pre-determined order of questions.
Selective group randomization
Tested with: 1.82
Select which surveys you want to have their groups randomized, and not a global setting. This workaround puts a extra tab under group ordering which allows you to enable / disable group randomization for the selected survey.
A working code and database modification is described in the PDF file selective_random_groups which is downloadable from the Bugtracker at [12].
Note: There may be situations where this might not work, for example when adding conditions or assessments to surveys.
Randomize the order of sequences of groups in a survey
Tested with: 1.86
You can randomize the order of subsequences of groups in a survey. E.g., you may have a survey comprising the below group structure
- demographics
- itemgroup1
- itemgroup2
- itemgroup3
- interlude
- itemgroup4
- itemgroup5
- itemgroup6
- closingcomments
and want to separately randomize the presentation order of itemgroup1...3 and itemgroup4...6 while maintaining the position of the other three groups. A working code modification is described in the PDF file randomize_groups which is downloadable from the Bugtracker at [13].
- Note: The code will randomize the order of subsequent groups in isolation, not across different sequences. Hence in the above example, you might get itemgroup1, 3, 2 but never itemgroup1, 4, 2
- Note: The survey presentation format must be Group by Group not Question by Question
- Note: If you wish to select only a limited number of groups from a larger set, replace
$scratcharr = array_merge($scratcharr, $randarr);
with
$scratcharr = array_merge($scratcharr, array_slice($randarr,0,x));
where x is the number of elements/groups that you wish to include. In the example above $scratcharr = array_merge($scratcharr, array_slice($randarr,0,2)); would select two out of the possible three groups in each group set.
- Warning: The code is compatible with conditions operating on items within a group but most possibly produces erroneous behavior with conditions between groups
- Warning: In a multi-language survey, the groups get randomized each time the language is changed. A simple workaround is to remove the language changer from the question pages of the survey leaving it on the welcome page only. (Though not totally foolproof this does lower the risk of unnecessary language changes.)
Selective Question Randomization
Tested with: 1.82
With this workaround you are able to select which groups within a survey should have their questions randomized and not kept in order. This workaround also adds a tab in the question ordering page. The extra tab allows you to enable / disable question randomization for the selected group.
A working code and database modification is described in the PDF file selective_random_questions which is downloadable from the Bugtracker at [14].
Note: This might not work when adding conditions or assessments to the survey.
Randomize the order of questions within individual groups - JavaScript solution
Tested with: 1.85+ (7557), IE 6/7, Firefox 3.0, Safari 3.2
This workaround allows you to randomize the order of questions in individual groups. It uses JavaScript/jQuery to apply this randomization to only those groups that you wish and requires no modification of the core files when updating the installation.
The script uses a cookie to "remember" the shuffled order of the questions for the duration of the session so if a respondent navigates away from the group and returns, they will see the same question order. However if the survey is submitted or the session expires the questions will be re-shuffled.
A couple of cautions about the script are:
- If the survey is saved, the questions will be re-shuffled when it is accessed again (as with the PHP solution).
- The question shuffling may play havoc with conditions within a group (as with the PHP solution).
- The script has been tested with all templates shipped with 1.85+ but if you have a custom template with "question" in the ID of division(s) (ie <div id="questionHolder">) it may fail - the script looks for all divs with IDs starting with "question" and adds them to an array to be shuffled.
There is a small demonstration here.
Put simply, the script:
- Checks cookies to see if the questions have already been shuffled for this group and session.
- If so - displays the questions in that order.
- If not - creates an array of all of the questions in the group, shuffles the array, sets a cookie with the shuffled array contents, displays the questions in the shuffled order.
Implementation is as follows:
- Turn off $filterxsshtml to allow insertion of JavaScript (see documentation here)..
- Create your group and questions.
- In the source of the group description add the following onload function (see How to use script here).
Onload code:
<script type="text/javascript" charset="utf-8">

   $(document).ready(function() {

       function shuffleQuestions() {

           // Create an array to hold question IDs

           var qArray = new Array();

           // Find the group ID of the page

           var fieldNames = $( 'input#fieldnames' ).attr('value');

           var tmp = fieldNames.split('X');

           var sID = tmp[0];

           var gID = tmp[1];

           // A function to get the value of a cookie by name

           function getCookie ( cookieName ) {

               var results = document.cookie.match ( '(<div class="simplebox">|;) ?' + cookieName + '=([</div>;]*)(;|$)' );

               if ( results ) {

                   return ( unescape ( results[2] ) );

               }

               else {

                   return null;

               }

           }

           // Get the session name

           var sessionName = getCookie ( 'PHPSESSID' );

           // Check to see if the question order has already been shuffled in this session

           var cookieArray = getCookie ( 'sArray' + gID + '_' + sessionName );

           // If already shuffled, use that question order

           if ( cookieArray ) {

               //qArray = $.trim(cookieArray);

               qArray = cookieArray.split(',');

           }

           // If not, go ahead and shuffle

           else {

               // Load the IDs of all questions on the page into the array

               $( 'div[id<div class="simplebox">="question"]' ).each(function(i) {

                   qArray.push($( this ).attr('id'));

               });

               // Shuffle the questions array

               function shuffle(o){

                   for(var j, x, i = o.length; i; j = parseInt(Math.random() * i), x = o[--i], o[i] = o[j], o[j] = x);

                   return o;

               }

               shuffle(qArray);

               // Set a cookie with the value of the shuffled array

               var today = new Date();

               today.setTime( today.getTime() );

               var expires = 2 * 1000 * 60 * 60 * 24; // Expire the cookie in 2 days

               var expiresDate = new Date( today.getTime() + (expires) );

               document.cookie = 'sArray' + gID + '_' + sessionName + '=' + qArray + ';expires=' + expiresDate.toGMTString();

           }

           // Wrap the questions in a div

           $( 'div[id</div>="question"]' ).wrapAll( document.createElement('div') );

           $( 'div[id<div class="simplebox">="question"]:eq(0)' ).parent().attr('id', 'qWrapper');

           $( 'div#qWrapper' ).css({

               'padding':0,

               'margin':0

           });

           // Insert the questions into the wrapper in the shuffled order

           $.each(qArray, function(i, val){

               $( 'div#' + val + '' ).appendTo( $( '#qWrapper' ) );

           });

       }

       shuffleQuestions();

   });

</script>
Randomise the order of questions within groups
Tested with:
You can randomize the order questions of within groups (i.e. without interleaving questions from different groups) like this:
1 Call a custom function from the last line of buildsurveysession() before the return statement in index.php:
$_SESSION<nowiki>[</nowiki>'fieldarray'] = withinGroupsShuffle();
2. Add these custom functions at the end of the same file:
$currentGid;

function withinGroupsShuffle() {

   global $currentGid;

   $groupArray = array();

   $shuffledArray = array();

   foreach ($_SESSION['grouplist'] as $group)    {

       $currentGid = $group[0];

       $groupArray = array_filter($_SESSION['fieldarray'], "questionInGroup");

       shuffle($groupArray);

       $tmp = $shuffledArray;

       $shuffledArray = array_merge($tmp, $groupArray);

       $groupArray = array();

   }

   return $shuffledArray;

}

function questionInGroup($question) {

   global $currentGid;

   return ($question[5] == $currentGid) ? 1 : 0;

}
(I'm new to PHP, so please make changes if you can make the code shorter or more elegant)
This could be combined with the method mentioned above for shuffling the order of groups:
shuffle($_SESSION<nowiki>[</nowiki>'grouplist']);
I don't know how this code affects or is affected by conditions or tokens! This code has the same limitations as the global randomisation above: it applies to all groups in all surveys. It would be nice to add a group-level parameter like randomise_questions = [0|1], but I can't find a mechanism for doing that.
Random question sets
Tested with: 1.85+ (7557), IE 6/7, Firefox 3.0, Safari 3.2
This workaround, in conjunction with the randomizing questions script, allows you to display a random set of questions in a group.
There is a small demonstration here (page 2).
JavaScript is used to first shuffle the question order and then hide the number of questions that you stipulate, effectively giving respondents a random question set. So if, as in the demo, you have 5 questions in your group and choose to hide 2, the respondents will be presented with a random 3 questions.
A brief explanation of the script is:
- The questions are shuffled (see randomizing questions) and their IDs placed in an array.
- The number of questions to be shown is calculated and their IDs are moved to a new array.
- All questions in the first array are hidden - this effectively hides the first n questions on the page so you'll get a random set of questions displayed.
- An asterisk is prepended to the remaining questions (remove this if your questions are not mandatory).
- When the next/submit button is clicked, all remaining questions are checked for an answer. If any are unanswered, their text is turned red, an alert is popped up and the next/submit is aborted (remove this if your questions are not mandatory).
A cookie is used to "remember" the shuffled order of the questions for the duration of the session so if a respondent navigates away from the group and returns, they will see the same question set. However if the survey is submitted or the session expires, the questions will be re-shuffled and a new set will be displayed. Therefor this workaround should not be used with surveys that can be saved.
A couple of cautions about the script are:
- If the survey is saved, the questions will be re-shuffled when it is accessed again and a new question set will be displayed.
- The question shuffling may play havoc with conditions within a group.
- The script has been tested with all templates shipped with 1.85+ but if you have a custom template with "question" in the ID of division(s) (ie <div id="questionHolder">) it may fail - the script looks for all divs with IDs starting with "question" and adds them to an array to be shuffled.
- The script may need to be modified to display the "Mandatory" asterisk in templates other than the default - see below.
Implementation is as follows:
- Turn off $filterxsshtml to allow insertion of JavaScript (see documentation here).
- Create your group with all questions non-mandatory (we'll make them mandatory later with JavaScript).
- In the source of the group description add the following onload function (see How to use script here).
- Modify the function call at the end of the script for the number of questions to be hidden and the mandatory error text.
Onload code:
<script type="text/javascript" charset="utf-8">

   $(document).ready(function() {

       function shuffleQuestions() {

           // Create an array to hold question IDs

           var qArray = new Array();

           // Find the group ID of the page

           var fieldNames = $( 'input#fieldnames' ).attr('value');

           var tmp = fieldNames.split('X');

           var sID = tmp[0];

           var gID = tmp[1];

           // A function to get the value of a cookie by name

           function getCookie ( cookieName ) {

               var results = document.cookie.match ( '(</div>|;) ?' + cookieName + '=([<div class="simplebox">;]*)(;|$)' );

               if ( results ) {

                   return ( unescape ( results[2] ) );

               }

               else {

                   return null;

               }

           }

           // Get the session name

           var sessionName = getCookie ( 'PHPSESSID' );

           // Check to see if the question order has already been shuffled in this session

           var cookieArray = getCookie ( 'sArray' + gID + '_' + sessionName );

           // If already shuffled, use that question order

           if ( cookieArray ) {

               //qArray = $.trim(cookieArray);

               qArray = cookieArray.split(',');

           }

           // If not, go ahead and shuffle

           else {

               // Load the IDs of all questions on the page into the array

               $( 'div[id</div>="question"]' ).each(function(i) {

                   qArray.push($( this ).attr('id'));

               });

               // Shuffle the questions array

               function shuffle(o){

                   for(var j, x, i = o.length; i; j = parseInt(Math.random() * i), x = o[--i], o[i] = o[j], o[j] = x);

                   return o;

               }

               shuffle(qArray);

               // Set a cookie with the value of the shuffled array

               var today = new Date();

               today.setTime( today.getTime() );

               var expires = 2 * 1000 * 60 * 60 * 24; // Expire the cookie in 2 days

               var expiresDate = new Date( today.getTime() + (expires) );

               document.cookie = 'sArray' + gID + '_' + sessionName + '=' + qArray + ';expires=' + expiresDate.toGMTString();

           }

           // Wrap the questions in a div

           $( 'div[id<div class="simplebox">="question"]' ).wrapAll( document.createElement('div') );

           $( 'div[id</div>="question"]:eq(0)' ).parent().attr('id', 'qWrapper');

           $( 'div#qWrapper' ).css({

               'padding':0,

               'margin':0

           });

           // Insert the questions into the wrapper in the shuffled order

           $.each(qArray, function(i, val){

               $( 'div#' + val + '' ).appendTo( $( '#qWrapper' ) );

           });

       }

       shuffleQuestions();

       function hideQuestions(numberToHide, mandatoryMsg) {

           // Create an array of the IDs of all questions on the page

           var questions = new Array();

           $( 'div[id<div class="simplebox">="question"]' ).each(function(i) {

               questions.push($( this ).attr('id'));

           });

           // Remove the "shown" questions and place them in a new array

           var questionsLength = questions.length;

           var shownQuestions = questions.splice(numberToHide,questionsLength-numberToHide);

           // Hide the remaining questions

           $.each(questions, function(i, val){

               $( 'div#' + val + '' ).hide();

           });

           // Add an asterisk to the "shown" questions

           // NOTE: Comment this section out if questions are not mandatory

           $( 'td.questiontext' ).prepend( '<span class="asterisk">*</span>');

           // Interrupt the submit function and validate mandatory questions

           // NOTE: Comment this section out if questions are not mandatory

           $('form#limesurvey').submit(function(){

               // Loop through all "shown" questions and check for answer

               var answered = 0;

               $.each(shownQuestions, function(i, val){

                   if ( $( 'div#' + val + ' input.radio:checked' ).length == 0 ) {

                       $( 'div#' + val + '' ).css('color', 'red');

                       answered = 1;

                   }

                   else {

                       $( 'div#' + val + '' ).css('color', '');

                   }

               });

               if ( answered == 1 ) {

                   alert ( mandatoryMsg );

                   return false;

               }

               else {

                   return true;

               }

           });

       }

       // Call the hide function

       // Edit here for number of question to hide and mandatory message

       hideQuestions(2, 'Please complete all questions');

   });

</script>
To add the asterisk to non default templates, replace $( 'td.questiontext' ).prepend( '*');'' with:
- basic - $( 'td.be' ).prepend( '*');
- bluengrey - Not possible to insert asterisk in correct location
- business_grey - $( 'div.questiontext' ).prepend( '*');
- clear_logo - $( 'td.be' ).prepend( '*');
- default - $( 'td.questiontext' ).prepend( '*');
- eirenicon - Not possible to insert asterisk in correct location
- limespired - $( 'div.survey-question-text' ).prepend( '*');
- mint_idea - $( 'div.survey-question-text' ).prepend( '*');
- sherpa - $( 'div.survey-question-text' ).prepend( '*');
- vallendar - Not possible to insert asterisk in correct location
Randomization - Assign People Randomly To Surveys
Tested with:
This is a very easy way to assign people randomly to surveys, I think experts do it in other ways, but it works for me.
LINK.PHP:
<?php

 $db = @file("link.txt"); // path to .txt file

 $anz = @count($db);

 srand[[SGQA identifier]], and the answer, as a parameter of your survey URL. This feature will only work where the survey is commenced immediately upon entering the URL (so it won't work if you use CAPTCHA's to restrict access, or the registration page).

You'll need to ensure that the answer you pass is the correct format for the question you are attempting to prefill - for example - multiple option questions should contain a "Y" to check a box. List type questions need the correct answer code. To be certain which codes to pass, complete a survey manually with the prefilled answer(s) you want, and then export the results as question codes and answer codes(not full text). This will give you both the correct SGQA identifier (the name of the column), and the correct format for the answer.

'''Example:'''

<div class="simplebox">http://www.myownd.../index.php?sid=1234&1234X43X123=Y</div>

When the user gets to that question, the "Y" will be prefilled as the answer to question 123 in group 43 in survey 1234.

==Prefilling survey answers using the survey URL and hiding the Answer==

''Tested with: 1.80RC3+''

Having used the previous workaround to prefill an answer in your survey by passing a [[SGQA identifier]] throught the URL, you may also want to hide the question that is being prefilled so that the user cannot modify it (or even know it is there).

There are currently two options for you:
*The javascript approach which does not require patching the limesurvey source
*Applying the patch attached to http://bugs.limesurvey.org/view.php?id=3555 and setting the ''hidden'' question attribute.

===The javascript approach===

To do this, utilise the id name of each answers div area. Each question is presented in a div with an idea comprising the word "question" immediately followed with the questions unique id code. So from the above example, with SGQA 1234X43X123, the question id we are prefilling is id 123. That means the div id for displaying the whole question is "question123".

To hide this question, enter the following javascript in the question source.

<syntaxhighlight lang="php" enclose="div">

<script type='text/javascript'>


</script>
This workaround will make most sense if you are displaying your surveys in groups. If you are displaying question by question, then the user will get a blank page with just a "Next" and "Prev" button, and they may get confused.
Prefilling a date question with the current date
Tested with: 1.80RC3
Workaround created by user "Mazi"
Using the workaround mentioned above you can prefill the current date for a date question. Instead of using the common link to a survey which looks like this
you create an additional script, let's call it date.php. This script contains the following code:
<?php
$date = date("Y-m-d");
header("Location: http://www.yourdomain.org/limesurvey/index.php?sid=53298&newtest;=Y⟨=de&53298X15X102=$date");
?>
The script determines the current date and calls the survey with a certain URL. The current date is attached as the answer for a certain date question using SGQA identifier. Don't forget to adjust the SID and SGQA identifier according to your survey/group/question ID!
Upload the new date.php file into your limesurvey directory. You can then call the survey using this link:
Things to watch out for:
- Date questions always use the internal date data format of the database which has to be YYYY-MM-DD!
- You have to adjust the SID at the URl.
- Also adjust the SGQA identifier (SIDXGIDXQID) according to your survey.
- This solution doesn't work if you use tokens at your survey.
New: I created a PHP script which is easy to adapt by just entering the matching IDs. (Mazi)
Offer option to change answers later
Tested with:
When having a closed access survey using a token table it is possible to offer the opportunity to change answers later. Normally after having submitted the answers a token is marked as "used". To prevent this do as follows:
- set your survey to question-by-question mode (or group-by-group mode)
- set the survey to Non anonymous + Allow persistence for token answers
- activate survey and create your token table
- add at least one question of type boilerplate (which contains just some text). This is necessaray to give some instructions to the user like "Your answers have been recorded to the DB, if you're sure you won't modify them, you can submit your response. If unsure, please quit your browser now and get back later with the private URL you've received.
By not submitting the survey the user is still able to change the answers later.
Use general password for accessing a survey
If you don't want to use tokens but a general password to access a survey you can set your survey to "allow public access". Don't create a token table but use the following workaround:
- Create a short text question first
- Create the other questions
- Use conditions on all the other questions. You can use regular expressions to validate the string entered at the short text question. Just validate a certain password. If the password is correct the following questions are shown.
- Create a boilerplate question which just says "invalid password" which is shown if the user entered a wrong password.
Create token on the fly and Edit completed survey
When having a close token survey you can create a token on the fly by giving as parameters sid and token.
In addition if someone has already completed a survey he can review his answers and correct them.
Just put this script attached at the bugtracker ticket into limesurveys root directory
Prerequisites:
- Anonymous answers? No (This survey is NOT anonymous.)
- Enable Token-based answers persistence? Yes
- Switch to closed-acces mode
Example:
where Survey id = 98761 your survey's id and token=12345 a token (any token actually)
- The first time the token will be created and you you will redirect to anwser the surrvey
- If you wont complete the survey and call the script with the same parameters you will be redirect to the same case in order to finish the survey
- If you finish the survey and call the script with the same parameters you will see restart the survey with your previews answers prefiled so you can change them
- Back to 3
this is valid for all survey in the installation but you can make a filter so it wont be valid for every survey.
Relative posts
- LimeSurvey Bug & Feature Tracker
- the code
http://bugs.limesurvey.org/file_download.php?file_id=1826&type;=bug
by user "janokary"
multiple 'completed' with only one token
Tested with: 1.71
Whit a closed survey, each token work only one time. Sometime we need the possibility to complete a particular survey several time with the same token.
Here is an example for the survey id '71314'. Don't forget to adapt your own sid.
Edit index.php to in the function submittokens() replace lines ~ 1312 :
if (bIsTokenCompletedDatestamped($thissurvey))

   {

   $utquery .= "SET completed='$today'\n";

   }

   }

   else

   {

   $utquery .= "SET completed='Y'\n";
with lines :
if (bIsTokenCompletedDatestamped($thissurvey))

   {

   //multiple token only for survey 71314

   if ($surveyid == '71314') {

   $utquery .= "SET completed='N'\n";

   }else {

   $utquery .= "SET completed='$today'\n";

   }

   }

   else

   {

   //$utquery .= "SET completed='Y'\n";
We never update the database with the completed date and time for this survey.
Warning : a limitation of this code is that you never recieve a confirmation mail for the compledted.
Loop question(s)
Tested with: 1.85
There is no real loop option within Limesurvey 1.x. Too loop a question an initial question to determine the number of loops is needed. Looping is then done using a condition wokraround:
1. Create a single choice question asking "How many X do you want to rate", possible answers 1, 2, 3, 4, 5.
2. Create up to 5 following questions asking "Please rate item 1/2/3/...".
3. Check manual -> conditions and read it carefully.
4. Set conditions like
a) "Only show Q3 (Rate item 2) IF Q1 (How many...) was answered 2
OR Q1 (How many...) was answered 3
OR Q1 (How many...) was answered 4
OR Q1 (How many...) was answered 5"
b) "Only show Q4 (Rate item 3) IF Q1 (How many...) was answered 3
OR Q1 (How many...) was answered 4
OR Q1 (How many...) was answered 5"
c) Q5... see above
d) Q6...
Of course Q2 is always shown, the following question will be added by conditions depending on what the user answered at Q1.
Improve Statistics
Tested with: version 1.85
Some of you may want to give your survey respondents a URL that will display a menu of all surveys that have public statistics to be displayed. This is a hack module that generates a menu only and then calls the real userstatistics module to display those statistics for your user.
It is a small file and is basically the same code Jason wrote to build the survey menu with some minor edits. You can rename the module to anything you like for your particular survey system and place it in your root directory. Then give the URL to this module to your users to produce a menu of the available surveys you have public statistics enabled on.
You can download the file in the forum
Everything Else
How to import survey responses from v1.00 into v1.5x (and later)
Tested with: LS >= 1.50
In LimeSurvey v1.50 it´s possible to import a survey, which is generated (and exported) with v1.00 into v1.5x. The Problem is, on that way only the survey structure gets imported, but no respones to that survey.
If you also need to import the responses, follow the next steps:
- Export your survey in v1.00
- Do a VV-Export in v1.00 (to save your responses)
- Import your survey from v1.00 into v1.5x via "Create or Import a New Survey" in the main Admin Panel
- Activate your imported survey
- Fill out your survey once, so that at least one response is in your database.
- Do a VV-Export in v1.5x
- Open both VV-Exports (v1.5x and v1.00); if you use Microsoft Excel do it via "Open New File" and "Import from Text-File" or "Import from external source - textfile" and choose "seperated" and "Unicode (UTF-8)"; choose
- Compare the file structure and you´ll see that there are two columns added (submitdate and startlanguage) and that all question codes changed.
- Copy all rows (except row 1 and 2, that means you start with the third row) from your VV-Export v1.00 into your VV-Export v1.5x (also put it at the third row)
- Add the columns "submitdate" and "startlanguage" in your VV-Export v1.5x-File, right between "id" and "token"
- Save your file (in Microsoft Excel use Textfile - Tabstopp seperated). It´s necessary that your file after saving has the same format as before - Notice: it´s not a normal .csv-File.
- Import your file via VV-Import
If you closed your survey accidentally
Tested with: All versions
- Activate your survey again
- Go to the "Browse responses for this survey" menu
- Click at the "Import answers from a deactivated survey table" button
- Choose your source table
- Click at the "Import responses" button
Translate surveys without admin access
Tested with:
User "CasN" has written a nice extension that allows you to translate surveys without having access to the admin panel. He has added his files in the bug and feature tracker (01735: Remote translating feature) where you can download them. You'll also find a short How-To there.
This is how it works:
Copy the scripts in the root of your survey directory and call starttrans.php like this starttrans.php?survey=12345
It will check the languages connected to the survey and also verify the labelsets used.
You will then get a screen with for each language the required links for translating, aswell for the labels as the survey itself. From the survey, the question and tip fields are presented for translation.
Thanks CasN for sharing your solution with the community!
Create Question Pools
Tested with:
This workarounds was created by user "akky" and posted in the forum:
This is a simple solution to create question pools for Limesurvey. It will require access to the backend database. I'm not going to explain how to do this, as if you don't understand it, then you shouldn't really do it.
Basically 3 tables exist that we care about:
- lime_surveys - id field = sid
- lime_groups - id field = gid
- lime_questions id field = qid
In order to show the questions correctly the id field from the lime_groups table exists in the lime_questions table. This then is used to create the parent/child relationship.
However, if you want to create a pool of questions all you need to do is to amend the gid field in the lime_questions table to a value that doesn't exist in the lime_groups table. I would use 0 or a something silly like 10000. Try this with one question and you will notice it doesnt appear in the question list.
It's a crude workaround, but allows you to create as many questions as you want, without having them visible.
This could also be applied for groups as well just by using the sid field in the lime_groups table.
Re-open a submitted answer
Tested with: 1.71+
As an administrator you can re-open a submitted answer.
- Reset tokens invitation to not sent
- Reset answers to not completed
- release <= 1.72: In LS <= 1.72 you don't have the option to "Reset answers to not completed" that version 1.8 offers, so this would require the following workaround:
- export of tokens
- vvexport of answers
- deactivate/activate survey in order to erase answers
- import answers from VVimport but Add the 'import as not finalized answers' option
- import tokens
- release >= 1.8:
- from the answer summary page, a new option can be used to reset all answers to a not submitted state
- from the tokens summary page, you can reset all tokens to 'not sent' state
- release <= 1.72: In LS <= 1.72 you don't have the option to "Reset answers to not completed" that version 1.8 offers, so this would require the following workaround:
Note that this will work only on non anonymous surveys with "Allow Persistence" option set.
Bypassing email check at registration
When you allow public registration to your survey Limesurvey developers have opted to put in place a certain level of protection from bots and spammers by placing a captcha and by forcing the users to go and check their emails to find the link associated with their tokens.
Sometimes, however, this is a nuisance that actually force people to wait for the email when they would rather just take the survey and get on with things. Ideally it would be great if a token-based survey present the participant a short-text box (like a security question) asking at random one of the field in the registration form when the token is passed via URL (i will put this as feature request for the next edition!).
In the meantime, there is a very easy workaround. The solution is to edit the register.php and add the following code around line 156 (where the code is rewriting the page with the message that the email has been sent):
<a href='$publicurl/index.php?sid=$surveyid&token;=$newtoken⟨=$baselang'>Whatever you want to say</a>
I placed right on line 156 between the two line breaks. The code is simply creating a link to the survey embedding the token in the URL.
NOTE that this is literally bypassing the safety currently in place, but the advantage is streamlining the steps for taking the survey with registration.
Used email and public registration
Tested with v1.8
When you have a closed survey with public registration, currently LimeSurvey is not allowing a user to re-use the same email. This is a problem if the user has deleted the registration email without taking the survey. In the above workaround a user was allowed to take a survey by presenting a link straight after the registration; ideally they should be prompted with an additional security question and/or captcha (see bugtracker). In the meantime, this owrkaround allows you to from a link from the corresponding email and present it to the user.
Make sure you back up your register.php first!
Here the querystring has been modified to pull out the token as well as the email address and the error message has been changed to display the link to the survey for the existing token. Please also note that this forced change will not be reflected in the different languages!
Around line 75 find the corresponding code:
//Check if this email already exists in token database
$query = "SELECT email,token FROM {$dbprefix}tokens_$surveyid\n"
. "WHERE email = ".db_quoteall(sanitize_email(returnglobal('register_email')));
$result = $connect->Execute($query) or safe_die ($query."<br />".$connect->ErrorMsg()); //Checked
if [[$result->RecordCount(]] > 0)
{
//transform in array of values
$row=$result->FetchRow();
$register_errormsg=$clang->gT("The email you used has already been registered.")."<br><br>".
"<a style='color:red;font-weight: bold;' href='$publicurl/index.php?sid=$surveyid&token;=".$row['token']."⟨=$baselang'>Click this link to take the survey now</a><br><br>";
include "index.php";
exit;
}
HTTP-Refferer is not shown after a Redirect
There are different ways to redirect a page, just as HTTP-Redirect 301, meta http-equiv="Refresh", meta http-equiv="Referrer", link rel=”canonical” or JavaScript window.location. But all of them don't work correct in all Browsers when it comes up to the HTTP-Referer. The only working solution I found is with a bit strange JavaScript. You see the solution at [16]
Export graphic results to pdf
Note: Limesurvey can export statistics with graphs to pdf from version 1.86.
Limesurvey is not yet able to export statistics to pdf. The following workaround is a solution to print your statistics (including graphs) to a pdf file with one page per question. You first will need to install a pdf printer (I use pdfcreator). Then you will need to modify Limesurvey as follows :
- open the common.php file
- after the line number 3615 (LS 1.80 build 6506) or 3641 (LS 1.80+ build 6601) or 3736 (LS 1.82+ build 6825) add the following line :
$strAdminHeader.="\t\t<link rel=\"stylesheet\" type=\"text/css\" href=\"styles/print.css\" media=\"print\" />\n";
- create a new file named print.css in the admin/styles folder and write the following code in it :
@page {

size: 21.0cm 29.7cm;

margin: 1cm;

}

.statisticstable {

page-break-after:always;

}
- visualize your stats with graphs from the admin panel then from your browser go to the file/print menu and select your pdf printer
- it prints your stats to a pdf file with one page per question