Theme editor/de: Difference between revisions
From LimeSurvey Manual
(Created page with "=Fragen stylen mit CSS=") |
(Created page with "Folgende Optionen stehen zur Verfügung:") |
||
| (40 intermediate revisions by 2 users not shown) | |||
| Line 2: | Line 2: | ||
=Einführung= | =Einführung= | ||
LimeSurvey | LimeSurvey verfügt über ein grundlegendes Template- und Style-System, das eine themenähnliche Funktionalität bietet, die in vielen Browser-basierten Anwendungen zu finden ist. Sie werden hier einfach als '''Design-Vorlagen''' bezeichnet. Die Vorlagen ermöglichen die Kontrolle über das Aussehen und die Handhabung von Seiten während einer Umfrage. Ein Umfrageadministrator kann die für jede Umfrage zu verwendende Vorlage auswählen, um das Aussehen und die Bedienung der Umfrage zu personalisieren. Änderungen an einer Vorlage können so einfach sein, wie das Hinzufügen eines einzigartigen Logos auf der Startseite, das Ändern von Hintergrundfarben oder vielleicht neue Textfarben für bestimmte Fragen. | ||
LimeSurvey wird mit einem Satz Vorlagen ausgeliefert. Diese initialen Vorlagen werden durch Verzeichnisse innerhalb des LimeSurvey-Installationsverzeichnisses "templates" definiert. Jedes Vorlage hat sein eigenes Verzeichnis. Im Hauptverzeichnis eines Vorlageverzeichnisses befinden sich zahlreiche Dateien: '''Vorlagen (.pstpl)''', ''' Kaskadierende Stylesheets (.css)''', '''Bilder''' ('''.jpg''' oder '''.png''') und vielleicht andere. | |||
Wie in anderen themenbasierten Systemen werden auch in den. pstpl-Vorlagen-Dateien Fragmente von HTML-Code gespeichert. Diese Fragmente werden eingelesen und zur Erstellung der Seite verwendet, die dem Endbenutzer während des Betriebs einer Umfrage angezeigt werden soll. Oftmals werden '''Schlüsselwörter''' von geschweiften Klammern umgeben in die Dateien aufgenommen, die dann durch den entsprechenden Text ersetzt werden. Im Folgenden finden Sie ein Beispiel für den Inhalt einer Vorlagen-Datei und ihr Ergebnis bei der Verwendung in einer Umfrage-Seite: | |||
Seit LimeSurvey 3 verwendet die Theme-Engine [https://twig.symfony.com Twig], sodass die Theme-Entwickler die Logik des Renderings der Umfrage auf sichere und einfache Weise ändern können. Twig ersetzt das alte System der Platzhalter, das in früheren Versionen verwendet wurde. Die Logik, die zum Generieren des HTML verwendet wurde, ist jetzt Teil der Theme. | |||
Schnipsel aus der Vanilla Theme: | |||
<center>< | <div style=' text-align: center;' ><span style=' color: rot' >Meine neue Umfrage</span></div> | ||
<div style=' text-align: center;' ><span style=' color: red' >Dies ist eine Umfrage, die von mir geschrieben wurde, um herauszufinden, welche Art von Schokolade Leute mögen. </span></div>> | |||
</syntaxhighlight>> | |||
Damit man über die LimeSurvey Oberfläche eine bestehende Vorlage editieren oder in eine neue kopieren kann, benötigt man zunächst das Benutzerrecht Vorlagen zu editieren. LimeSurvey selbst benötigt natürlich Schreibrechte für das Vorlagenverzeichnis auf dem Server. Ist eines dieser Rechte nicht gesetzt, kann die Vorlage nicht über LimeSurvey angepasst werden. In diesem Fall muss man die Dateien beispielsweise per FTP herunterladen und mit geeigneter Software ändern. Eine Änderung an einer Vorlage kann unter Umständen alle gespeicherten Befragungen betreffen, daher sollten die Designanpassungen von Leuten übernommen werden, die das grundsätzliche Konzept und den genutzen Code von LimeSurvey verstehen. Die Gestaltung der Vorlagen stellen schon eine fortgeschrittene Aufgabe dar und kann einige Zeit in Anspruch nehmen, wenn man mit HTML-Code nicht wirklich viel anfangen kann. | Damit man über die LimeSurvey Oberfläche eine bestehende Vorlage editieren oder in eine neue kopieren kann, benötigt man zunächst das Benutzerrecht Vorlagen zu editieren. LimeSurvey selbst benötigt natürlich Schreibrechte für das Vorlagenverzeichnis auf dem Server. Ist eines dieser Rechte nicht gesetzt, kann die Vorlage nicht über LimeSurvey angepasst werden. In diesem Fall muss man die Dateien beispielsweise per FTP herunterladen und mit geeigneter Software ändern. Eine Änderung an einer Vorlage kann unter Umständen alle gespeicherten Befragungen betreffen, daher sollten die Designanpassungen von Leuten übernommen werden, die das grundsätzliche Konzept und den genutzen Code von LimeSurvey verstehen. Die Gestaltung der Vorlagen stellen schon eine fortgeschrittene Aufgabe dar und kann einige Zeit in Anspruch nehmen, wenn man mit HTML-Code nicht wirklich viel anfangen kann. | ||
| Line 22: | Line 24: | ||
Wenn Sie eine neue Vorlage erstellen, ziehen Sie bitte in Erwägung diese der LimeSurvey Community zur Verfügung zu stellen, um das Projekt zu unterstützen. Auf der LimeSurvey-Seite finden sich im Downloadbereich sehr viele Vorlagen und Beschriftungssets. | Wenn Sie eine neue Vorlage erstellen, ziehen Sie bitte in Erwägung diese der LimeSurvey Community zur Verfügung zu stellen, um das Projekt zu unterstützen. Auf der LimeSurvey-Seite finden sich im Downloadbereich sehr viele Vorlagen und Beschriftungssets. | ||
Mit Ihrer Hilfe können wir unsere Downloadbereich aus Vorlagen, Umfragen und anderen Add-Ons weiter wachsen lassn, um LimeSurvey noch besser zu machen (siehe [http://www.limesurvey.org/en/ | Mit Ihrer Hilfe können wir unsere Downloadbereich aus Vorlagen, Umfragen und anderen Add-Ons weiter wachsen lassn, um LimeSurvey noch besser zu machen (siehe [http://www.limesurvey.org/en/add-ons Template Repository]). | ||
=Neue Vorlage erstellen= | =Neue Vorlage erstellen= | ||
Damit Sie eine neue Designvorlage erstellen (oder eine bestehende bearbeiten) können, benötigen Sie die Berechtigung Designvorlagen zu erstellen, als auch Berechtigung die dahinter liegenden Dateien des Betriebssystems zu bearbeiten. | |||
<div class="simplebox">''' | <div class="simplebox">'''Achtung:''' Da Änderungen an der Designvorlage alle Umfragen in einer LimeSurvey-Installation beeinflussen können, sollten diese nur von jemandem durchgeführt werden, der die Konzepte dahinter versteht. Designvorlagen sind ein erweitertes Feature, welches Erfahrung und etwas Experimentieren benötigt, bis man es wirklich richtig macht mit den HTML-Code Methoden.</div> | ||
Der bevorzugte Weg, um eine neue Vorlage zu erstellen, ist durch den Template-Editor (siehe unten) über die Webadmin-Oberfläche. Einige Leute können gerne direkt mit Template-Dateien arbeiten, so dass sie ihren Lieblings-Text-Editor stattdessen verwenden können anstatt der Web-Schnittstelle. In diesem Fall benutzen Sie immer noch den Template-Editor um zuerst Ihre neue Vorlage zu erstellen. Dies wird eine neue Basis-Vorlage mit allen Dateien, die Sie benötigen im Verzeichnis LimeSurvey_web_root/upload/templates/neues_template erstellen. Von dort aus können Sie Ihren Text-Editor zum manuellen Bearbeiten der Template-Dateien benutzen. | |||
<div class="simplebox">'''Permissions Note:''' on unix/linux systems, these | <div class="simplebox">'''Permissions Note:''' on unix/linux systems, these theme files will be owned by the group and user where the web server is running (may be "www" for some systems). So, make sure you have enough access to edit these files, When you save them, make sure they don't change ownership! In this way, you can still use the web Theme Editing interface if needed.</div><br /> | ||
Eine Reihe von 'öffentlichen' Elementen von LimeSurvey kann durch eine Reihe von Vorlagen angepasst werden. Im nächsten Abschnitt finden Sie eine sehr kurze Erläuterung dieser Vorlagen. | |||
{{Note|Themes files may seem complex. Besides HTML, you might also need to understand CSS, Twig, and JavaScript.}} | |||
=Der LimeSurvey-Template-Editor= | =Der LimeSurvey-Template-Editor= | ||
Um das Verständnis und die schnelle Aktualisierung eines Templates zu erleichtern, bietet LimeSurvey einen''' Template Editor'' in der Hauptsymbolleiste der Anwendung an. Dieser Vorlageneditor steht nur Benutzern zur Verfügung, die das Zugriffsrecht in den Benutzersicherheitseinstellungen haben und für Superadministratoren. Eine Vorlage wirkt sich auf alle Umfragen aus, und kann eine Umfrage unbrauchbar machen, wenn sie nicht korrekt aufgebaut ist. | |||
{{Alert|title=Attention|text=A theme that is not correctly constructed can make a survey (that uses the respective template) inoperable. }} | |||
The LimeSurvey theme editor allows you to edit the contents of your themes online. To start the Theme Editor: click on '''Themes''' link in the '''Configuration''' menu, and then click on the "Theme editor" button next of the theme you want to edit or extend. | |||
[[File:Themes menu.png]] | |||
[[File:Theme editor button.png|''The button to access the theme editor for Bootswatch theme'']] | |||
The template editor page allows you to select the template you would like to edit/view. | |||
[[File:Template-editor-2013-7-10_11_38_16.png|center]] | |||
Folgende Optionen stehen zur Verfügung: | |||
*'''Create''': Allows you to create a new template. In order not to start from scratch, the template 'default' is copied. | |||
*''' | *'''Import''': Allows you to import a template from a ZIP file. | ||
*''' | *'''Export''': Allows you to export the current template to a ZIP file. | ||
*'''Export | *'''Copy''': Allows you to make a new template by copying the current one. | ||
*'''Copy | *'''Rename''': Allows you to change the name of the template. It is generally used after copying or importing a template. | ||
*'''Template''': It is a drop-down list that shows all the available templates that are located in your LimeSurvey installation. | |||
*'''Screen''': It is a drop-down list which allows you to choose which particular survey page of that template you want to look at. | |||
*'''Return to admin panel'''. | |||
==Importieren/Exportieren/Kopieren einer Vorlage== | ==Importieren/Exportieren/Kopieren einer Vorlage== | ||
When you '''export '''a template, | When you '''export '''a template, a ZIP-file archive with all the files your template consists of will be created (.pstpl files, images, css files, ...). You can simply '''import''' the exported zip-file into another LimeSurvey installation by using the import feature or you can manually copy the archive into another LimeSurvey installation and extract it into the corresponding [[Theme editor#Template files location|template directory there]]. | ||
However, it is preferred to use the LimeSurvey template import/export/copy functions in the template editor. | |||
==Page Structure / Template Use== | ==Page Structure / Template Use== | ||
*'''The Welcome Page:''' startpage.pstpl, welcome.pstpl, navigator.pstpl, endpage.pstpl | *'''The Welcome Page:''' startpage.pstpl, welcome.pstpl, privacy.pstpl, navigator.pstpl, endpage.pstpl | ||
*'''The Questions Pages:''' startpage.pstpl, survey.pstpl, startgroup.pstpl, groupdescription.pstpl, question.pstpl, endgroup | *'''The Questions Pages:''' startpage.pstpl, survey.pstpl, startgroup.pstpl, groupdescription.pstpl, question.pstpl, endgroup.pstpl, endpage.pstpl | ||
*'''The | *'''The Final Page:''' startpage.pstpl, assessment.pstpl, completed.pstpl, endpage.pstpl | ||
==Template-Dateien== | ==Template-Dateien== | ||
The following template files are used to produce your public survey and must exist in any new template folder you create: | The following template files are used to produce your public survey and must exist in any new template folder you create: | ||
*'''startpage.pstpl:''' Produces the start of each html page. It starts at the "<head>" tag, and should not contain the "<html>" tag. This 'very beginning' of a standard html page is written by the scripts. Please ensure that your startpage.pstpl files contains a <body> tag | *'''startpage.pstpl:''' Produces the start of each html page. It starts at the "<head>" tag, and should not contain the "<html>" tag. This 'very beginning' of a standard html page is written by the scripts. Please ensure that your startpage.pstpl files contains a <body> tag. Even though many browsers do not require strict adherence to the W3 HTML standards, the LimeSurvey script needs to find a <body> tag to run certain javascript elements. It is not expected to see many 'keywords' used in the startpage.pstpl file. However, you may wish to put the {SURVEYNAME} into the title. The startpage.pstpl file can contain code that ends in the corresponding endpage.pstpl file. For example, you can start a table in this file and close the table in the endpage.pstpl file. The startpage.pstpl and endpage.pstpl files wrap around every possible page used by LimeSurvey. | ||
*'''survey.pstpl:''' This template is the second used on most pages | *'''survey.pstpl:''' This template is the second used on most pages and provides a space to put the survey name and description. This template does not have a corresponding 'closing' template, and subsequently you should close all tags opened in this template file (i.e.: don't leave a table open here because there is nowhere else to close it). | ||
*'''welcome.pstpl:''' This template is only used in the welcome screen (which is also on the main page for 'all in one' surveys). You can use this to print out the welcome text, and other information that should be provided in the introduction. Like the 'survey.pstpl' file, there is no corresponding 'closing' template, so all tags opened in this template file should be closed as well. | *'''welcome.pstpl:''' This template is only used in the welcome screen (which is also on the main page for 'all in one' surveys). You can use this to print out the welcome text, and other information that should be provided in the introduction. Like the 'survey.pstpl' file, there is no corresponding 'closing' template, so all tags opened in this template file should be closed as well. | ||
*'''startgroup.pstpl:''' This template can provide a 'summary' wrap around for questions within a group. It has a matching 'endgroup.pstpl' template that can be used to close any opened tags in this file, so you can open a table within this. | *'''startgroup.pstpl:''' This template can provide a 'summary' wrap around for questions within a group. It has a matching 'endgroup.pstpl' template that can be used to close any opened tags in this file, so you can open a table within this. | ||
*'''groupdescription.pstpl:''' This template file is used to display a description of a group. | *'''groupdescription.pstpl:''' This template file is used to display a description of a group. Please note that in the survey settings (access the ''Presentation & navigation settings'' by clicking on the '''Presentation''' tab) you can set if the group description should be shown or not. If not, then this file is not included at all. | ||
*'''question.pstpl:''' This file contains the question, answer and help text sections of your survey | *'''question.pstpl:''' This file contains the question, answer, and help text sections of your survey. In the "group by group" and "all in one" surveys, this template is cycled repeatedly with each question. There is no corresponding closing file for this and all tags should be closed. | ||
*'''question_start.pstpl:''' This file contains the individual elements found at the start of a question. It is included within 'question.pstpl' via the {QUESTION} keyword. It is intended to allow template designers more control over the layout of a question. This template sits outside the normal templating system and '''was superseeded (as of | *'''question_start.pstpl:''' This file contains the individual elements found at the start of a question. It is included within 'question.pstpl' via the {QUESTION} keyword. It is intended to allow template designers more control over the layout of a question. This template sits outside the normal templating system and '''was superseeded (as of LimeSurvey 1.87)'''. All keywords from this template are now available directly in question.pstpl. | ||
*'''completed.pstpl:''' This page is displayed as the final page when the survey responses have been saved and the survey is over. It can be used to display a "forwarding link" as set in the survey setup. | *'''completed.pstpl:''' This page is displayed as the final page when the survey responses have been saved and the survey is over. It can be used to display a "forwarding link" as set in the survey setup. | ||
*'''endgroup.pstpl:''' This file closes the group, and can be used to close off any tags opened in the startgroup.pstpl file | *'''endgroup.pstpl:''' This file closes the group, and can be used to close off any tags opened in the startgroup.pstpl file | ||
*'''navigator.pstpl:''' This file contains the buttons that navigate through the survey, "next", "prev", "last", "submit", "save so far" and the "clear all" link. It is used in all pages except the completed page. | *'''navigator.pstpl:''' This file contains the buttons that navigate through the survey, "next", "prev", "last", "submit", "save so far" and the "clear all" link. It is used in all pages except the completed page. | ||
*'''printanswers.pstpl:''' This file has the HTML wrapper for the print version of the survey. | *'''printanswers.pstpl:''' This file has the HTML wrapper necessary for the print version of the survey. | ||
*'''print_group.pstpl:''' This file is the same as startgroup.pstpl endgroup.pstpl but for the print version of the survey. | *'''print_group.pstpl:''' This file is the same as startgroup.pstpl and endgroup.pstpl, but for the print version of the survey. | ||
*'''print_question.pstpl:''' This file is the same as question.pstpl but for the print version of the survey. | *'''print_question.pstpl:''' This file is the same as question.pstpl, but for the print version of the survey. | ||
*'''print_survey.pstpl:''' This file is the same as survey.pstpl but for the print version of the survey. | *'''print_survey.pstpl:''' This file is the same as survey.pstpl, but for the print version of the survey. | ||
== CSS und JavaScript== | == CSS und JavaScript== | ||
Two files are | Two files that are always used in a template are template.css (for CSS) and template.js (for Javascript). | ||
*'''{TEMPLATECSS}:''' Add lines for default css, template.css and template-rtl.css for rtl language. | *'''{TEMPLATECSS}:''' Add lines for default css, template.css, and template-rtl.css for rtl language. | ||
*'''{TEMPLATEJS}:''' Add lines for default javascript files, template.js and all js files needed for LimeSurvey. | *'''{TEMPLATEJS}:''' Add lines for default javascript files, template.js, and all js files needed for LimeSurvey. | ||
=== Using Bootstrap=== | |||
LimeSurvey has Bootstrap 3 embedded, so you can style all your templates with the well documented Bootstrap classes. | |||
For more information please refer to the [https://getbootstrap.com Bootstrap documentation]. | |||
The [https://github.com/flatlogic/awesome-bootstrap-checkbox Awesome-Bootstrap-Checkbox] plugin is also included. With it, you can use the typical Bootstrap color-classes (info,warning,danger,etc.) also with the suffix "-checkbox" or "-radio", though styling checkboxes and radios as you prefer. | |||
Some | === Replacing default CSS or Javascript=== | ||
Some questions use specific files for Javascript or CSS. If you need to replace a function, use a cascading system. For javascript function, the last function read is the function used. | |||
==Other Template Files== | ==Other Template Files== | ||
The '''privacy.pstpl''', '''invitationemail.pstpl''', '''reminderemail.pstpl''' and '''confirmationemail.pstpl''' are no longer used by LimeSurvey and defaults are instead set in the applicable language files. The email messages can now be edited on a survey by survey basis. | The '''privacy.pstpl''', '''invitationemail.pstpl''', '''reminderemail.pstpl''', and '''confirmationemail.pstpl''' are no longer used by LimeSurvey and defaults are instead set in the applicable language files. The email messages can now be edited on a survey by survey basis. | ||
==Standard Pages== | ==Standard Pages== | ||
There are ten standard pages that a survey participant may see in the course of taking or accessing the LimeSurvey application. | There are ten standard pages that a survey participant may see in the course of taking or accessing the LimeSurvey application. Each is constructed from a number of common '''Template''' files from the '''Template''' specified in the settings of the survey. The table below indicates which template files are used in constructing each of these pages. | ||
{| | {| class="wikitable" | ||
! '''Survey Pages/'''<br />'''Template Files'''!!Survey<br />List!!Welcome!!Question!!Completed!!Clear All!!Register!!Load!!Save!!Print<br />Answers!!Print<br />Survey | |||
|- | |- | ||
|SurveyList|| [[File:check.gif]]|| || || || || || || || || | |SurveyList||align="center" | [[File:check.gif]]|| || || || || || || || || | ||
|- | |- | ||
|Welcome|| || [[File:check.gif]]|| || || || || || || || | |Welcome|| ||align="center" | [[File:check.gif]]|| || || || || || || || | ||
|- | |- | ||
|Privacy|| || [[File:check.gif]]|| || || || || || || || | |Privacy|| ||align="center" | [[File:check.gif]]|| || || || || || || || | ||
|- | |- | ||
|Navigator|| || [[File:check.gif]]|| [[File:check.gif]]|| || || || || || || | |Navigator|| ||align="center" | [[File:check.gif]]||align="center" | [[File:check.gif]]|| || || || || || || | ||
|- | |- | ||
|Survey|| || || [[File:check.gif]]|| || || [[File:check.gif]]|| || || || | |Survey|| || ||align="center" | [[File:check.gif]]|| || ||align="center" | [[File:check.gif]]|| || || || | ||
|- | |- | ||
|StartGroup|| || || [[File:check.gif]]|| || || || || || || | |StartGroup|| || ||align="center" | [[File:check.gif]]|| || || || || || || | ||
|- | |- | ||
|GroupDescription|| || || [[File:check.gif]]|| || || || || || || | |GroupDescription|| || ||align="center" | [[File:check.gif]]|| || || || || || || | ||
|- | |- | ||
|Question<span style='color:red'>'''*'''</span>|| || || [[File:check.gif]]|| || || || || || || | |Question<span style='color:red'>'''*'''</span>|| || ||align="center" | [[File:check.gif]]|| || || || || || || | ||
|- | |- | ||
|EndGroup|| || || [[File:check.gif]]|| || || || || || || | |EndGroup|| || ||align="center" | [[File:check.gif]]|| || || || || || || | ||
|- | |- | ||
|Assessment|| || || || [[File:check.gif]]|| || || || || || | |Assessment|| || || ||align="center" | [[File:check.gif]]|| || || || || || | ||
|- | |- | ||
|Completed|| || || || [[File:check.gif]]|| || || || || || | |Completed|| || || ||align="center" | [[File:check.gif]]|| || || || || || | ||
|- | |- | ||
|ClearAll|| || || || || [[File:check.gif]]|| || || || || | |ClearAll|| || || || ||align="center" | [[File:check.gif]]|| || || || || | ||
|- | |- | ||
|Register|| || || || || || [[File:check.gif]]|| || || || | |Register|| || || || || ||align="center" | [[File:check.gif]]|| || || || | ||
|- | |- | ||
|Load|| || || || || || || [[File:check.gif]]|| || || | |Load|| || || || || || ||align="center" | [[File:check.gif]]|| || || | ||
|- | |- | ||
|Save|| || || || || || || || [[File:check.gif]]|| || | |Save|| || || || || || || ||align="center" | [[File:check.gif]]|| || | ||
|- | |- | ||
|PrintAnswers|| || || || || || || || || [[File:check.gif]]|| | |PrintAnswers|| || || || || || || || ||align="center" | [[File:check.gif]]|| | ||
|- | |- | ||
|Print Survey || || || || || || || || || || [[File:check.gif]] | |Print Survey || || || || || || || || || ||align="center" | [[File:check.gif]] | ||
|- | |- | ||
|Print Group || || || || || || || || || || [[File:check.gif]] | |Print Group || || || || || || || || || ||align="center" | [[File:check.gif]] | ||
|- | |- | ||
|Print Question || || || || || || || || || || [[File:check.gif]] | |Print Question || || || || || || || || || ||align="center" | [[File:check.gif]] | ||
|- | |- | ||
|StartPage<br/>EndPage<br/>Template.css|| [[File:check.gif]]|| [[File:check.gif]]|| [[File:check.gif]]|| [[File:check.gif]]|| [[File:check.gif]]|| [[File:check.gif]]|| [[File:check.gif]]|| [[File:check.gif]]|| [[File:check.gif]]|| | |StartPage<br />EndPage<br />Template.css||align="center" | [[File:check.gif]]||align="center" | [[File:check.gif]]||align="center" | [[File:check.gif]]||align="center" | [[File:check.gif]]||align="center" | [[File:check.gif]]||align="center" | [[File:check.gif]]||align="center" | [[File:check.gif]]||align="center" | [[File:check.gif]]||align="center" | [[File:check.gif]]|| | ||
|} | |} | ||
<span style='color:red'>'''*'''</span>NOTE: In | <span style='color:red'>'''*'''</span>NOTE: In version 1.90+, this replaces question.pstpl AND question_start.pstpl. If you are using an old custom template, you need to add the following line to the beginning of question.pstpl:<syntaxhighlight lang="php" enclose="div"><div {QUESTION_ESSENTIALS} class="{QUESTION_CLASS}{QUESTION_MAN_CLASS}{QUESTION_INPUT_ERROR_CLASS}"></syntaxhighlight>And then add the corresponding closing tag to the end of question.pstpl:<syntaxhighlight lang="php" enclose="div"></div></syntaxhighlight> | ||
<span style='color:red'>'''*'''</span>NOTE: In version 1.91 and earlier, LimeSurvey js files are not included | <span style='color:red'>'''*'''</span>NOTE: In version 1.91 and earlier, LimeSurvey js files are not included in the template. In version 2, '''you have to use {TEMPLATEJS} in one of your template file''' to add the link to the js file. You can add it in startpage.pstpl or in endpage.pstpl. You can remove the {TEMPLATEURL}/template.js line and you have to replace with {TEMPLATEJS} to update a personal template. | ||
==The File Control Section== | ==The File Control Section== | ||
In the "file control" window on the left, you can click on one of the template files that is used to compile the page. The HTML code for that file will then appear in the "Now editing" window in the center. If the template is editable (determined by directory permissions) you can then make any changes and save them. | In the "file control" window on the left, you can click on one of the template files that is used to compile the page. You can see the ''Screen part'', JavaScript, and CSS files. The HTML code for that file will then appear in the "Now editing" window in the center. If the template is editable (determined by directory permissions) you can then make any changes and save them. | ||
<center>[[File:File Control Section.png|center]]</center> | |||
The "Other files" window shows a list of all other files from the template directory. You can use the right side to '''upload and select image files (your pics, logos,...) or other files needed to create your template'''. | |||
Instead of using a link for each picture, utilize the field string {TEMPLATEURL}. So, instead of: | |||
<syntaxhighlight lang="html4strict" enclose="div">img src='/limesurvey/templates/yourtemplate/files/mypicture.jpg'</syntaxhighlight> | |||
You can use {{NewIn|2.50}}: | |||
<syntaxhighlight lang="html4strict" enclose="div">img src='{TEMPLATEURL}files/mypicture.jpg'</syntaxhighlight> | |||
< | In LimeSurvey versions before 2.50 use: | ||
<syntaxhighlight lang="html4strict" enclose="div">img src='{TEMPLATEURL}mypicture.jpg'</syntaxhighlight> | |||
A "sample" of the template page you are editing will be visible in the bottom of the screen. There is no way to delete a template from the template editor. This must be done by accessing the underlying directory and deleting manually the files from there. You also have the possibility to select different screen resolutions in order to better evaluate the feel and look of the template. | |||
<div class="simplebox">'''Note:''' The shipped templates cannot be edited using the template editor. If you want to modify them, create a copy first and edit the copy.</div> | |||
==Template files location== | |||
LimeSurvey stores each of the 'standard' templates in their own distinct sub-directory within the ''/templates'' directory that is kept in the public directory with the other LimeSurvey public files. Customized user templates are stored in the ''/upload/templates'' directory. | |||
You can use any image files that you upload into the template management area with syntax | There should '''ALWAYS''' be a "default" directory in the templates directory. This template is used by default and as a fall-back if a template folder doesn't exist, or can't be found. It comes installed by default. | ||
You can use any image files that you upload into the template management area with the help of this syntax: | |||
<syntaxhighlight lang="php" enclose="div">{TEMPLATEURL}filename.xyz</syntaxhighlight> | <syntaxhighlight lang="php" enclose="div">{TEMPLATEURL}filename.xyz</syntaxhighlight> | ||
| Line 177: | Line 201: | ||
=Fragen stylen mit CSS= | =Fragen stylen mit CSS= | ||
Styling of questions in CSS has become much easier. Each question type now | Styling of questions in CSS has become much easier. Each question type has now a unique class. The mandatory questions have an additional mandatory class. For example, for a non-mandatory question: | ||
<syntaxhighlight lang=" | <syntaxhighlight lang="html4strict" enclose="div"><div id="question5" class="gender"> | ||
... | ... | ||
</div></syntaxhighlight> | </div></syntaxhighlight> | ||
and if the question is mandatory | and if the question is mandatory: | ||
<syntaxhighlight lang=" | <syntaxhighlight lang="html4strict" enclose="div"><div id="question5" class="gender mandatory"> | ||
... | ... | ||
</div></syntaxhighlight> | </div></syntaxhighlight> | ||
and if the question is mandatory but the user didn't answer it or if there is validation on a question | and if the question is mandatory, but the user didn't answer it or if there is validation on a question: | ||
<syntaxhighlight lang=" | <syntaxhighlight lang="html4strict" enclose="div"><div id="question5" class="gender mandatory input-error"> | ||
... | ... | ||
</div></syntaxhighlight> | </div></syntaxhighlight> | ||
and if the question has validation applied but the user hasn't answered correctly | and if the question has validation applied, but the user hasn't answered correctly: | ||
<syntaxhighlight lang=" | <syntaxhighlight lang="html4strict" enclose="div"><div id="question6" class="text-short input-error"> | ||
... | ... | ||
</div></syntaxhighlight> | </div></syntaxhighlight> | ||
==The | ==Global classes for question part== | ||
These classes are used for each question type. Some question types use only one or two classes, while others may use much more. | |||
{| class="wikitable alternance" | |||
|+ Global classes | |||
|- | |||
! scope="col" | Class name | |||
! scope="col" | Part | |||
! scope="col" | Question type | |||
! scope="col" | Examples | |||
! scope="col" | Note | |||
|- | |||
! scope="row" | .question {{ObsoleteIn|3.0}} | |||
| All question block | |||
| All question type | |||
|<p class="question">, <ul class="question">, <table class="question"> | |||
| | |||
|- | |||
! scope="row" | .ls-answers {{NewIn|3.0}} | |||
| All question block | |||
| All question type | |||
|<div class="ls-answers ">, <ul class="ls-answers ">, <table class="ls-answers"> | |||
| | |||
|- | |||
! scope="row" | .subquestions-list | |||
| List of subquestion | |||
| Multi choice question, array question type | |||
| <ul class="subquestions-list">, <table class="subquestions-list"> | |||
| .questions-list is used too | |||
|- | |||
! scope="row" | .answers-list | |||
| List of answers | |||
| Single choice question, array question type, Multi input text question | |||
| <ul class="answers-list">, <table class="answers-list"> | |||
| | |||
|- | |||
! scope="row" | .answer-item | |||
| The answer part: one answer | |||
| Single choice question, array question type, Multi input text question | |||
| <li class="answer-item">, <td class="answer-item"> | |||
| | |||
|- | |||
! scope="row" | .noanswer-item | |||
| The answer part for no answer | |||
| Single choice question, array question type | |||
| <li class="noanswer-item">, <td class="noanswer-item"> | |||
| No answer is an answer too, then have double class noanswer-item and answer-item | |||
|- | |||
! scope="row" | .question-item | |||
| The question part: one question | |||
| Multi text question, array question type | |||
| <li class="question-item">, <tr class="question-item"> | |||
| Some answers are questions too. Then we have a lot of class="question-item answer-item" | |||
|- | |||
! scope="row" | .button-list | |||
| A list of button | |||
| Yes no and Gender question | |||
| <ul class="button-list"> | |||
| | |||
|- | |||
! scope="row" | .button-item | |||
| The answer part with a button | |||
| Yes no and Gender question | |||
| <li class="button-item"> | |||
| | |||
|- | |||
! scope="row" | .checkbox-list | |||
| A list of checkbox | |||
| Multi choice question, array number (checkbox) question type | |||
| <ul class="checkbox-list">, <tr class="checkbox-list"> | |||
| Some question types use multi-list class, like checkbox with comment: class="checkbox-list text-list" | |||
|- | |||
! scope="row" | .checkbox-array {{NewIn|3.0}} | |||
| A array of checkbox | |||
| Array (numbers) with checkbox option | |||
| <table class="checkbox-list"> | |||
| | |||
|- | |||
! scope="row" | .checkbox-item | |||
| The answer part with a checkbox | |||
| Multi choice question, array number (checkbox) question type | |||
| <li class="checkbox-item">, <td class="checkbox-item"> | |||
| | |||
|- | |||
! scope="row" | .radio-list | |||
| A list of radio item | |||
| Single choice question, array question type (each row) | |||
| <ul class="radio-list">, <tr class="radio-list"> | |||
| | |||
|- | |||
! scope="row" | .radio-array {{NewIn|3.0}} | |||
| A array of radio item | |||
| Array question type | |||
| <table class="radio-array"> | |||
| | |||
|- | |||
! scope="row" | .radio-item | |||
| The answer part with a radio | |||
| Single choice question, array question type | |||
| <li class="radio-item">, <td class="radio-item"> | |||
| | |||
|- | |||
! scope="row" | .text-list | |||
| A list of text input | |||
| Multi text question type, array of text | |||
| <ul class="text-list">, <tr class="text-list"> | |||
| | |||
|- | |||
! scope="row" | .text-item | |||
| The answer part of a text input | |||
| Multi text question type, array of text | |||
| <li class="text-item">, <td class="text-item"> | |||
| | |||
|- | |||
! scope="row" | .numeric-list | |||
| A list of text input with numeric only answer | |||
| Multi numeric question type, array of number | |||
| <ul class="text-list numeric-list">, <tr class="text-list numeric-list"> | |||
| | |||
|- | |||
! scope="row" | .number-list | |||
| A list of text input with numeric only answer (each row) | |||
| Multi numeric question type, array of number | |||
| <ul class="text-list numeric-list">, <tr class="text-list numeric-list"> | |||
| | |||
|- | |||
! scope="row" | .number-array {{NewIn|3.0}} | |||
| The answer part of a numeric input | |||
| Array of number | |||
| <table class="number-array"> | |||
| | |||
|- | |||
! scope="row" | .select-list {{ObsoleteIn|2.50}} | |||
| A list of select | |||
| Array numbers, Dual scale array (select) | |||
| <table class="select-list"> | |||
| | |||
|- | |||
! scope="row" | .dropdown-list {{NewIn|2.50}} | |||
| A list of select | |||
| Array numbers, Dual scale array (select) (each row) | |||
| <table class="dropdown-list"> | |||
| | |||
|- | |||
! scope="row" | .dropdown-array {{NewIn|3.0}} | |||
| A array of dropdown | |||
| Array numbers, Dual scale array (select) | |||
| <table class="dropdown-array"> | |||
| | |||
|- | |||
! scope="row" | .select-item {{ObsoleteIn|2.50}} | |||
| The answer part of a select | |||
| Array numbers, Dual scale array (select), single choice with select | |||
| <p class="select-item">, <td class="select-item"> | |||
| | |||
|- | |||
! scope="row" | .dropdown-item {{NewIn|2.50}} | |||
| The answer part of a select | |||
| Array numbers, Dual scale array (select), single choice with select | |||
| <p class="dropdown-item">, <td class="dropdown-item"> | |||
| | |||
|- | |||
! scope="row" | .hide {{ObsoleteIn|3.0}} | |||
| Used for accessibility: hidden with css but read by screenreader, since 2.50 : you can use sr-only from bootstrap | |||
| Short text question | |||
| <label class="hide"> | |||
| Can be used for other purposes | |||
|- | |||
! scope="row" | .ls-js-hidden {{NewIn|3.0}} | |||
| Used for part to be hidden if javascript is activated | |||
| Button for example | |||
| <div class="ls-js-hidden"> | |||
| LimeSurvey core used it, but you can use it too in your template | |||
|- | |||
! scope="row" | .ls-js-hidden-sr {{NewIn|3.0}} | |||
| Used for accessibility: hide it if js is activated, but always show if user use a screenreader | |||
| Button for example | |||
| <a class="ls-js-hidden-sr"> | |||
| Button | |||
|- | |||
! scope="row" | .ls-no-js-hidden {{NewIn|3.0}} | |||
| Used for part to be hidden if javascript is not activated | |||
| Link | |||
| <a class="ls-no-js-hidden"> | |||
| LimeSurvey core used it for inactive link if javascript is not activated | |||
|- | |||
! scope="row" | .ls-label-xs-visibility {{NewIn|3.0}} | |||
| Label to be hidden in big screen, but show with little screen (with no more table) and to screenreader | |||
| label | |||
| <label class="ls-no-js-hidden"> | |||
| Used for label inside table cell of array question type | |||
|- | |||
! scope="row" | .ls-input-group-extra {{NewIn|3.0}} | |||
| Same usage of boostrap input-group-addon, but without the border and the background. | |||
| right suffix | |||
| <div class="ls-input-group-extra"> | |||
| Used for right and left suffix (global) | |||
|- | |||
! scope="row" | .checkbox {{ObsoleteIn|3.0}} | |||
| input[type=checkbox] | |||
| Question with checkbox | |||
| <input type="checkbox" class="checkbox"> | |||
| With modern browser: not needed, but some old browser need this | |||
|- | |||
! scope="row" | .radio {{ObsoleteIn|3.0}} | |||
| input[type=radio] | |||
| Question with radio | |||
| <input type="radio" class="radio"> | |||
| With modern browser: not needed, but some old browser need this | |||
|- | |||
! scope="row" | .text | |||
| input[type=text] | |||
| Question with input text, or textarea | |||
| <textarea class="text"> | |||
| | |||
|- | |||
! scope="row" | .answertext | |||
| Array question type | |||
| Answer part of array question type | |||
| <th class="answertext"> | |||
| | |||
|- | |||
! scope="row" | .col-answers | |||
| Array question type | |||
| Column of answers | |||
| <col class="col-answers"> | |||
| | |||
|- | |||
! scope="row" | .odd .even {{ObsoleteIn|2.50}} | |||
| Array question type | |||
| Alternation for column | |||
| <col class="odd"> | |||
| | |||
|- | |||
! scope="row" | .array1 .array2 {{ObsoleteIn|3.0}} | |||
| Array question type | |||
| Alternation for line | |||
| <tr class="array1"> | |||
| | |||
|- | |||
! scope="row" | .ls-odd .ls-even {{NewIn|3.0}} | |||
| Array question type | |||
| Alternation for subquestion and Y axis | |||
| <tr class="ls-odd"> | |||
| | |||
|} | |||
=== Some example of question part with classes=== | |||
'''Text-short question type:'''<source lang="html4strict"> | |||
<p class="question answer-item text-item "> | |||
<label class="hide label" for="answerSGQA">Answer</label><input type="text" value="" id="answerSGQA" name="SGQA" size="50" class="text empty"> | |||
</p> | |||
</source> | |||
'''Multiple short text'''<source lang="html4strict"> | |||
<ul class="subquestions-list questions-list text-list"> | |||
<li class="question-item answer-item text-item" id="javatbdSGQA"> | |||
<label for="answerSGQA">Some example subquestion</label> | |||
<span><input type="text" value="" id="answerSGQA" name="SGQA" size="20" class="text empty"></span> | |||
</li> | |||
</ul> | |||
</source> | |||
'''Array question type'''<source lang="html4strict"> | |||
<table class="question subquestion-list questions-list "> | |||
<caption class="hide read">Some explanation for accessibility.</caption> | |||
<colgroup class="col-responses"> | |||
<col width="50%" class="col-answers"> | |||
<col width="25%" class="odd"> | |||
<col width="13.3%" class="col-no-answer even"> | |||
</colgroup> | |||
<thead> | |||
<tr class="array1 dontread"> | |||
<td> </td> | |||
<th>1</th> | |||
<th>No answer</th> | |||
</tr> | |||
</thead> | |||
<tbody> | |||
<tr class="array2 answers-list radio-list" id="javatbdSGQ"> | |||
<th width="20%" class="answertext">Some example subquestion | |||
</th> | |||
<td class="answer_cell_001 answer-item radio-item"> | |||
<label for="answerSGQA" class="hide read">1</label> | |||
<input type="radio" value="1" id="answerSGQA" name="SGQA" class="radio"> | |||
</td> | |||
<td class="answer-item radio-item noanswer-item"> | |||
<label for="answerSGQA" class="hide read">No answer</label> | |||
<input type="radio" value="" id="answerSGQA" name="SGQA" class="radio"> | |||
</td> | |||
</tr> | |||
</tbody> | |||
</table> | |||
</source> | |||
==Vollständige Liste der CSS-Klassen für Fragen== | |||
{| | {| | ||
| Line 237: | Line 555: | ||
|- | |- | ||
|List (dropdown)||.list-dropdown||! | |List (dropdown)||.list-dropdown||! | ||
|- | |- | ||
|List (radio)||.list-radio||L | |List (radio)||.list-radio||L | ||
| Line 273: | Line 587: | ||
These apply to the help and/or validation tip messages so that each type can be individually styled. | These apply to the help and/or validation tip messages so that each type can be individually styled. | ||
The .hide-tip option and .input-error options | The .hide-tip option and .input-error options interact by default so that you can have validation tips hidden. However, they do appear when there are validation errors and disappear again when those errors are rectified. | ||
All of these are designed to eliminate the need for pop-up alert messages. | All of these are designed to eliminate the need for pop-up alert messages. Instead, tips can appear/disappear as needed and are color-coded to indicate whether the answers pass the validation criteria. | ||
Furthermore, when you first visit a page that has unmet validation criteria, you can color-code the tips in a pleasing color to show which validation criteria have not been | Furthermore, when you first visit a page that has unmet validation criteria, you can color-code the tips in a pleasing color to show which validation criteria have not been met yet; then re-display the page using a harsher color if the person submits the page with lingering validation errors. | ||
{| | {| | ||
| Line 287: | Line 601: | ||
|- | |- | ||
|Hide Tip||.hide-tip||added if you use the hide_tip option | |Hide Tip||.hide-tip||added if you use the hide_tip option | ||
|- | |||
|defrault type||.em_default||for default tip set ( numeric value etc …) | |||
|- | |- | ||
|Num answers||.em_num_answers||for for min_answers and max_answers | |Num answers||.em_num_answers||for for min_answers and max_answers | ||
| Line 309: | Line 625: | ||
The custom question styles are near the bottom of each template's CSS file and start with:<syntaxhighlight lang="php" enclose="div">/* --------------------------- START: Question styles ------------------------------ */</syntaxhighlight> | The custom question styles are near the bottom of each template's CSS file and start with:<syntaxhighlight lang="php" enclose="div">/* --------------------------- START: Question styles ------------------------------ */</syntaxhighlight> | ||
If you're styling your own custom template, | If you're styling your own custom template, you should be able to copy everything after the above one from ''templates/default/template.css'' (for table-based layouts) or ''/templates/limespired/template.css'' (for CSS-based layouts) into your own style sheet without any impact on your other styles. | ||
==Internet Explorer conditional style sheets== | ==Internet Explorer conditional style sheets== | ||
Because of the marked discrepancies in rendering between IE6 | Because of the marked discrepancies in rendering between IE6 & IE7 and the other browsers, there are special IE conditional style sheets included for each template. | ||
< | <source lang="html4strict" enclose="div"> | ||
<!--[if IE]> | <!--[if IE]> | ||
<link rel="stylesheet" type="text/css" href="{TEMPLATEURL}IE_fix_all-versions.css" /> | <link rel="stylesheet" type="text/css" href="{TEMPLATEURL}IE_fix_all-versions.css" /> | ||
| Line 325: | Line 641: | ||
<link rel="stylesheet" type="text/css" href="{TEMPLATEURL}ie_fix_8.css" /> | <link rel="stylesheet" type="text/css" href="{TEMPLATEURL}ie_fix_8.css" /> | ||
<![endif]--> | <![endif]--> | ||
</ | </source> | ||
You should include the above code within your '''startpage.pstpl''' and copies of both the IE style sheets from either /templates/default/ or /templates/limespired for Tables base layout and CSS based layout respectively. | You should include the above code within your '''startpage.pstpl''' and copies of both the IE style sheets from either ''/templates/default/'' or ''/templates/limespired'' for Tables base layout and CSS based layout respectively. | ||
<div class="simplebox">'''Note:''' If you copy the styles into your own style sheet you will almost certainly need to tweak them.</div> | <div class="simplebox">'''Note:''' If you copy the styles into your own style sheet you will almost certainly need to tweak them.</div> | ||
| Line 333: | Line 649: | ||
===Alternative solution for Internet explorer=== | ===Alternative solution for Internet explorer=== | ||
You can put conditional class for body in startpage.pstpl | You can put a conditional class for body in startpage.pstpl and use this class in your template.css. This method is used in the citronade template{{ObsoleteIn|2.06}}. Adding a js / no-js class to have javascript / no javascript system. | ||
< | <source lang="html4strict"><!--[if lt IE 7 ]> <body class="lang-{SURVEYLANGUAGE} {SURVEYFORMAT} ie ie6 ielt7 ielt8 ielt9 no-js"> <![endif]--> | ||
<!--[if IE 7 ]> <body class="lang-{SURVEYLANGUAGE} {SURVEYFORMAT} ie ie7 ielt8 ielt9 no-js"> <![endif]--> | |||
<!--[if IE 8 ]> <body class="lang-{SURVEYLANGUAGE} {SURVEYFORMAT} ie ie8 ielt9 no-js"> <![endif]--> | |||
<!--[if IE 9 ]> <body class="lang-{SURVEYLANGUAGE} {SURVEYFORMAT} ie ie9 no-js"> <![endif]--> | |||
<!--[if gt IE 9]><!--><body id="body" class="lang-{SURVEYLANGUAGE} {SURVEYFORMAT} no-js"><!--<![endif]--> | |||
<script type='text/javascript'>/*<![CDATA[*/(function(H){ H.className=H.className.replace(/\bno-js\b/,'js') })(document.getElementsByTagName('body')[0]);/*]]>*/</script></source> | |||
And in template.css use | And in template.css use: | ||
< | <source lang="css">.ie6{/*specific for internet explorer 6*/} | ||
.ie{/*specific for all internet explorer */}</ | .ielt8{/*specific for internet explorer 6 and 7*/} | ||
.ie{/*specific for all internet explorer */}</source> | |||
== Right-to-Left (RTL) Languages and justify== | == Right-to-Left (RTL) Languages and justify== | ||
The text editor within LimeSurvey is able to format RTL | The text editor within LimeSurvey is able to format RTL text. However, the editor itself shows the RTL language in a left to right format when justified. This is just an editor display issue. The RTL and justified question or text will display correctly from right to left, even when justified, in your survey or on preview. | ||
==Schlüsselwörter== | ==Schlüsselwörter== | ||
{{Deprecated|3.0}} | |||
Schlüsselwörter in einer Vorlagendatei werden durch entsprechenden Umfrage-Information ersetzt. Sie sind von geschweiften Klammern umschlossen, z.B {SURVEYNAME} | Schlüsselwörter in einer Vorlagendatei werden durch entsprechenden Umfrage-Information ersetzt. Sie sind von geschweiften Klammern umschlossen, z.B {SURVEYNAME} | ||
| Line 354: | Line 676: | ||
Die folgenden Ausdrücke/Platzhalter werden von LimeSurvey beim Aufbau der Umfrageseite automatisch umgewandelt und der entsprechenden Information ersetzt. Diese Ausdrücke funktionieren auf fast jeder Vorlagenseite, ausgenommen der Abschluss-Seite. | Die folgenden Ausdrücke/Platzhalter werden von LimeSurvey beim Aufbau der Umfrageseite automatisch umgewandelt und der entsprechenden Information ersetzt. Diese Ausdrücke funktionieren auf fast jeder Vorlagenseite, ausgenommen der Abschluss-Seite. | ||
{| | {|class=wikitable | ||
|''' | |'''<center>Ausdruck</center>'''||'''<center>wird ersetzt mit</center>''' | ||
|- | |- | ||
|{ | |{SURVEYNAME}||Der Name der Umfrage | ||
|- | |- | ||
|{ | |{SURVEYDESCRIPTION}||Der Beschreibung der Umfrage | ||
|- | |- | ||
|{ | |{WELCOME}||Dem Willkommenstext der Umfrage | ||
|- | |- | ||
|{ | |{PERCENTCOMPLETE}||Ein grafischer Balken, der den Prozentsatz anzeigt, wie viel der Umfrage schon beantwortet wurde | ||
|- | |- | ||
|{ | |{GROUPNAME}||Dem Namen der aktuellen Gruppe | ||
|- | |- | ||
|{ | |{GROUPDESCRIPTION}||Die Beschreibung der aktuellen Gruppe | ||
|- | |- | ||
|{ | |{QUESTION}||Den Text der aktuellen Frage | ||
|- | |- | ||
|{ | |{QUESTION_CODE}||Den Fragencode der aktuellen Frage | ||
|- | |- | ||
|{ | |{ANSWER}||Die Anwort(en) zur aktuellen Frage | ||
|- | |- | ||
|{ | |{THEREAREXQUESTIONS}||Wird ersetzt mit der Textzeile: "Ihre Umfrage besteht aus X Fragen." | ||
|- | |- | ||
|{ | |{NUMBEROFQUESTIONS}||Die Anzahl der Fragen in ihrer Umfrage | ||
|- | |- | ||
|{ | |{TOKEN}||Der entsprechende Probandenschlüssel | ||
|- | |- | ||
|{ | |{SID}||DieID der aktuellen Umfrage | ||
|- | |- | ||
|{ | |{QUESTIONHELP}||Dem Hilfetext zur aktuellen Frage (in einem Java-Skript-Popup) | ||
|- | |- | ||
|{ | |{QUESTIONHELPPLAINTEXT}||Der Ausfüllhilfe zur aktuellen Frage | ||
|- | |- | ||
|{ | |{NAVIGATOR}||Die "Vor >>" und "<< Zurück" Buttons | ||
|- | |- | ||
|{SUBMITBUTTON}|| | |{SUBMITBUTTON}||Dem "Absenden" Button | ||
|- | |- | ||
|{COMPLETED}||completed | |{COMPLETED}||Dem Text "Survey is completed and saved" aus der Übersetzung | ||
|- | |- | ||
|{URL}|| | |{URL}||Der URL/URL Titel für die Umfrage | ||
|- | |- | ||
|{PRIVACY}|| | |{PRIVACY}||Fügt den Inhalt der Datei privacy.pstpl aus der Vorlage ein | ||
|- | |- | ||
|{PRIVACYMESSAGE}|| | |{PRIVACYMESSAGE}||Die "Privacy Message" aus der Übersetzung | ||
|- | |- | ||
|{ | |{CLEARALL}||DerURL für "Beenden und Antworten verwerfen" | ||
|- | |- | ||
|{ | |{TEMPLATEURL}||Der URL zum aktuellen Vorlagen-Verzeichnis (nützlich um Logos und Bilder in eine Vorlage einzubauen) | ||
|- | |- | ||
|{ | |{SUBMITCOMPLETE}||Dem entsprechenden Text aus der Übersetzung, welche dem Benutzer mitteilt, dass er die Umfrage vollständig ausgefüllt hat und nun absenden kann, in dem er auf den "Absenden"-Button klickt. | ||
|- | |- | ||
|{ | |{SUBMITREVIEW}||Dem entsprechenden Text aus der Übersetzung, welche dem Benutzer mitteilt, dass er die Ergebnisse der Umfrage verändern kann, wenn er auf den "Vor" oder "Zurück"-Button klickt. | ||
|- | |- | ||
|{TOKEN: | |{TOKEN:FIRSTNAME}||Wenn die Antworten der Umfrage nicht anonym sind, mit dem Vornamen des entsprechenden Probanden (aus der Probandentabelle) | ||
|- | |- | ||
|{TOKEN: | |{TOKEN:LASTNAME}||Wenn die Antworten der Umfrage nicht anonym sind, mit dem Nachnamen des entsprechenden Probanden (aus der Probandentabelle) | ||
|- | |- | ||
|{TOKEN: | |{TOKEN:EMAIL}||Wenn die Antworten der Umfrage nicht anonym sind, mit der E-Mail-Adresse des entsprechenden Probanden (aus der Probandentabelle) | ||
|- | |- | ||
|{TOKEN: | |{TOKEN:ATTRIBUTE_1}||Wenn die Antworten der Umfrage nicht anonym sind, mit dem Attribut 1 des entsprechenden Probanden (aus der Probandentabelle) | ||
|- | |- | ||
|{ | |{TOKEN:ATTRIBUTE_2}||Wenn die Antworten der Umfrage nicht anonym sind, mit dem Attribut 2 des entsprechenden Probanden (aus der Probandentabelle) | ||
|- | |- | ||
|{ | |{ANSWERSCLEARED}||Dem Text "Antworten zurückgesetzt" aus der Übersetzung | ||
|- | |- | ||
|{ | |{RESTART}||URL um mit der Umfrage erneut beginnen zu können | ||
|- | |- | ||
|{ | |{CLOSEWINDOW}||URL zum Schließen des Fensters | ||
|- | |- | ||
|{ | |{REGISTERERROR}||Zeigt eine Fehlermeldung auf der Registrierungsseite (z.B.:: "Sie müssen eine gültige E-Mail-Adresse angeben") | ||
|- | |- | ||
|{ | |{REGISTERMESSAGE1}||Dem Text "Sie müssen registriert sein, um an dieser Umfrage teilzunehmen." aus der Übersetzung | ||
|- | |- | ||
|{ | |{REGISTERMESSAGE2}||Informationen zur Registrierung aus der Übersetzung | ||
|- | |- | ||
|{ | |{REGISTERFORM}||Das aktuelle Formular zur Registrierung, hängt davon ab, ob das Feld attribute_1 oder attribute_2 verwendet wird. | ||
|- | |- | ||
|{ | |{CHECKJAVASCRIPT}||Eine Fehlermeldung, welche dem Benutzer mitteilt, dass er in seinem Browser Javascript deaktiviert hat. Das Aussehen dieser Meldung wird auf CSS ähnliche Art in der Datei startpage.pstpl festgelegt. | ||
|} | |} | ||
==Input/Buttons== | ==Input/Buttons== | ||
Each "input" type in a survey has been given its own class name, so that you can add CSS to your "startpage.pstpl" file | Each "input" type in a survey has been given its own class name, so that you can add CSS to your "startpage.pstpl" file and have some control over the appearance of form buttons and inputs. These class names are as follows: | ||
*'''submit''' (Submit Buttons) | *'''submit''' (Submit Buttons) | ||
*'''text''' (Text Inputs - for short free text, date and numerical type) | *'''text''' (Text Inputs - for short free text, date, and numerical type) | ||
*'''answertext''' (Text of answers) | *'''answertext''' (Text of answers) | ||
*'''radio''' (Radio Buttons) | *'''radio''' (Radio Buttons) | ||
| Line 471: | Line 767: | ||
*'''textarea''' (Large text inputs - for long free text) | *'''textarea''' (Large text inputs - for long free text) | ||
*'''clearall''' (The "Exit and Clear Survey" link) | *'''clearall''' (The "Exit and Clear Survey" link) | ||
*'''rank''' (The rank style question. Doesn't set the colour of the select box or the text boxes | *'''rank''' (The rank style question. Doesn't set the colour of the select box or the text boxes, but it does allow the changing of background colour, text colour, size etc., for the rest of the ranking question) | ||
*'''graph''' (The "percentage completed" graph table) | *'''graph''' (The "percentage completed" graph table) | ||
*'''innergraph''' (The table inside the graph table - this contains the 0% and 100% text. Use this for changing the size of this text | *'''innergraph''' (The table inside the graph table - this contains the 0% and 100% text. Use this for changing the size of this text) | ||
*'''question''' (General settings for any question that is displayed within a table. Generally you should use this to make sure that their font size and | *'''question''' (General settings for any question that is displayed within a table. Generally, you should use this to make sure that their font size and color is the same as you have used elsewhere as a default) | ||
*'''mandatory''' (Mandatory questions) | *'''mandatory''' (Mandatory questions) | ||
*'''input-error''' (User input error - for if a user has made a mistake with a mandatory question or question with validation) | *'''input-error''' (User input error - for if a user has made a mistake with a mandatory question or question with validation) | ||
*'''array1''' and '''array2''' (These two styles are cycled when presenting the range of answers for an array type question. This allows you to set an alternating background | *'''array1''' and '''array2''' (These two styles are cycled when presenting the range of answers for an array type question. This allows you to set an alternating background color for these question types. '''Array1''' is also used for the column headings in these question types) | ||
*'''errormandatory''' (Sets the | *'''errormandatory''' (Sets the color and style of the "This question is mandatory" error message) | ||
*'''warningjs''' (Sets the | *'''warningjs''' (Sets the color and style of the warning message displayed if the participant's browser has javascript disabled) | ||
There are also some elements that can be accessed using the ID of the element ('''#ID''' in CSS): | There are also some elements that can be accessed using the ID of the element ('''#ID''' in CSS): | ||
| Line 485: | Line 781: | ||
*'''tokenmessage''' (used for messages inside the survey, e.g. the session expired error message) | *'''tokenmessage''' (used for messages inside the survey, e.g. the session expired error message) | ||
Because you can edit all the HTML aspects, there's no reason to surround your templates with a | |||
<syntaxhighlight lang="php" enclose="div"><div class='new_name'></div></syntaxhighlight> | |||
Because you can edit all the HTML aspects, there's no reason to surround your templates with a <div class='new_name'> and then define a css for that new_name class. | and then define a css for that new_name class. | ||
==Styling the progress bar== | ==Styling the progress bar== | ||
The progress bar appearance can be modified with CSS. | The progress bar appearance can be modified with CSS. | ||
To change the background | To change the background color of the bar, add something like the following to the end of your template.css file: | ||
<syntaxhighlight lang="php" enclose="div">#progress-wrapper .ui-widget-header { | <syntaxhighlight lang="php" enclose="div">#progress-wrapper .ui-widget-header { | ||
| Line 505: | Line 795: | ||
}</syntaxhighlight> | }</syntaxhighlight> | ||
To change the border | To change the border color of the bar, add something like the following to the end of your template.css file: | ||
<syntaxhighlight lang="php" enclose="div">#progress-wrapper .ui-widget-content, | <syntaxhighlight lang="php" enclose="div">#progress-wrapper .ui-widget-content, | ||
| Line 514: | Line 804: | ||
==Advanced Features Available to Developers== | ==Advanced Features Available to Developers== | ||
LimeSurvey has integrated some user-made patches that permits some special changes. These very advanced features (generally) require changes to the underlying code base of LimeSurvey and should be done carefully in order not to introduce security holes. | |||
===Support for your own Javascript functions=== | ===Support for your own Javascript functions=== | ||
Some users may need to run Javascript on the survey pages, but calling '''checkconditions()''' in the BODY element made it impossible to do so. | Some users may need to run Javascript on the survey pages, but calling '''checkconditions()''' in the BODY element made it impossible to do so. This call has been replaced with a small JavaScript function in the HEAD that sniffs for the existence of '''checkconditions()''' and '''template_onload()''' before calling them. In this way, a template author can create his or her own '''template_onload()''' function in the HEAD that replaces the default one. | ||
*Disable XSS filter - in Global settings -> Security, set "Filter HTML for XSS" to No. | *Disable XSS filter - in Global settings -> Security, set "Filter HTML for XSS" to No. | ||
*Enter your script in the source of a question or group description. | *Enter your script in the source of a question or group description. | ||
{{Note|For further details, see the [[Workarounds: Manipulating a survey at runtime using Javascript#How to use Script (eg. JavaScript etc.) in LimeSurvey|workaround section]].}} | |||
=Videos on Templates= | =Videos on Templates= | ||
This video will demonstrate the basic and advanced template functions that are available to all LimeSurvey users. This includes changing the appearance of certain forms and inserting custom graphics. Additionally, it will thoroughly walk you through on how to edit and preview specific page templates, importing/exporting templates, modify appearance of questions in the CSS, customizing survey description | This video will demonstrate the basic and advanced template functions that are available to all LimeSurvey users. This includes changing the appearance of certain forms and inserting custom graphics. Additionally, it will thoroughly walk you through on how to edit and preview specific page templates, importing/exporting templates, modify appearance of questions in the CSS, and customizing survey description page. | ||
Video - needed | |||
=Tips & Tricks= | =Tips & Tricks= | ||
| Line 552: | Line 825: | ||
==Some language specific element== | ==Some language specific element== | ||
If you want to have some | If you want to have some language specific sentence in a survey, for example a help at the end of each page, you can add in a .pstl file a sentence and hidding it for other language. If we hide it in the template.css, we can use the pseudo selector :lang, but we use some class for better compatibility. | ||
Below, there are two help sentences, in French and English. Put this on endpage.pstpl: | |||
<syntaxhighlight lang="php" enclose="div"><div class="fr" lang="fr">Pour de l'aide en direct appelez le 000000</div> | <syntaxhighlight lang="php" enclose="div"><div class="fr" lang="fr">Pour de l'aide en direct appelez le 000000</div> | ||
<div class="en" lang="en">For some help, please call 000000</div></syntaxhighlight> | <div class="en" lang="en">For some help, please call 000000</div></syntaxhighlight> | ||
and in template.css: | |||
<syntaxhighlight lang="php" enclose="div">.lang-fr .en{display:none} | <syntaxhighlight lang="php" enclose="div">.lang-fr .en{display:none} | ||
.lang-en .fr{display:none}</syntaxhighlight> | .lang-en .fr{display:none}</syntaxhighlight> | ||
==Change the layout of the survey page== | ==Change the layout of the survey page== | ||
After editing and saving a template, it applies to a survey list page only if it is selected from the settings of the survey. To make it the default template, go under the '''General tab''' located in the '''Global settings''' of your LimeSurvey installation and choose the desired template. From now on, all the templates that use the "default" option as template plus the ones that are going to be newly created, will use the newly selected default template. | |||
To use your current template for this page you have change the according setting | To use your current template for this page, you have to change the according setting from '''Global settings'''. In older versions, this change can be done by editing the $defaulttemplate setting from the config file: copy this setting from config-defaults.php to config.php which overrides config-defaults.php and edit this setting to <code lang="html">$defaulttemplate = 'yourtemplatename';</code>. | ||
==Import/Export of templates: Mac users== | ==Import/Export of templates: Mac users== | ||
Mac users, please note | <u>Mac users</u>, please note that the Mac OSX default archive utility may have problems with zip folders "generated on the fly". | ||
A workaround is to unix'es unzip from the command line: | |||
$ unzip template.zip -d template | $ unzip template.zip -d template | ||
| Line 586: | Line 857: | ||
inflating: ... | inflating: ... | ||
Another workaround is to use scripts in their mac-compiled counterparts. | |||
==Replacing the help icon {{ObsoleteIn|2.50}} == | |||
When a question help text is shown, then an help.gif image is used from the default template folder. | |||
You can replace this image by uploading a new help.gif, help.png or help.jpg in your custom template folder. It will then be automatically used instead of the default help icon. | |||
==Replacing an existing logo {{NewIn|2.50}} {{ObsoleteIn|3.0}}== | |||
'''Note''': In the '''default''' Template of 2.50, there is no preembedded logo. Read further our [[#Adding_your_own_logo |wiki on how to add your own logo]]. | |||
'' | 1. To edit the logo go to the ''<u>template.css</u>'' file which you can find it here: | ||
<center>[[File:t1.PNG|200px]]</center> | |||
2. Click the search button to find occurrences of logo related styles and search for ''logo'' | |||
2. | <center>[[File:2.png|200px]]</center> | ||
3. Edit the main style file. | |||
You will see something similar to: | |||
[[File: | <center>[[File:t4.PNG|500px]]</center> | ||
If you want to change the image, just replace logo.gif with another image link. Example: (<u>logo.png</u> or <u>logo.jpg</u>). | |||
If you want to change the image size, adjust width and height (in pixels) like this: | |||
<syntaxhighlight lang="php" enclose="div">width:100px; height:100px;</syntaxhighlight> | |||
==Adding your own logo {{ObsoleteIn|3.0}} == | |||
1. Find and open the '''startpage.pstpl''' template file. | |||
< | <center>[[File:startpage.pstpl.png]]</center> | ||
== | 2. After this | ||
<source lang="html4strict" ><div id="topContainer" class="jumbotron"></source> | |||
add this line to '''startpage.pstpl''': | |||
<source lang="html4strict"> | |||
<div class="container"><img id='page_logo' src='{TEMPLATEURL}/files/logo.png' class="clearfix pull-right" /></div> | |||
</source> | |||
3. To upload your own logo, go to the template editor and upload your logo. | |||
[[File: | <center>[[File:uploadyourlogo.png]]</center> | ||
To position your logo, please use one of the following css classes: | |||
*'''If you want the logo to be placed on the left side:''' | |||
'''If you want | |||
<source lang="html">clearfix pull-left</source> | |||
'''If you want | *'''If you want the logo to be placed on the right side:''' | ||
< | <source lang="html">clearfix pull-right</source> | ||
If you want to | *'''If you want to center the logo''' | ||
< | <source lang="html">clearfix center-block</source> | ||
== | ==Dasselbe Template mit verschiedenen Logos benutzen== | ||
Wenn Sie dasselbe Template für all Ihre Umfrage nutzen und nur das Logo für jede Umfrage ändern möchten, dann können Sie den {SID}-Platzhalter in Ihrer .pstpl Vorlagendatei benutzen und auf diesem Weg auf verschiedene Bilder verweisen: | |||
<syntaxhighlight lang="php" enclose="div"> | <syntaxhighlight lang="php" enclose="div"><img src="{TEMPLATEURL}files/logoDatei-{SID}.png"></syntaxhighlight> | ||
== | == Eigenes Favicon zeigen == | ||
Ein Favicon ist das kklein Symbol, das Sie in ihrer Browser-Adresszeile, Ihren Lesezeichen oder auf dem Tabfür ihre LimeSurvey-Umfrage sehen. Sie können Ihr eigenes Icon auf folgende Weise anzeigen: | |||
# | #Erstellen Sie ein neue Favicon - googlen Sie einfach um viele Webseiten zu finden, die Ihnen dabei helfen. | ||
# | #Benennen Sie die Datei 'favicon.ico" und laden Sie diese in ihrem Template als zusätzliche Datei hoch. | ||
# | #Fügen Sie den folgenden Code zu Ihrer "startpage.pstpl" for dem </head> Tag hinzu. | ||
<syntaxhighlight lang="html4strict" enclose="div"><link rel="shortcut icon" href="{TEMPLATEURL}favicon.ico" type="image/x-icon"> | <syntaxhighlight lang="html4strict" enclose="div"><link rel="shortcut icon" href="{TEMPLATEURL}files/favicon.ico" type="image/x-icon"> | ||
<link rel="icon" href="{TEMPLATEURL}favicon.ico" type="image/x-icon"></syntaxhighlight> | <link rel="icon" href="{TEMPLATEURL}files/favicon.ico" type="image/x-icon"></syntaxhighlight> | ||
== Different appearance for survey-/question-pages== | == Different appearance for survey-/question-pages== | ||
('' | If you want LimeSurvey to change the appearance of every second page (i.e. of even and odd survey pages), you can use '''.page-odd''' class in your CSS file to change the appearance of odd pages. | ||
An example from default template of LimeSurvey 1.91+: | |||
example from default template of LimeSurvey 1.91+ | |||
<syntaxhighlight lang="php" enclose="div"> | <syntaxhighlight lang="php" enclose="div"> | ||
| Line 713: | Line 949: | ||
}</syntaxhighlight> | }</syntaxhighlight> | ||
If you do '''not''' want differentiate even and odd pages, find all instances of ''.page-odd'' in template.css and remove those styles. | |||
==Create a vertical separator border for dual scale array== | ==Create a vertical separator border for dual scale array== | ||
To create a vertical separator border for a dual scale array you can add the following lines to your '''template.css'''-file. | To create a vertical separator border for a dual scale array, you can add the following lines to your '''template.css'''-file. | ||
<syntaxhighlight lang="php" enclose="div"> | <syntaxhighlight lang="php" enclose="div"> | ||
| Line 727: | Line 963: | ||
</syntaxhighlight> | </syntaxhighlight> | ||
header_separator is used to adress the separator for the header "td" | ''header_separator'' is used to adress the separator for the header "td". The "dual_scale_separator" is used to address the separator column in the dual scale array. | ||
==Hide the survey contact message shown on the start page/survey list== | ==Hide the survey contact message shown on the start page/survey list {{ObsoleteIn|3.0}} == | ||
To hide the "Please contact ..." | To hide the "Please contact ..." message on the start page (with the survey list), you can add the following to the '''$(document).ready''' function in the '''template.js''' of your used design template: | ||
<syntaxhighlight lang="php" enclose="div"> | <syntaxhighlight lang="php" enclose="div"> | ||
| Line 739: | Line 975: | ||
</syntaxhighlight> | </syntaxhighlight> | ||
==Remove the survey contact message shown on error messages== | ==Remove the survey contact message shown on error messages {{ObsoleteIn|3.0}}== | ||
If you want to remove the survey contact message from error messages it'll be trickier. You can add the | If you want to remove the survey contact message from error messages, it'll be trickier. You can add the function from below. It calls the '''$(document).ready''' function in the '''template.css''' of your used design template: | ||
<syntaxhighlight lang="php" enclose="div"> | <syntaxhighlight lang="php" enclose="div"> | ||
| Line 762: | Line 998: | ||
</syntaxhighlight> | </syntaxhighlight> | ||
It will probably not work for | It will probably not work for a survey in English language and has to be extended when used for multilingual surveys. But it's an idea/tip on how to solve this. | ||
==How to deal with multilingual question attributes | ==How to deal with multilingual question attributes {{ObsoleteIn|2.50}}== | ||
If you have a multilingual survey and e. g. want to use a different string for the "other" field, this could only be done for the base language (until this feature was added at LimeSurvey 2.0). To work around this, paste in the field to change the label for "other" | If you have a multilingual survey and e. g. want to use a different string for the "other" field, this could only be done for the base language (until this feature was added at LimeSurvey 2.0). To work around this, paste in the field to change the label for "other": | ||
<syntaxhighlight lang="php" enclose="div"><span class="en">New label</span><span class="fr">Nouveau label</span></syntaxhighlight> | <syntaxhighlight lang="php" enclose="div"><span class="en">New label</span><span class="fr">Nouveau label</span></syntaxhighlight> | ||
Add in the template.css of your template (at ''/limesurvey/upload/templates/<yourtemplatename>/template.css''): | |||
<syntaxhighlight lang="php" enclose="div">html:lang(en) .fr{display:none} | <syntaxhighlight lang="php" enclose="div">html:lang(en) .fr{display:none} | ||
html:lang(fr) .en{display:none}</syntaxhighlight> | html:lang(fr) .en{display:none}</syntaxhighlight> | ||
==Adding your own logo to the survey list {{ NewIn|3.0}} == | |||
# First please open the theme editor for the theme you like to use. [[File:OpenThemeEditor.jpg]] | |||
# We recommend to use fruity, it is our best theme currently. | |||
# Then extend the theme and give it a name you will recognize. [[File:ExtendTheme.jpg]] | |||
# In the following view you may upload the logo you want to use. [[File:UploadFileTheme.jpg]] | |||
# Select the editor screen `Survey List´ in the Screen dropdown in the top right corner. [[File:OpenScreenSurveyList.jpg]] | |||
# Then select `layout_survey_list.twig´ in the left side menu. [[File:EditLayoutSurveyListTwig.jpg]] | |||
# In the editor scroll to line 126 and change the marked part to the filename of the image you uploaded to the theme before. [[File:ChangeSurveyListHeaderImageEditor.jpg]] | |||
# Save your file. [[File:ThemeEditorSaveChanges.jpg]] | |||
# Change default theme to your extended theme. [[File:ChangeDefaultTheme.jpg]] | |||
=Custom Question Views {{NewIn|3.0}}= | |||
<div class="simplebox">'''Note:''' This is a temporary feature to be replaced in the future by question object (it will be very easy to move custom views to question object). It is disabled by default.</div> | |||
As of version 2.5, you can create template-specific custom views for questions and some of their incorporated elements. This is useful if you want to modify the HTML layout of a particular question type for one or more surveys. | |||
*In application/config/config.php, find 'config'=>array and add this line to the array : 'allow_templates_to_overwrite_views'=>1 | |||
*In /{your_template}/config.xml, set "overwrite_question_views" to true | |||
*Copy application/views/survey/* to template/{your_view_directory}/survey/ | |||
*Note that you only need to copy the files that you intend to modify but the file structure must remain the same as in application/views/survey/ | |||
=Insert Custom CSS or JavaScript files for template {{NewIn|2.50}}= | |||
As of version 2.50, you can use the config.xml file to automatically load plugin files. | |||
*Upload your files to the template /css or /scripts folder | |||
*In /{your_template}/config.xml, add the file paths to the <css> or <js> blocks, something like this:<syntaxhighlight lang="xml" enclose="div"><css> | |||
<filename>css/jquery-ui-custom.css</filename> | |||
<filename>css/bootstrap-slider.css</filename> | |||
<filename>css/awesome-bootstrap-checkbox/awesome-bootstrap-checkbox.css</filename> | |||
<filename>css/flat_and_modern.css</filename> | |||
<filename>css/template.css</filename> | |||
<filename>css/myCustomPlugin.css</filename> | |||
</css> | |||
<js> | |||
<filename>scripts/template.js</filename> | |||
<filename>scripts/bootstrap-slider.js</filename> | |||
<filename>scripts/myCustomPlugin.js</filename> | |||
</js> | |||
</syntaxhighlight> | |||
[[Category:Theme]] | |||
[[Category:Twig]] | |||
Revision as of 14:00, 21 November 2019
Einführung
LimeSurvey verfügt über ein grundlegendes Template- und Style-System, das eine themenähnliche Funktionalität bietet, die in vielen Browser-basierten Anwendungen zu finden ist. Sie werden hier einfach als Design-Vorlagen bezeichnet. Die Vorlagen ermöglichen die Kontrolle über das Aussehen und die Handhabung von Seiten während einer Umfrage. Ein Umfrageadministrator kann die für jede Umfrage zu verwendende Vorlage auswählen, um das Aussehen und die Bedienung der Umfrage zu personalisieren. Änderungen an einer Vorlage können so einfach sein, wie das Hinzufügen eines einzigartigen Logos auf der Startseite, das Ändern von Hintergrundfarben oder vielleicht neue Textfarben für bestimmte Fragen.
LimeSurvey wird mit einem Satz Vorlagen ausgeliefert. Diese initialen Vorlagen werden durch Verzeichnisse innerhalb des LimeSurvey-Installationsverzeichnisses "templates" definiert. Jedes Vorlage hat sein eigenes Verzeichnis. Im Hauptverzeichnis eines Vorlageverzeichnisses befinden sich zahlreiche Dateien: Vorlagen (.pstpl), Kaskadierende Stylesheets (.css), Bilder (.jpg oder .png) und vielleicht andere.
Wie in anderen themenbasierten Systemen werden auch in den. pstpl-Vorlagen-Dateien Fragmente von HTML-Code gespeichert. Diese Fragmente werden eingelesen und zur Erstellung der Seite verwendet, die dem Endbenutzer während des Betriebs einer Umfrage angezeigt werden soll. Oftmals werden Schlüsselwörter von geschweiften Klammern umgeben in die Dateien aufgenommen, die dann durch den entsprechenden Text ersetzt werden. Im Folgenden finden Sie ein Beispiel für den Inhalt einer Vorlagen-Datei und ihr Ergebnis bei der Verwendung in einer Umfrage-Seite:
Seit LimeSurvey 3 verwendet die Theme-Engine Twig, sodass die Theme-Entwickler die Logik des Renderings der Umfrage auf sichere und einfache Weise ändern können. Twig ersetzt das alte System der Platzhalter, das in früheren Versionen verwendet wurde. Die Logik, die zum Generieren des HTML verwendet wurde, ist jetzt Teil der Theme.
Schnipsel aus der Vanilla Theme:
>
</syntaxhighlight>>
Damit man über die LimeSurvey Oberfläche eine bestehende Vorlage editieren oder in eine neue kopieren kann, benötigt man zunächst das Benutzerrecht Vorlagen zu editieren. LimeSurvey selbst benötigt natürlich Schreibrechte für das Vorlagenverzeichnis auf dem Server. Ist eines dieser Rechte nicht gesetzt, kann die Vorlage nicht über LimeSurvey angepasst werden. In diesem Fall muss man die Dateien beispielsweise per FTP herunterladen und mit geeigneter Software ändern. Eine Änderung an einer Vorlage kann unter Umständen alle gespeicherten Befragungen betreffen, daher sollten die Designanpassungen von Leuten übernommen werden, die das grundsätzliche Konzept und den genutzen Code von LimeSurvey verstehen. Die Gestaltung der Vorlagen stellen schon eine fortgeschrittene Aufgabe dar und kann einige Zeit in Anspruch nehmen, wenn man mit HTML-Code nicht wirklich viel anfangen kann.
Wenn Sie eine neue Vorlage erstellen, ziehen Sie bitte in Erwägung diese der LimeSurvey Community zur Verfügung zu stellen, um das Projekt zu unterstützen. Auf der LimeSurvey-Seite finden sich im Downloadbereich sehr viele Vorlagen und Beschriftungssets.
Mit Ihrer Hilfe können wir unsere Downloadbereich aus Vorlagen, Umfragen und anderen Add-Ons weiter wachsen lassn, um LimeSurvey noch besser zu machen (siehe Template Repository).
Neue Vorlage erstellen
Damit Sie eine neue Designvorlage erstellen (oder eine bestehende bearbeiten) können, benötigen Sie die Berechtigung Designvorlagen zu erstellen, als auch Berechtigung die dahinter liegenden Dateien des Betriebssystems zu bearbeiten.
Der bevorzugte Weg, um eine neue Vorlage zu erstellen, ist durch den Template-Editor (siehe unten) über die Webadmin-Oberfläche. Einige Leute können gerne direkt mit Template-Dateien arbeiten, so dass sie ihren Lieblings-Text-Editor stattdessen verwenden können anstatt der Web-Schnittstelle. In diesem Fall benutzen Sie immer noch den Template-Editor um zuerst Ihre neue Vorlage zu erstellen. Dies wird eine neue Basis-Vorlage mit allen Dateien, die Sie benötigen im Verzeichnis LimeSurvey_web_root/upload/templates/neues_template erstellen. Von dort aus können Sie Ihren Text-Editor zum manuellen Bearbeiten der Template-Dateien benutzen.
Eine Reihe von 'öffentlichen' Elementen von LimeSurvey kann durch eine Reihe von Vorlagen angepasst werden. Im nächsten Abschnitt finden Sie eine sehr kurze Erläuterung dieser Vorlagen.
Der LimeSurvey-Template-Editor
Um das Verständnis und die schnelle Aktualisierung eines Templates zu erleichtern, bietet LimeSurvey einen' Template Editor in der Hauptsymbolleiste der Anwendung an. Dieser Vorlageneditor steht nur Benutzern zur Verfügung, die das Zugriffsrecht in den Benutzersicherheitseinstellungen haben und für Superadministratoren. Eine Vorlage wirkt sich auf alle Umfragen aus, und kann eine Umfrage unbrauchbar machen, wenn sie nicht korrekt aufgebaut ist.
The LimeSurvey theme editor allows you to edit the contents of your themes online. To start the Theme Editor: click on Themes link in the Configuration menu, and then click on the "Theme editor" button next of the theme you want to edit or extend.


The template editor page allows you to select the template you would like to edit/view.

Folgende Optionen stehen zur Verfügung:
- Create: Allows you to create a new template. In order not to start from scratch, the template 'default' is copied.
- Import: Allows you to import a template from a ZIP file.
- Export: Allows you to export the current template to a ZIP file.
- Copy: Allows you to make a new template by copying the current one.
- Rename: Allows you to change the name of the template. It is generally used after copying or importing a template.
- Template: It is a drop-down list that shows all the available templates that are located in your LimeSurvey installation.
- Screen: It is a drop-down list which allows you to choose which particular survey page of that template you want to look at.
- Return to admin panel.
Importieren/Exportieren/Kopieren einer Vorlage
When you export a template, a ZIP-file archive with all the files your template consists of will be created (.pstpl files, images, css files, ...). You can simply import the exported zip-file into another LimeSurvey installation by using the import feature or you can manually copy the archive into another LimeSurvey installation and extract it into the corresponding template directory there.
However, it is preferred to use the LimeSurvey template import/export/copy functions in the template editor.
Page Structure / Template Use
- The Welcome Page: startpage.pstpl, welcome.pstpl, privacy.pstpl, navigator.pstpl, endpage.pstpl
- The Questions Pages: startpage.pstpl, survey.pstpl, startgroup.pstpl, groupdescription.pstpl, question.pstpl, endgroup.pstpl, endpage.pstpl
- The Final Page: startpage.pstpl, assessment.pstpl, completed.pstpl, endpage.pstpl
Template-Dateien
The following template files are used to produce your public survey and must exist in any new template folder you create:
- startpage.pstpl: Produces the start of each html page. It starts at the "<head>" tag, and should not contain the "<html>" tag. This 'very beginning' of a standard html page is written by the scripts. Please ensure that your startpage.pstpl files contains a <body> tag. Even though many browsers do not require strict adherence to the W3 HTML standards, the LimeSurvey script needs to find a <body> tag to run certain javascript elements. It is not expected to see many 'keywords' used in the startpage.pstpl file. However, you may wish to put the {SURVEYNAME} into the title. The startpage.pstpl file can contain code that ends in the corresponding endpage.pstpl file. For example, you can start a table in this file and close the table in the endpage.pstpl file. The startpage.pstpl and endpage.pstpl files wrap around every possible page used by LimeSurvey.
- survey.pstpl: This template is the second used on most pages and provides a space to put the survey name and description. This template does not have a corresponding 'closing' template, and subsequently you should close all tags opened in this template file (i.e.: don't leave a table open here because there is nowhere else to close it).
- welcome.pstpl: This template is only used in the welcome screen (which is also on the main page for 'all in one' surveys). You can use this to print out the welcome text, and other information that should be provided in the introduction. Like the 'survey.pstpl' file, there is no corresponding 'closing' template, so all tags opened in this template file should be closed as well.
- startgroup.pstpl: This template can provide a 'summary' wrap around for questions within a group. It has a matching 'endgroup.pstpl' template that can be used to close any opened tags in this file, so you can open a table within this.
- groupdescription.pstpl: This template file is used to display a description of a group. Please note that in the survey settings (access the Presentation & navigation settings by clicking on the Presentation tab) you can set if the group description should be shown or not. If not, then this file is not included at all.
- question.pstpl: This file contains the question, answer, and help text sections of your survey. In the "group by group" and "all in one" surveys, this template is cycled repeatedly with each question. There is no corresponding closing file for this and all tags should be closed.
- question_start.pstpl: This file contains the individual elements found at the start of a question. It is included within 'question.pstpl' via the {QUESTION} keyword. It is intended to allow template designers more control over the layout of a question. This template sits outside the normal templating system and was superseeded (as of LimeSurvey 1.87). All keywords from this template are now available directly in question.pstpl.
- completed.pstpl: This page is displayed as the final page when the survey responses have been saved and the survey is over. It can be used to display a "forwarding link" as set in the survey setup.
- endgroup.pstpl: This file closes the group, and can be used to close off any tags opened in the startgroup.pstpl file
- navigator.pstpl: This file contains the buttons that navigate through the survey, "next", "prev", "last", "submit", "save so far" and the "clear all" link. It is used in all pages except the completed page.
- printanswers.pstpl: This file has the HTML wrapper necessary for the print version of the survey.
- print_group.pstpl: This file is the same as startgroup.pstpl and endgroup.pstpl, but for the print version of the survey.
- print_question.pstpl: This file is the same as question.pstpl, but for the print version of the survey.
- print_survey.pstpl: This file is the same as survey.pstpl, but for the print version of the survey.
CSS und JavaScript
Two files that are always used in a template are template.css (for CSS) and template.js (for Javascript).
- {TEMPLATECSS}: Add lines for default css, template.css, and template-rtl.css for rtl language.
- {TEMPLATEJS}: Add lines for default javascript files, template.js, and all js files needed for LimeSurvey.
Using Bootstrap
LimeSurvey has Bootstrap 3 embedded, so you can style all your templates with the well documented Bootstrap classes. For more information please refer to the Bootstrap documentation.
The Awesome-Bootstrap-Checkbox plugin is also included. With it, you can use the typical Bootstrap color-classes (info,warning,danger,etc.) also with the suffix "-checkbox" or "-radio", though styling checkboxes and radios as you prefer.
Replacing default CSS or Javascript
Some questions use specific files for Javascript or CSS. If you need to replace a function, use a cascading system. For javascript function, the last function read is the function used.
Other Template Files
The privacy.pstpl, invitationemail.pstpl, reminderemail.pstpl, and confirmationemail.pstpl are no longer used by LimeSurvey and defaults are instead set in the applicable language files. The email messages can now be edited on a survey by survey basis.
Standard Pages
There are ten standard pages that a survey participant may see in the course of taking or accessing the LimeSurvey application. Each is constructed from a number of common Template files from the Template specified in the settings of the survey. The table below indicates which template files are used in constructing each of these pages.
| Survey Pages/ Template Files |
Survey List |
Welcome | Question | Completed | Clear All | Register | Load | Save | Print Answers |
Print Survey |
|---|---|---|---|---|---|---|---|---|---|---|
| SurveyList | ||||||||||
| Welcome | ||||||||||
| Privacy | ||||||||||
| Navigator | ||||||||||
| Survey | ||||||||||
| StartGroup | ||||||||||
| GroupDescription | ||||||||||
| Question* | ||||||||||
| EndGroup | ||||||||||
| Assessment | ||||||||||
| Completed | ||||||||||
| ClearAll | ||||||||||
| Register | ||||||||||
| Load | ||||||||||
| Save | ||||||||||
| PrintAnswers | ||||||||||
| Print Survey | ||||||||||
| Print Group | ||||||||||
| Print Question | ||||||||||
| StartPage EndPage Template.css |
*NOTE: In version 1.90+, this replaces question.pstpl AND question_start.pstpl. If you are using an old custom template, you need to add the following line to the beginning of question.pstpl:
<div {QUESTION_ESSENTIALS} class="{QUESTION_CLASS}{QUESTION_MAN_CLASS}{QUESTION_INPUT_ERROR_CLASS}">
And then add the corresponding closing tag to the end of question.pstpl:
</div>
*NOTE: In version 1.91 and earlier, LimeSurvey js files are not included in the template. In version 2, you have to use {TEMPLATEJS} in one of your template file to add the link to the js file. You can add it in startpage.pstpl or in endpage.pstpl. You can remove the {TEMPLATEURL}/template.js line and you have to replace with {TEMPLATEJS} to update a personal template.
The File Control Section
In the "file control" window on the left, you can click on one of the template files that is used to compile the page. You can see the Screen part, JavaScript, and CSS files. The HTML code for that file will then appear in the "Now editing" window in the center. If the template is editable (determined by directory permissions) you can then make any changes and save them.

The "Other files" window shows a list of all other files from the template directory. You can use the right side to upload and select image files (your pics, logos,...) or other files needed to create your template.
Instead of using a link for each picture, utilize the field string {TEMPLATEURL}. So, instead of:
img src='/limesurvey/templates/yourtemplate/files/mypicture.jpg'You can use (New in 2.50 ):
img src='{TEMPLATEURL}files/mypicture.jpg'In LimeSurvey versions before 2.50 use:
img src='{TEMPLATEURL}mypicture.jpg'A "sample" of the template page you are editing will be visible in the bottom of the screen. There is no way to delete a template from the template editor. This must be done by accessing the underlying directory and deleting manually the files from there. You also have the possibility to select different screen resolutions in order to better evaluate the feel and look of the template.
Template files location
LimeSurvey stores each of the 'standard' templates in their own distinct sub-directory within the /templates directory that is kept in the public directory with the other LimeSurvey public files. Customized user templates are stored in the /upload/templates directory.
There should ALWAYS be a "default" directory in the templates directory. This template is used by default and as a fall-back if a template folder doesn't exist, or can't be found. It comes installed by default.
You can use any image files that you upload into the template management area with the help of this syntax:
{TEMPLATEURL}filename.xyz
Fragen stylen mit CSS
Styling of questions in CSS has become much easier. Each question type has now a unique class. The mandatory questions have an additional mandatory class. For example, for a non-mandatory question:
<div id="question5" class="gender">
...
</div>
and if the question is mandatory:
<div id="question5" class="gender mandatory">
...
</div>
and if the question is mandatory, but the user didn't answer it or if there is validation on a question:
<div id="question5" class="gender mandatory input-error">
...
</div>
and if the question has validation applied, but the user hasn't answered correctly:
<div id="question6" class="text-short input-error">
...
</div>
Global classes for question part
These classes are used for each question type. Some question types use only one or two classes, while others may use much more.
| Class name | Part | Question type | Examples | Note | |
|---|---|---|---|---|---|
| .question (Obsolete since 3.0) | All question block | All question type | <p class="question">, <ul class="question">, <table class="question"> | ||
| .ls-answers (New in 3.0 ) | All question block | All question type | <div class="ls-answers ">, <ul class="ls-answers ">, <table class="ls-answers"> | ||
| .subquestions-list | List of subquestion | Multi choice question, array question type | <ul class="subquestions-list">, <table class="subquestions-list"> | .questions-list is used too | |
| .answers-list | List of answers | Single choice question, array question type, Multi input text question | <ul class="answers-list">, <table class="answers-list"> | ||
| .answer-item | The answer part: one answer | Single choice question, array question type, Multi input text question | <li class="answer-item">, <td class="answer-item"> | ||
| .noanswer-item | The answer part for no answer | Single choice question, array question type | <li class="noanswer-item">, <td class="noanswer-item"> | No answer is an answer too, then have double class noanswer-item and answer-item | |
| .question-item | The question part: one question | Multi text question, array question type | <li class="question-item">, <tr class="question-item"> | Some answers are questions too. Then we have a lot of class="question-item answer-item" | |
| .button-list | A list of button | Yes no and Gender question | <ul class="button-list"> | ||
| .button-item | The answer part with a button | Yes no and Gender question | <li class="button-item"> | ||
| .checkbox-list | A list of checkbox | Multi choice question, array number (checkbox) question type | <ul class="checkbox-list">, <tr class="checkbox-list"> | Some question types use multi-list class, like checkbox with comment: class="checkbox-list text-list" | |
| .checkbox-array (New in 3.0 ) | A array of checkbox | Array (numbers) with checkbox option | <table class="checkbox-list"> | ||
| .checkbox-item | The answer part with a checkbox | Multi choice question, array number (checkbox) question type | <li class="checkbox-item">, <td class="checkbox-item"> | ||
| .radio-list | A list of radio item | Single choice question, array question type (each row) | <ul class="radio-list">, <tr class="radio-list"> | ||
| .radio-array (New in 3.0 ) | A array of radio item | Array question type | <table class="radio-array"> | ||
| .radio-item | The answer part with a radio | Single choice question, array question type | <li class="radio-item">, | ||
| .text-list | A list of text input | Multi text question type, array of text | <ul class="text-list">, <tr class="text-list"> | ||
| .text-item | The answer part of a text input | Multi text question type, array of text | <li class="text-item">, | ||
| .numeric-list | A list of text input with numeric only answer | Multi numeric question type, array of number | <ul class="text-list numeric-list">, <tr class="text-list numeric-list"> | ||
| .number-list | A list of text input with numeric only answer (each row) | Multi numeric question type, array of number | <ul class="text-list numeric-list">, <tr class="text-list numeric-list"> | ||
| .number-array (New in 3.0 ) | The answer part of a numeric input | Array of number | <table class="number-array"> | ||
| .select-list (Obsolete since 2.50) | A list of select | Array numbers, Dual scale array (select) | <table class="select-list"> | ||
| .dropdown-list (New in 2.50 ) | A list of select | Array numbers, Dual scale array (select) (each row) | <table class="dropdown-list"> | ||
| .dropdown-array (New in 3.0 ) | A array of dropdown | Array numbers, Dual scale array (select) | <table class="dropdown-array"> | ||
| .select-item (Obsolete since 2.50) | The answer part of a select | Array numbers, Dual scale array (select), single choice with select | <p class="select-item">, <td class="select-item"> | ||
| .dropdown-item (New in 2.50 ) | The answer part of a select | Array numbers, Dual scale array (select), single choice with select | <p class="dropdown-item">, <td class="dropdown-item"> | ||
| .hide (Obsolete since 3.0) | Used for accessibility: hidden with css but read by screenreader, since 2.50 : you can use sr-only from bootstrap | Short text question | <label class="hide"> | Can be used for other purposes | |
| .ls-js-hidden (New in 3.0 ) | Used for part to be hidden if javascript is activated | Button for example | <div class="ls-js-hidden"> | LimeSurvey core used it, but you can use it too in your template | |
| .ls-js-hidden-sr (New in 3.0 ) | Used for accessibility: hide it if js is activated, but always show if user use a screenreader | Button for example | <a class="ls-js-hidden-sr"> | Button | |
| .ls-no-js-hidden (New in 3.0 ) | Used for part to be hidden if javascript is not activated | Link | <a class="ls-no-js-hidden"> | LimeSurvey core used it for inactive link if javascript is not activated | |
| .ls-label-xs-visibility (New in 3.0 ) | Label to be hidden in big screen, but show with little screen (with no more table) and to screenreader | label | <label class="ls-no-js-hidden"> | Used for label inside table cell of array question type | |
| .ls-input-group-extra (New in 3.0 ) | Same usage of boostrap input-group-addon, but without the border and the background. | right suffix | <div class="ls-input-group-extra"> | Used for right and left suffix (global) | |
| .checkbox (Obsolete since 3.0) | input[type=checkbox] | Question with checkbox | <input type="checkbox" class="checkbox"> | With modern browser: not needed, but some old browser need this | |
| .radio (Obsolete since 3.0) | input[type=radio] | Question with radio | <input type="radio" class="radio"> | With modern browser: not needed, but some old browser need this | |
| .text | input[type=text] | Question with input text, or textarea | <textarea class="text"> | ||
| .answertext | Array question type | Answer part of array question type | <th class="answertext"> | ||
| .col-answers | Array question type | Column of answers | <col class="col-answers"> | ||
| .odd .even (Obsolete since 2.50) | Array question type | Alternation for column | <col class="odd"> | ||
| .array1 .array2 (Obsolete since 3.0) | Array question type | Alternation for line | <tr class="array1"> | ||
| .ls-odd .ls-even (New in 3.0 ) | Array question type | Alternation for subquestion and Y axis | <tr class="ls-odd"> |
Some example of question part with classes
Text-short question type:
<p class="question answer-item text-item ">
<label class="hide label" for="answerSGQA">Answer</label><input type="text" value="" id="answerSGQA" name="SGQA" size="50" class="text  empty">
</p>
Multiple short text
<ul class="subquestions-list questions-list text-list">
  <li class="question-item answer-item text-item" id="javatbdSGQA">
    <label for="answerSGQA">Some example subquestion</label>
     <span><input type="text" value="" id="answerSGQA" name="SGQA" size="20" class="text empty"></span>
  </li>
</ul>
Array question type
<table class="question subquestion-list questions-list ">
<caption class="hide read">Some explanation for accessibility.</caption>
<colgroup class="col-responses">
<col width="50%" class="col-answers">
<col width="25%" class="odd">
<col width="13.3%" class="col-no-answer even">
</colgroup>
<thead>
<tr class="array1 dontread">
<td> </td>
<th>1</th>
<th>No answer</th>
</tr>
</thead>
<tbody>
<tr class="array2 answers-list radio-list" id="javatbdSGQ">
<th width="20%" class="answertext">Some example subquestion
</th>
<td class="answer_cell_001 answer-item radio-item">
<label for="answerSGQA" class="hide read">1</label>
<input type="radio" value="1" id="answerSGQA" name="SGQA" class="radio">
</td>
<td class="answer-item radio-item noanswer-item">
<label for="answerSGQA" class="hide read">No answer</label>
<input type="radio" value="" id="answerSGQA" name="SGQA" class="radio">
</td>
</tr>
</tbody>
</table>Vollständige Liste der CSS-Klassen für Fragen
| Question Type | Question Class | Question ID |
| 5 point choice | .choice-5-pt-radio | 5 |
| Array (10 point choice) | .array-10-pt | B |
| Array (5 point choice) | .array-5-pt | A |
| Array (Flexible Labels) dual scale | .array-flexible-duel-scale | 1 |
| Array (Increase, Same, Decrease) | .array-increase-same-decrease | E |
| Array (Multi Flexible) (Numbers) | .array-multi-flexi | : |
| Array (Multi Flexible) (Text) | .array-multi-flexi-text | ; |
| Array (Yes/No/Uncertain) | .array-yes-uncertain-no | C |
| Array (flexible labels) | .array-flexible-row | F |
| Array (flexible labels) by column | .array-flexible-column | H |
| Boilerplate question | .boilerplate | X |
| Date | .date | D |
| Gender | .gender | G |
| Huge free text | .text-huge | U |
| Language switch | .language | I |
| List (dropdown) | .list-dropdown | ! |
| List (radio) | .list-radio | L |
| List with comment | .list-with-comment | O |
| Long free text | .text-long | T |
| Multiple numerical input | .numeric-multi | K |
| Multiple options | .multiple-opt | M |
| Multiple options with comments | .multiple-opt-comments | P |
| Multiple short text | .multiple-short-txt | Q |
| Numerical input | .numeric | N |
| Ranking | .ranking | R |
| Short free text | .text-short | S |
| Yes/No | .yes-no | Y |
The full list of validation classes
These apply to the help and/or validation tip messages so that each type can be individually styled.
The .hide-tip option and .input-error options interact by default so that you can have validation tips hidden. However, they do appear when there are validation errors and disappear again when those errors are rectified.
All of these are designed to eliminate the need for pop-up alert messages. Instead, tips can appear/disappear as needed and are color-coded to indicate whether the answers pass the validation criteria.
Furthermore, when you first visit a page that has unmet validation criteria, you can color-code the tips in a pleasing color to show which validation criteria have not been met yet; then re-display the page using a harsher color if the person submits the page with lingering validation errors.
| Purpose | CSS Class | Description |
| Mandatory | .mandatory | the question is mandatory |
| User input error | .input-error | the question had at least one validation error |
| Hide Tip | .hide-tip | added if you use the hide_tip option |
| defrault type | .em_default | for default tip set ( numeric value etc …) |
| Num answers | .em_num_answers | for for min_answers and max_answers |
| Value range | .em_value_range | for min/max_num_value_n and multiflexible_min/max |
| Sum range | .em_sum_range | for min/max/equals_num_value |
| Regex validation | .em_regex_validation | for regular-expression validation of the question |
| Question-level validation function | .em_q_fn_validation | for the em_validation_q option |
| Subquestion-level validation function | .em_sq_fn_validation | for the em_validation_sq option |
| Other comment mandatory | .em_other_comment_mandatory | for other_comment_mandatory option - shows when "other" is selected but associated comment is missing. |
Importing styles into your custom template
The custom question styles are near the bottom of each template's CSS file and start with:
/* --------------------------- START: Question styles ------------------------------ */
If you're styling your own custom template, you should be able to copy everything after the above one from templates/default/template.css (for table-based layouts) or /templates/limespired/template.css (for CSS-based layouts) into your own style sheet without any impact on your other styles.
Internet Explorer conditional style sheets
Because of the marked discrepancies in rendering between IE6 & IE7 and the other browsers, there are special IE conditional style sheets included for each template.
<!--[if IE]>
  <link rel="stylesheet" type="text/css" href="{TEMPLATEURL}IE_fix_all-versions.css" />
<![endif]-->
<!--[if lt IE 7]>
  <link rel="stylesheet" type="text/css" href="{TEMPLATEURL}IE_fix_older-than-7.css" />
<![endif]-->
<!--[if IE 8]>
		<link rel="stylesheet" type="text/css" href="{TEMPLATEURL}ie_fix_8.css" />
<![endif]-->
You should include the above code within your startpage.pstpl and copies of both the IE style sheets from either /templates/default/ or /templates/limespired for Tables base layout and CSS based layout respectively.
Alternative solution for Internet explorer
You can put a conditional class for body in startpage.pstpl and use this class in your template.css. This method is used in the citronade template (Obsolete since 2.06). Adding a js / no-js class to have javascript / no javascript system.
<!--[if lt IE 7 ]> <body class="lang-{SURVEYLANGUAGE} {SURVEYFORMAT} ie ie6 ielt7 ielt8 ielt9 no-js"> <![endif]-->
<!--[if IE 7 ]> <body class="lang-{SURVEYLANGUAGE} {SURVEYFORMAT} ie ie7 ielt8 ielt9 no-js"> <![endif]-->
<!--[if IE 8 ]> <body class="lang-{SURVEYLANGUAGE} {SURVEYFORMAT} ie ie8 ielt9  no-js"> <![endif]-->
<!--[if IE 9 ]> <body class="lang-{SURVEYLANGUAGE} {SURVEYFORMAT} ie ie9 no-js"> <![endif]-->
<!--[if gt IE 9]><!--><body id="body" class="lang-{SURVEYLANGUAGE} {SURVEYFORMAT} no-js"><!--<![endif]-->
<script type='text/javascript'>/*<![CDATA[*/(function(H){ H.className=H.className.replace(/\bno-js\b/,'js') })(document.getElementsByTagName('body')[0]);/*]]>*/</script>
And in template.css use:
.ie6{/*specific for internet explorer 6*/}
.ielt8{/*specific for internet explorer 6 and 7*/}
.ie{/*specific for all internet explorer */}
Right-to-Left (RTL) Languages and justify
The text editor within LimeSurvey is able to format RTL text. However, the editor itself shows the RTL language in a left to right format when justified. This is just an editor display issue. The RTL and justified question or text will display correctly from right to left, even when justified, in your survey or on preview.
Schlüsselwörter
Schlüsselwörter in einer Vorlagendatei werden durch entsprechenden Umfrage-Information ersetzt. Sie sind von geschweiften Klammern umschlossen, z.B {SURVEYNAME}
Die folgenden Ausdrücke/Platzhalter werden von LimeSurvey beim Aufbau der Umfrageseite automatisch umgewandelt und der entsprechenden Information ersetzt. Diese Ausdrücke funktionieren auf fast jeder Vorlagenseite, ausgenommen der Abschluss-Seite.
| {SURVEYNAME} | Der Name der Umfrage |
| {SURVEYDESCRIPTION} | Der Beschreibung der Umfrage |
| {WELCOME} | Dem Willkommenstext der Umfrage |
| {PERCENTCOMPLETE} | Ein grafischer Balken, der den Prozentsatz anzeigt, wie viel der Umfrage schon beantwortet wurde |
| {GROUPNAME} | Dem Namen der aktuellen Gruppe |
| {GROUPDESCRIPTION} | Die Beschreibung der aktuellen Gruppe |
| {QUESTION} | Den Text der aktuellen Frage |
| {QUESTION_CODE} | Den Fragencode der aktuellen Frage |
| {ANSWER} | Die Anwort(en) zur aktuellen Frage |
| {THEREAREXQUESTIONS} | Wird ersetzt mit der Textzeile: "Ihre Umfrage besteht aus X Fragen." |
| {NUMBEROFQUESTIONS} | Die Anzahl der Fragen in ihrer Umfrage |
| {TOKEN} | Der entsprechende Probandenschlüssel |
| {SID} | DieID der aktuellen Umfrage |
| {QUESTIONHELP} | Dem Hilfetext zur aktuellen Frage (in einem Java-Skript-Popup) |
| {QUESTIONHELPPLAINTEXT} | Der Ausfüllhilfe zur aktuellen Frage |
| {NAVIGATOR} | Die "Vor >>" und "<< Zurück" Buttons |
| {SUBMITBUTTON} | Dem "Absenden" Button |
| {COMPLETED} | Dem Text "Survey is completed and saved" aus der Übersetzung |
| {URL} | Der URL/URL Titel für die Umfrage |
| {PRIVACY} | Fügt den Inhalt der Datei privacy.pstpl aus der Vorlage ein |
| {PRIVACYMESSAGE} | Die "Privacy Message" aus der Übersetzung |
| {CLEARALL} | DerURL für "Beenden und Antworten verwerfen" |
| {TEMPLATEURL} | Der URL zum aktuellen Vorlagen-Verzeichnis (nützlich um Logos und Bilder in eine Vorlage einzubauen) |
| {SUBMITCOMPLETE} | Dem entsprechenden Text aus der Übersetzung, welche dem Benutzer mitteilt, dass er die Umfrage vollständig ausgefüllt hat und nun absenden kann, in dem er auf den "Absenden"-Button klickt. |
| {SUBMITREVIEW} | Dem entsprechenden Text aus der Übersetzung, welche dem Benutzer mitteilt, dass er die Ergebnisse der Umfrage verändern kann, wenn er auf den "Vor" oder "Zurück"-Button klickt. |
| {TOKEN:FIRSTNAME} | Wenn die Antworten der Umfrage nicht anonym sind, mit dem Vornamen des entsprechenden Probanden (aus der Probandentabelle) |
| {TOKEN:LASTNAME} | Wenn die Antworten der Umfrage nicht anonym sind, mit dem Nachnamen des entsprechenden Probanden (aus der Probandentabelle) |
| {TOKEN:EMAIL} | Wenn die Antworten der Umfrage nicht anonym sind, mit der E-Mail-Adresse des entsprechenden Probanden (aus der Probandentabelle) |
| {TOKEN:ATTRIBUTE_1} | Wenn die Antworten der Umfrage nicht anonym sind, mit dem Attribut 1 des entsprechenden Probanden (aus der Probandentabelle) |
| {TOKEN:ATTRIBUTE_2} | Wenn die Antworten der Umfrage nicht anonym sind, mit dem Attribut 2 des entsprechenden Probanden (aus der Probandentabelle) |
| {ANSWERSCLEARED} | Dem Text "Antworten zurückgesetzt" aus der Übersetzung |
| {RESTART} | URL um mit der Umfrage erneut beginnen zu können |
| {CLOSEWINDOW} | URL zum Schließen des Fensters |
| {REGISTERERROR} | Zeigt eine Fehlermeldung auf der Registrierungsseite (z.B.:: "Sie müssen eine gültige E-Mail-Adresse angeben") |
| {REGISTERMESSAGE1} | Dem Text "Sie müssen registriert sein, um an dieser Umfrage teilzunehmen." aus der Übersetzung |
| {REGISTERMESSAGE2} | Informationen zur Registrierung aus der Übersetzung |
| {REGISTERFORM} | Das aktuelle Formular zur Registrierung, hängt davon ab, ob das Feld attribute_1 oder attribute_2 verwendet wird. |
| {CHECKJAVASCRIPT} | Eine Fehlermeldung, welche dem Benutzer mitteilt, dass er in seinem Browser Javascript deaktiviert hat. Das Aussehen dieser Meldung wird auf CSS ähnliche Art in der Datei startpage.pstpl festgelegt. |
Input/Buttons
Each "input" type in a survey has been given its own class name, so that you can add CSS to your "startpage.pstpl" file and have some control over the appearance of form buttons and inputs. These class names are as follows:
- submit (Submit Buttons)
- text (Text Inputs - for short free text, date, and numerical type)
- answertext (Text of answers)
- radio (Radio Buttons)
- checkbox (Check Boxes)
- select (Select / List Boxes)
- textarea (Large text inputs - for long free text)
- clearall (The "Exit and Clear Survey" link)
- rank (The rank style question. Doesn't set the colour of the select box or the text boxes, but it does allow the changing of background colour, text colour, size etc., for the rest of the ranking question)
- graph (The "percentage completed" graph table)
- innergraph (The table inside the graph table - this contains the 0% and 100% text. Use this for changing the size of this text)
- question (General settings for any question that is displayed within a table. Generally, you should use this to make sure that their font size and color is the same as you have used elsewhere as a default)
- mandatory (Mandatory questions)
- input-error (User input error - for if a user has made a mistake with a mandatory question or question with validation)
- array1 and array2 (These two styles are cycled when presenting the range of answers for an array type question. This allows you to set an alternating background color for these question types. Array1 is also used for the column headings in these question types)
- errormandatory (Sets the color and style of the "This question is mandatory" error message)
- warningjs (Sets the color and style of the warning message displayed if the participant's browser has javascript disabled)
There are also some elements that can be accessed using the ID of the element (#ID in CSS):
- surveycontact (The contact message shown on the start page)
- tokenmessage (used for messages inside the survey, e.g. the session expired error message)
Because you can edit all the HTML aspects, there's no reason to surround your templates with a
<div class='new_name'></div>
and then define a css for that new_name class.
Styling the progress bar
The progress bar appearance can be modified with CSS.
To change the background color of the bar, add something like the following to the end of your template.css file:
#progress-wrapper .ui-widget-header {
 background-color: #3300FF;
}
To change the border color of the bar, add something like the following to the end of your template.css file:
#progress-wrapper .ui-widget-content,
#progress-wrapper .ui-widget-header {
 border: 1px solid #FF0000;
}
Advanced Features Available to Developers
LimeSurvey has integrated some user-made patches that permits some special changes. These very advanced features (generally) require changes to the underlying code base of LimeSurvey and should be done carefully in order not to introduce security holes.
Support for your own Javascript functions
Some users may need to run Javascript on the survey pages, but calling checkconditions() in the BODY element made it impossible to do so. This call has been replaced with a small JavaScript function in the HEAD that sniffs for the existence of checkconditions() and template_onload() before calling them. In this way, a template author can create his or her own template_onload() function in the HEAD that replaces the default one.
- Disable XSS filter - in Global settings -> Security, set "Filter HTML for XSS" to No.
- Enter your script in the source of a question or group description.
Videos on Templates
This video will demonstrate the basic and advanced template functions that are available to all LimeSurvey users. This includes changing the appearance of certain forms and inserting custom graphics. Additionally, it will thoroughly walk you through on how to edit and preview specific page templates, importing/exporting templates, modify appearance of questions in the CSS, and customizing survey description page.
Video - needed
Tips & Tricks
Some language specific element
If you want to have some language specific sentence in a survey, for example a help at the end of each page, you can add in a .pstl file a sentence and hidding it for other language. If we hide it in the template.css, we can use the pseudo selector :lang, but we use some class for better compatibility.
Below, there are two help sentences, in French and English. Put this on endpage.pstpl:
<div class="fr" lang="fr">Pour de l'aide en direct appelez le 000000</div>
<div class="en" lang="en">For some help, please call 000000</div>
and in template.css:
.lang-fr .en{display:none}
.lang-en .fr{display:none}
Change the layout of the survey page
After editing and saving a template, it applies to a survey list page only if it is selected from the settings of the survey. To make it the default template, go under the General tab located in the Global settings of your LimeSurvey installation and choose the desired template. From now on, all the templates that use the "default" option as template plus the ones that are going to be newly created, will use the newly selected default template.
To use your current template for this page, you have to change the according setting from Global settings. In older versions, this change can be done by editing the $defaulttemplate setting from the config file: copy this setting from config-defaults.php to config.php which overrides config-defaults.php and edit this setting to $defaulttemplate = 'yourtemplatename';.
Import/Export of templates: Mac users
Mac users, please note that the Mac OSX default archive utility may have problems with zip folders "generated on the fly".
A workaround is to unix'es unzip from the command line:
$ unzip template.zip -d template
Archive: template.zip
inflating: template/startpage
inflating: ...
Another workaround is to use scripts in their mac-compiled counterparts.
Replacing the help icon (Obsolete since 2.50)
When a question help text is shown, then an help.gif image is used from the default template folder.
You can replace this image by uploading a new help.gif, help.png or help.jpg in your custom template folder. It will then be automatically used instead of the default help icon.
Replacing an existing logo (New in 2.50 ) (Obsolete since 3.0)
Note: In the default Template of 2.50, there is no preembedded logo. Read further our wiki on how to add your own logo.
1. To edit the logo go to the template.css file which you can find it here:

2. Click the search button to find occurrences of logo related styles and search for logo
3. Edit the main style file.
You will see something similar to:

If you want to change the image, just replace logo.gif with another image link. Example: (logo.png or logo.jpg).
If you want to change the image size, adjust width and height (in pixels) like this:
width:100px; height:100px;
Adding your own logo (Obsolete since 3.0)
1. Find and open the startpage.pstpl template file.

2. After this
<div id="topContainer" class="jumbotron">add this line to startpage.pstpl:
<div class="container"><img id='page_logo' src='{TEMPLATEURL}/files/logo.png' class="clearfix pull-right" /></div>3. To upload your own logo, go to the template editor and upload your logo.

To position your logo, please use one of the following css classes:
- If you want the logo to be placed on the left side:
clearfix pull-left
- If you want the logo to be placed on the right side:
clearfix pull-right
- If you want to center the logo
clearfix center-block
Dasselbe Template mit verschiedenen Logos benutzen
Wenn Sie dasselbe Template für all Ihre Umfrage nutzen und nur das Logo für jede Umfrage ändern möchten, dann können Sie den {SID}-Platzhalter in Ihrer .pstpl Vorlagendatei benutzen und auf diesem Weg auf verschiedene Bilder verweisen:
<img src="{TEMPLATEURL}files/logoDatei-{SID}.png">
Eigenes Favicon zeigen
Ein Favicon ist das kklein Symbol, das Sie in ihrer Browser-Adresszeile, Ihren Lesezeichen oder auf dem Tabfür ihre LimeSurvey-Umfrage sehen. Sie können Ihr eigenes Icon auf folgende Weise anzeigen:
- Erstellen Sie ein neue Favicon - googlen Sie einfach um viele Webseiten zu finden, die Ihnen dabei helfen.
- Benennen Sie die Datei 'favicon.ico" und laden Sie diese in ihrem Template als zusätzliche Datei hoch.
- Fügen Sie den folgenden Code zu Ihrer "startpage.pstpl" for dem </head> Tag hinzu.
<link rel="shortcut icon" href="{TEMPLATEURL}files/favicon.ico" type="image/x-icon">
<link rel="icon" href="{TEMPLATEURL}files/favicon.ico" type="image/x-icon">
Different appearance for survey-/question-pages
If you want LimeSurvey to change the appearance of every second page (i.e. of even and odd survey pages), you can use .page-odd class in your CSS file to change the appearance of odd pages.
An example from default template of LimeSurvey 1.91+:
.page-odd table.question-group {
 background-color: #D2F2D3;
}
If you do not want differentiate even and odd pages, find all instances of .page-odd in template.css and remove those styles.
Create a vertical separator border for dual scale array
To create a vertical separator border for a dual scale array, you can add the following lines to your template.css-file.
table.question thead td.header_separator,
table.question tbody td.dual_scale_separator
{
   border-right:solid 1px #00A8E1;
}
header_separator is used to adress the separator for the header "td". The "dual_scale_separator" is used to address the separator column in the dual scale array.
Hide the survey contact message shown on the start page/survey list (Obsolete since 3.0)
To hide the "Please contact ..." message on the start page (with the survey list), you can add the following to the $(document).ready function in the template.js of your used design template:
$('#surveycontact').hide(); //Hides the survey contact message
Remove the survey contact message shown on error messages (Obsolete since 3.0)
If you want to remove the survey contact message from error messages, it'll be trickier. You can add the function from below. It calls the $(document).ready function in the template.css of your used design template:
removeContactAdressFromMessage(); //Removes the survey contact message from error messages
and add the following function to your *template.js* file
function removeContactAdressFromMessage()
{
if ($('#tokenmessage').length > 0)
   {
   var oldMessage = $('#tokenmessage').html();
   var indexContact = oldMessage.indexOf('Bitte kontaktieren');
   var newMessage = oldMessage.substr(0, indexContact);
   $('#tokenmessage').html(newMessage);
   }
}
It will probably not work for a survey in English language and has to be extended when used for multilingual surveys. But it's an idea/tip on how to solve this.
How to deal with multilingual question attributes (Obsolete since 2.50)
If you have a multilingual survey and e. g. want to use a different string for the "other" field, this could only be done for the base language (until this feature was added at LimeSurvey 2.0). To work around this, paste in the field to change the label for "other":
<span class="en">New label</span><span class="fr">Nouveau label</span>
Add in the template.css of your template (at /limesurvey/upload/templates/<yourtemplatename>/template.css):
html:lang(en) .fr{display:none}
html:lang(fr) .en{display:none}
Adding your own logo to the survey list (New in 3.0 )
- First please open the theme editor for the theme you like to use.
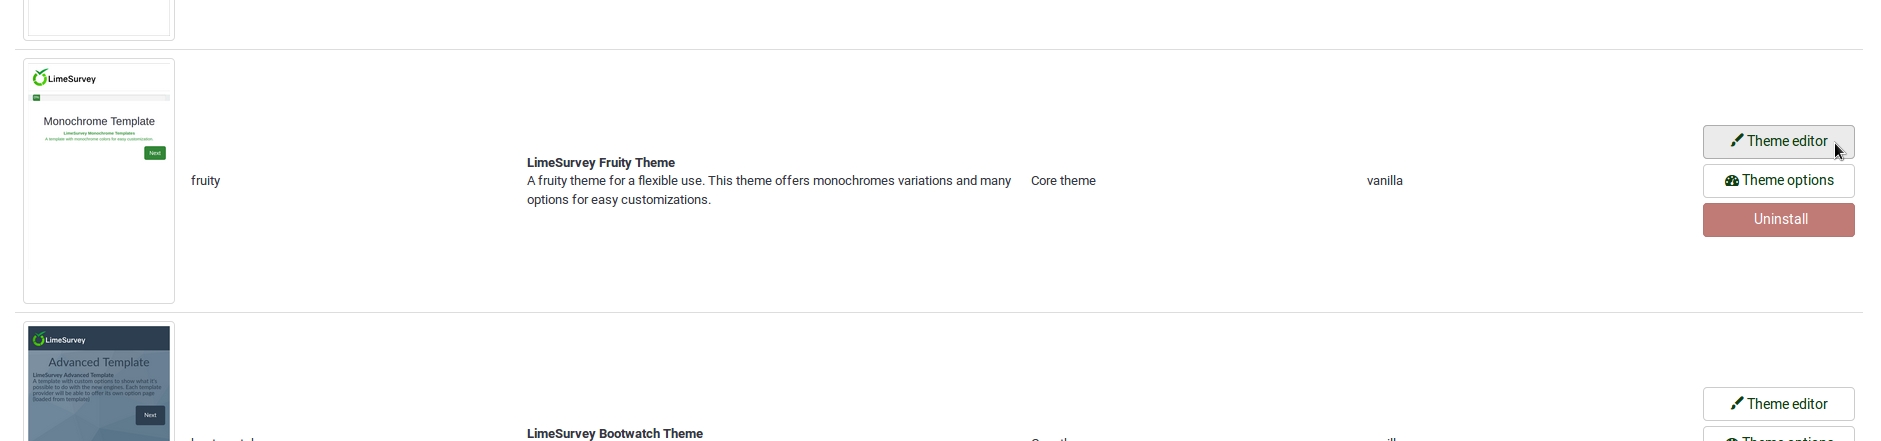
- We recommend to use fruity, it is our best theme currently.
- Then extend the theme and give it a name you will recognize.
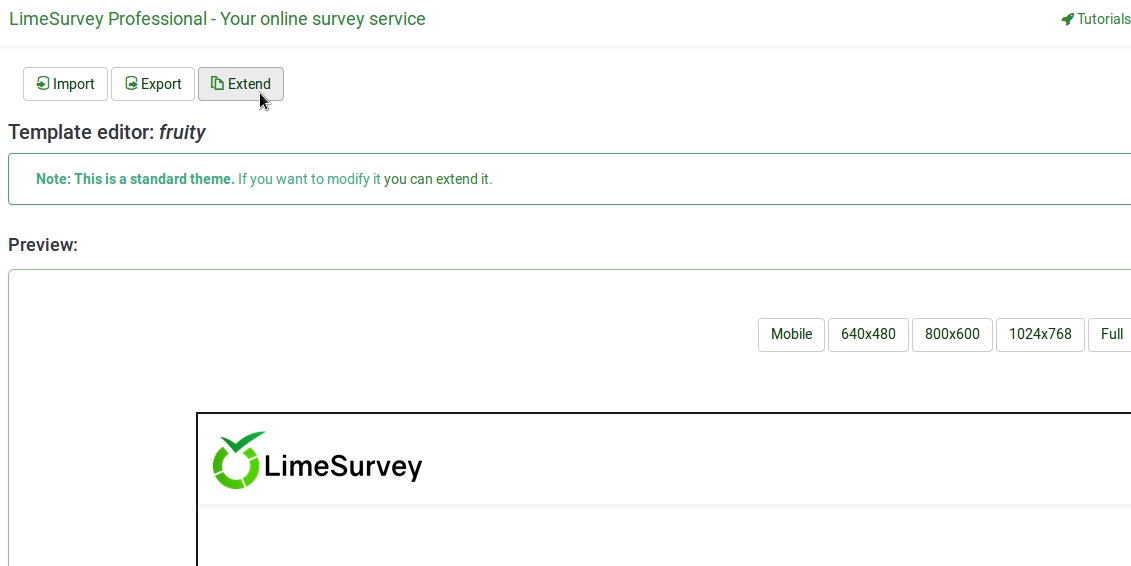
- In the following view you may upload the logo you want to use.
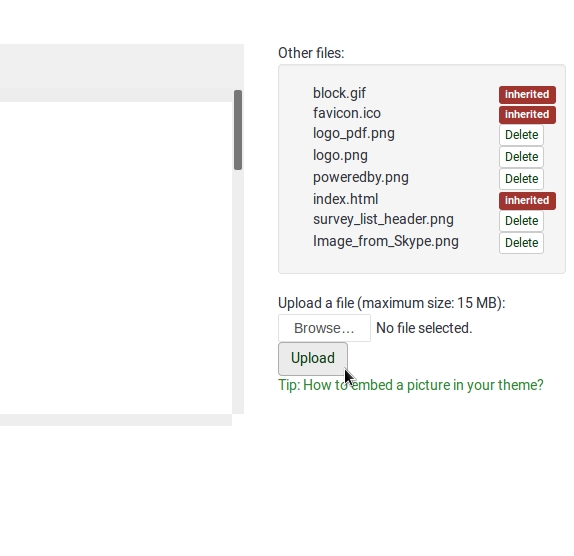
- Select the editor screen `Survey List´ in the Screen dropdown in the top right corner.
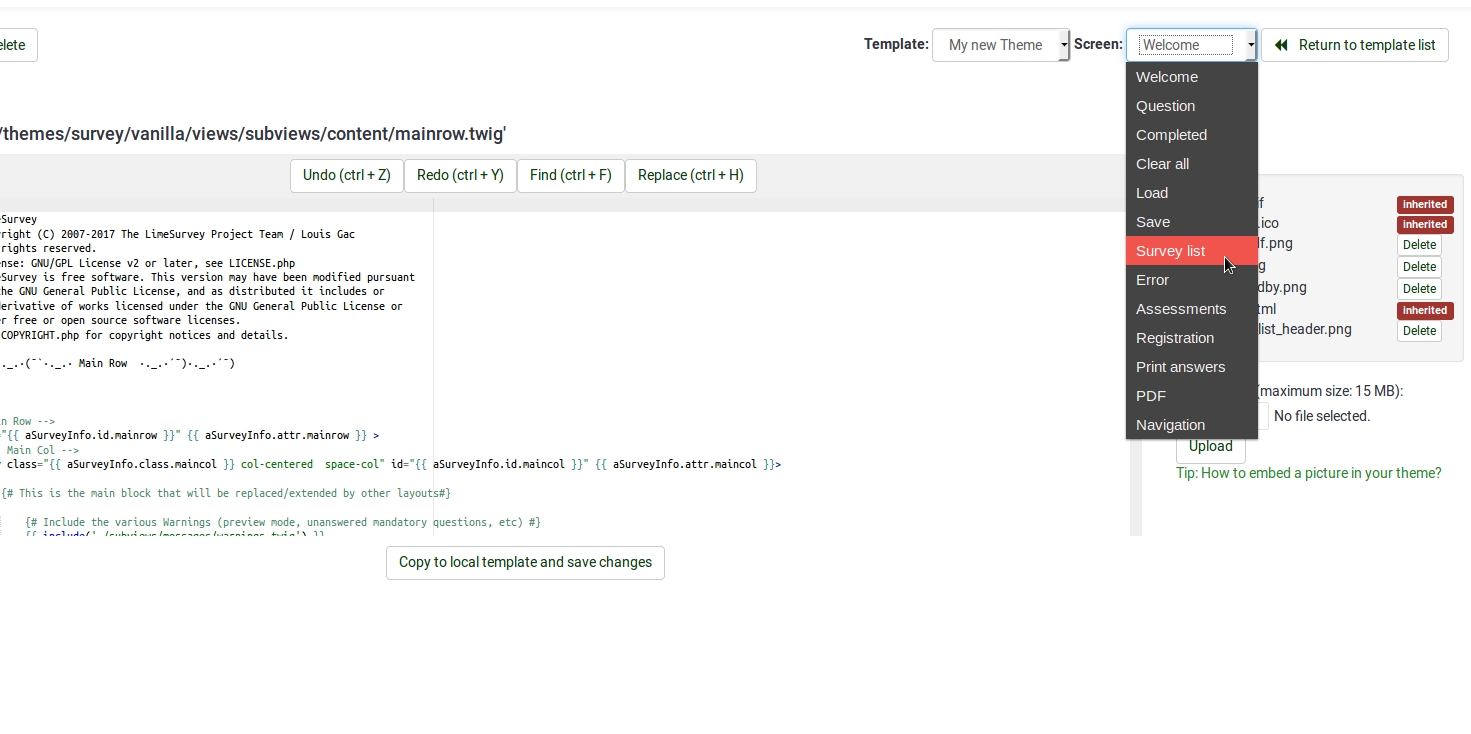
- Then select `layout_survey_list.twig´ in the left side menu.
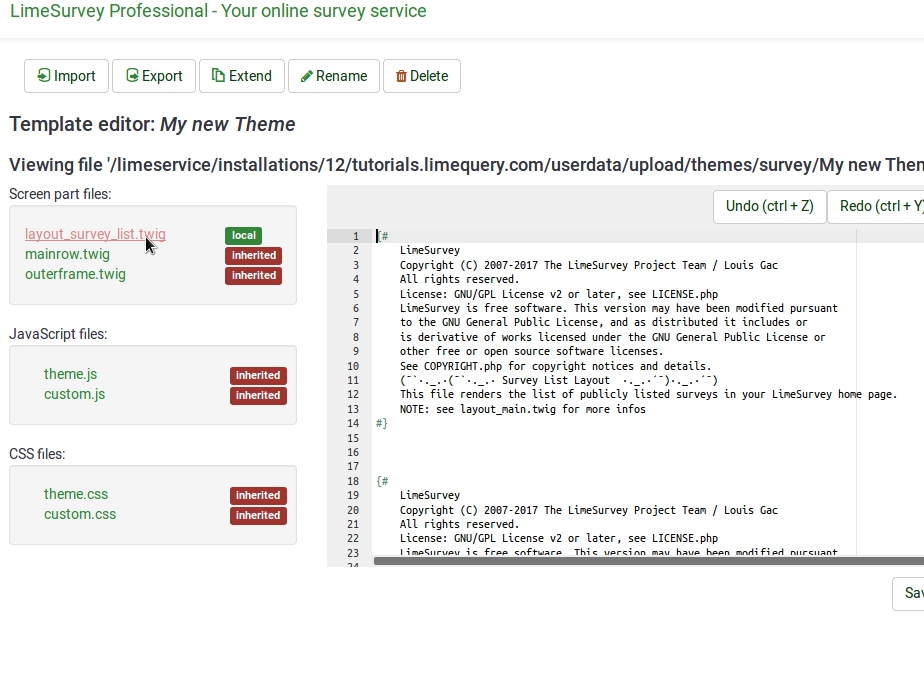
- In the editor scroll to line 126 and change the marked part to the filename of the image you uploaded to the theme before.
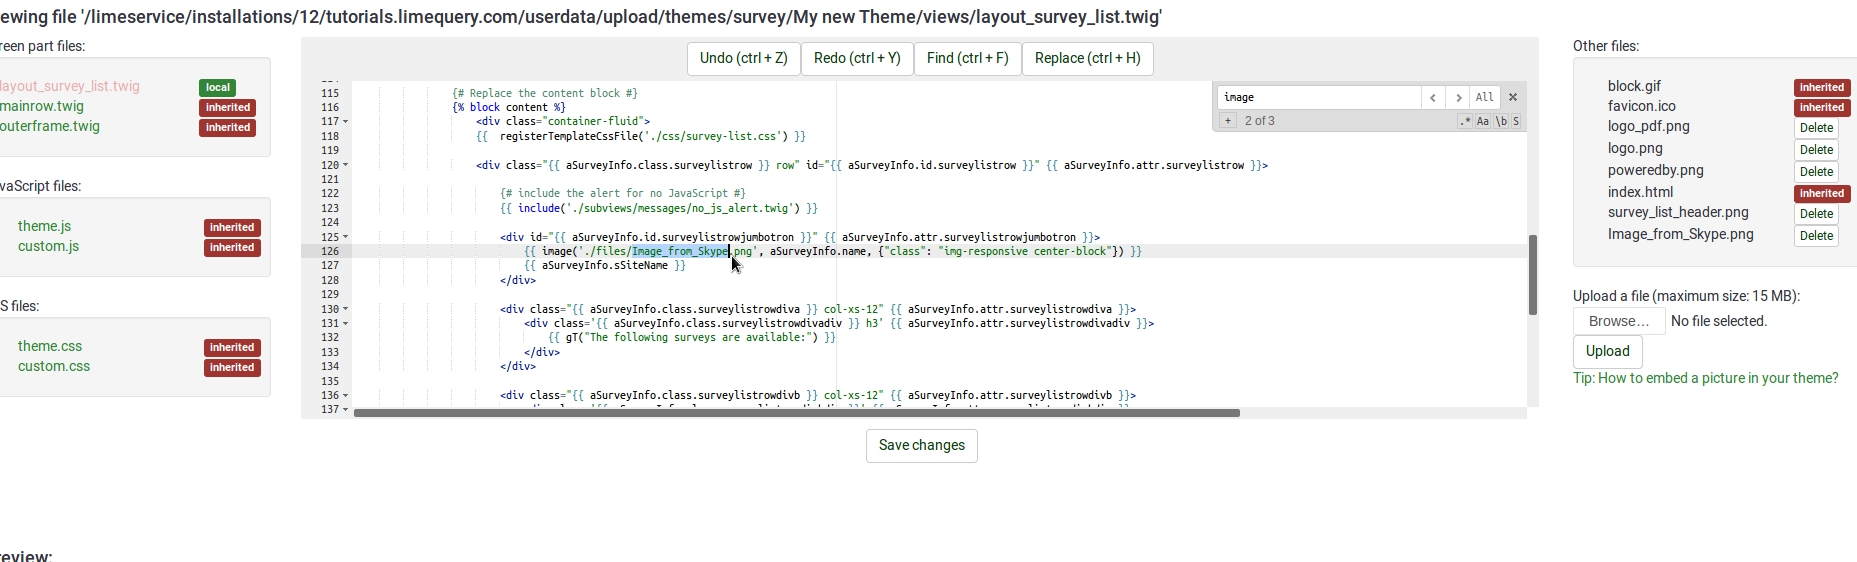
- Save your file.
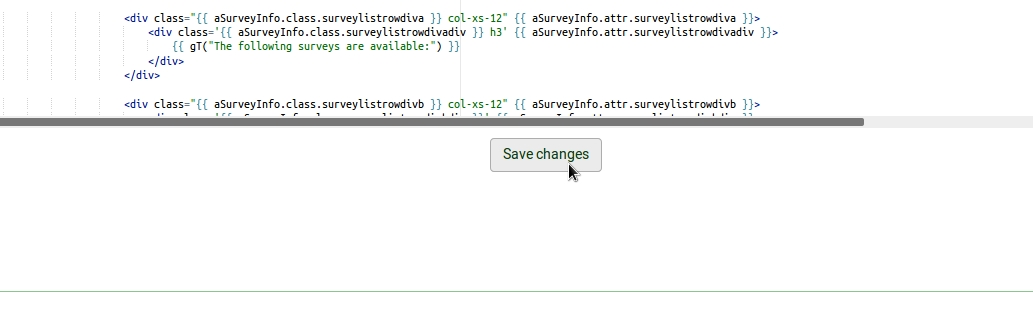
- Change default theme to your extended theme.
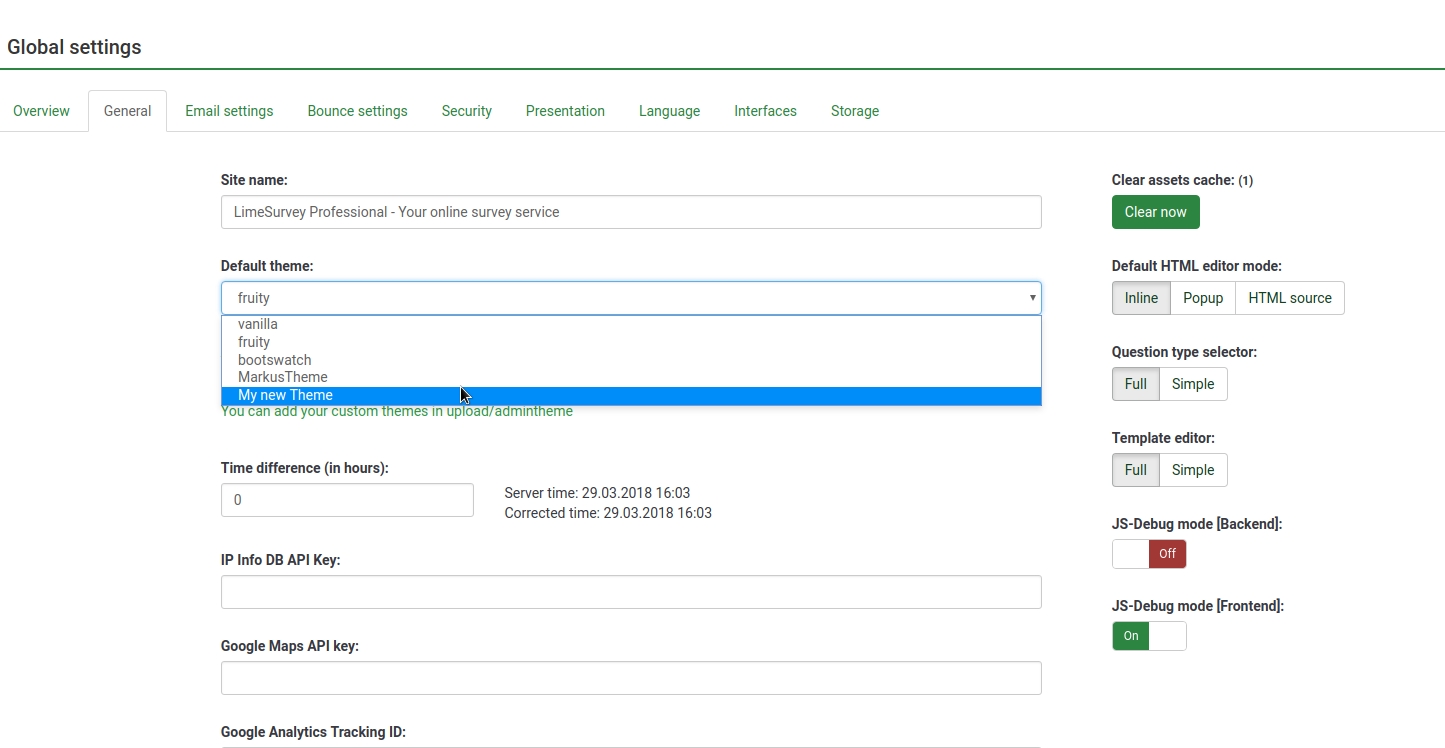


Custom Question Views (New in 3.0 )
As of version 2.5, you can create template-specific custom views for questions and some of their incorporated elements. This is useful if you want to modify the HTML layout of a particular question type for one or more surveys.
- In application/config/config.php, find 'config'=>array and add this line to the array : 'allow_templates_to_overwrite_views'=>1
- In /{your_template}/config.xml, set "overwrite_question_views" to true
- Copy application/views/survey/* to template/{your_view_directory}/survey/
- Note that you only need to copy the files that you intend to modify but the file structure must remain the same as in application/views/survey/
Insert Custom CSS or JavaScript files for template (New in 2.50 )
As of version 2.50, you can use the config.xml file to automatically load plugin files.
- Upload your files to the template /css or /scripts folder
- In /{your_template}/config.xml, add the file paths to the <css> or <js> blocks, something like this:
<css>
	<filename>css/jquery-ui-custom.css</filename>
	<filename>css/bootstrap-slider.css</filename>

	<filename>css/awesome-bootstrap-checkbox/awesome-bootstrap-checkbox.css</filename>
	<filename>css/flat_and_modern.css</filename>

	<filename>css/template.css</filename>

	<filename>css/myCustomPlugin.css</filename>
</css>
<js>
	<filename>scripts/template.js</filename>
	<filename>scripts/bootstrap-slider.js</filename>

	<filename>scripts/myCustomPlugin.js</filename>
</js>