Surveys - introduction/de: Difference between revisions
From LimeSurvey Manual
No edit summary |
No edit summary |
||
| Line 102: | Line 102: | ||
=== Präsentation & Navigation === | === Präsentation & Navigation === | ||
Folgende Optionen finden Sie unter dieser Registerkarte: | |||
Revision as of 11:37, 7 January 2019
Allgemeines
Eine Umfrage umfasst verschiedene miteinander verbundene Einstellungen: Sprachen, Fragengruppen, Fragen, Fragenattribute, Antworten, Unterfragen, Standardantworten, Bewertungen, usw. Um die Umfrageverwaltung zu vereinfachen, wurde kürzlich die Funktion Umfragegruppen hinzugefügt.
Umfragen
Es gibt zwei Möglichkeiten, um auf die Seite Neue Umfrage erstellen zu gelangen:
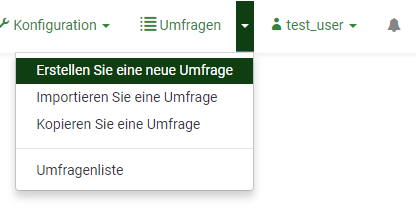
1. Sie können auf den Pfeil neben der Schaltfläche Umfragen, die sich in der obersten Symbolleiste Ihrer LimeSurvey-Homepage befindet. Es erscheint anschließend eine Dropdown-Liste, in der Sie die Option Erstellen Sie eine neue Umfrage auswählen können:
2. Sie können auch direkt auf die Schaltfläche Umfragen in der obersten Symbolleiste Ihrer LimeSurvey-Homepage klicken.

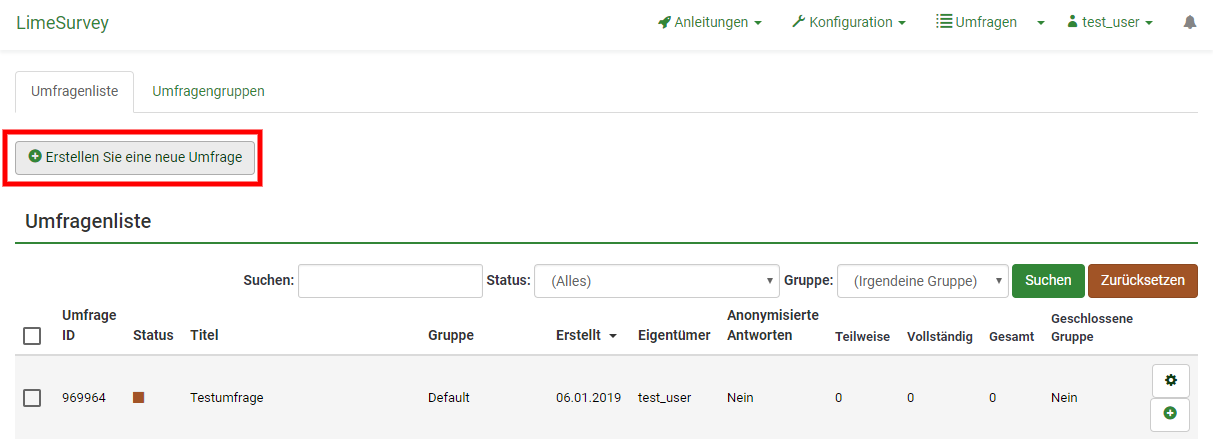
Eine Liste aller Umfragen wird angezeigt. Um eine neue Umfrage zu erstellen, klicken Sie auf die Schaltfläche Erstellen Sie eine neue Umfrage 'oben links im Fenster oberhalb der Liste mit allen Umfragen.
Eine neue Umfrage erstellen
Nachdem Sie auf "Erstellen Sie eine neue Umfrage" geklickt haben, wird die folgende Seite geladen.
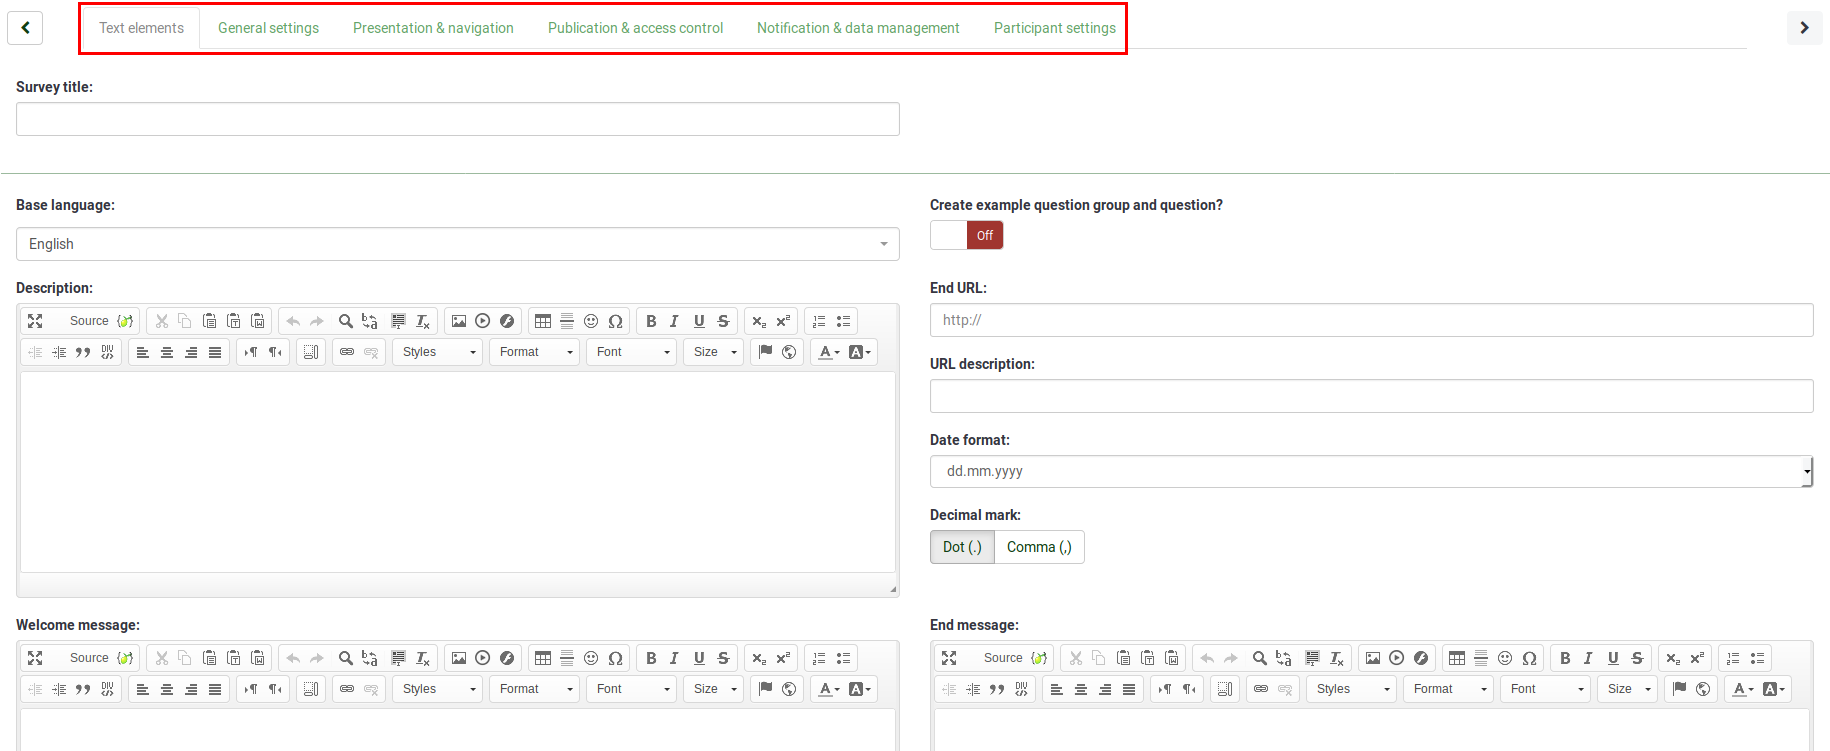
Um Ihre Umfrage zu optimieren, überprüfen Sie die unter den Registerkarten angeführten Optionen:
- Textelemente
- Allgemeine Einstellungen
- Präsentation & Navigation
- Publizieren & Zugangskontrolle
- Benachrichtigung & Datenverwaltung
- Teilnehmereinstellungen
Textelemente
Die folgenden Einstellungen befinden sich unter dieser Registerkarte:
- Umfragetitel: Hier können Sie den Titel der Umfrage festlegen.
- Beispielfragengruppe und Frage erstellen?: Wurde diese Einstellung auf "An" gestellt, wird Ihrer Umfrage standardmäßig eine Fragengruppe und eine zugehörige Frage hinzugefügt.
- Basissprache: Dies ist die Hauptsprache der Umfrage. Wenn Sie weitere Umfragesprachen hinzufügen möchten, erstellen Sie zunächst eine Umfrage, und rufen Sie dann die allgemeinen Einstellungen der neu erstellten Umfrage auf und fügen Sie eine zusätzliche Sprache hinzu.
- Beschreibung: Sie können eine Beschreibung eingeben. Standardmäßig erleichtert Ihnen ein HTML-Editor die Formatierung de Textes.
- End-URL: LimeSurvey bietet die Möglichkeit, die Umfrageteilnehmer nach Beendigung der Umfrage automatisch auf eine andere Seite weiterzuleiten. Falls dies gewünscht ist, tragen Sie hier die Ziel-URL ein und aktivieren Sie die Einstellung "Automatisch URL laden, wenn Umfrage abgeschlossen" in der Registerkarte "Präsentation & Navigation".
- URL Beschreibung: Hier kann eine kurze Beschreibung der End-URL stehen. Dies ist insbesondere dann hilfreich, wenn die angegebene End-URL-Website in einem anderen Kontext steht, als die Umfragen-Website.
- Datumsformat: Diese Einstellung wird dann wichtig, wenn Sie Datumsangaben zusammen mit den Antworten der Befragten verwenden wollen. Aus einer DropDown-Liste können Sie aus einer Vielzahl von Datumsformaten wählen. Wählen Sie jenes Datumsformat, mit dem Ihre Umfrageteilnehmer am besten vertraut sind.
- Dezimaltrennzeichen: Sie haben die Wahl zwischen den Einstellungen Punkt (Schreibweise Dezimalzahl: 0.00 )und Komma (Schreibweise Dezimalzahl: 0,00). Wählen Sie die Option, die für Ihre Umfrageteilnehmer am gebräuchlichsten ist.
- Willkommensnachricht: Dies ist jene Nachricht, die Umfrageteilnehmer zu sehen bekommen, wenn sie die Umfrage öffnen.
- Endnachricht: Geben Sie eine Nachricht ein, die den Umfrageteilnehmern angezeigt wird, sobald sie den Fragebogen vollständig ausgefüllt haben. Wenn das Feld Automatisch URL laden, wenn Umfrage abgeschlossen: in der Registerkarte Präsentation & Navigation auf "An" gestellt, wird die Endmeldung nicht mehr angezeigt.
Allgemeine Einstellungen
Folgende Optionen finden Sie unter dieser Registerkarte:
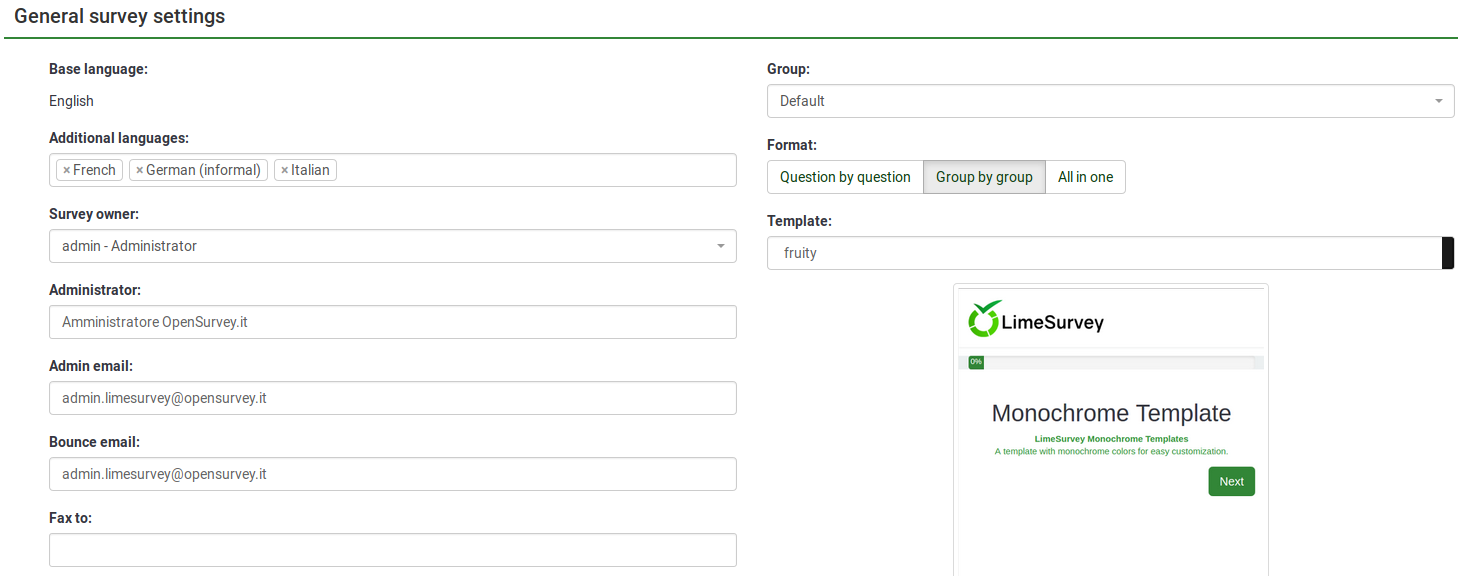
- Umfragebesitzer: Wählen Sie aus der Liste den Umfragebesitzer aus.
- Administrator Name: Geben Sie den Namen des des nach außen auftretenden Ansprechpartners der Umfrage ein.
- Adminstrator E-Mail: Geben Sie die E-Mail des Ansprechpartners ein.
- E-Mail für Rückläufer: Dies ist die E-Mail-Adresse, an die Benachrichtigungs-E-Mails mit Zustellungsfehlern gesendet werden.
- Faxnummer: Dieses Feld wird verwendet, um eine Faxnummer auf dem Ausdruck der "druckbaren Umfrage" anzuführen, falls Sie jemandem eine gedruckte Kopie senden möchten, weil er/sie die Online-Umfrage nicht verwenden kann.
- Gruppe: Wählen Sie die Umfragegruppe aus, zu der die neu erstellte Umfrage hinzugefügt werden soll.
- Format: Hier können Sie auswählen, auf welche Weise die Fragen in der Umfrage angezeigt werden. Drei Optionen stehen zur Verfügung:
- Frage für Frage: Pro Seite wird eine Frage angezeigt. Wenn diese Option gewählt wird, werden die Willkommensnachricht und eine Endnachricht auf einer eigenen Seite angezeigt;
- Gruppe für Gruppe: Pro Umfrageseite wird eine Fragengruppe angezeigt. Auch hier werden die Willkommensnachricht und die Endnachricht auf einer eigenen Seite angezeigt
- Alles auf einer Seite: Wird dies ausgewählt, werden alle Fragen auf einer einzigen Seite angezeigt. Ebenso werden die Willkommensnachricht und die Endnachricht alle zusammen mit den Fragen auf derselben Seite angezeigt.
- Vorlage: Hier geht es um die Gestaltung (Formatierung) Ihrer Umfrage. Die Standardvorlage ist ziemlich einfach gehalten, aber funktional. Weitere Informationen zum Erstellen eigener Vorlagen finden Sie hier.
Folgende Optionen finden Sie unter dieser Registerkarte:
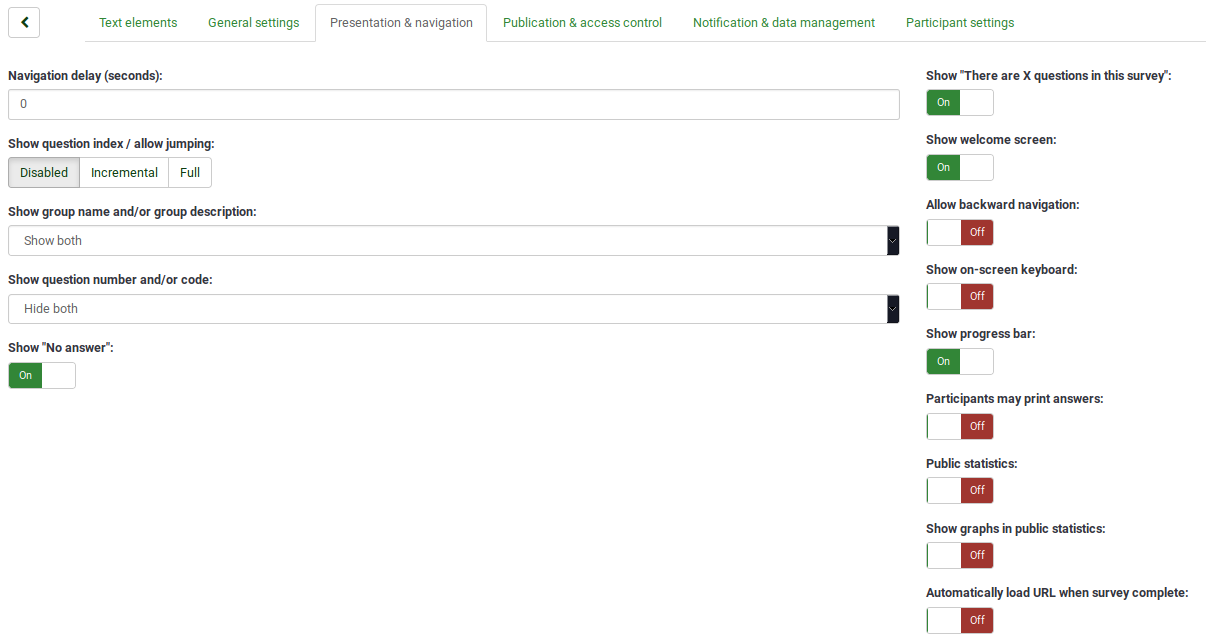
- Navigationsverzögerung (Sekunden): Zeigt die Anzahl Sekunden an, bevor die Schaltflächen "Weiter", "Zurück" und "Absenden" aktiviert wurden. Soll diese Funktion nicht verwendet werden, muss der Feldwert "0" (Sekunden; Standardwert, Anm.) sein.
- Zeige Fragenindex / erlaube Springen: Wenn diese Funktion aktiviert ist, kann ein Fragenindex in der Umfrage angezeigt werden, sodass der Benutzer von einer Fragengruppe zur anderen springen kann. Sie können zwischen folgenden Optionen wählen:
- Deaktiviert: Wenn diese Option aktiviert ist, wird kein Index in der Umfrage angezeigt;
- Inkrementell: Wenn diese Option ausgewählt ist, werden die Fragengruppen über das Indexmenü (oben rechts in der Umfrage) angezeigt. Es kann nur zu zuvor aufgerufenen Fragengruppen gesprungen werden.
- Vollständig: Das Springen von Fragengruppe zu Fragengruppe ist über das Indexmenü (oben rechts in der Umfrage) zulässig.
- Diese Umfrage hat X Fragen" anzeigen: In Ihrer Umfrage wird die Gesamtzahl der Fragen angezeigt.
- Zeige Fragengruppennamen und/oder -beschreibung: Ihre Umfrage zeigt den Umfrageteilnehmern die Namen und/oder die Beschreibung der Fragengruppen an.
- Zeige Fragennummer und/oder Fragencode: Hier kann ein eingestellt werden, ob den Umfrageteilnehmern die Fragennummer und/oder der Fragencode angezeigt werden soll. Die Fragennummer wird in dem Moment angezeigt, in dem jemand die Umfrage beginnen möchte. Der Fragencode wird bei jeder Frage angezeigt.
- Zeige "keine Antwort": Wurde dies aktiviert, wird bei Optionsfeldern sowie Auswahlfragen mit auszuwählenden Antworten auch die Option "keine Antwort" angezeigt. Auf diese Weise können sich die Befragten entscheiden, die jeweilige Frage bzw. Unterfrage nicht zu beantworten. Ihnen stehen folgende Optionen zur Verfügung:
- An: Wenn diese Option ausgewählt wird, können die Befragten bei solchen Fragen die Option "keine Antwort" wählen.
- Aus: Wenn diese Option ausgewählt wird, können die Befragten bei solchen Fragen die Option "keine Antwort" nicht wählen.
- Willkommensseite anzeigen: Wenn diese Option deaktiviert ist, wird die Willkommensnachricht nicht mehr zu Beginn des Fragebogens angezeigt.
- Rückwärtsnavigation zulassen: Wurde dies aktiviert, können die Benutzer zu vorherigen Fragen navigieren, um ihre Antworten zu ändern.
- Bildschirmtastatur anzeigen: Wenn diese Option aktiviert ist, wird eine Bildschirmtastatur angezeigt, wenn Fragen beantwortet werden, für die ein Text eingegeben werden muss.
- Zeige Fortschrittsbalken Zeigt dem Umfrageteilnehmer einen Fortschrittsbalken an, der in Prozent angibt, wie viel von der Umfrage bereits ausgefüllt wurde.
- Teilnehmer können Antworten ausdrucken: Wurde dies aktiviert, können die Umfrageteilnehmer am Ende der Umfrage wählen, ob sie ihre Antworten ausdrucken möchten.
- Öffentliche Statistiken: Wenn diese Option aktiviert ist, wird am Ende der Umfrage ein Link zu Statistiken zur Umfrage angezeigt.
- Zeige Diagramme in öffentlichen Statistiken: Wenn aktiviert, werden Diagramme auch in den öffentlichen Statistiken am Ende der Umfrage angezeigt. Bitte beachten Sie, dass die Option "Öffentliche Statistiken" aktiviert sein muss, damit die Umfrageteilnehmer die Diagramme sehen können.
- URL automatisch nach Abschluss der Umfrage laden: Wurde in der Registerkarte Textelemente eine End-URL definiert, wird, sofern diese Option aktiviert ist, der Weiterleitungslink mit Abschluss der Umfrage geöffnet.
Publizieren & Zugangskontrolle
The following set of options is available under this tab:
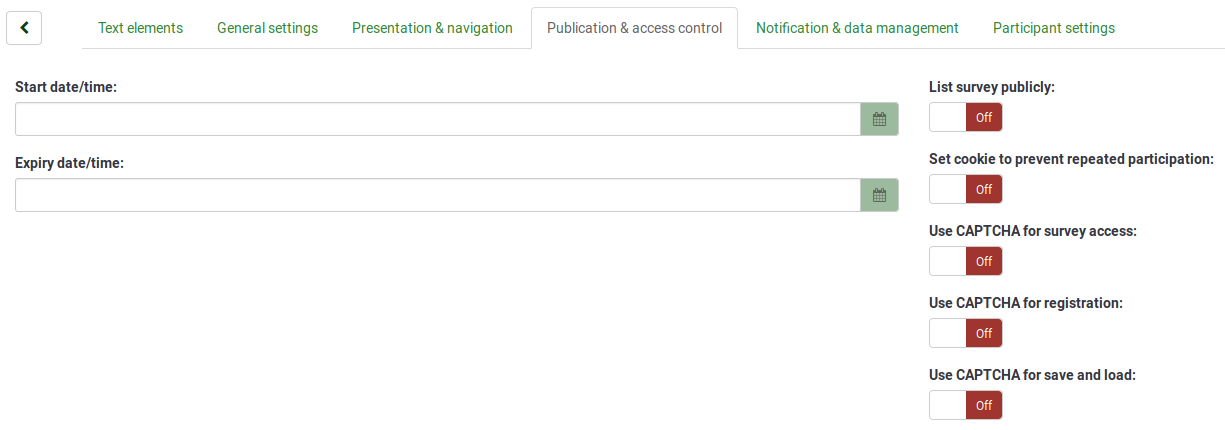
- Start date/time: The date/time the survey starts;
- Expiry date/time: Set this to some date if you want your survey to expire on a special date. This is the last date on which the public survey script will let people participate. (Example: If you set it for the 31st of December, then people will no longer be able to fill out the survey on the 1st of January). To disable this, just clear the date from the input field;
- List survey publicly: The default value is "No". When it is set to "Yes", your survey will be listed in the "available surveys" portal where it can be seen by all LimeSurvey users;
- Set cookie to prevent repeated participation: If this is turned on, a survey participant will be blocked from completing a survey for the second time;
- Use CAPTCHA for survey access: In order to access the survey, a CAPTCHA code has be typed in by the survey participant;
- Use CAPTCHA for registration: In order to register for the survey, a CAPTCHA code has be typed in by the survey participant;
- Use CAPTCHA for save and load: Enable it if you wish a survey participant to type in a CAPTCHA code when he or she loads again the survey after only a part of it was completed.
Notification & data management
The following options are available:
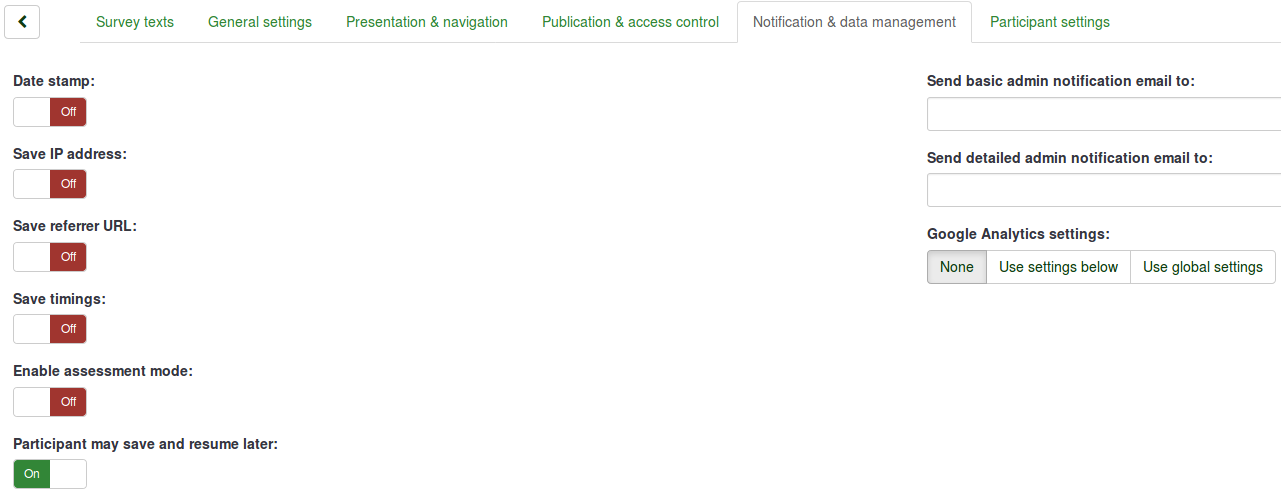
- Date stamp: Turn it on if you would like to see the time when the answers were submitted;
- Save IP address: If turned yes, the IP address of the survey respondent will be stored together with his or her answers;
- Save referrer URL: If turned yes, the referrer URL will be stored together with the answers;
- Save timings: If enabled, the time spent on each page of the survey by each survey participant is recorded;
- Enable assessment mode: You can enable/disable assessments for this survey with this setting;
- Participant may save and resume later: This setting allows a participant to save his responses and resume to answer the survey questions at a later time. Please note that this makes most sense with open surveys or surveys with anonymized answer. If you are using tokens and the survey is not anonymous, in most cases it is better to activate token-based response persistence from the Participant settings panel.
- Send basic admin notification email to and Send detailed admin notification email to: These two fields allow you to send notifications or survey responses to any email addresses once the survey is submitted. You can edit the templates for these emails from the Email templates menu. Multiple recipients can be set by separating the entries with a semicolon (;) (e.g "yourname@test.com; myname@test.com;hisname@test.com" or (if using placeholders) "yourname@test.com;{INSERTANS:82733X12X73};{TOKEN:EMAIL}").
There are different ways for entering an address:
- Enter a specific email address (ie: yourname@test.com);
- Enter a SGQA code and the response will be sent to an email address entered as an answer to that particular question (use the format {INSERTANS:9999X88X12} in the same way you would reuse information from previous answers);
- Enter a Token code (only possible if your survey is not anonymous) and the response will be sent to an email address retrieved from a token field (use the format {TOKEN:EMAIL} or {TOKEN:ATTRIBUTE_1} in the same way you would re-use Information from the Survey participants table).
- Google Analytics settings: If you would like to get further details about the survey web traffic, use Google Analytics. Three options are available:
- None : Google Analytics will not be used;
- Use settings below : If chosen, the survey owner can type in his or her Google Analytics Tracking ID to be stored only with the respective survey. You also have the possibility to choose one of the three Google Analytics styles:
- Do not use Google Analytics - so {GOOGLE_ANALYTICS_JAVASCRIPT} is an empty string;
- Default Google Analytics - {GOOGLE_ANALYTICS_JAVASCRIPT} uses the standard Google Analytics code, inserting the proper Google Analytics Key;
- SurveyName-[SID]/GroupName - {GOOGLE_ANALYTICS_JAVASCRIPT} contains customized Google Analytics code to log the URL as {SURVEYNAME}-[{SID}]/{GROUPNAME}. This can be helpful if you want to analyze navigation paths through your survey, time spent per page, and drop-off rates per page.
- Use global settings : If picked up, the survey will use the same Google Analytics Tracking ID as the one saved in the global settings and then you choose the desired Google Analytics style.
Participant settings
The following options are available:
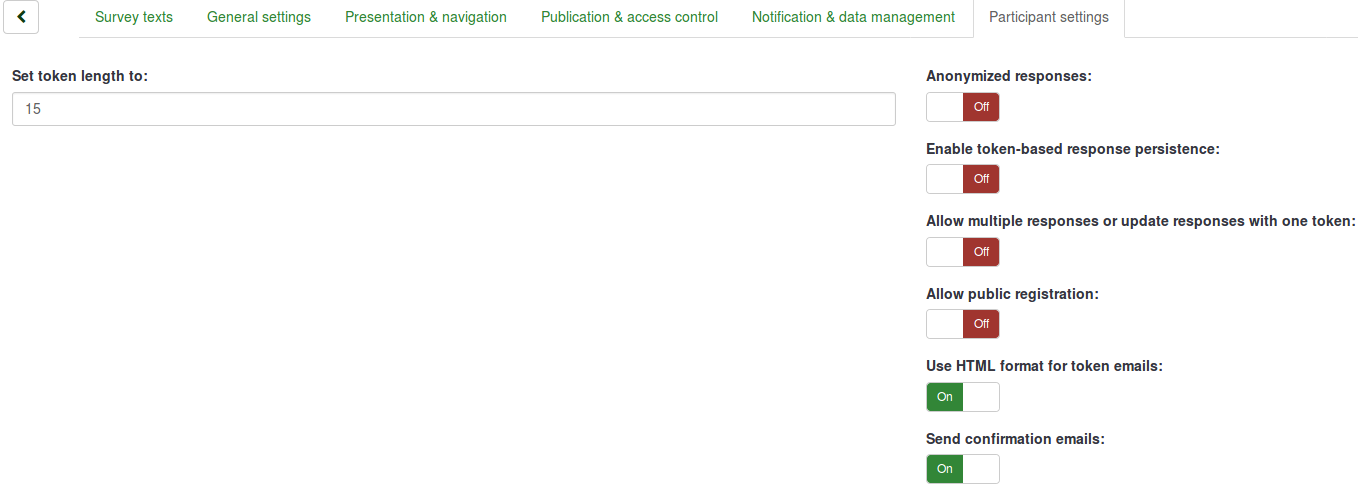
- Set token length to: Usually, the default value of 15 (max. supported value: 35) digits does not need to be changed. However, if you wish to change this setting, please enter a number (X) which is greater than 5. If the number entered is smaller than 5, it will be converted to the default value of 15. When generating tokens, all tokens will use a length of X digits;
- Anonymized responses: It allows you to determine whether responses to your survey are matched up with information from the Survey participants table (utilized in the respective survey) or are kept "anonymous". The default is "No". If you choose "Yes", then your survey is set to anonymize responses - there will be no way to connect answers and participants. Even the survey administrator will not be able to link response data and participant/token data. However, you will always be able to specifically view each response entered by your participants in the survey. Thus individual and anonymous analyses can still be done;
- Enable token-based response persistence: If your survey uses tokens and your responses are not anonymized, you may want to enable this feature. If you turn this on, your participants will be able to leave the survey and resume later at any time without using the Resume later function - for example, when they get distracted or their browser crashes. Upon clicking the invitation link again, they will find their survey answers still in place when they return to the survey and will even find themselves on the same page where they were before leaving;
- Allow multiple responses or update responses with one token: If this option is activated, participants will be able to return to their survey by clicking the invitation link, even if they have already submitted the survey. If the survey is anonymous or "Enable token-based response persistence" is set to "No", this will add a new response. If the survey is not anonymous and "Enable token-based response persistence" is enabled, the user will update the existing responses;
- Allow public registration: If you use tokens to control access to your survey, the only people who can use the survey are those who have an entry and a unique token code allocated in the Survey participants table. If you would like to use tokens, but also allow public registration, set this to "Yes". The "Yes" setting will allow visitors to register his or her name and email address. The script will create a new entry in your Survey participants table for this person, then send them an invitation email. The script will ensure that only one person per email address can complete your survey;
- Use HTML format for token emails: When enabled, all emails sent by the token management interface (invite, reminder, confirmation) will be formatted as HTML. You'll then be able to use rich formatting for these emails. The default value is "Yes";
- Send confirmation emails: If enabled, the participant will receive a confirmation email that the survey was submitted.
Import a survey
If you wish to import a survey, you can do that from the "Create, import, or copy survey" screen. To get there, click the Create, import, or copy a survey button and then on the Import tab. Next, click on browse to choose the file you wish to import, and then on the Import survey button.

The import process reads the following formats:
- .LSS files (XML-format created by LimeSurvey 1.90 or later);
- .LSA files (Survey archive which may include also token, responses and timings - available since LimeSurvey 2.0);
- .TXT files (Text-format created by Excel - available since LimeSurvey 2.0);
- .CSV files (Created by early LimeSurvey versions from 1.50 to 1.90).
The import function "intelligently" re-numbers the survey, groups, questions, answers, and condition IDs so that they all match each other. No existing survey is going to be overwritten during the import process.
By default, the resource links and expression fields are also imported. Basically, the more advanced type of questions are going to be also imported along questions that include complex branching, assessments, validation, and tailoring.
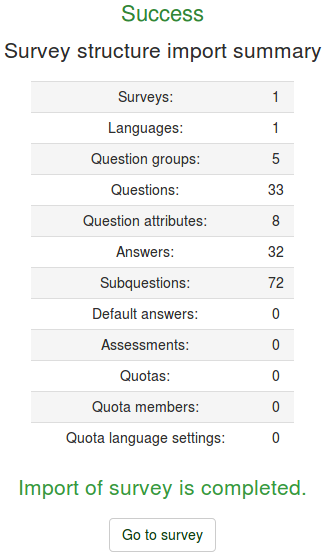
Once the import process is completed, a survey structure import summary will be displayed, showing whether it was successful or not:
Copy a survey
The last tab contains the copy survey functionality and its options:
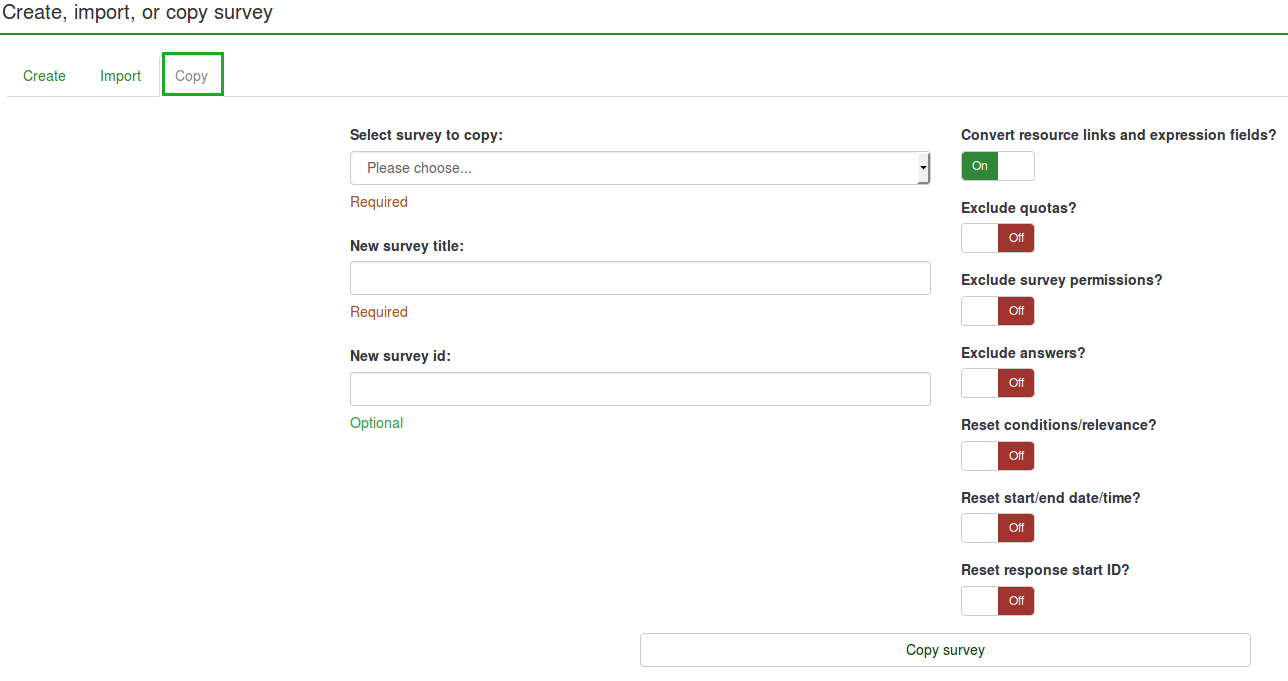
- Select survey to copy: Select from the drop-down list the survey you want to copy;
- New survey title: Type in the title you wish the copied survey to have;
- New survey id: You can complete it or let the field empty as it gets automatically assigned a survey id during the process;
- Convert resource links and expression fields: If you disable it, the more advanced question types that use the expression manager will not be copied;
- Exclude quotas: The quotas are going to be excluded if this option is disabled;
- Exclude survey permissions: If enabled, no survey permissions will be copied into the new survey.
- Exclude answers: Exclude the already-stored answers;
- Reset conditions/relevance: Reset the conditions set in the original survey;
- Reset start/end date/time?: Reset the set start/end date/time;
- Reset response start ID?: Each response has a corresponding ID. If enabled, the ID of the responses will be reset. However, bear in mind that it is better not to have an id with two matching responses because it might influence the output of your survey.
Once you are done with the options, click on the Copy survey button located on the bottom of the page. A survey copy summary will be displayed:
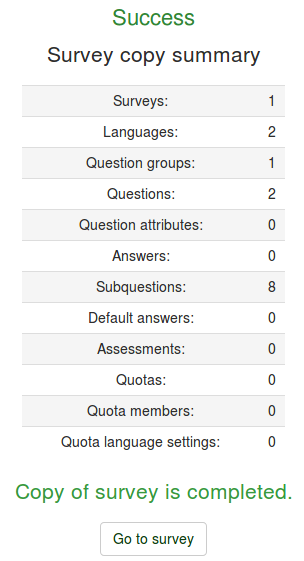
To access the copied survey, click Go to survey to be redirected to the settings of the newly added survey.
List surveys
To get an overview of all your surveys, click on the Surveys button located on the toolbar of LimeSurvey home page:

- Survey ID: When created, the survey receives a unique id that is used to make the connection between different LimeSurvey tables;
- Status: It can be:
- Title: The title of the survey;
- Group: The survey group to which the survey belongs to;
- Created: The date when the survey was created;
- Owner: The name of the user that owns the survey;
- Anonymized responses: It shows whether the responses are anonymized when stored into the database or not;
- Partial: The number of surveys that were partially completed;
- Full: The number of surveys that were fully completed by the survey participants;
- Total: The number of partially and fully completed surveys;
- Closed group: It can be either "Yes" (if a Survey participants table is used) or "No";
- Actions: The last column presents the actions that are available for each survey:

If you want to look for a specific survey, use the search bar and filter the results via the survey status field ("active", "active and running inactive", "inactive", "active but expired", and "active but not yet started").
Delete a survey
In order to delete a survey, you have to first access the survey list page. Then, select the survey(s) you wish to delete and click on the Selected survey(s)... button located on the bottom-left side of the page:
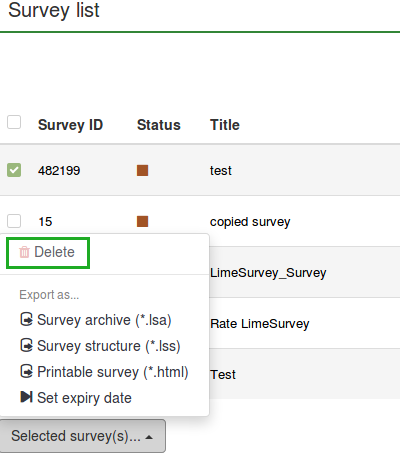
When you click Delete, a confirmation window will pop up in order to confirm your action.
Export a survey
If you want to export a survey, you have to access the survey list table and select the survey(s) you wish to export:
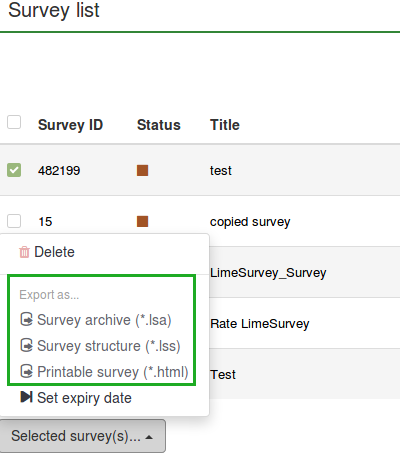
The following options are available:
- Survey archive (*.lsa);
- Survey structure (*.lss);
- Printable survey (*.html): if you would like to export the survey in a printable format in order to be filled out "offline".
For more details, check our wiki section on how to export a survey structure.
Survey groups
In order to access the survey group functionalities, click on the Surveys button located on the main toolbar of the LimeSurvey home page. Then, access Survey groups:

A survey groups list will be displayed.
On this page you can:
- Create a survey group - located above the survey groups table;
- Edit a survey group - located on the last column (the green pencil icon);
- Delete a survey group - located on the last column (the red trash icon).
Create a survey group
To add a new survey group, click on the Create a new survey group button located above the survey groups list. The following columns have to be filled in:
- Name: Type in the name of the survey group;
- Title: Type in the title of the survey group;
- Description: Type in a short description of the survey group;
- Order: Helps you organize the order of the survey groups within a parent group;
- Parent: Choose the survey group that will be the parent survey group. The parent group option is used to ease the edit of template-related options of a high number of survey groups via a few clicks.
Edit survey group
The following options of a survey group can be edited:
- Surveys in this group;
- Settings for this survey group;
- Template options for this survey group (New in 3.0 ).
Surveys in this group
If you click on the first tab, all the surveys from the respective group will be displayed.

This works as a filtering function, filtering out all the surveys not listed in the chosen survey group. You can now select the desired survey and start editing it. To see which survey-editing functionalities are available, check the list surveys section.
Settings for this survey group
The following fields can be edited from the Settings for this Surveygroup tab:
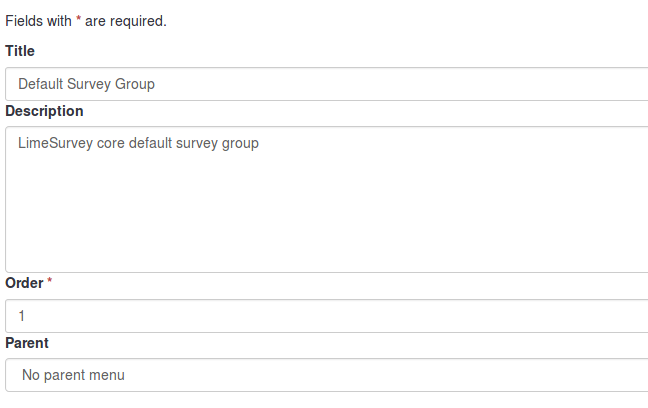
- Title: Type in the title of the survey group;
- Description: Type in a short description of the survey group;
- Order: Helps you organize the order of the survey groups within a parent group;
- Parent: Choose the survey group that will be the parent survey group. The parent group option is used to ease the edit of template-related options to a higher number of survey groups via a few clicks.
Template options for this survey group
The template options functionalities are present in LimeSurvey 3.0+. It offers a set of various options that allows you to quickly and easily change the templates-related settings of the surveys that belong to the same survey group:
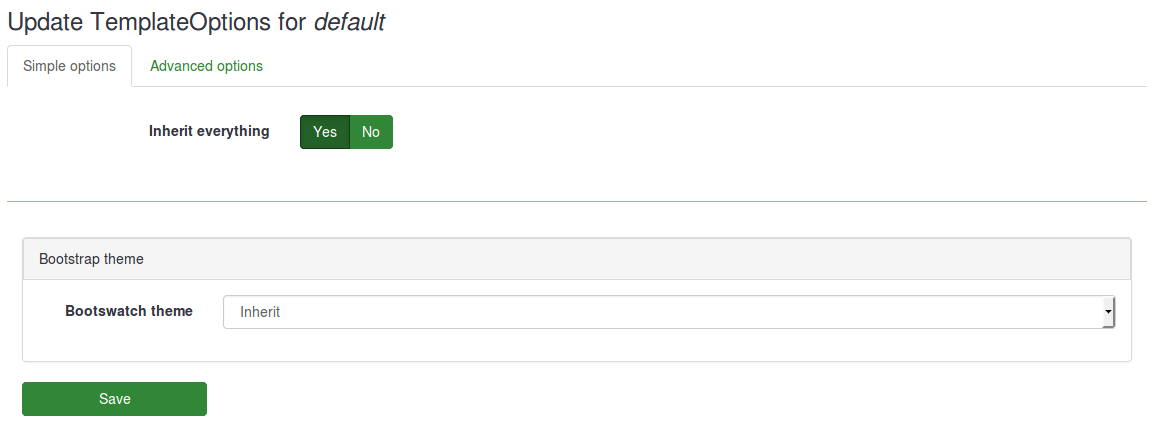
The Inherit everything functionality lets you decide whether you want the survey group to inherit everything or not from the parent survey group theme.
If you do not want this to happen, select "No". The following options will show up which will allow you to choose what should be inherited from the parent survey group theme:
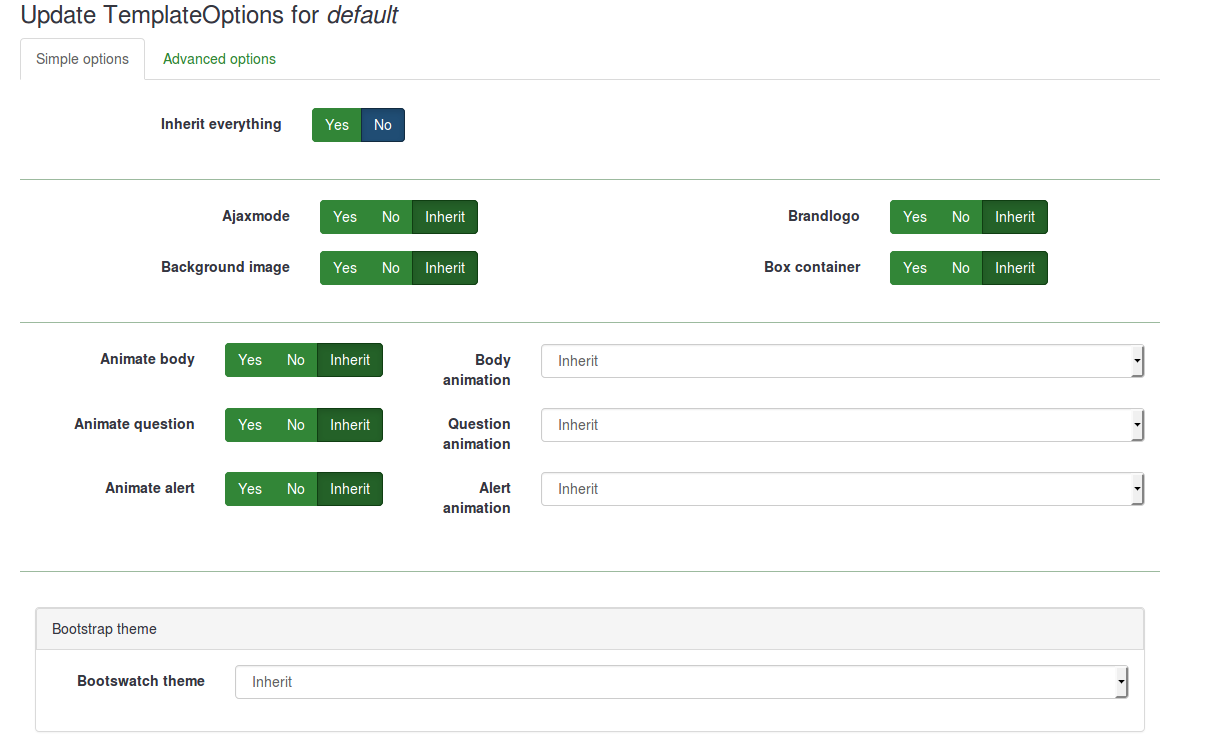
Below, you will see that you can choose a bootswatch theme for your survey group. Bootswatch themes can be used to quickly edit your templates. Basically, bootswatch is a collection of themed swatches which can be freely downloaded and dropped into your Bootstrap site. Some of these themes are already included into your LimeSurvey installation and they can be selected from the Bootswatch theme drop-down list.
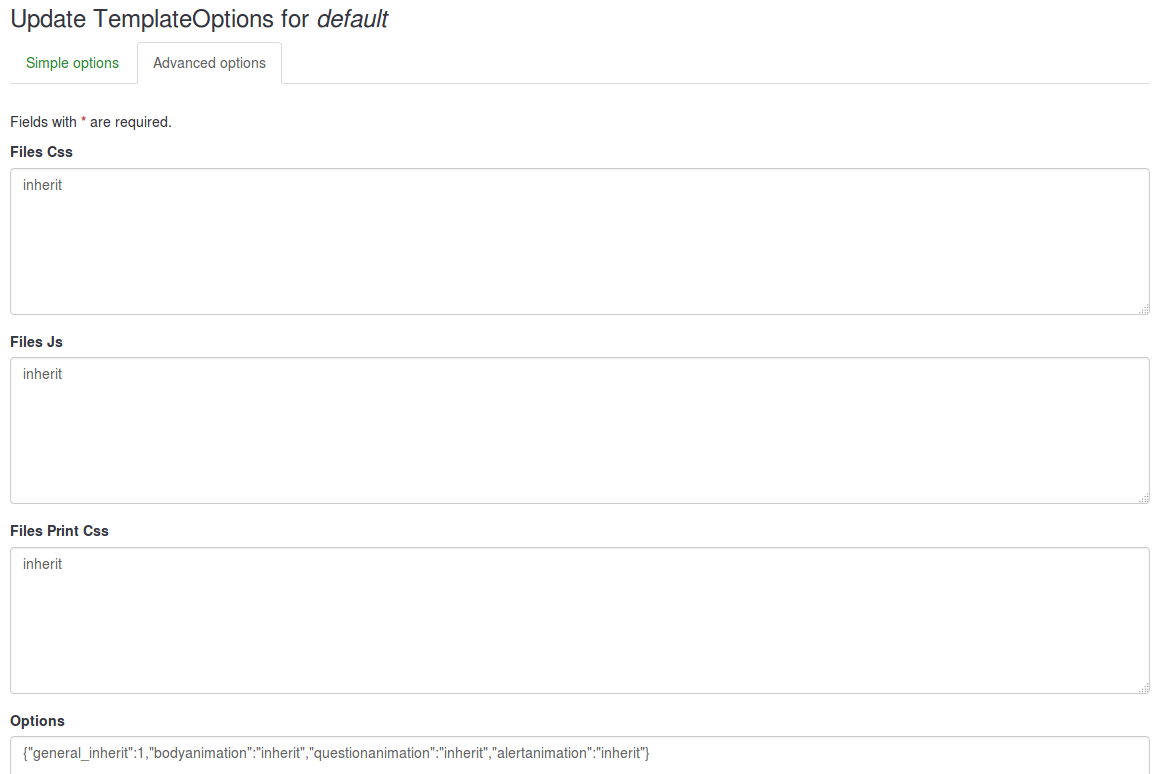
If you want to tweak more a survey group template options, click on the advanced option tab (recommended for advanced users):
Delete a survey group
To delete a survey group, select the survey group you wish to remove and click on the red trash button located in the last column. Then, confirm the deletion.