Surveys - introduction: Difference between revisions
From LimeSurvey Manual
mNo edit summary |
No edit summary |
||
| Line 112: | Line 112: | ||
*'''Use CAPTCHA for survey access:''' In order to access the survey, a CAPTCHA code needs to be typed in. | *'''Use CAPTCHA for survey access:''' In order to access the survey, a CAPTCHA code needs to be typed in. | ||
*'''Use CAPTCHA for registration:''' In order to register for the survey, a CAPTCHA code needs to be typed in. | *'''Use CAPTCHA for registration:''' In order to register for the survey, a CAPTCHA code needs to be typed in. | ||
*'''Use CAPTCHA for save and load:''' | *'''Use CAPTCHA for save and load:''' Enable it if a survey participant loads again his survey after he completed only a part of it. | ||
===Notifaction & data management=== | ===Notifaction & data management=== | ||
| Line 130: | Line 129: | ||
Enter a SGQA code and the response will be sent to an email address entered as an answer to that particular question (use the format {INSERTANS:9999X88X12}, in the same way you would Re-use information from previous answers) | Enter a SGQA code and the response will be sent to an email address entered as an answer to that particular question (use the format {INSERTANS:9999X88X12}, in the same way you would Re-use information from previous answers) | ||
Enter a Token code (only possible if your survey is not anonymous) and the response will be sent to an email address retrieved from a token field (use the format {TOKEN:EMAIL} or {TOKEN:ATTRIBUTE_1} in the same way you would Re-use Information from the Tokens Table) | Enter a Token code (only possible if your survey is not anonymous) and the response will be sent to an email address retrieved from a token field (use the format {TOKEN:EMAIL} or {TOKEN:ATTRIBUTE_1} in the same way you would Re-use Information from the Tokens Table) | ||
*'''Google Analytics settings:''' If you would like to get further details about the survey web traffic, use Google Analytics. Three options are available: | |||
**None: Google Analytics is/will not be used. | |||
**Use settings below: if chosen, the survey owner can type in his or her Google Analytics Tracking ID to be stored only with the respective survey. You also have the possibility to choose one of the three Google Analytics styles: | |||
***Do not use Google Analytics - so {GOOGLE_ANALYTICS_JAVASCRIPT} is an empty string | |||
***Default Google Analytics - {GOOGLE_ANALYTICS_JAVASCRIPT} uses the standard Google Analytics code, inserting the proper Google Analytics Key | |||
***SurveyName-[SID]/GroupName - {GOOGLE_ANALYTICS_JAVASCRIPT} contains customized Google Analytics code to log the URL as {SURVEYNAME}-[{SID}]/{GROUPNAME}. This can be helpful if you want to analyze navigation paths through your survey, time spent per page, and drop-off rates per page. | |||
{{Box|Google Analytics Tracking ID for this survey: Allows for integration with Google Analytics. The tracking ID can be inserted into templates using {GOOGLE_ANALYTICS_API_KEY}. The full JavaScript that Google Analytics expects (including the key) can be included in templates via {GOOGLE_ANALYTICS_JAVASCRIPT}}} | |||
**Use global settings: If picked up, the survey will use the same Google Analytics Tracking ID as the one mentioned in the global settings and it iwll allow you to choose the desired Google Analytics style. | |||
**Use global settings: If picked up, the survey will use the same Google Analytics | |||
===Participant settings=== | ===Participant settings=== | ||
| Line 208: | Line 206: | ||
*'''Title:''' The title of the survey/questionnaire | *'''Title:''' The title of the survey/questionnaire | ||
*'''Group:''' The survey group to which the survey/questionnaire belongs to | *'''Group:''' The survey group to which the survey/questionnaire belongs to | ||
*'''Created:''' The date | *'''Created:''' The date when the survey was created | ||
*'''Owner:''' The name of the user that owns the | *'''Owner:''' The name of the user that owns the survey | ||
*'''Anonymized responses:''' It shows whether the responses are | *'''Anonymized responses:''' It shows whether the responses are anonymized when stored into the database or not. | ||
*'''Partial:''' | *'''Partial:''' | ||
*'''Full:''' | *'''Full:''' | ||
Revision as of 18:00, 13 September 2017
General
A survey is an indispensable part of LimeSurvey. It includes via different interconnected databases: languages, question groups, questions, question attributes, answers, subquestions, default answers, assessments, quotas, quota members, and quota language settings. To facilitate the surveys management, the survey group functionality was added. (New in 3.0 )
Surveys
There are two ways through which you can reach the create a new survey page:
1. The first one is to click on the arrow besides the Surveys button that is located on the main toolbar of your LimeSurvey installation home page. A dialog will show up from where you can choose the Create a new survey option:
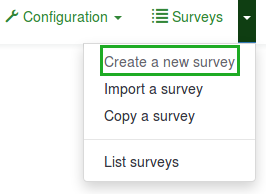
2. The second one is to click on the Surveys button located on the main toolbar of your LimeSurvey installation home page:

A survey list is shown. To create a new survey, click on the Create a new survey button located in the top-left part of the window, above the survey list.

Create a new survey
After you clicked Create new survey, the following page is displayed:
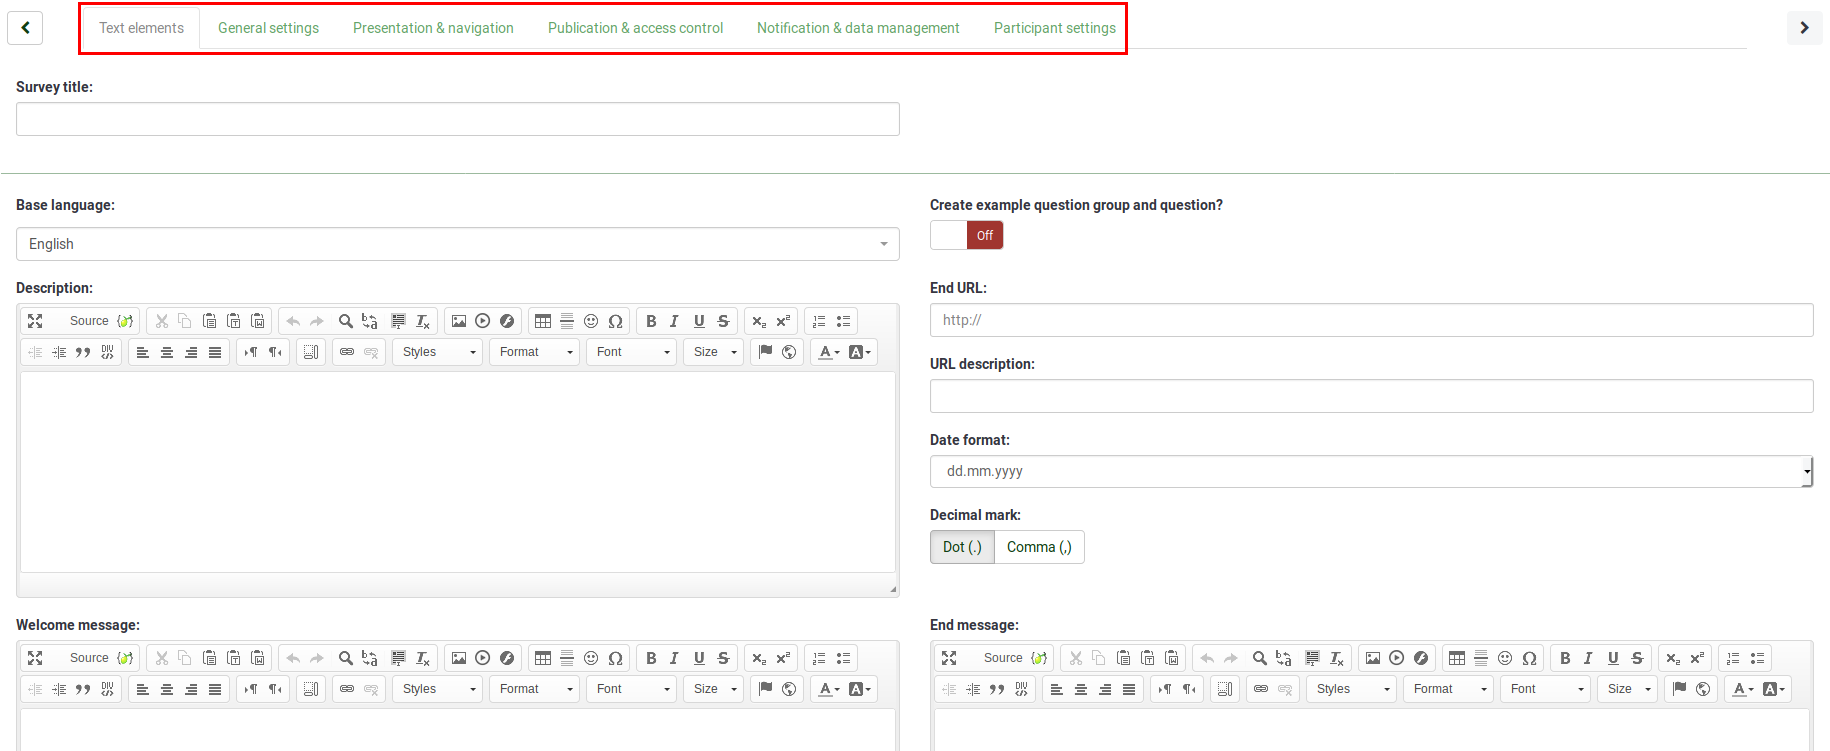
To optimize your survey, check the options available under each tab located on the the Create new survey toolbar:
- Survey texts
- General settings
- Presentation & navigation
- Publication & access control
- Notification & data management
- Participant settings
Survey texts
The following options can be changed from this tab:
- Survey title: The title of the survey;
- Create example question and question group?: (New in 3.0 ) If it is turned on, a question and question group will be added to your survey by default when you create new one;
- Description: Survey description;
- End URL: You have the possibility to redirect the user to another page when they finish filling in the questionnaire. If you wish to redirect them, type in the URL and activate the automatically load URL function that is located under the Presentation & navigation tab.
- URL description: A short URL description can be added in the case in which the user is redirected to a non-related survey webgapge.
- Date format: It is important when you want to record the timestamps. If you click on it, a drop-down list will show up with a multitude of date formats. Choose the one that mostly fits the survey respondents. Do not forget that different date formats are used across the world. For example, it is recommended to use a different time format on the US market (mm-dd-yyyy) than on an Eastern European country (dd-mm-yy);
- Decimal mark: Two options are available: dot (.) and comma (,). Choose the one that fits the place where you conduct the study (e.g. US vs Germany);
- Welcome message: Type in a message that will welcome the survey participants when they access your survey link;
- End message: Type in a message that will be displayed to the survey participants once they finish the questionnaire. If the end URL field is automatically loaded, the end message will not be displayed anymore.
General settings
The following options can be found under this tab:
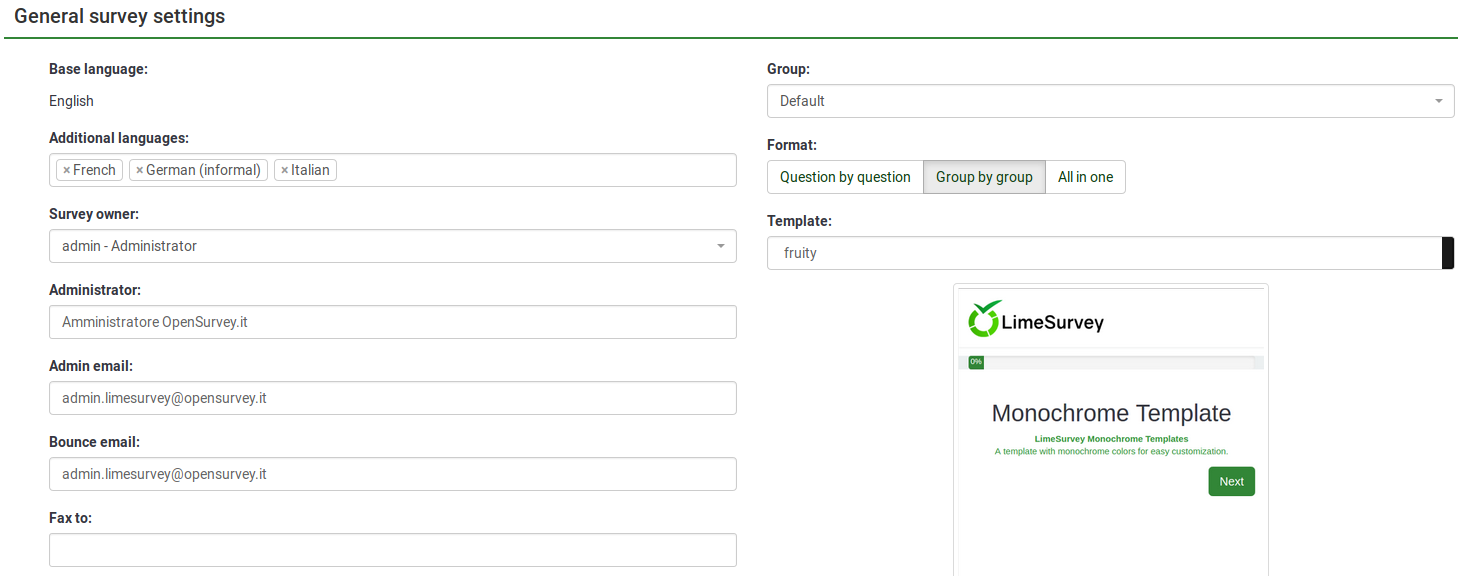
- Base language: The main language of the survey. The default value is the one picked up from the Language|global settings of your LimeSurvey installation;
- Additional languages: More languages can be added to your survey. This option is important when you want to create multilingual surveys. For example, if you wish to use English, German, and Romanian for your survey, add Romanian and German as additional languages (if English is already the default/base language). The list of available languages could be smaller if the LimeSurvey administrator has decided to diminish the number of available languages from the LimeSurvey global installation;
- Survey owner: Type in the real name of the survey owner;
- Administrator: The name of the administrator, followed by the email-address of the administrator;
- Admin email: Type in the email of the survey administrator;
- Bounce email: This is the email address where a delivery error notification email should be sent. It represents the address to which bounced emails will be send to;
- Fax to: This field is used to give a fax number on the "printable survey" - ie: when you want to send someone a hard copy because he/she cannot use the online survey.;
- Group: Select the survey group to which the newly created survey should be added to; (New in 3.0 )
- Format: Three options are available:
- Question by Question: Public survey will display one question per page.
- Group by Group: Public survey will display all questions in a group per page. Group at a time surveys still have a separate "welcome" page and "submit" page, like "Question by Question" surveys.
- All in one: Public survey will display all questions in one single page. Activated All in one surveys do not have a "welcome" page or "submit" page - the welcome message and submit button all appear on the same page.
- Template: The default template is rather dull, but functional. More information on creating your own templates is available here.
The following options can be found under this tab:
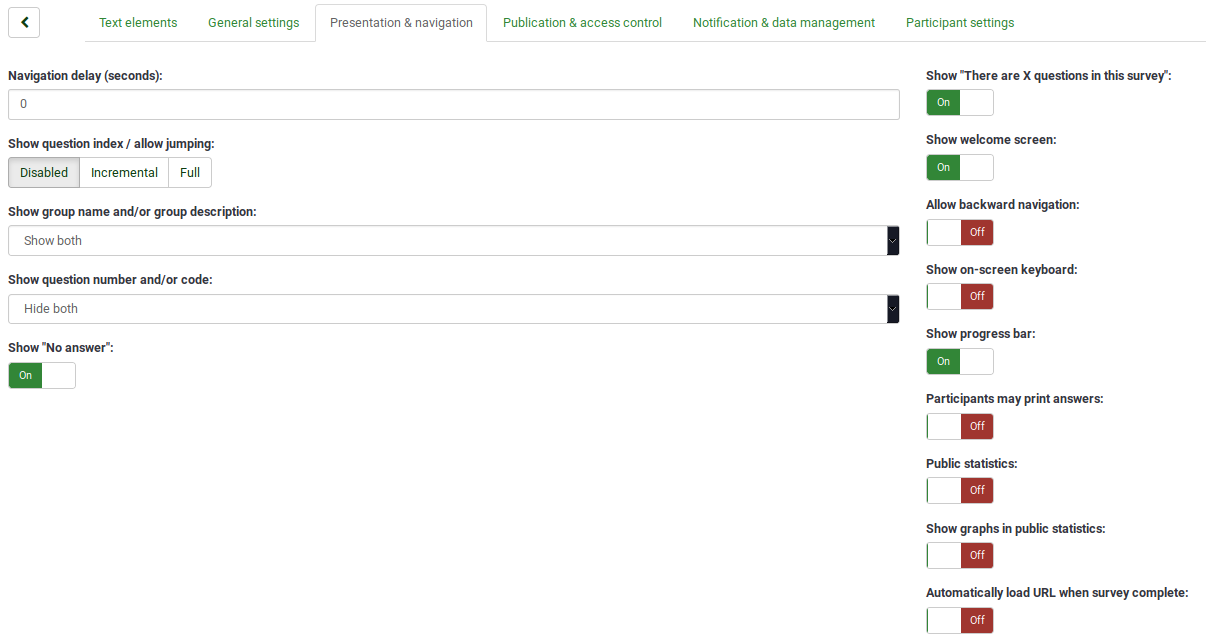
- Navigation delay (seconds):
- Show question index / allow jumping:
- Show "There are X questions in this survey": It shows the number of questions and groups in your survey.
- Show group name and/or group description: Your survey will show to the survey participants the question groups names and/or group descriptions.
- Show question number and/or code: What to be shown to the survey participants - the question number and/or the question code, both or none. There is also a fifth option in which this option can be selected by the survey admin. The number of the questions is shown in the moment in which someone wishes to start the survey, while the question code is shown next to each question from the survey.
- Show "No answer:'" When a question of a radio button/select type that contains editable answers (i.e.: List & array questions) is not mandatory and this is set to 'On' (default), an additional entry 'No answer' is shown for each sub-question - so that participants may choose not to answer the question.
- Selectable : The survey users have the possibility to choose whether the question is non-mandatory or not when they create create/edit a question;
- On : If this option is chosen, the users can create questions with the 'no answer' option for non-mandatory questions ;
- Off : If off, the users cannot create non-mandatory questions that have the 'non answer' option available for the survey participants.
- Show welcome screen: If turned off, the welcome text message will not be shown anymore - the survey participants will directly start the questionnaire.
- Allow backward navigation: If it is turned on, it will allow the users to navigate backwards and change his/her previous answers
- Show on-screen keyboard: If turned on, an on-screen keyboard will show up when answering questions that require typing in information.
- Show progress bar: It shows to the user a progress bar that underlines how much of the survey was completed and how much is left to be completed.
- Participants may print answers: If turned on, the survey participants may choose at the end of the survey to print they answers.
- Public statistics: A link to a set of statistics will be shown at the end of the survey if this option is turned on,
- Show graphs in public statistics: If turned on, graphs will also be shown in the public statistics from the end of the survey. Please note that the Public statistics option has to be turned on in order to also show the graphs.
- Automatically load URL when survey complete: The end URL becames a redirect link once the survey is completed, if this option is turned on.
Publication & access control
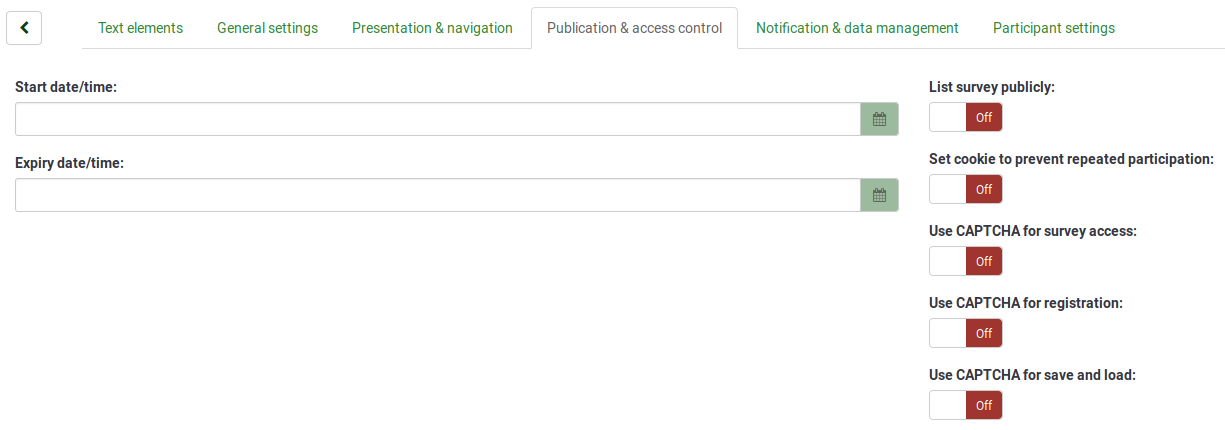
- Start date/time: The date the survey starts if "Timed Start" is set to Yes.
- Expiry date/time: Set this to some date if you want your survey to expire on a special date. This is the last date on which the public survey script will let people participate. (Example: If you set it for the 31st of December, then people will no longer be able to use the survey script on the 1st of January). To disable this just clear the date from the input field.
- List survey publicly: Yes/No. Default No. When it is set to yes, your survey will be listed in the 'available surveys' portal
- Set cookie to prevent repeated participation: If this is turned on, a survey participant will be blocked from completing a survey for the second time.
- Use CAPTCHA for survey access: In order to access the survey, a CAPTCHA code needs to be typed in.
- Use CAPTCHA for registration: In order to register for the survey, a CAPTCHA code needs to be typed in.
- Use CAPTCHA for save and load: Enable it if a survey participant loads again his survey after he completed only a part of it.
Notifaction & data management
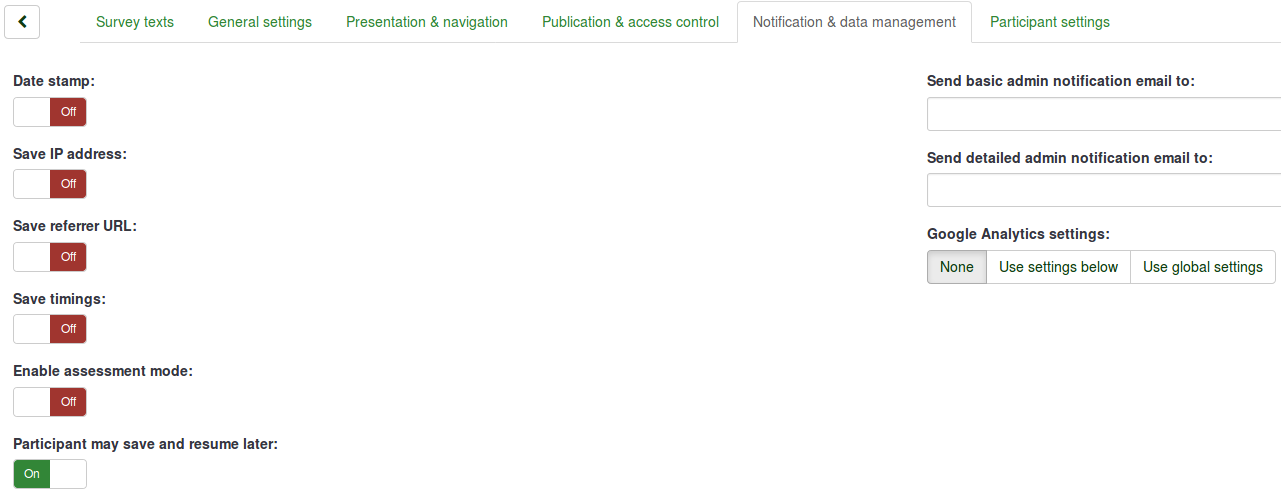
- Date stamp: Turned it on if you would like to see when the answers were submitted. It is a function that can be used to check the hour at which people completed your survey.
- Save IP address: If turned yes, the IP address of the survey respondent will be stored together with his/her answers
- Save referrer URL: If turned yes, the referrer URL will be stored together with the answers. It is useful if you would like to see how your survey participants access your survey.
- Save timings:
- Enable assessment mode: With this setting you can enable/disable assessments for this survey.
- Participant may save and resume later:This setting allows a participant to save his responses and resume to answer the survey at a later time. Please note that this makes most sense with open surveys or surveys with anonymized answer. If you are using tokens and the survey is not anonymous in most cases it is better to activate 'Token-based response persistence' in the token tab.*Send basic admin notification email to:
- Send detailed admin notification email to:
These fields allow you to send notifications or survey responses to any email addresses once the survey is submitted. You can edit the templates for these emails under 'Email templates'. Multiple recipients can be set by separating the entries with a semicolon (;) - eg "yourname@test.com; myname@test.com;hisname@test.com" OR when using placeholders "yourname@test.com;{INSERTANS:82733X12X73};{TOKEN:EMAIL}". To sedn an email to the administrator email of the survey : you must use {ADMINEMAIL}. There are different ways for entering an address: Enter a specific email address (ie: yourname@test.com) Enter a SGQA code and the response will be sent to an email address entered as an answer to that particular question (use the format {INSERTANS:9999X88X12}, in the same way you would Re-use information from previous answers) Enter a Token code (only possible if your survey is not anonymous) and the response will be sent to an email address retrieved from a token field (use the format {TOKEN:EMAIL} or {TOKEN:ATTRIBUTE_1} in the same way you would Re-use Information from the Tokens Table)
- Google Analytics settings: If you would like to get further details about the survey web traffic, use Google Analytics. Three options are available:
- None: Google Analytics is/will not be used.
- Use settings below: if chosen, the survey owner can type in his or her Google Analytics Tracking ID to be stored only with the respective survey. You also have the possibility to choose one of the three Google Analytics styles:
- Do not use Google Analytics - so {GOOGLE_ANALYTICS_JAVASCRIPT} is an empty string
- Default Google Analytics - {GOOGLE_ANALYTICS_JAVASCRIPT} uses the standard Google Analytics code, inserting the proper Google Analytics Key
- SurveyName-[SID]/GroupName - {GOOGLE_ANALYTICS_JAVASCRIPT} contains customized Google Analytics code to log the URL as {SURVEYNAME}-[{SID}]/{GROUPNAME}. This can be helpful if you want to analyze navigation paths through your survey, time spent per page, and drop-off rates per page.
}
- Use global settings: If picked up, the survey will use the same Google Analytics Tracking ID as the one mentioned in the global settings and it iwll allow you to choose the desired Google Analytics style.
Participant settings
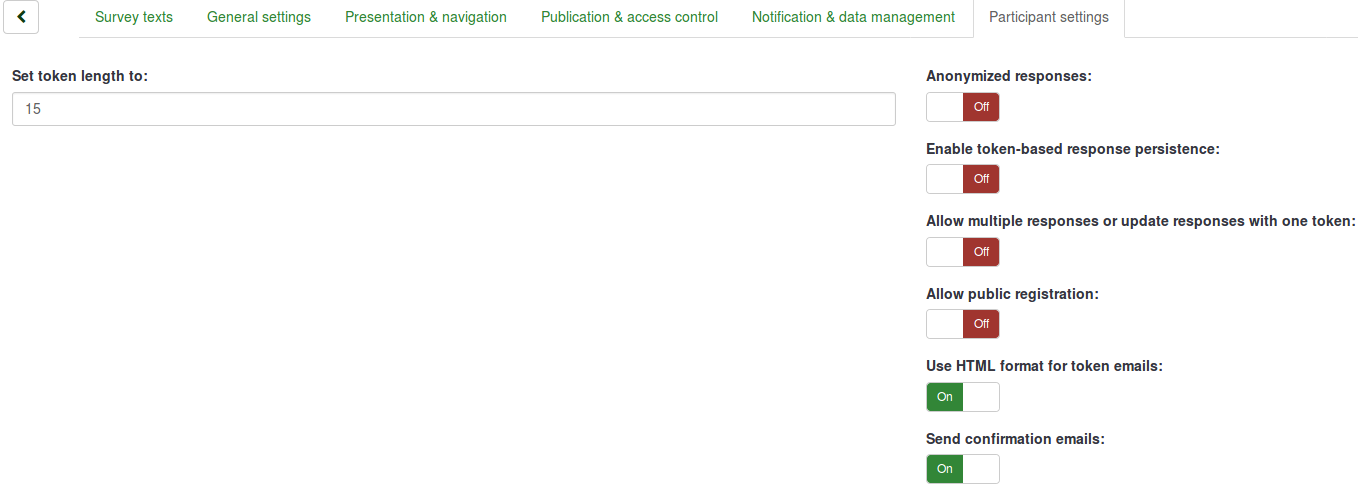
- Set token length to: Usually you don't need to change this, the default setting of 15 digits (max. supported value: 35) is fine. If changing this setting please enter a number (X) which should be greater than 5 (if the number entered is <5 it will be converted to the default value of 15). When generating tokens all tokens will use a length of X digits.
- Anonymized responses: This allows you to determine whether responses to your survey are matched up with information from your surveys tokens table, or kept 'anonymous'. The default is 'No'. If you choose 'Yes' then your survey is set to radically anonymize responses - there is really no way to connect answers and participants. Even the admin can't link response data and participant/token data. However you will always be able to specifically view each response entered by your participants in the survey. Thus individual, but anonymous, statistics is still possible to do. Attention:: If this feature is activated the response submission date and the token completed date are always set to 1980-01-01 00:00, no matter of other settings. Why? Invalidating the submission date ensures no match with webserver logs where the token key might show up when a survey is started. Invalidating the token completed date makes sure that you can't align the order of submitted responses to the order of the token date/time.
- Enable token-based response persistence: If your survey uses tokens and your responses are not anonymized, you may want to enable this feature. If you turn this on, your participants will be able to leave the survey and resume later at any time without using the 'Resume later' function - for example if they get distracted or their browser crashes. Upon clicking the invitation link again, they will find their survey answers still in place when they return to the survey, and will even find themselves on the same page where they were before leaving.
- Allow multiple responses or update responses with one token:Default: No. If you activate this setting, participants will be able to return to their survey by clicking the invitation link, even if they have already submitted the survey. If the survey is anonymous or "Enable token-based response persistence" is set to NO, this will add a new response. If the survey is not anonymous and "Enable token-based response persistence" is Yes, the user will update the existing responses.
- Allow public registration: If you use tokens to control access to your survey, the only people who can use the survey are those who have an entry and a unique token from the token table. If you would like to use tokens, but also allow public registration, set this to "Yes". The "Yes" setting will allow a visitor to register his name and email address. The script will create a new entry in your tokens table for this person, then send them an invitation email. The script will ensure that only one person per email address can complete your survey.
- Use HTML format for token emails: When set to yes, all emails sent by the token management interface (invite, reminder, confirmation) will be formatted as HTML. You'll then be able to use rich formatting for this emails. Default is Yes at survey creation. Caution, when you switch on/off this feature, you'll have to double check that your email templates are still displayed as you want.
- Send confirmation emails:
Import a survey
If you wish to import a survey, you can do that from the "Create, import, or copy survey" screen. To get there just click the 'Create, import, or copy a survey' icon and in the following screen click on the 'Import' tab. Click on the browse button to choose the file, and then click on the Import survey' button.

The import process reads the following formats:
- .LSS files (XML-format created by LimeSurvey 1.90 or later);
- .LSA files (Survey archive which may include also token, responses and timings - available since LimeSurvey 2.0);
- .TXT files (Text-format created by Excel - available since LimeSurvey 2.0);
- .CSV files (Created by early LimeSurvey versions from 1.50 to 1.90).
The import function "intelligently" re-numbers the survey, groups, questions, answers, and condition IDs so that they all match each other. No existing surveys are going to be overwritten during the import process.
Convert resource links and expression fields?
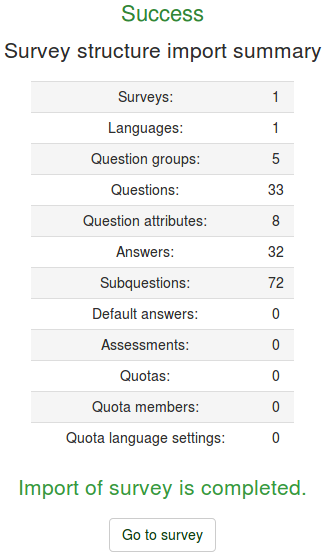
Survey structure import summary.
Copy a survey
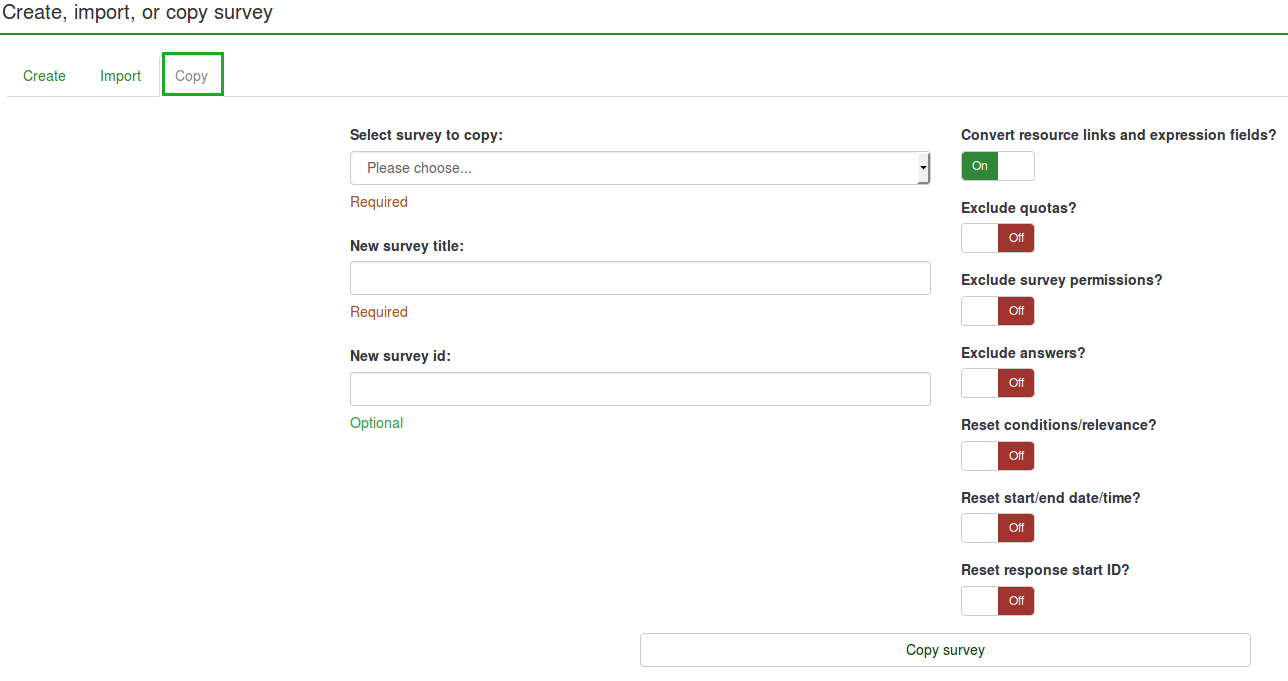
- Select survey to copy: Select from the drop-down list the survey you want to copy;
- New survey title: Type in the title you wish the copied survey to have;
- New survey id: - it s autmatically different
- Convert resource links and expression fields:
- Exclude quotas:
- Exclude survey permissions: Exclude the survey users with survey permissions on the original survey to receive the same survey permissions in the copied version of the survey;
- Exclude answers: Exclude the already-stored answers;
- Reset conditions/relevance: Reset the conditions set in the original survey;
- Reset start/end date/time?: Reset the set start/end date/time;
- Reset response start ID?:
Once you are done completing the fields and chossing the options you want to be copied into the new survey, click on the Copy survey button:
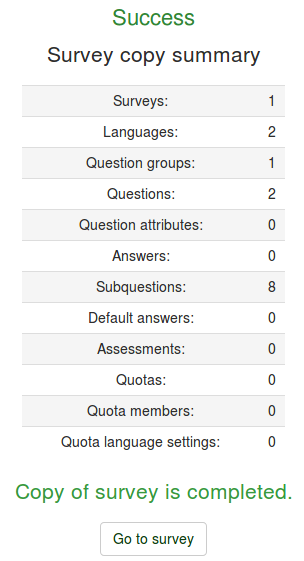
A survey copy summary is presented. To access the copied survey, click Go to survey to be redirected to the settings of the newly added survey.
List surveys

- Survey ID: When created, the survey receives a unique id that is used to make the connection between different LimeSurvey tables
- Status: It can be either active (
 ) or inactive (
 )
) - Title: The title of the survey/questionnaire
- Group: The survey group to which the survey/questionnaire belongs to
- Created: The date when the survey was created
- Owner: The name of the user that owns the survey
- Anonymized responses: It shows whether the responses are anonymized when stored into the database or not.
- Partial:
- Full:
- Total:
- Closed group:
- Actions: The last columns presents different actions available for each survey:
Click on a column and sort them Search bar Status bar Search Reset
Survey groups
